The Importance of Density Altitude

Density Altitude:  Pressure Altitude corrected for non-standard temperature.

That’s the book definition of density altitude.  The problem is, that definition leaves a lot of general aviation pilots scratching their heads.  What really is density altitude?

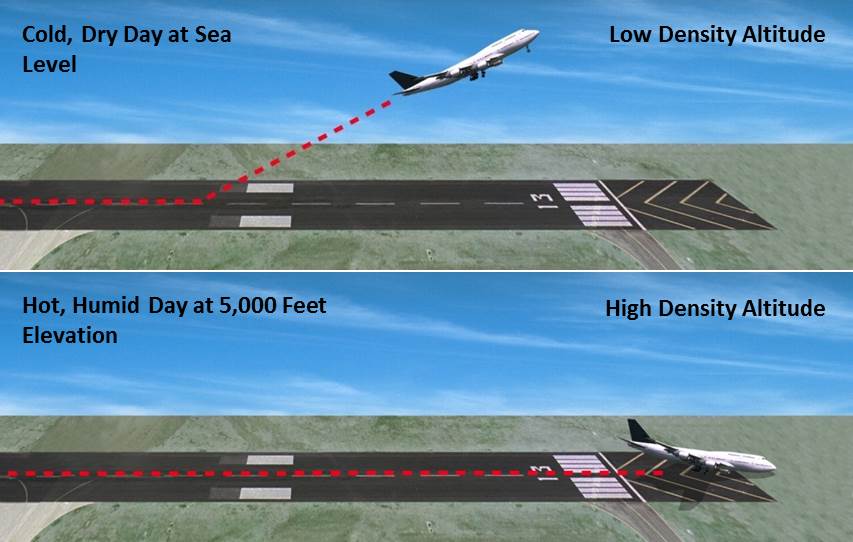
All airplane engines rely on air and fuel mixing together, then that mixture is ignited to create combustion. Normally aspirated piston engine airplanes get their best performance at sea level, where the air is nice and thick, allowing plenty of air molecules to get sucked in the engine intake.  As a normally-aspirated airplane climbs, the ambient air pressure drops with an increase in altitude (the air gets thinner, less dense), thereby reducing airplane takeoff, climb, and landing performance.  There just isn’t as much air at higher altitudes, to put it simply.

Turbo charged piston engines assist with this air density problem.  A turbo charger boosts the air coming into the engine and fools the engine into thinking it is at sea level pressure all the time.  The higher the altitude, the faster the turbo charger spins, spinning the compressor faster, which compresses more air to continue to give the engine sea level pressure air.  This gets faster cruise speeds the higher you go.

Both normally aspirated & turbo charged engines do experience longer takeoff rolls and reduced climb rates at higher airport elevations & higher altitudes.

How does this all relate to density altitude?

When the outside air temperature rises, the air becomes thinner, less dense.  This means that when an airport elevation is 1,000 feet, but the density altitude is reported as 3,000 feet, the airplane engine thinks it is at 3,000 feet.  It won’t accelerate as fast.  The airplane’s climb rate will also be reduced.  That means that the normal climb pitch attitude a pilot is used to seeing won’t be accurate at higher density altitudes. It will lead to slower indicated airspeeds, slow enough to potentially lead to a stall if a pilot isn’t paying attention.

Where does this get dangerous?  High elevation airports.  Whenever the OAT creeps above 85 or 90 at an airport that is higher elevation (I would classify higher elevation as 2,500 feet or higher), the corresponding density altitude sky rockets.  If a pilot isn’t paying attention to airspeed or angle of attack (if the airplane is equipped with an AOA), a stall can come very quickly on climb out.

What to take home from this?  Monitor your climb speed and angle of attack, especially right after takeoff, when you hear density altitude on the ATIS or AWOS.

Similar Posts

  • Flight Watch to be Discontinued

    The FAA has decided to discontinue the dedicated En Route Flight Advisory (EFAS or Flight Watch) frequency 122.0.  The effective date will be September 24th, but Flight Service will continue to monitor the frequency for an additional six months to direct pilots to Flight Service Station frequencies.

    EFAS services will still be provided by Flight Service, though, on the published Flight Service Station frequencies (and 122.2).

    To me, this makes some sense.  In the past, if I accidentally contacted Flight Service on one of their frequencies to issue a pilot report or get a weather update, they would send me over to Flight Watch on 122.0.  More than likely, the Flight Watch operator was sitting right next to the Flight Service operator, but I had to flip frequencies.  This will help alleviate some confusion for pilots.

    The deactivation of Flight Watch had been coming for years since the advent of Foreflight and other iPad and tablet apps giving pilots much easier access to weather, both in flight and on the ground.  With Nexrad and Stratus, there isn’t much need for Flight Watch anymore (though you still can’t file a PIREP over the XM Weather!).

    For more information, check out AOPA’s website.

  • An Educational Runup

    When a pilot thinks of an engine runup in a single engine piston airplane, typically it is let’s find out if the engine is running rough or not, meaning a spark plug is fouled.  Believe it or not, there is a little more to learn from a runup than just checking the spark plugs.

    A distinct advantage to having an engine monitor that monitors all EGTs and CHTs is you get a better idea of engine health.  When switching to one magneto or the other during the runup, all the EGTs should rise, showing that the temperature of the exhaust gas is going up from each cylinder.  This occurs because when running on only one magneto and one set of spark plugs in each cylinder, the mixture takes longer to burn, so, when the exhaust valve in the cylinder opens, the burn is still on going and this hits the EGT probe, causing a temperature rise.  An indication of a magneto failure in flight would be a rise in all the cylinders EGT without a change in mixture setting.

    Now that we know what to look for when checking each magneto, what would one look for to show that there is a problem?  The basic that each student pilot is taught still applies.  The engine manufacturer puts a limit on RPM drop during the runup.  When checking one magneto or the other, watch for an excessive RPM drop.  If the RPM drops past the limit, this usually will be accompanied by engine roughness.

    Why is that?  Let’s look at the cause for the excessive RPM drop.  For this, we need to go back to our EGT indicators.  Let’s say we have a 6 cylinder engine.  When the key is turned to the right magneto, the RPM drops 250 RPM and the engine gets very rough.  Look at the EGT gauge.  The cylinders where the spark plugs are firing normally will all show a temperature.  The cylinder (or cylinders) where there is no combustion, meaning a bad plug, will show no temperature.  This is because the mixture is just sitting in the cylinder and not igniting, therefore, no exhaust gases will be pushed out so there will be no EGT indication for that cylinder.  This is also how you tell a mechanic which cylinder to check for the bad plug.

    It could also be a bad magneto.  If multiple cylinders EGT all drop, or the engine wants to quit entirely, you have a bad magneto or bad ignition harness.

    What else can you learn during the runup?  Electrical system health is key, especially in all electric airplanes (meaning no vacuum system).  It’s a very good idea to turn on all the lights and pitot heat to ensure that a rise is indicated on the ammeter.  This means the alternator is carrying the load and working properly.

    The next time you do your runup, keep an eye on your EGT to see the rise during a magneto check.

  • Garmin G1000 Updates

    You have just received the keys of your shiny new (to you) airplane complete with a beautiful Garmin G1000 glass panel flight deck. Synthetic Vision, WAAS, and ADS-B are all installed. You are ready to cruise in high technology.

    You turn on the PFD and MFD and notice one problem. All your databases are expired. No big deal, right? Your Garmin 530W was easy as pie to update with it’s single data card.

    You start looking around and can’t find the data card. Then you notice that there are several SD cards in slots on the panels. SD cards won’t fit in your Blue Jepp Skybound card reader. Confusion sets in which quickly leads to full on panic.

    What have you gotten yourself into?!

    No need to fear, Texas Top Aviation is here to help with your Garmin G1000 database update confusion (and hopefully not panic).

    Database Update Providers

    First, you have to choose who to get your Garmin G1000 updates from. You have two options. One is Garmin (fly.garmin.com; always use either Firefox or Chrome to update, don’t use Safari). The other is Jeppesen.

    Honestly, there is no difference between the data that each provides. If you had a 530 or 430 before, you used Jepp already. Just keep the Jepp account, call them, and have them get you set up for your Garmin G1000 updates.

    If you didn’t have a Jepp account before, I would use Garmin, for a couple of reasons. You get multiple downloads in case you mess something up (Jepp NavData gives 1 download per month, while Safe Taxi, etc. you get 2-3). On Jepp, you have to call in and have them reset the account, which can be a pain if it’s after hours or a Saturday or Sunday.

    The other problem with Jepp is since Boeing bought Jeppesen, I have found it extremely difficult to find online where to set up a new account and purchase databases. Yes, you can always call, but, again, problematic after hours or on a weekend.

    The only problem with Fly Garmin for your Garmin G1000 updates is Garmin is constantly updating their program. You have to update their downloader quite often, which can be a bit frustrating.

    I’m going to use Fly Garmin as my example.

    What to Buy

    Garmin gives you a couple of different bundle options for your Garmin G1000 updates, the OnePak and the PilotPak. The main difference between the two is the PilotPak includes approach charts that display on your PFD and the OnePak doesn’t. Therefore, the OnePak is about $200 cheaper.

    Both include Navigation Data, SafeTaxi, Obstacles, Airport Directory, Terrain, and the BaseMap.

    How to Update

    Once you have followed all the instructions on Garmin’s website (or gotten Jeppesen set up), here is what to put on which SD card.

    NOTE: YOU WILL NEED TO PURCHASE ONE OR TWO BLANK SD CARDS FOR THE NAVIGATION DATABASES. DO NOT PUT THE NAVIGATION DATA ON THE SD CARD THAT IS ALREADY IN THE TOP SLOT ON THE MFD. THAT IS FOR ENGINE DATA LOGGING ONLY. NO NAVIGATION DATA SHOULD EVER BE PUT THAT ON THAT CARD.

    Bottom Card, PFD

    • SafeTaxi
    • Obstacles

    Bottom Card, MFD

    • SafeTaxi
    • Obstacles
    • Airport Directory
    • Flite Charts

    Top Card, PFD & MFD (This is the new blank SD card(s) you bought)

    NOTE: REMOVE THE TOP SD CARD IN THE MFD THAT IS ALREADY IN THE SLOT AND DON’T PUT ANY DATABASE INFORMATION ON IT.

    • Navigation Data

    Garmin G1000 NXi Users (or Cirrus Perspective + Users)

    Ignore everything above and put all databases on the bottom card of the MFD. You have database sync, so you don’t have to mess with multiple cards. When you do an update though, go to the AUX chapter on the MFD and scroll down to the Databases page. Ensure that all dates match what you just put on the SD Card.


    For you Jeppesen users, check out the new Bad Elf Wombat updater that works with the iPad JDM app for updates.

  • Night Flying

    Ah, fall is finally here.  In Texas, it arrived about a month late, but showed up with a vengeance.  A strong cold front caused a 40 degree temperature drop in 12 hours earlier this week, bringing rain, lower freezing levels, and lots of wind.

    Fall means cooler temps, but fall also means less light.  The sun begins to set sooner, plus the fall back time change in November cause darkness to spring upon an unaware pilot.

    Before getting in to too many night landings tips, just a friendly reminder, passengers can only be carried at night if the PIC has completed 3 takeoffs and landings to a full stop in the last 90 days during the time period of 1 hour after sunset to 1 hour before sunrise.

    Lots of us have been landing long before sunset for most of the past couple of months, so those night flying skills might be a little rusty.  The best way to remedy night flying rustiness?  Call an instructor and go get some practice.

    In the meantime, here are some tips as to what to expect for your next night flying experience.

    1. Your Eyes Are Very Important.  This may seem like an obvious statement, but night vision can be affected by many things.  Before you takeoff, you want to make sure you can see in the dark.  The FAA recommends no bright lights 30 minutes prior to takeoff.  They also recommend using oxygen at night as this greatly improves night vision, even at low altitudes.  Use off center viewing to help spot traffic or other objects in the air.  Finally, when preflighting, use a red flashlight as much as possible, but if you do have to use a white light, close one eye to keep one eye from being blinded.
    2. Utilize Approach Lights on Landing.  Night landings are very different then day landings.  It is very difficult to get the proper depth perception, not too mention see obstacles below you on your final approach to a runway.  PAPI’s, VASI’s, and instrument approach glide slope’s become very important.  If you are VFR only pilot, if your airport has a PAPI or a VASI, keep 2 white and 2 red (or 1 white and 1 red) lights.  If you see 3 red (or 2 red), climb.  If you see 4 red, definitely climb.  If you are an IFR pilot, I highly recommend always flying an approach at night.  What if your airport doesn’t have a PAPI, VASI, or approach with a glide slope?  You might not want to utilize it at night.  One side note on VFR flight: Clouds are nearly invisible at night.  If you do fly into a cloud (a clue is your strobe lights start reflecting back at you), don’t panic.  If you have an autopilot, turn it on and execute a 180 degree level turn.  If you don’t have an autopilot, start scanning your instruments, keep your attitude indicator blue side up, and make a shallow 180 degree while maintaining altitude.  Then call ATC, advise them what happened, and ask for help.  One more note:  I highly recommend that if a pilot finds that he/she will fly at night at lot, get an instrument rating and fly IFR at night.  It’s much safer.
    3. Practice Landings Before Carrying Passengers.  The tendency when landing at night is to level off too high before flaring, causing the airplane to bleed off speed and energy too high above the runway.  This can lead to a stall, a hard landing, and/or too high of a pitch attitude at touch down causing a tail strike. A good tip is start your level off when you can see the tire marks on the runway.  Make sure you practice night landings, preferably with an experienced instructor who is night current and proficient, before carrying any passengers on board, even if you are night current, but haven’t landed at night in a while.
    4. Night Emergencies.  For engine failures at night, you are very limited on options.  Unless you have a Cirrus equipped with a CAPS parachute system, you really have two options if an airport isn’t within gliding distance.  Find a wide, lighted road that appears to be lightly trafficked.  A word of caution, though:  be careful of light poles, fences, concrete medians, cars, and buildings.  The LA freeway would not be a good option (though there are exceptions to this rule as is evidenced by the picture below).  The second option is find a dark spot and pray it’s a field (or the Hudson River).  As you get closer, you can turn your landing light on to see what the ground looks like.  If it looks good, keep the light on and continue.  If you don’t like what you see, turn your landing light off and continue….

    Flying at night can be the best time of day to fly.  It’s usually smoother, cooler, and you get to see all the city lights.  It is a very different environment, however, so make sure to get some training before darkness settles in on your next trip.

  • Medical Reforms Get Passed

    On July 15th, the medical reforms that AOPA and many other aviation advocacy organizations had pushed so hard for were passed into law.  President Obama signed the medical reforms law on the 15th, but, before practical application of the law takes place, the FAA has to translate the law into regulations.

    Doctor

    What do the new medical reforms mean for medical certificates and flying?  First, you still have to get a medical examination at some point in your flying career.  Student pilots will still need an initial medical examination. Initially, for pilots who have held a medical certificate at some point over the previous 10 years, a new medical examination may not be needed (this still has to be regulated by the FAA so exact details aren’t known yet).

    So, if you’re medical certificate has expired but you have had one in the past 10 years, you qualify.  But, if you have had your medical certificate revoked, suspended, withdrawn or denied, you don’t qualify.

    Once that student pilot receives the initial medical certificate (or the experienced pilot decides to start flying again), all that needs be accomplished is to take a free, online course on aeromedical factors every two years and meet with a physician at least once every four years.

    There are some operating limitations that will be put into place for folks operating without a third class medical.  Pilot’s can operate aircraft with no more than 6 seats that weigh less than 6,000 pounds, can carry 5 passengers, and are able to operate in day or night VFR or IFR conditions.  Pilot’s may not operate for hire, nor climb above 18,000 feet or fly faster than 250 knots.

    It will take some time for the FAA to put the regulations in place, but the process has begun.

  • Scud Running

    I was speaking with a pilot a few months back who was not instrument rated.  He was telling me of his flying experience while continually speaking fondly of scud running.  He told me several stories, most of the time with a smile on his face, about scud running to his destination while staying clear of clouds.  While he was talking, my mind was cycling through the numerous accident reports I’ve seen where a scud running VFR pilot has crashed into terrain or an obstacle.  Needless to say, scud running is not a very good idea.

    This pilot’s stories got me to thinking, how common is the practice of scud running amongst VFR only pilots?  As an instructor, I always teach my private students about personal minimums and making that no-go decision when clouds are below those personal minimums.  The act of scud running falls under several of those dangerous pilot mindsets, get-there-itis, invincibility, and macho-ism, to name a few.

    To bring everyone on the same page, let’s define scud running.  Wikipedia has a very good definition:

    Scud running is a practice in which pilots lower their altitude to avoid clouds or instrument meteorological conditions (IMC). The goal of scud running is to stay clear of weather to continue flying with visual, rather than instrument, references. This practice is widely accepted to be dangerous, and has led to death in many cases from pilots flying into radio towers and high tension wires; however, even instrument-rated pilots sometimes elect to take the risk to avoid icing or embedded thunderstorms in cloud, or in situations where the minimum instrument altitudes are too high for their aircraft.

    To put some numbers with that definition, a scud running VFR pilot would takeoff with a 1200-1500 foot ceiling and stay 700-1000 feet above the ground, right in the area where towers, hills, and rapidly rising terrain reside.

    Scud Running

    How do we change this mindset?  Well, if someone has been scud running for years without incident, the practice becomes normal, like the pilot I mentioned above.  The mindset of invincibility sets in and the practice continues.  This particular pilot can also lead other pilots to adopt the same practice, encouraging them that nothing will happen to them, since we all know that our pilot peers know better than our flight instructors (insert heavy sarcasm here).

    In order to change this mindset, instructors need to emphasize personal minimums from day one.  This includes ceilings, visibility, and winds.  For a seasoned pilot, a review of accident statistics might help the process.

    Scud running is not a safe practice.  If you’re a scud runner, you need to rethink your attitude.  Is getting there really worth it?

    Still not convinced?  Read this pilot’s experience from AOPA.

Leave a Reply

Your email address will not be published. Required fields are marked *