A Proper Cross Country Flight Checklist (Part 1)

I love cross country flights. Airplanes are designed to travel.  When I was instructing private students, my favorite lessons were always the first cross country flights. I looked forward to getting my students out of the pattern, away from the practice area, and showing them what they could really look forward to as a private pilot.

When I was in college, my friend and I borrowed his dad’s Cessna 150, did a cross country flight in it from Indianapolis to Kitty Hawk, then down the coast to Florida. We camped in the grass next to the airplane wherever the airport managers would let us and had our own aviation adventure complete with mechanical problems, unexpected weather, and interesting people along the way. These types of trips have produced some of the best memories and experiences that I’ve acquired during my aviation career so far.

Unfortunately, I know many people whose only cross country flight experience is what was necessary to satisfy their Private and Instrument training requirements. Some of them are nervous about the idea of venturing away from the familiarity of their home airport, while others are relatively new pilots who simply don’t know where to start planning a long cross country flight.

I’ve taken some notes on my preparations for an upcoming cross country flight that I’ll be flying in my dad’s Bonanza. I’m hoping this checklist might help others feel a little more confident that they have everything they need to get going.

Oil

Its always a good idea to bring a few extra quarts of oil. If you stop somewhere and find you need some, its nice to have the right kind on hand. Never assume that the airport you’ll be landing at next will have oil available.

I like to keep a few extra quarts of 15W50 in the back of the Bonanza, just in case (photo from oil-store.com)

Fuel Stops

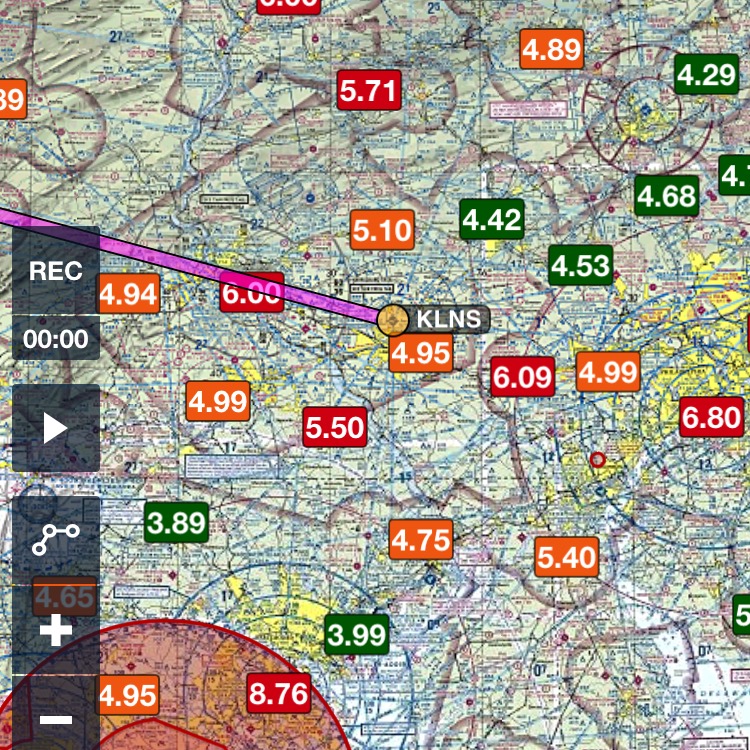
Here is an example of the 100LL price tool as seen on the Foreflight maps page

I’ve learned the hard way that calling ahead to verify fuel availability can be extremely important. I landed at an airport in Ohio one beautiful Sunday morning to find that the FBO wouldn’t be open until much later in the day. Naturally, there was no other fuel available on the field. I hadn’t called ahead to verify the hours of fuel availability (I assumed they had Self Serve) and had only 2 options: wait a while for the FBO to open, or try and find somewhere else nearby that had gas. As far as price, www.100LL.com is a valuable tool for finding cheap fuel. Foreflight also has posted prices for 100LL and Jet A, but it’s still a good idea to call ahead and verify price and availability.

Batteries for electronics

It’s miserable to run out of batteries for a noise canceling headset with hours remaining in your flight. Bring spares, not only for your headset, but for your flashlight and other gadgets as well. Make sure your hand held GPS, iPad, and Stratus are charged (if you have them). I like to carry a charge cable and adapter as a backup so that I can plug things into the cigarette lighter.

Jumper Cables

We always carry the ground power cable in the back of the Bonanza just in case we ever need a jump. Last month, when I was flying down to Texas, I was glad I had them; we had a dead battery after our fuel stop and had to borrow some power from an FBO worker’s pick up truck. Don’t assume that wherever you are stopping will have the correct cable to jump your airplane, especially if it requires a specific plug.

These are the cables we keep in the back of the Bonanza (photo from airchief.com)

Parking Fees

Every airport is different. I like to call ahead and find out how much the FBO is going to make me pay in landing/overnight fees. When I flew up to Buffalo last summer, I paid 25 dollars for parking at Niagara International (IAG). Had I parked at Buffalo (BUF), they would have charged me over $200.

Approach plates and charts

Make sure you have current approach plates and charts either physically available or downloaded before you blast off. Having a copy of an AFD is a good idea as well, be it digital or paper.

Rental cars

If you arrange it beforehand, many FBO’s will have the car ready for you upon arrival. You may also be able to drop the car off at the FBO when are finished, instead of taking it back to the rental agency. It sure is nice to have the car pulled up next to the airplane when it’s time to unload.

Hotels

Bigger FBO’s may have discounted rates with local hotels. If you call the desk and explain your needs they may offer to book it for you, or at least point you in the right direction. It may be worth picking an airport with more expensive fuel if it puts you closer to the hotels or restaurants you want to go to.

Come back next month for Part 2!

Andrew Robinson is a 135 Charter Pilot and flight instructor who lives with his wife and 2 daughters in Pennsylvania.  He flies Pilatus PC-12s and instructs in Beechcraft Bonanzas.

Similar Posts

  • Piper PA46 Partnership in San Antonio

    A Piper PA46 partnership is being formed in the San Antonio area. Two to three partners are being sought to purchase either a Piper PA46-310P Malibu or a ’90s model Piper PA46-350P Mirage.

    The Piper PA46 Malibu is the original Piper PA46 airframe. It is equipped with a Continental TSIO 520, 310HP engine (though many have been upgraded to the Continental TSIO 550C engine, which is a great upgrade), is complex, and pressurized (the best feature about the airplane!). The six seat airframe travels around 185-190 KTAS at FL200 on 16-17 GPH, giving an incredible range with 120 gallons of fuel.

    The Piper Mirage is what Piper designated the PA46 when it switch to the Lycoming TIO 540 350HP engine in 1989. The airframe remained the same, but the engine eeks out a few more KTAS at 22-25 GPH depending on how high the cruise altitude is.

    Both the Piper Malibu and the ’90s model Mirage are equipped with the KFC 150 autopilot. A lot of the Piper PA46 airframes still have a Garmin 530W/430W or dual 430Ws, but a large number have been upgraded to the Garmin GTN 750/650, while a few have opted for the Avidyne IFD 540/440 GPS units. There are a fair number still with steam gauges, while some have upgraded to Aspen units or the Garmin G500 or G500TXi.

    If you are located in the San Antonio area and interested in a 3-4 way partnership on a Piper PA46, please Contact Us. The purchase price will be between $300,000-$450,000, so only interested parties that can afford a budget of $100,000-$150,000 please.

    The plane will be based at Stinson Field (KSSF) or New Braunfels (KBAZ).

  • Jeppesen vs. Aeroservices Charts

    Many people ask, which set of charts is better? Should I use the FAA Aeroservices charts on Foreflight or pay extra for the Jeppesen charts? Since you have to pay for Jeppesen, they are probably better, right?

    I am not here to say which one is better as a chart preference is just that, a preference for one over the other or for certain features. After a while, muscle memory and routine take over and you probably wont even notice the difference.

    History

    In 1934, Elroy Jeppesen began making his own charts and sold them to other pilots. His little company grew into the giant Boeing chart company we know today. Jeppesen charts are used internationally and therefore include information that might otherwise seem common knowledge, like transition altitudes. The key is, you cannot get FAA Aeroservices charts for international destinations. Jeppesen is the only option for outside the US.

    National Aerospace Charting Office (NACO), or the new(er) name “Aeroservices” or FAA chart, whatever you decide to call them, are United States government issued charts. In addition to civilian use, Aeroservices charts are used by the military so there will be some terminology that does not apply to civilians. The best part about FAA Aeroservices charts are… they’re free!

    If you are in the middle of a transition or trying to decide which charts to use, you have come to the right place. Here are a few key differences.

    Obstacle Departure Procedure Chart
    KAXX (Angel Fire, New Mexico) ODP

    1. Frequencies: FAA Chart provides the AWOS so you have all departure frequencies in once place.
    2. Airport: Jeppesen highlight the airport, which is a nice feature so you can easily see the flow from the airport.
    3. Notes and Remarks: Jeppesen bolds the speed restriction all over the chart so you won’t miss it. All other requirements are in the top right corner. Note the transition altitude 18,000′. Since Jeppesen is used internationally, it is published on the chart since other countries have different transition altitudes. It takes up a chunk of chart real estate, but it’s clear, easy to read, and always in the same place. The FAA charts post all the requirements and restrictions as notes off to the side. Since it’s in the same space as the chart graphic, it’s easy for the eyes to catch while studying the plate.
    4. Take off Minimums: NOT APPLICABLE for PART 91 – however, it’s wise for all pilots to look and abide by them. Jeppesen displays the standard take off minimums table, as well as the rate of climb table, which is nice to have all in one place. The FAA chart gives the non standard information but you need to know/look up the rest in the Digital Terminal Procedures Supplemental document. (Hint: It’s in the Documents section of Foreflight)
    5. Take Off Obstacles: About the same on both charts
    6. Route Description: Similar on both charts, but larger font and clearer description on the FAA chart. When there are different routes from different runways, the FAA chart layout is really helpful.
    7. Graphic Layout: Jeppesen and FAA use the same graphics for all their different charts and plates which makes it easy to read once you are familiar with the respective charts. FAA charts are easy to read and distractions are kept to a minimum. Jeppesen charts make things bold and enlarge pertinent information so you won’t miss it.
    8. Airport altitude: This is only on the Jeppesen chart (the FAA chart doesn’t include it), but it is very helpful for situational awareness. As you brief the arrival altitudes, I think it’s important to have an idea what AGL you are at.

    Approach Charts

    One thing pilots love about Jeppesen approach charts is the clear set up for an approach brief. The top section is created as a “briefing strip” starting with the frequencies, then navigation frequencies, minimums, airport elevation and the missed approach. It’s very natural and user friendly.

    FAA charts have a slightly bigger picture of the approach planview, but the profile view and minimums section can get a bit cluttered. It can feel a little discontinuous when briefing the approach to bounce all over the page. However, some pilots really like the small airport diagram in the corner, which I find really helpful for situational awareness (particularly for students learning circle approaches). Non- standard alternate and takeoff minimums are also clearly noted, but unfortunately we must hunt elsewhere to find them. The Jeppesen alternate minimums and takeoff minimums will both be on the airport diagram

    1. Frequencies: Getting weather and tuning radios is easy on the Jeppesen charts – just follow the briefing strip. The frequency section on the FAA charts is still easy to read, but closer to the center of the page. It’s split up from the nav frequencies and other important briefing information.
      a. FAA charts are created by the government and have military specific information, which are the odd looking frequencies and channels on the chart.
    2. Approach Navigation: On a Jeppesen chart, you will continue to the next line to verify your frequency, course and set minimums (assuming you are straight in on the ILS). On the FAA chart, you will then have to skip to the top of the chart to get the frequency and course, and then scan to the bottom of the page to input your minimums. However, since you could be flying a localizer approach or a circle to land, it’s a good reminder that not everyone using this approach chart will be using the same Decision Altitude (DA). The FAA chart also includes runway distance information so pilots can make determinations of approach speeds and stopping distance if the runway is wet or icy.
    3. Missed Approach – Textual
    4. Approach Lighting
    5. Missed Approach- Graphical: The missed approach information is the same on both charts. The lighting information is key for determining a missed approach and is next to the missed approach text on the FAA chart. It’s found next to the missed approach graphic on the Jeppesen chart. Personally, I find it easier to find and read the lighting information on the Jeppesen chart. Remember, on both charts, the placement of the PAPI on the chart indicates the physical location of the lights (left or right of the runway).
    6. Notes: Both charts have a notes box, but they use them a little differently. Once again, remember that Jeppesen charts are used internationally and include the transition altitudes and altimeter setting info. On both charts, the notes section will be where other critical information will be shared which isn’t really applicable for this airport. On the FAA chart, the tower frequency is starred to note that there are operating hours (you’ll have to check the chart supplement AF/D to find out what those hours are). There is also an L next to the frequency to indicate it is the pilot controlled lighting frequency. You will also find the note about the VGSI and the Approach Glide path next to the profile view on the FAA chart, whereas the Jeppesen chart has that note in the notes section at the top. The FAA chart also has the T and an A in black triangles to note that this airport has non- standard alternate and take off minimums. Again, those are found in separate documents when using FAA charts and on the Airport Diagram when using Jeppesen charts.
    7. Minimum Sector Altitude: Similar on both charts, but in different locations (reminder: ATC vector altitudes may be lower. It is the pilot’s responsibility for safety of flight to maintain safe obstacle clearance, so if you are ever concerned about going below the MSA – just ask ATC).
    8. Planview: Other then differences in size, visuals, and text, the information displayed on both is very similar.
    9. Profile View: Again, the displays look different and pilots will have their preference, but the information is the same.
    10. Minimums: Jeppesen charts not only note the category for each approach with its designated letter, but also displays it in knots. It is recommended that if you increase your approach speed (based on flaps or gusty winds or perhaps a faster speed for a circle to land approach) that you should use the higher category minimums. The reference guide makes that easy to look up. The other benefit of the Jeppesen charts is right the table that contains the time from the final approach fix to the missed approach point for a localizer approach, it also shows the rate of descent with the associated ground speed to maintain a 3 degree glideslope. Now there is no excuse not to set pitch and power! The minimums posted in parenthesis are for the military, but RVR in statute miles is also included.
    11. Airport diagram: Only on the FAA charts, this particular feature is particularly useful for situational awareness. The arrow pointing to the runway shows the direction the approach is arriving from so planning a circle to land is a cinch. There is also a lot of other information that can be gathered from the airport diagram for quick reference or to help a disoriented pilot: lighting, displaced thresholds, closed taxiways, and runway placement and lengths. This is easily one of the best perks of an FAA chart.

    Arrival/ Departure Charts: Sewzy 5 Arrival KAUS

    The Jeppesen lay out is very attractive and draws the pilots eye in a clear way to all the important information. The colors pop out, so the required altitudes and speeds are easy to read and remember. The chart, which is the proper scale, shows MORAs , easy to find airports (and runway layouts) and is over all easy to follow. However, the texts, while very clearly laid out, are small and difficult to read and pushed to the very edges of the chart. FAA charts are simple and fairly easy to read, but the airports are not as obvious and the flow to the airport requires a good look. The table on the Jeppesen chart is a really nice format, but the text and Notes for arrivals on the FAA chart are easy to find and much easier to read quickly.

    1. Frequency: FAA charts include the approach frequency on the arrival, which is helpful for having radios tuned. During a busy time when the controller changes your frequency, all you have to do is verify the frequency you already set, rather then totally stop what you’re doing to switch it. The Jeppesen charts add the airport elevation next to the ATIS, which really aids situational awareness.
    2. Notes: Jeppesen notes are clearly numbered and tucked away nicely in a box, but the FAA chart notes pop out in the middle of the page and are easy to skim for pertinent information.
    3. Planview: I think Jeppesen is the clear winner here- it is so easy to read, it only takes one glance to know where the primary airport is and how the arrival flows. The chart being at the proper scale offers the pilot important geographical information and over all is a clean look. Notice the small series of arrows after SMRFF on the the Jeppesen chart; those indicate the pilot should expect radar vectors. The FAA charts include those instructions in the text, but I find the visual reference on the chart helpful. The FAA charts are equally clean, with altitude and speed restrictions easy to read even if they don’t jump out. When there are multiple airports that the arrival serves, the airports are clearly marked, though, I think it would be nice to have a little more information surrounding the primary airport for better situational awareness.
    4. MSA: only on the Jeppesen chart
    5. Primary airport: The runway alignment and grey highlight on the Jeppesen chart stands out very clearly, while the FAA airports are a little more obscure.
    6. Arrival route description: The table on the Jeppesen chart is easy to follow but the text is very small and pushed to the bottom. The route description is much easier to find and read on the FAA chart.

    Airport Diagram

    The Jeppesen Airport Diagram page has it all: frequencies, airport diagram, runway info, take-off minimums, departure procedures and alternate minimums. It’s a one-stop shop. It makes preflight planning easy when its all at your fingertips.

    The FAA charts usually require a little more searching for different pieces of airport information. The Airport Diagram itself is just the airport layout. Above, you will see a simple FAA Airport diagram. It’s clean and simple, perfect for a knee board print out.

    In the flight planning process, as you look at what approaches you will be using for the airport, you might see an A or T inside a triangle. Those indicate that you will need to look in the Alternate Minimum or Take off minimum documents for more information. The Takeoff Minimums document (see below) is also where you will find any obstacle departure procedures for that airport. Apps like Foreflight help you out by posting the take off minimums under the departure tab. Even though it’s a little more difficult to read, I didn’t crop out the airport information so you can see what it looks like in context.

    FAA Alternate Minimums on the Left and Takeoff Minimums and Obstacle Departure Procedures on the Right
  • MMOPA Safety Foundation Training Videos

    The Malibu and M-Class Owner’s and Pilot’s Association (MMOPA) announced new Safety Foundation Training videos in September. The videos are aimed at both new Piper PA46 pilots and existing Piper PA46 pilots, all in the effort to fly the Piper PA46 to the highest and safest standards.

    Six videos have been released thus far, with the promise of more to come. The topics of the first videos are:

    • Instrument Approach
    • Visual Approach
    • Manual Gear Extension
    • Emergency Descent
    • Descent Planning
    • Takeoff and Climb

    Eventually, the goal is to release high quality training videos encompassing all aspects of Piper PA46 flying.

    To view the videos, you will need an MMOPA membership. The link to the MMOPA Safety and Education Foundation video page is: https://www.mmopasafety.org/education/

  • Air Traffic Control Privatization

    There was a bill introduced in Congress recently to take control of Air Traffic Control away from the FAA and give it to a private, for profit, corporation.  The initial reaction of pilots is “Ahhh!  User fees!” which we are all adamantly opposed to.  There are a myriad of reasons why this is a bad idea (the “Flying” article makes a comparison to giving NASA to Richard Branson and Jeff Bezos) and we as pilots should be against it.

    Read the “Flying” Magazine full article here.

    Air Traffic Control

  • Cirrus Braking Systems: A Hot Topic

    You just bought your Cirrus SR22. You do some flying, and soon find yourself with a brake temp sticker that isn’t white anymore. You remember from your transition training that any color other than white is a no go. You now ponder…. I don’t remember getting on the brakes hard, or riding the brakes while taxiing, but sure enough they aren’t white anymore. You now start thinking that all the horrible rumors of Cirrus brakes are true. They overheat so fast!

    I would like to share some little-known facts about the Cirrus factory equipped braking system. Following the procedures below can help make the brakes last a little longer. There is also a very popular STC that allows upgraded brakes to be installed on all SR series aircraft. More to come on that.

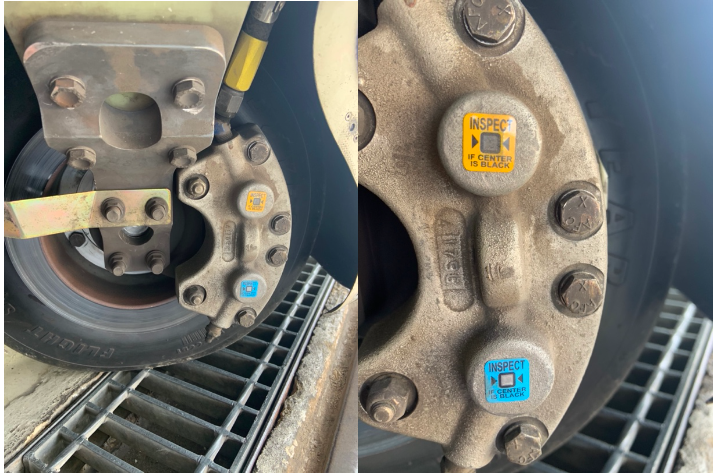
    Notice the Top Yellow sticker is far darker than the Bottom. The Yellow temperature indicator turns at 300 Degrees, while the bottom Blue indicator turns at 330 Degrees. This is an indication to the pilot that if the bottom sticker has turned colors, that the braking system has exceeded 330 degrees and is in need of servicing.

    Above is a photograph of an SR22 G1 braking system with turned brake temp stickers. The first things you may notice is that there are in fact two brake temperature stickers. We can only see the bottom blue sticker from the inspection port on the wheel pants. The other is higher on the caliper; in order to see it, the wheel pant must be removed. This isn’t common knowledge because there is no mention of this additional indicator in the POH.

    Now you may be asking yourself, what can I do to extend the service life of my factory equipped Cirrus brakes? Here are some tips. First, always taxi at 1000 RPM and use the rudder as much as you can while only tapping the brakes. This is not fool proof, since sometimes, depending on the grade, you will have no choice but to utilize brake tapping to keep the aircraft going straight. Taxiing is not typically where the brakes get overheated, though, but this is still a good practice to follow.

    What we tend to see is that the Cleveland brakes are generally overheated on landing. We always recommend to make sure your final approach speed is not excessive, land in the first 1/3 of the runway, and let the aircraft rollout to a smooth stop. What tends to happen is that the aircraft is too fast, and the pilot tries to exit at a certain taxi way, or brakes hard and continues to ride the brakes after landing during taxi. If you do your best to avoid these habits, it will serve you well.

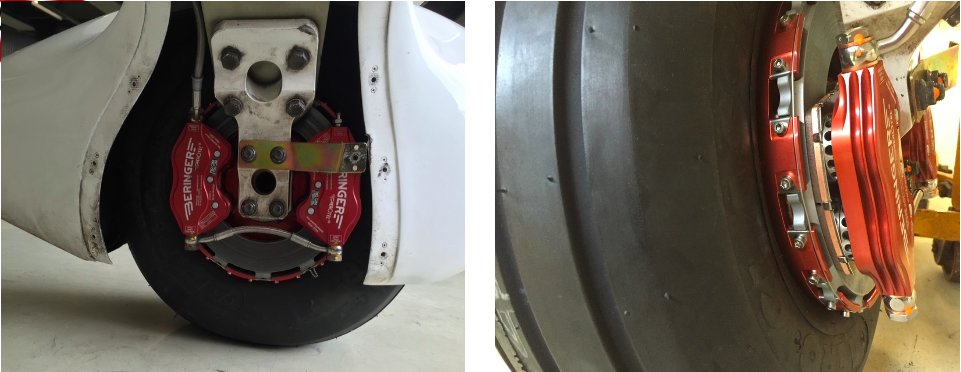
    This braking system remained unchanged all the way until the 2016 G5 Cirrus SR series. Starting in 2016, the factory equipped G5 and G6 Cirrus SR series all now come standard with a single piston hydraulic braking system from Beringer. The Cirrus Beringer brakes far exceed the braking power and durability of the old system. The new system is more robust, withstands heat better, and is is very well built. There is also an option for an upgraded dual caliper system to increase durability and stopping power. A braking system STC for the older Cirrus G1 through early G5 models was created to upgrade those airplanes to the better stopping power and cooling of the Cirrus Beringer brakes.

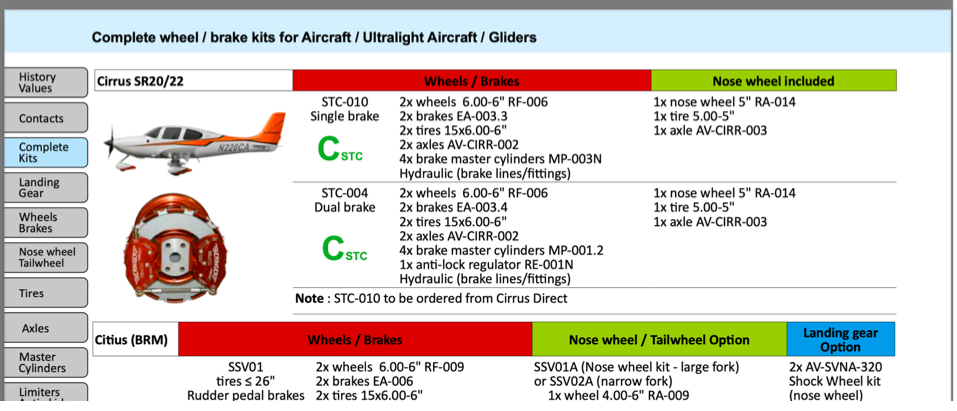
    Seen above is a page from a Beringer catalog highlighting the Cirrus SR series STC kits. Your local Cirrus service center will be able to quote prices for the kits. We have over 1000Hrs spent behind Beringer equipped Cirrus aircraft and the difference is quite apparent. The pilot has better control of the aircraft, no spongy pedal, and the confidence to get the plane stopped without possibly overheating the braking system. This, in our opinion, is one of the best upgrades you can do to your Cirrus.
    Above is what an STC upgraded braking kit from Beringer looks like, as well as the new temperature indicator for the pre/post flight inspection. Notice the black spot on the left hand picture. These brakes have been overheated.

    One other difference for a pilot to note is that once upgraded to the Cirrus Beringer brakes, there is only one temperature indicator and it changes color at a whopping 450 Degrees Fahrenheit! Needless to say, it can handle some heat! The new temperature indicator is now Orange in color and turns grey/black when overheated.

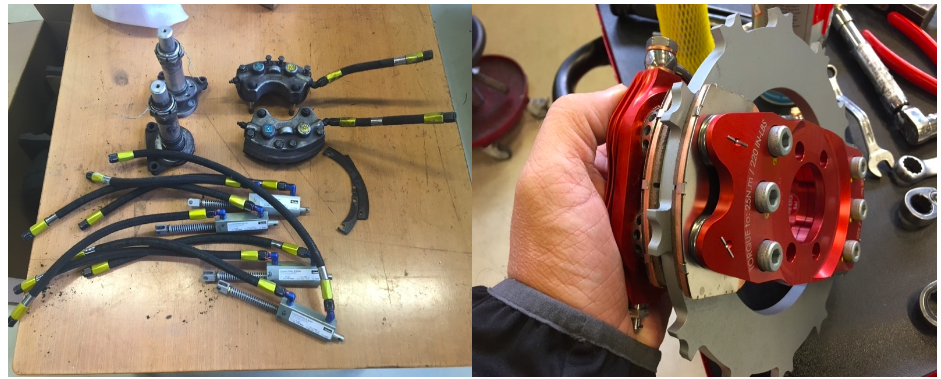
    On the left are the original Cirrus factory brakes. On the right is the caliper to the new Beringer brakes for a Cirrus.
    Dual Caliper Cirrus Beringer Brakes

    The Cirrus Beringer brakes upgrade is quite a step up in the world of slowing down. However, this doesn’t mean that they are completely issue free. There is one little-known problem with Beringer brakes that is not that big of a deal and can be fixed with relative ease.

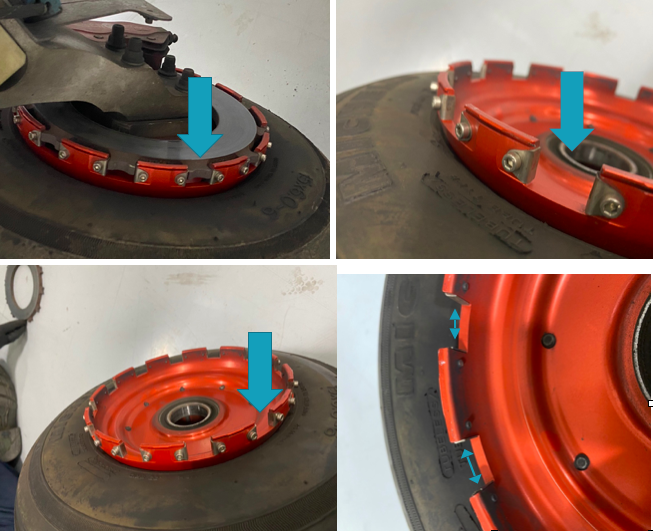
    The rotor on the Beringer braking systems is “free floating,” meaning it is not necessarily “fixed” in position when secured down to the spindle. It is “keyed” into the wheel rim with the male and female side interlocking.

    The brakes occasionally will get noisy, causing a “knocking” noise when brakes are applied. This noise is caused by the small metal tabs that tighten up the space between the wheel and the brake rotor. This is so the small tabs wear with use instead of the aluminum rim that they are fixed to. So, if your Beringers are making a knocking noise when brakes applied, this is most likely your culprit.

    These gaps above are the “keyed” position where the rotor finds home in the rim. Without these tabs that wear with use, we would be replacing the rim more often than the much cheaper replaceable tabs.

    It is highly recommended to upgrade your original Cirrus factory brakes to the new Beringer braking system. You will deal with less maintenance, less chance of a brake overheat, and less confusion on whether or not your brakes are airworthy. For more info, you can check out the Cirrus website for the single or dual caliper Beringer brakes.


    Zach Anderson is a Cirrus Standardized Instructor Pilot (CSIP) for Texas Top Aviation. Zach comes from a auto mechanic background and is very familiar with the ins and outs of maintenance. He started working for Texas Top Aviation in December 2020.

  • MAF Provides Disaster Relief in Haiti

    Hurricane Matthew rolled through the Caribbean last week and dumped vast amounts of rain across several of the island nations.  Haiti was one of them.  Haiti has been hard hit by disasters over the last 10 years.  Hurricane Ike in 2008, he devastating earthquake in 2010, Tropical Storm Isaac in 2012 and now Hurricane Matthew.

    maf-haiti

    MAF (Missionary Aviation Fellowship) has provided relief through all those disasters in Haiti.  Their disaster response team is preparing to provide relief yet again to the island nation in the form of relief supplies and personnel as well as damage assessment flights.

    MAF-US is based in Nampa, Idaho.  The organization uses aviation and technology to gain access to isolated people groups in order to allow those people to experience the love of Jesus Christ.  MAF-US serves in 6 countries around the world spread out amongst 15 bases.  MAF International works in 33 countries around the world.

    In addition, MAF works with multiple non-profits and human aid organizations to provide transportation to doctors and aid workers to those remote parts of the world where automobile transportation is impossible.

    In Haiti, MAF has 3 airplanes based in the country that serve 13 remote airstrips.  To read more about MAF, visit their website.

Leave a Reply

Your email address will not be published. Required fields are marked *