BendixKing Throws It’s Hat in the Glass Panel Ring

Two pilots walk into an FBO.  “Nice airplane,” Pilot 1 says to Pilot 2.  “What kind of panel do you have in it?”

“I just went all glass,” Pilot 2 says.  “Put in the Garmin G500 TXi, a GTN 750, and upgraded to the GFC 600 Autopilot.  Even put in the Mid-Continent standby instruments.  It’s a pretty sweet set up.  What about you?”

“Wow, sounds like it!” Pilot 1 responds.  “I went a different route.  I liked all my old BendixKing instruments, so I stuck with the company.  I put in a BendixKing AeroVue Touch panel, a BendixKing KSN 770 touch screen GPS, kept my KFC 225 autopilot, got the ADS-B out compliant BendixKing KT 74 transponder, and finished it off with a King AeroFlight KI 300 Digital Backup instrument.”

Wait, what?  BendixKing?

Yes, my friends, BendixKing is still around.

We are all used to the latest and greatest Garmin products these days.  Don’t get me wrong, Garmin and Aspen make great retro-fit products for your instrument panel, while Garmin and Avidyne are at the top of the touch-screen GPS market, but don’t forget about BendixKing.  They are staying in the game too.

BendixKing announced in April the xVue Touch for experimental aircraft, with the STC for the AeroVue Touch for certified aircraft coming later this summer.  The xVue and AeroVue touch are pretty nifty units, comparable in features to what Garmin is doing with the G500 TXi and G600 TXi.  It will be difficult to claw back into a competitive market share with Garmin, but BendixKing might find a niche market of followers.

Let’s take a look at the unit.

BendixKing AeroVue Touch
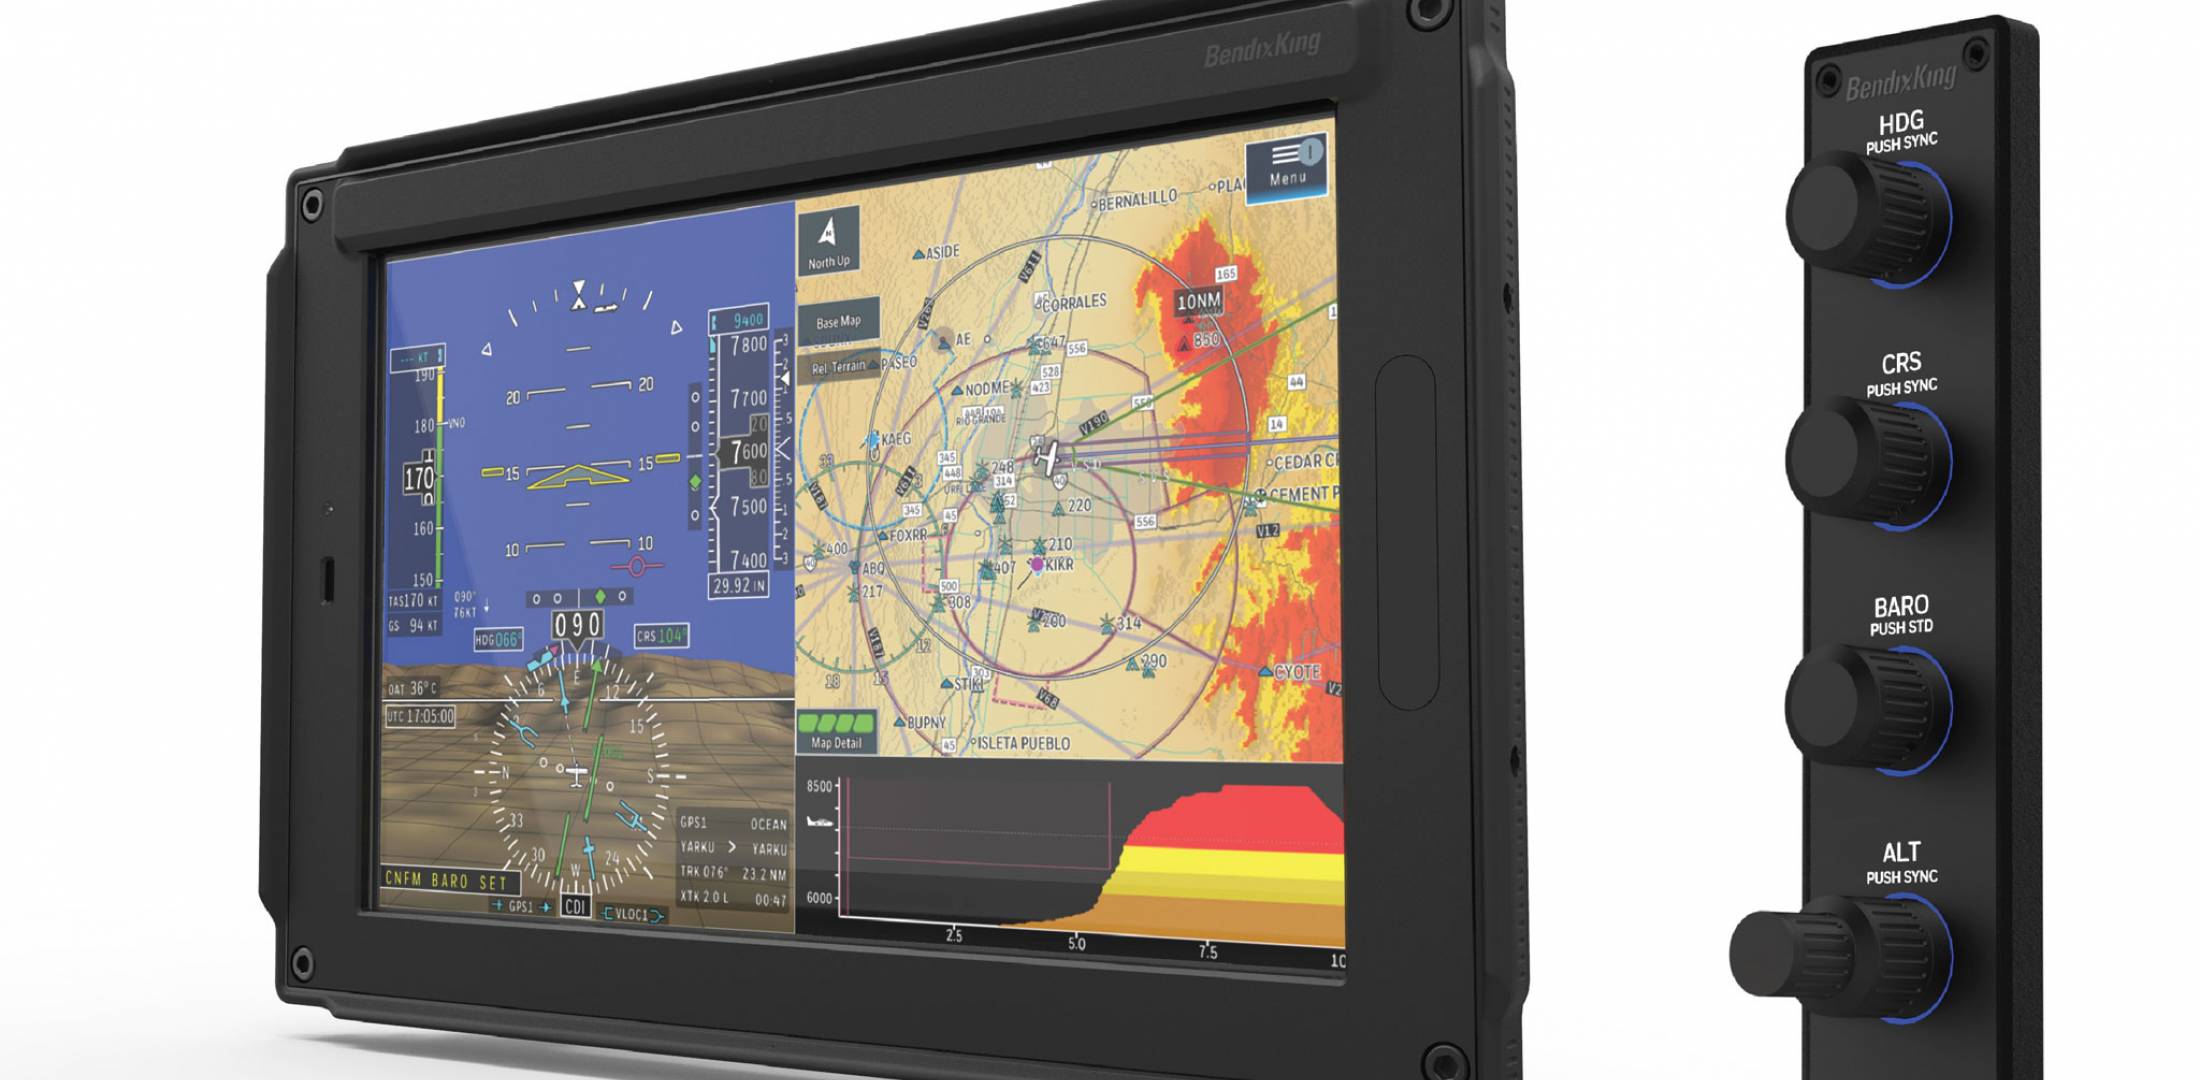
Now, I have not used the BendixKing AeroVue Touch or the xVue Touch, only read about them.  But, what I’ve read sounds pretty cool.  The display has really good resolution (BendixKing brags it is the highest screen resolution available), synthetic vision that comes standard (Garmin & Aspen charge extra for synthetic vision), plus VFR Sectional Charts & IFR High and Low Enroute charts, making paper charts even more obsolete.

The display is 10.1 inches and can be easily swapped between a full screen instrument mode or a split screen setup as seen above.  Apparently, BendixKing has 3-D moving maps available on the AeroVue Touch too, which is standard.

The one thing Garmin has on the BendixKing AeroVue Touch right now is engine information.  The G500TXi has a full complement of engine gauges available; the AeroVue Touch doesn’t, yet.  BendixKing says it’s in the works, as well as radio information and autopilot control.  I’m assuming the future autopilot control software would mean you could remotely mount an autopilot controller and input all functions from the AeroVue Touch display.  The nice thing about these future upgrades is all the software updates are free through BendixKing.

The sticker price for the forthcoming unit is going to be about $12,600.  Garmin’s 10.5 inch G500 TXi is $16,000, while Aspen doesn’t offer anything quite that big.

BendixKing KSN 770
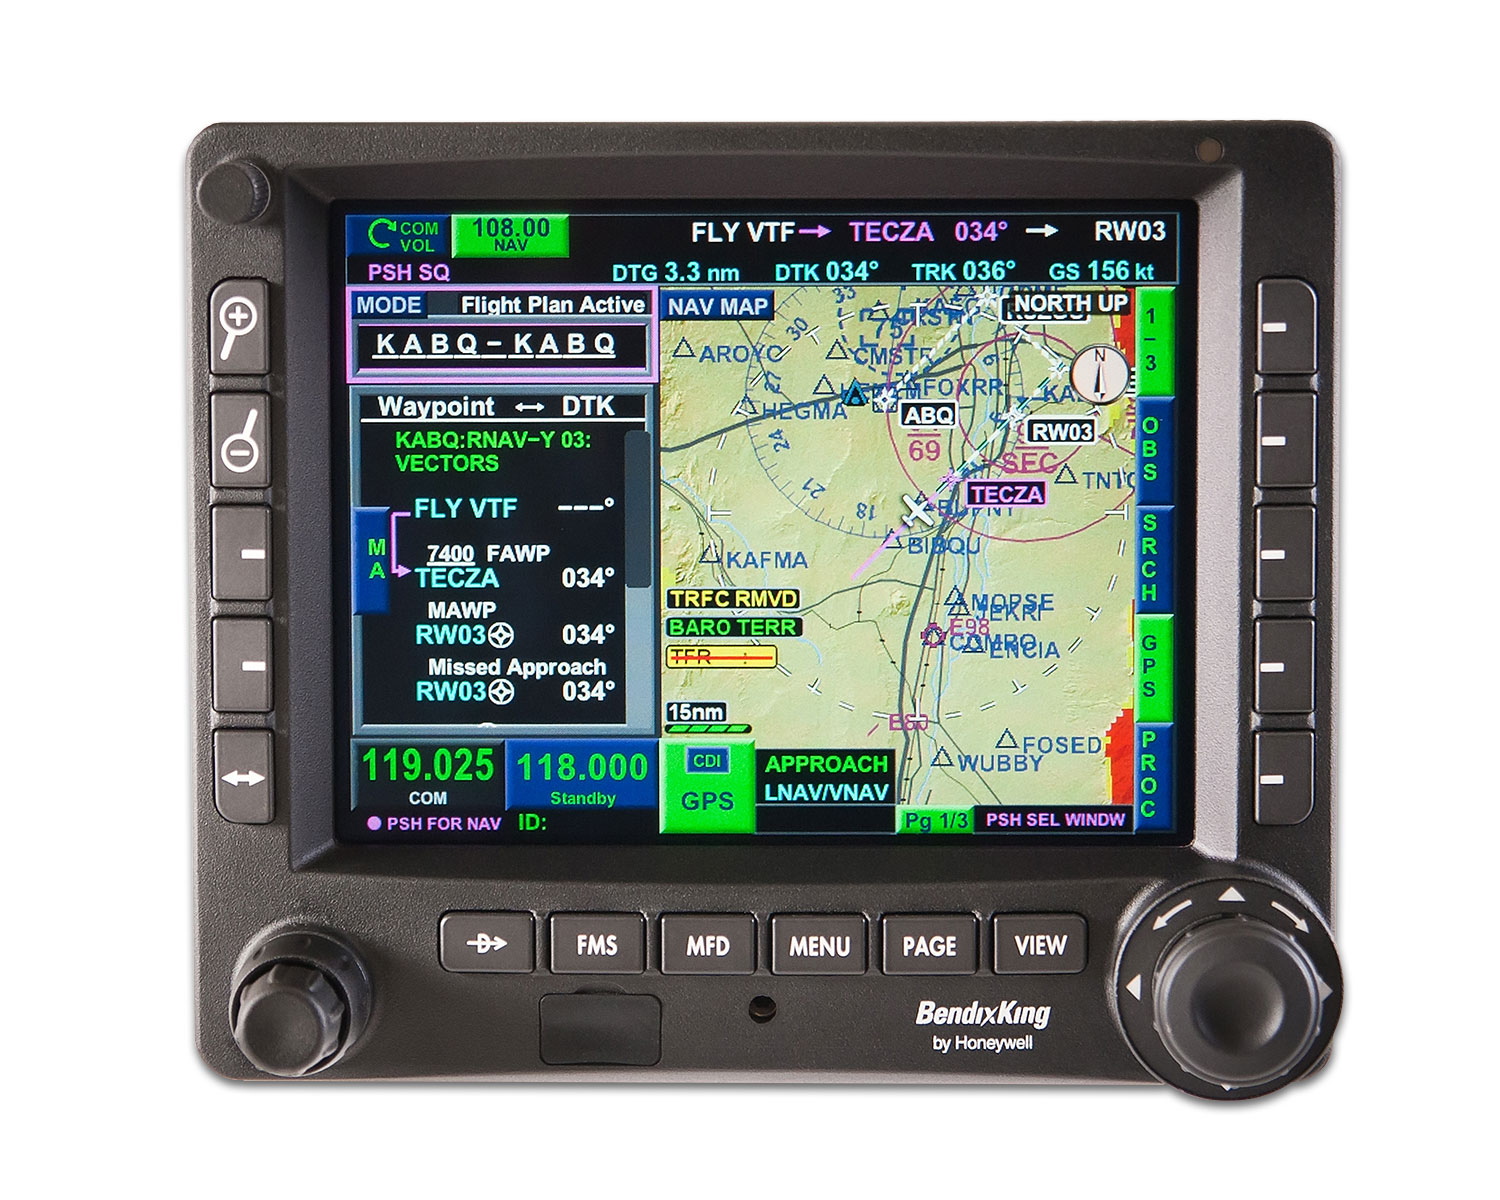
I’ve been keeping my eye on the BendixKing KSN 770 Touchscreen WAAS GPS for a few years now.  It never really has caught on quite like the Garmin GTN 750 or the Avidyne IFD 540.  BendixKing took the same route that Avidyne did in creating a hybrid touch GPS (or mini-MFD if you want to look at it that way) where a pilot can perform functions either using the touch screen or utilizing soft keys on the edges.  I like the hybrid touch approach as I have been bounced around in turbulence while trying to tap something into a Garmin GTN 750 and it can prove difficult.

Similar to the AeroVue Touch, BendixKing utilized split screen technology in the KSN 770.  It’s a full WAAS unit that is already certified.  It’s sticker price is $14,200, compared to the Garmin GTN 750 at $17,200 and the Avidyne IFD 540 at $15,000.

Other BendixKing Gadgets

Here are some other BendixKing Gadgets both available now and in the works:

Similar Posts

  • Garmin G1000 Updates

    You have just received the keys of your shiny new (to you) airplane complete with a beautiful Garmin G1000 glass panel flight deck. Synthetic Vision, WAAS, and ADS-B are all installed. You are ready to cruise in high technology.

    You turn on the PFD and MFD and notice one problem. All your databases are expired. No big deal, right? Your Garmin 530W was easy as pie to update with it’s single data card.

    You start looking around and can’t find the data card. Then you notice that there are several SD cards in slots on the panels. SD cards won’t fit in your Blue Jepp Skybound card reader. Confusion sets in which quickly leads to full on panic.

    What have you gotten yourself into?!

    No need to fear, Texas Top Aviation is here to help with your Garmin G1000 database update confusion (and hopefully not panic).

    Database Update Providers

    First, you have to choose who to get your Garmin G1000 updates from. You have two options. One is Garmin (fly.garmin.com; always use either Firefox or Chrome to update, don’t use Safari). The other is Jeppesen.

    Honestly, there is no difference between the data that each provides. If you had a 530 or 430 before, you used Jepp already. Just keep the Jepp account, call them, and have them get you set up for your Garmin G1000 updates.

    If you didn’t have a Jepp account before, I would use Garmin, for a couple of reasons. You get multiple downloads in case you mess something up (Jepp NavData gives 1 download per month, while Safe Taxi, etc. you get 2-3). On Jepp, you have to call in and have them reset the account, which can be a pain if it’s after hours or a Saturday or Sunday.

    The other problem with Jepp is since Boeing bought Jeppesen, I have found it extremely difficult to find online where to set up a new account and purchase databases. Yes, you can always call, but, again, problematic after hours or on a weekend.

    The only problem with Fly Garmin for your Garmin G1000 updates is Garmin is constantly updating their program. You have to update their downloader quite often, which can be a bit frustrating.

    I’m going to use Fly Garmin as my example.

    What to Buy

    Garmin gives you a couple of different bundle options for your Garmin G1000 updates, the OnePak and the PilotPak. The main difference between the two is the PilotPak includes approach charts that display on your PFD and the OnePak doesn’t. Therefore, the OnePak is about $200 cheaper.

    Both include Navigation Data, SafeTaxi, Obstacles, Airport Directory, Terrain, and the BaseMap.

    How to Update

    Once you have followed all the instructions on Garmin’s website (or gotten Jeppesen set up), here is what to put on which SD card.

    NOTE: YOU WILL NEED TO PURCHASE ONE OR TWO BLANK SD CARDS FOR THE NAVIGATION DATABASES. DO NOT PUT THE NAVIGATION DATA ON THE SD CARD THAT IS ALREADY IN THE TOP SLOT ON THE MFD. THAT IS FOR ENGINE DATA LOGGING ONLY. NO NAVIGATION DATA SHOULD EVER BE PUT THAT ON THAT CARD.

    Bottom Card, PFD

    • SafeTaxi
    • Obstacles

    Bottom Card, MFD

    • SafeTaxi
    • Obstacles
    • Airport Directory
    • Flite Charts

    Top Card, PFD & MFD (This is the new blank SD card(s) you bought)

    NOTE: REMOVE THE TOP SD CARD IN THE MFD THAT IS ALREADY IN THE SLOT AND DON’T PUT ANY DATABASE INFORMATION ON IT.

    • Navigation Data

    Garmin G1000 NXi Users (or Cirrus Perspective + Users)

    Ignore everything above and put all databases on the bottom card of the MFD. You have database sync, so you don’t have to mess with multiple cards. When you do an update though, go to the AUX chapter on the MFD and scroll down to the Databases page. Ensure that all dates match what you just put on the SD Card.


    For you Jeppesen users, check out the new Bad Elf Wombat updater that works with the iPad JDM app for updates.

  • Synthetic Vision Technology

    Let’s say you’re flying in the mountains of Colorado on a cloudy day.  There’s a solid layer from the surface all the way up to 14,000 feet.  You’re inbound to Eagle (KEGE) on the RNAV (GPS) D approach.  There are mountains next to you and below you, but you aren’t concerned since you can see them all.  The base of the last reported overcast layer was 3,000 feet, so you know you’ll break out before the MDA and land no problem.

    At 11,100 over AWACC, you clearly see the top of the mountain below you.  You are comfortably above it. You already have the runway in sight as well.  You pop out of the clouds on the approach at 9,700 feet, spot the airport and follow the tower’s instructions to circle north of the runway for a left base for runway 7.

    How could you see the mountains inside the clouds?  You have Synthetic Vision installed on your glass panel, that’s how.

    Aspen Synthetic Vision
    Aspen Synthetic Vision

    Synthetic Vision, which has actually been around since the ’70s when NASA and the US Military first developed it, was first FAA certified for the Gulfstream PlaneView flight deck in 2009.  Garmin, Avidyne, and Aspen are the main general aviation manufacturers of synthetic vision these days.  All Garmin PFDs are now equipped with Synthetic Vision while Aspen gives you the option to upgrade to Synthetic Vision when you get one of their PFDs installed.  Avidyne gives you Synthetic Vision in their R9 upgrade for the Cirrus.

    What is Synthetic Vision?  Basically, it’s a 3-D picture on the primary flight display showing terrain, obstacles, traffic, and runways.  It greatly enhances situation awareness in areas of terrain or high obstacles during IFR conditions or at night.

    The goal behind the development of Synthetic Vision was to decrease the amount of controlled flight into terrain (CFIT) accidents.  A CFIT accident consists of a perfectly airworthy airplane flown by a pilot (or autopilot) unintentionally into terrain. These accidents can happen in low visibility conditions or at night, but the reason is mainly due to the pilot losing track of his position in relation to obstacles or terrain (or water as was the case with JFK Jr.).

    With Synthetic Vision, the goal is to enhance pilot knowledge of what is around the airplane at all times. When you’re at altitude, the terrain below you looks flat.  When you start descending down amongst the rocks, the hills or mountains start to rise up on your screen.  For those used to the coloration with the 2-D terrain feature on a GPS unit, it translates very easily to the terrain coloration on a Synthetic Vision equipped PFD. Terrain that is between 100 and 500 feet below the aircraft is shown as yellow, while terrain closer than 100 feet is depicted as red.

    Garmin Synthetic Vision
    Garmin Synthetic Vision


    One neat feature on Garmin units is the Highway in the Sky.  When a pilot puts a course or a flight plan in the GPS, the PFD displays magenta boxes at the altitude selected displaying the route.  It’s handy when hand flying to just “fly through the boxes.”  They also display descent angles on approaches.

    Synthetic Vision is still optional on Garmin and Aspen units, but I highly recommend springing for it.  It will give you a higher level of safety and keep you out of the rocks.

  • Redbird Skyport Bluebonnet Fly-In at KHYI

    Bluebonnet Fly In

    Come out to Redbird Skyport at the San Marcos Municipal Airport on Saturday, May 30th for the Bluebonnet Fly-In.  Hank Gibson from Texas Top Aviation will be giving a safety presentation at 2pm in the large conference room entitled “Is The Approach Activate?  Flying Garmin Approaches.”

    Join Texas Top Aviation and Redbird Skyport as we open the summer together at the Bluebonnet Fly-In.

    To Register for the Safety Seminar, please click here.

  • Using the ICARUS Device to Simulate IFR Conditions

    Most of us who have been through instrument training are familiar with the traditional view limiting devices. There is the original hood, which does a decent job of blocking a pilot’s view of outside, but there are still gaps that allow “peeking”, though that peeking doesn’t really help a pilot fly an approach. It does help them figure out which way is up, so it’s not a true simulation.

    The other problem with a hood is the process of putting it on to begin simulating IFR conditions, then taking it off when it’s time to land. This process takes time and the instructor has to take the controls (or the autopilot flies), losing some of the realism of the simulation.

    Overall, an IFR hood is relatively comfortable. The elastic band sits under your headset, doesn’t squeeze your heard, and doesn’t press underneath your ear cups of the headset, giving you a headache. Hoods are large and somewhat unwieldy.

    Foggles are another way to simulate IFR conditions for training. Most of the time, these are safety glasses that have most of the lens blacked out or fogged out, leaving little slits at the bottom for the pilot’s eyes to see the instruments.

    Foggles aren’t quite as good as an IFR hood at blocking the outside. Due to their shape, there are often cracks that allow more “peeking” then a hood. The process of beginning to simulate IFR conditions and ending the simulated IFR conditions is easier though, since all the pilot has to do is put the foggles on or slip them off, which can often be done one handed (putting them on can be more difficult one handed since they have to fit underneath your headset). Wearing them for a long period of time can get painful as your headset is probably going to start crushing them against the side of your head.

    The best comfort and view limiting combination I have found, so far, is called the ViBAN. It’s very comfortable and does a really good job of simulating IFR by blocking a view of the outside.

    What’s the whole goal behind a view limiting device? When a pilot starts instrument training, ideally, all the training would take place in the clouds, since that is why someone get’s an instrument rating. As we all know, this isn’t possible, hence the need to simulate IFR conditions. The problem with simulating IFR is, it’s not true IFR. True IFR conditions are different then what a hood or a set of foggles can simulate. This can lead to spatial disorientation if a fresh instrument pilot enters the clouds for the first time, having done all his training in simulated conditions.

    I’ve even heard a story of a pilot who did all his IFR training with a hood, passed his check ride, went into the clouds the first time, and put the hood on because he was getting disoriented since he hadn’t ever experienced true IFR.

    What about full motion simulators? How I wish every airport had a full motion simulator for instrument training. Full motion sims are truly the best way to simulate IFR conditions. A pilot can easily get spatially disoriented in a sim if he or she isn’t careful. It’s a great way to simulate IFR conditions, but, alas, this just isn’t possible.

    Are we doomed to just do an okay job of training instrument pilots in simulated IFR conditions with a hood or foggles?

    Nope, at least not anymore.

    Enter the ICARUS Device. The ICARUS Device, which stands for Instrument Conditions Awareness Recognition and Understanding System, is an amazing piece of equipment which truly simulates IFR conditions in the training environment. The ICARUS is a plastic shield that uses a Polymer Dispersed Liquid Crystal film that allows the degradation of a pilot’s visibility. It clips on to a baseball cap and is attached to a battery. That battery is then bluetoothed to an iPad or iPhone App that allows the instructor to put the pilot into and take him out of simulated IFR conditions.

    Originally designed for helicopter training, it’s an excellent tool for fixed wing IFR training too. I’ve been using it for the last month and a half and I am hooked. The customer’s that I have used it with truly say that they cannot see a thing outside. Because the plastic shield turns white, it really does give the view that the pilot is in the clouds. The inner ear certainly believes it. The curve of it fits the glare shield in most planes nicely (there is some custom cutting that would have to take place for specifically rounded glare shields, but it fits Cirrus and Piper Saratogas nicely, the two planes I have used it in), and it sits away from the pilot’s face, blocking out all windows, which is what clouds do.

    The greatest thing from an instructor’s standpoint is the ICARUS Device app. The pilot puts the device on before taxi and I set the app to VMC. This completely clears the ICARUS Device so the pilot can see just fine for taxi and takeoff. Then, at about 400 AGL, I tap the <1/2 VIS button on the app, and boom, the pilot is in the clouds. I even have a time delay to slowly make the ICARUS Device opaque to simulate slowly entering the clouds. I do the same thing on an approach, except in the reverse order, simulating we are slowly exiting the clouds.

    The ICARUS Device is a game changer for IFR training. It’s comfortable, easy to use, the battery lasts for a long time (though bring a standard USB charging cord with you in the plane because the battery failure mode makes the ICARUS Device opaque instead of transparent. You don’t want that to happen at 200 AGL!), and, most important, it truly simulates IFR conditions.

    After using it, I believe all flight schools and CFII should get one of these, both in the fixed wing and helicopter world. It’s the best option for simulating IFR conditions.

    Checkout the ICARUS Device website for more information and to hear the story of the company.


    Texas Top Aviation, LLC was given an ICARUS Device by the ICARUS Device company to test. Texas Top Aviation, LLC was not paid for our above opinion on the ICARUS Device (trust me, if it was terrible, I would have told you!).

  • Hurricane Harvey

    Texas Top Aviation wants to express our heartfelt concerns and prayers for those affected by Hurricane Harvey along the Texas Gulf Coast and in Houston.  We have several customers in Houston and hope and pray that they are all safe.

    The Houston Hobby Airport after Hurricane Harvey’s Torrential downpour

    If you would like to donate to the relief effort, there are several organizations that are accepting support.  A few are below.

    Samaritan’s Purse

    American Red Cross

  • A Takeoff Briefing

    Takeoff briefings are one of those things that most pilots are taught when they first learn how to fly, but once they get into flying themselves around, quickly fall by the wayside.  There is a reason student pilots are instructed to perform a takeoff briefing before departure.  It gets them thinking about what the plan is after they get off the ground and what to do if something goes wrong.

    Takeoff Briefing

    Takeoff briefings are a good habit to get into.  Airline crews do a takeoff briefing before every departure, even though they have performed a takeoff in that particular airplane thousands of times.  It enhances safety and provides repetition, keeping that knowledge at the forefront of the crew’s minds.

    In general aviation, a takeoff briefing should cover what the takeoff procedure is, what the abort plan is, and what the plan after takeoff is.

    Takeoff Procedure

    Most pilots fly the same airplane all the time, so the familiarity with what goes into a takeoff is there.  But, habits should be formed to brief the takeoff procedure as part of the takeoff briefing.  It doesn’t need to be extensive, just covering the basics of how the airplane is getting off the ground.  Something like this:

    • Throttle setting (if turbo charged, will full throttle cause an overboost?)
    • Rotate speed
    • Expected takeoff roll

    That’s it.  Nothing fancy for the takeoff procedure.

    Abort Plan

    What is the plan if something goes wrong?  It doesn’t have to be an engine failure, maybe the engine coughs when full power is added or maybe the engine doesn’t produce peak RPM.  Maybe the takeoff roll is longer than anticipated and something doesn’t seem right.  Maybe on climb out a door pops open.  Maybe the engine fails at 1,000 feet.  It’s good to keep the plan in the foreground for what to do if an abnormal or emergency situation takes place.

    • Brief the aborted takeoff procedure
      • Pick an abort point on the runway based on the expected ground roll
      • What is the procedure if the airplane isn’t off the ground by then?
      • What is the procedure if the engine quits on the runway?
    • Brief the engine failure procedure at low altitude
      • If the engine fails over the runway, will you try to land on the runway?
      • What altitude would you elect to turn back as opposed to landing straight ahead?
      • If the plane is too low to turn back, would you land straight ahead or aim left or right?
      • What airspeed will you aim to hold if the engine fails?
    • In a Cirrus, what is your minimum parachute deployment altitude?

    After Takeoff Plan

    After the airplane is off the ground, what’s the plan then?  Are you staying in the pattern or departing the area?  Do you need to adjust your power at a certain altitude?  What altitude are you climbing to?  What heading are you going to fly?  Is your flight plan in your GPS?  This is an excellent time to set up altitude and heading bugs if your airplane is so equipped.

    Get in the habit of doing a takeoff briefing before you call the tower or announce your departure.  It get’s your mind focused on the task at hand and then what is going to be happening next.

One Comment

  1. Delivery and price…They could easily get back in the game with delivery on time and aggressive pricing. BK just doesn’t seem to be a priority to Honewell….

Leave a Reply

Your email address will not be published. Required fields are marked *