Cessna TTx Production Ceases

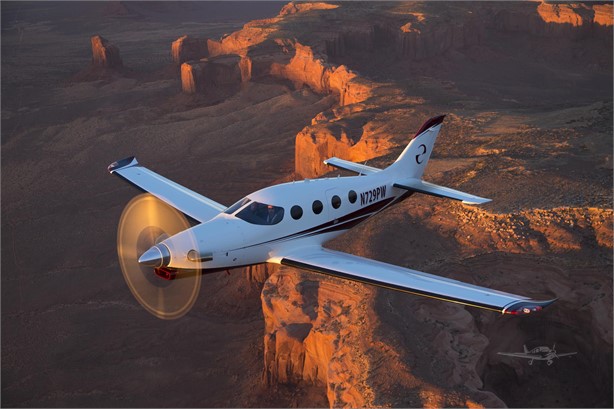
Sadly, in January, a pretty great airplane was put out to pasture.  Textron (the conglomerate that now owns Cessna, Beechcraft, Hawker, and Lycoming) announced it was ceasing production of the Cessna TTx.  With the end of the Cessna TTx production, an airplane that was the main “competitor” to Cirrus (if you can call it competition; Cirrus consistently outsold the Cessna TTx by a wide margin each year), it leaves the SR series to stand alone atop the High Performance piston single market.

I got to go through Cessna’s FITS Accepted Instructor (CFAI) course back in 2012 and have flown in the Cessna 350 and 400 (which is what they were known as at the time; the Cessna TTx name came around in 2011) for about 120 hours.  I really like the airplanes.  I’m partial to the Cirrus, but the Cessna 350 & 400 are fast airplanes and great for 1-2 people.  I flew a 350 (the non-turbo charged version) from New York to San Antonio last fall and routinely saw 170 knots at 12 GPH.

Columbia started out making the 350 & 400 (the turbo-charged version) in the early 2000s, but went bankrupt in 2007.  Lancair started Columbia to make a certified version of their popular kit planes.  If you see a Lancair ES floating around, you would swear it’s a Columbia with only 1 door.  Cessna bought the design from Columbia in 2007 to begin manufacturing the airplanes themselves.

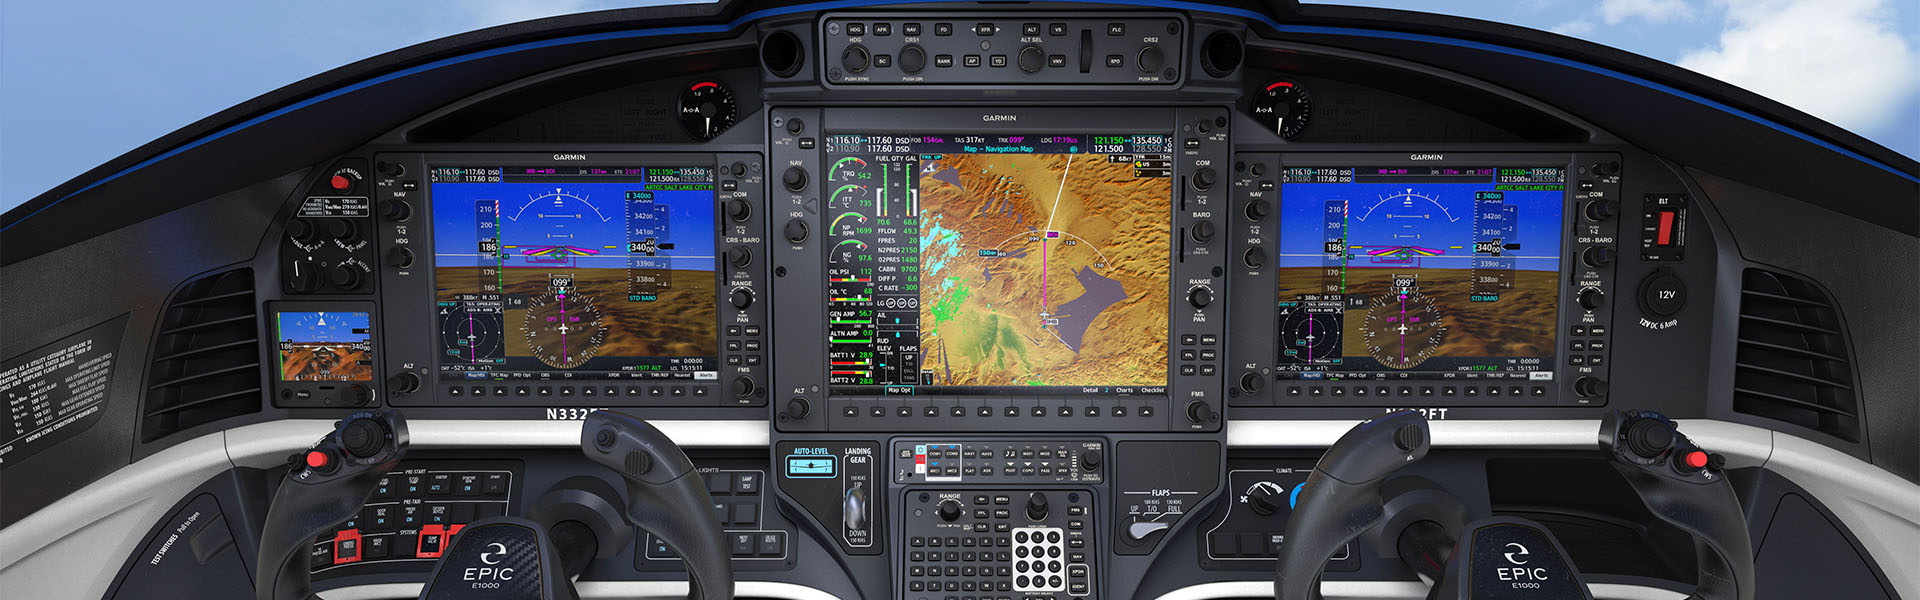
Cessna then made a huge mistake as they moved the production facility from Bend, Oregon to Mexico. Production completely halted in 2009 as the planes coming out of Mexico were found to have defective composite work.  The sales never really recovered, even though Cessna put the Garmin G2000 panel in the Cessna TTx, complete with a touchscreen key pad.  A FIKI system was added as an option in 2012.

A prospective buyer can still get a great value on a used 350, 400, or TTx, as they are valued a little lower than a Cirrus.  The 350, 400 or TTx all make excellent single pilot or two person speedsters with very comfortable amenities.

Information for this article was taken from Flying Magazine’s website.

Similar Posts

  • Rudder Use

    I have the blessing (same say it’s a curse) of being a tailwheel pilot. I did my tailwheel training in a Citabria and have gathered about 400 hours over the years in Citabrias, Super Cubs, and Maules (don’t judge all tailwheel airplanes by a Maule, by the way. The Maule is it’s own unique animal). The blessing of being a tailwheel pilot is that it greatly enhances my stick and rudder skills for all airplanes.

    No matter what airplane you fly, basic stick and rudder skills are always important. At some point during a flight, the rudder will need to be used, even if you have an airplane that has a yaw damper. Rudder use is vitally important in the takeoff and landing phase, especially if you fly an airplane that generates a lot of torque on the takeoff roll. Rudder in that phase of flight is pretty evident, because if the rudder isn’t used, you’ll go off the left side of the runway.

    Where I want to focus is rudder use in the landing phase. As an airplane comes down final, there are several forces that are be acting on the airplane. When it’s bumpy, updrafts and downdrafts are moving the plane up and down and all around. To correct for a bump that sends the airplane into a roll, aileron is added in the opposite direction of the roll. That aileron input also induces adverse yaw, pulling the nose of the airplane in the opposite direction that the pilot is moving the ailerons.

    If a pilot isn’t using his feet correctly, then the nose of the airplane will wallow around through the air as aileron inputs are used. The tail is also moving around quite a bit, so the pilot might not “feel” the yawing moment, but the passengers in the back seat certainly will.

    The other advantage that comes with proper rudder usage on short final is the airplane is more responsive to control inputs. When utilizing both the ailerons and the rudder, a pilot is able to fly the airplane much more precisely and control it much better.

    This doesn’t mean you have to be staring at the turn coordinator the whole time down final. In fact, that’s exactly what you don’t want to do. Your eyes need to be outside the airplane. Just get in the habit of stepping on the rudder whenever you move the ailerons on final and eventually, you will feel what your airplane is doing. Don’t step on the rudder as hard as you can, but slight pedal pressure in the direction of aileron input will make a big difference.

    Rudder is also vitally important for landing in a crosswind no matter that airplane. Crosswind landings are a learned skill that take a lot of practice to perfect. There is also a lot of confusion as to what control input does what during the landing.

    Here is the simplest way to picture a crosswind landing and what the controls do:

    • Aileron-When performing a crosswind landing, the ailerons keep the airplane over the centerline. If the airplane is drifting to the right of the centerline, add left aileron to bring it back to centerline, then keep enough aileron control pressure in to keep the airplane over centerline. In a perfect crosswind landing, the main tire on the windward side will touch down first. Left crosswind means left tire touching first.
    • Rudder-When performing a crosswind landing, the job of the rudder is to straighten the nose to point down the runway. You will not be coordinated in a crosswind landing, you will be slipping, which is the goal. So, with a left crosswind, you will be inputting left aileron to remain over the centerline and you will also need right rudder to straighten the nose. This also prevents the airplane from actually rolling in the direction of the aileron input.

    If you remember for a crosswind landing: “Aileron into the wind to stay over centerline, opposite rudder to straighten the nose.” Too much aileron and the plane will drift into the wind. Too much rudder and the nose will yaw in the opposite direction.

    Rudder is very important, even in our day and age where a lot of general aviation airplanes have yaw dampers. Our feet only have a job for a short period of time, but that is the most critical time. An excellent way to get more proficient in rudder use is to go get a tailwheel endorsement. If you are in the central Texas area, check out TacAreo in Fredericksburg, T82.

    Don’t let your feet fall asleep!

  • Garmin G1000 Updates

    You have just received the keys of your shiny new (to you) airplane complete with a beautiful Garmin G1000 glass panel flight deck. Synthetic Vision, WAAS, and ADS-B are all installed. You are ready to cruise in high technology.

    You turn on the PFD and MFD and notice one problem. All your databases are expired. No big deal, right? Your Garmin 530W was easy as pie to update with it’s single data card.

    You start looking around and can’t find the data card. Then you notice that there are several SD cards in slots on the panels. SD cards won’t fit in your Blue Jepp Skybound card reader. Confusion sets in which quickly leads to full on panic.

    What have you gotten yourself into?!

    No need to fear, Texas Top Aviation is here to help with your Garmin G1000 database update confusion (and hopefully not panic).

    Database Update Providers

    First, you have to choose who to get your Garmin G1000 updates from. You have two options. One is Garmin (fly.garmin.com; always use either Firefox or Chrome to update, don’t use Safari). The other is Jeppesen.

    Honestly, there is no difference between the data that each provides. If you had a 530 or 430 before, you used Jepp already. Just keep the Jepp account, call them, and have them get you set up for your Garmin G1000 updates.

    If you didn’t have a Jepp account before, I would use Garmin, for a couple of reasons. You get multiple downloads in case you mess something up (Jepp NavData gives 1 download per month, while Safe Taxi, etc. you get 2-3). On Jepp, you have to call in and have them reset the account, which can be a pain if it’s after hours or a Saturday or Sunday.

    The other problem with Jepp is since Boeing bought Jeppesen, I have found it extremely difficult to find online where to set up a new account and purchase databases. Yes, you can always call, but, again, problematic after hours or on a weekend.

    The only problem with Fly Garmin for your Garmin G1000 updates is Garmin is constantly updating their program. You have to update their downloader quite often, which can be a bit frustrating.

    I’m going to use Fly Garmin as my example.

    What to Buy

    Garmin gives you a couple of different bundle options for your Garmin G1000 updates, the OnePak and the PilotPak. The main difference between the two is the PilotPak includes approach charts that display on your PFD and the OnePak doesn’t. Therefore, the OnePak is about $200 cheaper.

    Both include Navigation Data, SafeTaxi, Obstacles, Airport Directory, Terrain, and the BaseMap.

    How to Update

    Once you have followed all the instructions on Garmin’s website (or gotten Jeppesen set up), here is what to put on which SD card.

    NOTE: YOU WILL NEED TO PURCHASE ONE OR TWO BLANK SD CARDS FOR THE NAVIGATION DATABASES. DO NOT PUT THE NAVIGATION DATA ON THE SD CARD THAT IS ALREADY IN THE TOP SLOT ON THE MFD. THAT IS FOR ENGINE DATA LOGGING ONLY. NO NAVIGATION DATA SHOULD EVER BE PUT THAT ON THAT CARD.

    Bottom Card, PFD

    • SafeTaxi
    • Obstacles

    Bottom Card, MFD

    • SafeTaxi
    • Obstacles
    • Airport Directory
    • Flite Charts

    Top Card, PFD & MFD (This is the new blank SD card(s) you bought)

    NOTE: REMOVE THE TOP SD CARD IN THE MFD THAT IS ALREADY IN THE SLOT AND DON’T PUT ANY DATABASE INFORMATION ON IT.

    • Navigation Data

    Garmin G1000 NXi Users (or Cirrus Perspective + Users)

    Ignore everything above and put all databases on the bottom card of the MFD. You have database sync, so you don’t have to mess with multiple cards. When you do an update though, go to the AUX chapter on the MFD and scroll down to the Databases page. Ensure that all dates match what you just put on the SD Card.


    For you Jeppesen users, check out the new Bad Elf Wombat updater that works with the iPad JDM app for updates.

  • Piper PA46 Maintenance Shops

    Sometimes, it’s hard to find a good shop that does quality work and communicates well without charging a fortune. Luckily for the PA46 owner, there are lots of good options. Here are the Texas Top Aviation recommended Piper PA46 maintenance shops.

    Lubbock Aero (KLBB)/Abilene Aero (KABI)-Texas

    Lubbock Aero and Abilene Aero are owned by the same company. Both are Piper service centers. I have had some Piper PA46 maintenance interactions with Chad at Lubbock Aero over the last year and have been impressed.

    The folks at Lubbock Aero are friendly, knowledgeable, and keep the customer abreast of what’s going on with their airplane. I haven’t been to Abilene Aero, but I suspect that the same quality of service exists there as well.

    Chuck’s Aircraft (KEDC)-Austin, TX

    Chuck’s Aircraft has been a Cirrus Service Center for a number of years. Recently, Chuck’s put several mechanics through Kevin Mead’s M-Class which educates mechanics on the ins and outs of Piper PA46 maintenance. Chuck’s is a great, convenient spot to get your PA46 worked on.

    First Line Aero (KJSO)-Jacksonville, TX

    Located on the same airport as Casey Aviation, First Line Aero specializes in Piper PA46 maintenance. Walking up to their hangar, it’s loaded with Malibus, Mirages, JetProps, and Meridians. Charles Crossman, the owner, has been turning wrenches for a lot of years. Anyone recommended by Joe Casey has a stamp of approval in my book.

    Midwest Malibu (KHUT)-Hutchinson, KS

    One of 2 nationally renowned PA46 shops, owners bring their PA46s from all over the country to Midwest Malibu. Owner Tony Beauchamp has personally assisted multiple of my customers when they have gotten in AOG situations with their PA46s.

    Des Moines Flying Service (KDSM)-Des Moines, IA

    I have not had any direct interaction with Des Moines Flying Service, but I have several customers who have. The reviews have all indicated knowledgeable mechanics, good work, and good communication.

    Malibu Aerospace (KANE)-Blaine, MN

    Malibu Aerospace (the second nationally renowned Piper PA46 maintenance shop) has done many great things for the PA46 line of aircraft. From the M1 Cooling Mod that alters the lower cowl and add baffles for cooling air getting to where it needs to go, to the M5 TSIO 550C upgrade for the original PA46-310P, the Malibu Aerospace guys know what they are doing with the PA46.

    Hetrick Aviation (KTOP)-Topeka, KS

    I recently learned about Hetrick Aviation in Topeka. I met a customer there to pick up his plane where it was having a pre-buy and annual done. Keith Hetrick, the owner, has worked on a lot of PA46 airplanes and was very knowledgeable in my discussions with him. He is also a pilot, so he flies each airplane after maintenance is done to make sure no bugs are present when an owner picks it up.


    Those are the Texas Top Aviation recommended PA46 shops. Have another one to add? Post in the comments below and we’ll get it added to the list.

  • Jeppesen vs. Aeroservices Charts

    Many people ask, which set of charts is better? Should I use the FAA Aeroservices charts on Foreflight or pay extra for the Jeppesen charts? Since you have to pay for Jeppesen, they are probably better, right?

    I am not here to say which one is better as a chart preference is just that, a preference for one over the other or for certain features. After a while, muscle memory and routine take over and you probably wont even notice the difference.

    History

    In 1934, Elroy Jeppesen began making his own charts and sold them to other pilots. His little company grew into the giant Boeing chart company we know today. Jeppesen charts are used internationally and therefore include information that might otherwise seem common knowledge, like transition altitudes. The key is, you cannot get FAA Aeroservices charts for international destinations. Jeppesen is the only option for outside the US.

    National Aerospace Charting Office (NACO), or the new(er) name “Aeroservices” or FAA chart, whatever you decide to call them, are United States government issued charts. In addition to civilian use, Aeroservices charts are used by the military so there will be some terminology that does not apply to civilians. The best part about FAA Aeroservices charts are… they’re free!

    If you are in the middle of a transition or trying to decide which charts to use, you have come to the right place. Here are a few key differences.

    Obstacle Departure Procedure Chart
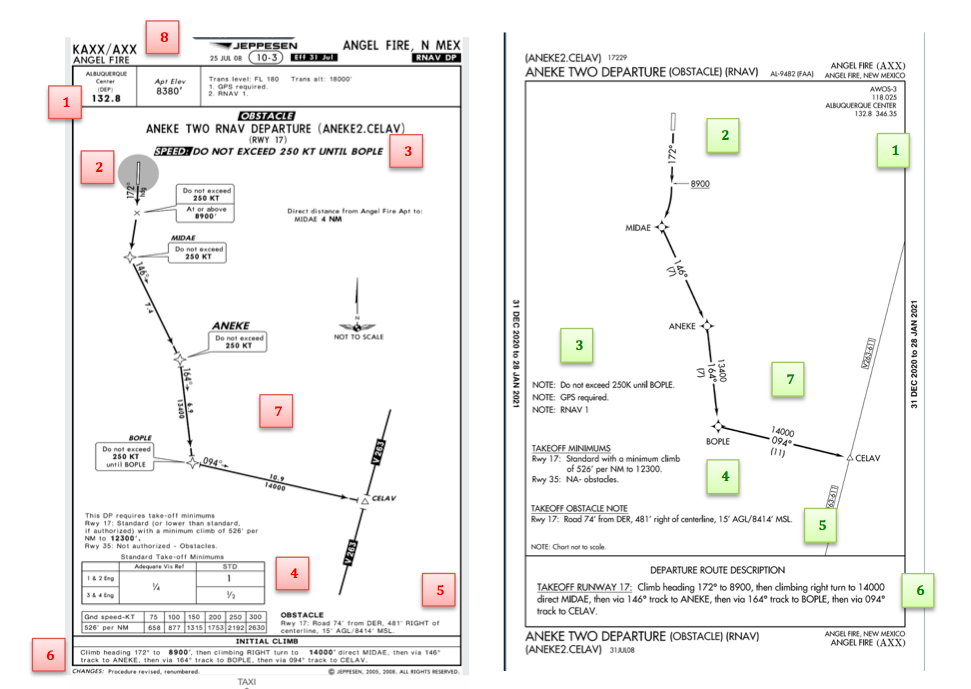
    KAXX (Angel Fire, New Mexico) ODP

    1. Frequencies: FAA Chart provides the AWOS so you have all departure frequencies in once place.
    2. Airport: Jeppesen highlight the airport, which is a nice feature so you can easily see the flow from the airport.
    3. Notes and Remarks: Jeppesen bolds the speed restriction all over the chart so you won’t miss it. All other requirements are in the top right corner. Note the transition altitude 18,000′. Since Jeppesen is used internationally, it is published on the chart since other countries have different transition altitudes. It takes up a chunk of chart real estate, but it’s clear, easy to read, and always in the same place. The FAA charts post all the requirements and restrictions as notes off to the side. Since it’s in the same space as the chart graphic, it’s easy for the eyes to catch while studying the plate.
    4. Take off Minimums: NOT APPLICABLE for PART 91 – however, it’s wise for all pilots to look and abide by them. Jeppesen displays the standard take off minimums table, as well as the rate of climb table, which is nice to have all in one place. The FAA chart gives the non standard information but you need to know/look up the rest in the Digital Terminal Procedures Supplemental document. (Hint: It’s in the Documents section of Foreflight)
    5. Take Off Obstacles: About the same on both charts
    6. Route Description: Similar on both charts, but larger font and clearer description on the FAA chart. When there are different routes from different runways, the FAA chart layout is really helpful.
    7. Graphic Layout: Jeppesen and FAA use the same graphics for all their different charts and plates which makes it easy to read once you are familiar with the respective charts. FAA charts are easy to read and distractions are kept to a minimum. Jeppesen charts make things bold and enlarge pertinent information so you won’t miss it.
    8. Airport altitude: This is only on the Jeppesen chart (the FAA chart doesn’t include it), but it is very helpful for situational awareness. As you brief the arrival altitudes, I think it’s important to have an idea what AGL you are at.

    Approach Charts

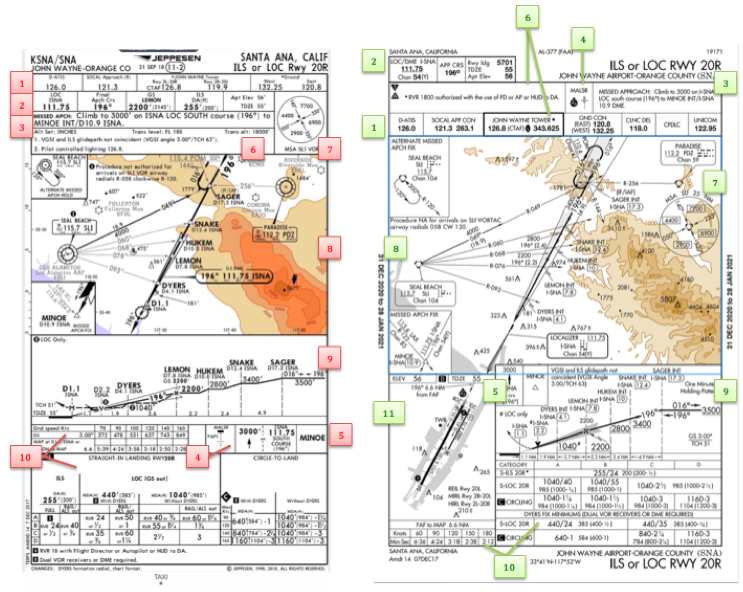
    One thing pilots love about Jeppesen approach charts is the clear set up for an approach brief. The top section is created as a “briefing strip” starting with the frequencies, then navigation frequencies, minimums, airport elevation and the missed approach. It’s very natural and user friendly.

    FAA charts have a slightly bigger picture of the approach planview, but the profile view and minimums section can get a bit cluttered. It can feel a little discontinuous when briefing the approach to bounce all over the page. However, some pilots really like the small airport diagram in the corner, which I find really helpful for situational awareness (particularly for students learning circle approaches). Non- standard alternate and takeoff minimums are also clearly noted, but unfortunately we must hunt elsewhere to find them. The Jeppesen alternate minimums and takeoff minimums will both be on the airport diagram

    1. Frequencies: Getting weather and tuning radios is easy on the Jeppesen charts – just follow the briefing strip. The frequency section on the FAA charts is still easy to read, but closer to the center of the page. It’s split up from the nav frequencies and other important briefing information.
      a. FAA charts are created by the government and have military specific information, which are the odd looking frequencies and channels on the chart.
    2. Approach Navigation: On a Jeppesen chart, you will continue to the next line to verify your frequency, course and set minimums (assuming you are straight in on the ILS). On the FAA chart, you will then have to skip to the top of the chart to get the frequency and course, and then scan to the bottom of the page to input your minimums. However, since you could be flying a localizer approach or a circle to land, it’s a good reminder that not everyone using this approach chart will be using the same Decision Altitude (DA). The FAA chart also includes runway distance information so pilots can make determinations of approach speeds and stopping distance if the runway is wet or icy.
    3. Missed Approach – Textual
    4. Approach Lighting
    5. Missed Approach- Graphical: The missed approach information is the same on both charts. The lighting information is key for determining a missed approach and is next to the missed approach text on the FAA chart. It’s found next to the missed approach graphic on the Jeppesen chart. Personally, I find it easier to find and read the lighting information on the Jeppesen chart. Remember, on both charts, the placement of the PAPI on the chart indicates the physical location of the lights (left or right of the runway).
    6. Notes: Both charts have a notes box, but they use them a little differently. Once again, remember that Jeppesen charts are used internationally and include the transition altitudes and altimeter setting info. On both charts, the notes section will be where other critical information will be shared which isn’t really applicable for this airport. On the FAA chart, the tower frequency is starred to note that there are operating hours (you’ll have to check the chart supplement AF/D to find out what those hours are). There is also an L next to the frequency to indicate it is the pilot controlled lighting frequency. You will also find the note about the VGSI and the Approach Glide path next to the profile view on the FAA chart, whereas the Jeppesen chart has that note in the notes section at the top. The FAA chart also has the T and an A in black triangles to note that this airport has non- standard alternate and take off minimums. Again, those are found in separate documents when using FAA charts and on the Airport Diagram when using Jeppesen charts.
    7. Minimum Sector Altitude: Similar on both charts, but in different locations (reminder: ATC vector altitudes may be lower. It is the pilot’s responsibility for safety of flight to maintain safe obstacle clearance, so if you are ever concerned about going below the MSA – just ask ATC).
    8. Planview: Other then differences in size, visuals, and text, the information displayed on both is very similar.
    9. Profile View: Again, the displays look different and pilots will have their preference, but the information is the same.
    10. Minimums: Jeppesen charts not only note the category for each approach with its designated letter, but also displays it in knots. It is recommended that if you increase your approach speed (based on flaps or gusty winds or perhaps a faster speed for a circle to land approach) that you should use the higher category minimums. The reference guide makes that easy to look up. The other benefit of the Jeppesen charts is right the table that contains the time from the final approach fix to the missed approach point for a localizer approach, it also shows the rate of descent with the associated ground speed to maintain a 3 degree glideslope. Now there is no excuse not to set pitch and power! The minimums posted in parenthesis are for the military, but RVR in statute miles is also included.
    11. Airport diagram: Only on the FAA charts, this particular feature is particularly useful for situational awareness. The arrow pointing to the runway shows the direction the approach is arriving from so planning a circle to land is a cinch. There is also a lot of other information that can be gathered from the airport diagram for quick reference or to help a disoriented pilot: lighting, displaced thresholds, closed taxiways, and runway placement and lengths. This is easily one of the best perks of an FAA chart.

    Arrival/ Departure Charts: Sewzy 5 Arrival KAUS

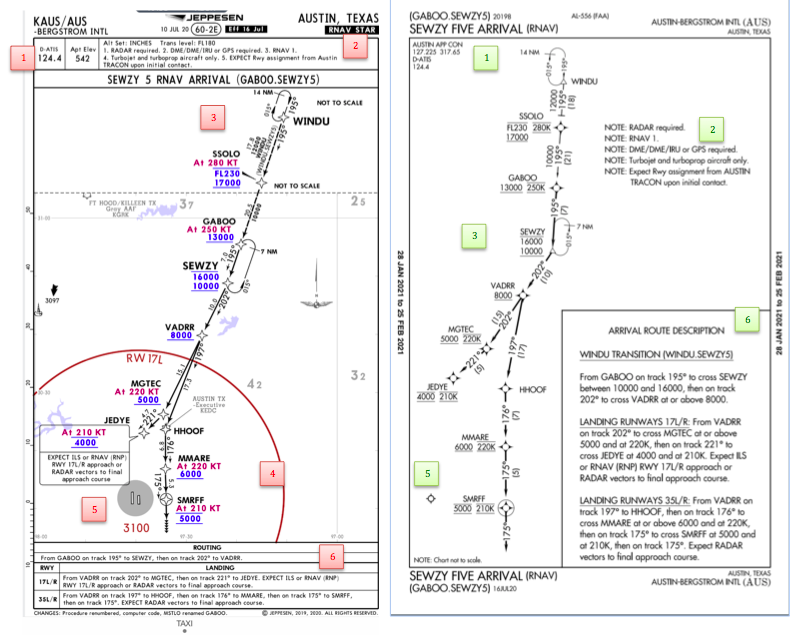
    The Jeppesen lay out is very attractive and draws the pilots eye in a clear way to all the important information. The colors pop out, so the required altitudes and speeds are easy to read and remember. The chart, which is the proper scale, shows MORAs , easy to find airports (and runway layouts) and is over all easy to follow. However, the texts, while very clearly laid out, are small and difficult to read and pushed to the very edges of the chart. FAA charts are simple and fairly easy to read, but the airports are not as obvious and the flow to the airport requires a good look. The table on the Jeppesen chart is a really nice format, but the text and Notes for arrivals on the FAA chart are easy to find and much easier to read quickly.

    1. Frequency: FAA charts include the approach frequency on the arrival, which is helpful for having radios tuned. During a busy time when the controller changes your frequency, all you have to do is verify the frequency you already set, rather then totally stop what you’re doing to switch it. The Jeppesen charts add the airport elevation next to the ATIS, which really aids situational awareness.
    2. Notes: Jeppesen notes are clearly numbered and tucked away nicely in a box, but the FAA chart notes pop out in the middle of the page and are easy to skim for pertinent information.
    3. Planview: I think Jeppesen is the clear winner here- it is so easy to read, it only takes one glance to know where the primary airport is and how the arrival flows. The chart being at the proper scale offers the pilot important geographical information and over all is a clean look. Notice the small series of arrows after SMRFF on the the Jeppesen chart; those indicate the pilot should expect radar vectors. The FAA charts include those instructions in the text, but I find the visual reference on the chart helpful. The FAA charts are equally clean, with altitude and speed restrictions easy to read even if they don’t jump out. When there are multiple airports that the arrival serves, the airports are clearly marked, though, I think it would be nice to have a little more information surrounding the primary airport for better situational awareness.
    4. MSA: only on the Jeppesen chart
    5. Primary airport: The runway alignment and grey highlight on the Jeppesen chart stands out very clearly, while the FAA airports are a little more obscure.
    6. Arrival route description: The table on the Jeppesen chart is easy to follow but the text is very small and pushed to the bottom. The route description is much easier to find and read on the FAA chart.

    Airport Diagram

    The Jeppesen Airport Diagram page has it all: frequencies, airport diagram, runway info, take-off minimums, departure procedures and alternate minimums. It’s a one-stop shop. It makes preflight planning easy when its all at your fingertips.

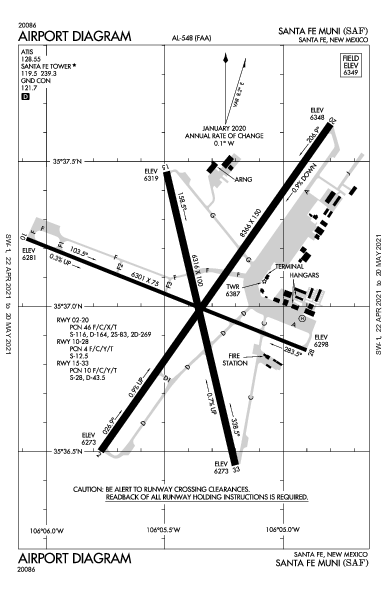
    The FAA charts usually require a little more searching for different pieces of airport information. The Airport Diagram itself is just the airport layout. Above, you will see a simple FAA Airport diagram. It’s clean and simple, perfect for a knee board print out.

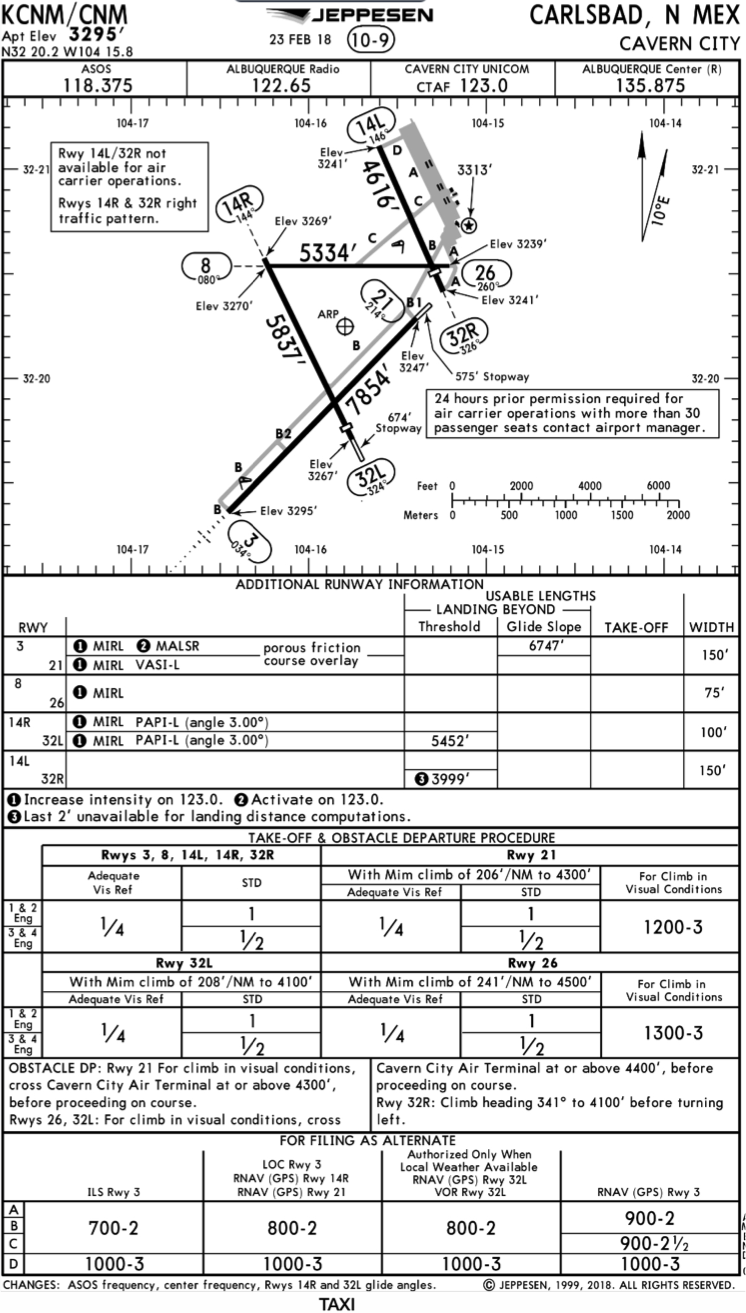
    In the flight planning process, as you look at what approaches you will be using for the airport, you might see an A or T inside a triangle. Those indicate that you will need to look in the Alternate Minimum or Take off minimum documents for more information. The Takeoff Minimums document (see below) is also where you will find any obstacle departure procedures for that airport. Apps like Foreflight help you out by posting the take off minimums under the departure tab. Even though it’s a little more difficult to read, I didn’t crop out the airport information so you can see what it looks like in context.

    FAA Alternate Minimums on the Left and Takeoff Minimums and Obstacle Departure Procedures on the Right
  • PopSocket iPad Yoke Mount

    I was recently clued in to a really cool (and very cost efficient) iPad yoke mount.

    It’s called a PopSocket and you won’t find it on any aviation website (I have to credit Joe Casey of Casey Aviation with this nifty find).

    It’s very simple.  You take the mount (see right) and stick it to your yoke.  Then you pick one of a ton of designs from PopSocket and stick it to the back of your iPad (you can even create your own design!  B2 Bomber anyone?).

    It’s low profile, doesn’t get in the way of anything, and is easily removable.  The PopSocket mounts are $10 apiece (depending on the size of your iPad, you may want to get 2).  The PopSocket is $10, so at the most, you’ll be in $40 plus tax and shipping.  Most mounts on Sporty’s are upwards of $50 and require a lot of installation, are big and bulky, and usually require lots of juggling to get the iPad in and out of the mount.

    Give the PopSocket a try.

  • The Diamond DA62: The Ultimate Twin

    Late last year, the Diamond Aircraft Corporation announced a brand new twin engine, the Diamond DA62. At first glance, this is a pretty cool airplane.  It seats 7 passengers, spread out amongst 3 rows, with 2 massive doors, leading to an “SUV” type feel, according to Flying Magazine.  That is only one of the “neato” features of the Diamond DA62.

    The thing that will make pilots believers is the fuel burn.  According to Flying Magazine, which did a test flight of the airplane, at 14,000 feet and 60% power, the airplane was only burning 12 GPH, but still doing 170 KTAS.  Remember, this is a twin.  That’s about the same as a normally aspirated Cirrus SR22 at the same altitude.

    Diamond DA62

    How does Diamond do it?  Jet A.  The company put two Austro AE330, 170 Horsepower, Jet A burning piston engines on the Diamond DA62.  You may say, well, yeah, at 60% power, that’s great, but I want to go places. How much fuel does it burn then?  Even at max continuous power of 95%, it’s still only burning 18.5 GPH total and cruising at 195 knots.  Paying Jet A prices, that’s pretty sweet.

    The range on the airplane is quite nice too.  Again, according to Flying Magazine, the range with full fuel (86.4 gallons with aux tanks) is about 1,300 miles.  You can carry the whole family too, as the full fuel payload is 1,000 pounds.  Golf clubs?  No problem.  Just stick them in the nose.

    The Diamond DA62 is probably one of the easiest twins to manage, engine-wise, too.  The Fully Automated Digital Engine Control (FADEC) system that Diamond installed leaves the pilot with only 2 power levers, instead of 6 on the typical piston twin.  All that needs to be done at cruise is set a percent power and the FADEC computer does the rest.

    Need air conditioning, built in oxygen, and TKS?  Diamond can set you up.  The G1000 system complete with digital backup instruments is standard in the airplane.  What more can you really ask for?

    If you haven’t figured it out, I really like this airplane and would be aching to fly it.  I enjoy the DA40 and have a good amount of DA42 experience, but I’d really like to hop in a Diamond DA62.

    Read the whole Flying Magazine article here.

    Sources:  Flyingmag.com

Leave a Reply

Your email address will not be published. Required fields are marked *