PIREP: Austin Executive Opens a Control Tower

Austin Executive Airport opened a control tower on Friday, February 23rd 2018.  The airport is now officially Class D airspace.  The charts and A/FD are not updated yet to reflect the tower, but there is a NOTAM with the tower and ground frequency information.  The tower hours are from 6am to 10pm.  The weather frequency remains the same.

Make sure you check those NOTAMs if you are headed to KEDC anytime soon!

KEDC Tower Frequency:  120.3

KEDC Ground:  119.45

Similar Posts

  • Pancake Fly-In At KCVB

    For those of you in the Hill Country looking to kick off the Christmas month right, head over to the Castroville Airport (KCVB) on Saturday, December 6th and get yourself a short stack of flapjacks.  For just $5, you can get yourself a good hearty breakfast that includes coffee or juice and bacon or sausage.  The eating starts at 0800 and goes until 1200, local time.  Come with an empty belly and an empty gas tank as CVB currently has some of the lowest priced gas in South Texas, currently listed at $4.70/gallon.

    There will be plenty of hangar flying, lots of airplanes to look at, and most importantly, lots of pancakes!

    CVB Pancake Breakfast

  • Aircraft Purchase: The Logbook & Pre-Purchase Inspections

    Your about to make your dream aircraft purchase.  The plane has low time on the engine, is reasonably priced, and, according to the seller, has no damage history.  You are overjoyed!  Your dream of making an aircraft purchase is finally coming true.  You prepare your offer for the seller, set up the escrow account, and start all the paperwork.

    Two weeks later, the airplane is yours!  You start flying it, though, and the engine starts to have some strange vibrations.  After several flights, it starts to get worse.  You take it to your mechanic to get it looked at and you find out the airplane needs three new cylinders along with some other engine work that is going to total a lot of money.  Plus, your airplane is now going to be in the shop for several weeks.

    All that excitement you just had?  It just went out the window.

    Could this have been prevented?  Probably so, with a logbook inspection and a pre-purchase inspection.

    Aircraft Purchase:  Maintenance Logbooks

    Aircraft Purchase: Logbook Inspection

    Inspecting a logbook can be very daunting when making an aircraft purchase, especially for older airplanes.  This is, however, one of the most vital steps in making a new aircraft purchase.  You can find out many things from looking at the maintenance logs of an airplane.  First, you can check the compression levels of the engine.  Typically, you want compression levels in the 70’s, with it still being okay in the high 60’s.  Anything below 65 and there could be potential problems.

    Second, you can find out if there has been any odd maintenance done pointing to possible unreported damage history.  This is rare, as most aircraft owners are honest and up front when talking about damage history.  But, if there is an entry detailing a prop overhaul after only 50 hours on that prop, you may start to ask some questions.

    Third, you can find out how well the airplane has been maintained.  If a lot of maintenance was completed at each annual, even if it was a lot of small things, then the airplane has been maintained by a good mechanic who is very thorough.  This also involves a check of the ADs, Mandatory SBs, SBs, and SLs that have been issued for the airplane.  If all that has been kept up with, it’s a well maintained airplane.

    Finally, it gives you a good idea of how much the airplane has been flown.  Sure, the ad online will have the total time and time since overhaul, but you can look at the year by year breakdown of how much the airplane has been flown.  It may have been flown a lot earlier in it’s life, but not quite as much recently.  That’s not necessarily a bad thing, but airplanes like to be flown.

    Aircraft Purchase: Pre-Purchase Inspection

    Before making an aircraft purchase, it is extremely vital that whenever you are buying an airplane that you get a pre-purchase inspection done on the airplane.  Even better is getting one done by a mechanic who specializes in that type of airplane (eg. Piper Service Center for Pipers, Cirrus Service Centers for Cirrus, Kevin Mead for PA-46s).  A pre-purchase inspection can save you a lot of money in the end.

    There is always going to be some kind of maintenance issue with an airplane being purchased, whether it is big or small.  Once a pre-purchase inspection is completed, you can take the findings to the seller and negotiate for a lower price based on those findings, or just have the seller fix the items before the sale is completed.

    I would recommend having the seller fix the problems before the sale is completed.  Even though it may take a little longer for the sale to be completed this way, you’ll get to enjoy your airplane right away instead of it being in the shop the next several weeks after you complete the purchase.

    There is the circumstance where the  pre-purchase inspection reveals some serious airworthiness issues which would cause the deal to be voided.  Always put this clause in a purchase agreement, giving you, the buyer, an out if there are serious airworthiness issues.

    When it comes to making an aircraft purchase, it is not a process to be rushed.  Slow and steady usually gets the best airplane for the money, giving you years of enjoyment in the future.

    Looking to make an aircraft purchase?  Daunted by all the work that’s involved to find a good, quality airplane?  Let Texas Top Aviation do your aircraft search for you!  To learn more, visit Texas Top Aviation’s Aircraft Purchase Consultations page.

  • Winter Ops

    It’s summertime and the weather is hot! Over this dry, sunny season, winter flying is probably the last thing on your mind. However, now is the perfect time to start getting things in place for winter and that includes having a plan for taking care of your airplane.

    Why are preparations for winter ops needed in the first place? Cold weather, especially during the engine start and warm up period, can be very damaging to your engine if precautions aren’t taken to ensure that safe temperatures exist inside the engine before you turn the key. I always thought that the biggest problem associated with cold weather was engine oil. The logic is since cold oil is thicker and less viscous as the temperature drops, it is not able to circulate quickly throughout the engine to provide proper lubrication upon starting.

    While cold oil may be a factor, the introduction of multi­viscocity oils has greatly reduced that issue. The real problem is created by the different ways that various parts of the engine respond to heat. Because aluminum expands more quickly when heated than steel does, the pistons (made of aluminum) expand more quickly than the cylinders (made of steel). This can lead to scuffing on the sides of the cylinder barrel. In the same way, differential heating can reduce clearances which are designed to provide cooling oil to bearings and other vital engine parts, thereby causing damage which greatly reduces the life of the engine.

    So how cold is TOO cold? Unfortunately, that is a difficult question to answer. Because there is so much variation between engines, airplanes, and environments, there really isn’t any one specific answer. An older, more worn out engine may actually be less susceptible to cold weather damage than a newer, tighter engine because its internal clearances are probably not as tight as they were a few thousand hours ago. I have heard of some people who preheat their airplanes anytime the temperature falls below about 40 degrees. For us northerners, this seems excessive. On our E33A Bonanza which has a Continental IO­520, we generally preheat the airplane when it is cold soaked in temperatures below freezing (32° F).

    Here are a few of the best ways to get your machine ready for a cold weather flight:

    • Heated Hangar:­ Nothing beats a heated hangar for warming up an airplane. The warm air is evenly distributed around the engine and in the cockpit (your avionics and gyros will thank you!). The airplane will need to be in the hangar for a while in order to warm up the guts of the engine. Often, the easiest way is to have the airplane pulled in the evening before the planned departure and left overnight. Many FBOs will hangar airplanes overnight for a small fee and it is well worth the price. We almost always have our charter airplanes put into hangars overnight when on a winter trip to ensure that we don’t have any trouble when we depart the next day. This practice has the added benefit of keeping the airframe clear of any ice and snow that may accumulate before you are scheduled to leave.
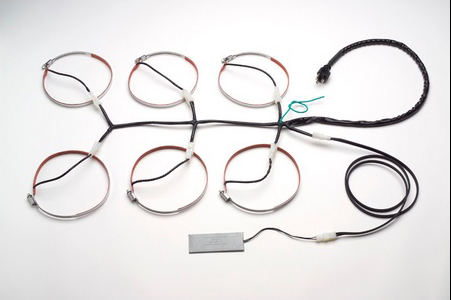
    • Electric Engine Heaters­: Multi­point electronic heaters use heating pads that are placed around the engine in order to heat up the various components such as cylinders, the oil pan and crankcase. Most of these systems are designed to be activated by being plugged into a wall outlet with an extension cord. Preheating for a winter flight is as simple as going to the airport the night before and plugging it in. Two well ­known manufacturers of multi­point engine heaters are Reiff and Tanis. These systems are relatively inexpensive and can be a life saver if you regularly travel in colder climates. If an engine heater is the right choice for you, it is recommended to avoid less ­expensive models that heat only the oil pan.


    Reiff system
    Pictured above is the Reiff system. The heated bands go around the cylinder bases and the pad at the bottom of the picture heats the oil pan. Picture Courtesy of www.reiffpreheat.com


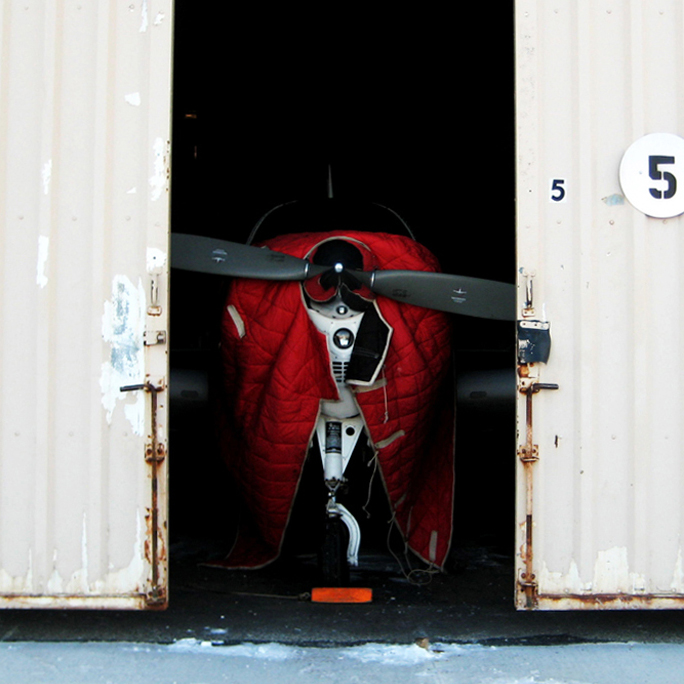
    • Covers and Blankets­: If it is especially cold or you have to preheat outside, having something to insulate the cowling and keep the wind out can be very useful. Regular blankets will work long as you can secure them in place. If you have an ongoing need for additional insulation, there are companies that make custom blankets and propeller covers to fit your airplane. If you are landing and then taking off again relatively quickly, using a few blankets and cowl plugs will work nicely to keep the engine warm while it is sitting outside. In a pinch, placing a couple of powered light bulbs in the cowling overnight with insulation on top can result in sufficient temperatures for starting the engine.


    Bonanza Cover
    Even with the multi­point electric heater, we still use a blanket while preheating to help keep everything toasty.


    • Forced Air:­ This method is used widely by FBO’s and flight schools. Hot air is produced in a portable heater and is then pumped into the engine compartment via the openings at the front or bottom of the cowling. This method has the benefit of not requiring any additional equipment to be installed on the aircraft beforehand and can be very effective provided there is adequate time for the engine to heat completely before removal.


    Forced Heat
    Pictured above is a Red Dragon engine preheater. Photo courtesy of Red Dragon’s website: www.flameengineering.com


    • Winter Baffles:­ When the air temperature starts to drop into the teens and lower, you may find it difficult to keep your engine temperatures warm enough in cruise flight. The problem is that the air entering the cowling inlets is so cold that it overcools the engine. The solution is to install additional baffling in the engine inlets to reduce the amount of airflow into the cowling. These additional baffles are usually just sheets of aluminum that are cut to the correct size and are bolted in and removed quickly and easily as needed. Some pilots swear by them while others complain that they can cause uneven cooling. If you have questions about winter baffling, I’d suggest talking to your mechanic about your specific airplane.

    Winter flying can be extremely rewarding. After their hands thaw from pre­flight, a pilot is often rewarded with smooth air, improved performance and outstanding views. Just don’t forget to prepare the airplane for the cold. The preparation is often as simple as plugging in an extension cord or making a phone call to the FBO. So whether you live in the north or the south, take good care of your engine so that it can keep taking good care of you.

  • The Dual Garmin G5 Glass Panel Solution

    What’s the most cost effective glass panel retrofit?  There are several options out there (and it seems like more coming each Sun ‘N’ Fun or Osh Kosh event), but the consensus is the Aspen EFD 1000 or 1500, right?  At $12,000 installed, it’s about $8,000-$10,000 cheaper than the Garmin G500 (though you can make the argument that when you add a second screen and SVT to the Aspen, the price is about the same).

    I am here to blow your mind.  What if you could get a glass panel retrofit that is a complete AHRS system with airspeed and altitude, plus a slaved HSI that auto slews to your GPS and a 4 hour backup battery so you can throw your steam attitude indicator away, for only $4,600, plus installation?

    I am not crazy.

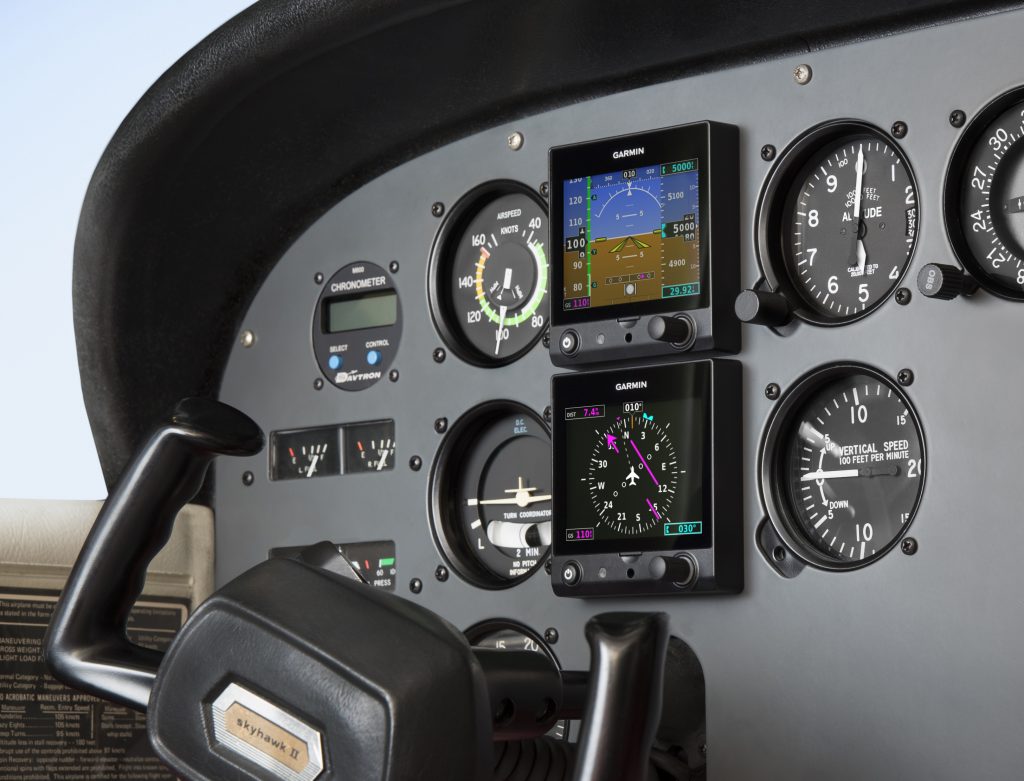
    The Garmin G5 debuted last year when the FAA relaxed it’s regulations to allow more experimental avionics into certified airplanes.  The single G5 was a big hit.  The 3.5 inch screen fit nicely into the hole that the traditional attitude indicator left, giving pilots a glass attitude, airspeed and altimeter options for less than $2,500.

    In March, Garmin brought out the HSI version of the G5.  Equipped with a low cost magnetometer, the DG/HSI version is a complete replacement for the traditional DG/HSI.  The unit also displays ground speed and distance (received from the GPS information), while auto-slewing to the GPS flight plan, so the CDI needle will move on it’s own, eliminating the annoying need for the pilot to set the course on the HSI (and ridding the GPS of the message that pops up reminding the pilot to set the course).

    The dual units provide a complete backup Attitude in the case of a display failure.  The reversionary mode you get with the Garmin G1000 and the Garmin G500 is also present in the dual G5s.  This eliminates the need for a backup steam gauge attitude indicator, freeing up panel space for an engine monitor or some other toy.  The G5 units can also be equipped with 4 hour backup batteries in case of electrical failure.

    The price for the dual G5 setup is very reasonable at just under $4,600 plus installation (which, according to Garmin, should be pretty simple as the units act as plug and play instruments).  The AHRS unit is available stand alone for under $2,200 while the DG/HSI unit standalone runs just under $2,600.

    For more information, check out Garmin’s website.

  • Fuel Planning

    A few years ago I took off out of Chicago’s Dupage airport (KDPA) in a Bonanza headed for Deck Airport (9D4), a small uncontrolled airport about 60nm to the west of Philadelphia. It was late November and, unfortunately, due to some unexpected ice, I found myself flying a significant portion of the flight at 4-5,000 feet instead of the 11,000’ at which I had originally planned. This was an issue because I was burning significantly more fuel at 4,000’ than I would have at 11,000’. I did my fuel planning math and came to the conclusion that I would still make it to 9D4 with the required minimums. On I flew, watching the number on the totalizer decrease.

    I arrived at 9D4 after dark. Although I didn’t think I would need one, I ended up having to fly an approach to get down below the cloud deck. My troubles weren’t over. After breaking out of the clouds, I was terrified to realize that the runway lights weren’t working.

    Now, I had a problem. I was in a relatively unfamiliar area in marginal VFR at night and I was quickly running out of options as far as my fuel was concerned. Fortunately for me, 9D4 is located 14nm north of Lancaster Airport (KLNS), which is a towered airport with very nice approaches and facilities. Also working in my favor was the fact that Lancaster was reporting VFR. I headed as quickly as I could for Lancaster and landed uneventfully.

    When I landed I had the required fuel minimums on the airplane, but I managed to scare myself pretty thoroughly. I realized that while I had been forced to deal with some unexpected complications: icing forcing me down several hours before my planned descent and inoperative runway lights that were not listed in the airport NOTAMs. I was very blessed that Lancaster was so close by and that I was able to land without having make an approach. Had LNS not been VFR, I could have easily burned through another 15 minutes of fuel maneuvering for and executing an approach. If, for some reason I’d had to go missed or perform a hold, I would have gone through my remaining fuel pretty quickly. To me, this is a classic example of “just because it’s legal, doesn’t mean it’s safe.” I realized I needed to change how I did my fuel planning.

    Since then, I have enforced a personal minimum: 18 gallons must be on the Bonanza at the time I reach my destination. If things change un-expectedly enroute and I realize I won’t make it to my airport with at least 18 gallons, I stop. I had always tried to have an hour of fuel on board as a reserve, but having a hard number is an easy way for me to make decisions.

    Having a fuel totalizer installed in an airplane is a really nice way to upgrade the panel and give the pilot a clearer idea of how much gas is being burned/ how much is remaining. The totalizer installed in our Bonanza is a JPI Fuel Flow 450. It has a lot of nice features which make fuel management chores much easier. If a totalizer is something that you are considering installing in your aircraft, or if you have one already, here are a few things that I’ve learned from my experience flying with them.


    • While helpful, don’t rely too heavily on the totalizer to do your fuel math for you. Similar to the negative effect that using GPS navigation can have on a pilot’s ability to navigate via a chart, over dependence on digital fuel systems can lead to problems. A fuel totalizer should be telling you what you already know, not doing all your math for you. Do your fuel math and confirm it with the totalizer. If it failed, you should still know how much you have and how much is needed.
    • Likewise, don’t rely completely on the accuracy of a totalizer. Technology isn’t perfect, and if the instrument isn’t quite calibrated correctly, the numbers could be wrong. Fuel information is absolutely critical, and thus warrants constant monitoring and double checking. When you do arrive at your destination, keep track of how much fuel the airplane takes and compare it to the numbers on the totalizer to verify its accuracy.
    • Unless you are flying an airplane which has a “both” setting, you will still need to be keeping track of how much fuel is available in the aircraft’s individual tanks. For example: our Bonanza has two tanks, but the totalizer doesn’t keep track of that information. If I don’t remember to switch tanks, I can run one completely dry and the digital read out will indicate the remaining gas in the other tank. The totalizer won’t indicate anything about the individual tank quantity until the engine quits and the flow drops to zero.


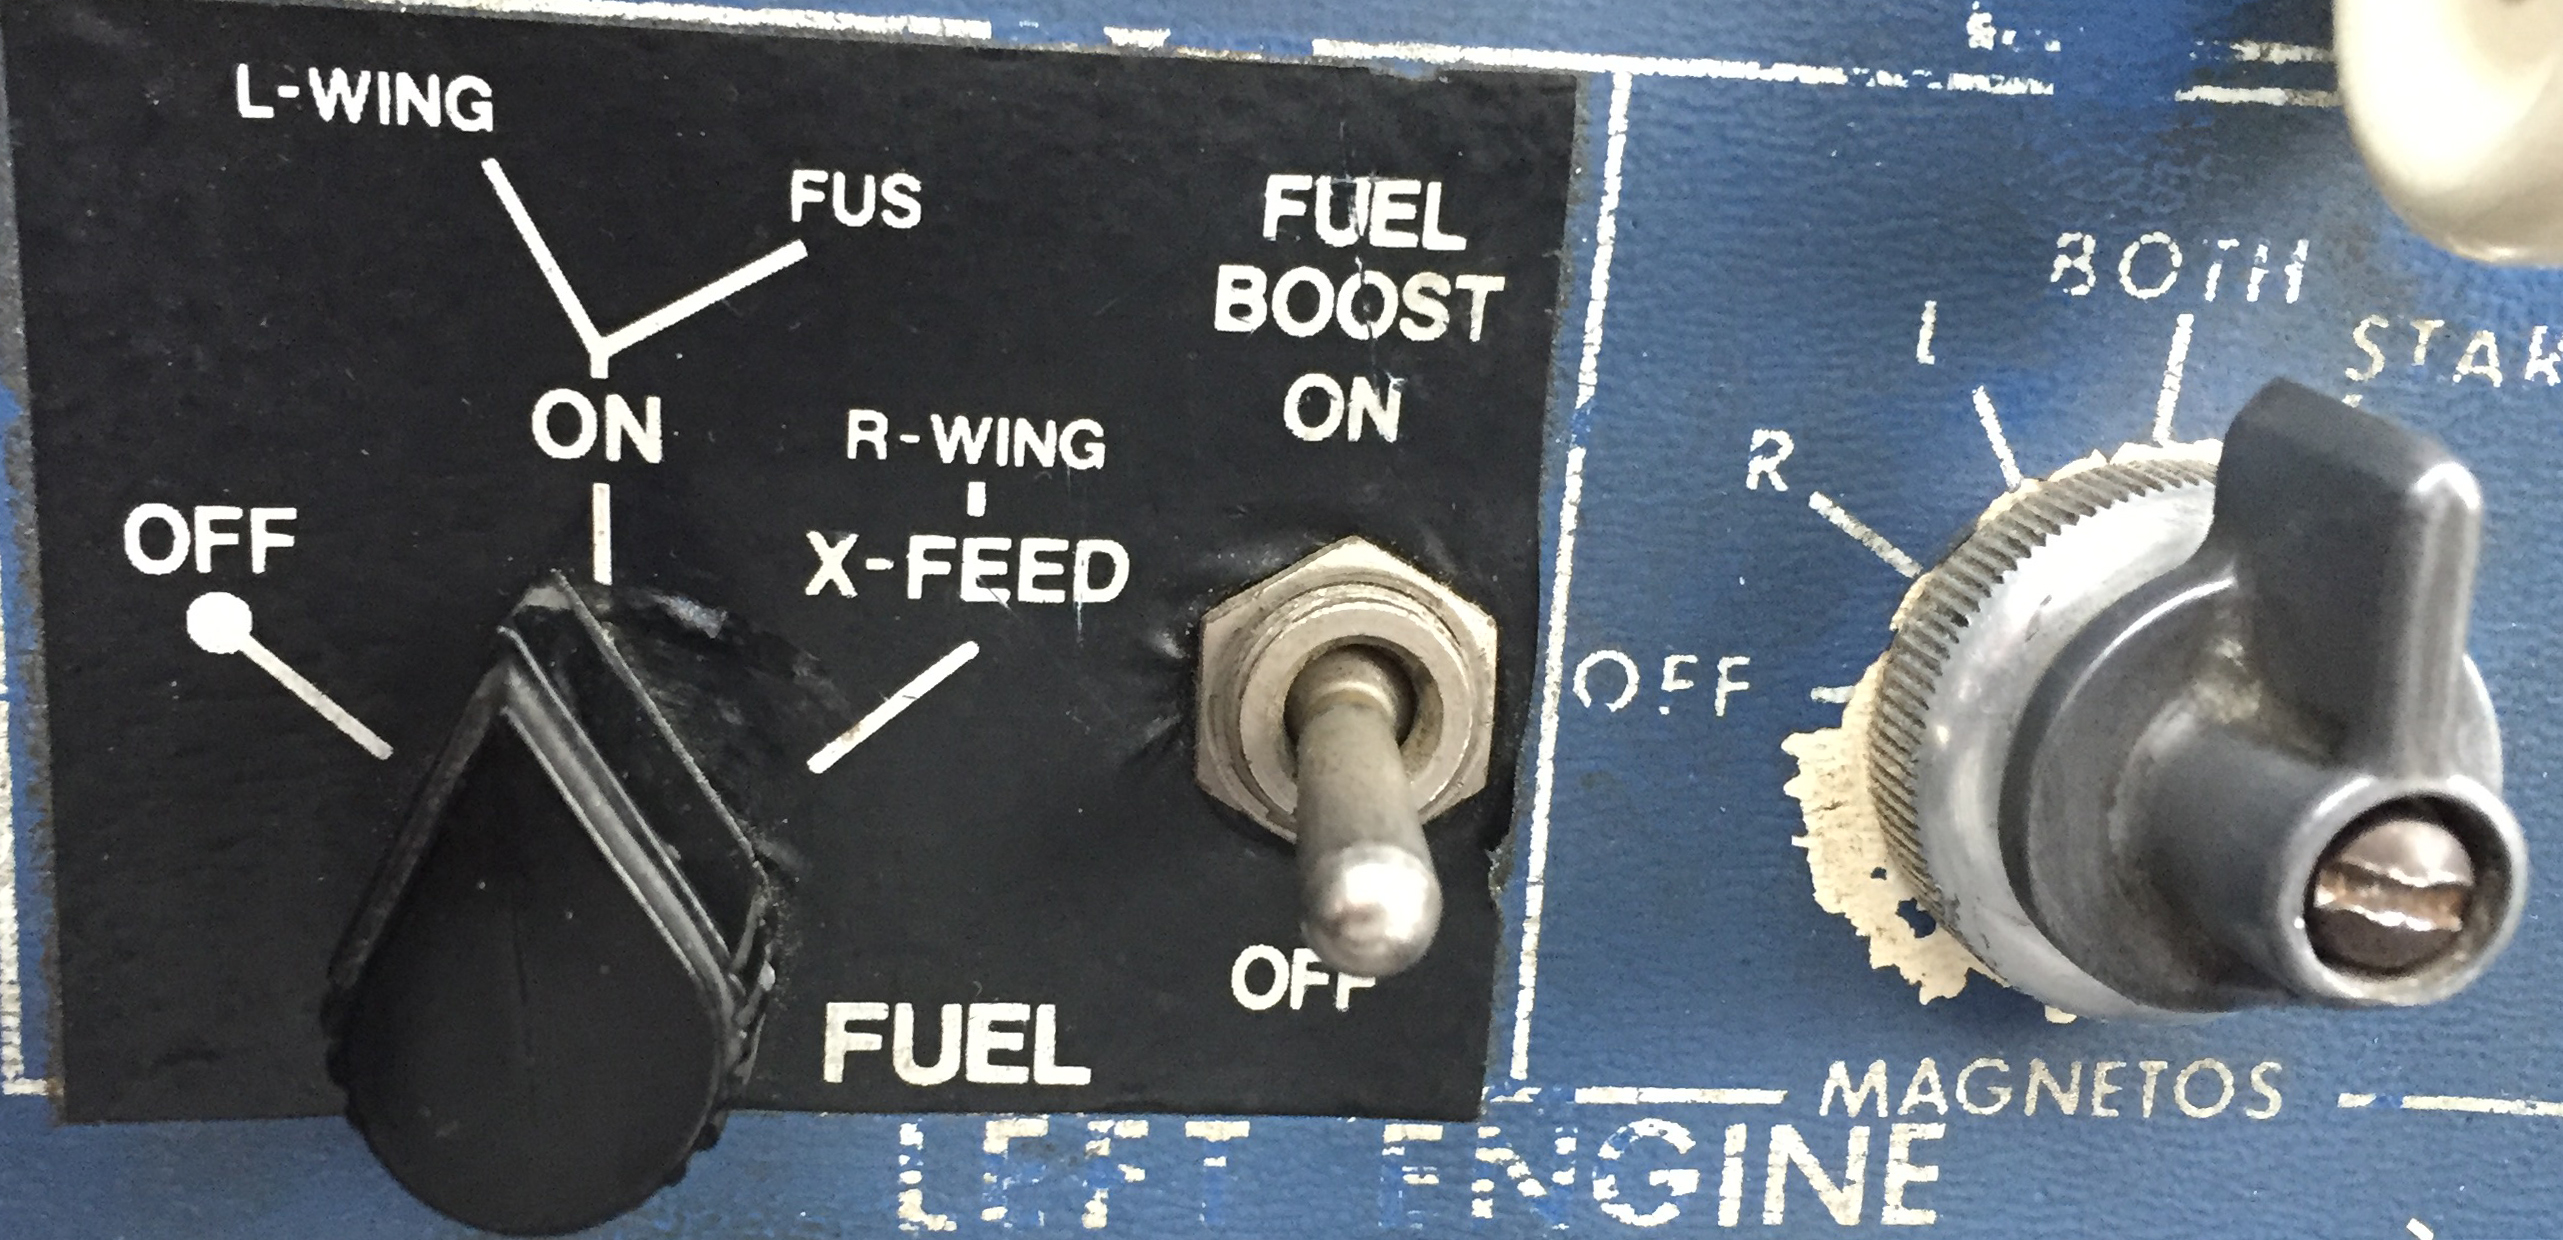
    Pictured below on the left is a fuel selector from a Piper Aerostar. The airplane has two selector valves and three fuel tanks. While the system is not difficult to use, it does require proper understanding and regular monitoring to ensure that the fuel is distributed correctly. The picture on the right is the selector out of an A36 Bonanza. I love the simplicity of the Bonanza’s fuel system, but it still takes attention and intention on the part of the pilot to keep track of how much gas is available on either side.


    • The JPI unit that we have installed on our airplane even has an “hours and minutes remaining” screen as well as a “fuel required” screen. The totalizer actually talks to the GPS and is able to tell me how much gas I will need to get to my destination. Just remember that those numbers are computed only at the current flow and do not take into account the potential increases/ decreases in consumption which will occur as power settings are changed for descent and arrival into the airport. I may feel pretty good about my hours and minutes remaining when I’m sitting at 12,000 feet, but when center makes me descend to 5,000’ and I’m still an hour away from my destination, endurance will decrease. It also can’t take into account any additional flight time that may be required to shoot approaches, hold, or divert.
    • Have you ever heard of “G.I.G.O?” It stands for “Garbage In, Garbage Out.” What it means is that the information which the fuel totalizer is giving the pilot is only as good as the information that the pilot gave it at the beginning of the flight. The totalizer in our Bonanza does not have any method of checking the quantity in the fuel tanks. At start up the pilot inputs the amount of fuel on board the airplane and the totalizer keeps track of how much is burned which is then subtracted from that inputted number. Ergo, if the amount of fuel is not updated or is incorrect, the fuel total numbers displayed will be inaccurate. If a pilot told the computer that the tanks had been topped off, but didn’t verify it, the fuel could be exhausted and the totalizer would still indicate that there was fuel available. It is, therefore, VERY IMPORTANT to confirm the airplane is fueled to the amount desired (visually if possible) and use the fuel gauges in the airplane to verify the accuracy of the totalizer.
    • Use a timer: I like to use the timer on my phone to remind me when it is time to switch the fuel tanks. If I set the phone to vibrate and put it in my pocket, it will remind me to change tanks at the desired time if I haven’t remembered to otherwise. It’s also nice because I can write down exactly at what time (or quantity) I changed tanks so I can keep very accurate track of how much fuel I have in any given tank. This is especially helpful in airplanes that have more than two fuel tanks. Another option is setting the timer on a Garmin 430, 530, or G1000 to give an alert or message reminding the pilot to change tanks at a preset time.


    It shouldn’t come as news to anyone that the importance of fuel planning cannot be overstated. I personally know multiple people who have run airplanes out of fuel because their planning wasn’t quite right or the weather changed and they were unwilling to take the time to stop. In the case of my Bonanza story earlier in this article, it was obvious to me before I even landed that I should have picked a fuel stop when it became apparent that I would arrive at my destination with less than my desired one hour margin.

    The technology that we have now to help us keep track of our fuel usage is wonderful, but use it as an aid; not as your only source of fuel calculation. Remember to verify the amount of fuel on the airplane before you go because the number on the totalizer won’t mean anything if it doesn’t match the amount in the tanks! Above all, don’t be afraid to stop and get fuel when you need it. I’d rather have to tell the passengers that we need to stop for gas than deal with the potential consequences of running out.

    Andrew Robinson is a 135 Charter Pilot and flight instructor who lives with his wife and 2 daughters in Pennsylvania.  He flies Pilatus PC-12s and instructs in Beechcraft Bonanzas.

  • Garmin GTN 750 Tips & Tricks

    The Garmin GTN 750 is an awesome piece of equipment.  Garmin tried to make the user interface with the touch screen as simple as possible (though there still is a bit of a learning curve when moving up from a Garmin 530W).  Garmin also integrated several key features that the 530W did not have that makes flying with a Garmin GTN 750 in IFR all that much better.

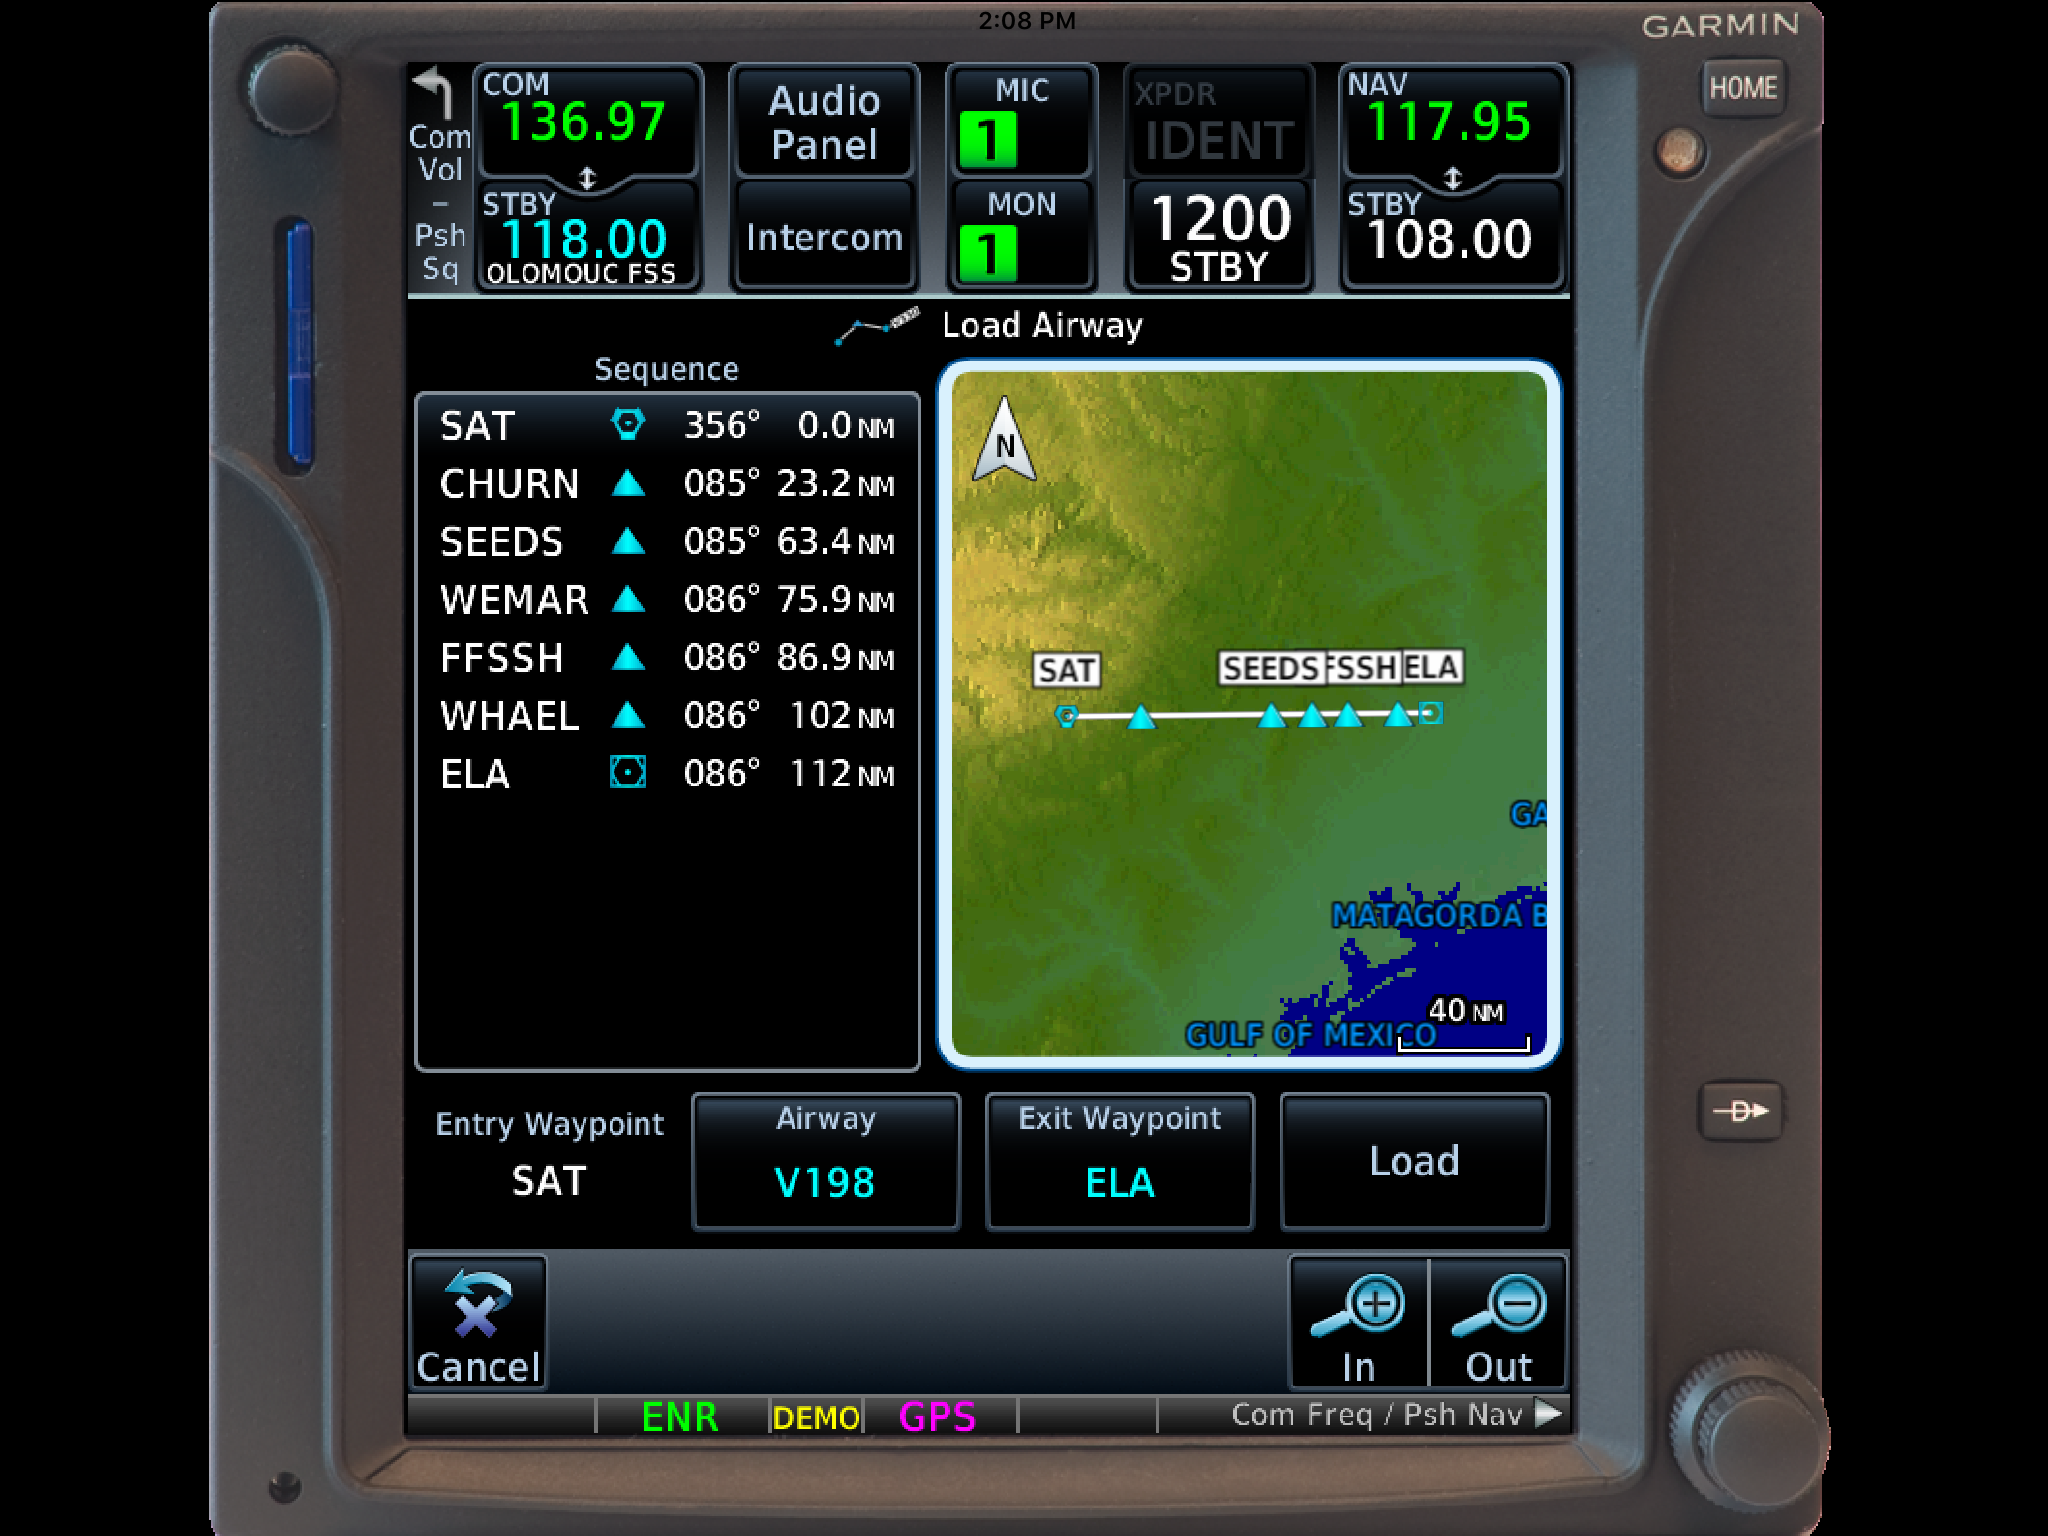
    The two features of the Garmin GTN 750 I want to focus on today are the “Load Airway” feature and the “Hold at Waypoint” feature.  If a pilot isn’t looking for these specifically, they can actually be a bit hard to find.  The “Load Airway” feature is especially handy when flying IFR long distances with several airways as part of the clearance.  Here’s how to utilize both.

    Load Airway

    1. On your flight plan page, insert the waypoint that you will be joining the airway, or, if your clearance was radar vectors to join an airway, then insert the waypoint on the airway that begins the leg you will be joining on.
    2. Tap the waypoint you just inserted.
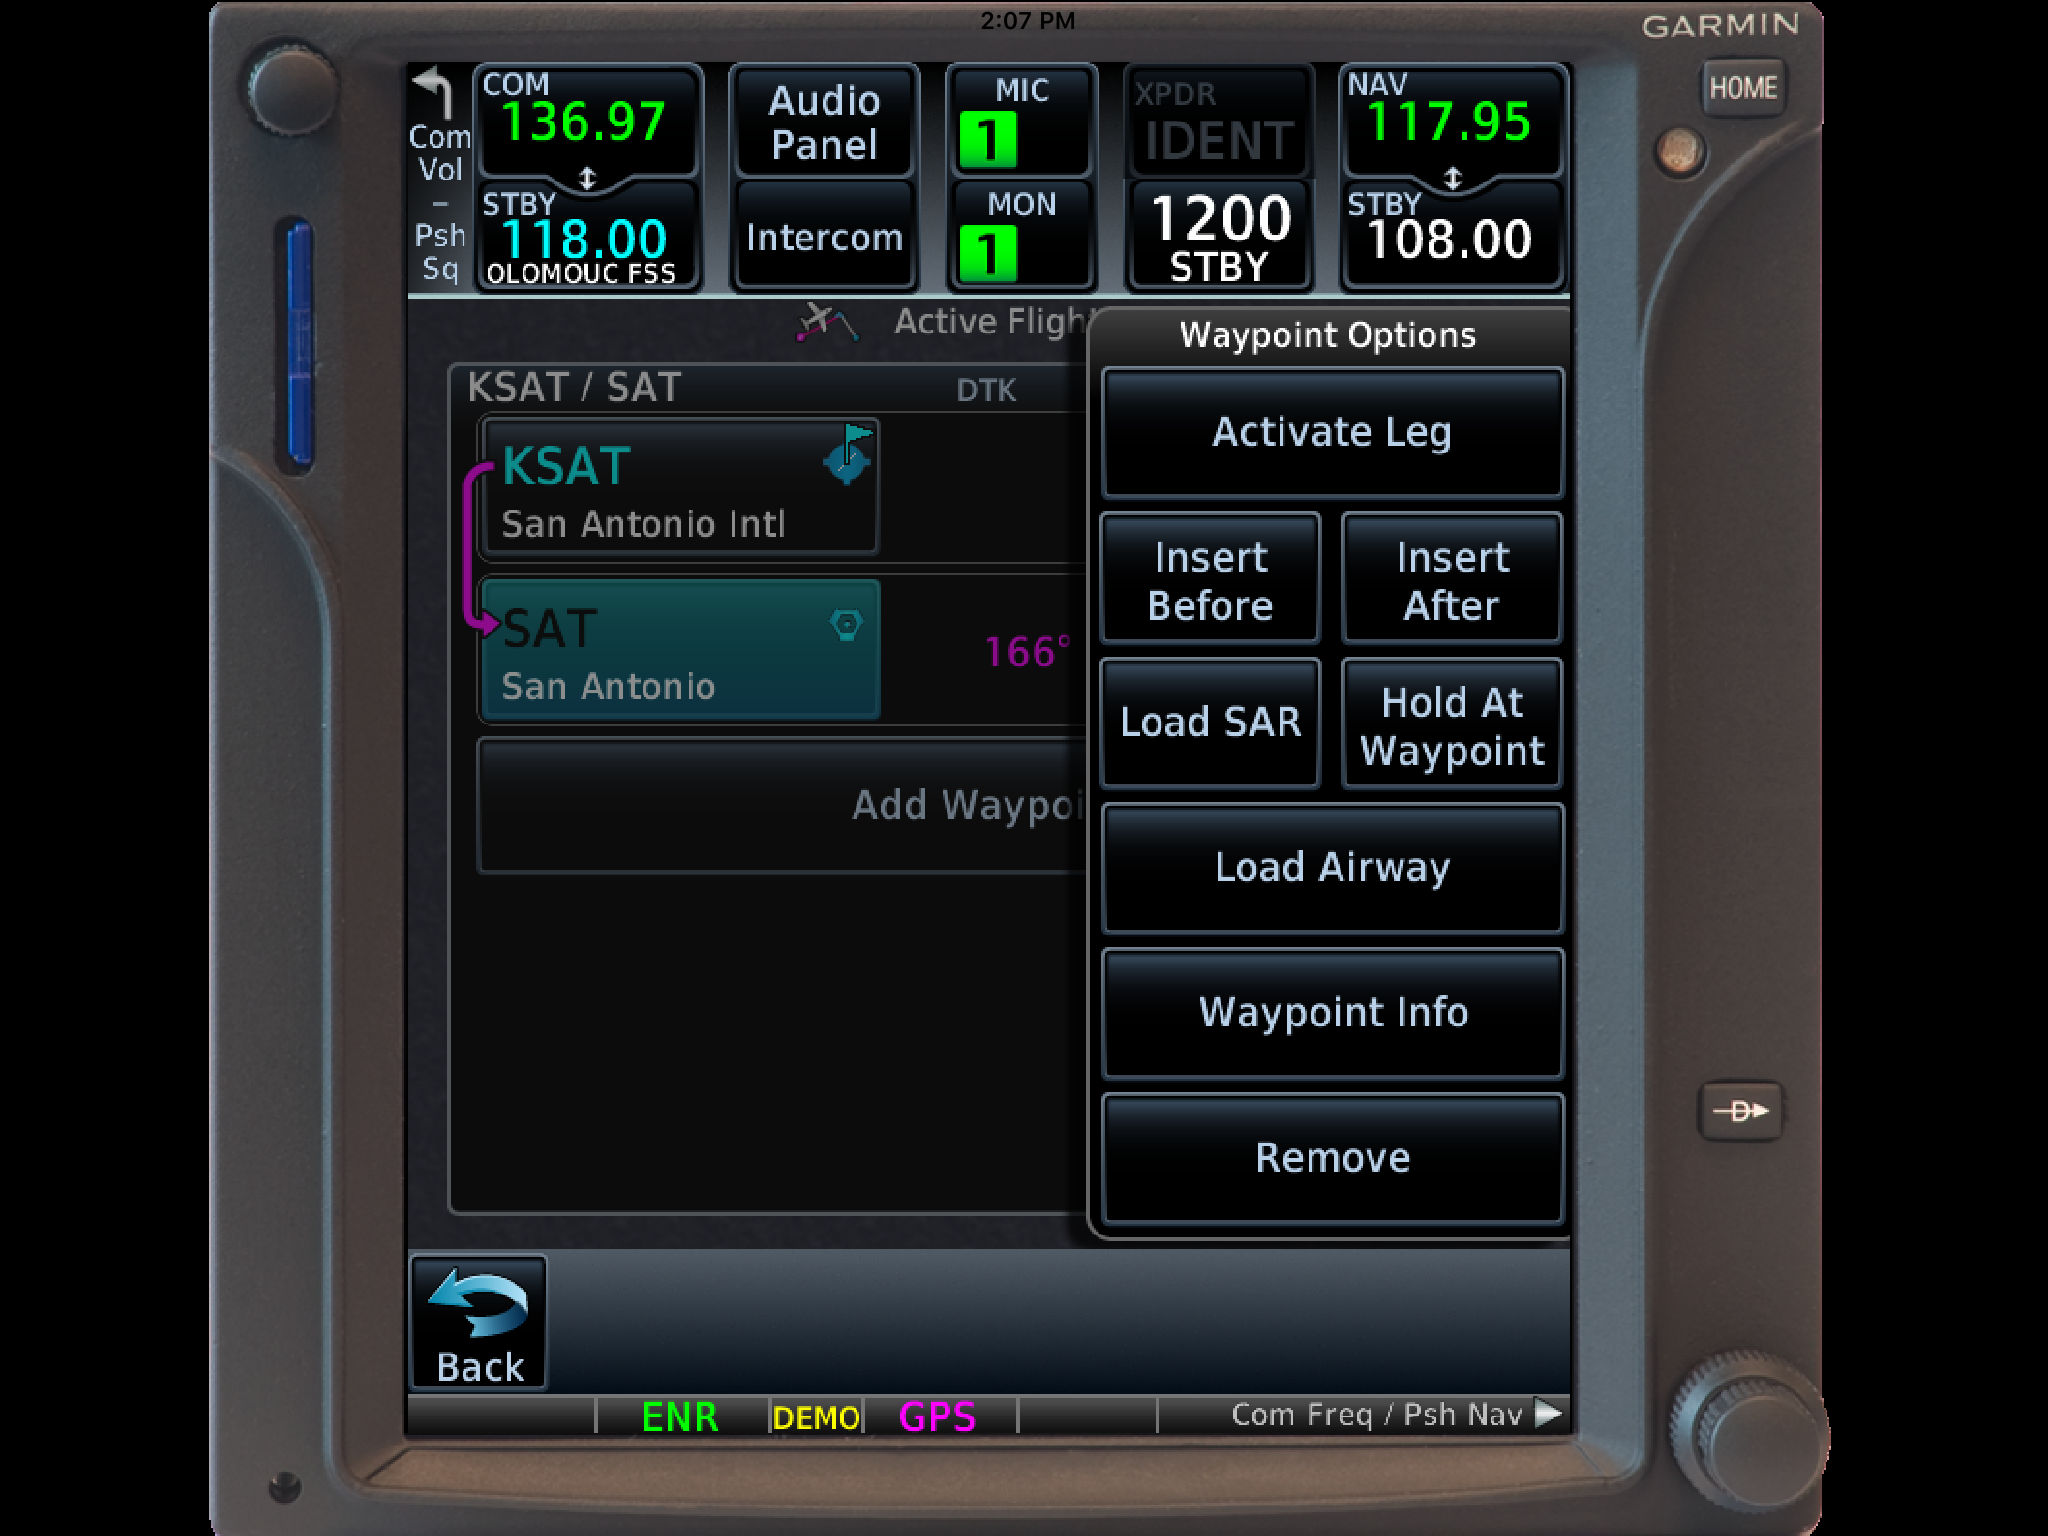
    3. A menu will pop up.  Tap Load Airway.
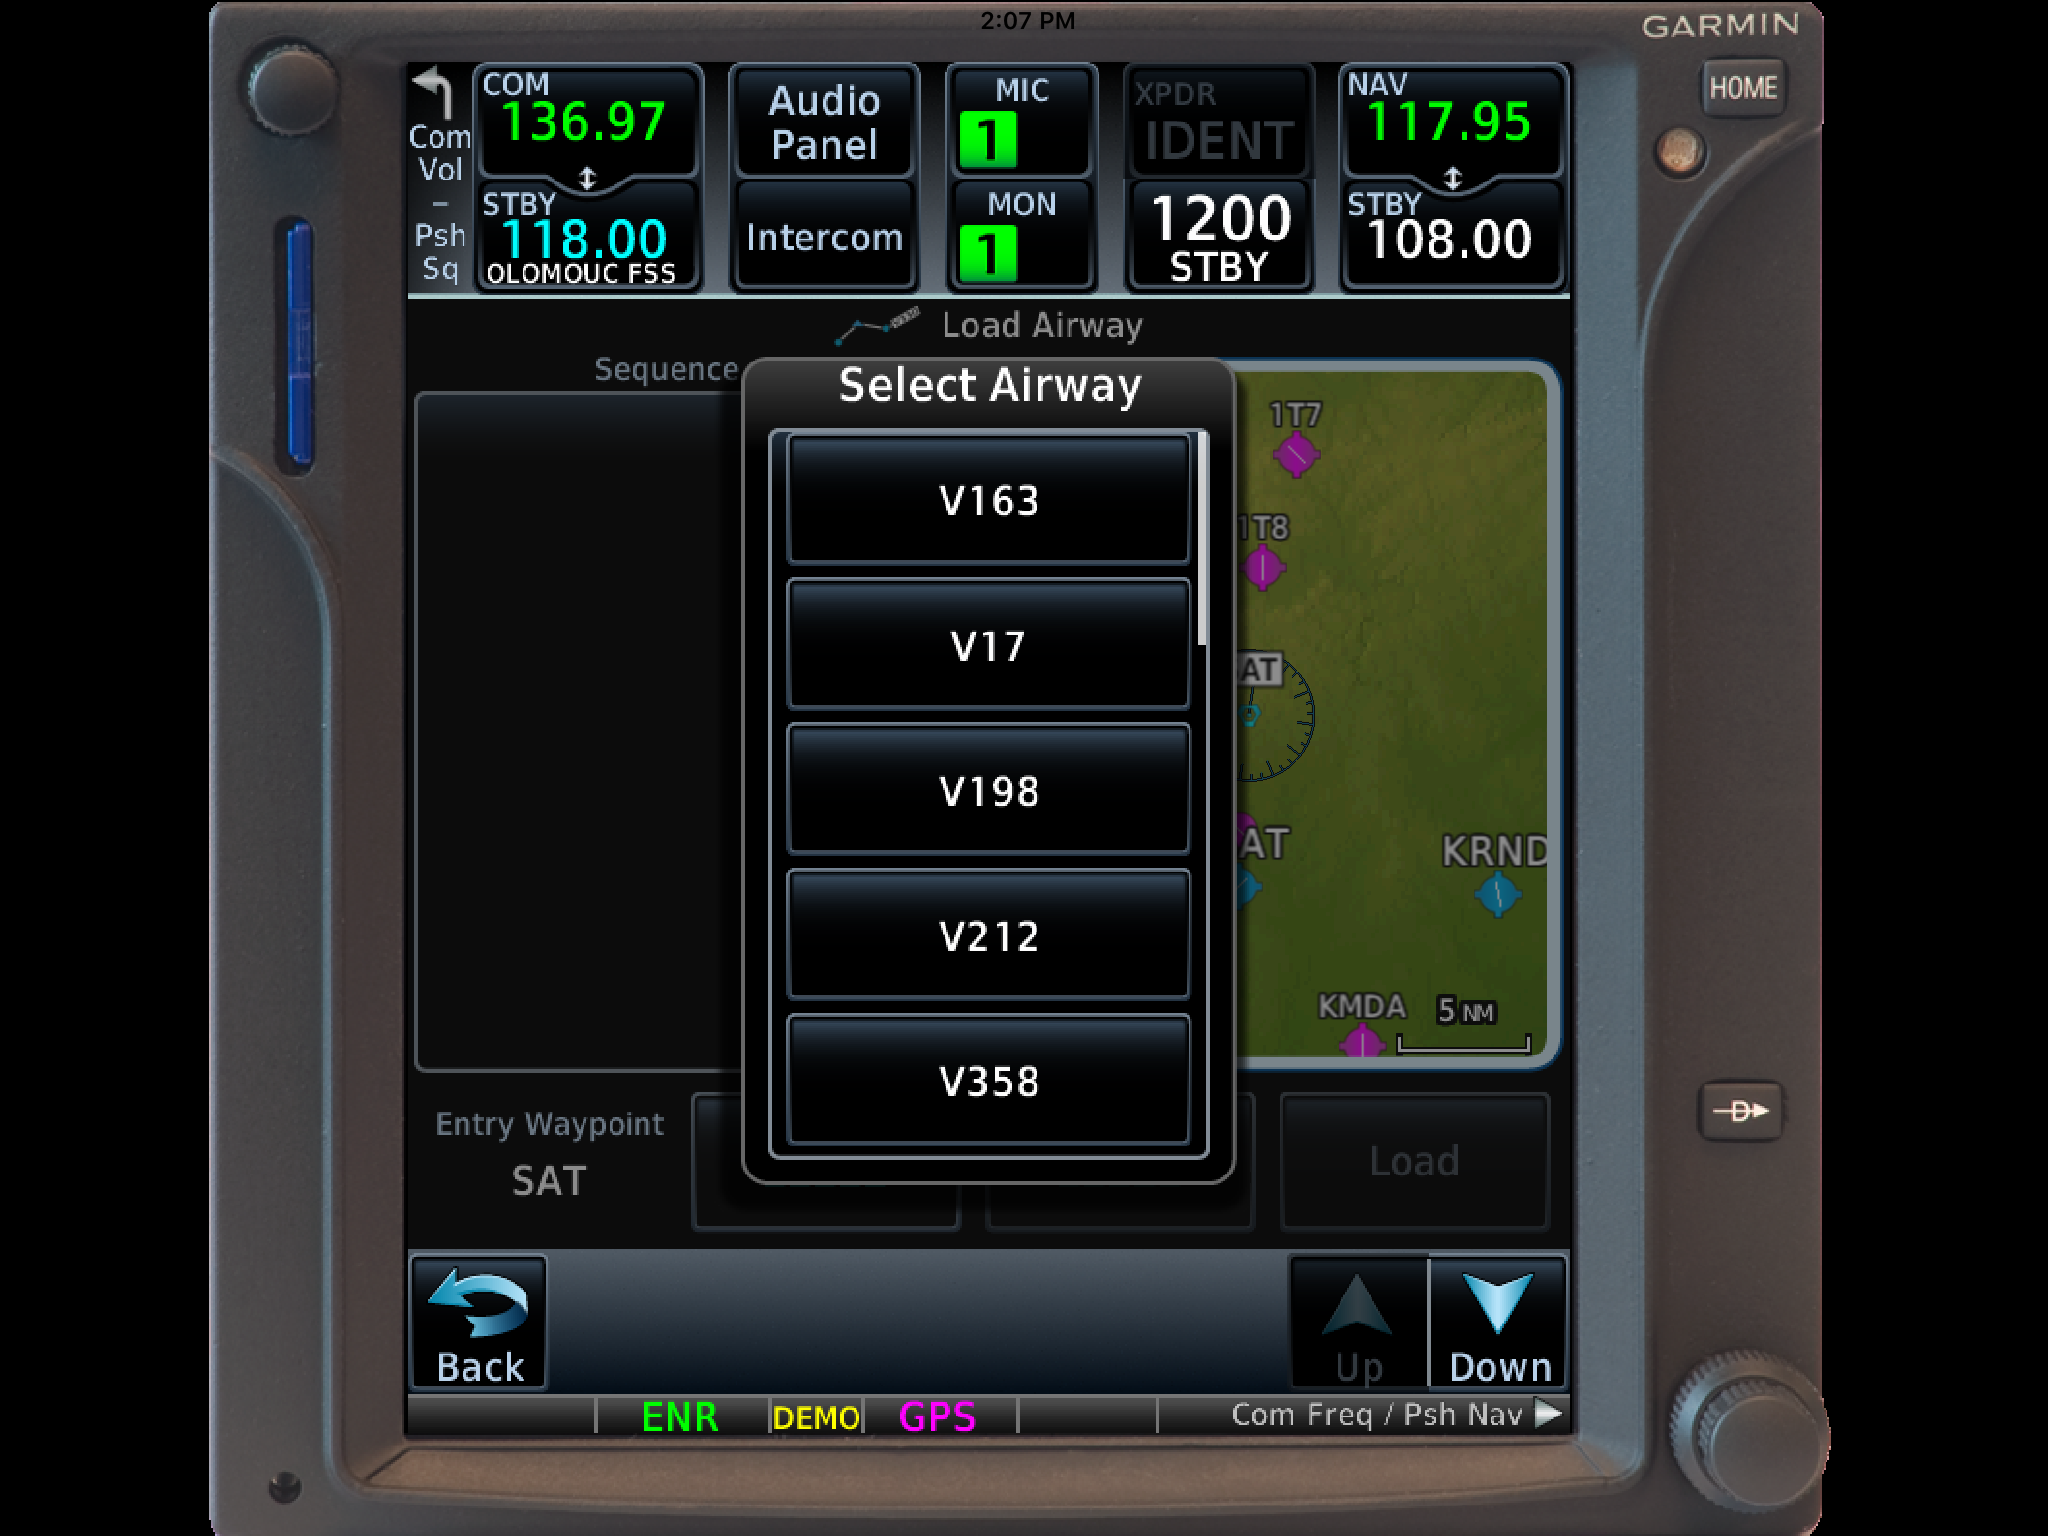
    4. Select the Airway you want from the next menu that pops up.
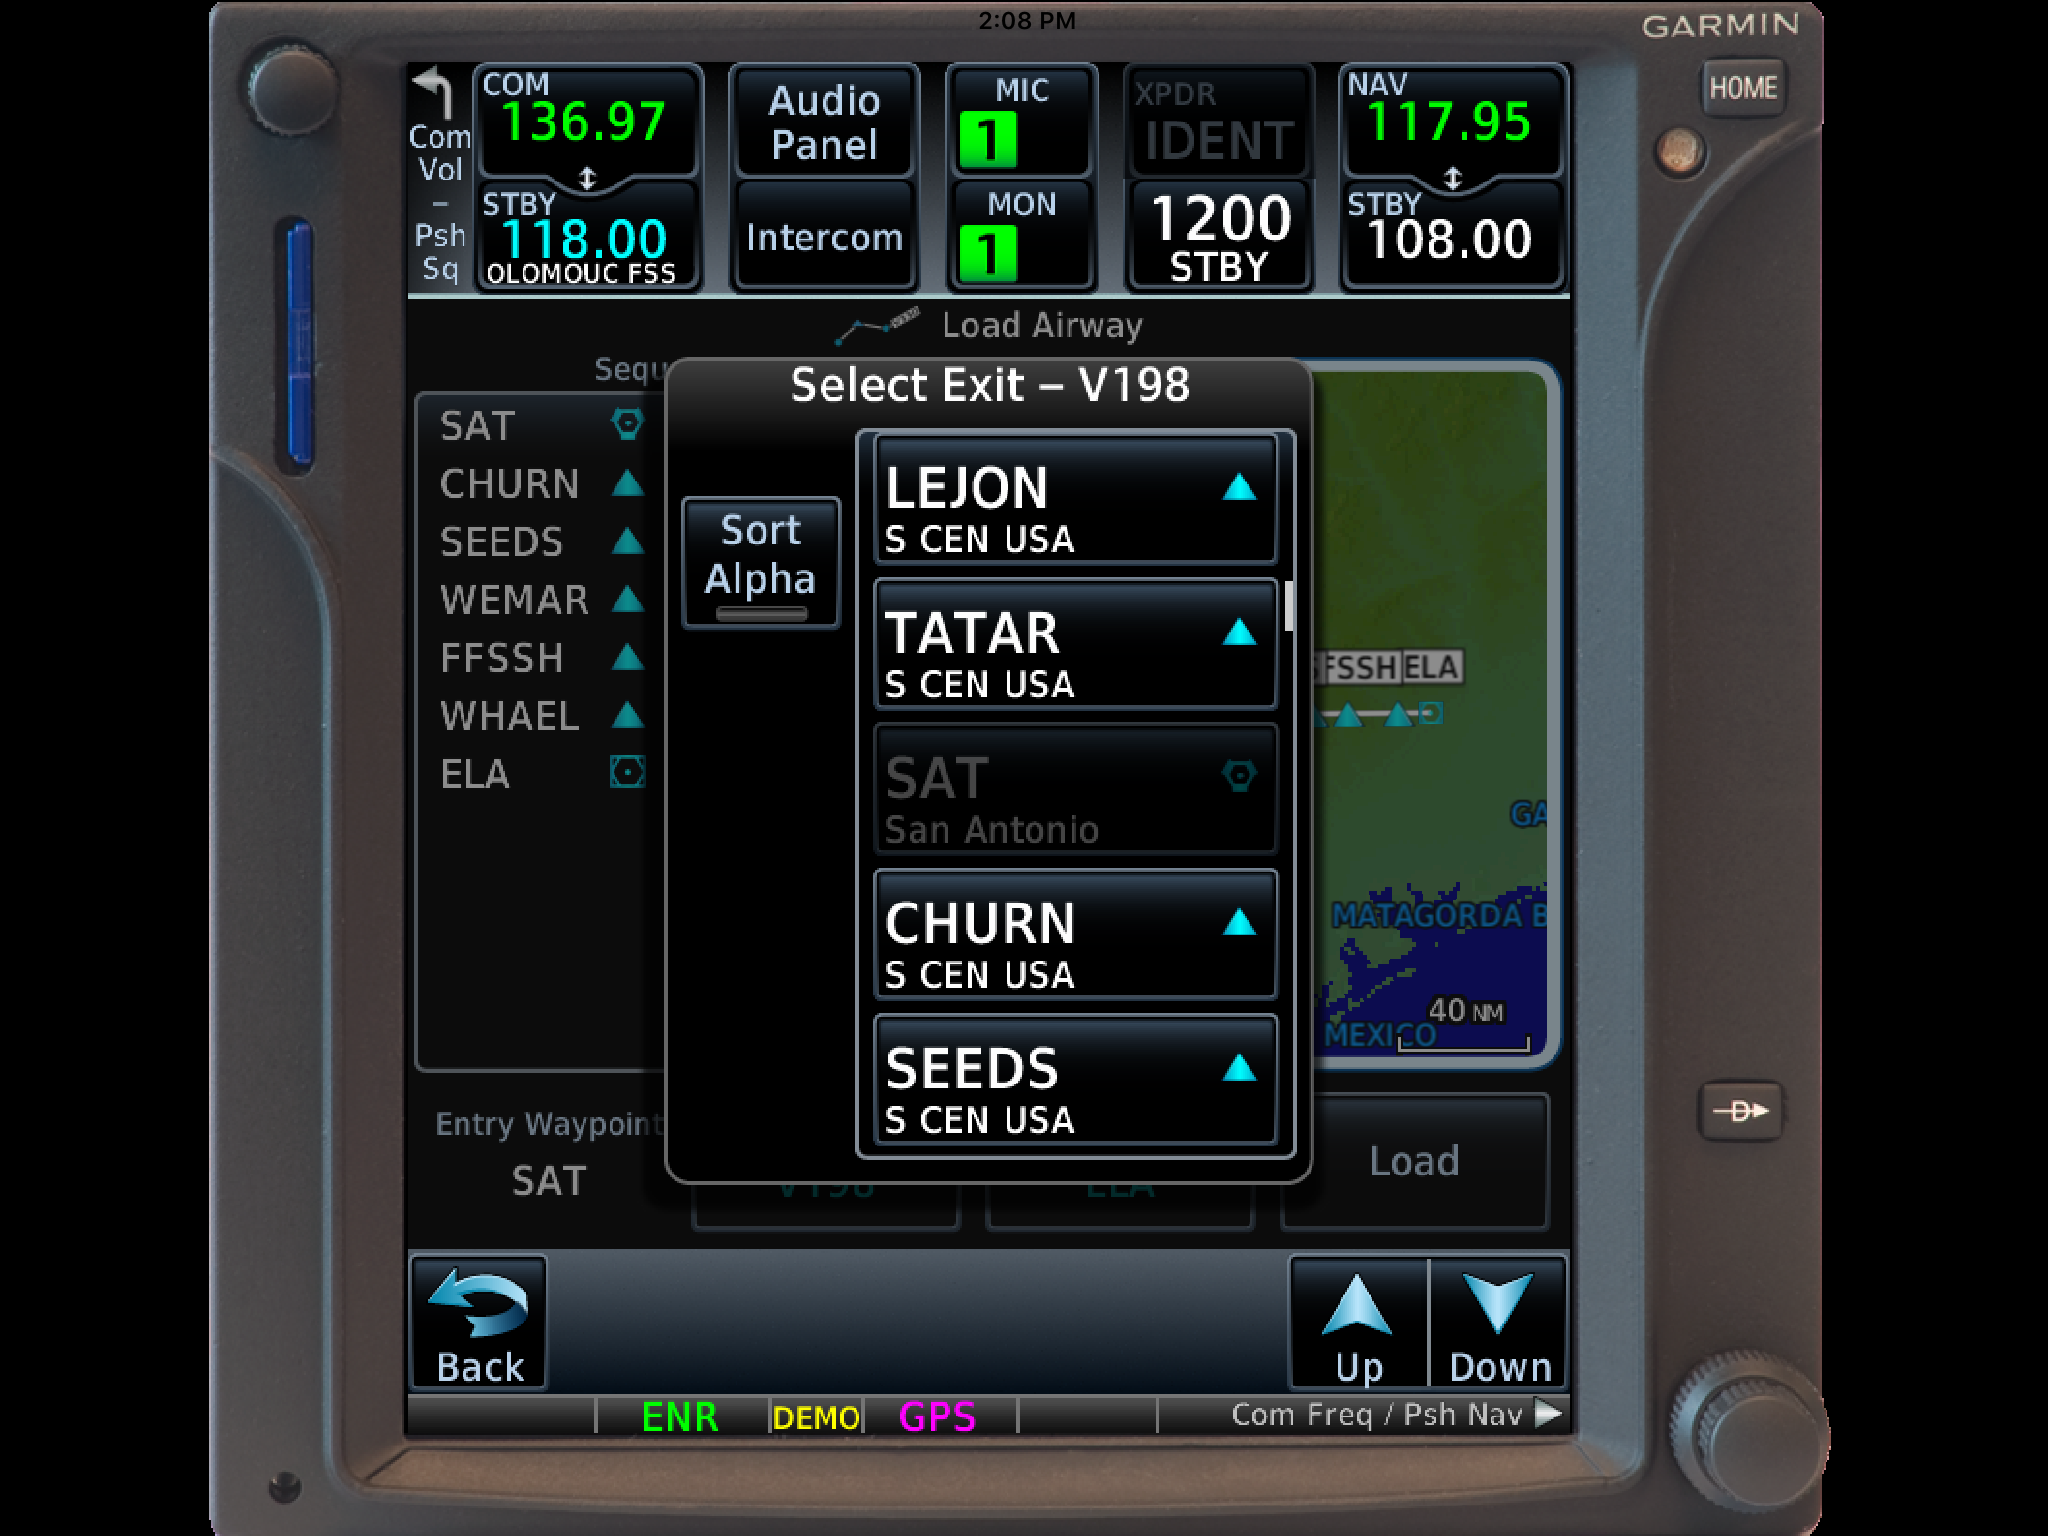
    5. Then, a list of waypoints will display to exit the airway.  Select the waypoint where you will be exiting the airway.
      1. Note:  Garmin defaults to listing these waypoints alphabetically.  If you unselect the “Sort Alpha” option, it will sort the waypoints by direction and distance from the entry waypoint.  This is a little more practical, easier to work with, and how I recommend doing it.  This way you can either scroll up or down depending on the direction of travel on the airway and find your exit waypoint.
    6. Tap Load.
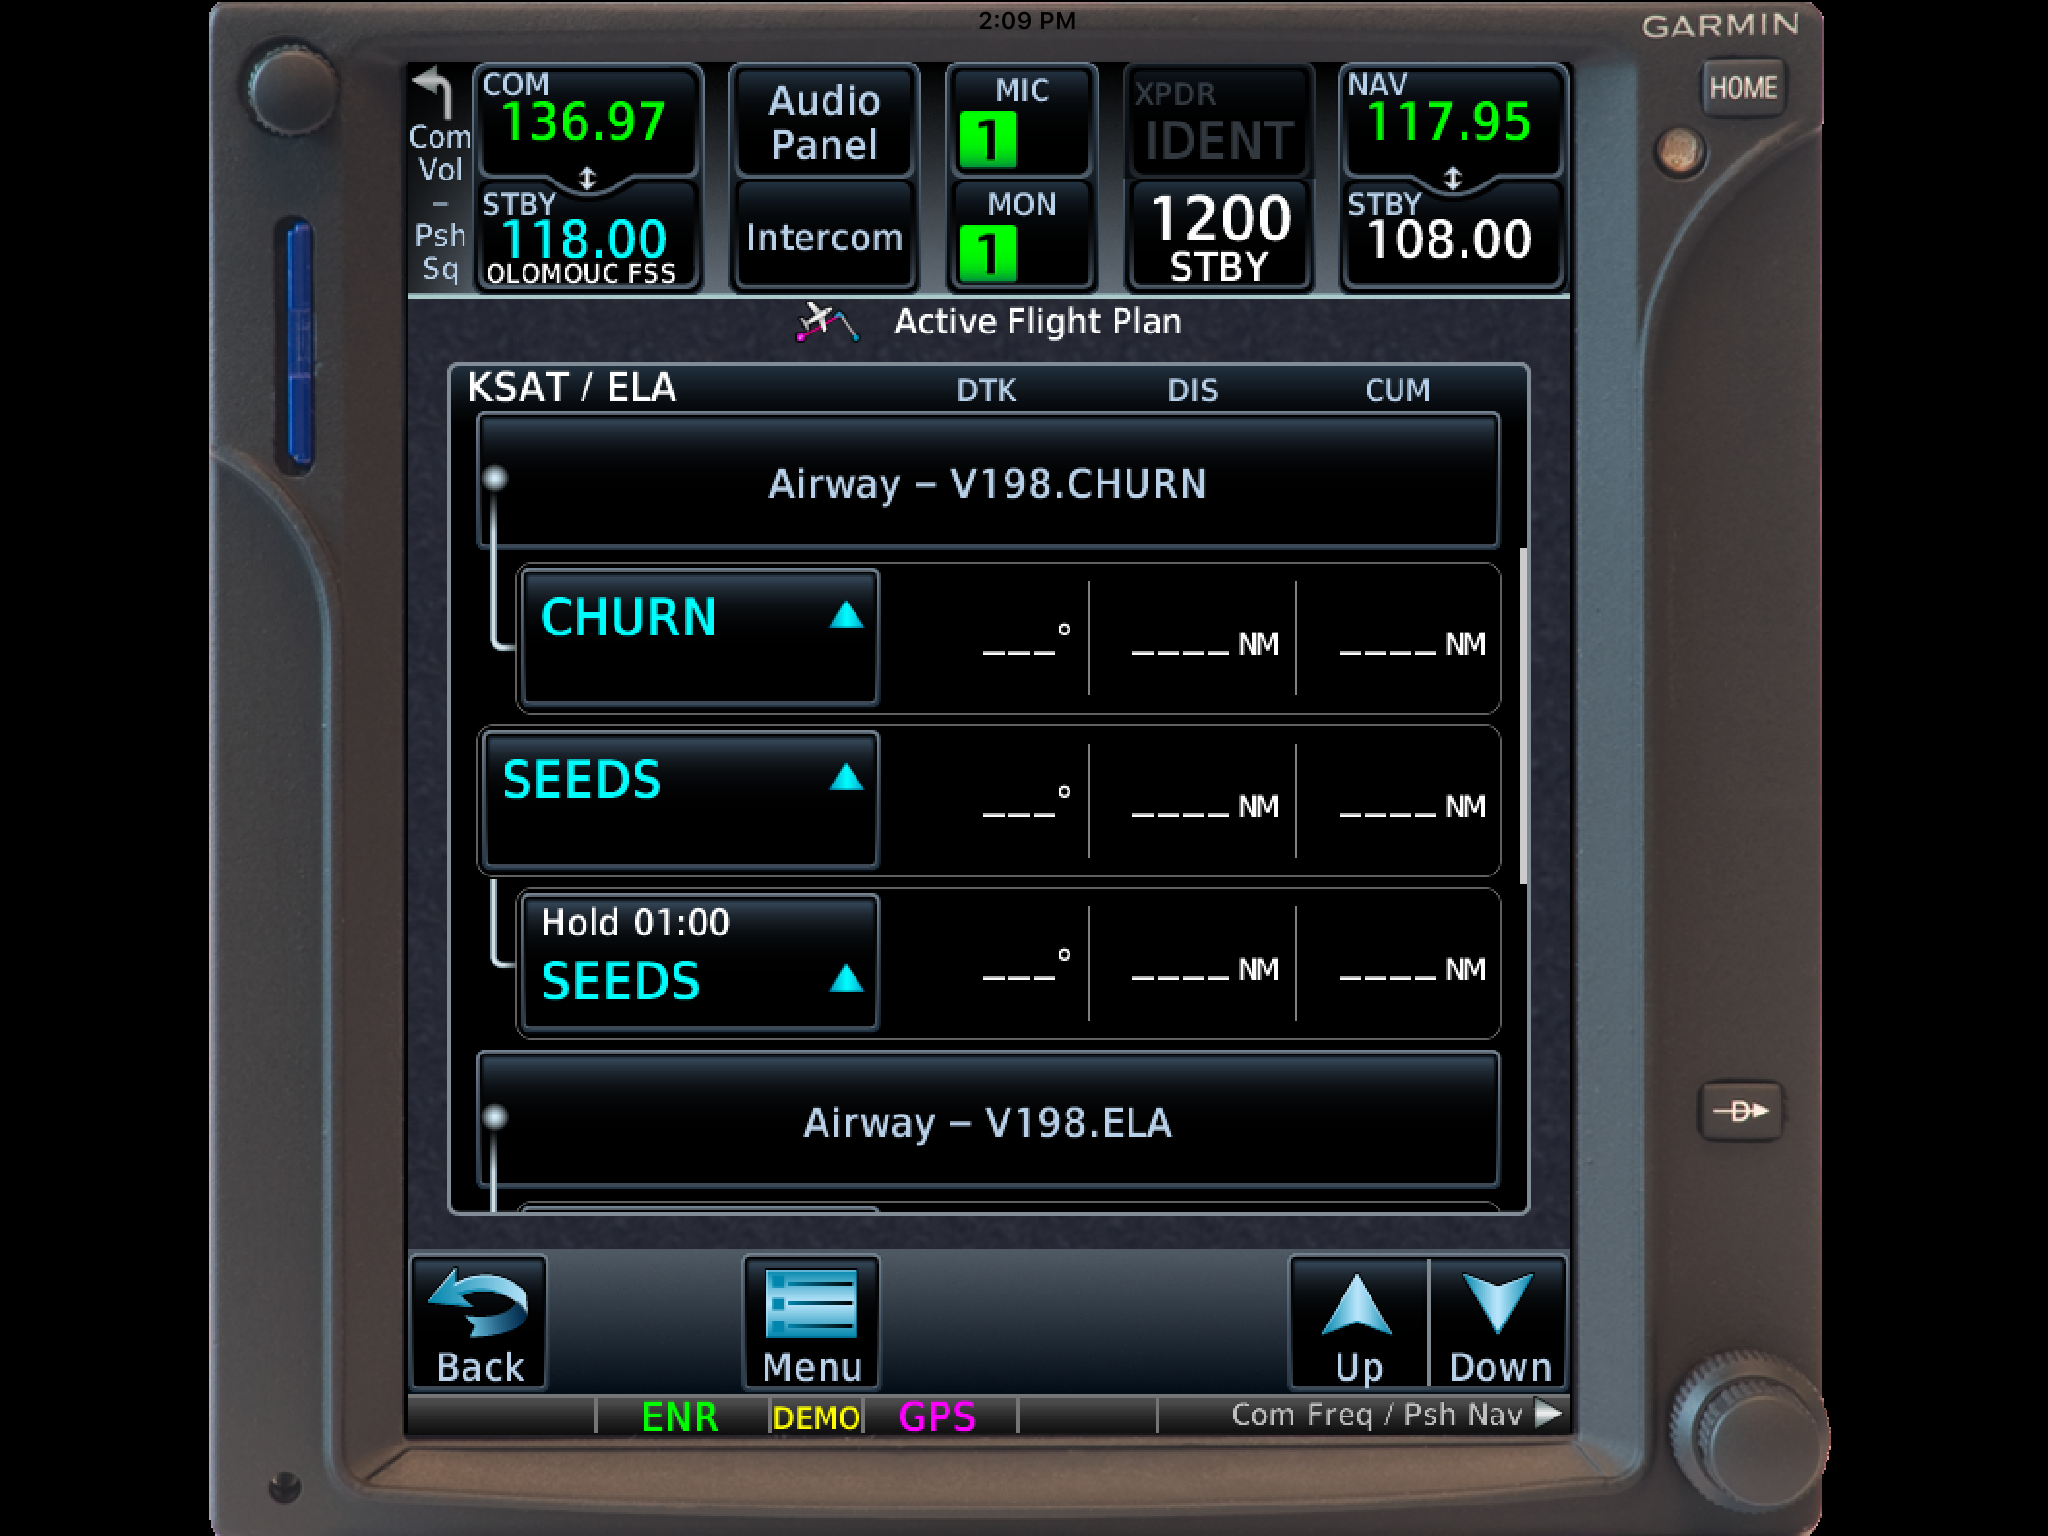
    7. The Airway and all the waypoints in between your entry and exit waypoints appear in your flight plan.
    8. If you are getting vectors to join the airway, you’ll need to use the Activate Leg function to activate the leg you will be joining the airway on.
      1. On the Flight Plan page, tap the waypoint that ends the leg you want to activate.
      2. On the menu that pops up, tap Activate Leg.

    Hold At Waypoint

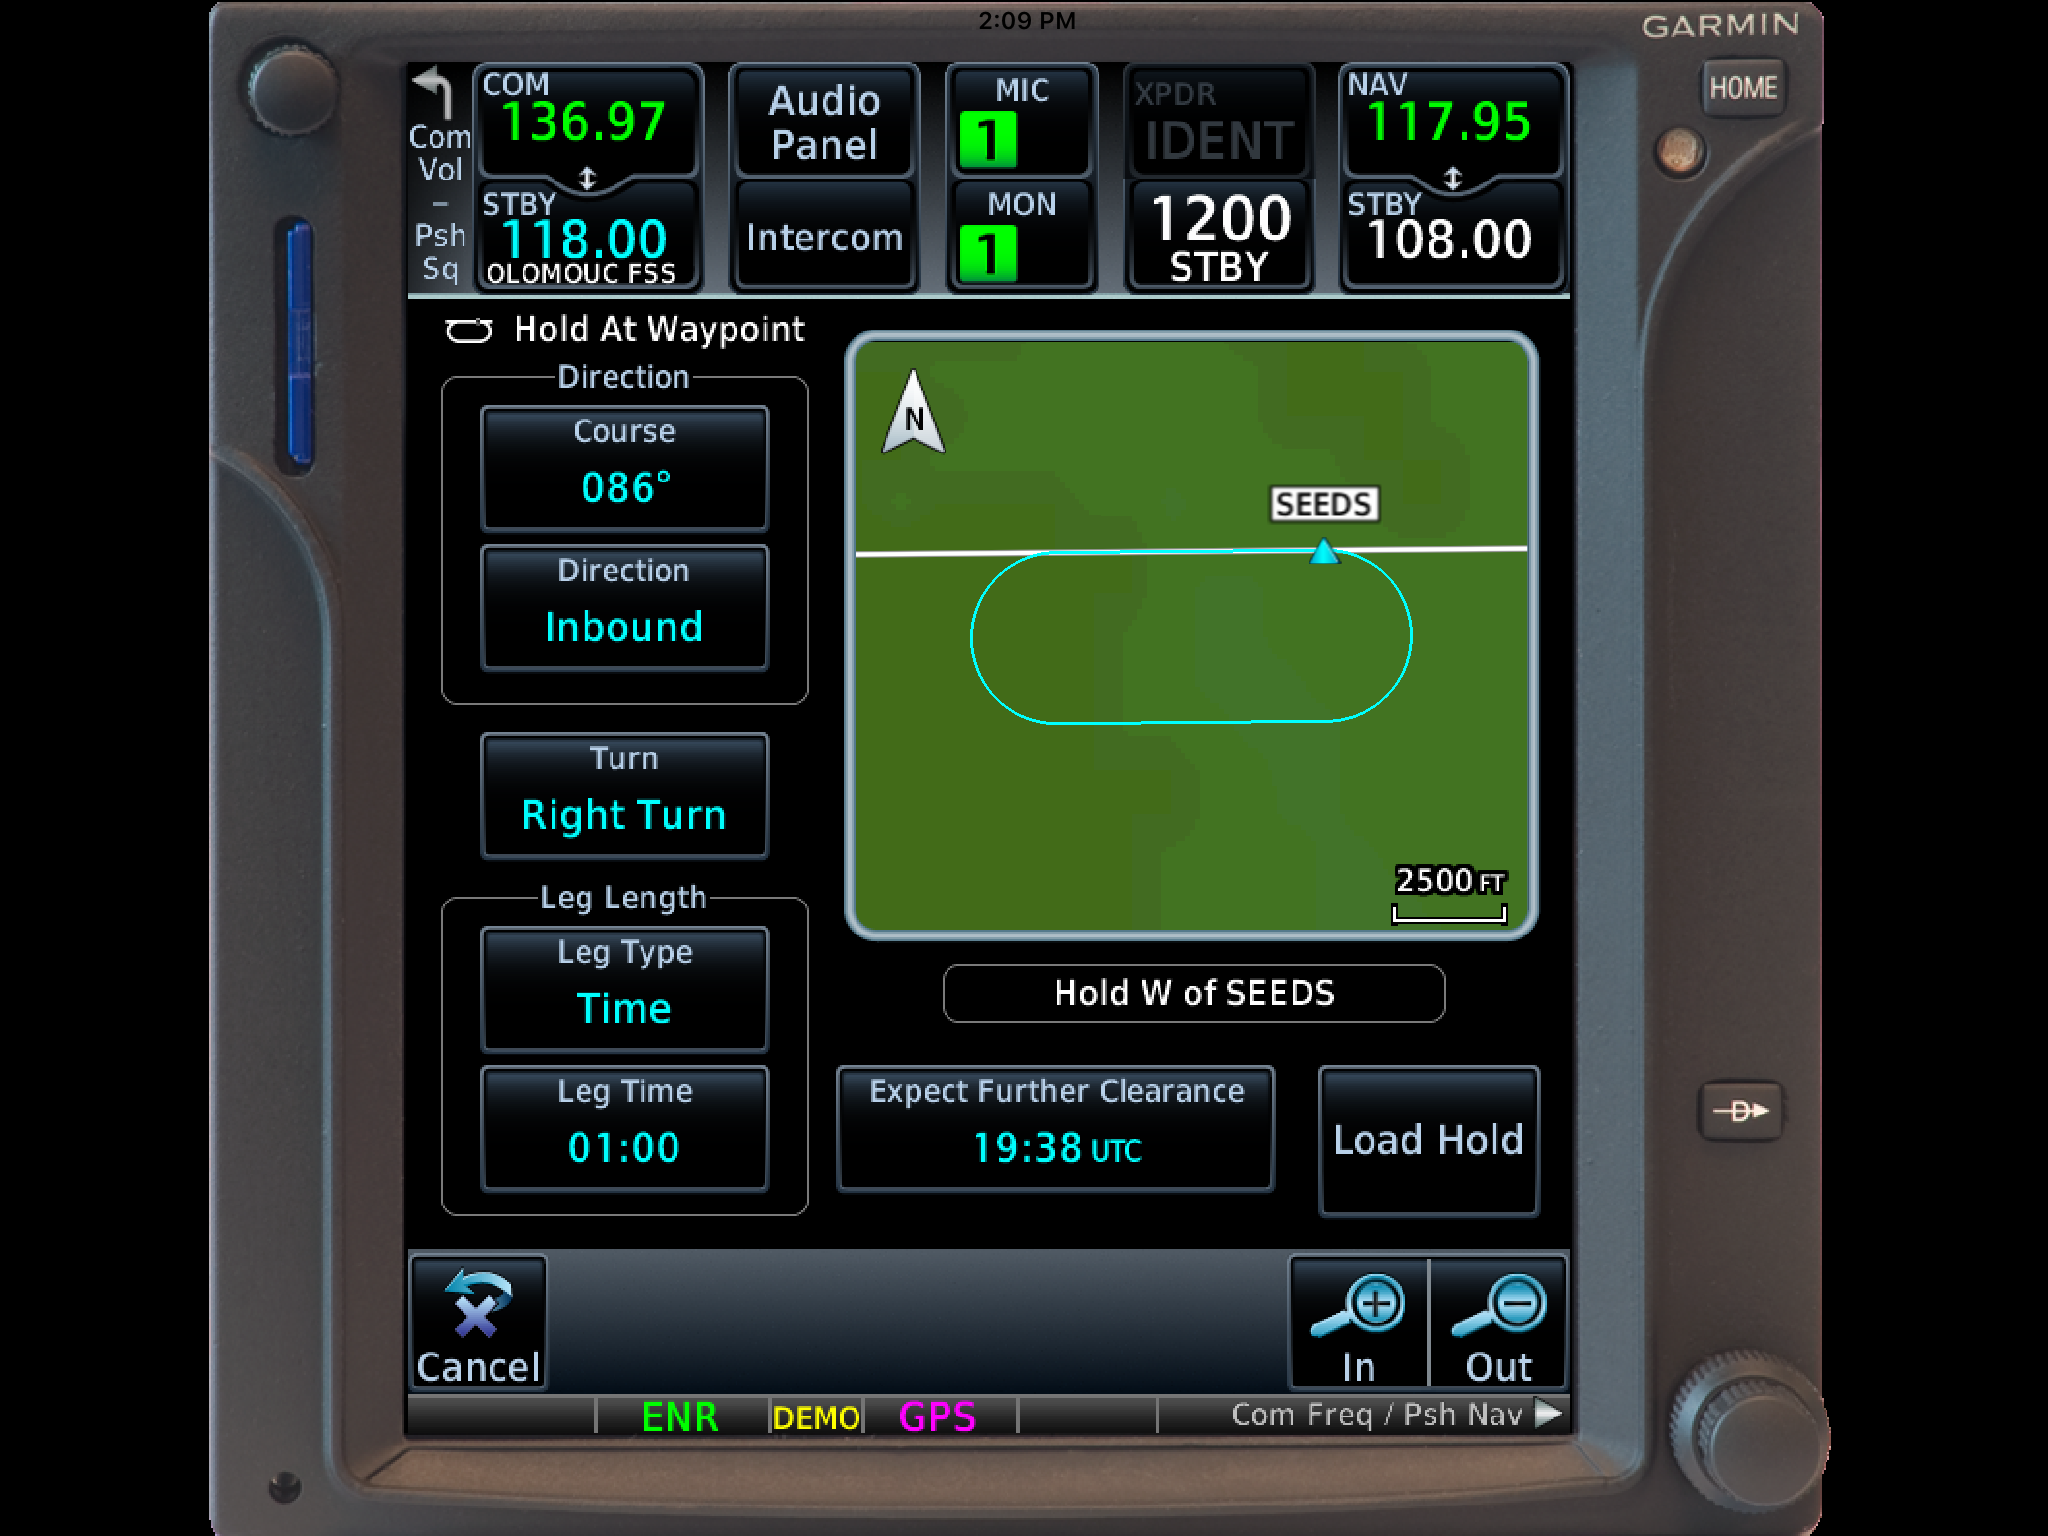
    The Garmin GTN 750 allows pilots to place a holding pattern at any waypoint that is in the Nav Database (or any user created waypoint).  Here’s how to do it.

    1. On the Flight Plan page, tap the Waypoint that you want to hold at.
    2. On the menu that pops up, tap Hold At Waypoint
    3. On the next menu that pops up, input either the inbound or outbound course, right or left turns, leg time or distance, and the EFC time, then tap Load.
    4. You will see the hold now as a Waypoint in your flight plan.


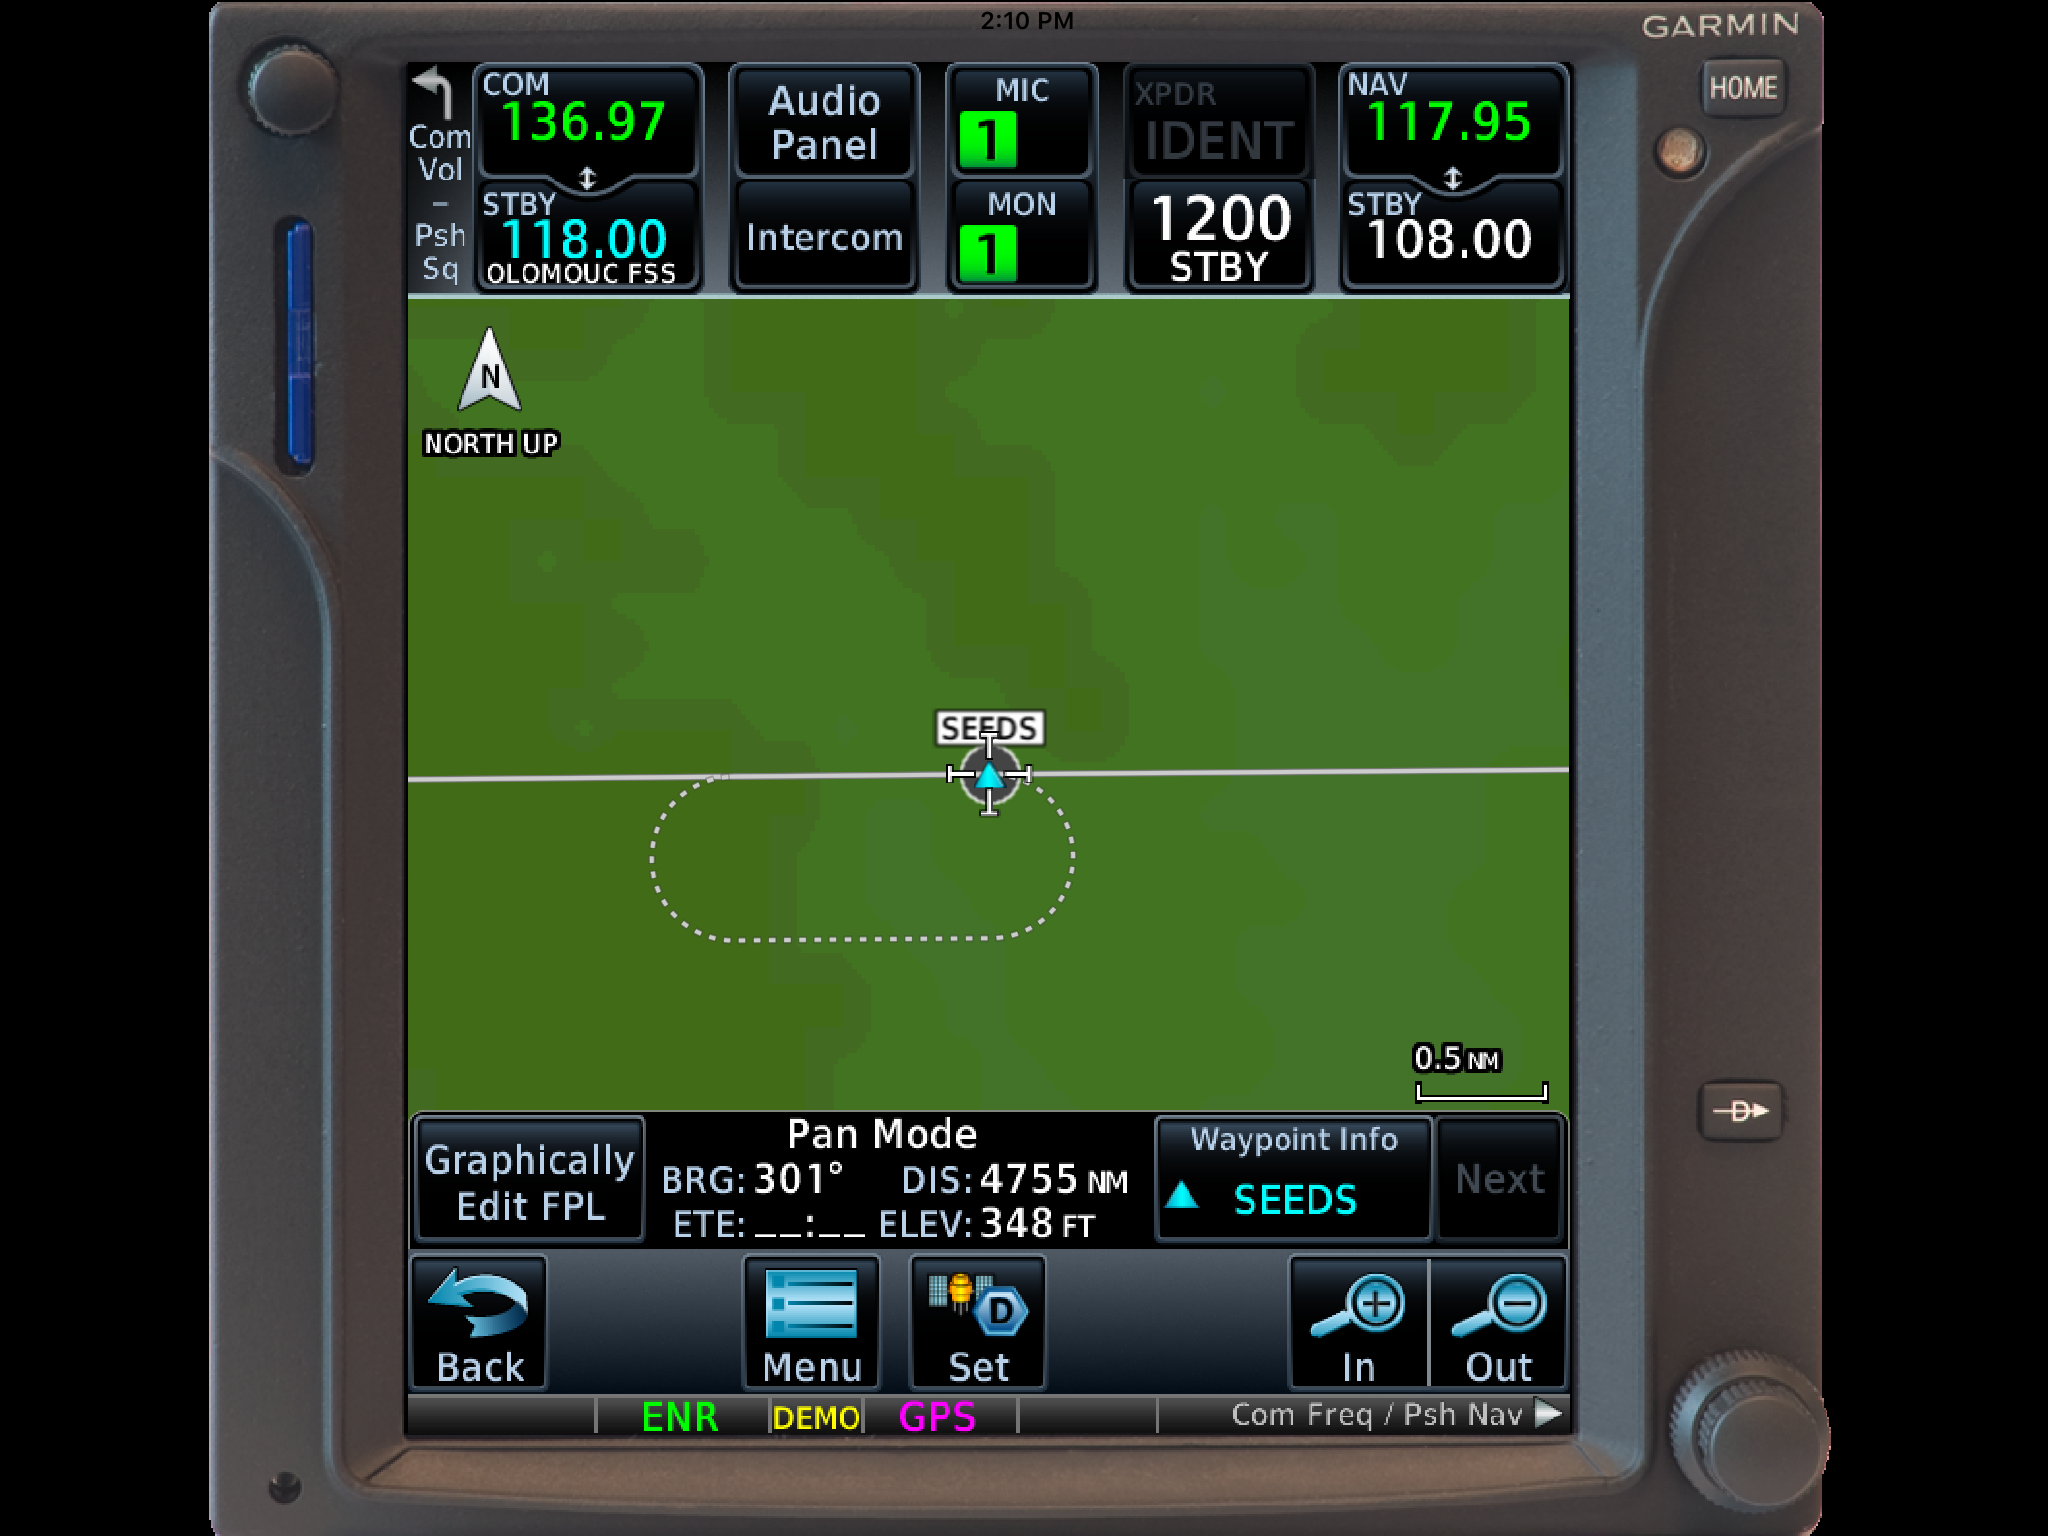
    Once the hold is entered, the GPS will go into Suspend mode, suspending the Flight Plan Waypoint Sequencing.  Once you are ready to depart the hold, you will have to tap Unsuspend before crossing the holding point on the inbound leg, then the GPS will resume normal waypoint sequencing.

    These are 2 of the really cool, gee-wiz features of the Garmin GTN 750.  Following the above steps will make IFR flying much easier for the pilot, as well as much more enjoyable!

Leave a Reply

Your email address will not be published. Required fields are marked *