|

Rudder Use

I have the blessing (same say it’s a curse) of being a tailwheel pilot. I did my tailwheel training in a Citabria and have gathered about 400 hours over the years in Citabrias, Super Cubs, and Maules (don’t judge all tailwheel airplanes by a Maule, by the way. The Maule is it’s own unique animal). The blessing of being a tailwheel pilot is that it greatly enhances my stick and rudder skills for all airplanes.

No matter what airplane you fly, basic stick and rudder skills are always important. At some point during a flight, the rudder will need to be used, even if you have an airplane that has a yaw damper. Rudder use is vitally important in the takeoff and landing phase, especially if you fly an airplane that generates a lot of torque on the takeoff roll. Rudder in that phase of flight is pretty evident, because if the rudder isn’t used, you’ll go off the left side of the runway.

Where I want to focus is rudder use in the landing phase. As an airplane comes down final, there are several forces that are be acting on the airplane. When it’s bumpy, updrafts and downdrafts are moving the plane up and down and all around. To correct for a bump that sends the airplane into a roll, aileron is added in the opposite direction of the roll. That aileron input also induces adverse yaw, pulling the nose of the airplane in the opposite direction that the pilot is moving the ailerons.
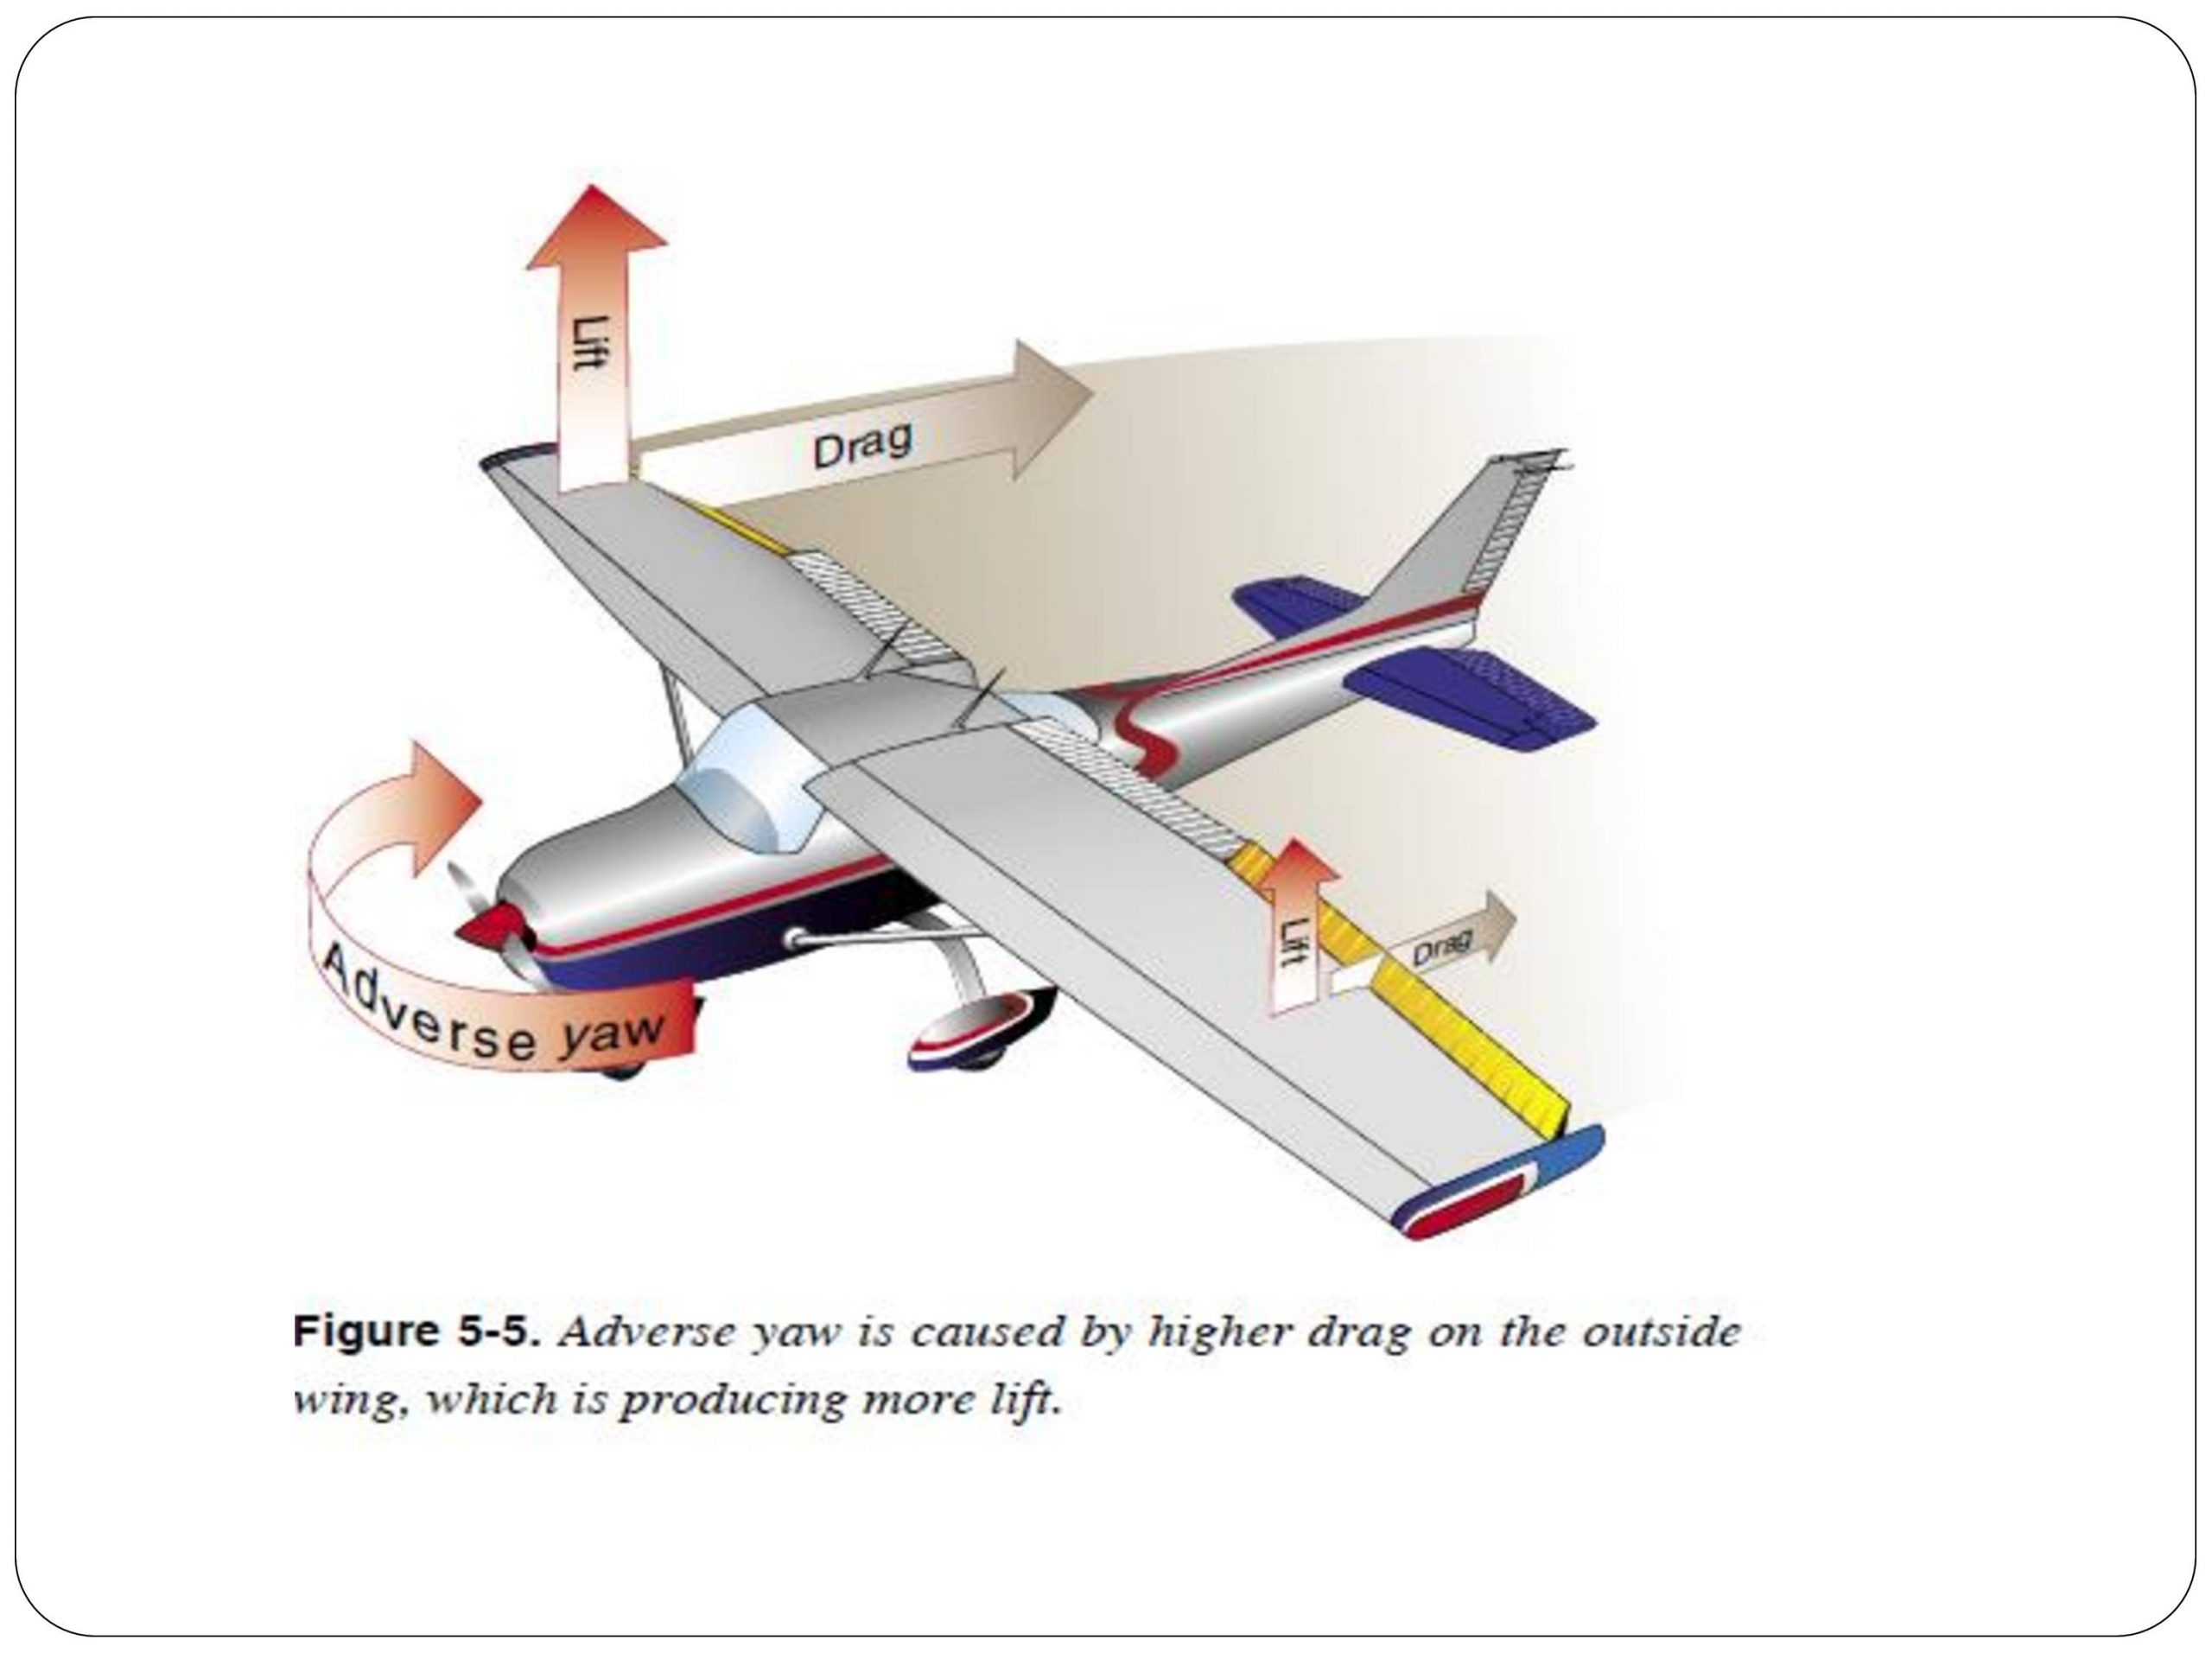
If a pilot isn’t using his feet correctly, then the nose of the airplane will wallow around through the air as aileron inputs are used. The tail is also moving around quite a bit, so the pilot might not “feel” the yawing moment, but the passengers in the back seat certainly will.

The other advantage that comes with proper rudder usage on short final is the airplane is more responsive to control inputs. When utilizing both the ailerons and the rudder, a pilot is able to fly the airplane much more precisely and control it much better.

This doesn’t mean you have to be staring at the turn coordinator the whole time down final. In fact, that’s exactly what you don’t want to do. Your eyes need to be outside the airplane. Just get in the habit of stepping on the rudder whenever you move the ailerons on final and eventually, you will feel what your airplane is doing. Don’t step on the rudder as hard as you can, but slight pedal pressure in the direction of aileron input will make a big difference.

Rudder is also vitally important for landing in a crosswind no matter that airplane. Crosswind landings are a learned skill that take a lot of practice to perfect. There is also a lot of confusion as to what control input does what during the landing.

Here is the simplest way to picture a crosswind landing and what the controls do:

  • Aileron-When performing a crosswind landing, the ailerons keep the airplane over the centerline. If the airplane is drifting to the right of the centerline, add left aileron to bring it back to centerline, then keep enough aileron control pressure in to keep the airplane over centerline. In a perfect crosswind landing, the main tire on the windward side will touch down first. Left crosswind means left tire touching first.
  • Rudder-When performing a crosswind landing, the job of the rudder is to straighten the nose to point down the runway. You will not be coordinated in a crosswind landing, you will be slipping, which is the goal. So, with a left crosswind, you will be inputting left aileron to remain over the centerline and you will also need right rudder to straighten the nose. This also prevents the airplane from actually rolling in the direction of the aileron input.

If you remember for a crosswind landing: “Aileron into the wind to stay over centerline, opposite rudder to straighten the nose.” Too much aileron and the plane will drift into the wind. Too much rudder and the nose will yaw in the opposite direction.

Rudder is very important, even in our day and age where a lot of general aviation airplanes have yaw dampers. Our feet only have a job for a short period of time, but that is the most critical time. An excellent way to get more proficient in rudder use is to go get a tailwheel endorsement. If you are in the central Texas area, check out TacAreo in Fredericksburg, T82.

Don’t let your feet fall asleep!

Similar Posts

  • Cessna TTx Production Ceases

    Sadly, in January, a pretty great airplane was put out to pasture.  Textron (the conglomerate that now owns Cessna, Beechcraft, Hawker, and Lycoming) announced it was ceasing production of the Cessna TTx.  With the end of the Cessna TTx production, an airplane that was the main “competitor” to Cirrus (if you can call it competition; Cirrus consistently outsold the Cessna TTx by a wide margin each year), it leaves the SR series to stand alone atop the High Performance piston single market.

    I got to go through Cessna’s FITS Accepted Instructor (CFAI) course back in 2012 and have flown in the Cessna 350 and 400 (which is what they were known as at the time; the Cessna TTx name came around in 2011) for about 120 hours.  I really like the airplanes.  I’m partial to the Cirrus, but the Cessna 350 & 400 are fast airplanes and great for 1-2 people.  I flew a 350 (the non-turbo charged version) from New York to San Antonio last fall and routinely saw 170 knots at 12 GPH.

    Columbia started out making the 350 & 400 (the turbo-charged version) in the early 2000s, but went bankrupt in 2007.  Lancair started Columbia to make a certified version of their popular kit planes.  If you see a Lancair ES floating around, you would swear it’s a Columbia with only 1 door.  Cessna bought the design from Columbia in 2007 to begin manufacturing the airplanes themselves.

    Cessna then made a huge mistake as they moved the production facility from Bend, Oregon to Mexico. Production completely halted in 2009 as the planes coming out of Mexico were found to have defective composite work.  The sales never really recovered, even though Cessna put the Garmin G2000 panel in the Cessna TTx, complete with a touchscreen key pad.  A FIKI system was added as an option in 2012.

    A prospective buyer can still get a great value on a used 350, 400, or TTx, as they are valued a little lower than a Cirrus.  The 350, 400 or TTx all make excellent single pilot or two person speedsters with very comfortable amenities.

    Information for this article was taken from Flying Magazine’s website.

  • Flying to the Bahamas

    A couple weeks ago, my employer informed me that he wanted to take a group to Nassau, The Bahamas. I thought, no big deal, this should be an easy trip. The more I started to read, though, the more I realized it wasn’t going to be just a “normal” trip.

    If you aren’t a member of AOPA, I would highly recommend joining. AOPA’s website was where I started researching. They actually have a checklist to help you along the way.

    The first step is getting the paperwork started. All souls on board are going to need a valid passport. In our case, a couple of passengers need to get theirs. Since it was a little shorter notice, we had to go through the expedited process. It’s fairly simple. A quick internet search gave me a couple of people that helped the process along.

    Next was making sure the aircraft had all it’s paperwork. The airworthiness certificate was easy as it’s always in the plane (or should be).

    The registration certificate was next to check. We recently upgraded to the King Air 350 so we had to make sure we had the original issuance registration certificate. The Bahamas supposedly doesn’t allow Temporary Certificates and I really didn’t want to test that policy.  Thankfully after a couple of calls between owner and the FAA we got the original.

    The aircraft and pilot are both also required to have an FCC Radio License. This is only for international flying, but not an everyday thing pilots think about.

    After that was flight planning. I use FltPlan.com. The actual filing of the flight plan was very easy. I use the prescribed routes from the website. In the remarks section of the flight plan put ADCUS (Advise Customs). This advices ATC to let customs know of your arrival. It’s basically an added safety net in case you forget to call ahead or your flight times end up being way off.

    The other item when dealing with flight planning is dealing with eApis. There are numerous companies who will provide this service for you. I elected not to use one of those. If you go to the CBP website, you can set up an account and do all of it yourself. Take your time and really plan the flight out well to make sure your arrival times are as close to real time as possible. If you’re way off, this will make any customs agent very frustrated and that is not something you want to be dealing with.

    Approach charts and en route charts are another hurdle. Thankfully Foreflight has you covered. With my subscription, I already had en route charts. The approach charts were the real issue. In the Bahamas, the only places that have approved instrument approaches is Nassau and Freeport. Fortunately, we were going to Nassau. Foreflight does charge almost $400 for the Caribbean and Bahamas charts.  Emailing the FBO is a good option as they can usually supply approach plates for international flights.

    You’ll also need a CBP sticker. This goes on the outside of the aircraft showing customs you’re in the system. This can be found on the CBP website as well. It takes a little bit to get the
    sticker in the mail. However, once you pay for the sticker, the receipt can be used in place of the sticker.

    The final thing I focused on was picking an FBO. I chose Jet Aviation. They had CAA which gave us a Jet fuel discount. Their facility was excellent and staff was very friendly. The thing that put it over the top for me was how they handled customs. I emailed Jet Aviation all the information for myself and passengers and they pre-filled all the customs forms for me. When we arrived, customs took all of five minutes and then my passengers were out the door.

    While in Nassau, I stayed at Breezes Resort. It’s all inclusive so that helps keep the costs down for your owners if you’re a corporate pilot. It’s next to some of the other bigger resorts so there were shuttles available to get to other amenities. The only complaint I might have was the power kept cycling on and off and the internet wasn’t reliable. This proved challenging when trying to plan for the return trip.

    The return trip required a lot of the same preparation. Again it was nice to have a good FBO to help prepare the paperwork required to clear customs. Jet Aviation handled the General Declarations for me and my passengers. All I was required to do was file the flight plan and file eApis, which was actually challenging while my internet at the resort was on the fritz.

    Don’t forget to call US Customs at your Port of Entry! As this was Ft. Lauderdale for us, I called them twenty four hours in advance as prescribed. The customs agent was friendly and helpful with any questions I had. I think the best advice I can give throughout this whole experience is call ahead and ask lots of questions! Did I say that already?

    The morning of the return trip went off with no hitches. Again, Jet Aviation had set up a driver to pick me up and he was on time. Jet Aviation had all the General Declarations paperwork pre-filled out for myself and passengers. Again, I use FltPlan.com to file my flight plans. Their service performed flawlessly even though I had heard rumors of flight plans not going through. To curb my bet, I talked with the staff at Jet Aviation and they made a call to tower for me to verify that the flight plan had gone through; of course, it had.

    The actual flight out of Nassau was pretty uneventful. The last real hurdle I had was dealing with customs in Ft. Lauderdale, and hurdle it was. When we landed at FLL, ground instructed me over to customs ramp. There was no one to tell us where to park on the ramp. This was extremely frustrating.

    A Learjet taxied in prior to us and had taken up most of the ramp but, we found a spot and shutdown. Once we shut down, no one came out to our aircraft. I walked in to talk to someone and was greeted by a Boarder agent who was less than helpful. Since the Learjet had parked first, they got to go through first. Evidently, we were not allowed in the building until they were done. This didn’t make my owner too happy!

    Be prepared, though, if another airplane is on the Customs ramp before you arrive.  You are not supposed to get out of the airplane until a Customs agent comes and meets you, even to go to the bathroom.  This can result in large fines.

    Once we were allowed in, the process went smoothly. We had to put all of our bags through the x-ray machine. Beyond the x-ray machine, CPB didn’t require any other security measures. On other crossings I’ve done, CPB had opened up bags and sifted through clothes, so just doing the conveyor belt was a surprise. The rest of the trip was fairly commonplace. We stopped in Destin FL for dinner before making our final leg into Dallas. All in all, it was an excellent trip and I’m excited to do another one.

    Ryne Bergren works for a Part 91 operation in Dallas flying a King Air 350. Being a Part 91 outfit, he doesn’t get to rely on a “dispatch” or “company” to help with any international flight planning. This was a learning experience for him. Hopefully this will be a help to anyone for future trips.

  • Night Flying

    Ah, fall is finally here.  In Texas, it arrived about a month late, but showed up with a vengeance.  A strong cold front caused a 40 degree temperature drop in 12 hours earlier this week, bringing rain, lower freezing levels, and lots of wind.

    Fall means cooler temps, but fall also means less light.  The sun begins to set sooner, plus the fall back time change in November cause darkness to spring upon an unaware pilot.

    Before getting in to too many night landings tips, just a friendly reminder, passengers can only be carried at night if the PIC has completed 3 takeoffs and landings to a full stop in the last 90 days during the time period of 1 hour after sunset to 1 hour before sunrise.

    Lots of us have been landing long before sunset for most of the past couple of months, so those night flying skills might be a little rusty.  The best way to remedy night flying rustiness?  Call an instructor and go get some practice.

    In the meantime, here are some tips as to what to expect for your next night flying experience.

    1. Your Eyes Are Very Important.  This may seem like an obvious statement, but night vision can be affected by many things.  Before you takeoff, you want to make sure you can see in the dark.  The FAA recommends no bright lights 30 minutes prior to takeoff.  They also recommend using oxygen at night as this greatly improves night vision, even at low altitudes.  Use off center viewing to help spot traffic or other objects in the air.  Finally, when preflighting, use a red flashlight as much as possible, but if you do have to use a white light, close one eye to keep one eye from being blinded.
    2. Utilize Approach Lights on Landing.  Night landings are very different then day landings.  It is very difficult to get the proper depth perception, not too mention see obstacles below you on your final approach to a runway.  PAPI’s, VASI’s, and instrument approach glide slope’s become very important.  If you are VFR only pilot, if your airport has a PAPI or a VASI, keep 2 white and 2 red (or 1 white and 1 red) lights.  If you see 3 red (or 2 red), climb.  If you see 4 red, definitely climb.  If you are an IFR pilot, I highly recommend always flying an approach at night.  What if your airport doesn’t have a PAPI, VASI, or approach with a glide slope?  You might not want to utilize it at night.  One side note on VFR flight: Clouds are nearly invisible at night.  If you do fly into a cloud (a clue is your strobe lights start reflecting back at you), don’t panic.  If you have an autopilot, turn it on and execute a 180 degree level turn.  If you don’t have an autopilot, start scanning your instruments, keep your attitude indicator blue side up, and make a shallow 180 degree while maintaining altitude.  Then call ATC, advise them what happened, and ask for help.  One more note:  I highly recommend that if a pilot finds that he/she will fly at night at lot, get an instrument rating and fly IFR at night.  It’s much safer.
    3. Practice Landings Before Carrying Passengers.  The tendency when landing at night is to level off too high before flaring, causing the airplane to bleed off speed and energy too high above the runway.  This can lead to a stall, a hard landing, and/or too high of a pitch attitude at touch down causing a tail strike. A good tip is start your level off when you can see the tire marks on the runway.  Make sure you practice night landings, preferably with an experienced instructor who is night current and proficient, before carrying any passengers on board, even if you are night current, but haven’t landed at night in a while.
    4. Night Emergencies.  For engine failures at night, you are very limited on options.  Unless you have a Cirrus equipped with a CAPS parachute system, you really have two options if an airport isn’t within gliding distance.  Find a wide, lighted road that appears to be lightly trafficked.  A word of caution, though:  be careful of light poles, fences, concrete medians, cars, and buildings.  The LA freeway would not be a good option (though there are exceptions to this rule as is evidenced by the picture below).  The second option is find a dark spot and pray it’s a field (or the Hudson River).  As you get closer, you can turn your landing light on to see what the ground looks like.  If it looks good, keep the light on and continue.  If you don’t like what you see, turn your landing light off and continue….

    Flying at night can be the best time of day to fly.  It’s usually smoother, cooler, and you get to see all the city lights.  It is a very different environment, however, so make sure to get some training before darkness settles in on your next trip.

  • Aircraft Purchase: The Logbook & Pre-Purchase Inspections

    Your about to make your dream aircraft purchase.  The plane has low time on the engine, is reasonably priced, and, according to the seller, has no damage history.  You are overjoyed!  Your dream of making an aircraft purchase is finally coming true.  You prepare your offer for the seller, set up the escrow account, and start all the paperwork.

    Two weeks later, the airplane is yours!  You start flying it, though, and the engine starts to have some strange vibrations.  After several flights, it starts to get worse.  You take it to your mechanic to get it looked at and you find out the airplane needs three new cylinders along with some other engine work that is going to total a lot of money.  Plus, your airplane is now going to be in the shop for several weeks.

    All that excitement you just had?  It just went out the window.

    Could this have been prevented?  Probably so, with a logbook inspection and a pre-purchase inspection.

    Aircraft Purchase:  Maintenance Logbooks

    Aircraft Purchase: Logbook Inspection

    Inspecting a logbook can be very daunting when making an aircraft purchase, especially for older airplanes.  This is, however, one of the most vital steps in making a new aircraft purchase.  You can find out many things from looking at the maintenance logs of an airplane.  First, you can check the compression levels of the engine.  Typically, you want compression levels in the 70’s, with it still being okay in the high 60’s.  Anything below 65 and there could be potential problems.

    Second, you can find out if there has been any odd maintenance done pointing to possible unreported damage history.  This is rare, as most aircraft owners are honest and up front when talking about damage history.  But, if there is an entry detailing a prop overhaul after only 50 hours on that prop, you may start to ask some questions.

    Third, you can find out how well the airplane has been maintained.  If a lot of maintenance was completed at each annual, even if it was a lot of small things, then the airplane has been maintained by a good mechanic who is very thorough.  This also involves a check of the ADs, Mandatory SBs, SBs, and SLs that have been issued for the airplane.  If all that has been kept up with, it’s a well maintained airplane.

    Finally, it gives you a good idea of how much the airplane has been flown.  Sure, the ad online will have the total time and time since overhaul, but you can look at the year by year breakdown of how much the airplane has been flown.  It may have been flown a lot earlier in it’s life, but not quite as much recently.  That’s not necessarily a bad thing, but airplanes like to be flown.

    Aircraft Purchase: Pre-Purchase Inspection

    Before making an aircraft purchase, it is extremely vital that whenever you are buying an airplane that you get a pre-purchase inspection done on the airplane.  Even better is getting one done by a mechanic who specializes in that type of airplane (eg. Piper Service Center for Pipers, Cirrus Service Centers for Cirrus, Kevin Mead for PA-46s).  A pre-purchase inspection can save you a lot of money in the end.

    There is always going to be some kind of maintenance issue with an airplane being purchased, whether it is big or small.  Once a pre-purchase inspection is completed, you can take the findings to the seller and negotiate for a lower price based on those findings, or just have the seller fix the items before the sale is completed.

    I would recommend having the seller fix the problems before the sale is completed.  Even though it may take a little longer for the sale to be completed this way, you’ll get to enjoy your airplane right away instead of it being in the shop the next several weeks after you complete the purchase.

    There is the circumstance where the  pre-purchase inspection reveals some serious airworthiness issues which would cause the deal to be voided.  Always put this clause in a purchase agreement, giving you, the buyer, an out if there are serious airworthiness issues.

    When it comes to making an aircraft purchase, it is not a process to be rushed.  Slow and steady usually gets the best airplane for the money, giving you years of enjoyment in the future.

    Looking to make an aircraft purchase?  Daunted by all the work that’s involved to find a good, quality airplane?  Let Texas Top Aviation do your aircraft search for you!  To learn more, visit Texas Top Aviation’s Aircraft Purchase Consultations page.

  • 2018 Great American Lancair Rally

    A brand-new event for Lancair owners, the 2018 Great American Lancair Rally will be a multi-stage “grand tour” of the Western US.  Starting and ending in Central Texas, the Rally will take place September 24th through October 5th 2018.

    The Rally will begin in Uvalde, TX (KUVA) on September 24th at the Lancair headquarters.  There will be 6 legs, with stops at:

    • Sedona, Arizona (KSEZ)
    • Paso Robles, California (KPRB)
    • Redmond, Oregon (KRDM)
    • Spanish Fork, Utah (KSPK)
    • Taos, New Mexico (KSKX)
    • San Marcos, TX (KHYI)

    At each stop, there will be food, drinks, and fun for everyone.

    Lancair plans on making instructors available to pilots who would like any kind of training along the way.  Hank Gibson from Texas Top Aviation will be one of the instructors available.

    Lancair plan to make the Great American Lancair Rally an annual event, with the 2019 Rally spanning the eastern half of the country.

    The Great American Lancair Rally is open to all Lancair owners, potential owners and interested aviators. Fly a different airplane?  All makes and models are welcome!

    For more information & to register, check out the 2018 Great American Lancair Rally’s website.

  • Drones: A Brief History

    Drones; these technological wonders have, seemingly, come out of nowhere over the course of a few years. Although they bring with them the promise of convenience and fun, they have also brought problems and uncertainty for the government, general public, and, specifically, the aviation community. But, where did drones come from and are they really something to be worried about? Let’s take a look at Unmanned Aerial Systems (UAS) and hopefully put to bed some of the concerns which seem to be following them around.

    It shouldn’t come as a surprise to anyone when I say that drones have recently become overwhelmingly popular. The military, businesses, and hobbyists are increasingly utilizing them for all kinds of purposes, which range from enemy surveillance to package delivery. Drone pilots are in high demand and several aviation universities are even offering majors designed to produce graduates which specialize in UAVs (Unmanned Aerial Vehicles).

    Drones are relatively new to the landscape of unmanned flying machines. Although model airplanes have been popular since the dawn of aviation, the first “drones” didn’t start becoming commercially available until a few years ago. As electronic technology advanced, so did model aviation. Models became more and more sophisticated and could be flown remotely as long as they remained within sight of the person flying it.

    It wasn’t until about 3 or 4 years ago that the technology became available to develop drones. This is due to the need for very small and light electric motors, batteries, and stabilization systems. Once these started to become popular, it didn’t take long for drones to become bigger, cheaper, and completely automated.

    It is important to note that there is a difference between drones and conventional model airplanes and helicopters. Drones are defined most simply as an unmanned vehicle which can be operated without user input from the ground. Conventional model aircraft can take all shapes and sizes, but must be operated within line of sight from the operator; as they have no ability to fly, takeoff, land, or navigate without input via a radio transmitter. So, if you happen to see a model aircraft flying, don’t assume automatically that it is a drone. Most of the time, model airplanes, helicopters and even drones are being flown safely and legally.

    Generally, a drone is designed with several arms which come off of a central body. Each of the “arms” typically has a motor with a rotor mounted on it to provide lift while the main body is home to the radio equipment, landing skids and camera gear. If you see a model flying that looks like a conventional airplane or helicopter, odds are it isn’t a drone. Most likely it is being flown recreationally by someone nearby.

    Historically, model airplanes and helicopters have been difficult to learn to fly. Before the times of pre-built foam airplanes and ready to fly drones, a modeler had to build their flying machine and find someone to teach them how to fly it. (Otherwise, they would likely only get one short flight). New modelers would be directed toward the local model flying club and would get plugged in with a group of established fliers who could outline the rules for model aircraft as well as get them up in the air safely.


    However, because most everything is purchased online in today’s market, drones are bought and flown by enthusiasts who have not been taught the rules, safety protocols, and procedures necessary to safely operate their new kits. In addition, the drones incredible stability and ability to be flown without any skill means that anyone with great enough funds and an equally great lack of common sense can buy a model and program it to fly over any location they choose. Unfortunately, sometimes that includes places which cause problems.

    Andrew Robinson is a 135 Charter Pilot and flight instructor who lives with his wife and 2 daughters in Pennsylvania.  He flies Pilatus PC-12s and instructs in Beechcraft Bonanzas.

Leave a Reply

Your email address will not be published. Required fields are marked *