Wind the Clock

There is truth in the old adage that 99% of flying is routine while the remaining 1% holds the potential for events that cause those who fly to hold themselves above mere ground-bound mortals. My 37 years of military flying might have distorted that ratio a fair bit given the complexity of high-energy fighter aircraft and the uncertainties of combat, but rest assured we all earn our right to be proud of our wings every time we fly.

The requirement that a single-seat fighter pilot be able to handle rapidly evolving emergency situations and complex systems diagnosis sets a high bar for any who join that group. However, the lessons we learned and techniques we developed for making fighter aviation significantly safer than in yesteryear have direct applicability to general aviation.

Prioritization and compartmentalization are two important skills that every pilot should have. These skills amount to the ability to look at a complex problem, quickly determine the most critical elements, and mentally set aside those things that can wait so as to deal with highest priorities first. While this does not sound like rocket science, the art is in the doing!

The technique for dealing with the immediate onslaught of information, such as when that caution tone or caution light presents and different gauges or displays go haywire, provided the title for this piece.

All flight training will, at some point, involve what is called situational emergency procedures training, know to military aviators as SEPT. We do this type of training in a simulated cockpit that has all the dials and switches for our particular aircraft. None of the switches and dials do anything, some are just decals on a wooden dashboard, but the presentation allows the SEPT victim to reach for the appropriate switch or lever, while telling the instructor what and why they are doing so.

One of the most common mistakes new trainees make is that of trying to act too fast, before they have fully and correctly analyzed the situation at hand. Herein lies the titled technique. After blurting out a quick and incorrect answer, the instructor would admonish with: “rather than try to react instantly, maintain aircraft control, analyze the situation, then take appropriate action. The best thing you can do is to reach up and wind the clock. This will give your nervous energy some place to channel itself, while your brain takes in the full situation.”
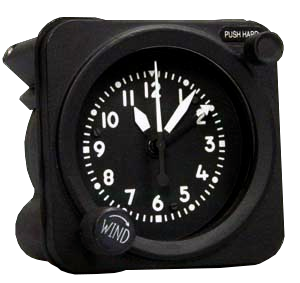
Waltham clock

Winding the clock might seem like an archaic notion, but, amazingly enough, even our most modern aircraft have the same clock we flew with as far back as the 1960s. The Waltham A-13A aircraft clock and timer is a wind-up device that only uses power to light up at night. Unless your emergency involved some type of catastrophic impact to the instrument panel, you could count on at least your clock to be functioning normally. Thus, reaching out and winding it was unlikely to cause any worsening of your evolving emergency and would distract your brain from the need to take some poorly-thought-out action, too quickly.

Now, in most aircraft there are a few emergencies that will require immediate, reactive actions. In fighters, we call these Boldface Emergencies. For each type of fighter, we memorize, to the letter, the few key actions that have to be instinctive, to prevent disaster. For all other emergencies, there is time to reach out and wind the clock while assessing all instruments and lights to fully understand your situation.

For your aircraft, know those Boldface or Critical Action Procedures, but for all other emergencies, take the time to maintain aircraft control, “wind the clock” while you analyze the situation, then take appropriate action.

Mike Hostage is a retired USAF pilot with 37 years of experience, flying a wide variety of aircraft.  An instructor pilot for more than half of his 4800 flight hours, Mike is currently qualified in a Cirrus SR-22T and regularly flys his two homebuilt sailplanes.


Similar Posts

  • Jet A Fueling Mismanagement

    I’m sure at this point, most pilots in Texas have heard about the Cessna 421 that went down two weeks ago in Lufkin.  The Golden Eagle suffered a dual engine failure (the pilot lost the first at 2300 feet, then the second at 1700 feet) in IMC on climb out.  He broke out at 1,000 AGL miraculously lined up with US 59, south of the Lufkin airport.  The pilot had to dodge a car as he was attempting his landing, stalled the airplane, sheared off the landing gear, then slid into the median.  No one died, but lots of bumps and bruises.  All were airlifted to Houston.

    Jet A Lufkin Plane Crash

    The cause was a lineman at LFK put Jet A in the 421, which is a piston airplane and takes 100LL Avgas.  The story that I saw said the pilot and two passengers were returning to Houston from Kansas City and diverted to LFK due to weather.  They landed in driving rain and spent the night.  I have not seen any reports saying whether the pilot sumped the tanks or not the following morning.

    There were several factors that led to this accident.  If you take one factor out, the accident probably wouldn’t have happened.  Let’s take a look at the sequence of events.

    The 421 arrived in a driving rain storm, so the pilot and passengers probably disembarked quickly to get out of the weather.  Factor number 1 presents itself here.  We don’t know whether or not the pilot told the lineman to put Avgas in it or not (he may have just said fill it up), so we’ll leave that aside.

    Understandably, the pilot dashed inside to get out of the rain, but they neglected to monitor the fueling.  Whether or not the fueling took place that night or the next morning, we can’t say.  I have started to greatly encourage my customers to monitor the fueling of their airplanes, especially when it’s a fuselage that can either have Avgas piston engines or Jet A turboprops, as is the case with the Cessna 421.

    Factor number 2, we already know about.  The lineman messed up and put the wrong fuel in.  If their was uncertainty about what type of fuel, he would have been prudent to await the return of the pilot to ask, even if that meant delaying the pilot’s departure.

    Factor number 3 is the matter of sumping the fuel.  We don’t know if the pilot sumped the fuel or not. The tricky thing about sumping is Jet A doesn’t settle out of Avgas like water does unless it sits for a long, long time.  The two ways to determine if you have Jet A in your Avgas airplane are to smell it, as Jet A has a very strong diesel smell, or do the paper towel test.  The paper towel test consists of dumping a fuel sample onto a paper towel, then let the Avgas evaporate.  If you are left with a nasty, oily residue, you’ve got Jet A in your tanks (not to mention it will smell like diesel).

    To prevent misfueling of your airplane, take the following steps:

    • Be specific in telling the lineman what type of fuel you want, not just “fill ‘er up”
    • Monitor the fueling and watch which truck pulls up to your airplane
      • This is especially important with fuselages that can have either Pistons or Turbo-Prop engines, like the PA-46 line or the Twin Cessna line
    • Always sump your fuel, definitely smell it, and if there are any doubts, try a paper towel test
  • Using the ICARUS Device to Simulate IFR Conditions

    Most of us who have been through instrument training are familiar with the traditional view limiting devices. There is the original hood, which does a decent job of blocking a pilot’s view of outside, but there are still gaps that allow “peeking”, though that peeking doesn’t really help a pilot fly an approach. It does help them figure out which way is up, so it’s not a true simulation.

    The other problem with a hood is the process of putting it on to begin simulating IFR conditions, then taking it off when it’s time to land. This process takes time and the instructor has to take the controls (or the autopilot flies), losing some of the realism of the simulation.

    Overall, an IFR hood is relatively comfortable. The elastic band sits under your headset, doesn’t squeeze your heard, and doesn’t press underneath your ear cups of the headset, giving you a headache. Hoods are large and somewhat unwieldy.

    Foggles are another way to simulate IFR conditions for training. Most of the time, these are safety glasses that have most of the lens blacked out or fogged out, leaving little slits at the bottom for the pilot’s eyes to see the instruments.

    Foggles aren’t quite as good as an IFR hood at blocking the outside. Due to their shape, there are often cracks that allow more “peeking” then a hood. The process of beginning to simulate IFR conditions and ending the simulated IFR conditions is easier though, since all the pilot has to do is put the foggles on or slip them off, which can often be done one handed (putting them on can be more difficult one handed since they have to fit underneath your headset). Wearing them for a long period of time can get painful as your headset is probably going to start crushing them against the side of your head.

    The best comfort and view limiting combination I have found, so far, is called the ViBAN. It’s very comfortable and does a really good job of simulating IFR by blocking a view of the outside.

    What’s the whole goal behind a view limiting device? When a pilot starts instrument training, ideally, all the training would take place in the clouds, since that is why someone get’s an instrument rating. As we all know, this isn’t possible, hence the need to simulate IFR conditions. The problem with simulating IFR is, it’s not true IFR. True IFR conditions are different then what a hood or a set of foggles can simulate. This can lead to spatial disorientation if a fresh instrument pilot enters the clouds for the first time, having done all his training in simulated conditions.

    I’ve even heard a story of a pilot who did all his IFR training with a hood, passed his check ride, went into the clouds the first time, and put the hood on because he was getting disoriented since he hadn’t ever experienced true IFR.

    What about full motion simulators? How I wish every airport had a full motion simulator for instrument training. Full motion sims are truly the best way to simulate IFR conditions. A pilot can easily get spatially disoriented in a sim if he or she isn’t careful. It’s a great way to simulate IFR conditions, but, alas, this just isn’t possible.

    Are we doomed to just do an okay job of training instrument pilots in simulated IFR conditions with a hood or foggles?

    Nope, at least not anymore.

    Enter the ICARUS Device. The ICARUS Device, which stands for Instrument Conditions Awareness Recognition and Understanding System, is an amazing piece of equipment which truly simulates IFR conditions in the training environment. The ICARUS is a plastic shield that uses a Polymer Dispersed Liquid Crystal film that allows the degradation of a pilot’s visibility. It clips on to a baseball cap and is attached to a battery. That battery is then bluetoothed to an iPad or iPhone App that allows the instructor to put the pilot into and take him out of simulated IFR conditions.

    Originally designed for helicopter training, it’s an excellent tool for fixed wing IFR training too. I’ve been using it for the last month and a half and I am hooked. The customer’s that I have used it with truly say that they cannot see a thing outside. Because the plastic shield turns white, it really does give the view that the pilot is in the clouds. The inner ear certainly believes it. The curve of it fits the glare shield in most planes nicely (there is some custom cutting that would have to take place for specifically rounded glare shields, but it fits Cirrus and Piper Saratogas nicely, the two planes I have used it in), and it sits away from the pilot’s face, blocking out all windows, which is what clouds do.

    The greatest thing from an instructor’s standpoint is the ICARUS Device app. The pilot puts the device on before taxi and I set the app to VMC. This completely clears the ICARUS Device so the pilot can see just fine for taxi and takeoff. Then, at about 400 AGL, I tap the <1/2 VIS button on the app, and boom, the pilot is in the clouds. I even have a time delay to slowly make the ICARUS Device opaque to simulate slowly entering the clouds. I do the same thing on an approach, except in the reverse order, simulating we are slowly exiting the clouds.

    The ICARUS Device is a game changer for IFR training. It’s comfortable, easy to use, the battery lasts for a long time (though bring a standard USB charging cord with you in the plane because the battery failure mode makes the ICARUS Device opaque instead of transparent. You don’t want that to happen at 200 AGL!), and, most important, it truly simulates IFR conditions.

    After using it, I believe all flight schools and CFII should get one of these, both in the fixed wing and helicopter world. It’s the best option for simulating IFR conditions.

    Checkout the ICARUS Device website for more information and to hear the story of the company.


    Texas Top Aviation, LLC was given an ICARUS Device by the ICARUS Device company to test. Texas Top Aviation, LLC was not paid for our above opinion on the ICARUS Device (trust me, if it was terrible, I would have told you!).

  • Determining Pattern Altitude

    Figuring out the pattern altitude at an airport should be pretty simple, right?  But, in this day of helpful technology, most pilots actually get it wrong.  How can you always get it right?  Well, it just takes about an extra 15 seconds.  Here’s how.

    Traffic Pattern
    John Wayne Airport Traffic Patterns

    As outlined in the Aeronautical Information Manual, section 4-3-3, “traffic pattern altitudes for propeller-driven aircraft generally extend from 600 feet to as high as 1,500 feet above the ground.”  Further, in the Pilot’s Handbook of Aeronautical Knowledge on page 13-10, it states:  “1,000 AGL is recommended pattern altitude unless established otherwise.”

    Okay, so for piston driver’s, we’ve got it narrowed down to 1,000 AGL (Above Ground Level for those who don’t like acronyms).  But wait!  There’s that very important phrase at the end of the last quote:  “unless established otherwise.”  That means not all airports have traffic pattern altitudes of 1,000 AGL, or else they wouldn’t put that line in there!

    How do you find out what the TPA (Traffic Pattern Altitude) is for a certain airport if it’s not 1,000 AGL?  Great question!  Your first guess is probably to look on Foreflight.  Though this is a good start, it is not the full answer.

    Let’s use an example.  Look up KAQO, the Llano Airport on Foreflight.  At the top of the page, the airport elevation is stated as 1,101′ MSL and the pattern altitude is stated as 1,902′ MSL.  From what we just learned, 1,902′ MSL is not 1,000 AGL, so is 1,902′ MSL otherwise established?

    On the Airports page with KAQO pulled up, tap the A/FD tab, second to last on the left.  Scroll down to Llano Muni.  Read the whole entry.  Does it state in the entry that pattern altitude is different than 1,000 AGL?  It sure doesn’t.  So, because it is not otherwise established, pattern altitude at KAQO is 2,102′ MSL not 1,902′ MSL.

    Where did Foreflight get that?  I have no idea.  Too often, though, pilots look at the Foreflight pattern altitude and don’t actually check the Airport Facilities Directory (A/FD).  Then, they get the pattern altitude wrong.

    What does it look like when pattern altitude is otherwise established?  Look up KSGR, Sugar Land Regional, on your Foreflight app.  Foreflight states the elevation as 82′ MSL and the Pattern Altitude as 1,000′ MSL.  Is this correct?  Well, tap that A/FD button again and let’s find out.

    On the second line of the A/FD entry, it says TPA-See Remarks.  Down in the remarks section, we find the following:

    TPA-1000 (918) single engine piston acft, TPA-1500 (1418) for twin and turbojet acft, TPA-500 (418) for helicopters within 2NM.

    Foreflight got it right this time for single engine pistons, but if you are in a twin, the pattern altitude is different.  What’s the lesson here?  Always check the A/FD and don’t always go by what Foreflight says.  The A/FD is always right and usually has a little more detail to help set you straight.

    One last thing.  Both the AIM and the Pilot’s Handbook of Aeronautical Knowledge, when talking about pattern altitude, state, “When operating at an airport, traffic pattern altitudes should be maintained unless otherwise required by the applicable distance from cloud criteria in…section 91.155.”  91.155 defines basic VFR weather minimums.  So, to fully interpret what the AIM is saying, we have to take into account the type of airspace we are in to determine if we can safely and legally operate at pattern altitude at a particular airport.

    For example, let’s say we are at KCVB, the Castroville Airport.  Pattern altitude there is 1,602 feet, which is 829 AGL.  CVB is Class G airspace up to 700 AGL, then Class E above that.  Let’s say there is a 700 AGL broken cloud layer.  Pattern altitude is 829 AGL, so you won’t be able to get up that high with a broken ceiling.  What altitude can you do pattern work at to stay legal?

    Class G VFR weather minimums during the day below 1,200 AGL is 1 SM visibility and clear of clouds.  So, legally, you could fly at 699 AGL (which at CVB would be 1,472 MSL) while in the pattern and be legal.  Safe?  Maybe, but probably not if you are skimming the base of the clouds.  Is 1300 MSL a safer pattern altitude in this example?  Well, that is 527 AGL, so probably not, since towers tend to stick up that high sometimes.

    Let’s go back to KSGR and put a 1,000 AGL overcast ceiling there.  SGR is Class D airspace and we already determined pattern altitude there was 1,000 MSL for piston singles.  VFR visibility and cloud clearance requirements in Class D airspace are 1,000 feet above clouds, 500 feet below clouds, and 2,000 feet horizontally from the clouds with 3 SM visibility.  In order to stay 500 feet below the clouds, you would be flying a 582 MSL pattern.  Safe?  Probably not, though it is legal.

    To summarize, don’t take Foreflight’s word for pattern altitude.  Cross reference the A/FD (it only takes 15 seconds at the most) to verify.  If it’s cloudy, it’s really best to stay on the ground, but if you want to find out your legal pattern altitude with a cloud deck, cross reference 91.155.  I don’t recommend flying below pattern altitude because it is there for a reason.

  • ViBAN IFR Hood

    The first task I give my new instrument students before we start training is to find a view limiting device that they like.  There’s the hood that everyone hates (which has been used since the beginning of instrument training,though it isn’t that uncomfortable) or foggles, which usually end up becoming very uncomfortable very quickly.  The headset ends up pressing the sides of the foggles into the side of your head, leaving lumps and scars that hurt for days.

    Well, there is finally another solution that combines the hood and foggles.  Meet the ViBAN.

    ViBan

    ViBAN brags that it is the most comfortable IFR view limiting device out there.  I have a customer who has one and he loves it.  It’s easy to put reading glasses on underneath while still blocking the view of the exterior of the plane.  It doesn’t leave bruises against the side of your head, either.

    If you’re looking for something different for your IFR training, give ViBAN a try.

  • Cirrus Braking Systems: A Hot Topic

    You just bought your Cirrus SR22. You do some flying, and soon find yourself with a brake temp sticker that isn’t white anymore. You remember from your transition training that any color other than white is a no go. You now ponder…. I don’t remember getting on the brakes hard, or riding the brakes while taxiing, but sure enough they aren’t white anymore. You now start thinking that all the horrible rumors of Cirrus brakes are true. They overheat so fast!

    I would like to share some little-known facts about the Cirrus factory equipped braking system. Following the procedures below can help make the brakes last a little longer. There is also a very popular STC that allows upgraded brakes to be installed on all SR series aircraft. More to come on that.

    Notice the Top Yellow sticker is far darker than the Bottom. The Yellow temperature indicator turns at 300 Degrees, while the bottom Blue indicator turns at 330 Degrees. This is an indication to the pilot that if the bottom sticker has turned colors, that the braking system has exceeded 330 degrees and is in need of servicing.

    Above is a photograph of an SR22 G1 braking system with turned brake temp stickers. The first things you may notice is that there are in fact two brake temperature stickers. We can only see the bottom blue sticker from the inspection port on the wheel pants. The other is higher on the caliper; in order to see it, the wheel pant must be removed. This isn’t common knowledge because there is no mention of this additional indicator in the POH.

    Now you may be asking yourself, what can I do to extend the service life of my factory equipped Cirrus brakes? Here are some tips. First, always taxi at 1000 RPM and use the rudder as much as you can while only tapping the brakes. This is not fool proof, since sometimes, depending on the grade, you will have no choice but to utilize brake tapping to keep the aircraft going straight. Taxiing is not typically where the brakes get overheated, though, but this is still a good practice to follow.

    What we tend to see is that the Cleveland brakes are generally overheated on landing. We always recommend to make sure your final approach speed is not excessive, land in the first 1/3 of the runway, and let the aircraft rollout to a smooth stop. What tends to happen is that the aircraft is too fast, and the pilot tries to exit at a certain taxi way, or brakes hard and continues to ride the brakes after landing during taxi. If you do your best to avoid these habits, it will serve you well.

    This braking system remained unchanged all the way until the 2016 G5 Cirrus SR series. Starting in 2016, the factory equipped G5 and G6 Cirrus SR series all now come standard with a single piston hydraulic braking system from Beringer. The Cirrus Beringer brakes far exceed the braking power and durability of the old system. The new system is more robust, withstands heat better, and is is very well built. There is also an option for an upgraded dual caliper system to increase durability and stopping power. A braking system STC for the older Cirrus G1 through early G5 models was created to upgrade those airplanes to the better stopping power and cooling of the Cirrus Beringer brakes.

    Seen above is a page from a Beringer catalog highlighting the Cirrus SR series STC kits. Your local Cirrus service center will be able to quote prices for the kits. We have over 1000Hrs spent behind Beringer equipped Cirrus aircraft and the difference is quite apparent. The pilot has better control of the aircraft, no spongy pedal, and the confidence to get the plane stopped without possibly overheating the braking system. This, in our opinion, is one of the best upgrades you can do to your Cirrus.
    Above is what an STC upgraded braking kit from Beringer looks like, as well as the new temperature indicator for the pre/post flight inspection. Notice the black spot on the left hand picture. These brakes have been overheated.

    One other difference for a pilot to note is that once upgraded to the Cirrus Beringer brakes, there is only one temperature indicator and it changes color at a whopping 450 Degrees Fahrenheit! Needless to say, it can handle some heat! The new temperature indicator is now Orange in color and turns grey/black when overheated.

    On the left are the original Cirrus factory brakes. On the right is the caliper to the new Beringer brakes for a Cirrus.
    Dual Caliper Cirrus Beringer Brakes

    The Cirrus Beringer brakes upgrade is quite a step up in the world of slowing down. However, this doesn’t mean that they are completely issue free. There is one little-known problem with Beringer brakes that is not that big of a deal and can be fixed with relative ease.

    The rotor on the Beringer braking systems is “free floating,” meaning it is not necessarily “fixed” in position when secured down to the spindle. It is “keyed” into the wheel rim with the male and female side interlocking.

    The brakes occasionally will get noisy, causing a “knocking” noise when brakes are applied. This noise is caused by the small metal tabs that tighten up the space between the wheel and the brake rotor. This is so the small tabs wear with use instead of the aluminum rim that they are fixed to. So, if your Beringers are making a knocking noise when brakes applied, this is most likely your culprit.

    These gaps above are the “keyed” position where the rotor finds home in the rim. Without these tabs that wear with use, we would be replacing the rim more often than the much cheaper replaceable tabs.

    It is highly recommended to upgrade your original Cirrus factory brakes to the new Beringer braking system. You will deal with less maintenance, less chance of a brake overheat, and less confusion on whether or not your brakes are airworthy. For more info, you can check out the Cirrus website for the single or dual caliper Beringer brakes.


    Zach Anderson is a Cirrus Standardized Instructor Pilot (CSIP) for Texas Top Aviation. Zach comes from a auto mechanic background and is very familiar with the ins and outs of maintenance. He started working for Texas Top Aviation in December 2020.

  • MMOPA Safety Stand Down Rescheduled for Online

    April 18th, 2020 was supposed to mark the MMOPA Spring Safety Stand Down, an event held around the country for PA46 owners which counted toward the Master Aviator program. Sadly, due to the COVID-19 repercussions, the in person event had to be canceled.

    Thankfully, due to modern technology, the event has been rescheduled to a nationwide webcast. The date for the Online MMOPA Safety Standdown in Saturday, August 8th. Joe Casey and Travis Holland will be hosting the MMOPA Safety Standdown.

    The cost is free. To register, please click here.

Leave a Reply

Your email address will not be published. Required fields are marked *