A Flying Car in the Future?

EAA Airventure at Osh Kosh always draws great innovators every year, leading the aviation consumer to discover something new and different.  Flying cars have always been a dream for the everyday pilot.  Why not fly to work?  Why not park the plane in the parking lot?  Why not drive from the runway onto the freeway?  All excellent questions!

Samson Switchblade Driving

Well, Samson Motorworks is trying to make those dreams a reality.  Samson’s Switchblade flying car is in the (hopefully) finally stages of development this summer.  The company expects to be able to conduct test flights early next year, then begin selling the experimental kit.

The Samson Switchblade will be in the Experimental category, but Samson has a builder assist program that only adds $20,000 to the final cost of the kit.  The total price of the kit, which comes 49% completed and only takes 3 weeks to complete with the builder assist program, comes in at $140,000.  That includes the engine, avionics (it’s equipped with Dynon’s 7″ Skyview glass panel display, a Dynon radio and transponder, a Dynon intercom, a Dynon AOA, an iPad mini, and an ADS-B GPS), and the builder assist program.  Similar to a Cirrus, it is also equipped with a Ballistic Parachute Recovery system.

The Samson Switchblade has several different engine options, including a supercharged, liquid cooled, V-4 similar to a Corvette engine that will produce 190 HP.  Max cruise in the air should be around 170 knots.  The Switchblade will hold 30 gallons of mogas, burn 9 GPH in the air, and get 35 mpg on the ground.  The gross weight will be 1,750 pounds.

How does the car to plane transition happen?  Samson has developed a fly by wire system to retract the rudder down while the car is in drive mode.  The wings use a mechanical linkage to fold up into the belly.
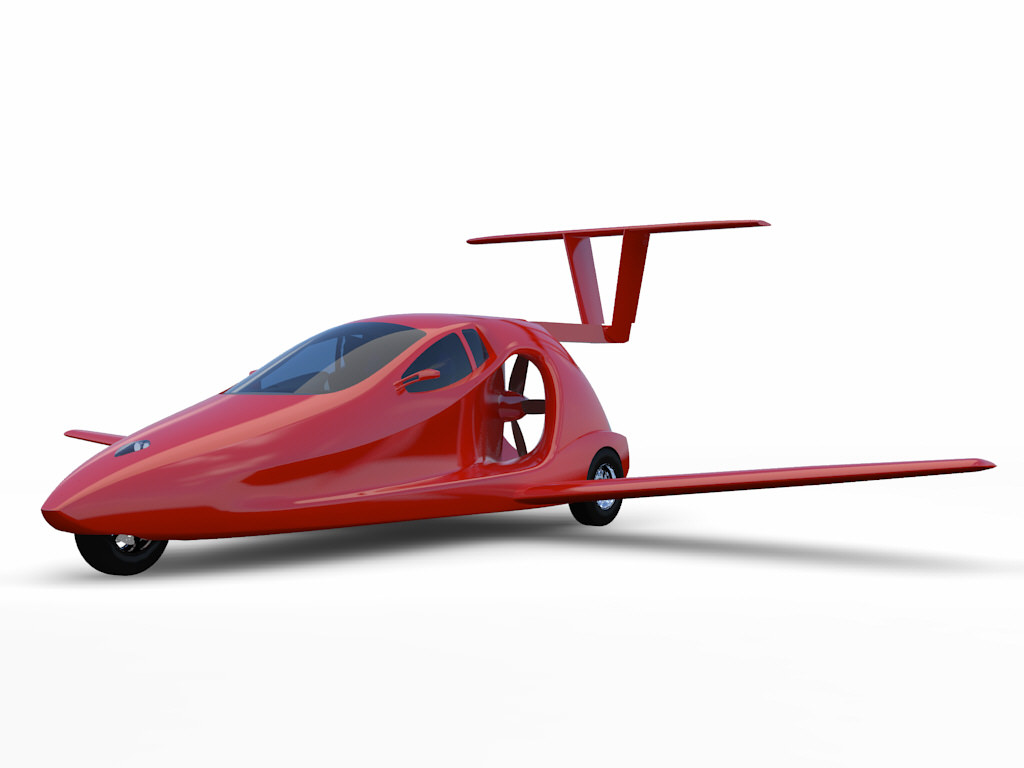
Samson Switchblade Flying

There are several different packages for the Samson Switchblade:  the Snowbird, the Aurora, and the Trek options.  Details can be found on Samson’s website.

I, for one, will be keeping an eye on the freeways next summer to keep an eye out for cars sprouting wings.  No more traffic jams!

Similar Posts

  • Flying the Hudson River Corridor

    Ever since I moved out to the Philadelphia area, the Hudson River corridor in New York City has become one my favorite places to fly. It’s hard to overstate the beauty of the city from low over the river. Every time I have a family member or friend come to visit, I try and take them over to see the city from the air.

    Each time I fly up the river I can’t believe that we are actually allowed to do so, flying below the tops of the buildings and close enough that you feel that you could reach and out touch them. The draw back to the Hudson River Corridor is that it can be busy, intimidating, and confusing. However, with some reading and preparation, the Skyline flight is easy to do and extremely rewarding.

    Having the right weather is an important first step. The second step is try to arrive during ideal lighting conditions. If possible, select a smooth, calm day to make it easier to maintain a track down the correct side of the river. I always try and target arrival at the city around sunset. The view is spectacular any time of day, but having the lights from the city while the sun is just setting gives the best viewing. I’ve also flown over and done the whole flight after dark, which is always spectacular.

    View of the World Trade Center

    The first method of flying the river is to utilize VFR flight following. If the controllers aren’t too busy, they will provide advisories to aircraft that request the Skyline. The nice thing about doing it this way is that the controller will clear you into the NY bravo airspace and keep you above the traffic flying the Skyline in the VFR corridor below. This is the method that I have always preferred as I enjoy the added benefit of the traffic advisories and it’s nice not to worry about position reporting on the radio.

    If you want to get flight following, head toward the corridor and request the Skyline route with NY Approach. (Remember to stay clear of the Bravo until you’re cleared in!) Once you’re cleared into the Bravo and approaching the corridor, they will hand you off to Newark/ LaGuardia Tower for traffic advisories over the river. I like to approach from the south and ask for a 180 over the George Washington Bridge. This allows me to fly past the city a second time before exiting the corridor over the VZ (Verrazano Bridge) and heading back toward home.

    In red is the path I typically fly. I descend to 1400’ and fly toward the APPLE intersection picking up the shoreline around Staten Island and hugging it until crossing the middle of the VZ. Newark normally clears me into the Bravo at 1400’ or 1500’ to fly up the corridor.

    Pros:

    • Better traffic Awareness
    • No position reports

    Cons:

    • Flying slightly higher reduces the view
    • If the controllers are busy, they may deny your request for advisories  
    • Can be intimidating to talk to NY Approach/ Newark/ LaGuardia 

    The other option is to fly in the VFR corridor. If you want to do it via this method there are just a few things you need to make sure you’re familiar with before you go. When in the VFR corridor you’ll need to make required position reports on a CTAF frequency. Make sure that you have the proper charts and have studied pictures of the landmarks so that you know what you’re looking for. I tend to plan on this as a backup in the event that the controllers won’t give me advisories.

    Pros:

    • Doesn’t require talking to controllers/ class B clearance
    • More freedom to select altitude and routing as desired

    Cons: 

    • Less traffic awareness
    • Required position reporting

    All the requirements and guidelines for flying the corridor can be found on the back of the NYC TAC chart. Any pilot flying the river is required to have one of these or a NYC helicopter route chart on board. If you’re using Foreflight, look in the Documents section under FAA Fly Charts and select the NYC TAC chart in order to read the back of page.

    Below you’ll find examples of the diagrams/ instructions printed on the back of the NYC TAC charts.

    You can see the traffic flow requires northbound airplanes to hug the east side of the river, while the southbound traffic stays on the west side. The VFR reporting positions (listed from North to South) are: Alpine Tower, George Washington Bridge, Intrepid aircraft carrier, Goldman Sachs (clock), Statue of Liberty, VZ (Verrazano Bridge). Each position report should include aircraft type, position, direction, and altitude.

    Other things to be aware of:
    NYC is always a hotspot for TFR’s. There are often TFR’s for baseball games or presidential movements so make sure to check before you head that way. Additionally, there is a speed restriction in place of 140 kts, though I’m not sure why anyone sightseeing would want to go that fast anyhow.

    I realize that all of the procedures and restrictions can be overwhelming, but with the proper preparation, the Hudson Skyline is one of the most incredible places in the world to operate an airplane. There are a lot of things that are easy to get excited about that don’t live up to expectation, but this isn’t one of them. I’ve never taken anyone to the river that wasn’t impressed by what they saw and that’s why I plan to keep going back.

    About to cross the VZ looking north toward the city

  • Selecting the Proper Altitude

    One of the first questions a student pilot asks me when starting the cross country portion of his or her training is, how do I know what altitude is best for my flight?  This is a good question, because without taking certain aspects of the flight into account, it’s really just a crap shoot when selecting an altitude.  Craps and flying don’t mix, so let’s take a look at a few considerations when selecting an altitude.

    Sky Coverage

    Sky coverage has several subcategories when it comes to selecting an altitude.  First is how high are the bases?  Is it IFR (VFR pilots would be grounded), marginal VFR (1,000 AGL to 3,000 AGL ceiling), or good VFR (above 3,000 AGL ceiling)?  If the cloud deck is only 2,500 feet off the ground, then VFR pilots are limited to either 1,000 AGL to 2,000 AGL.  This is an excellent segue into why VFR pilots shouldn’t scud run!

    Scattered Clouds

    Second, what kind of cloud deck is it?  Is it an actual ceiling (broken or overcast), or is it a scattered layer?  Few or scattered layers usually allow VFR pilots to find a hole to get higher to some smoother air, making the flight more pleasant.  VFR pilots, always make sure to check the destination weather as it could be scattered where you are departing from, but it might be broken or overcast where you are arriving.

    Last, how high are the tops of the clouds?  Pilots can only get this information in the planning stage from the area forecast or from pilot reports, so most of the time, it’s not very precise information.  If the tops are at 10,000 feet and the pilot is flying a 172 on a 30 mile trip, it doesn’t make much sense to get on top of the clouds.

    Terrain and Obstacles

    Terrain goes hand in hand with sky coverage.  If there are low clouds and high terrain, that doesn’t bode well for trying to stay VFR and not hitting anything.  Obstacles need to be taken into account too, as there are some pretty tall radio towers that can stretch up into a 1,500-2,000 AGL deck of clouds.

    Winds Aloft

    Winds Aloft

    Once the sky coverage and terrain have been considered, it’s time to look at the winds aloft.  Tailwinds are preferred, but, sometimes, a headwind is the only option.  After taking the clouds and terrain into account, this narrows down your altitude to a handful of options.  The winds aloft will further narrow it down.

    Aircraft Performance

    Once you have two or three altitudes in mind, taking a look at the performance charts for your airplane will help nail down that final altitude.  Pull out the POH, compare fuel burn and cruise speed, and you’ll have your altitude selected.

  • Preventing Gear Up Landings

    baron
    Image credit: Aviation Consumer

    On the evening of November 3rd, 2015, I was returning to my home airport of Lancaster from Pittsburgh in my company’s Aerostar, after being out on charter all day. It was dark out as I entered the traffic pattern at Lancaster. After an uneventful approach, I was cleared to land behind a Mooney. The spacing looked good as I turned final, but, as I was nearing the threshold, I started to become concerned that the Mooney wouldn’t be clear of the runway in time for me to land. At that moment, over the radio I heard an uncomfortable transmission from the Mooney pilot: “Tower, Mooney ABC has landed gear up.”

    It took the tower controller a minute to grasp what was going on, and I was on about a 1-2 mile final when I was instructed to go around. Thankfully, the Mooney came to a stop in such a position that I was able to use the other intersecting runway, and was on the ground only a few minutes later. I can assure you, however, that I’ve never checked my “3 green” so many times in one traffic pattern as after that incident. Thankfully, no one was hurt, but there sure was an impressive amount of emergency equipment on the runway as I taxied back to my hangar.

    In aviation, there’s a saying that goes: “There are two types of pilots. Those who have landed with their gear up, and those that will.” I don’t like that saying. The potential of a gear up landing (as a result of pilot error) is something that has always been a risk that I have worked hard to avoid. Not only is a gear up landing embarrassing; but it’s also an extremely expensive black mark on any pilot’s career.

    image
    Not a good day. (Photo credit: http://www.newsday.com/long-island/suffolk/plane-lands-at-republic-with-no-wheels-1.2735131)

    According to a July 2006, article in Aviation Consumer, the estimated cost of repairs following a gear up landing for an A-36 Bonanza would be about $27,000 and about 3 weeks of down time. 25 years ago, even my beloved E33 Bonanza was the victim of a gear up landing. While it was neither me nor my dad flying our airplane that day, the event stays in its history and reduces its value should the time ever come to sell it.

    That incident in 1990 resulted in approximately $25,000-30,000 in repairs. The cause of the incident was classic: the pilot put the gear down at the normal time, but then had his downwind extended by tower. He brought the gear back up to fly the longer downwind, but forgot to put it back down later when he was cleared to land. Like many pilots, he had a set routine time when he normally put the gear down, and when his routine was changed, he didn’t remember to lower the gear once more.

    Unfortunately, no matter what experience level one may be at, no pilot is immune to the possibility of such a mistake. The following are 5 tips that I have learned in my time flying that have helped myself and others minimize the chance of a gear-up landing occurring:

    1. Know your aircraft systems: What are the operating perimeters on your airplane’s gear warning system? Most airplanes have a designated speed or power setting at which the gear warning horn will sound in the event that the gear isn’t down and locked. In the Aerostar that I was flying, the gear horn was supposed to come on at 15” of manifold pressure with the gear up, but in practice, it didn’t come on until much lower than that. It has since been adjusted, but at the time it was important for me to know that if I had left the gear up, the horn wouldn’t have sounded in a timely enough manner for me to go around, much less lower it prior to touchdown. Most likely it would have just added to the noise of metal on concrete as I pulled the power all the way back in the landing flare.
    2. Don’t override gear-up warning systems: They were put there for a reason! Even if you’re out doing maneuvers and the horn is blasting in your ear for half an hour, resist the temptation to simply pull the circuit breaker or push the warning silencer to make it shut up. If a pilot disables the gear-up warning horn and then later forgets to put the gear down on landing, he or she will have a much worse headache on their hands than the one that the horn would have given them.
    3. Use your checklists and memory items: It doesn’t matter how much a pilot knows about his or her airplane, or the procedures for it. Distractions happen. Mistakes Happen. Always consult the checklist for confirmation that you’ve accomplished all the essential tasks before landing. Additionally, if you haven’t already, work on developing call outs which you perform out loud regardless of whether you are alone in the airplane or not. Whenever I’m landing an airplane, I start with my flows, go through my GUMPS (Gas-Under carriage- mixture- props- seat belt) checks, then do the printed checklist, and finally when on short final I call out “short final, cleared to land, three green.” I’ve had several passengers tease me about doing the “three green” call out while I was flying aircraft that didn’t have retractable landing gear. But, I’d much rather be in the habit of checking every time regardless of what I’m flying than forgetting to check when it is necessary.
    4. Use your available resources and develop healthy habits: If I have someone riding with me, I generally ask them to confirm that there are 3 green lights glowing on the instrument panel. Even if that person isn’t a pilot, they will probably enjoy the opportunity to be involved, and it’s a good way for me to stay in the habit of checking the gear lights to ensure that everything is properly down and locked. I’ve also found that intentionally leaving your hand on the gear lever until you have gear safe lights is a good idea. Forcing yourself to keep your hand on the handle until you have the all important lights obligates you to actually observe the indications instead of simply throwing the lever and moving onto something else. This way, if you only get an indication of 2 greens you’ll be aware of it right away and have more time to respond appropriately. It also helps you to learn the normal length of time it takes for the gear to extend or retract, which will be helpful to you to be aware of any abnormalities in the gear system.
    5. Upgrade your aircraft’s gear-up warnings: There’s a variety of ways you can improve your aircraft’s ability to warn you of a potential gear-up landing. For student pilots or pilots new to complex aircraft, it could be something as simple as a red post-it note on the panel to remind you to verify the gear position prior to landing. Or, if you own an aircraft that doesn’t have an effective way to warn the pilot of a gear-up landing, consider investing in an aftermarket gear-up warning system – surely the extra price of such an upgrade is a small amount next to the cost of repairing the damage from a gear-up landing!

    Crash recovery and emergency management crews survey a C-17 Globemaster as it rests on Bagram Air Field's active runway Jan. 31 after landing with its landing gear still up. More than 120 Airmen, Defense Department civilians and contractors successfully removed the crippled aircraft from the runway Feb. 2 and restored full air operations shortly thereafter. The "belly up," or no landing gear, recovery effort that began here Jan. 30 was the first time in the airframe's 16-year Air Force history. (U.S. Air Force photo)
    It can happen to anyone! The gear handle in this C-17 was in the “UP” position. (Photo Credit:https://theaviationist.com/2009/02/09/c-17-gear-up-landing-in-bagram-images/)

    Always remember, regardless of experience, no pilot is immune to the possibility of a gear up landing. The best way to safeguard yourself is to discipline yourself in the use of flows, checklists, and call outs. Things like gear warning horns, visual reminders, and other systems are a useful back up, but they shouldn’t be relied upon to save your bacon if you don’t get the gear down at the proper time. Fortunately, in most gear up landings, the pilot and passengers are able to walk away uninjured – but that doesn’t lessen the embarrassment or financial burden of the event. So, keep your chin up, your gear down, and remember….THREE GREEN

  • Flying to the Bahamas

    A couple weeks ago, my employer informed me that he wanted to take a group to Nassau, The Bahamas. I thought, no big deal, this should be an easy trip. The more I started to read, though, the more I realized it wasn’t going to be just a “normal” trip.

    If you aren’t a member of AOPA, I would highly recommend joining. AOPA’s website was where I started researching. They actually have a checklist to help you along the way.

    The first step is getting the paperwork started. All souls on board are going to need a valid passport. In our case, a couple of passengers need to get theirs. Since it was a little shorter notice, we had to go through the expedited process. It’s fairly simple. A quick internet search gave me a couple of people that helped the process along.

    Next was making sure the aircraft had all it’s paperwork. The airworthiness certificate was easy as it’s always in the plane (or should be).

    The registration certificate was next to check. We recently upgraded to the King Air 350 so we had to make sure we had the original issuance registration certificate. The Bahamas supposedly doesn’t allow Temporary Certificates and I really didn’t want to test that policy.  Thankfully after a couple of calls between owner and the FAA we got the original.

    The aircraft and pilot are both also required to have an FCC Radio License. This is only for international flying, but not an everyday thing pilots think about.

    After that was flight planning. I use FltPlan.com. The actual filing of the flight plan was very easy. I use the prescribed routes from the website. In the remarks section of the flight plan put ADCUS (Advise Customs). This advices ATC to let customs know of your arrival. It’s basically an added safety net in case you forget to call ahead or your flight times end up being way off.

    The other item when dealing with flight planning is dealing with eApis. There are numerous companies who will provide this service for you. I elected not to use one of those. If you go to the CBP website, you can set up an account and do all of it yourself. Take your time and really plan the flight out well to make sure your arrival times are as close to real time as possible. If you’re way off, this will make any customs agent very frustrated and that is not something you want to be dealing with.

    Approach charts and en route charts are another hurdle. Thankfully Foreflight has you covered. With my subscription, I already had en route charts. The approach charts were the real issue. In the Bahamas, the only places that have approved instrument approaches is Nassau and Freeport. Fortunately, we were going to Nassau. Foreflight does charge almost $400 for the Caribbean and Bahamas charts.  Emailing the FBO is a good option as they can usually supply approach plates for international flights.

    You’ll also need a CBP sticker. This goes on the outside of the aircraft showing customs you’re in the system. This can be found on the CBP website as well. It takes a little bit to get the
    sticker in the mail. However, once you pay for the sticker, the receipt can be used in place of the sticker.

    The final thing I focused on was picking an FBO. I chose Jet Aviation. They had CAA which gave us a Jet fuel discount. Their facility was excellent and staff was very friendly. The thing that put it over the top for me was how they handled customs. I emailed Jet Aviation all the information for myself and passengers and they pre-filled all the customs forms for me. When we arrived, customs took all of five minutes and then my passengers were out the door.

    While in Nassau, I stayed at Breezes Resort. It’s all inclusive so that helps keep the costs down for your owners if you’re a corporate pilot. It’s next to some of the other bigger resorts so there were shuttles available to get to other amenities. The only complaint I might have was the power kept cycling on and off and the internet wasn’t reliable. This proved challenging when trying to plan for the return trip.

    The return trip required a lot of the same preparation. Again it was nice to have a good FBO to help prepare the paperwork required to clear customs. Jet Aviation handled the General Declarations for me and my passengers. All I was required to do was file the flight plan and file eApis, which was actually challenging while my internet at the resort was on the fritz.

    Don’t forget to call US Customs at your Port of Entry! As this was Ft. Lauderdale for us, I called them twenty four hours in advance as prescribed. The customs agent was friendly and helpful with any questions I had. I think the best advice I can give throughout this whole experience is call ahead and ask lots of questions! Did I say that already?

    The morning of the return trip went off with no hitches. Again, Jet Aviation had set up a driver to pick me up and he was on time. Jet Aviation had all the General Declarations paperwork pre-filled out for myself and passengers. Again, I use FltPlan.com to file my flight plans. Their service performed flawlessly even though I had heard rumors of flight plans not going through. To curb my bet, I talked with the staff at Jet Aviation and they made a call to tower for me to verify that the flight plan had gone through; of course, it had.

    The actual flight out of Nassau was pretty uneventful. The last real hurdle I had was dealing with customs in Ft. Lauderdale, and hurdle it was. When we landed at FLL, ground instructed me over to customs ramp. There was no one to tell us where to park on the ramp. This was extremely frustrating.

    A Learjet taxied in prior to us and had taken up most of the ramp but, we found a spot and shutdown. Once we shut down, no one came out to our aircraft. I walked in to talk to someone and was greeted by a Boarder agent who was less than helpful. Since the Learjet had parked first, they got to go through first. Evidently, we were not allowed in the building until they were done. This didn’t make my owner too happy!

    Be prepared, though, if another airplane is on the Customs ramp before you arrive.  You are not supposed to get out of the airplane until a Customs agent comes and meets you, even to go to the bathroom.  This can result in large fines.

    Once we were allowed in, the process went smoothly. We had to put all of our bags through the x-ray machine. Beyond the x-ray machine, CPB didn’t require any other security measures. On other crossings I’ve done, CPB had opened up bags and sifted through clothes, so just doing the conveyor belt was a surprise. The rest of the trip was fairly commonplace. We stopped in Destin FL for dinner before making our final leg into Dallas. All in all, it was an excellent trip and I’m excited to do another one.

    Ryne Bergren works for a Part 91 operation in Dallas flying a King Air 350. Being a Part 91 outfit, he doesn’t get to rely on a “dispatch” or “company” to help with any international flight planning. This was a learning experience for him. Hopefully this will be a help to anyone for future trips.

  • What’s Going On With the Airplane Market?

    An Airplane Market Update, Q2 2026

    I get asked some version of the same question almost every day right now: “Hank, what’s going on with the airplane market?” Owners are nervous. The market has definitely slowed down, and the second quarter has been especially quiet. So let me give you a straight read on what’s actually happening, why, and what it means for your airplane.

    Here’s the short version: don’t panic. A slow market is not a market crash. It’s a market that rewards sellers who price realistically and buyers who are ready to pull the trigger. Patience is the name of the game right now.

    PDF
    ★ Free Download
    Get the Full Q2 2026 Aircraft Market Report
    The complete write-up — values, trends, and forecasts broken down by airframe. Sent straight to your inbox, free.

    Where values have actually been heading

    Used airplane values shot up through the COVID years, peaked somewhere around 2022, and have been softening ever since — really since about 2023. That’s carried into 2026. But in most piston airplanes, it looks a whole lot more like a slow, steady give-back than a crash.

    Now, here’s where I’d rather look than at asking prices. An asking price is just what a seller is hoping — or dreaming — to get; it isn’t what the airplane is worth. What an airplane is actually worth is what VREF tracks. And when I pull the VREF values on the single-engine pistons I’ve been appraising lately, a clear pattern shows up:

    • Older and less expensive airplanes are holding up the best. A clean normally-aspirated G1, G2, or G3 Cirrus SR20 or SR22 is down about 3% over the last twelve months. Older, more classic airplanes — Bonanzas, a Cherokee Six, a clean P210 — are flat to down just a few points. One outlier is the Cessna/Columbia 400 market — those are down about 13%.
    • The newer and more expensive, cabin-class singles have dropped more. A pressurized Malibu Mirage is down around 12% on VREF value, with other PA-46 pistons and turbines valued a little better, but still down between 8–12% over the last year.

    Call it roughly 5% on average across the segment. That’s more than the under-1% you’d guess from asking prices alone — but it’s still less than 15% down over the last year, not a crash. The rule of thumb: the older and less expensive the aircraft, the better the values are holding; the newer and more expensive the aircraft, the more the value has dropped over the last year.

    What a Crash Actually Looks Like

    Worth being precise about what I mean. A real crash — like 2008–09 — is sudden and disorderly: values plunge almost overnight, financing dries up, buyers walk away from their deposits, and airplanes sit because there’s no one to buy them at any price. New business-jet deliveries fell nearly 34% in a single year, and it took years to climb back. What we have now is the opposite on every count — value drops of 15% or less, financing that’s tighter but still available, and airplanes that are still changing hands. That’s a soft, orderly market, not a crash.

    Why Q2 got so quiet

    A handful of things piled up at the same time. None of them is a disaster on its own, but together they explain why the phone has been ringing less.

    Rates didn’t come down the way everybody expected. Oil shot past $110 a barrel after the conflict with Iran, inflation came roaring back, and the Fed stopped dropping rates — so financing an airplane still costs more, and that takes the urgency out of buyers. Financing also got tighter; the days of 100% loans with no money down are basically over, and lenders want bigger down payments.

    The tax rush already happened, too: when the One Big Beautiful Bill brought back 100% bonus depreciation, it set off a mad dash to close before year-end, and a lot of the folks who’d have been shopping this spring already bought last winter. Plus, there are simply more airplanes to choose from now, which hands buyers options and pulls pricing power away from sellers.

    So what should you do?

    It depends on which side of the deal you’re on.

    If you’re selling, price to today’s market — not the 2022 peak, and, unfortunately, not what you paid for the airplane. Realistically priced airplanes are still selling; the ones that sit are the ones chasing a number the market left behind. Keep your logs complete, stay current on inspections (don’t forget those 24-month IFR inspections!) and ADs, and present the airplane well. Have a thorough annual done before putting it on the market. Keep it clean and do whatever cosmetic or avionics fixes or upgrades you’ve been neglecting — you want it to show as well as possible, because there’s a lot of competition out there.

    Re-dyeing the leather seats is a cost-effective way to spruce up the interior without replacing the seats. A good wash will certainly help the exterior. Glass in the panel always shows better than steam gauges, so even something simple like an Aspen upgrade, two Garmin GI 275s or G5s, or a 7-inch Garmin G3X will bring value to your airplane and make it show better — any of those are less than $10,000. If you do still have a Garmin 530W or 430W, consider changing them out for a newer Garmin or Avidyne IFD unit; Garmin won’t support the 530W/430W anymore. And Avidyne is quietly ending support for the Entegra system this fall — but the good news is the Avidyne Vantage panels are finally certified.

    And if you can wait, give it some thought — the back half of the year is shaping up stronger. The fourth quarter is traditionally the best stretch for used sales, and now that bonus depreciation is permanent, that year-end push resets every fall.

    If you’re buying, this is your window. Higher rates have thinned out the competition, there are more airplanes to pick from than there have been in years, and sellers are more willing to deal. If you’ve got cash ready or financing lined up, you’ve got leverage you didn’t have eighteen months ago. Be picky — buy the clean one with good records.

    If you’re just holding, relax. There’s no reason to panic-sell. Most piston values are easing off slowly, not collapsing. Patience wins here.

    The right move always comes down to your specific airplane, your timeline, and what you’re trying to accomplish. If you’d like a current valuation — or just an honest read on where your airplane sits in today’s market — give me a call. That’s what we’re here for.

  • Garmin Perspective Tips & Tricks

    The Garmin Perspective and Perspective + are awesome pieces of equipment.  There is so much a pilot can do with this system that it can sometimes get overwhelming. There are two very important features of the Garmin Perspective that all IFR pilots need to know, but are tricky to do if the correct buttons aren’t pushed.

    The two features of the Garmin Perspective I want to focus on today are the “Load Airway” feature and the “Hold at Waypoint” feature.  The “Load Airway” feature is especially handy when flying IFR long distances with several airways as part of the clearance.  Here’s how to utilize both on the Garmin Perspective.

    Load Airway

    • On your flight plan page, insert the waypoint where you will be joining the airway, or, if your clearance was radar vectors to join an airway, then insert the waypoint on the airway that begins the leg you will be joining on
    • Press the Menu key on the keypad
    • A menu will pop up. Scroll down to highlight Load Airway
    • Highlight the Airway you want from the next menu that pops up then press Enter
    • Then, a list of waypoints will display to exit the airway. Highlight the waypoint where you will be exiting the airway and Press Enter
    • The cursor will then move down to Load at the bottom of the menu. Press Enter to load the airway
    • The Airway and all the waypoints in between your entry and exit waypoints appear in your flight plan
    • If you are getting vectors to join the airway, you’ll need to use the Activate Leg function to activate the leg you will be joining the airway on
      • On the Flight Plan page, highlight the waypoint that ends the leg you want to activate
      • Look for the ACT LEG soft key on the lower right hand side of the MFD and press
      • This Activates the leg on the airway. Then, just simply fly the heading assigned by ATC until the CDI needle centers showing you are on the airway

    Hold At Waypoint

    The Garmin Perspective allows pilots to place a holding pattern at any waypoint that is in the Nav Database (or any user created waypoint).  Here’s how to do it.

    • On the Flight Plan page, highlight the Waypoint that you want to hold over and press Menu on the keypad
    • On the menu that pops up, highlight Hold At Waypoint and press Enter
    • On the next menu that pops up, input either the inbound or outbound course, right or left turns, leg time or distance, and the EFC time, then highlight Load and press Enter
    • You will see the hold now as a Waypoint in your flight plan

Leave a Reply

Your email address will not be published. Required fields are marked *