| |

Avidyne Vantage

For years, Cirrus owners who have the Avidyne Entegra PFD and MFD have been clamoring for Avidyne to come up with some sort of upgrade. The Entegra, or EX 5000 system, is late ’90s technology and, though it still works, there will be a certain point in the future when it gives up the ghost. Avidyne still supports the Entegra system, but it’s hard for a Cirrus owner to see all this new technology coming on the market while not being able to upgrade the original Avidyne screens.

Avidyne gave it a go in the late 2000s with a panel upgrade known as the R9. The R9 was a good system, but Avidyne was very slow on the release (rumors were the company wanted it to be absolutely perfect before releasing it, which frustrated Cirrus, who then switched to the Garmin Perspective panel, leaving Avidyne behind) which led to the R9 only being available as a very expensive retrofit to the Entegra system ($80,000-$90,000 for the system and install). Needless to say, there weren’t that many takers.

Late in 2020, Garmin announced it had received certification to retrofit Avidyne Entegra equipped Cirrus Aircraft with the company’s G500 TXi displays, which gave new hope to G1, G2, and G3 Cirrus owners. The price tag wasn’t outrageous, coming in at $16,000 apiece for each display. The G500 TXi works with any possible GPS that can be installed in a Cirrus (GNS 430Ws, GTN 650s, GTN750, or the Avidyne IFD 540/440) and with the DFC 90 Autopilot (if the Cirrus is still equipped with an STEC 55x, the Autopilot would need to be changed to either a DFC 90 or a Garmin GFC 500).

Fast forward to June of 2021 and Avidyne re-enters the game with the Avidyne Vantage. After the R9 debacle, Avidyne has opted this time to go for a more simple approach. The Avidyne Vantage system changes out the Entegra PFD and MFD with bigger screens (12″; Garmin’s TXi units are only 10.6″) with high quality pixelation, synthetic vision, engine gauges, checklists, charts, a hybrid touch interface, and all the other information that was offered on the Entegra system, just all more modern and updated. The best news is that the system provides redundant reversionary mode, which was one of the biggest complaints about the Entegra system.
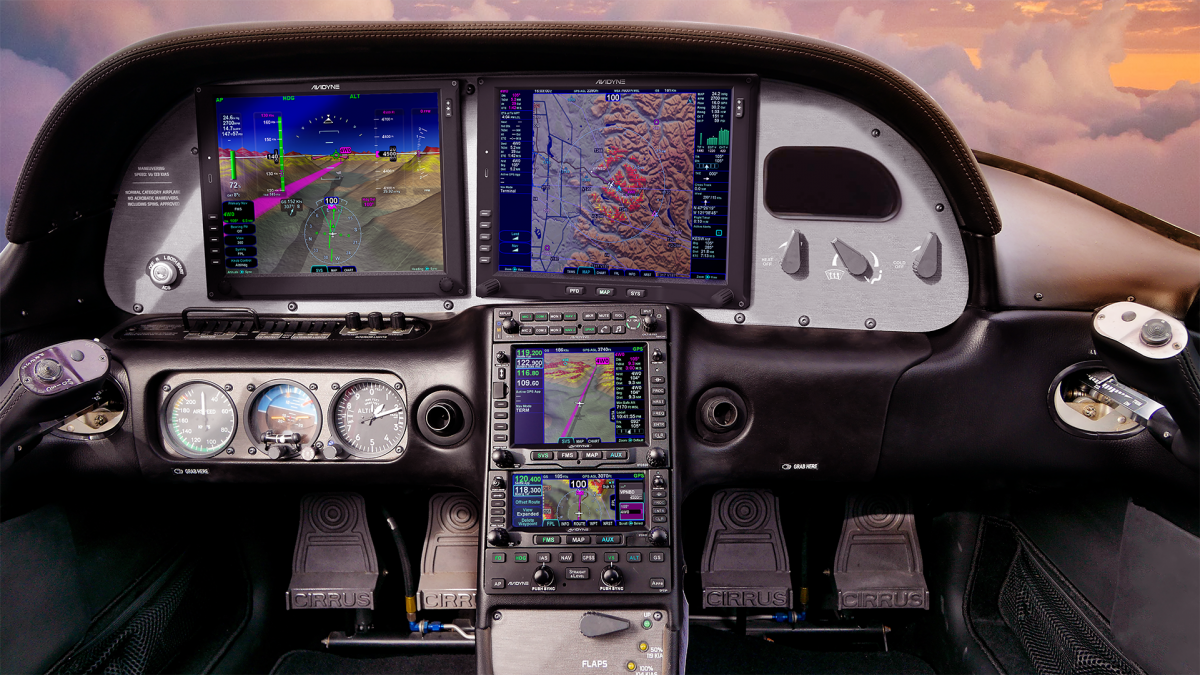
The price tag comes in lower than Garmin, with each screen being priced at $12,500. The units will work seamlessly with the Avidyne IFD Series GPS units, though, as of this writing, it isn’t clear if the Avidyne Vantage will work with Garmin GTN 430Ws or the GTN 750/650. I would assume that the integration would be there, but I haven’t found any documentation stating that yet. DFC 90 Autopilot integration would be seamless, but not sure the integration with the STEC 55x or Garmin GFC 500.

Avidyne says the Vantage will be fully certified in early 2022, but the company is taking orders now. Visit the Avidyne Website for more information.

Similar Posts

  • A Complex Clearance?

    I was flying in the Rio Grande Valley in south Texas a few weeks ago and heard an IFR clearance given to a King Air that pricked my ears up.  It was a clearance from CRP to LRD, but the routing was one you don’t hear too often anymore.  Because of active military airspace, the routing was via a radial and DME off the CRP VOR (so a point defined by the radial and DME) to another radial and DME point off the LRD VOR.

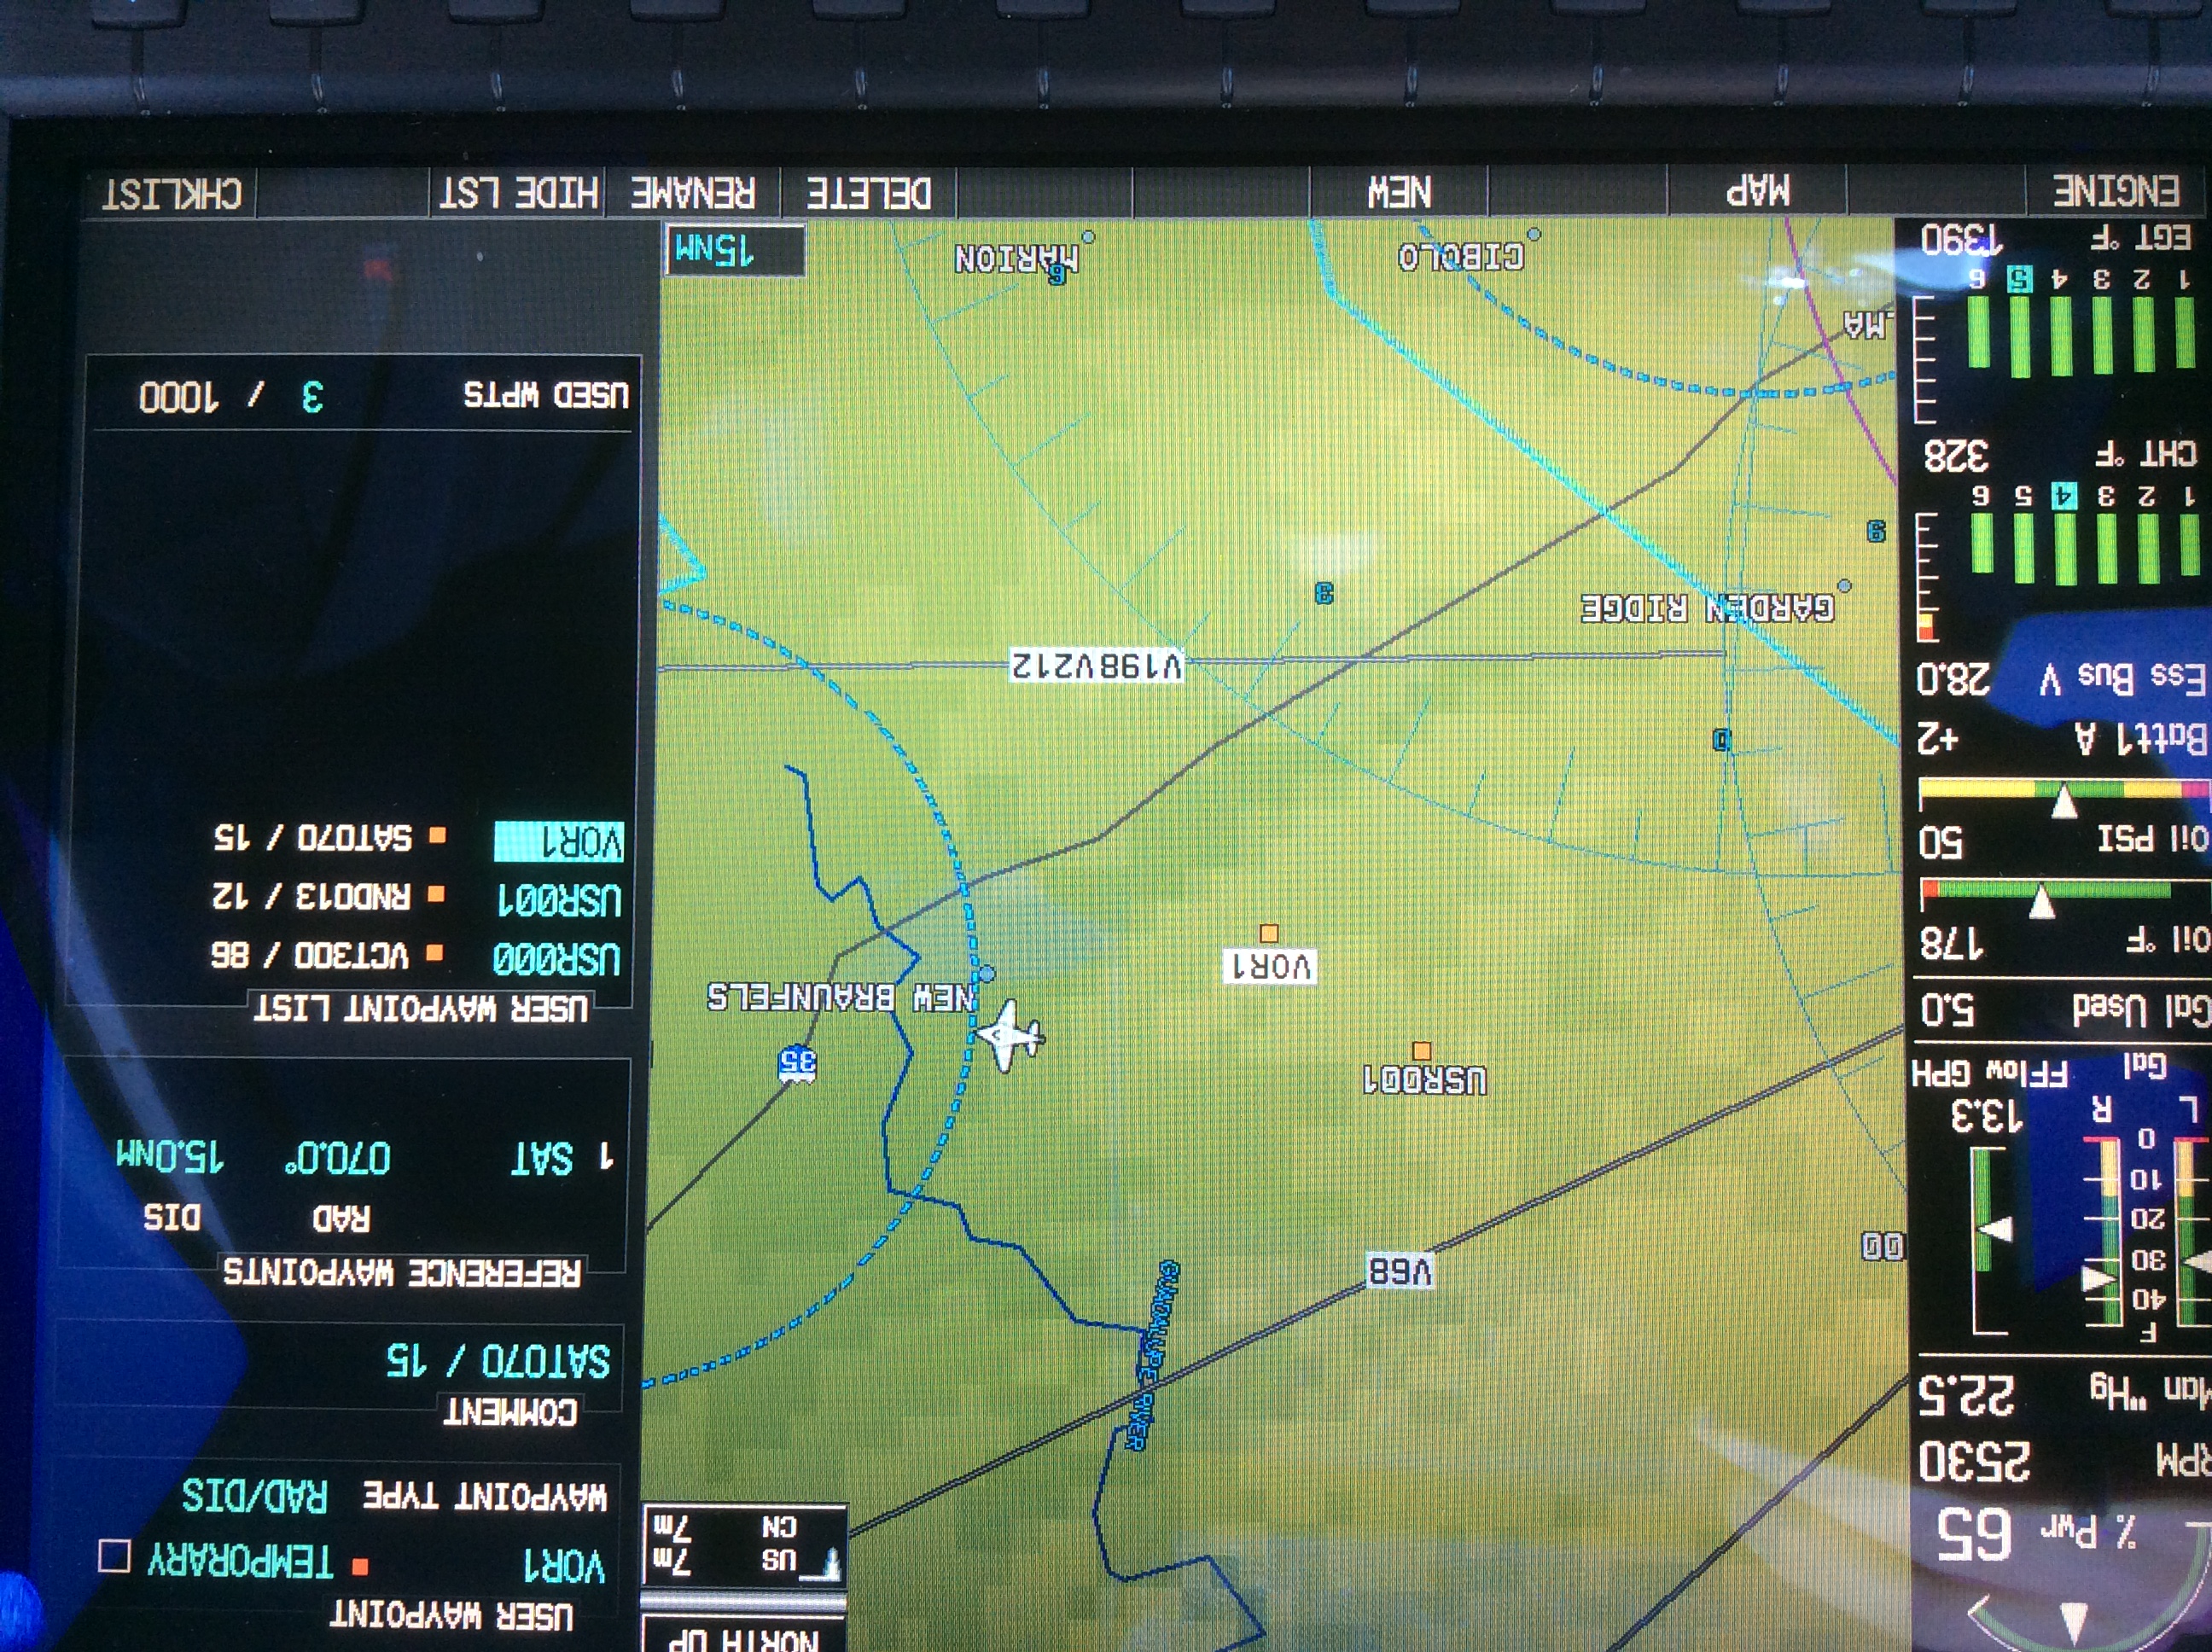
    It took me a second to think about how to do this the easiest (without setting up the VOR and watching the DME).  After a moment’s thought, it’s actually a snap with the G1000.  You create 2 user waypoints, one for each Radial/DME spot, then put those 2 user waypoints in your Flight Plan.

    Here’s how.

    Step 1

    Using the big knob, go to the Waypoint chapter.  Once there, scroll down to the User Waypoint page using the small knob.

    Step 2

    Press the New soft key.  If you want to name the waypoint something specific, you can do that at the top of the page.  If not, it will default to something like VOR 1 or VOR 2.

    Step 3

    Under Waypoint Type, use the small knob to select RAD/DIS (stands for Radial/Distance).

    Step 4

    Under Reference Waypoints, again using the small knob (or your keypad), type or dial in the VOR identifier, the radial from that VOR, and the DME distance.  Press enter and you are done.

    Once you have both User Waypoints created, then just put them in your flight plan (if you forget what you named them, you can just go back to the User Waypoint page), and off you go.

  • Night Flying

    Ah, fall is finally here.  In Texas, it arrived about a month late, but showed up with a vengeance.  A strong cold front caused a 40 degree temperature drop in 12 hours earlier this week, bringing rain, lower freezing levels, and lots of wind.

    Fall means cooler temps, but fall also means less light.  The sun begins to set sooner, plus the fall back time change in November cause darkness to spring upon an unaware pilot.

    Before getting in to too many night landings tips, just a friendly reminder, passengers can only be carried at night if the PIC has completed 3 takeoffs and landings to a full stop in the last 90 days during the time period of 1 hour after sunset to 1 hour before sunrise.

    Lots of us have been landing long before sunset for most of the past couple of months, so those night flying skills might be a little rusty.  The best way to remedy night flying rustiness?  Call an instructor and go get some practice.

    In the meantime, here are some tips as to what to expect for your next night flying experience.

    1. Your Eyes Are Very Important.  This may seem like an obvious statement, but night vision can be affected by many things.  Before you takeoff, you want to make sure you can see in the dark.  The FAA recommends no bright lights 30 minutes prior to takeoff.  They also recommend using oxygen at night as this greatly improves night vision, even at low altitudes.  Use off center viewing to help spot traffic or other objects in the air.  Finally, when preflighting, use a red flashlight as much as possible, but if you do have to use a white light, close one eye to keep one eye from being blinded.
    2. Utilize Approach Lights on Landing.  Night landings are very different then day landings.  It is very difficult to get the proper depth perception, not too mention see obstacles below you on your final approach to a runway.  PAPI’s, VASI’s, and instrument approach glide slope’s become very important.  If you are VFR only pilot, if your airport has a PAPI or a VASI, keep 2 white and 2 red (or 1 white and 1 red) lights.  If you see 3 red (or 2 red), climb.  If you see 4 red, definitely climb.  If you are an IFR pilot, I highly recommend always flying an approach at night.  What if your airport doesn’t have a PAPI, VASI, or approach with a glide slope?  You might not want to utilize it at night.  One side note on VFR flight: Clouds are nearly invisible at night.  If you do fly into a cloud (a clue is your strobe lights start reflecting back at you), don’t panic.  If you have an autopilot, turn it on and execute a 180 degree level turn.  If you don’t have an autopilot, start scanning your instruments, keep your attitude indicator blue side up, and make a shallow 180 degree while maintaining altitude.  Then call ATC, advise them what happened, and ask for help.  One more note:  I highly recommend that if a pilot finds that he/she will fly at night at lot, get an instrument rating and fly IFR at night.  It’s much safer.
    3. Practice Landings Before Carrying Passengers.  The tendency when landing at night is to level off too high before flaring, causing the airplane to bleed off speed and energy too high above the runway.  This can lead to a stall, a hard landing, and/or too high of a pitch attitude at touch down causing a tail strike. A good tip is start your level off when you can see the tire marks on the runway.  Make sure you practice night landings, preferably with an experienced instructor who is night current and proficient, before carrying any passengers on board, even if you are night current, but haven’t landed at night in a while.
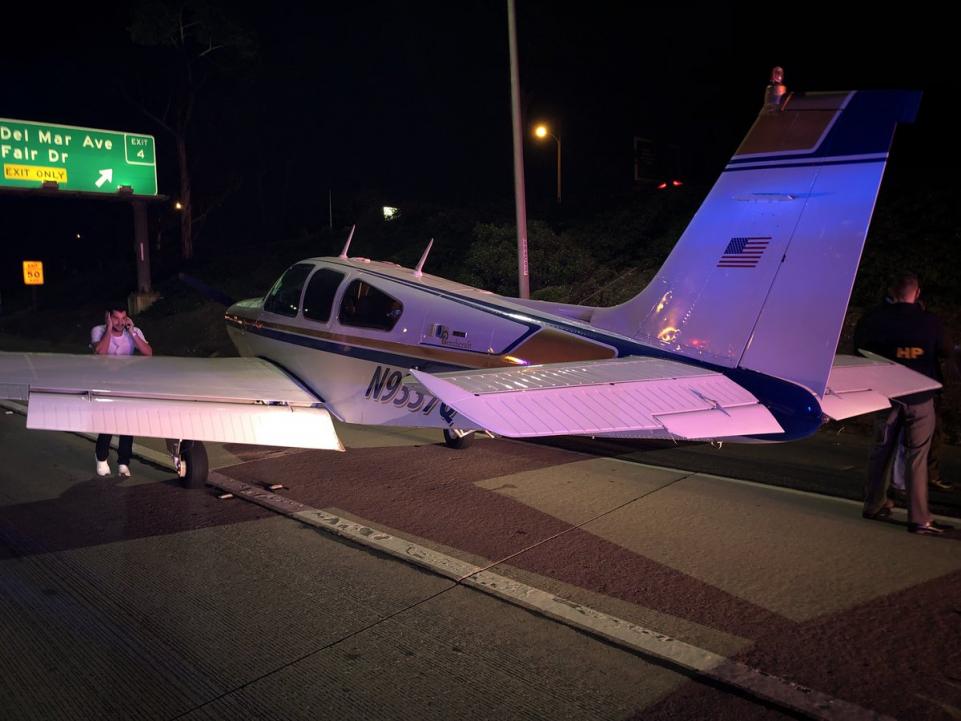
    4. Night Emergencies.  For engine failures at night, you are very limited on options.  Unless you have a Cirrus equipped with a CAPS parachute system, you really have two options if an airport isn’t within gliding distance.  Find a wide, lighted road that appears to be lightly trafficked.  A word of caution, though:  be careful of light poles, fences, concrete medians, cars, and buildings.  The LA freeway would not be a good option (though there are exceptions to this rule as is evidenced by the picture below).  The second option is find a dark spot and pray it’s a field (or the Hudson River).  As you get closer, you can turn your landing light on to see what the ground looks like.  If it looks good, keep the light on and continue.  If you don’t like what you see, turn your landing light off and continue….

    Flying at night can be the best time of day to fly.  It’s usually smoother, cooler, and you get to see all the city lights.  It is a very different environment, however, so make sure to get some training before darkness settles in on your next trip.

  • Guardian Seven Trauma

    First Aid Kit on Steroids

    We have all seen the little first aid kits that a pilot can get to carry in an airplane. It usually has some bandaids, maybe some gauze, and some antibiotic ointment. Very helpful in the even that your paper VFR chart cuts your finger when you are unrolling it.

    What happens if you crash in a harsh environment and you have some actual injuries to take care of?

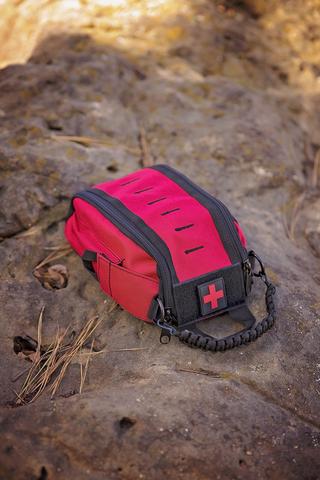
    Enter the Guardian Seven Trauma G7-Alpha Trauma and Egress Kit. It literally is a First Aid Kit on steroids.

    Guardian Seven Trauma has put together a kit that contains just about anything you need to take care of an injury from an airplane crash. Plus, the kit only weighs less than 2 pounds. It easily mounts in an aircraft and can be opened with only one hand.

    The kit contains:

    • CAT Tourniquet
    • Quick Clot Z Hold Hemostatic Gauze
    • 4″ Emergency Trauma Dressing
    • Nasal Airway
    • ARS Needle
    • HyFin Chest Seal Twin Pack
    • (4) 3″ Gauze Rolls
    • Triangle Bandage
    • Mylar Blanket
    • Leatherman Z Rex Tool (for emergency egress)
    • Trauma Shears
    • Roll of Medical Tape
    • Bear Claw Glove Kit
    • Permanent Marker
    • Multi Purpose Paracord Handle
    • Nylon Straps with Buckles (2)
    • Medical Patch

    Want to upgrade your first aid kit? Visit Guardian Seven’s website to order the G7-Alpha kit.

  • FltPlan Go

    I am an iPad user, but I have an Android phone.  I had been using a junky aviation weather app that just gave meters and TAFs, but seemed to have been programmed in a foreign language (un-decoded TAFs notwithstanding).  I wanted something more robust, but didn’t see the need to pay for a Garmin Pilot subscription since Foreflight on my iPad was my main EFB (Electronic Flight Bag) I use in the airplane.

    When I upgraded my phone, I decided I had to find something better.  I have a WIFI only iPad, so I utilize my phone to take quick glances at weather reports or when I want to see the radar without having to tether my iPad to my phone.  The app I had wasn’t cutting it.

    That’s when I found FltPlan Go.  We are all familiar with FltPlan.com.  It’s what a lot of corporate pilots use to file flight plans.  I’ve used it some, but there is a large amount of data it needs to set up an airplane. Since I already have all the airplanes I need in Foreflight, I don’t use it that much since I didn’t want to do the setup.  It is rather handy as it spits out flight logs and has a lot of pre-loaded performance numbers for different makes and models.

    FltPlan Go

    FltPlan Go is FltPlan.com‘s app.  It is very user friendly, easy to use, and, most importantly, free!  You can get METARs, TAFs, NOTAMs, Airport Diagrams, approach plates, full weather reports for airports including radar, maps, and a whole lot more.  As far as I can tell, it is a full fledged EFB.  I haven’t really scratched the surface on all the features in using mine, but it is quite robust from the little bit of poking around I’ve done.

    I’m still a Foreflight guy, but if you want something else or you have an Android phone and don’t want to pay for Garmin Pilot or WingXPro, check out FltPlan Go.  It’s a winner.

  • Cirrus Approach

    Earlier this year, Cirrus debuted it’s new Learning Management System (LMS), Cirrus Approach. For several years, Cirrus has led the way in online systems training while using several different platforms for it’s LMS. Cirrus Approach is the culmination of lots of sampling and tinkering, and boy, did Cirrus knock it out of the park.

    For those of you unfamiliar with the Cirrus training program, here is the quick rundown. When a pilot who has no Cirrus time buys a Cirrus aircraft, initial transition training is required to familiarize the pilot with the aircraft systems, speeds to fly, power settings, etc. The Cirrus Transition Course is a 3 day that gets a VFR pilot up to speed in the airplane. Under the Cirrus Embark program, those 3 days of training are covered by Cirrus and free to the new owner.

    If the pilot is an IFR pilot, then the 5 day Cirrus Advanced Transition Training Course is required. If the pilot has Cirrus experience, but with a different engine or avionics configuration, there are courses for that too. The Cirrus Embark program covers 3 days of training for most courses for a new Cirrus owner.

    As part of the aforementioned courses, there are systems to learn about and procedures to understand. This is where the Cirrus Approach LMS excels. Cirrus has done a great job of putting together lots of good videos (that are actually interesting but not annoying) on the airplane, systems, how to fly it, etc. for each course. It cuts down greatly on the time that the training instructor has to spend on the ground with the pilot since the pilot has already compiled knowledge through Cirrus Approach.

    Cirrus Approach is accessible online at learning.cirrusapproach.com. To get access to the courses, create an account, then select the Learning Catalog. The courses are categorized based on the type of training (Transition, Advanced Transition, Avionics Differences, Airframe & Powerplant Differences, Recurrent, and Specialty), then further broken down into the type of airplane, engine and avionics (eg. SR22T G6 Perspective+). Make sure the correct engine and avionics configuration is selected! Notice, there is a difference between the SR22T and SR22 (Turbo & Non-Turbo).

    Anyone can do the specialty courses. I would highly recommend for everyone to take the Engine Management course as well as the Icing Awareness Course for you TKS and FIKI operators. The Takeoff & Landing course is a good refresher course for a pilot who hasn’t done any training in a while.

    The Recurrent Training courses are encouraged for all Cirrus pilots. There is an IFR Refresher, a VFR Refresher, and a Skills Refresher. These are recommended to rotate through with a CSIP (Cirrus Standardized Instructor Pilot) on a yearly basis. With a little extra ground, a Flight Review and an IPC can be accomplished yearly using these courses.


    Interested in Initial or Recurrent training in your Cirrus using Cirrus Approach? Contact Texas Top Aviation today!

  • Garmin 530/430 Missed Approaches

    Flying a missed approach can be stressful enough.  When you haven’t done one in a while and your GPS isn’t showing you how to get to the missed approach point and you can’t remember which button to press, that adds a lot more stress.  Recipe for disaster?  Quite possibly!

    No need to fear, we are here to help.  The procedure for getting a Garmin 530 or 430 to give you missed approach guidance is actually simple and straightforward, if you know what to do!

    Note: Because of the variety of different autopilot configurations in different airplanes, this article will focus solely on the GPS.

    What the GPS is Thinking

    The way Garmin designed the Garmin 530 and Garmin 430 is to be as helpful to pilots as possible.  Their thinking was, 95% of the time, a pilot will make a landing on an instrument approach.  This is pretty accurate as most of the time, this is what happens.  Most general aviation pilots don’t fly approaches to minimums all that often, thus negating the need for a missed approach.

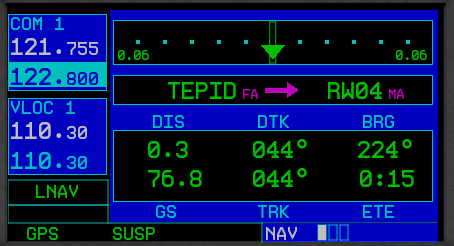
    Garmin Missed ApproachGarmin designed their software with this in mind.  When an airplane crosses the missed approach point, the GPS will go into what’s called suspend mode (a SUSP annunciation appears above the OBS key).  It will keep the missed approach point as the active waypoint because it assumes the pilot is going to land.

    This can be confusing to pilots.  This is what happens when software engineers and pilots come together. Engineers often believe they are smarter than pilots! (See the Airbus fly by wire roll out)

    The Procedure

    In the case of a missed approach, the button pushing on the GPS is actually relatively simple.  There is no SUSP key to take the GPS out of SUSP mode (thanks Garmin!).  Instead, you press the OBS key.  This will take the GPS out of SUSP mode, making the first waypoint on the missed approach procedure the active waypoint.  Your GPS will now give you guidance on the missed approach procedure.

    If you are going missed off an ILS, LOC, or VOR approach, then there is one more key you’ll have to press. Your CDI needle (whether it is digital or analog, an HSI or just a CDI gauge) will be reading off the NAV radio and your CDI indication on the GPS will be VLOC.  After you press the OBS key, press the CDI key on the GPS so you will start getting course guidance from the GPS again.

    That’s it.  Button pressing on the different autopilots will vary, but if you are familiar with yours, you’ll be able to tell it to follow the GPS and climb to the proper altitude.

Leave a Reply

Your email address will not be published. Required fields are marked *