Drones; these technological wonders have, seemingly, come out of nowhere over the course of a few years. Although they bring with them the promise of convenience and fun, they have also brought problems and uncertainty for the government, general public, and, specifically, the aviation community. But, where did drones come from and are they really something to be worried about? Let’s take a look at Unmanned Aerial Systems (UAS) and hopefully put to bed some of the concerns which seem to be following them around.
It shouldn’t come as a surprise to anyone when I say that drones have recently become overwhelmingly popular. The military, businesses, and hobbyists are increasingly utilizing them for all kinds of purposes, which range from enemy surveillance to package delivery. Drone pilots are in high demand and several aviation universities are even offering majors designed to produce graduates which specialize in UAVs (Unmanned Aerial Vehicles).
Drones are relatively new to the landscape of unmanned flying machines. Although model airplanes have been popular since the dawn of aviation, the first “drones” didn’t start becoming commercially available until a few years ago. As electronic technology advanced, so did model aviation. Models became more and more sophisticated and could be flown remotely as long as they remained within sight of the person flying it.
It wasn’t until about 3 or 4 years ago that the technology became available to develop drones. This is due to the need for very small and light electric motors, batteries, and stabilization systems. Once these started to become popular, it didn’t take long for drones to become bigger, cheaper, and completely automated.
It is important to note that there is a difference between drones and conventional model airplanes and helicopters. Drones are defined most simply as an unmanned vehicle which can be operated without user input from the ground. Conventional model aircraft can take all shapes and sizes, but must be operated within line of sight from the operator; as they have no ability to fly, takeoff, land, or navigate without input via a radio transmitter. So, if you happen to see a model aircraft flying, don’t assume automatically that it is a drone. Most of the time, model airplanes, helicopters and even drones are being flown safely and legally.
Generally, a drone is designed with several arms which come off of a central body. Each of the “arms” typically has a motor with a rotor mounted on it to provide lift while the main body is home to the radio equipment, landing skids and camera gear. If you see a model flying that looks like a conventional airplane or helicopter, odds are it isn’t a drone. Most likely it is being flown recreationally by someone nearby.
Historically, model airplanes and helicopters have been difficult to learn to fly. Before the times of pre-built foam airplanes and ready to fly drones, a modeler had to build their flying machine and find someone to teach them how to fly it. (Otherwise, they would likely only get one short flight). New modelers would be directed toward the local model flying club and would get plugged in with a group of established fliers who could outline the rules for model aircraft as well as get them up in the air safely.
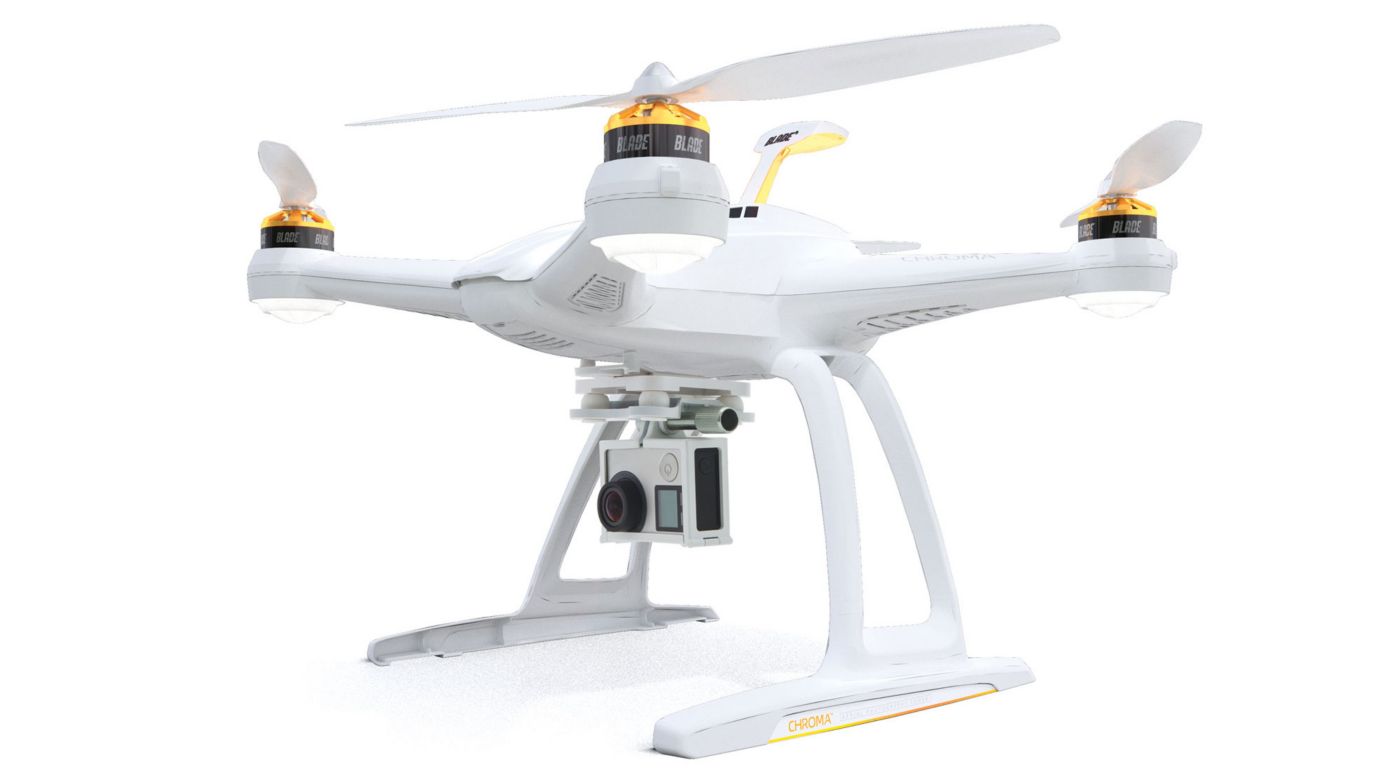
This is a classic example of a Drone. You can see the long arms which house the motor units and rotors as well as the camera and skids mounted in the center. I got this picture (this model is called a Chroma) off of HorizonHobby.com
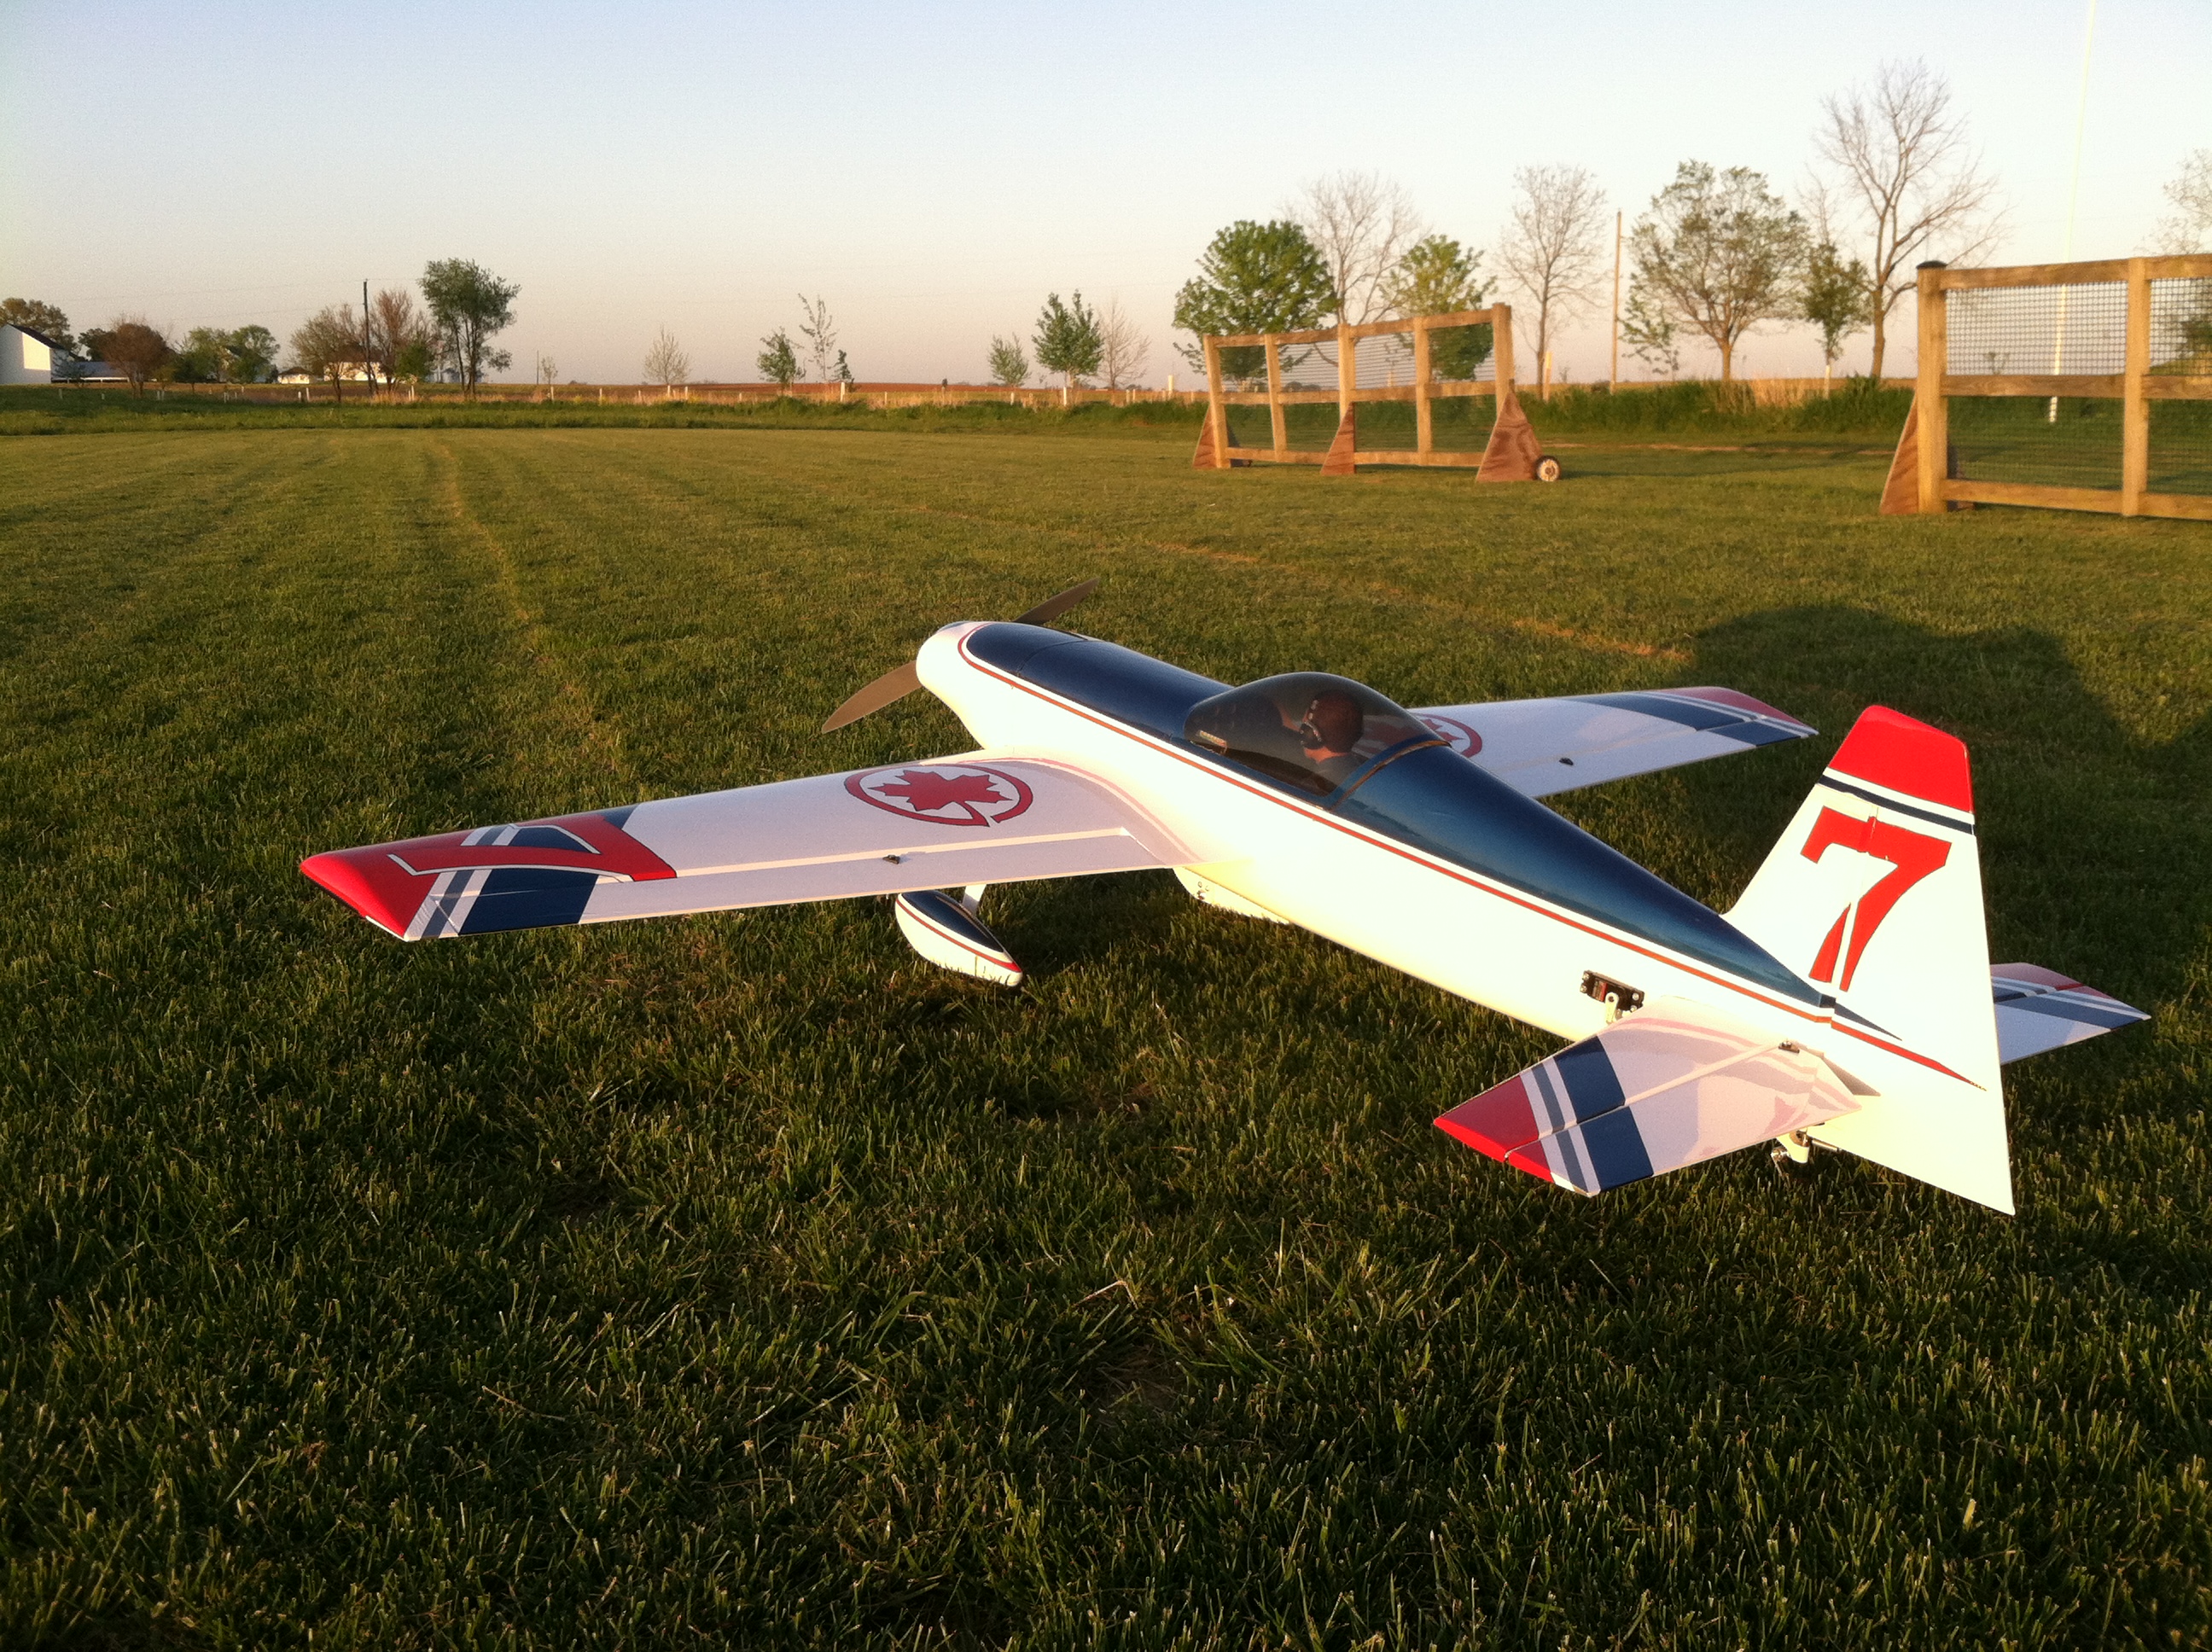
This is one of my models, a Revolver 70. It wouldn’t be considered a drone as it cannot fly without a pilot on the ground (within eye sight) controlling it. You can see the structure of the revolver and the helicopter pictured below varies greatly from that of the Chroma drone.
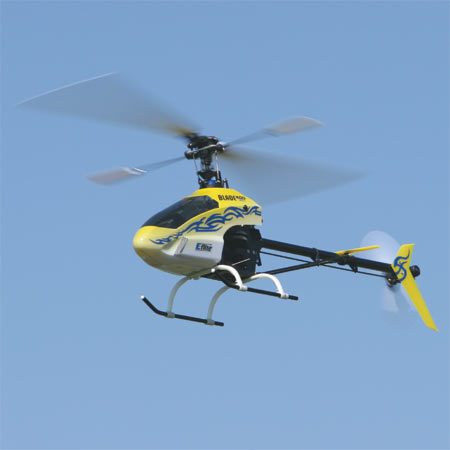
This is a Blade 400 helicopter. Just like the Revolver, it requires a pilot to be present nearby and would not be considered a drone. Worth mentioning is that neither the Blade nor the Revolver have any cameras mounted anywhere on them, as their sole purpose is to be flown for fun. Picture from BladeHelis.com
However, because most everything is purchased online in today’s market, drones are bought and flown by enthusiasts who have not been taught the rules, safety protocols, and procedures necessary to safely operate their new kits. In addition, the drones incredible stability and ability to be flown without any skill means that anyone with great enough funds and an equally great lack of common sense can buy a model and program it to fly over any location they choose. Unfortunately, sometimes that includes places which cause problems.
Andrew Robinson is a 135 Charter Pilot and flight instructor who lives with his wife and 2 daughters in Pennsylvania. He flies Pilatus PC-12s and instructs in Beechcraft Bonanzas.
MMOPA announced the location for the 2022 MMOPA Convention. The 2022 Convention will be in Tucson, Arizona and will take place September 29th-October 2nd, 2022. The JW Marriott Starr Pass will be the host resort.
Thursday, September 29th will kick off the convention with a safety event for pilots and companions, lunch with exhibitors, and the return of the charity golf tournament.
Friday, September 30th and Saturday, October 1st will be when all the classes and seminars that make the MMOPA convention great are held. The Friday dinner will be at an aviation themed spot in Tucson while the annual auction and black tie affair will be Saturday night.
Stay tuned to the event details page on the MMOPA website to see when registration is opened.
Technology has made our job as pilots simpler, streamlined, and safer. With all the new GPS & autopilot technology that seems to come out every month, flying an airplane is getting easier every day (and when I say flying, I mean programming!). I can’t tell you the last time I actually used a VOR for navigation, other than a practice approach. The AIM even has guidance in it now allowing pilots to use the GPS overlay on a VOR or LOC approach instead of switching to the actual NavAid on the course needle (you have to WAAS in order to legally do this).
I hear the argument already. I am young (31) and used to all the different touchscreens because I have grown up with them. Tech is nothing new to me. It’s not that easy for everyone, I do understand. There is also the argument that all the tech causes pilots to not know how to fly the airplane, which is also valid. This is why I put an emphasis on hand flying in any kind of training I do.
For the sake of argument in this article, yes, I am young and I adapt to technology pretty easily. I’m not afraid to press buttons to figure out what they do, but I usually do it while sitting on the ground with a GPU hooked up (or I go look in the manual). And yes, all the autopilot ability has caused a decrease in base pilot skills. I actually encourage every customer I have to go get a tailwheel rating so that they can actually learn how to fly better. You don’t use a rudder much in a Cirrus compared to a Super Cub or a Citabria.
What I want to focus on for a few minutes is how to alleviate the frustration that comes with getting so wrapped up in the technology when it doesn’t do something that you want it to, or the wrong button gets pressed, then you end up somewhere you had no intention of being.
The biggest thing a pilot can do when it comes to technology is NEVER to get in a hurry. Good training is first and foremost, but, after that when flying without an instructor or even in recurrent training, SLOW DOWN and think through what you are doing and what you want the system to do. This will alleviate a ton of frustration.
It can be very easy in hot, turbulent weather to get tuned in to the GPS programming, trying to do five or six different things in the span of five or six seconds, before looking up and realizing that plane is 500 feet off altitude (without an autopilot) or you blew through the course you were supposed to be intercepting (with an autopilot).
What I teach is to slow down, whether or not you have an autopilot, and do one thing at a time. Once that item is done, look up at the instruments or the horizon, check on things, make sure the airplane is still flying properly, then do the next thing. Don’t try and do a bunch of things all at once or in a hurry. It will usually get you off course and off altitude, plus it distracts the pilot from his main job: Flying the airplane.
So, next time you want to do something on your GPS, pause, take a breath, think through what you want to do, then do one item at a time. The outcome will be less frustrating and you’ll keep flying where you want to go.
Many people ask, which set of charts is better? Should I use the FAA Aeroservices charts on Foreflight or pay extra for the Jeppesen charts? Since you have to pay for Jeppesen, they are probably better, right?
I am not here to say which one is better as a chart preference is just that, a preference for one over the other or for certain features. After a while, muscle memory and routine take over and you probably wont even notice the difference.
History
In 1934, Elroy Jeppesen began making his own charts and sold them to other pilots. His little company grew into the giant Boeing chart company we know today. Jeppesen charts are used internationally and therefore include information that might otherwise seem common knowledge, like transition altitudes. The key is, you cannot get FAA Aeroservices charts for international destinations. Jeppesen is the only option for outside the US.
National Aerospace Charting Office (NACO), or the new(er) name “Aeroservices” or FAA chart, whatever you decide to call them, are United States government issued charts. In addition to civilian use, Aeroservices charts are used by the military so there will be some terminology that does not apply to civilians. The best part about FAA Aeroservices charts are… they’re free!
If you are in the middle of a transition or trying to decide which charts to use, you have come to the right place. Here are a few key differences.
Obstacle Departure Procedure Chart KAXX (Angel Fire, New Mexico) ODP
Frequencies: FAA Chart provides the AWOS so you have all departure frequencies in once place.
Airport: Jeppesen highlight the airport, which is a nice feature so you can easily see the flow from the airport.
Notes and Remarks: Jeppesen bolds the speed restriction all over the chart so you won’t miss it. All other requirements are in the top right corner. Note the transition altitude 18,000′. Since Jeppesen is used internationally, it is published on the chart since other countries have different transition altitudes. It takes up a chunk of chart real estate, but it’s clear, easy to read, and always in the same place. The FAA charts post all the requirements and restrictions as notes off to the side. Since it’s in the same space as the chart graphic, it’s easy for the eyes to catch while studying the plate.
Take off Minimums: NOT APPLICABLE for PART 91 – however, it’s wise for all pilots to look and abide by them. Jeppesen displays the standard take off minimums table, as well as the rate of climb table, which is nice to have all in one place. The FAA chart gives the non standard information but you need to know/look up the rest in the Digital Terminal Procedures Supplemental document. (Hint: It’s in the Documents section of Foreflight)
Take Off Obstacles: About the same on both charts
Route Description: Similar on both charts, but larger font and clearer description on the FAA chart. When there are different routes from different runways, the FAA chart layout is really helpful.
Graphic Layout: Jeppesen and FAA use the same graphics for all their different charts and plates which makes it easy to read once you are familiar with the respective charts. FAA charts are easy to read and distractions are kept to a minimum. Jeppesen charts make things bold and enlarge pertinent information so you won’t miss it.
Airport altitude: This is only on the Jeppesen chart (the FAA chart doesn’t include it), but it is very helpful for situational awareness. As you brief the arrival altitudes, I think it’s important to have an idea what AGL you are at.
Approach Charts
One thing pilots love about Jeppesen approach charts is the clear set up for an approach brief. The top section is created as a “briefing strip” starting with the frequencies, then navigation frequencies, minimums, airport elevation and the missed approach. It’s very natural and user friendly.
FAA charts have a slightly bigger picture of the approach planview, but the profile view and minimums section can get a bit cluttered. It can feel a little discontinuous when briefing the approach to bounce all over the page. However, some pilots really like the small airport diagram in the corner, which I find really helpful for situational awareness (particularly for students learning circle approaches). Non- standard alternate and takeoff minimums are also clearly noted, but unfortunately we must hunt elsewhere to find them. The Jeppesen alternate minimums and takeoff minimums will both be on the airport diagram
Frequencies: Getting weather and tuning radios is easy on the Jeppesen charts – just follow the briefing strip. The frequency section on the FAA charts is still easy to read, but closer to the center of the page. It’s split up from the nav frequencies and other important briefing information. a. FAA charts are created by the government and have military specific information, which are the odd looking frequencies and channels on the chart.
Approach Navigation: On a Jeppesen chart, you will continue to the next line to verify your frequency, course and set minimums (assuming you are straight in on the ILS). On the FAA chart, you will then have to skip to the top of the chart to get the frequency and course, and then scan to the bottom of the page to input your minimums. However, since you could be flying a localizer approach or a circle to land, it’s a good reminder that not everyone using this approach chart will be using the same Decision Altitude (DA). The FAA chart also includes runway distance information so pilots can make determinations of approach speeds and stopping distance if the runway is wet or icy.
Missed Approach – Textual
Approach Lighting
Missed Approach- Graphical: The missed approach information is the same on both charts. The lighting information is key for determining a missed approach and is next to the missed approach text on the FAA chart. It’s found next to the missed approach graphic on the Jeppesen chart. Personally, I find it easier to find and read the lighting information on the Jeppesen chart. Remember, on both charts, the placement of the PAPI on the chart indicates the physical location of the lights (left or right of the runway).
Notes: Both charts have a notes box, but they use them a little differently. Once again, remember that Jeppesen charts are used internationally and include the transition altitudes and altimeter setting info. On both charts, the notes section will be where other critical information will be shared which isn’t really applicable for this airport. On the FAA chart, the tower frequency is starred to note that there are operating hours (you’ll have to check the chart supplement AF/D to find out what those hours are). There is also an L next to the frequency to indicate it is the pilot controlled lighting frequency. You will also find the note about the VGSI and the Approach Glide path next to the profile view on the FAA chart, whereas the Jeppesen chart has that note in the notes section at the top. The FAA chart also has the T and an A in black triangles to note that this airport has non- standard alternate and take off minimums. Again, those are found in separate documents when using FAA charts and on the Airport Diagram when using Jeppesen charts.
Minimum Sector Altitude: Similar on both charts, but in different locations (reminder: ATC vector altitudes may be lower. It is the pilot’s responsibility for safety of flight to maintain safe obstacle clearance, so if you are ever concerned about going below the MSA – just ask ATC).
Planview: Other then differences in size, visuals, and text, the information displayed on both is very similar.
Profile View: Again, the displays look different and pilots will have their preference, but the information is the same.
Minimums: Jeppesen charts not only note the category for each approach with its designated letter, but also displays it in knots. It is recommended that if you increase your approach speed (based on flaps or gusty winds or perhaps a faster speed for a circle to land approach) that you should use the higher category minimums. The reference guide makes that easy to look up. The other benefit of the Jeppesen charts is right the table that contains the time from the final approach fix to the missed approach point for a localizer approach, it also shows the rate of descent with the associated ground speed to maintain a 3 degree glideslope. Now there is no excuse not to set pitch and power! The minimums posted in parenthesis are for the military, but RVR in statute miles is also included.
Airport diagram: Only on the FAA charts, this particular feature is particularly useful for situational awareness. The arrow pointing to the runway shows the direction the approach is arriving from so planning a circle to land is a cinch. There is also a lot of other information that can be gathered from the airport diagram for quick reference or to help a disoriented pilot: lighting, displaced thresholds, closed taxiways, and runway placement and lengths. This is easily one of the best perks of an FAA chart.
Arrival/ Departure Charts: Sewzy 5 Arrival KAUS
The Jeppesen lay out is very attractive and draws the pilots eye in a clear way to all the important information. The colors pop out, so the required altitudes and speeds are easy to read and remember. The chart, which is the proper scale, shows MORAs , easy to find airports (and runway layouts) and is over all easy to follow. However, the texts, while very clearly laid out, are small and difficult to read and pushed to the very edges of the chart. FAA charts are simple and fairly easy to read, but the airports are not as obvious and the flow to the airport requires a good look. The table on the Jeppesen chart is a really nice format, but the text and Notes for arrivals on the FAA chart are easy to find and much easier to read quickly.
Frequency: FAA charts include the approach frequency on the arrival, which is helpful for having radios tuned. During a busy time when the controller changes your frequency, all you have to do is verify the frequency you already set, rather then totally stop what you’re doing to switch it. The Jeppesen charts add the airport elevation next to the ATIS, which really aids situational awareness.
Notes: Jeppesen notes are clearly numbered and tucked away nicely in a box, but the FAA chart notes pop out in the middle of the page and are easy to skim for pertinent information.
Planview: I think Jeppesen is the clear winner here- it is so easy to read, it only takes one glance to know where the primary airport is and how the arrival flows. The chart being at the proper scale offers the pilot important geographical information and over all is a clean look. Notice the small series of arrows after SMRFF on the the Jeppesen chart; those indicate the pilot should expect radar vectors. The FAA charts include those instructions in the text, but I find the visual reference on the chart helpful. The FAA charts are equally clean, with altitude and speed restrictions easy to read even if they don’t jump out. When there are multiple airports that the arrival serves, the airports are clearly marked, though, I think it would be nice to have a little more information surrounding the primary airport for better situational awareness.
MSA: only on the Jeppesen chart
Primary airport: The runway alignment and grey highlight on the Jeppesen chart stands out very clearly, while the FAA airports are a little more obscure.
Arrival route description: The table on the Jeppesen chart is easy to follow but the text is very small and pushed to the bottom. The route description is much easier to find and read on the FAA chart.
Airport Diagram
The Jeppesen Airport Diagram page has it all: frequencies, airport diagram, runway info, take-off minimums, departure procedures and alternate minimums. It’s a one-stop shop. It makes preflight planning easy when its all at your fingertips.
The FAA charts usually require a little more searching for different pieces of airport information. The Airport Diagram itself is just the airport layout. Above, you will see a simple FAA Airport diagram. It’s clean and simple, perfect for a knee board print out.
In the flight planning process, as you look at what approaches you will be using for the airport, you might see an A or T inside a triangle. Those indicate that you will need to look in the Alternate Minimum or Take off minimum documents for more information. The Takeoff Minimums document (see below) is also where you will find any obstacle departure procedures for that airport. Apps like Foreflight help you out by posting the take off minimums under the departure tab. Even though it’s a little more difficult to read, I didn’t crop out the airport information so you can see what it looks like in context.
FAA Alternate Minimums on the Left and Takeoff Minimums and Obstacle Departure Procedures on the Right
We spend time training for them, but real-world emergencies are rare enough that it’s easy to get complacent. They don’t always happen to “other pilots,” though, and preparation can make a big difference when things don’t go as planned:
• What if you lose 500 rpm during takeoff, but the engine is running smoothly?
• What if the ammeter drops to zero during a flight in IMC?
• What if your left aileron develops a strong vibration in flight?
Our new seminar is full of expert tips on handling those “up here, but wishing you were down there” scenarios. We focus on how to keep abnormal situations from becoming full-blown emergencies, offer advice on keeping critical problems under control, and give our best advice on off-airport landings.
Find an AOPA Emergency Seminar near you!
Monday January 11, 2016-The Woodlands Waterway, 7pm-9pm
1601 Lake Robbins Drive, The Woodlands, TX 77380
Tuesday January 12, 2016-Wyndham Houston West, 7pm-9pm
14703 Park Row Blvd., Houston, TX 77079
Wednesday January 13, 2016, Holiday Inn San Antonio Airport, 7pm-9pm
77 NE Loop 410, San Antonio, TX 78216
Thursday January 14, 2016, Omni Austin Hotel at Southwark, 7pm-9pm
Ah, fall is finally here. In Texas, it arrived about a month late, but showed up with a vengeance. A strong cold front caused a 40 degree temperature drop in 12 hours earlier this week, bringing rain, lower freezing levels, and lots of wind.
Fall means cooler temps, but fall also means less light. The sun begins to set sooner, plus the fall back time change in November cause darkness to spring upon an unaware pilot.
Before getting in to too many night landings tips, just a friendly reminder, passengers can only be carried at night if the PIC has completed 3 takeoffs and landings to a full stop in the last 90 days during the time period of 1 hour after sunset to 1 hour before sunrise.
Lots of us have been landing long before sunset for most of the past couple of months, so those night flying skills might be a little rusty. The best way to remedy night flying rustiness? Call an instructor and go get some practice.
In the meantime, here are some tips as to what to expect for your next night flying experience.
Your Eyes Are Very Important. This may seem like an obvious statement, but night vision can be affected by many things. Before you takeoff, you want to make sure you can see in the dark. The FAA recommends no bright lights 30 minutes prior to takeoff. They also recommend using oxygen at night as this greatly improves night vision, even at low altitudes. Use off center viewing to help spot traffic or other objects in the air. Finally, when preflighting, use a red flashlight as much as possible, but if you do have to use a white light, close one eye to keep one eye from being blinded.
Utilize Approach Lights onLanding. Night landings are very different then day landings. It is very difficult to get the proper depth perception, not too mention see obstacles below you on your final approach to a runway. PAPI’s, VASI’s, and instrument approach glide slope’s become very important. If you are VFR only pilot, if your airport has a PAPI or a VASI, keep 2 white and 2 red (or 1 white and 1 red) lights. If you see 3 red (or 2 red), climb. If you see 4 red, definitely climb. If you are an IFR pilot, I highly recommend always flying an approach at night. What if your airport doesn’t have a PAPI, VASI, or approach with a glide slope? You might not want to utilize it at night. One side note on VFR flight: Clouds are nearly invisible at night. If you do fly into a cloud (a clue is your strobe lights start reflecting back at you), don’t panic. If you have an autopilot, turn it on and execute a 180 degree level turn. If you don’t have an autopilot, start scanning your instruments, keep your attitude indicator blue side up, and make a shallow 180 degree while maintaining altitude. Then call ATC, advise them what happened, and ask for help. One more note: I highly recommend that if a pilot finds that he/she will fly at night at lot, get an instrument rating and fly IFR at night. It’s much safer.
Practice Landings Before Carrying Passengers. The tendency when landing at night is to level off too high before flaring, causing the airplane to bleed off speed and energy too high above the runway. This can lead to a stall, a hard landing, and/or too high of a pitch attitude at touch down causing a tail strike. A good tip is start your level off when you can see the tire marks on the runway. Make sure you practice night landings, preferably with an experienced instructor who is night current and proficient, before carrying any passengers on board, even if you are night current, but haven’t landed at night in a while.
Night Emergencies. For engine failures at night, you are very limited on options. Unless you have a Cirrus equipped with a CAPS parachute system, you really have two options if an airport isn’t within gliding distance. Find a wide, lighted road that appears to be lightly trafficked. A word of caution, though: be careful of light poles, fences, concrete medians, cars, and buildings. The LA freeway would not be a good option (though there are exceptions to this rule as is evidenced by the picture below). The second option is find a dark spot and pray it’s a field (or the Hudson River). As you get closer, you can turn your landing light on to see what the ground looks like. If it looks good, keep the light on and continue. If you don’t like what you see, turn your landing light off and continue….
Flying at night can be the best time of day to fly. It’s usually smoother, cooler, and you get to see all the city lights. It is a very different environment, however, so make sure to get some training before darkness settles in on your next trip.
The FAA started their Pilot Proficiency Award Program (commonly known as FAA WINGS) in 1996. It is run by the FAA Safety Team, or the FAASTeam. The intent of the program was, and is, to “improve the nation’s accident rate by conveying safety principles and practices through training, outreach, and education” (taken from faasafety.gov). The FAA WINGS program, free of charge, encourages pilots to pursue recurrent training to enhance their overall knowledge of all the aspects of aviation.
The FAA WINGS program has evolved over the years, but with the current structure, pilot’s accomplish tasks, both knowledge and flying, for credit that adds up to the equivalent of a flight review. Pilot’s must accrue three knowledge credits and three flight credits to complete a phase, and each phase acts as a flight review.
FAA WINGS has three levels, the basic, advanced, and master level. Under each level, you accomplish different phases. The basic level is “designed for pilot’s [desiring] a higher level of proficiency than … a normal flight review” (faasafety.gov). The flying tasks in the basic phase are based on the private or commercial pilot PTS, depending on the airman’s certificate level. The knowledge courses revolve around many different areas, all of which can be viewed on the FAASafety Team’s website. Most are free, but there are some courses that have a cost associated with them. In the advanced and master phases of the FAA WINGS program, the tasks have higher standards, challenging pilots to hold themselves to those higher standards.
One unique aspect of the FAA WINGS program is the opportunity to attend a safety seminar for credit. Throughout the year, there are many different safety seminars that take place in the different FSDO areas. The FAA WINGS seminars range from a study of accidents, to GPS usage and anything in between. You can even get FAA WINGS credit for attending the Bonanza BPPP or the Cirrus CPPP programs.
As an instructor, I highly recommend to all my customers to enroll in the FAA WINGS program and use it. This keeps pilot proficiency at a high level, which in turn keeps safety at a high level as well. Plus, you get to learn a lot too!
If you’d like to enroll in the FAA WINGS program, visit faasafety.gov to create an account. Then, find a good instructor and start working on those phases!