Lightspeed Tango Headset

I recently purchased the new, wireless, Lightspeed Tango headset.  I’m a little OCD, so when a headset wire is banging against my shoulder while I’m trying to tune a radio or point something out, it’s a little annoying. A headset without the wires caught my eye.

As I’ve stated before in a previous article, I really like Lightspeed headsets.  They are more comfortable than Bose, and a little bit more affordable too.  The noise canceling quality is very high in the different Lightspeed models.  I personally believe it got even better with the Lightspeed Tango.
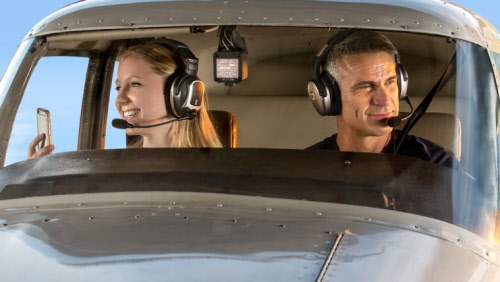
Lightspeed Tango

Let’s talk about the obvious first.  Not having a wire connecting you to the headset jacks is really nice.  You’re not tethered to anything, so your head is free to move anywhere without getting yanked back in place. Lightspeed developed a new technology, called Lightspeed Link, which bypasses Bluetooth or Wifi and connects the Panel Interface to the headset wirelessly.

The Link technology works pretty well.  The only problem I have noticed is in certain airplanes, I occasionally lose one ear, but after I wiggle the input wires around, the deaf ear comes back up.  It may be a loose connector in the plane itself.

The really nice thing about the Lightspeed Tango is the fact that it doesn’t need AA batteries anymore. Lightspeed put rechargeable lithium ion batteries in both the Panel Interface and the headset.  You get 12 hours of battery life out of both, far surpassing any length of time you would want to be in an airplane.  If the battery dies, there is a handy aux cable that can connect the Panel Interface directly to the headset (the ion batteries recharge with the included wall charger and USB cables in 2 hours).

Though the Lightspeed Tango is slightly heavier than the Zulu 2 due to the Link hardware and the lithium ion battery, it is still extremely comfortable.  The ear cups actually fit better over my ears and give me a better seal with glasses on then the Zulu 2 did.  As with all Lightspeed products, there is no squeezing of my head and the cushions on top of the headset sit very comfortably on top of my head.

The Bluetooth is much simpler to use than the Zulu 2 and definitely simpler than the Bose A20.  Sound quality is very good for phone calls and music.  The volume control on the headset itself is set to make smaller adjustments so you don’t have to deal with wide swings in volume.

Overall, I’m a big fan of the Lightspeed Tango.  I am recommending them to all the pilots I talk to.  Rolling in at $400 cheaper than the Bose, you can’t go wrong.
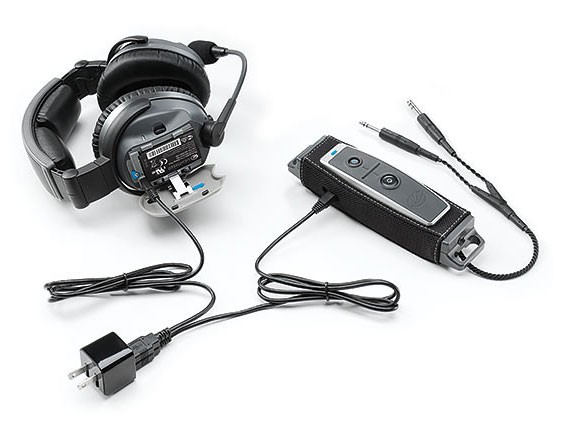
Lightspeed Tango 3

Similar Posts

  • L-3 Lynx Transponder Line

    L-3 has jumped into the ADS-B transponder game with their Lynx line of products.  Aircraft owners have a myriad of options with the Lynx line, from simply becoming ADS-B compliant with the NGT-1000 ($2,100, with ADS-B out that works with the GTX 327 and GTX 330), or going all in with the NGT-9000 touch screen transponder complete with ADS-B In, a traffic screen and NEXRAD ($6,800).

    L-3 Lynx

    The NGT 1000/2000/2500 line works with the existing transponder in the airplane (as long as it’s a Garmin GTX 327 or 330).  The 2000 gives ADS-B In capability, allowing the pilot to access NEXRAD and traffic, plus has a Wifi source to broadcast all the information to an iPad.  The 2500 includes all of that, plus gives the pilot MFD capability as well.  An optional control panel is available if the airplane is not equipped with one of the aforementioned Garmin transponders.

    The L-3 Lynx NGT-9000 is an actual transponder replacement.  It is a touch screen device that has a multitude of ADS-B features that, quite frankly, are really cool on a transponder.  The ADS-B traffic is displayed on the unit itself and can also be sent, via the optional Wifi connection, to an iPad on the WingXPro or SkyRadar apps.  The optional L-3 NextGen Active Traffic can also be installed to receive traffic callouts (this does not include resolution advisories).  Already have SkyWatch?  The L-3 Lynx can use the equipment.

    The L-3 Lynx NGT-9000 is also capable of displaying NEXRAD as well as METARs, TAFs, NOTAMs, and TFRs and a myriad of other weather products, all on it’s moving map.  It seems that L-3 has taken the transponder and turned it into something awesome.

    To read more about the L-3 Lynx line of transponders, you can visit their website.

  • Redbird Skyport Bluebonnet Fly-In at KHYI

    Bluebonnet Fly In

    Come out to Redbird Skyport at the San Marcos Municipal Airport on Saturday, May 30th for the Bluebonnet Fly-In.  Hank Gibson from Texas Top Aviation will be giving a safety presentation at 2pm in the large conference room entitled “Is The Approach Activate?  Flying Garmin Approaches.”

    Join Texas Top Aviation and Redbird Skyport as we open the summer together at the Bluebonnet Fly-In.

    To Register for the Safety Seminar, please click here.

  • Present Position Hold

    When I was working on my instrument rating back in 2007, my instructor and I did a lot of unpublished holds.  In ground school, I heard a lot about holding for weather or holding due to a traffic delay.  At my first job, my chief flight instructor was also a Continental (now United) captain and he told me a lot about having to hold for weather going into different places.

    I heard all this, but I figured it would never happen to me when I’m flying GA airplanes.

    Boy was I wrong!

    I was flying a Piper Malibu into Phoenix with two passengers for Super Bowl weekend and the weather was awful.  No thunderstorms, but moderate precipitation and low ceilings.  We were coming into Deer Valley (KDVT) on the north side of Phoenix and about an hour out, ATC advised me that arrivals into DVT were having to hold and to expect a delay.  The controller said the delay would be about 30 minutes, so by doing a quick calculation, I determined the delay would probably be all cleared up by the time I got in the area.  At the time, I didn’t know if the delay was due to weather or traffic congestion.

    Twenty minutes later, the controller advised me that there was still a delay.  I queried what it was for and he informed me it was due to weather.  He asked me if I wanted to hold or divert.  I listened to the ATIS and heard the ceilings were variable from just below the minimums to just above.  I told him I would hold as the TAF I saw predicted the ceilings to go up.

    “Malibu, hold present position, hold east, expect further clearance 2140 Zulu.”  Gulp.

    At this point, my autopilot had gone out, it was turbulent and I was definitely in the soup.  This was going to be fun.

    After recovering my wits, I read back the clearance, then set about setting up this hold without getting too far from my present position.  The Malibu I was flying had a Garmin 530 which I was using as my primary means of navigation.  I was on V190, but I didn’t have all the fixes in my flight plan.  What to do?  And what to do fast?

    The 530 has a rarely used function called a User Waypoint.  It comes in handy in situations like these.  On the moving map, you can turn the cursor on, move the cursor to any point on the map, and, by pressing enter, create a User Waypoint.  This is what I did on V190.  After I created it, I had to go to my flight plan, find the right spot, and input the User Waypoint just like I would any fix.  Just a note here, when you create a User Waypoint, make sure you remember what you named it so you can find it again.

    After I input the User Waypoint in the flight plan, I had to go back and activate the leg that the User Waypoint was the end point on.  Then, to make sure the flight plan didn’t go to the next waypoint once I crossed my User Waypoint, I had to press the OBS button on the 530 in order to put the GPS in suspend mode.

    Keep in mind, my autopilot wasn’t working, so this involved a lot of multi-tasking!

    That’s how to do a present position hold using the Garmin 530.  Got all that?  Here’s a concise review:

    • Create a User Waypoint
      • Turn the cursor on by pressing the FMS knob
      • Move the cursor to the point where you want your User Waypoint
      • Press enter and name the User Waypoint
    • Press the Flight Plan button
    • Input the User Waypoint into your flight plan at the proper point
    • Activate the leg that the User Waypoint is the end point on
    • Finally, press the OBS button to put the GPS in suspend mode
    • After you’re cleared onward, just press the OBS button again to take the GPS out of suspend mode
  • Inadvertent IMC Entry

    I ran across the story about the Korean Air flight that crashed in Guam in the late ’90s the other day.  It was a 747 that hit the side of hill about 3 miles short of the runway, killing most of the people on board.  The flight was at night (arrival time was about 1:30am) and the pilot’s lost sight of the runway on a visual approach due to inadvertent IMC entry.  They didn’t execute a missed approach soon enough, got too low, and crashed.

    Korean Air Crash

    These were experienced pilots, mind you, who had flown into that airport a number of times. They were experienced enough to know when to execute a go around.  There were several other factors that led up to the crash, but, ultimately, they lost sight of the runway due to inadvertent IMC entry.

    To all the VFR pilots out there, what do you do if you accidentally fly into a cloud?  It’s a lot easier to encounter inadvertent IMC at night, simply because you can’t see the clouds in front of you.  It is no less dangerous during the day, either.

    So, we’re going back to the basics today.  What really is the best course of action for a VFR pilot when flying into a cloud?  One option (and in my opinion, the best option) is to turn around. Immediately start scanning your instruments, execute a shallow banked 180 degree turn while maintaining altitude, and fly out of the cloud you just flew into.  If you have an autopilot, turn it on immediately and let it do the turn.

    What if you were descending or climbing when you encountered the inadvertent IMC?  In this case, just reverse whatever you were just doing.  If you were descending, climb.  If you were climbing, descend.  Caution is needed, though, as climbing or descending when flying on instruments for an inexperienced IFR pilot could lead to a greater chance of disorientation.

    One thing that could assist in spotting those clouds at night is turning the cockpit lights down.  This will allow you to see outside a little bit better and start to notice when those ground lights are disappearing.

    IMC FlightMost VFR pilots only do instrument flying on flight reviews.  That doesn’t lead to a very high level of proficiency, so go out and grab your instructor and tell him to put you under the hood once a month.  You’ll be a better pilot overall for it.

    IFR pilots, taking a note from the Korean Air flight; if you lose sight of the runway on a visual approach, especially at night, go missed and ask for the instrument approach procedure.  Don’t try and duck down below the clouds as there may be a hill or a mountain directly below you.

  • Dry Motoring a PT6

    When it comes to turboprop engines, a hot start is a really bad thing. For you piston drivers out there thinking, “What’s the big deal, you are just starting a hot engine,” then here’s a little education for you.

    In a PT6 turboprop engine, there is a very important temperature gauge that a pilot monitors very closely during each and every start. It is called the Inter-Turbine Temperature gauge, or ITT. This temperature is a measurement of the exhaust gases between the compressor turbine and the power turbine (s). In the picture below, the probe is located where the blue and red colors meet.

    In a turboprop engine, specifically the Pratt & Whitney PT-6 in all it’s different sizes and variations, there will always be a specific temperature that the pilot will want to keep the ITT below. This article will deal specifically with a Piper Meridian.

    A Piper Meridian starts hotter than almost any other PT6 engine because of the way it’s air intake is designed. Unlike other turboprops, the Meridian has a permanently open inertial separator. This means that not all the intake air makes it to the engine during start because some of it goes out the inertial separator opening. So, coming to a Meridian from operating other turboprop engines can lead to a little bit of a surprise on the ITT temperature being higher than what a pilot is used to when starting.

    As a rule of thumb, when starting a Meridian, never let a start continue when the ITT hits 875 degrees. Based on the chart below, you are still in the safe zone at 875 and have about a 50 degree buffer before you have to start getting worried.

    On cold starts with a good battery or a GPU, 875 is typically not an issue. Most starts when cold are going to be in the high 700s or low 800s. On a cold start, if you are seeing starts in the mid to upper 800s, try starting with a GPU and see if that lowers the start temperature. If it does, then that means your battery is weak and needs to be replaced. Another tell-tale sign of a weak batter is the Ng doesn’t spool up properly (meaning it settles around 12-13%) or takes a really long time to spool up. Also, never start on the battery with less than 24 volts.

    When there are multiple flights in one day, the pilot has to take into consideration the warm engine prior to starting. If the ITT, prior to the start sequence, is above 150 degrees, it is time to do some motoring of the engine.

    What is motoring? It is simply using the starter to turn the engine, which leads to air being sucked into the engine allowing the engine to cool off prior to start. The theory is, the cooler your engine prior to start, the cooler the ITT peaks at during start.

    Here’s the steps on how to dry motor a Piper Meridian:

    • Battery on
    • Strobes on
    • Fuel Pumps and Ignition off
    • Throttle idle
    • Condition Lever feather/cutoff
    • Push the start button
    • Monitor the ITT temperature
    • Reaching 150 degrees, if less than 30 seconds have elapsed:
      • Fuel Pumps on
      • Ignition On
      • Condition Lever run
    • Reaching 150 degrees, if 30 seconds have elapsed:
      • Push Manual/Stop button to stop the start
      • Let starter rest for 30 seconds

    The starter has a 30 second limit on the Meridian, followed by a 30 second rest period. You can do the sequence twice, then, after the 3rd start, there is a 30 minute rest period. Typically, if the ITT won’t cool down to 150 after the 3rd time, there is probably something wrong.

    The most important thing a pilot can remember is never, ever push the condition lever forward if the ITT is above 150 degrees. You’ll be well on your way to avoiding hot starts that way.

  • Flying to the Bahamas

    A couple weeks ago, my employer informed me that he wanted to take a group to Nassau, The Bahamas. I thought, no big deal, this should be an easy trip. The more I started to read, though, the more I realized it wasn’t going to be just a “normal” trip.

    If you aren’t a member of AOPA, I would highly recommend joining. AOPA’s website was where I started researching. They actually have a checklist to help you along the way.

    The first step is getting the paperwork started. All souls on board are going to need a valid passport. In our case, a couple of passengers need to get theirs. Since it was a little shorter notice, we had to go through the expedited process. It’s fairly simple. A quick internet search gave me a couple of people that helped the process along.

    Next was making sure the aircraft had all it’s paperwork. The airworthiness certificate was easy as it’s always in the plane (or should be).

    The registration certificate was next to check. We recently upgraded to the King Air 350 so we had to make sure we had the original issuance registration certificate. The Bahamas supposedly doesn’t allow Temporary Certificates and I really didn’t want to test that policy.  Thankfully after a couple of calls between owner and the FAA we got the original.

    The aircraft and pilot are both also required to have an FCC Radio License. This is only for international flying, but not an everyday thing pilots think about.

    After that was flight planning. I use FltPlan.com. The actual filing of the flight plan was very easy. I use the prescribed routes from the website. In the remarks section of the flight plan put ADCUS (Advise Customs). This advices ATC to let customs know of your arrival. It’s basically an added safety net in case you forget to call ahead or your flight times end up being way off.

    The other item when dealing with flight planning is dealing with eApis. There are numerous companies who will provide this service for you. I elected not to use one of those. If you go to the CBP website, you can set up an account and do all of it yourself. Take your time and really plan the flight out well to make sure your arrival times are as close to real time as possible. If you’re way off, this will make any customs agent very frustrated and that is not something you want to be dealing with.

    Approach charts and en route charts are another hurdle. Thankfully Foreflight has you covered. With my subscription, I already had en route charts. The approach charts were the real issue. In the Bahamas, the only places that have approved instrument approaches is Nassau and Freeport. Fortunately, we were going to Nassau. Foreflight does charge almost $400 for the Caribbean and Bahamas charts.  Emailing the FBO is a good option as they can usually supply approach plates for international flights.

    You’ll also need a CBP sticker. This goes on the outside of the aircraft showing customs you’re in the system. This can be found on the CBP website as well. It takes a little bit to get the
    sticker in the mail. However, once you pay for the sticker, the receipt can be used in place of the sticker.

    The final thing I focused on was picking an FBO. I chose Jet Aviation. They had CAA which gave us a Jet fuel discount. Their facility was excellent and staff was very friendly. The thing that put it over the top for me was how they handled customs. I emailed Jet Aviation all the information for myself and passengers and they pre-filled all the customs forms for me. When we arrived, customs took all of five minutes and then my passengers were out the door.

    While in Nassau, I stayed at Breezes Resort. It’s all inclusive so that helps keep the costs down for your owners if you’re a corporate pilot. It’s next to some of the other bigger resorts so there were shuttles available to get to other amenities. The only complaint I might have was the power kept cycling on and off and the internet wasn’t reliable. This proved challenging when trying to plan for the return trip.

    The return trip required a lot of the same preparation. Again it was nice to have a good FBO to help prepare the paperwork required to clear customs. Jet Aviation handled the General Declarations for me and my passengers. All I was required to do was file the flight plan and file eApis, which was actually challenging while my internet at the resort was on the fritz.

    Don’t forget to call US Customs at your Port of Entry! As this was Ft. Lauderdale for us, I called them twenty four hours in advance as prescribed. The customs agent was friendly and helpful with any questions I had. I think the best advice I can give throughout this whole experience is call ahead and ask lots of questions! Did I say that already?

    The morning of the return trip went off with no hitches. Again, Jet Aviation had set up a driver to pick me up and he was on time. Jet Aviation had all the General Declarations paperwork pre-filled out for myself and passengers. Again, I use FltPlan.com to file my flight plans. Their service performed flawlessly even though I had heard rumors of flight plans not going through. To curb my bet, I talked with the staff at Jet Aviation and they made a call to tower for me to verify that the flight plan had gone through; of course, it had.

    The actual flight out of Nassau was pretty uneventful. The last real hurdle I had was dealing with customs in Ft. Lauderdale, and hurdle it was. When we landed at FLL, ground instructed me over to customs ramp. There was no one to tell us where to park on the ramp. This was extremely frustrating.

    A Learjet taxied in prior to us and had taken up most of the ramp but, we found a spot and shutdown. Once we shut down, no one came out to our aircraft. I walked in to talk to someone and was greeted by a Boarder agent who was less than helpful. Since the Learjet had parked first, they got to go through first. Evidently, we were not allowed in the building until they were done. This didn’t make my owner too happy!

    Be prepared, though, if another airplane is on the Customs ramp before you arrive.  You are not supposed to get out of the airplane until a Customs agent comes and meets you, even to go to the bathroom.  This can result in large fines.

    Once we were allowed in, the process went smoothly. We had to put all of our bags through the x-ray machine. Beyond the x-ray machine, CPB didn’t require any other security measures. On other crossings I’ve done, CPB had opened up bags and sifted through clothes, so just doing the conveyor belt was a surprise. The rest of the trip was fairly commonplace. We stopped in Destin FL for dinner before making our final leg into Dallas. All in all, it was an excellent trip and I’m excited to do another one.

    Ryne Bergren works for a Part 91 operation in Dallas flying a King Air 350. Being a Part 91 outfit, he doesn’t get to rely on a “dispatch” or “company” to help with any international flight planning. This was a learning experience for him. Hopefully this will be a help to anyone for future trips.

Leave a Reply

Your email address will not be published. Required fields are marked *