|

How to Get the Current Weather

For a long time, I was happy if an FBO had a radio where I could tune the ATIS or automated weather before getting into the plane. This would allow me to skip listening to the weather in the airplane with the engine running, giving me a quicker exit from the ramp while burning a little less fuel. I would also be able to brief my taxi route from the ramp since I would know which runway was in use before getting in the plane.

As we progress forward in technology, I’m constantly amazed at how much more planning I can do from the palm of my hand. Now, I can call a phone number and get the ATIS, AWOS, or ASOS, depending on the size of the airport; if you prefer reading a text version…well, there’s an app for that.

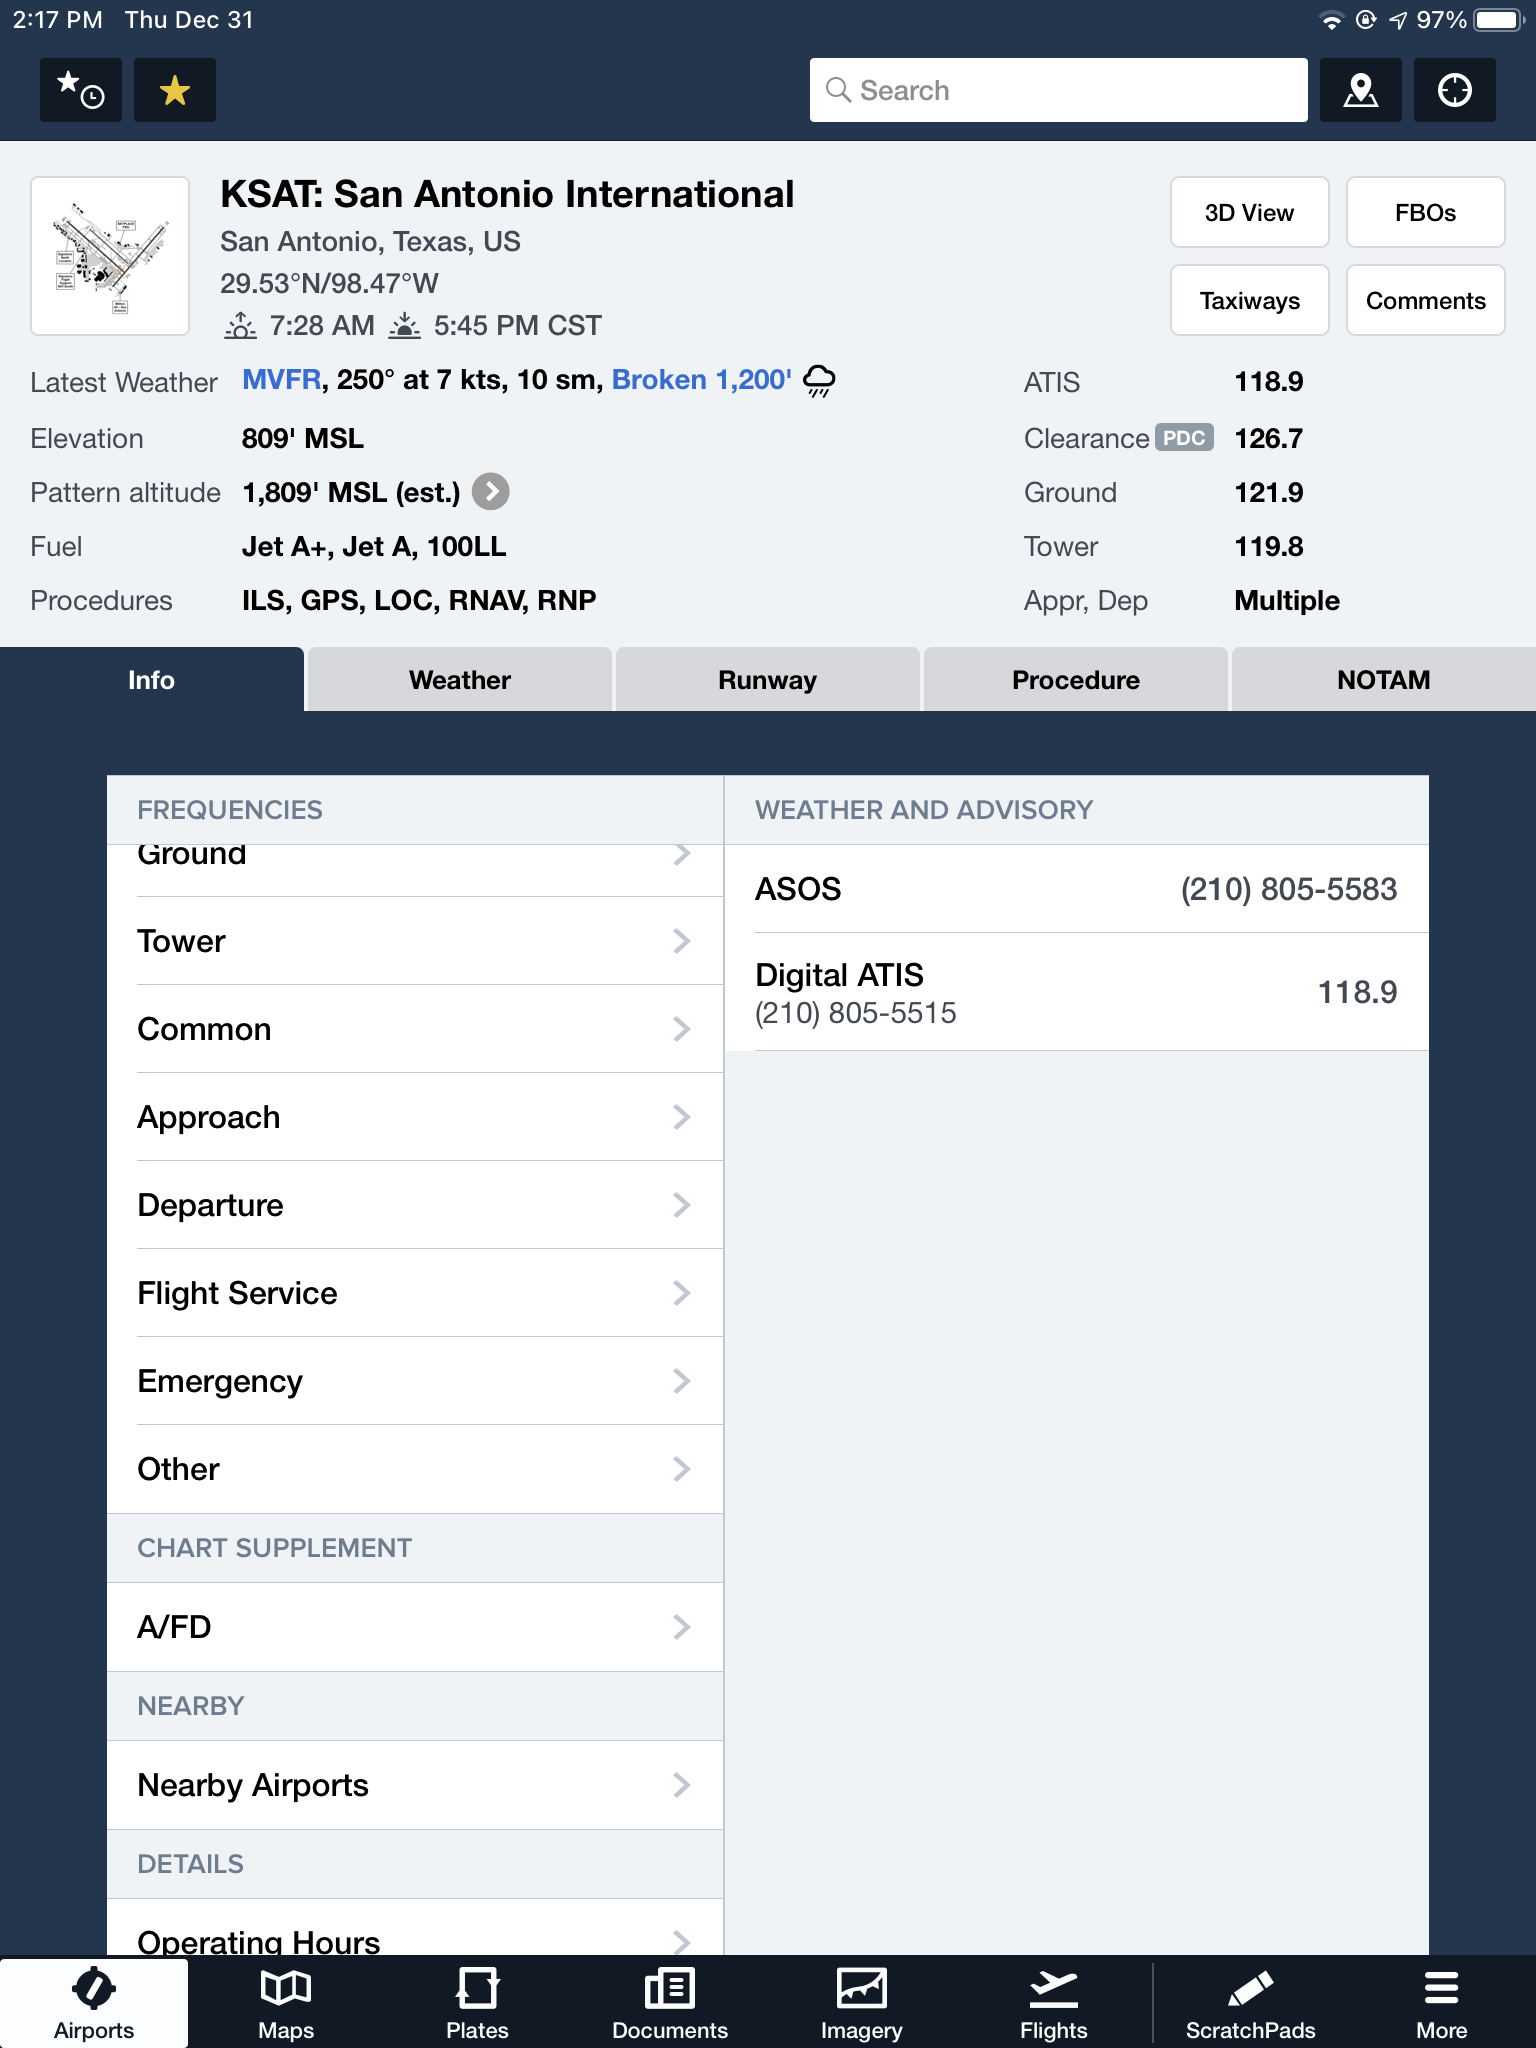
With this technology, it’s very important for pilots to be aware of what service they are utilizing when calling these numbers. Usually only a Class B or larger Class C airport will have a phone number specifically for ATIS as well as one for AWOS/ASOS. These are listed in the Airport/Facility Directory (AFD), as well as all flight planning apps (Foreflight, Garmin Pilot, Stratus Insight). More then one pilot has called the AWOS/ASOS number for an airport thinking they would receive the ATIS (because towered airports that have ATIS phone numbers often also have AWOS/ASOS phone numbers that are different). Since the pilot didn’t hear a code on the phone, that led to the false thinking that either the tower was closed or the pilot did not have the code (ie. Information Bravo) to give to ground control when calling for taxi instructions.  The minute weather can be very useful for flight planning, but the ATIS must be received before contacting ATC at a towered airport.
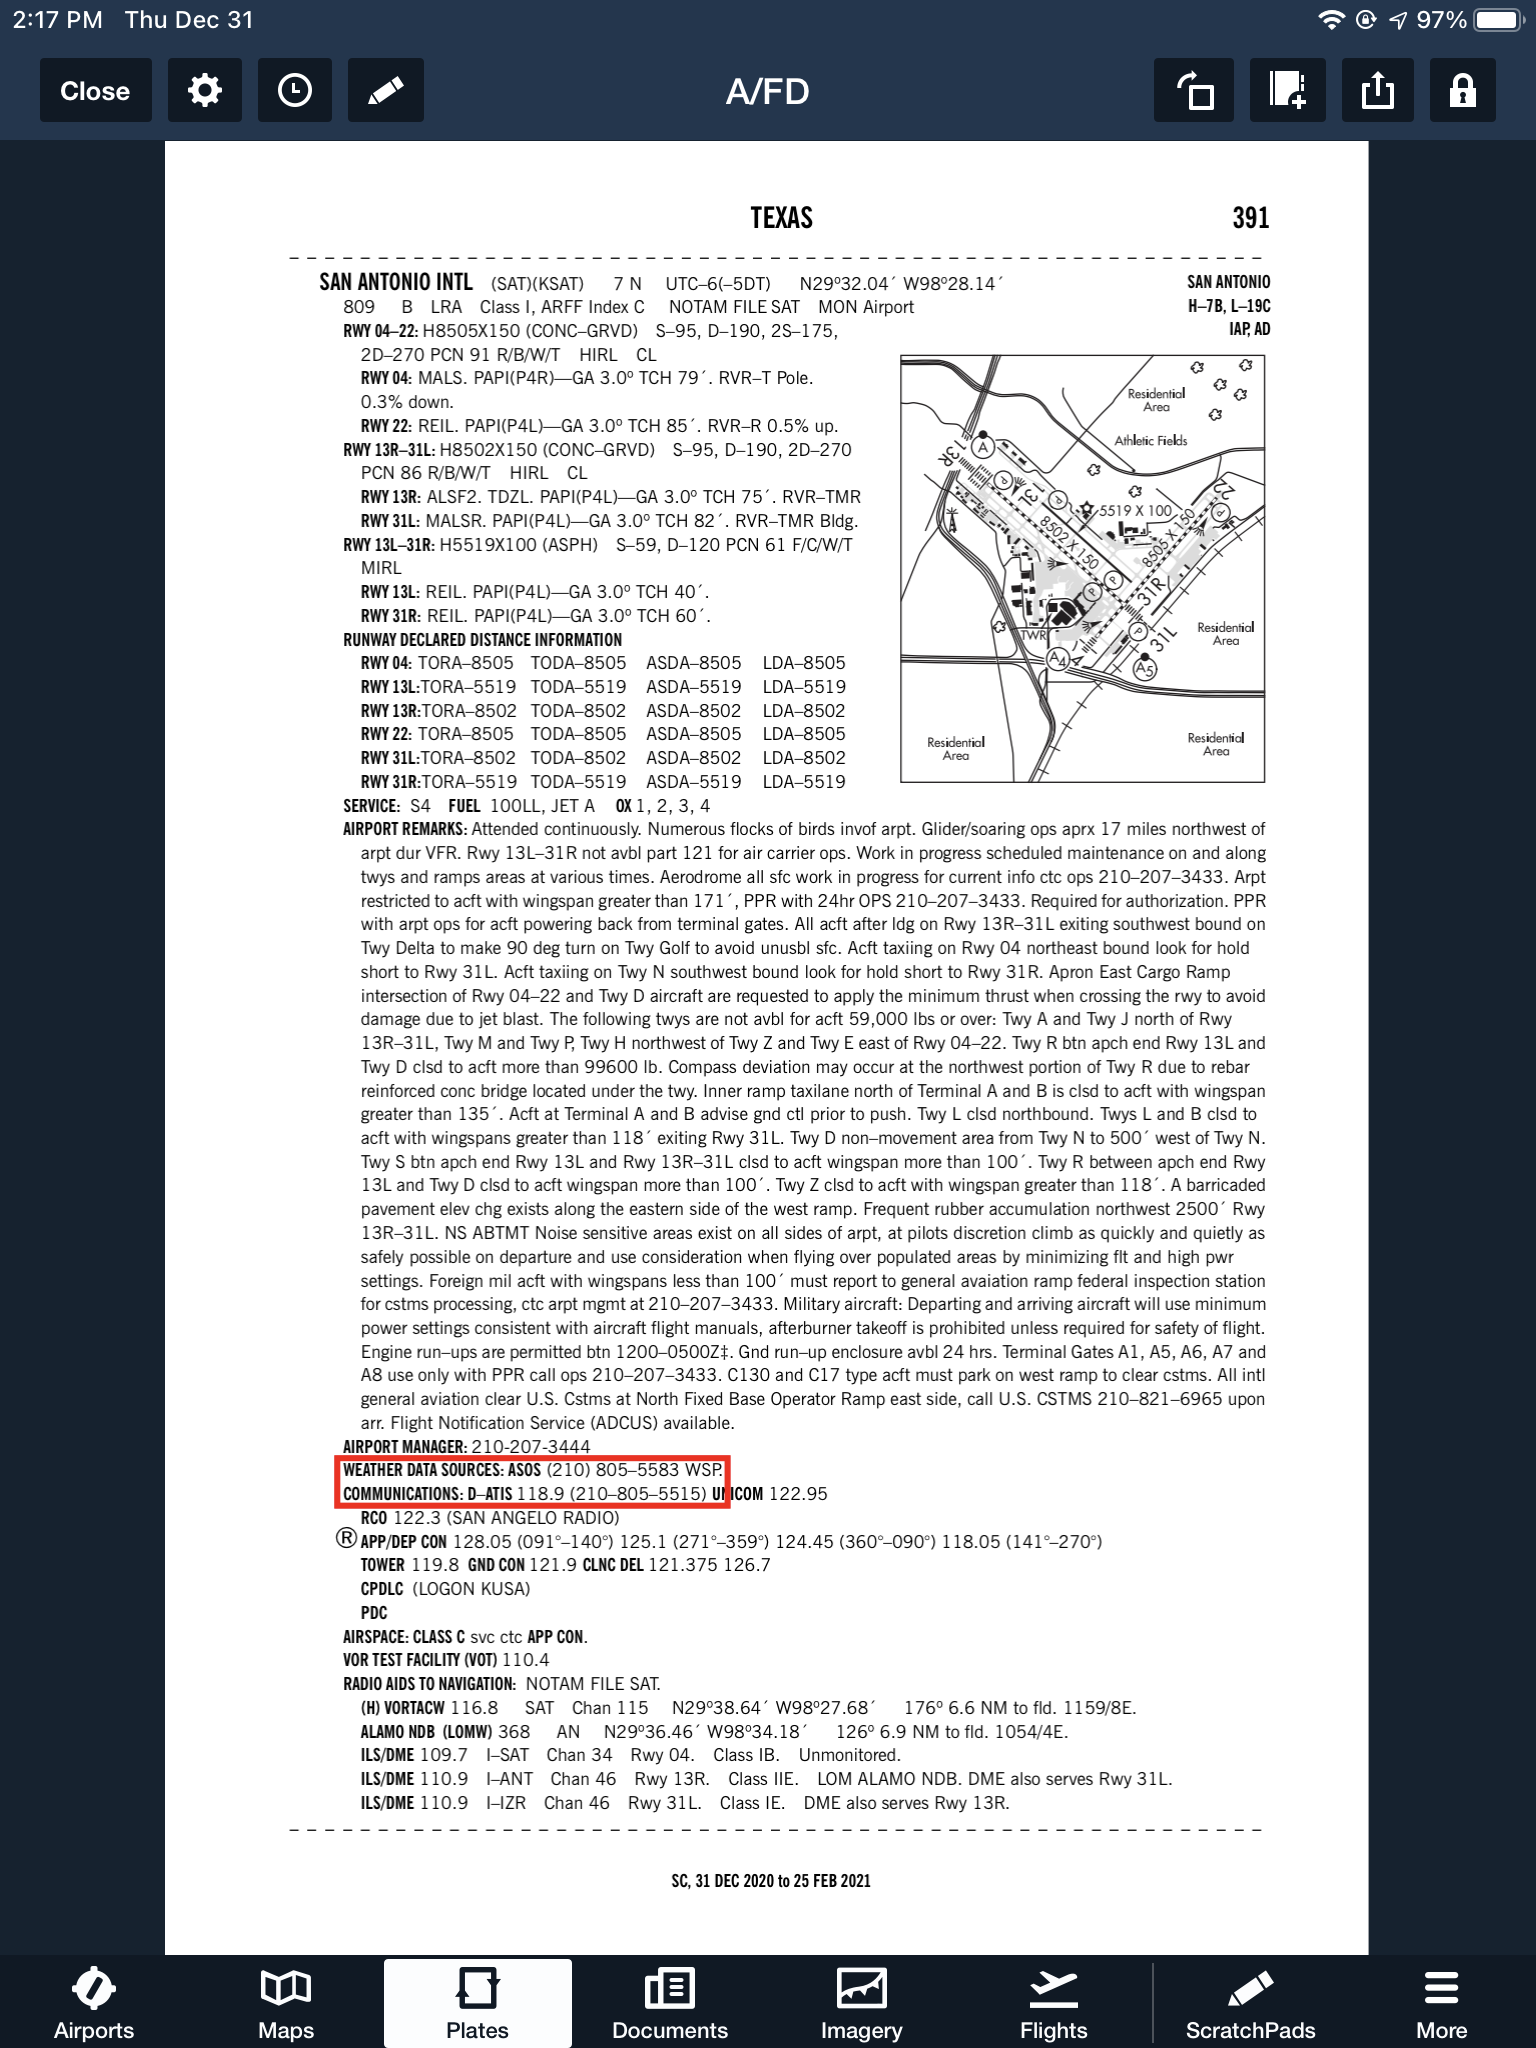
Notice the red box just past halfway down the page. There is a phone number for the ASOS at KSAT and a separate phone number for the ATIS next to the frequency.

Sometimes, you may get a busy tone if someone else is on the line. Usually, waiting a few minutes and trying again will lead to success. Just like old school phone lines, only one call can go through at at time! If it’s a particularly stormy day, you may be fighting a number of pilots to get on the line. In this case, an app where you can read the ATIS may be particularly helpful (Yes, there actually is a dedicated ATIS App!).

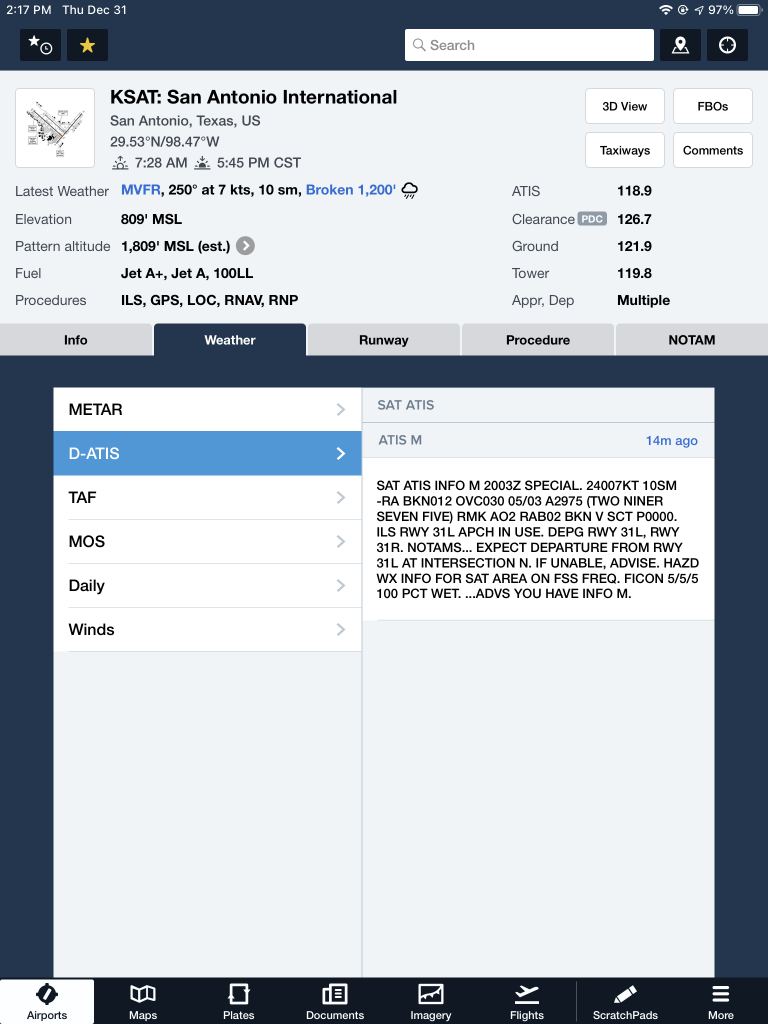
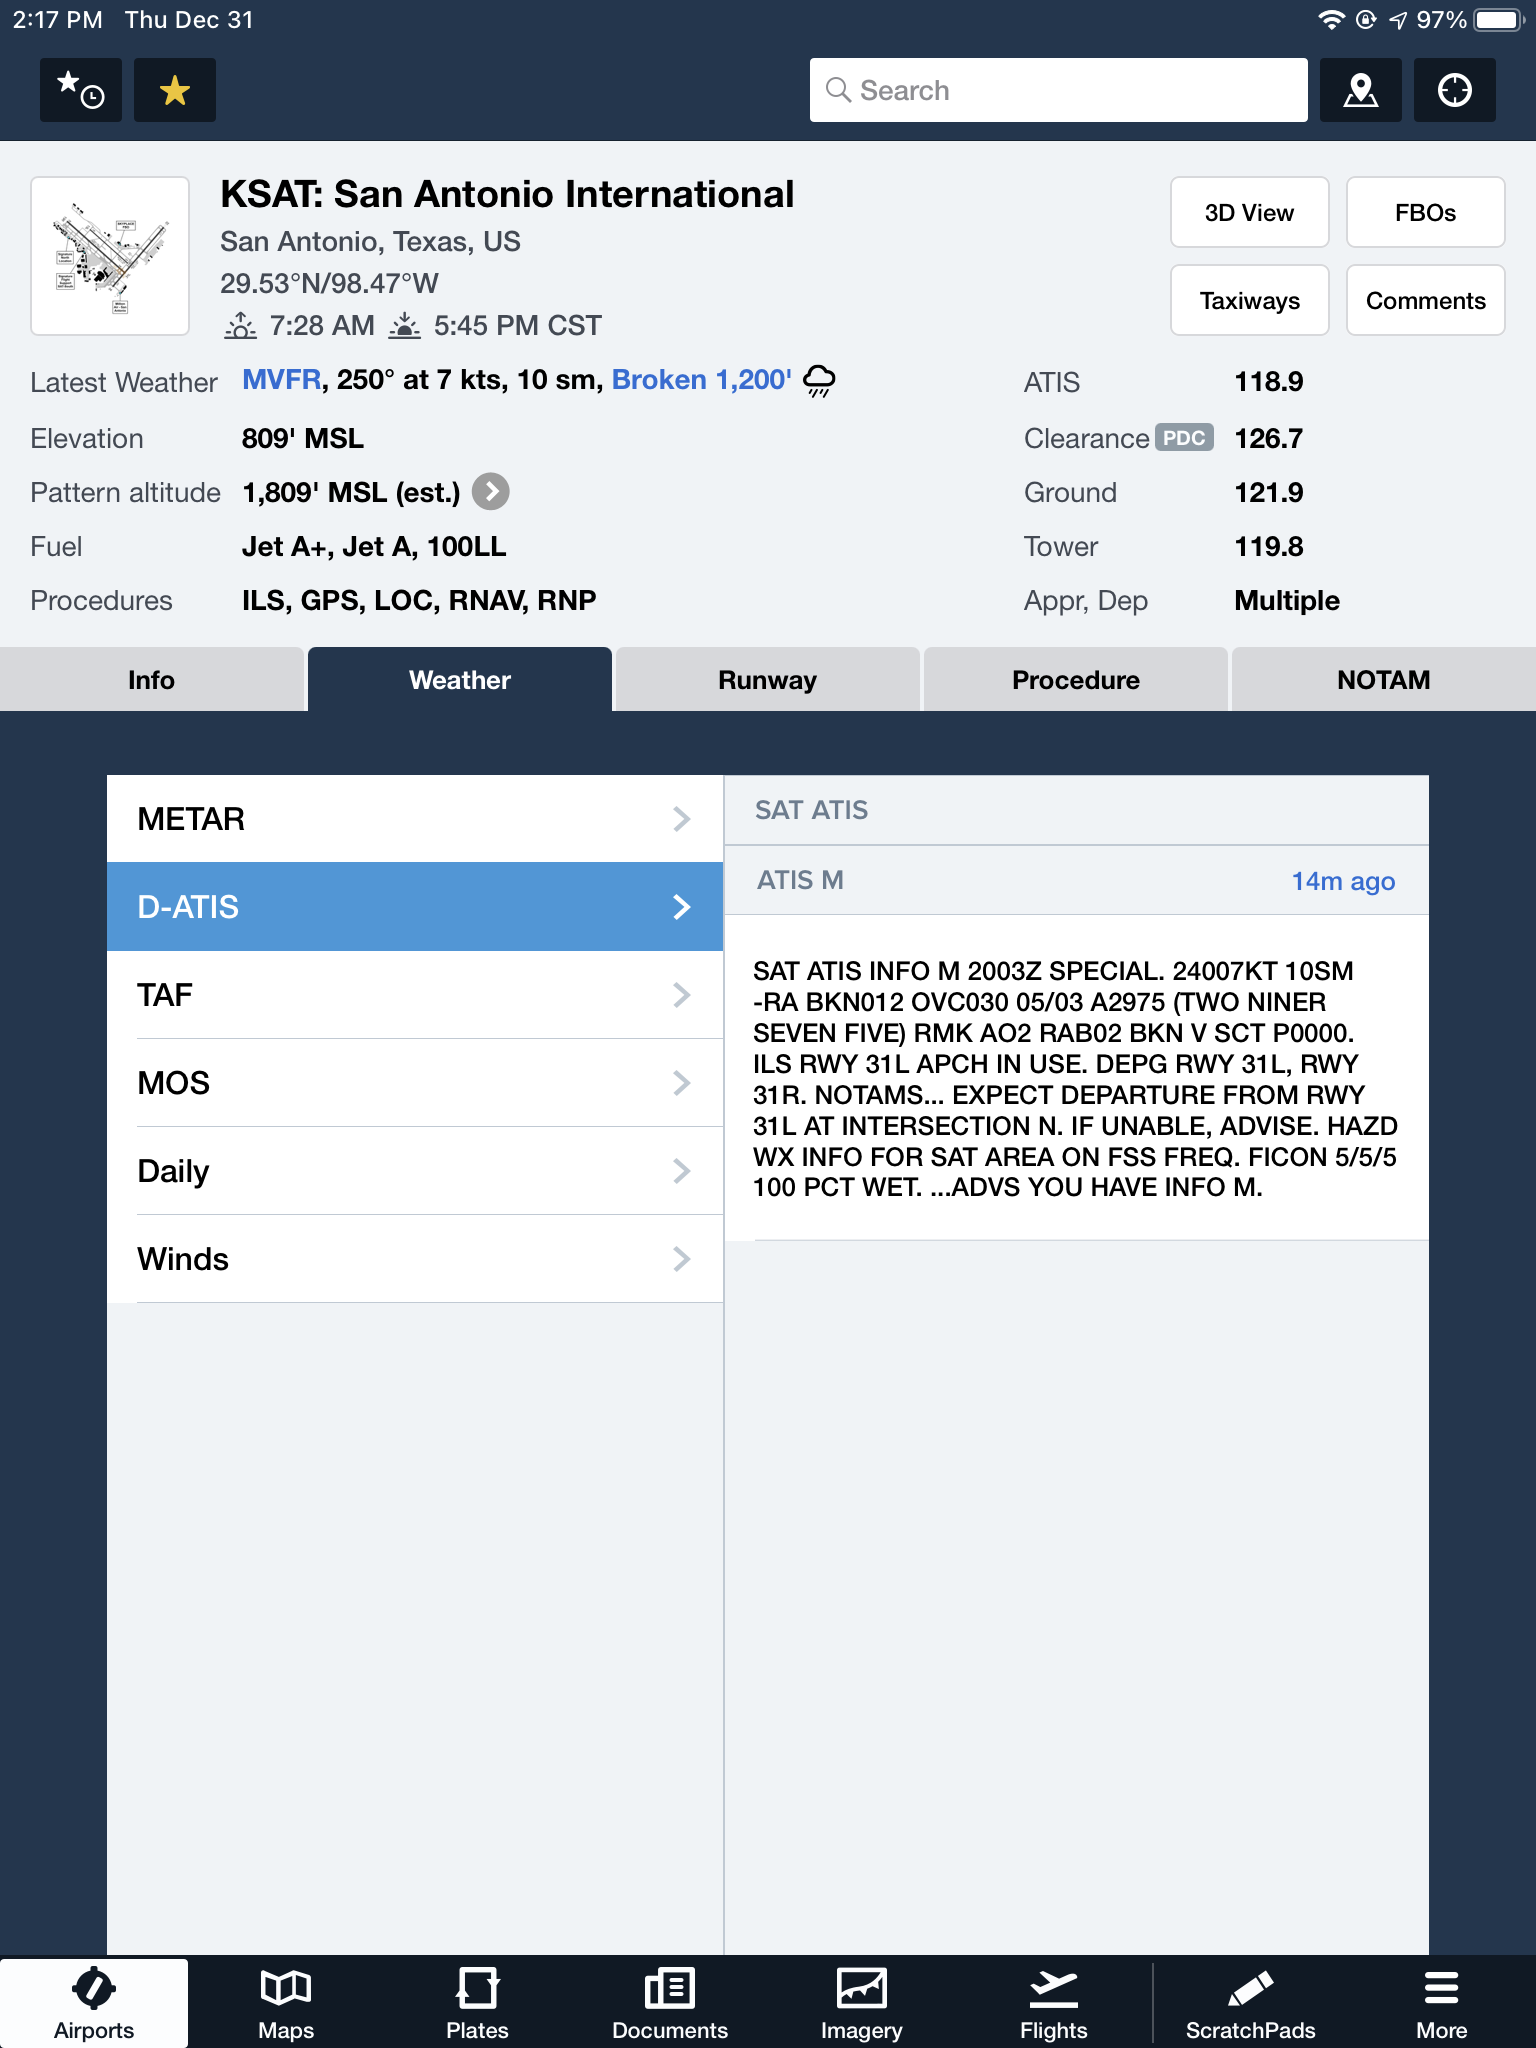
The ATIS app allows us lowly pilots without an Aircraft Communicating and Reporting System (ACARS) to access the Digital ATIS (D-ATIS ) at airports where ATIS is available. Only 76 airports in the US have D-ATIS, most of which are either Class B or busier Class C airports. Foreflight also provides D-ATIS textually at the same 76 airports, though it is only accessible depending on which subscription level you have with Foreflight (since I’m not a Garmin Pilot or Stratus Insight user, I’m not sure if either of them give D-ATIS reports).

ATIS App Symbol

With Foreflight’s D-ATIS, it does not get updated over ADS-B, only when your iPad or phone have an internet signal. When inbound to an airport with D-ATIS, the pilot has to listen to the radio frequency to get the current ATIS. Foreflight will display the last D-ATIS it received, but typically, it’s old. Check the time in the upper right hand corner.
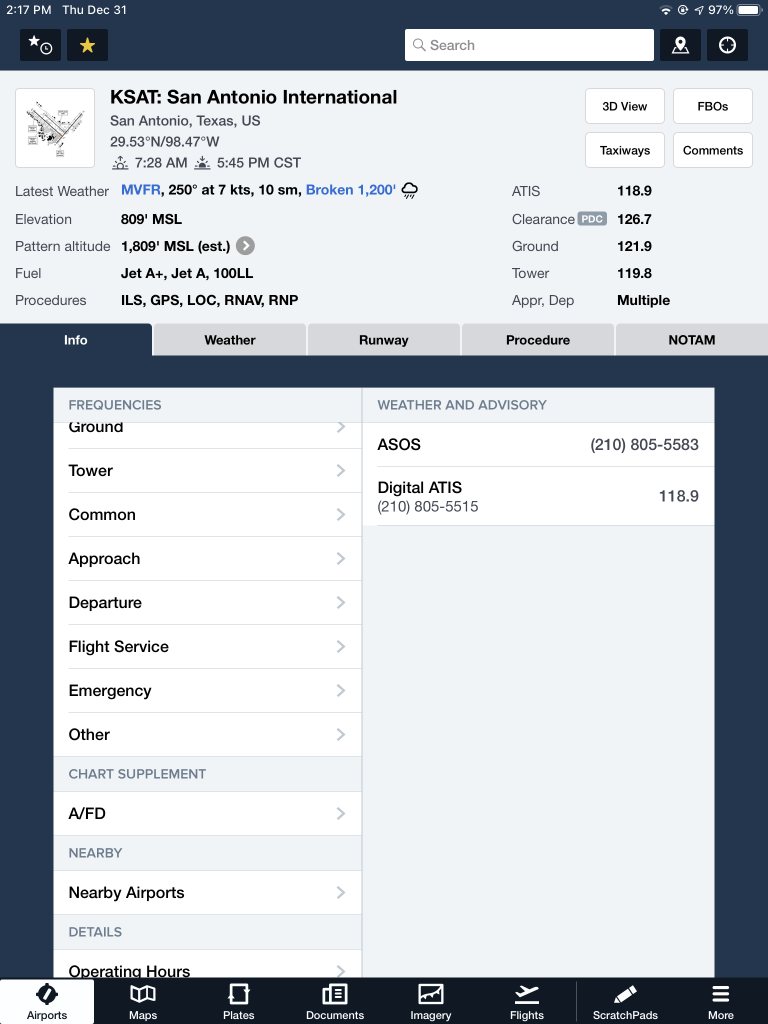
Foreflight now offers Pre-Departure Clearance (PDC) at those same 76 airports. With either a pre-registered tail number or a Foreflight call sign (starting in FFL), once a pilot files an IFR flight plan, the D-ATIS and the IFR clearance in it’s entirety are texted to the phone number the pilot filed with. All that is left to do is call ground, state “I have information Romeo and my clearance, ready to taxi,” then away you go. Skipping listening to the ATIS and talking to Clearance Delivery saves a good 5-10 minutes at times, depending on how busy the airport is.

These days, there are many different avenues to get the current weather (and IFR clearances!). When calling on the phone, the key is to be aware, know which number you are calling and, if you are expecting to hear an ATIS message but instead hear the AWOS/ASOS, verify the Chart Supplement Guide and Notices to Airmen (NOTAMS) to check tower hours of operation before flying into the airspace. 

Similar Posts

  • Matching the Airplane with Your Mission

    Has it come time to buy your first airplane?  Have the skies been calling your name?  Or are you just tired of standing in the airport security line then getting shoved in a long metal tube with no leg room?  Or, maybe you are a businessman who does business in remote areas that have local airports but are hard to get to commercially.

    Wherever your need is, you have decided it’s time to make a purchase.  If you are familiar with aviation, you may have an airplane in mind that you would like to have, but is that the right airplane for your mission?  If you are new to aviation, you may have no idea what airplane to go for.  Here are some helpful hints in narrowing down the different airplane options out there to fit your specific mission.

    Flying For Enjoyment, but Not Going Far Fast

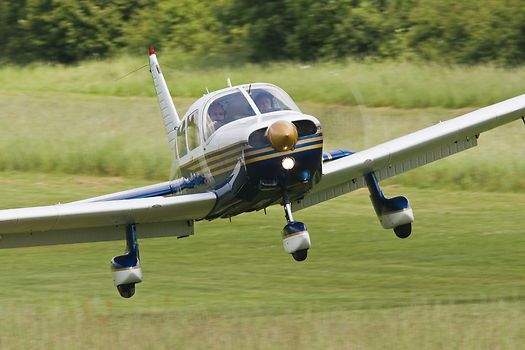
    Piper Cherokee

    If you’re just a weekend flyer who is tired of dealing with flight school rentals, but you don’t need to carry a lot of people or go very far, your options are pretty numerous.  Anything from a Cessna 152 to a Piper Cherokee, maybe a Beech Sundowner, or a Bellanca Viking, or anything in between.  If you are content with taking a weekend hop for a hamburger at 100-110 knots, you have limitless options for airplanes.  Tailwheels (Cubs, Citabrias, Huskies) are excellent birds for you well.

    Getting Places Fast With Only You and Maybe One Passenger

    Need to go 200-300 miles fast and not worried about weight?  A Cirrus SR22T, a Columbia 400, or Cessna Corvalis might be just what you need.  Cruise speeds on those are all around 180-190 knots at 10,000 feet. All are oxygen equipped if you want more speed higher up, as the service ceilings are 25,000 feet.  Payloads run in the range of 400-500 pounds with full fuel.  All these have air conditioning options, too.

    Hauling More Weight, but Still Need the Speed?

    Cessna 206 Mission

    A little slower (150-170 knots) but a little bit more payload options are A36 & B36 Bonanzas, Piper Saratogas, Cessna 206s, or Cessna 210s might suit your fancy.  All come in turbo models if you are a high elevation dweller.  The Cessna 206 has been used for many years as cargo and people haulers in remote regions like Alaska, South America, and Africa.  I’ve even seen pictures of snowmobiles being carried in a 206.

    Tired of Oxygen Cannulas?

    The next step up from a Cirrus, Corvalis, or Saratoga is the Piper Malibu.  A bigger brother to the Saratoga, the different PA-46 models offer one of the best options for a single engine piston out there.  All except the Matrix (PA-46-350T) are pressurized, all the pistons cruise about 200 knots, and all are configured with club seating with plenty of leg room.  Useful loads range around 1200-1400 pounds (they hold 120 gallons of fuel, so payloads range from 480-680 pounds).  The original Malibu (PA-46-310P) only burns 16.5 GPH so that allows partial fuel to be carried to allow more people and bags.  All have 6 seats.

    Need to Carry Even More Weight?

    It’s time to get into the piston twin market, then.  A Cessna 414, a Cessna 421, a Cessna 340, a Beech Duke or a Beech Baron are all pretty good options here.  The 421 and the 414 have the largest cabins, while the Duke has the highest useful load.  Cruise speeds range from 200-220 knots, but the cabin is roomier and you get a few more pounds useful load than a piston single.  If you do get into a 421, get good training as they are equipped with Continental geared engines, which can be tricky to operate if you don’t know what you are doing.

    Need to Carry a Lot of People and Go Fast?

    Turboprops are the way to go for you.  King Airs have the most utility while  the Pilatus PC-12 is the cream of the single engine turboprop crop as you can put almost anything you want in it.  If you have 4-5 passengers, stay away from a Piper Meridian as you can’t carry a lot of weight.  Those are better for 2-3 passengers at the most (plus a pilot).  The TBM 900 is pricey, but fast (300-325 knots).  The original TBM 700 can be had for under a million bucks, you get 280 knots, and a very usable useful load.  You still can’t fill all 6 seats with full fuel, but you can do more with it then a Meridian.

    Have a Boatload of Money Sitting Around?

    A jet might be for you then.  Fuel, insurance, maintenance, and hangar costs are high, but jets will get you places real fast with room for all your friends and family.

    Gulfstream


    Has it come time to buy your first airplane?  Have the skies been calling your name?  Or are you just tired of standing in the airport security line then getting shoved in a long metal tube with no leg room?  Or, maybe you are a businessman who does business in remote areas that have local…

  • Need To Breath


    I got a call today from a friend asking me about oxygen requirements.  That got my brain pondering about the different items the FAA would like all pilots to know. I did a little refreshing and found several other tidbits directly from the FAA that I thought worth sharing. No matter what you’re flying, I think these apply to all of us. 

    First off, what are our general oxygen requirements? If you jump on over to the FAR’s and take a look at 91.211 you’ll see: 

    1. At cabin pressure altitudes above 12,500ft MSL to 14,000ft MSL, pilots
    required to use oxygen unless the segment is less than 30 minutes of flight.

    2. At cabin pressure altitudes above 14,000ft MSL, the crew is required to use
    oxygen.

    3. At cabin pressure altitudes above 15,000ft MSL, each occupant must be
    provided the use of oxygen. This doesn’t necessarily mean they have to use it.


    Things get a little more in depth when you get to pressurized aircraft.

    These requirements are also listed in 91.211: 

    1. If you’re flying above Flight Level 250, a 10 minute supply of oxygen is
    required for each person onboard.

    2. If you’re flying above Flight Level 350-410, and one pilot leaves their seat, the other pilot will be required to wear an oxygen mask, unless both seats are equipped with quick-donning oxygen masks.


    There are three basic components to any oxygen system in an aircraft:  the storage system, the delivery system, and the mask or cannula. First, there are several types of storage systems. 

    Gaseous aviators breathing oxygen is the first. This is the standard green tank that everyone is familiar with. There are two types of tanks. Either the high- pressure with 1800-2200 psi or the low pressure tank with 400-450 psi. The major issue with these and General Aviation aircraft is weight. Some of these tanks can get bulky and heavy and therefore don’t work for everyone. 

    Liquid aviators breathing oxygen or LOX is another form of storage. The major advantage of LOX is that it has a 900 to 1 expansion ratio, meaning that 1 liter of liquid oxygen can be expanded into 900 gaseous liters of Aviators Breathing Oxygen. The disadvantages of LOX are they are extremely volatile and have to be stored at -197F. If it comes in contact with exposed skin, severe frost bite can occur. 

    Sodium chlorate candles or oxygen generators have a weight advantage like LOX. They’re essentially a canister that when activated mix sodium chloride and iron powder and produce oxygen. They general have a 600 to 1 expansion ratio, which goes back to the weight savings. However, once these are started they are very hard to stop. Another disadvantage is these devices produce a fair amount of heat, so proper precautions need to be taken. 

    Next are the delivery systems. The main systems are Continuous Flow, Diluter Demand, and Pressure Demand. Continuous Flow, is exactly as it sounds. The oxygen is allowed to flow continuously from the tank to the user. The benefits of continuous flow are you don’t need a complicated mask or regulator. The downside to this system is since it continuously pumps oxygen, you’re wasting oxygen when you exhale. Most of continuous flow systems are used on aircraft that generally fly below 28,000 feet. 

    Diluter Demand was designed to fix the negative of the Continuous Flow systems. Diluter Demand only sends oxygen to the user when the user inhales. The system also allows cabin air to be introduced in, sending the perfect mixture of oxygen to the user when needed. These systems are very efficient and generally tend to be used up to 40,000 feet. 

    Pressure Demand is designed to essentially “over inflate” the users lungs. This will basically pressurize the the users lugs and allow the user to fly above 40,000 feet. This is needed at flights above FL400 because 100% oxygen without positive pressure will not suffice. 

    The final portion of the oxygen system is the mask or cannula. Nasal cannulas generally are more comfortable and are regulated to 18,000 feet service altitude. Masks come in a couple different variants. From re-breathers to quick-donning, most masks accomplish the same task with a few small differences. Quick-donning must be able to be put on within five seconds and are rated up to FL400. 

    Since that was a lot of information, what does all of it mean to you? Most fair weather flyers will never run into any of this. However, the high performance owner/operator will run into oxygen use situations a fair amount. Taking the family up to Colorado on a ski trip, jumping up to 12,500 feet to get above some weather, or flying above 5,000 feet at night on a long xc are all situations where you may want to have oxygen on board. 

    If you are planning on doing any of this type of flying or are currently doing these types of flights, training is a must. If you’ve never been in an altitude chamber, I would highly recommend it. In college, I went with a group to Oklahoma City to the FAA’s headquarters where they hold a class on Hypoxia and High Altitude flying. It’s very informative to be in the chamber as it simulates being oxygen deprived. You get to see how you’ll react and what kind of symptoms you’ll have when in a loss of oxygen situation. Each person has different symptoms, so it’s important to see how you will react.

    It’s also good to fly with an experienced instructor. Finding an instructor who will allow you to learn in a safe environment is worth its weight in gold. 


    Ryne Bergren is currently a First Officer with Mesa Airlines in the CRJ 900. Ryne has experience in many different areas of aviation, from corporate to airlines to teaching to ferrying across the Atlantic Ocean. His passion is for all things that travel across the big blue sky.

    I got a call today from a friend asking me about oxygen requirements.  That got my brain pondering about the different items the FAA would like all pilots to know. I did a little refreshing and found several other tidbits directly from the FAA that I thought worth sharing. No matter what you’re flying, I…

  • 2018 Houston, TX CPPP

    The Cirrus Pilot Proficiency Program is once again returning to Houston, TX the first weekend in November. Henrickson Jet Center at the Houston Executive Airport (KTME) will be the host FBO this year.  If you are a Cirrus owner in the South Central US, the Houston CPPP weekend is definitely worth your while.

    What is it?  The Houston CPPP is a combination ground and flight training weekend.  With ground classes ranging from engine management, to loss of control prevention, to avionics best practices, an attendee will not lack a better Cirrus education by the time he or she leaves.

    The flight training side of the weekend gives an attendee several options.  A Houston CPPP attendee can do 1 or 2 flights with a highly qualified Cirrus Standardized Instructor Pilot (CSIP), one on Saturday and one on Sunday (if the 2 flight option is selected).  The Cirrus Owner’s and Pilot’s Association (COPA) brings in exceptional instructors for each of the CPPP events, so the training is top notch.  Folks who want to take in more ground school, but still want to fly a little bit have the option of just doing 1 flight, either Saturday or Sunday, in order to increase their Cirrus knowledge.

    The Houston CPPP event will be November 2nd, 2018-November 4th, 2018, a Friday through a Sunday.  The weekend kicks off with a welcome dinner Friday night, then ground sessions and flying on Saturday and Sunday, plus a dinner on Saturday night.

    For those who want to challenge themselves, there are simulator sessions available with a challenging instrument approach that doesn’t quite meet up with the normal, ho-hum type of approach.

    The Houston CPPP also provides a Partner in Command course for those right seaters out there wanting to learn more about what to do in an emergency situation.

    Hank Gibson of Texas Top Aviation will be at the Houston CPPP as a flight instructor.  For more information and to sign up, please click here.

    Hope to see you there!

    The Cirrus Pilot Proficiency Program is once again returning to Houston, TX the first weekend in November. Henrickson Jet Center at the Houston Executive Airport (KTME) will be the host FBO this year.  If you are a Cirrus owner in the South Central US, the Houston CPPP weekend is definitely worth your while. What is…

  • The Go Around Button

    Back in the old days, when flying an approach in an early Cirrus SR22 (circa 2004; yes, in airplane technology, those were the old days), performing a missed approach procedure was a lot of work.  You were low to the ground and weren’t able to see the runway.  Then, you had to start climbing so you don’t hit the ground, then push a lot of buttons in order to get the GPS and autopilot set fly the missed approach procedure.  It was very easy to get distracted with button pushing, then forget to fly the airplane, putting yourself and passengers in very unsafe circumstances.  The go around button has changed all that.

    Going Missed the Old Fashioned Way

    Let’s stick with our example of the 2004 Cirrus.  The SR22 in 2004 was equipped with the Avidyne Entegra system, complete with dual Garmin 430 GPS units, and an STEC 55x Autopilot.  A very capable IFR flying machine (we could use the same example of a 2004 or 2005 Lancair Columbia 350 or 400 that was equipped the same way, except the screens were vertical instead of horizontal).

    Avidyne Cirrus Go Around Button

    We’ll use the ILS 15 at the Temple airport, KTPL, for our example.  You pass TPL, the outer marker at 1,683 with the glide slope already centered.  Everything is going well so far.  The number 1 Garmin 430 is set to VLOC and the autopilot is showing NAV and APR for the lateral guidance and GS on the vertical, tracking the glide slope.  The last weather report stated the clouds were Broken at 500 feet, so it appears like you’ll be able to get in on the approach.

    As you get closer to the Decision Altitude, the clouds aren’t letting up at all.  You hit 1,000 feet on your altimeter, 120 feet above the minimums, and you still can’t see a thing.  Another 100 feet lower doesn’t change anything, so you elect to proceed with the missed approach.  This means things are about to get busy.

    Here’s the process:

    • Fly the airplane first, meaning shut off the autopilot, pitch the nose up to about 7 degrees, TRIM, add full power, retract the flaps, and step on the right rudder
    • The Garmin 430 is now in SUSP mode, meaning the missed approach point is locked in as the active waypoint.  So, you have to press the OBS button to cause the GPS to cycle over to the missed approach procedure
    • You have to press the VLOC button on the Garmin 430 in order to change the CDI back to GPS
    • You have to re-engage the autopilot by pressing NAV twice (which engages GPS Steering mode)
    • You have to reset your altitude bug (if you hadn’t set it for the missed approach altitude previously)
    • You have to press VS and ALT on your autopilot to have the STEC continue the climb

    That’s a lot of work, isn’t it?  Plus, that’s an extensive amount of head down time in the cockpit, with your eyes looking elsewhere other than the instruments while hand flying.  All very low to the ground, I might add.  Can you see how this can be dangerous?  (Note:  The Avidyne IFD 550 has made this a little easier with automatically switching from VLOC to GPS and automatically engaging the missed approach procedure in the flight plan)

    The advent of the Go Around Button has streamlined the process, leading to safer operations where it matters most.  The functions of the Go Around Button vary based on the airplane, but here are three examples, the Garmin G1000 Cessna Corvalis TT, the Garmin G1000 Piper Mirage, and the Garmin Perspective Cirrus SR22.

    Cessna Corvalis TT

    We’ll take the above situation and swap out the airplanes.  Gone is the 2004 Cirrus SR22.  Insert a 2008 Cessna Corvalis TT, equipped with the Garmin G1000 suite and the GFC 700 autopilot.  The go around button is positioned directly above the twist in throttle.

    Cessna Corvalis G1000 Go Around Button

    When you push the Go Around Button, here’s what the system does:

    • Disconnects the Autopilot
    • Sets the Flight Director for 7.5 degrees pitch up (which is about your normal climb angle) and wings level
    • Switches the CDI back to GPS
    • Takes the GPS out of SUSP mode and cycles the flight plan to the first waypoint on the missed approach procedure

    Here’s what you have to do:

    • Follow the flight director by pitching the nose up and TRIM
    • Add full mixture, prop and throttle (prop & throttle should be full already)
    • Retract the flaps
    • Step on the right rudder
    • Re-engage the autopilot, then press NAV and VS (or FLC) and set your altitude bug if it isn’t already set

    Not too bad, eh?  Makes the whole situation streamlined and safer.

    Piper PA46-350P Mirage

    Same situation, different airplane.  You’ll notice the procedure for the Piper Mirage is almost exactly the same as the  Corvalis procedure.  The difference between the two airplanes is where the autopilot controller is.  In the Corvalis, the autopilot controller is positioned on the left side of the MFD, making it easy to scan back and forth while pushing buttons on the autopilot.

    The Piper Mirage autopilot controller is positioned below both screens and in front of the power quadrant. With this positioning, the pilot’s eyes have to go a lot further to see which autopilot button he is pushing. In this case, it becomes very important to get the airplane climbing and trimmed before going down to engage the autopilot.

    As in the Corvalis, here is what the Go Around button does:

    • Disconnects the Autopilot
    • Sets the Flight Director for 7.5 degrees pitch up (which is about your normal climb angle) and wings level
    • Switches the CDI back to GPS
    • Takes the GPS out of SUSP mode and cycles the flight plan to the first waypoint on the missed approach procedure

    And here’s what you have to do:

    • Follow the flight director by pitching the nose up, then TRIM
    • Add full mixture, prop and throttle (prop & throttle should be full already)
    • Retract the flaps
    • Step on the right rudder
    • Re-engage the autopilot, then press NAV and VS (or FLC) and set your altitude bug if it isn’t already set

    Cirrus SR22

    Cirrus Perspective Go Around Button

    This time, we’ll use the 2010 Cirrus SR22T with the Garmin Perspective and GFC 700 Autopilot. One thing I really like about how Cirrus configured their system is where the Go Around button is.  It’s actually on the throttle itself, making it much more intuitive.  This way, you can press the Go Around button while adding full throttle.

    There is one major difference between the Garmin Perspective in the Cirrus and the G1000 in the Corvalis. When you press the Go Around button in the Cirrus, the autopilot actually stays on.

    Here’s what happens when you press the Go Around button in the Cirrus:

    • Flight Director pitches to 7.5 degrees pitch up and wings level
    • AP Mode switches to Go Around mode, following the flight director
    • GPS comes out of SUSP mode
    • CDI switches back to GPS

    All the pilot really has to do is add power, take the flaps up, then press NAV on the GFC 700 to get the autopilot following the missed approach procedure.

    If you aren’t familiar with the Go Around button or haven’t used the one in your plane lately, it’s good to go up with a knowledgeable instructor and fly a couple of approaches where you perform the published missed approach afterward.  That way, he or she can assist you through the first missed approach, then give you pointers until  you get comfortable with the Go Around button.

    Back in the old days, when flying an approach in an early Cirrus SR22 (circa 2004; yes, in airplane technology, those were the old days), performing a missed approach procedure was a lot of work.  You were low to the ground and weren’t able to see the runway.  Then, you had to start climbing so…

  • Cirrus G2 Vision Jet

    Well, that was fast.

    In January, Cirrus announced the Generation 2 SF50 Vision Jet.  After getting the Generation 1 Vision Jet certified in late 2016, Cirrus didn’t waste any time in starting in on improvements.

    The improvements are pretty sweet, making the G2 Vision Jet even easier to fly and step into for Cirrus’ target market, SR22 owners.

    Here are the improvements on the G2 Vision Jet.

    RVSM Approval

    The G2 Vision Jet has received RVSM approval, allowing the airplane to fly at 31,000 feet.  RVSM stands for Reduced Vertical Separation Minimums (read more about RVSM here).  RVSM airspace starts at 28,000 feet, the G1 Vision Jet’s ceiling.  Now that the G2 Vision Jet is RVSM certified, it can fly at 31,000 feet.

    For piston pilots, you are left scratching your head as to the advantage of this.  In a jet, the higher you go, the thinner the air, so the faster you go, and the less fuel you burn since the thin air needs less fuel to mix with.  This caps out at a certain altitude and the speed begins dropping and you start losing efficiency (even though the fuel burn is quite low).

    According to Cirrus, at 31,000 feet, the G2 Vision Jet cruises over 300 KTAS and gets a range boost to almost 1,200 nm.

    Garmin Perspective Touch+

    Cirrus & Garmin have taken the new NXi interface and paired it with the Garmin Perspective Touch to create the Touch+.  You can read about the improvements on the NXi here, all of which are included in the Touch+ in the G2 Vision Jet.

    The big improvement that is included in the Touch+ is Autothrottle capability.  An Autothrottle is integrated with the autopilot.  It automatically adjusts power settings and speeds based on the phase of flight without the pilot having to touch the throttle.  Pretty cool.

    New Cabin

    The G2 Vision Jet has a redesigned cabin as well, making it an extremely passenger friendly airplane.  The second row has been redesigned and equipped with a center console.  There is also a drop down TV screen that allows passengers to connect their mobile devices to it to watch movies or videos while traveling (no internet on board, yet.  That’ll probably be the G3 Vision Jet!).

    Cirrus also put in more noise reduction in the cabin, creating a quieter ride for passengers.  Cirrus also allows for multiple different seating configurations, depending on the needs of the owner.

    As always, Cirrus is on the leading edge of airplane technology, creating airplanes that are easy as well as fun to fly.  I’m excited to see how they continue to improve the design to both the SR22 and the Vision Jet.

    Well, that was fast. In January, Cirrus announced the Generation 2 SF50 Vision Jet.  After getting the Generation 1 Vision Jet certified in late 2016, Cirrus didn’t waste any time in starting in on improvements. The improvements are pretty sweet, making the G2 Vision Jet even easier to fly and step into for Cirrus’ target…

  • Texas Top Aviation at the AOPA Fly-In

    Where were you on April 26th?

    AOPA Fly In LogoTexas Top Aviation was at the AOPA Regional Fly-In at the San Marcos Regional Airport (KHYI).  If you weren’t there, you certainly missed out spending time with 2,500 other airplane and flying enthusiasts!

    The day began somewhat gloomy and windy with the threat of rain.  Organizers feared that weather would keep a lot of people from coming.  Boy, were they wrong!

    There were many classic airplanes, many modern and pretty nicely equipped airplanes, and everything in between.  There were aviation celebrities, Rod Machado and the Kings of King Schools fame, to name a few.  Not to mention the fabulous BBQ!

    N132BBTexas Top Aviation had several drawings for free training and 3 lucky winners.  We also had a Lancair Super ES for sale, N132BB (which made the San Marcos Record newspaper!). It definitely stood out with it’s unique paint job.  The flames on the tail drew many oohs and aahs.

    Departing the San Marcos Airport after the fly in was like battling traffic in Austin at rush hour (though, Austin doesn’t have any air traffic controllers).  The San Marcos controllers probably hadn’t seen that much traffic since the airport was an Army Air Base back during WWII.  It was quite a sight to see all the exhibitor’s airplanes lined up ready to head skyward.

    Thanks to all of you who stopped by the Texas Top Aviation booth!  It was a pleasure meeting all of you and we look forward to working with you in the future!

    Texas Top Aviation
    Hank Gibson and Russell Moore of Texas Top Aviation


    Where were you on April 26th? Texas Top Aviation was at the AOPA Regional Fly-In at the San Marcos Regional Airport (KHYI).  If you weren’t there, you certainly missed out spending time with 2,500 other airplane and flying enthusiasts! The day began somewhat gloomy and windy with the threat of rain.  Organizers feared that weather…

Leave a Reply

Your email address will not be published. Required fields are marked *