When filing an IFR flight plan, part of the process is determining whether or not an alternate airport is required. An alternate airport is required when the following conditions exist(as is outlined by the FAA in 91.169 (b)):
The weather conditions at the destination airport
From 1 hour before your arrival time to 1 hour after your estimated time of arrival, the weather conditions are forecast to be below
2,000 Feet AGL and/or
3 statute miles visibility
Let’s paint a scenario. You are traveling from KSAT (San Antonio International Airport) to KHBV (Jim Hogg County Airport in Hebbronville, TX). You start to file your flight plan and get down to the space where you put your alternate in. Since Laredo (KLRD) is the closest airport with a TAF, you check Laredo’s TAF and see that the forecast conditions there at your ETA are ceilings 1,500 and visibility of 2sm.
Based on this information, you need an alternate airport. Now, the process of finding one. In Part 91.169 (c), the forecast conditions at the alternate airport must be at or above:
600 Feet AGL and 2sm visibility for a precision approach, or
800 Feet AGL and 2sm visibility for a non-precision approach
Alright, now we have some guidance. Laredo is the nearest airport to KHBV, and we know the forecast from the above TAF showing the conditions are forecast to be above the alternate minimums outlined in Part 91, so let’s pick Laredo. All done?
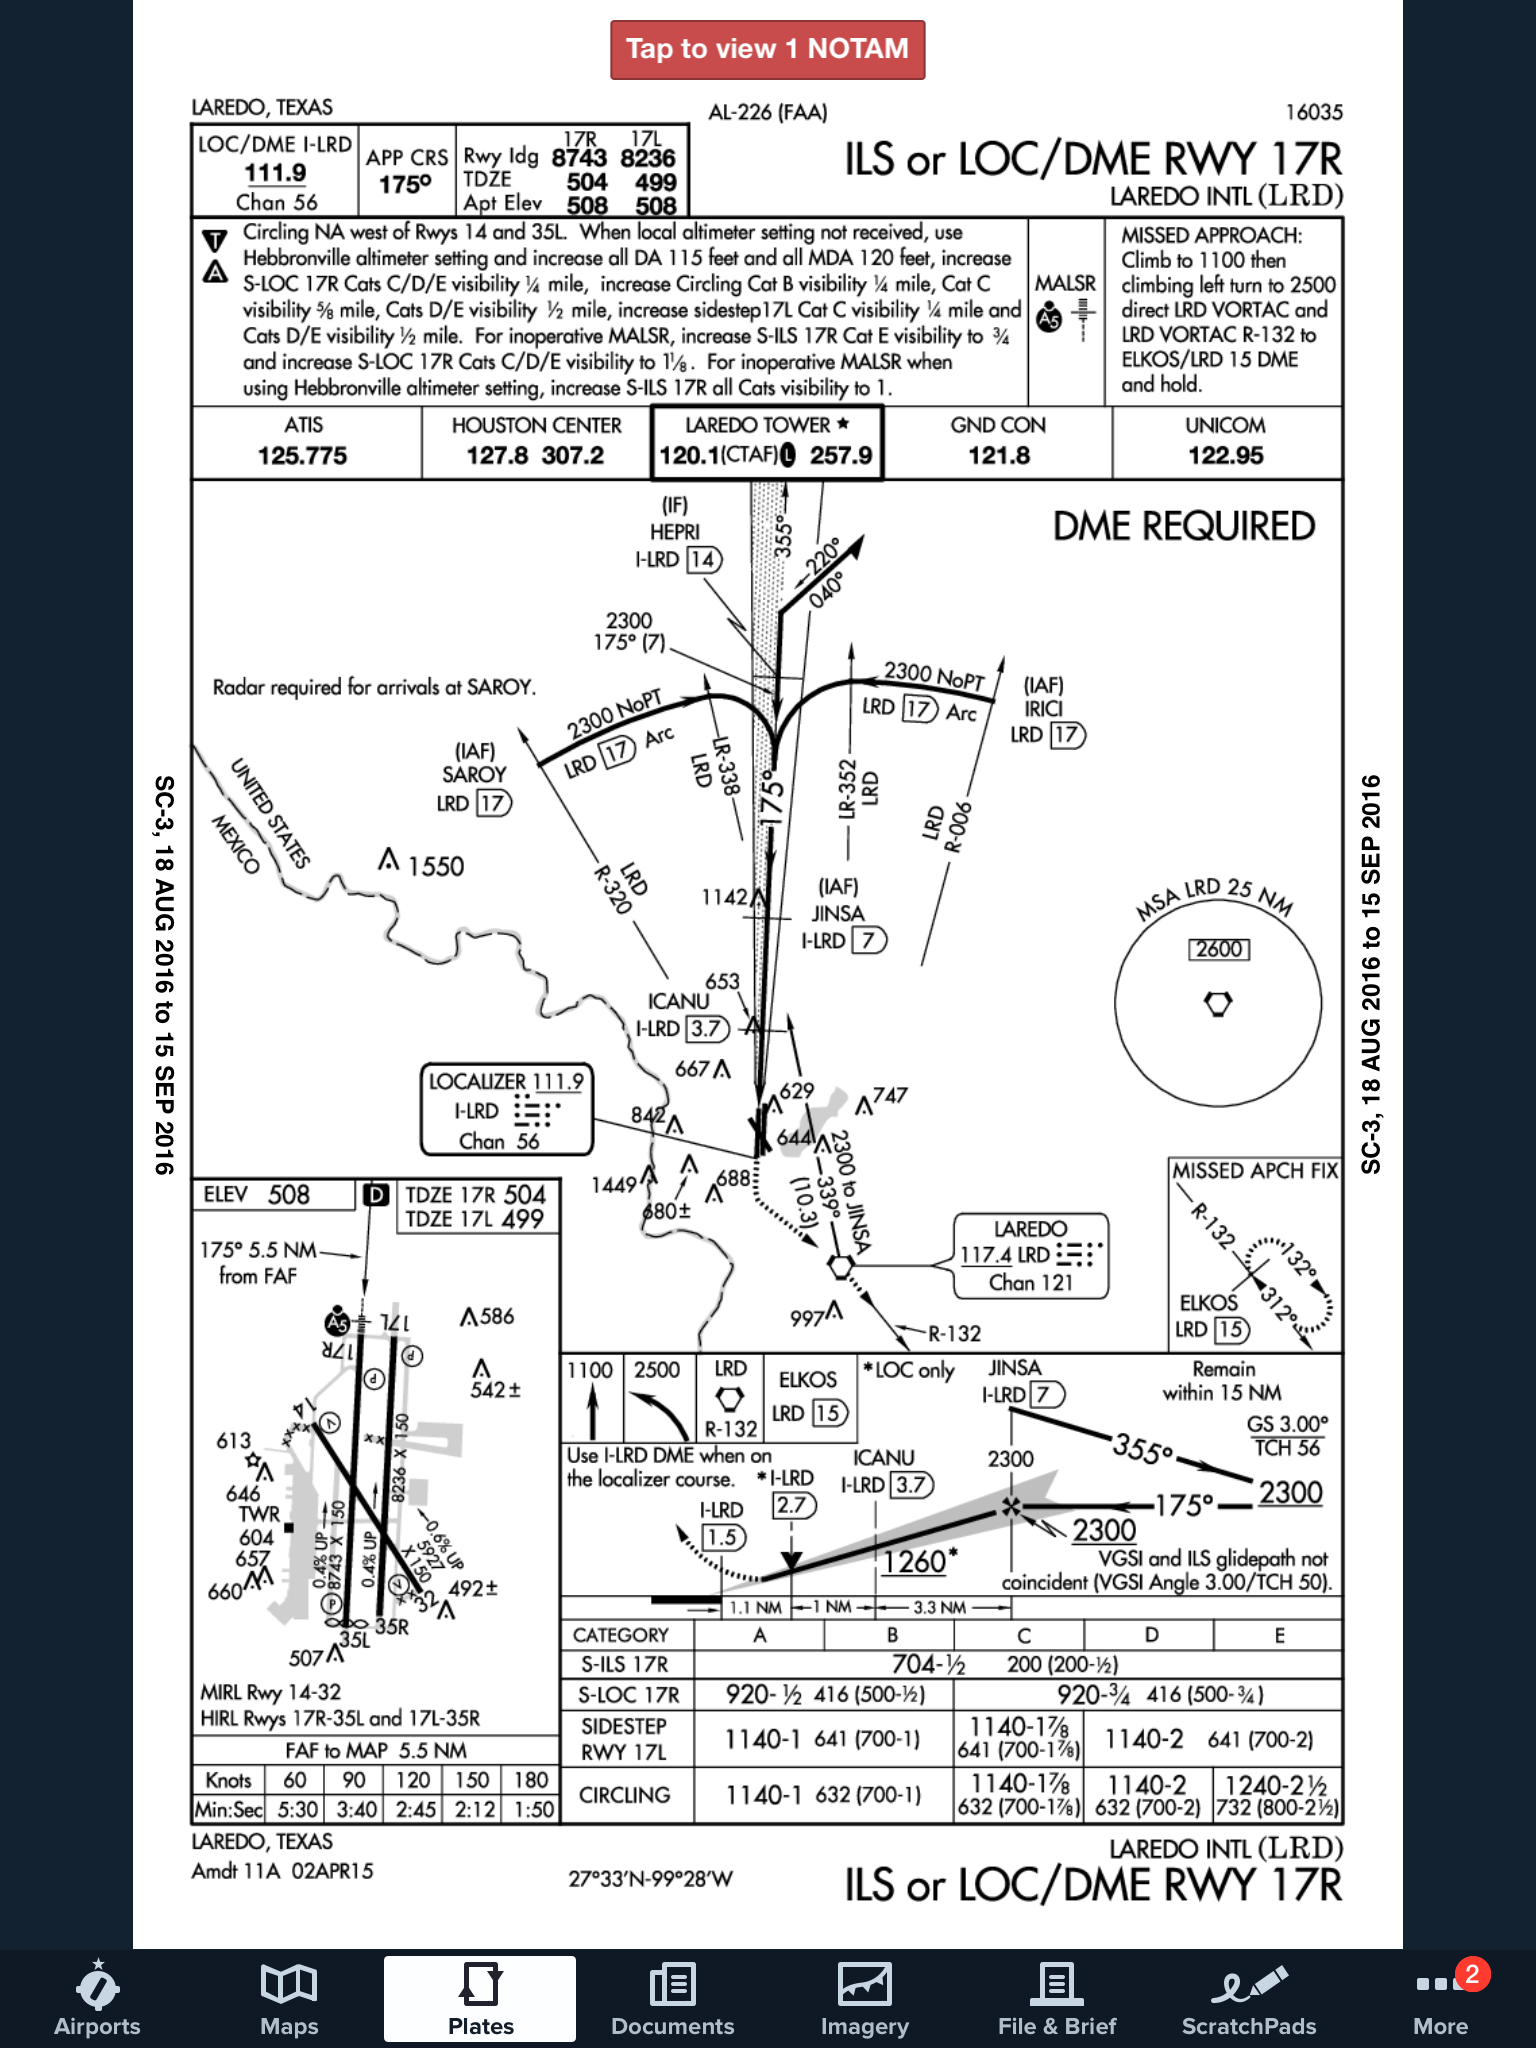
Not quite. A lot of airports have Non-Standard Alternate Minimums. How do you figure out if they do? The easiest way is to look at any approach plate for the airport. In the notes section of the government plates, there will be a black triangle with an A in it. That means there are non-standard alternate minimums published for that airport (in layman’s terms, different than the ones stated above in Part 91).
Now the question is, where do you find those non-standard alternate minimums? On Foreflight:
Go to the Airports page
Tap the Procedures button
Tap the Arrival button
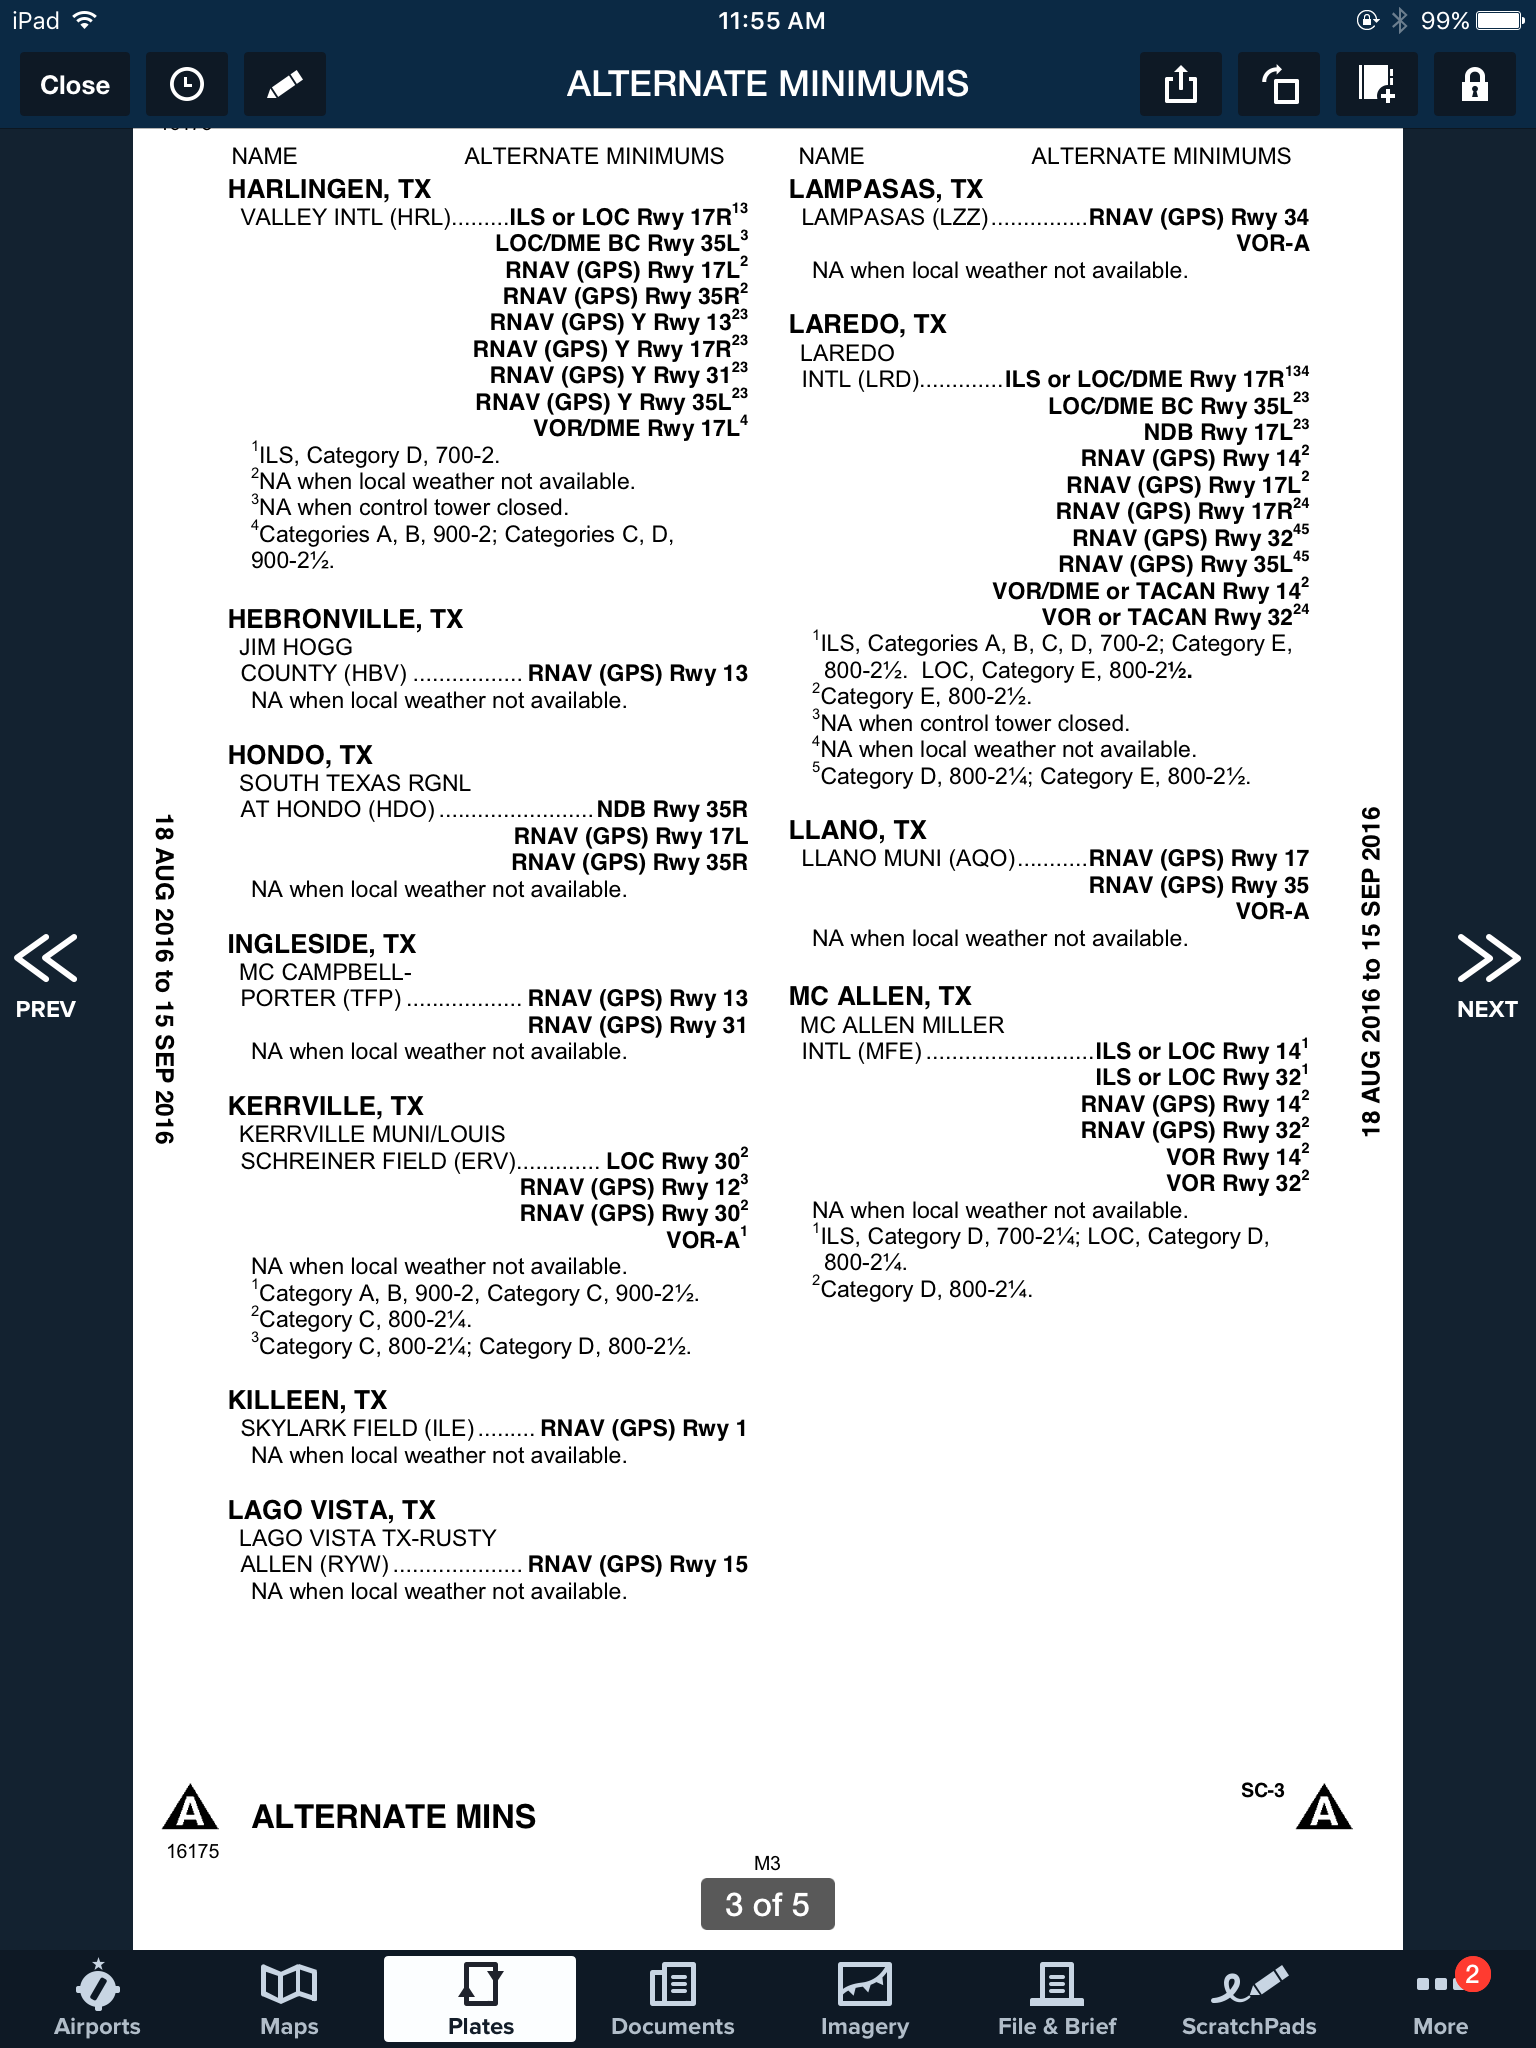
Tap the Alternate Minimums option
This brings up the IFR Alternate Minimums document for all the airports with non-standard alternate minimums in that area. Scroll through to find Laredo.
As you can see, there are several notes there concerning the different approaches into Laredo. For our example, we’ll say the winds are out of the south and we are planning on flying the ILS 17R if we cannot get into KHBV and have to come to Laredo. The note there is that the Alternate Minimums for the ILS 17R are actually 700 AGL ceilings and 2sm instead of the above state 600 AGL ceilings and 2sm, the procedure is NA if the tower is closed, and NA if the local weather isn’t received.
What does this tell us? If the forecasted ceilings at Laredo were below 600 AGL instead of 700 AGL, we would not be able to use LRD as an alternate airport if we were planning on flying the ILS 17R. The RNAV approaches are all fair game, so a GPS equipped aircraft would have no problem.
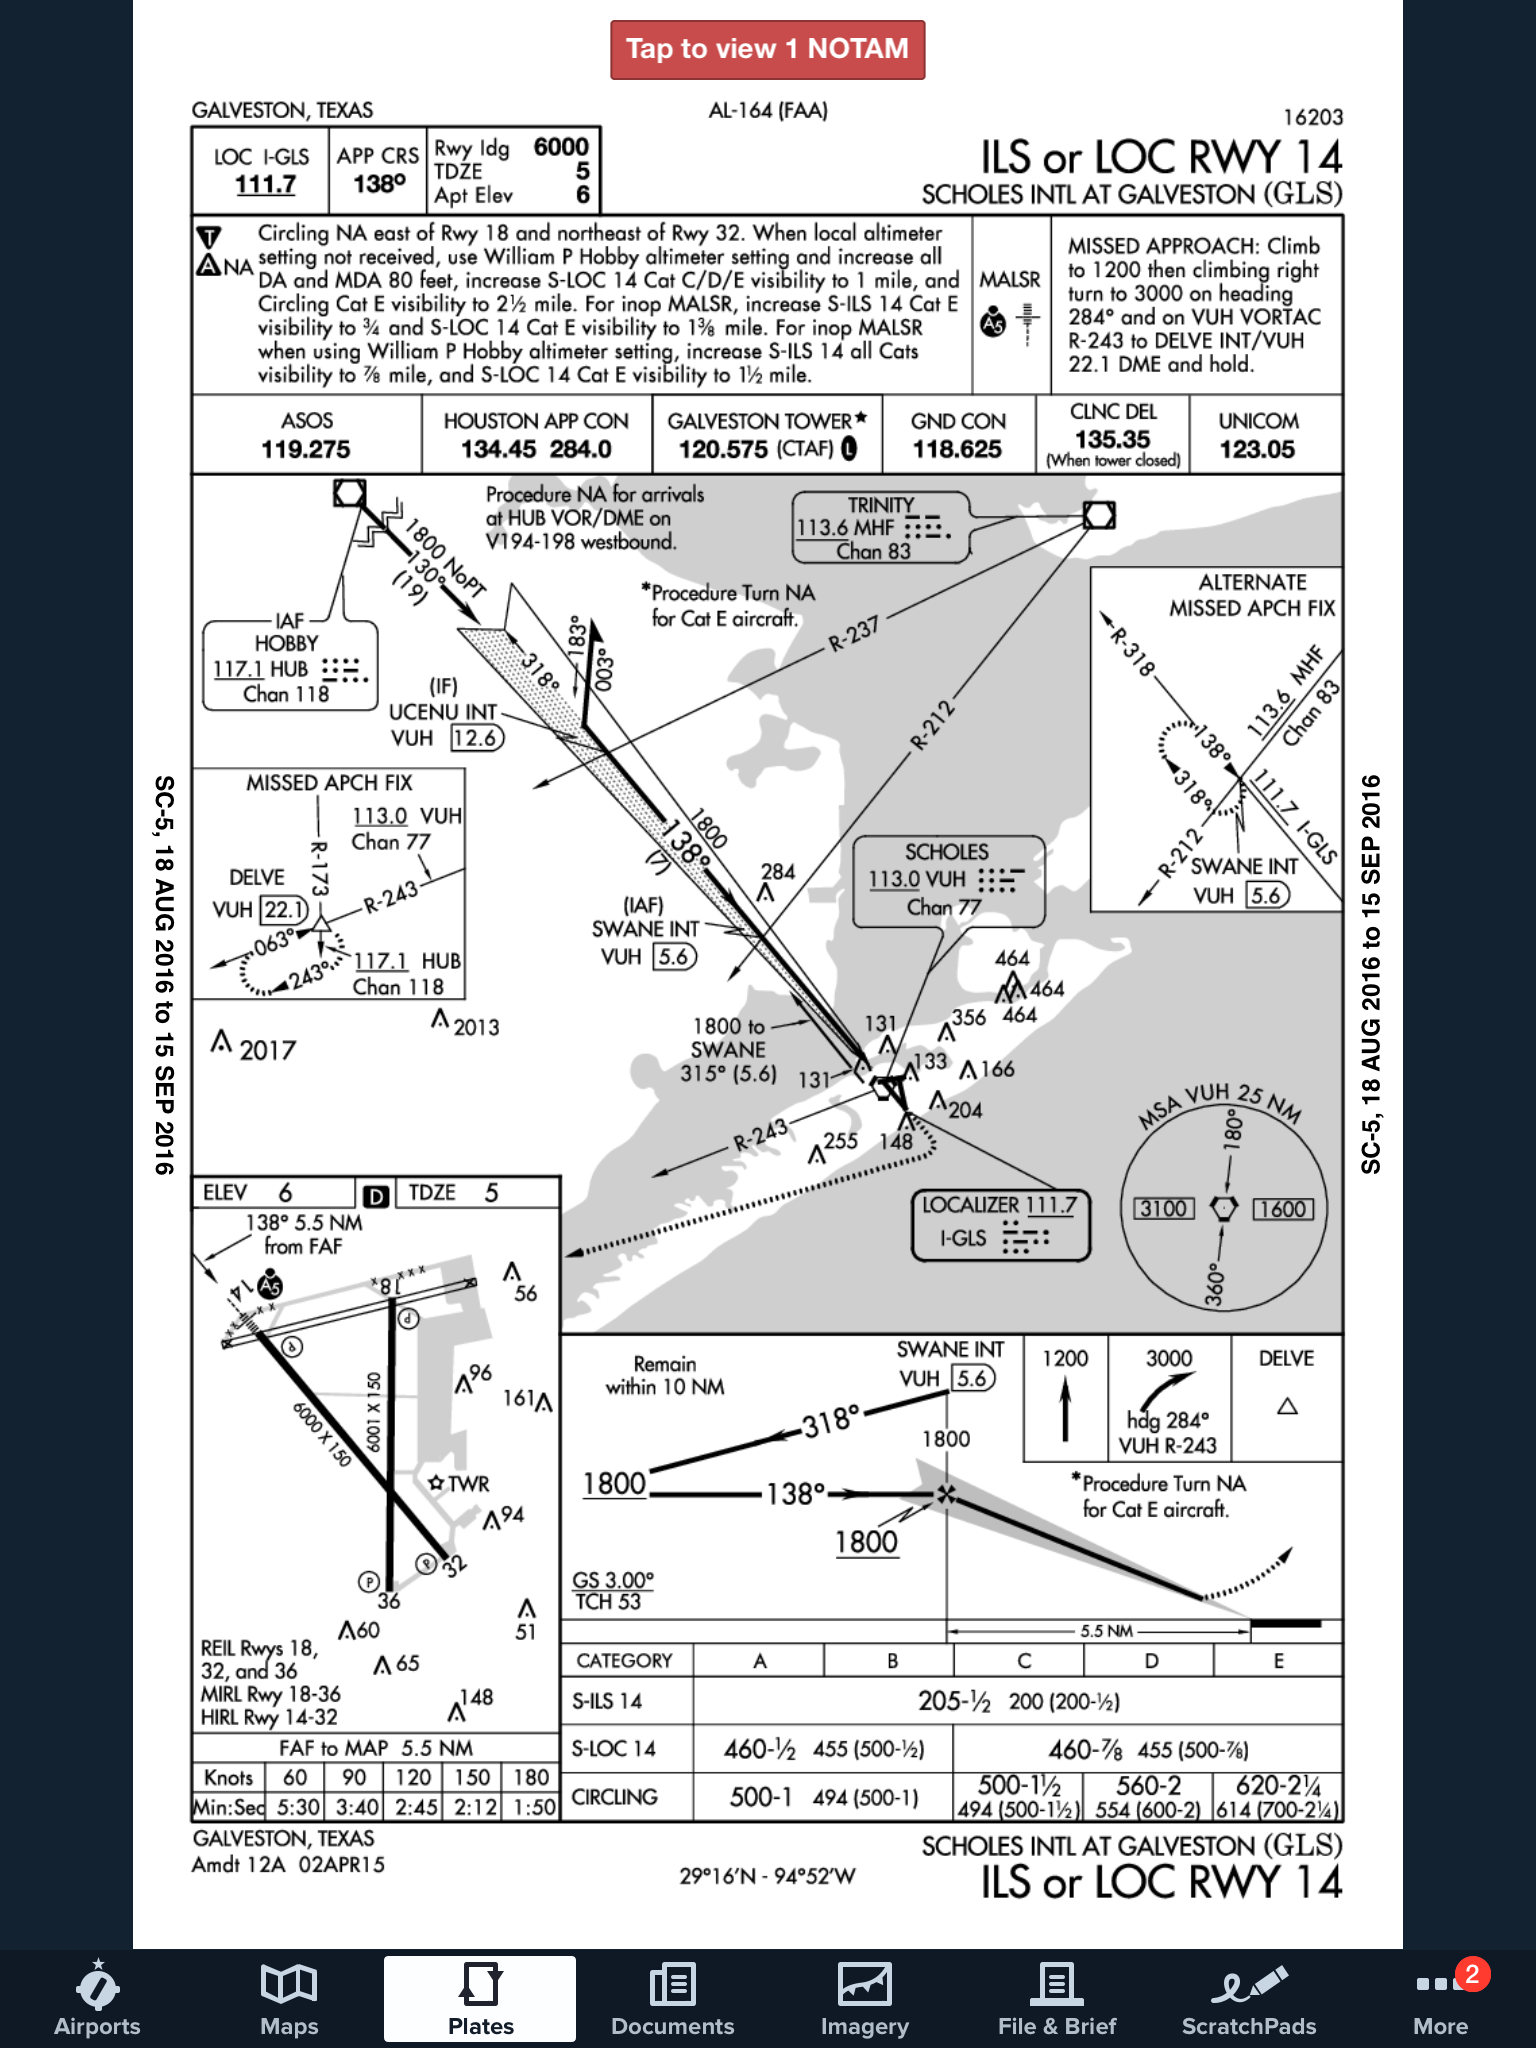
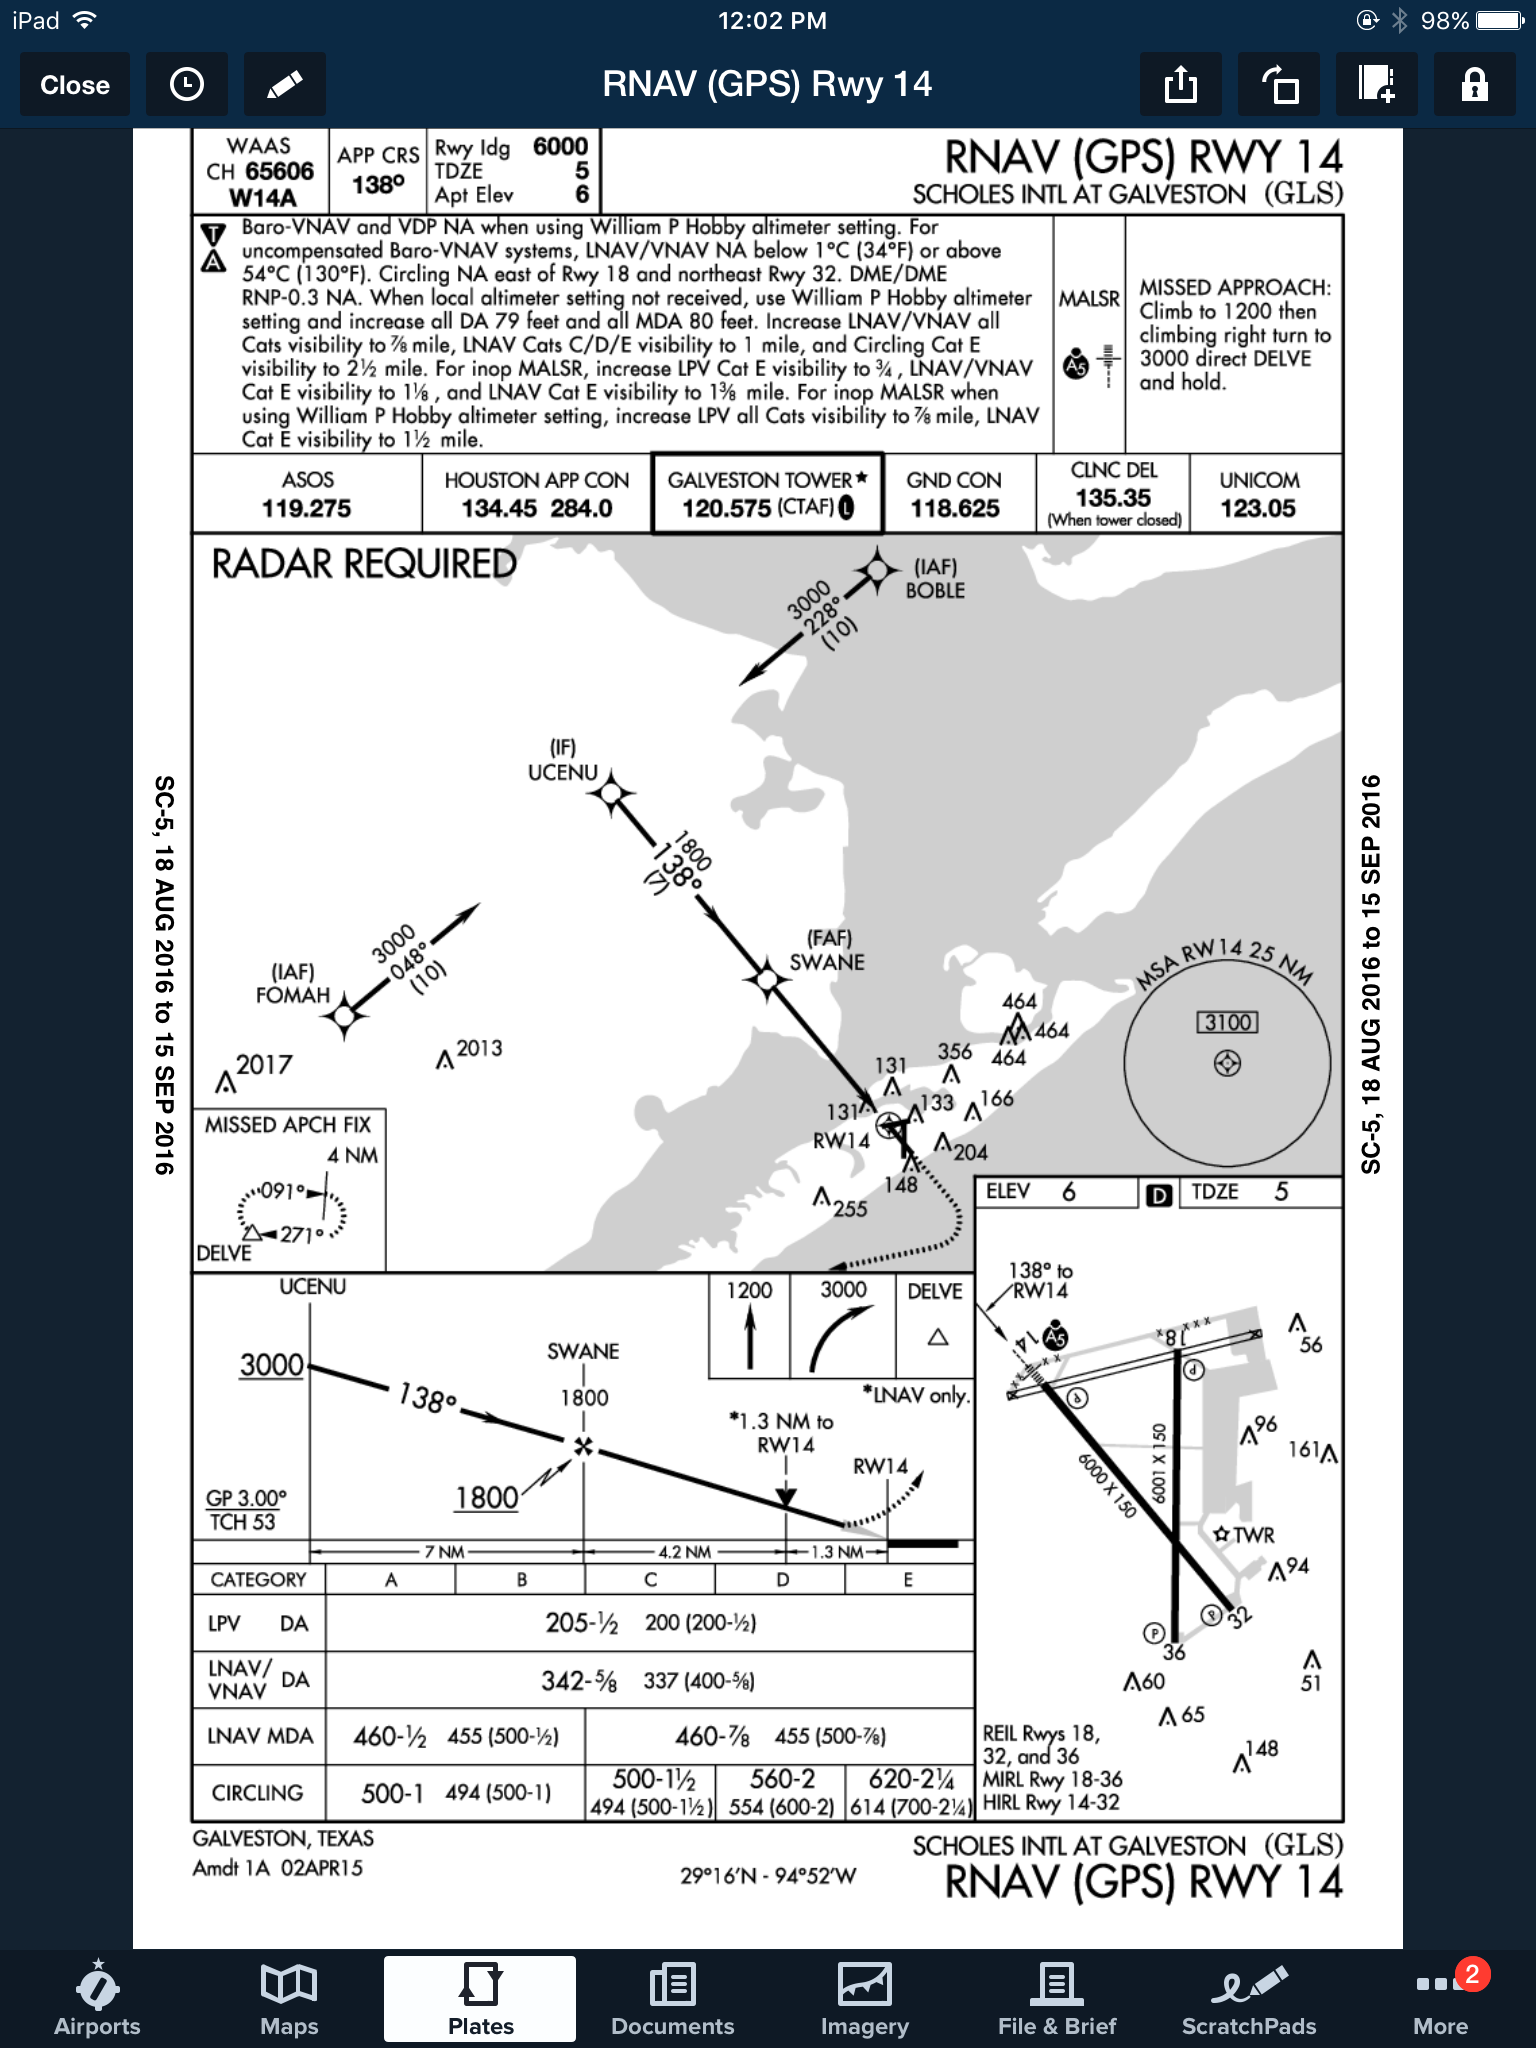
On top of that, some approaches at a certain airport are not authorized to be used in the case of the airport being used as an alternate. At the Galveston airport (KGLS), the ILS 14 is NA as an alternate procedure, but all the RNAV approaches are available.
Picking an alternate seems simple at first, but there are actually a lot of things to consider in the process.
Need help remember all this stuff? AOPA has put out a kneeboard sheet that helps all IFR pilots remember those important things when it comes to IFR flying. Check it out here.
MMOPA will be hosting it’s second Safety Standdown event at many locations across the country for Piper PA46 owners and pilots. The first iteration of MMOPA Safety Standdown in the fall of 2019 was a big hit. Each event was very well attended by MMOPA members.
What is Safety Standdown you ask? Safety Standdown was put together as a mid-year training event as part of the MMOPA Master Aviator program. It’s goal is to allow PA46 owners and pilots to fly in to a location at a reasonable time (the event starts at 10am local time), received some good quality ground training over relevant safety topics by highly experienced PA46 instructors, have a free lunch, then depart mid-afternoon to arrive back home before dark.
The event is free to all attendees. Lunch will be provided at each location. This event is not exclusive to MMOPA members, either. Any PA46 owner or pilot, or just anyone interested in the PA46 world, are invited to attend.
Texas Top Aviation is hosting the South Central Region Spring Safety Standdown at the Henrickson Jet Center at the Austin Executive Airport (KEDC). Hank Gibson and Pedro Vargas-Lebron will be presenting on the following topics:
MMOPA Operational Practices review and importance of stabilized approaches
Crosswind Takeoffs and Landings
High Density Altitude Operations
A discussion of thunderstorms, resources in the cockpit for weather avoidance, and accidents that have occurred involving thunderstorms
The MMOPA Spring Safety Standdown will take place on Saturday, April 18th, 2020. Registration is required for the event. The link for registration can be found here.
Come on out for some high quality training and free BBQ with 50 of your closest PA46 buddies!
MMOPA will be hosting it’s second Safety Standdown event at many locations across the country for Piper PA46 owners and pilots. The first iteration of MMOPA Safety Standdown in the fall of 2019 was a big hit. Each event was very well attended by MMOPA members. What is Safety Standdown you ask? Safety Standdown was…
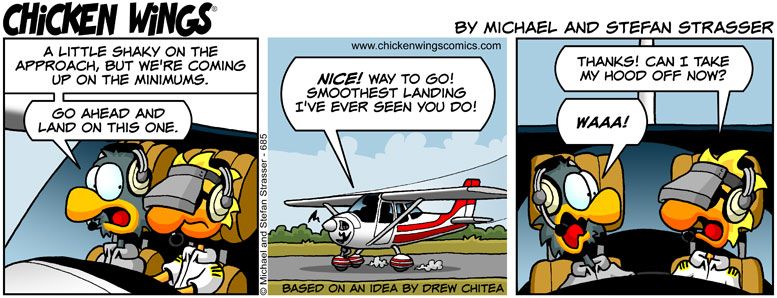
Most of us who have been through instrument training are familiar with the traditional view limiting devices. There is the original hood, which does a decent job of blocking a pilot’s view of outside, but there are still gaps that allow “peeking”, though that peeking doesn’t really help a pilot fly an approach. It does help them figure out which way is up, so it’s not a true simulation.
The other problem with a hood is the process of putting it on to begin simulating IFR conditions, then taking it off when it’s time to land. This process takes time and the instructor has to take the controls (or the autopilot flies), losing some of the realism of the simulation.
Overall, an IFR hood is relatively comfortable. The elastic band sits under your headset, doesn’t squeeze your heard, and doesn’t press underneath your ear cups of the headset, giving you a headache. Hoods are large and somewhat unwieldy.
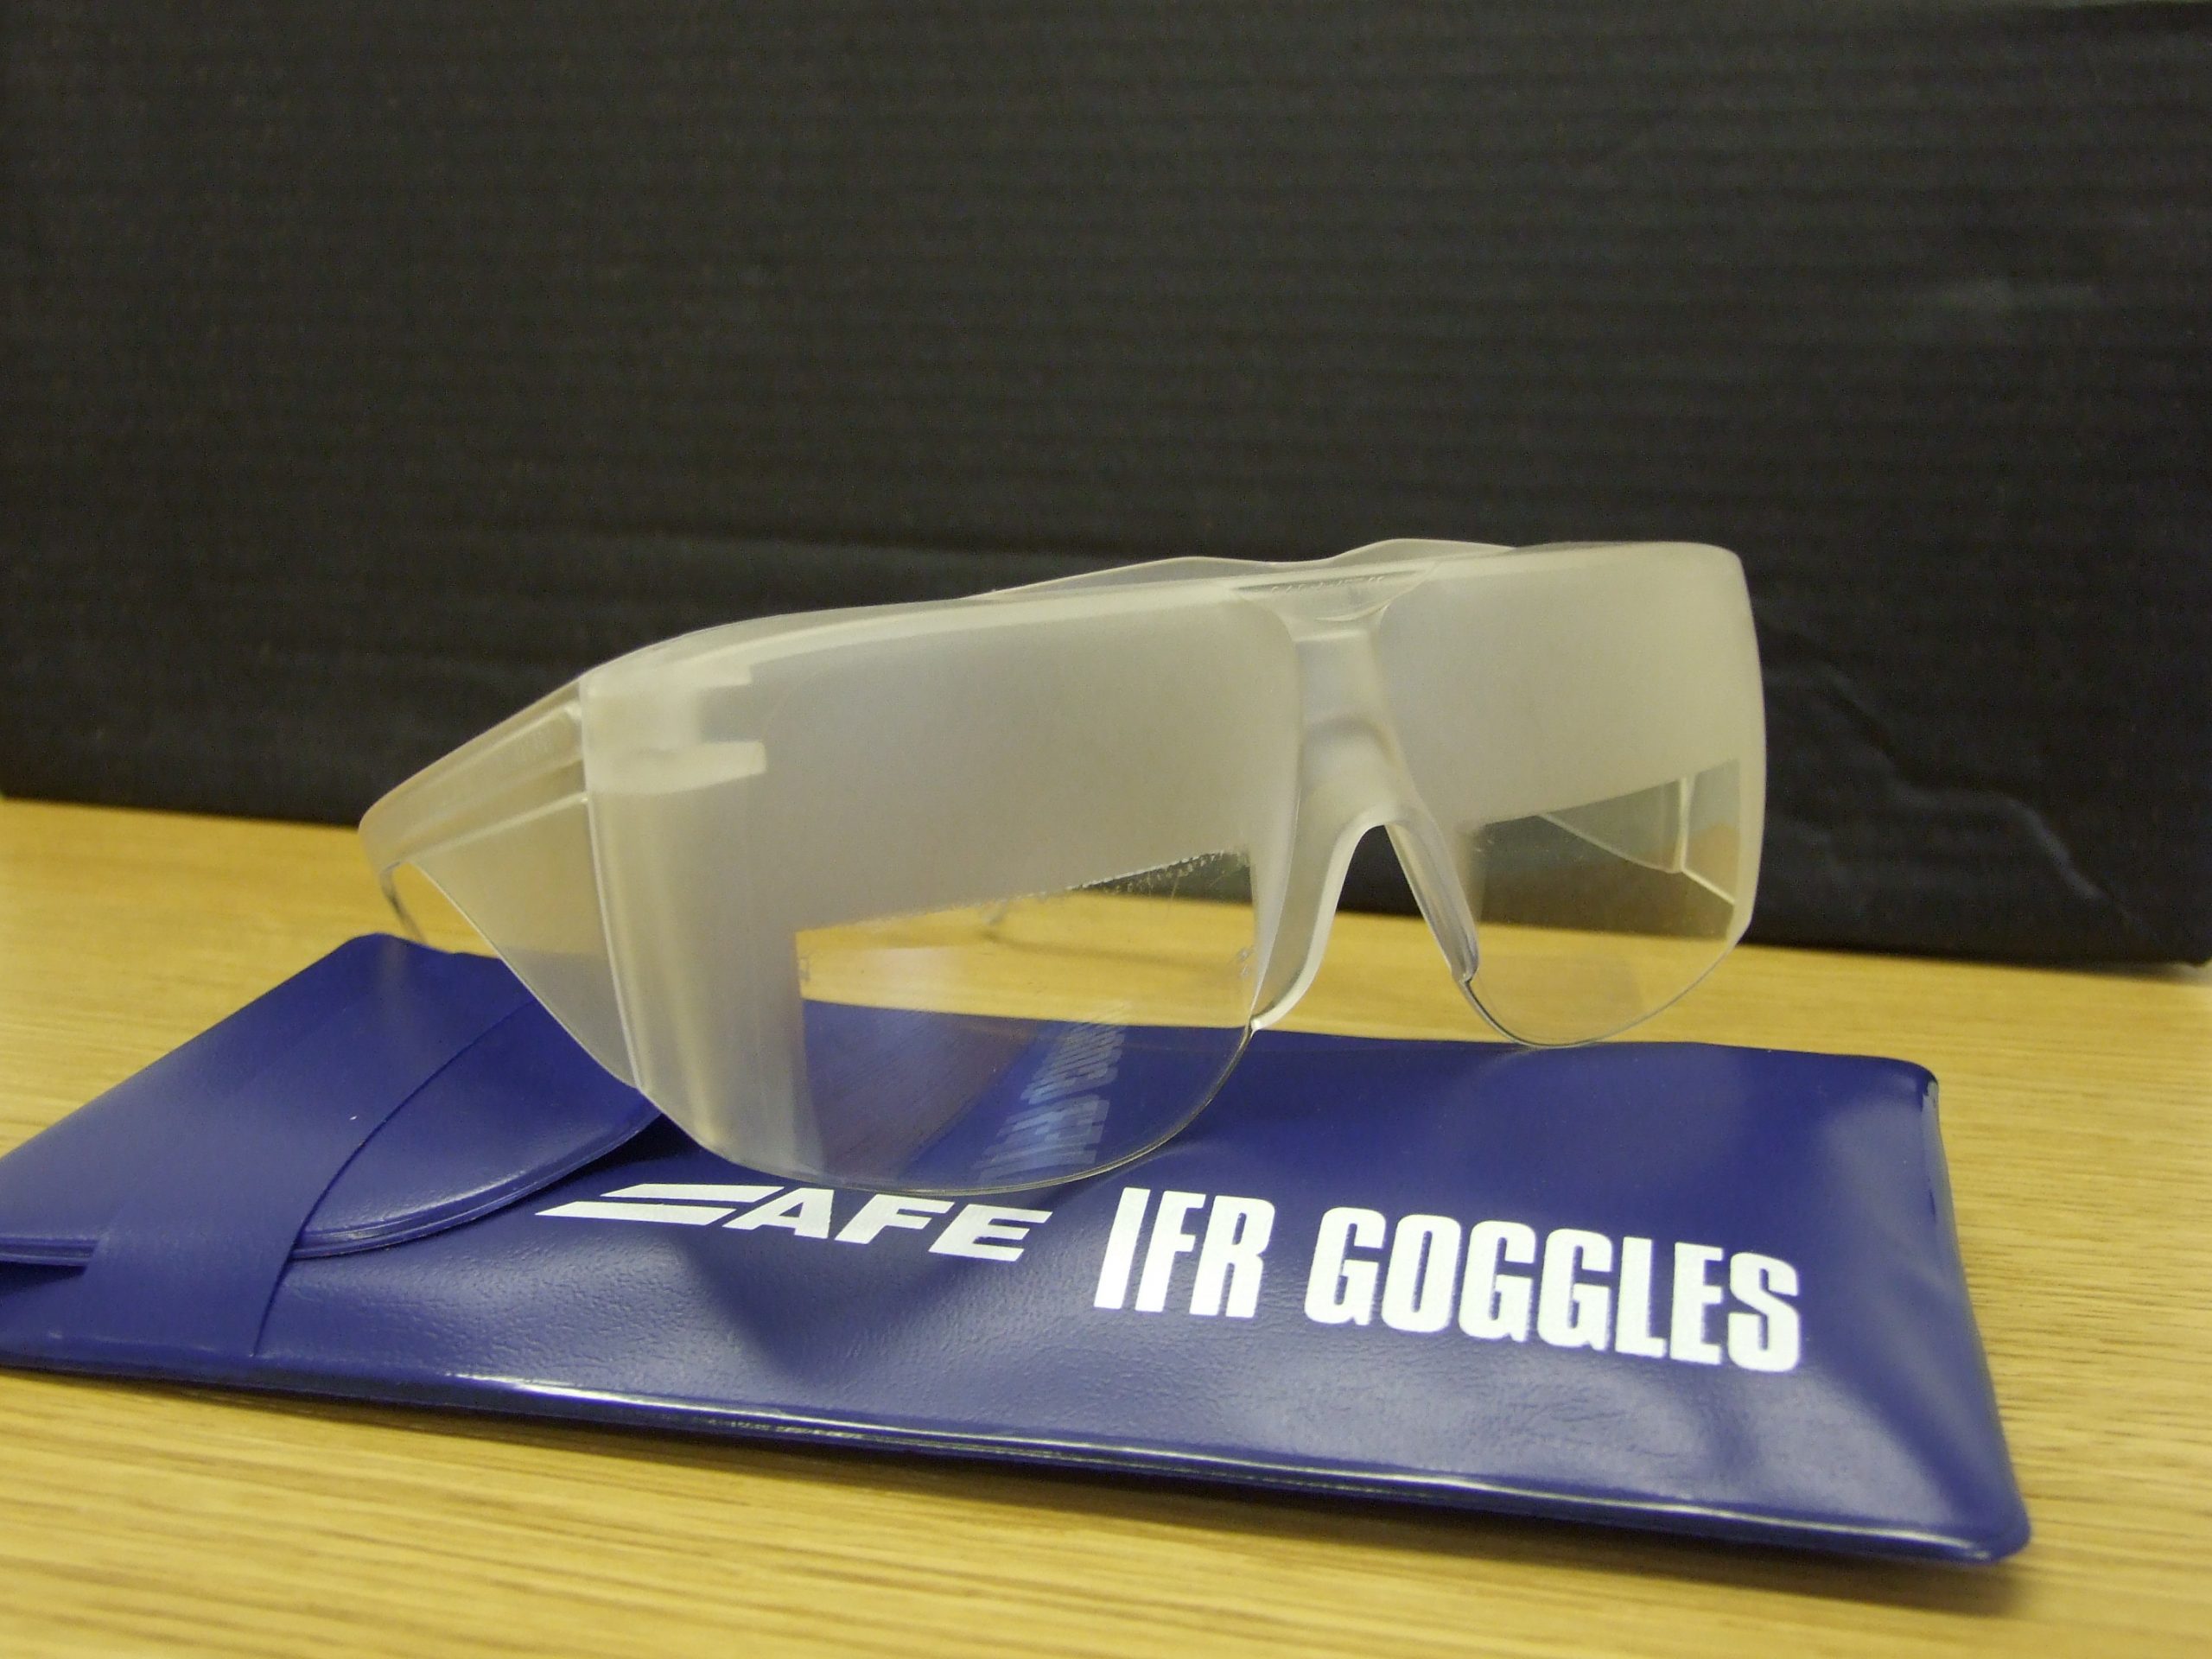
Foggles are another way to simulate IFR conditions for training. Most of the time, these are safety glasses that have most of the lens blacked out or fogged out, leaving little slits at the bottom for the pilot’s eyes to see the instruments.
Foggles aren’t quite as good as an IFR hood at blocking the outside. Due to their shape, there are often cracks that allow more “peeking” then a hood. The process of beginning to simulate IFR conditions and ending the simulated IFR conditions is easier though, since all the pilot has to do is put the foggles on or slip them off, which can often be done one handed (putting them on can be more difficult one handed since they have to fit underneath your headset). Wearing them for a long period of time can get painful as your headset is probably going to start crushing them against the side of your head.
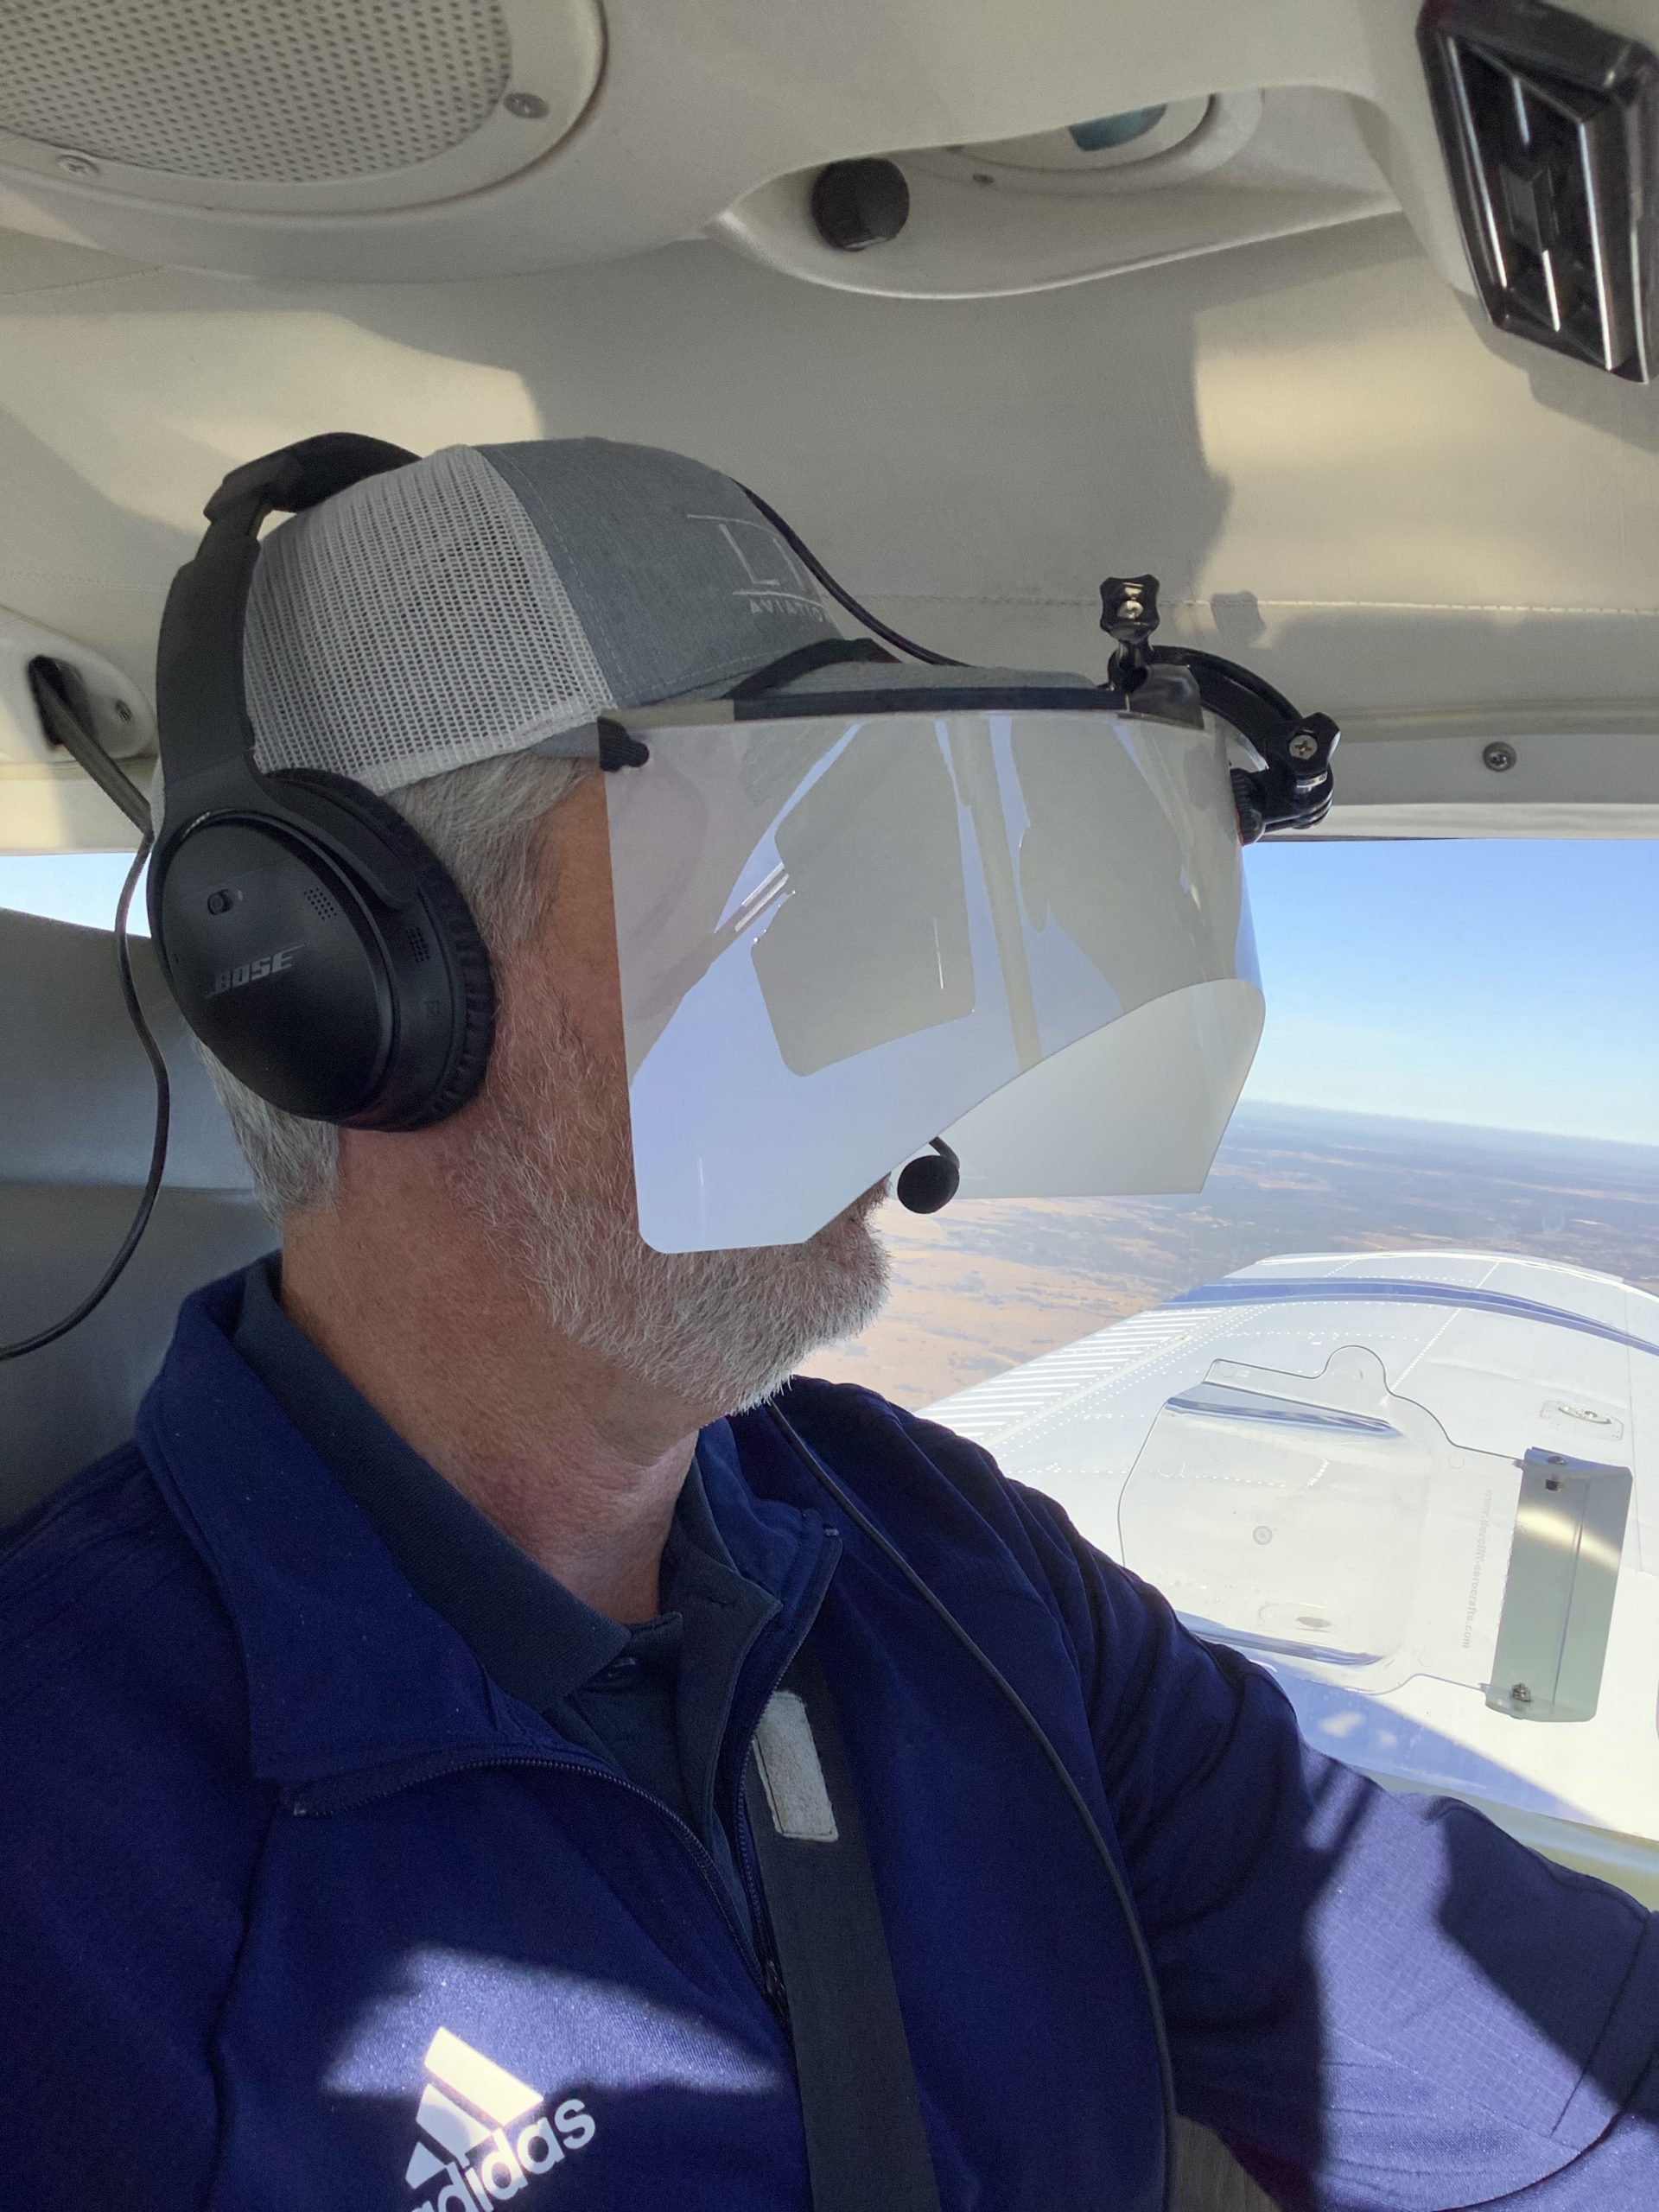
The best comfort and view limiting combination I have found, so far, is called the ViBAN. It’s very comfortable and does a really good job of simulating IFR by blocking a view of the outside.
What’s the whole goal behind a view limiting device? When a pilot starts instrument training, ideally, all the training would take place in the clouds, since that is why someone get’s an instrument rating. As we all know, this isn’t possible, hence the need to simulate IFR conditions. The problem with simulating IFR is, it’s not true IFR. True IFR conditions are different then what a hood or a set of foggles can simulate. This can lead to spatial disorientation if a fresh instrument pilot enters the clouds for the first time, having done all his training in simulated conditions.
I’ve even heard a story of a pilot who did all his IFR training with a hood, passed his check ride, went into the clouds the first time, and put the hood on because he was getting disoriented since he hadn’t ever experienced true IFR.
What about full motion simulators? How I wish every airport had a full motion simulator for instrument training. Full motion sims are truly the best way to simulate IFR conditions. A pilot can easily get spatially disoriented in a sim if he or she isn’t careful. It’s a great way to simulate IFR conditions, but, alas, this just isn’t possible.
Are we doomed to just do an okay job of training instrument pilots in simulated IFR conditions with a hood or foggles?
Nope, at least not anymore.
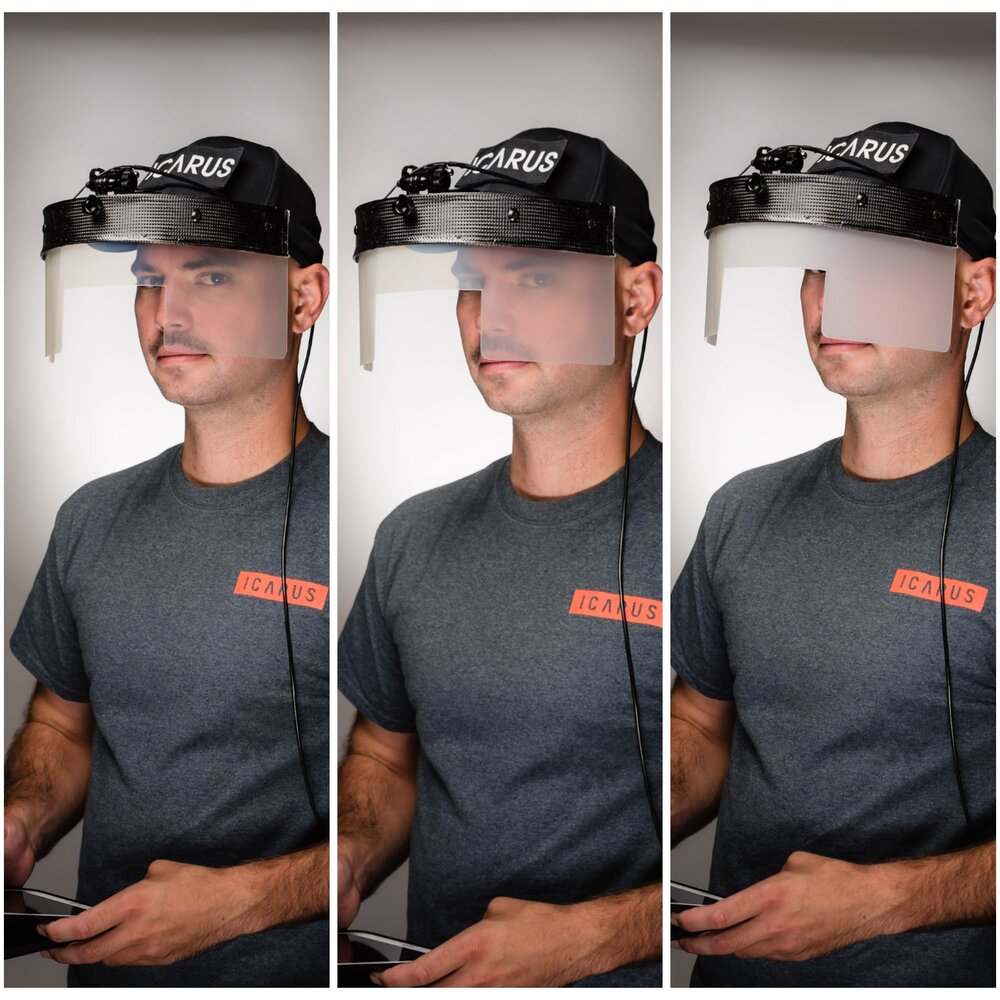
Enter the ICARUS Device. The ICARUS Device, which stands for Instrument Conditions Awareness Recognition and Understanding System, is an amazing piece of equipment which truly simulates IFR conditions in the training environment. The ICARUS is a plastic shield that uses a Polymer Dispersed Liquid Crystal film that allows the degradation of a pilot’s visibility. It clips on to a baseball cap and is attached to a battery. That battery is then bluetoothed to an iPad or iPhone App that allows the instructor to put the pilot into and take him out of simulated IFR conditions.
Originally designed for helicopter training, it’s an excellent tool for fixed wing IFR training too. I’ve been using it for the last month and a half and I am hooked. The customer’s that I have used it with truly say that they cannot see a thing outside. Because the plastic shield turns white, it really does give the view that the pilot is in the clouds. The inner ear certainly believes it. The curve of it fits the glare shield in most planes nicely (there is some custom cutting that would have to take place for specifically rounded glare shields, but it fits Cirrus and Piper Saratogas nicely, the two planes I have used it in), and it sits away from the pilot’s face, blocking out all windows, which is what clouds do.
The greatest thing from an instructor’s standpoint is the ICARUS Device app. The pilot puts the device on before taxi and I set the app to VMC. This completely clears the ICARUS Device so the pilot can see just fine for taxi and takeoff. Then, at about 400 AGL, I tap the <1/2 VIS button on the app, and boom, the pilot is in the clouds. I even have a time delay to slowly make the ICARUS Device opaque to simulate slowly entering the clouds. I do the same thing on an approach, except in the reverse order, simulating we are slowly exiting the clouds.
The ICARUS Device is a game changer for IFR training. It’s comfortable, easy to use, the battery lasts for a long time (though bring a standard USB charging cord with you in the plane because the battery failure mode makes the ICARUS Device opaque instead of transparent. You don’t want that to happen at 200 AGL!), and, most important, it truly simulates IFR conditions.
After using it, I believe all flight schools and CFII should get one of these, both in the fixed wing and helicopter world. It’s the best option for simulating IFR conditions.
Texas Top Aviation, LLC was given an ICARUS Device by the ICARUS Device company to test. Texas Top Aviation, LLC was not paid for our above opinion on the ICARUS Device (trust me, if it was terrible, I would have told you!).
Most of us who have been through instrument training are familiar with the traditional view limiting devices. There is the original hood, which does a decent job of blocking a pilot’s view of outside, but there are still gaps that allow “peeking”, though that peeking doesn’t really help a pilot fly an approach. It does…
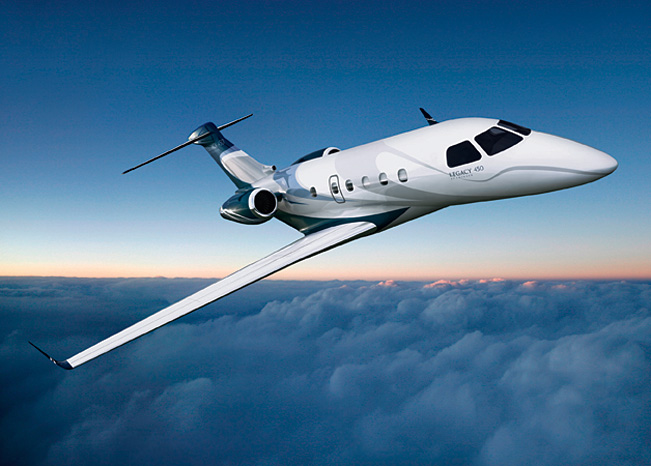
Brazilian manufacturer Embraer recently received FAA certification for it’s “mid-light” Legacy 450. Capable of Mach .83 and a 2,500 mile range, this is one sweet airplane. Embraer designers gave passengers headroom as the cabin stretches up to 6 feet in height down the center. Complete with fly by wire controls and a full glass cockpit configuration, Embraer did a wonderful job with this airplane. The club seats even fold down to a bed!
The airplane’s list price is $16.5 million. To learn more about the Legacy 450, visit Embraer’s website.
Brazilian manufacturer Embraer recently received FAA certification for it’s “mid-light” Legacy 450. Capable of Mach .83 and a 2,500 mile range, this is one sweet airplane. Embraer designers gave passengers headroom as the cabin stretches up to 6 feet in height down the center. Complete with fly by wire controls and a full glass cockpit…
On July 15th, the medical reforms that AOPA and many other aviation advocacy organizations had pushed so hard for were passed into law. President Obama signed the medical reforms law on the 15th, but, before practical application of the law takes place, the FAA has to translate the law into regulations.
What do the new medical reforms mean for medical certificates and flying? First, you still have to get a medical examination at some point in your flying career. Student pilots will still need an initial medical examination. Initially, for pilots who have held a medical certificate at some point over the previous 10 years, a new medical examination may not be needed (this still has to be regulated by the FAA so exact details aren’t known yet).
So, if you’re medical certificate has expired but you have had one in the past 10 years, you qualify. But, if you have had your medical certificate revoked, suspended, withdrawn or denied, you don’t qualify.
Once that student pilot receives the initial medical certificate (or the experienced pilot decides to start flying again), all that needs be accomplished is to take a free, online course on aeromedical factors every two years and meet with a physician at least once every four years.
There are some operating limitations that will be put into place for folks operating without a third class medical. Pilot’s can operate aircraft with no more than 6 seats that weigh less than 6,000 pounds, can carry 5 passengers, and are able to operate in day or night VFR or IFR conditions. Pilot’s may not operate for hire, nor climb above 18,000 feet or fly faster than 250 knots.
It will take some time for the FAA to put the regulations in place, but the process has begun.
On July 15th, the medical reforms that AOPA and many other aviation advocacy organizations had pushed so hard for were passed into law. President Obama signed the medical reforms law on the 15th, but, before practical application of the law takes place, the FAA has to translate the law into regulations. What do the new…
A common practice when ATC is setting an aircraft up for a visual approach is giving a clearance direct to the Final Approach Fix (FAF) for the approach for that runway. The theory is, the pilot will fly to the FAF, then he’ll pick up the airport and fly visually in. It is a handy way of setting the pilot up for a 5 mile straight in visual approach.
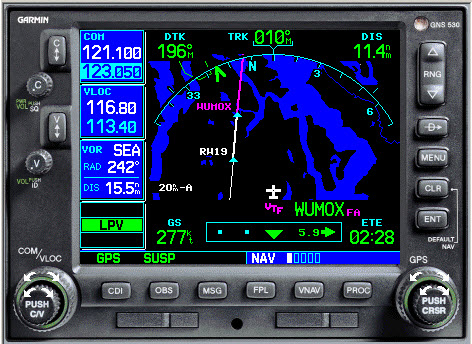
For anyone who flies with a Garmin GPS, whether is be a 430, a G1000, or a GTN 750, you have probably discovered a little nuance with going direct to the FAF. Once an approach is loaded into the flight plan, whether is is loaded via vectors or via an IAF, all the waypoints on the approach go into the flight plan. If the FAF is selected in the flight plan and the direct to command is given, the plane turns to the FAF and flies direct to it.
The fun starts once the plane gets to the FAF. The Garmin doesn’t sequence to the next waypoint. It just keeps the FAF as the active waypoint and the airplane just continues on the course it had to get to the FAF. This has probably caused some stress and frustration as the pilot is expecting the airplane to turn inbound (if the autopilot is engaged), but then it keeps flying, usually away from the runway.
How to fix this? If a Garmin GPS is closely inspected once the direct to the FAF command is selected, the pilot will notice that the GPS goes into Suspend mode. The Garmin programers thought this was a good idea to do.
How to get it to sequence properly? Well, once the FAF is the active waypoint and the airplane is flying direct to it, simply unsuspend the GPS, then the airplane will turn inbound on the final approach course and track inbound and the glide slope will pop up. On the 430 or 530, just press the OBS key. On the G1000, press SUSP. On the GTN 750, tap UNSUSP on the bottom of the unit.
Hopefully, this will lead to reduced frustration on what otherwise should be a simple approach to an airport.
A common practice when ATC is setting an aircraft up for a visual approach is giving a clearance direct to the Final Approach Fix (FAF) for the approach for that runway. The theory is, the pilot will fly to the FAF, then he’ll pick up the airport and fly visually in. It is a handy…
A couple of months ago, I had a life-threatening experience while flying. Thankfully, with my flight training, along with a lot of luck, I am here to talk about it.
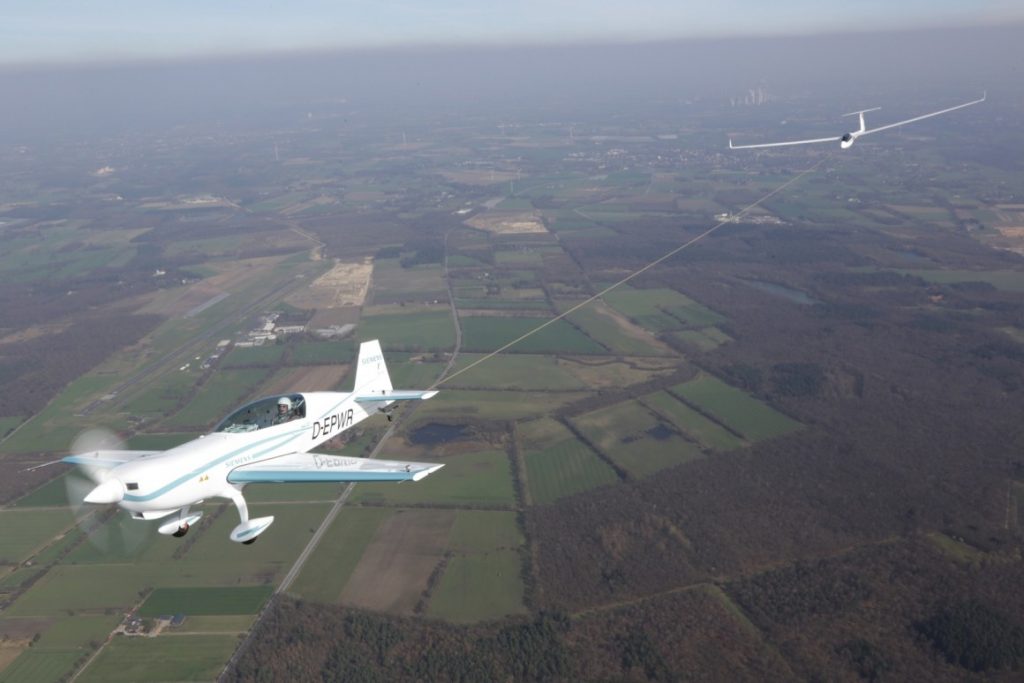
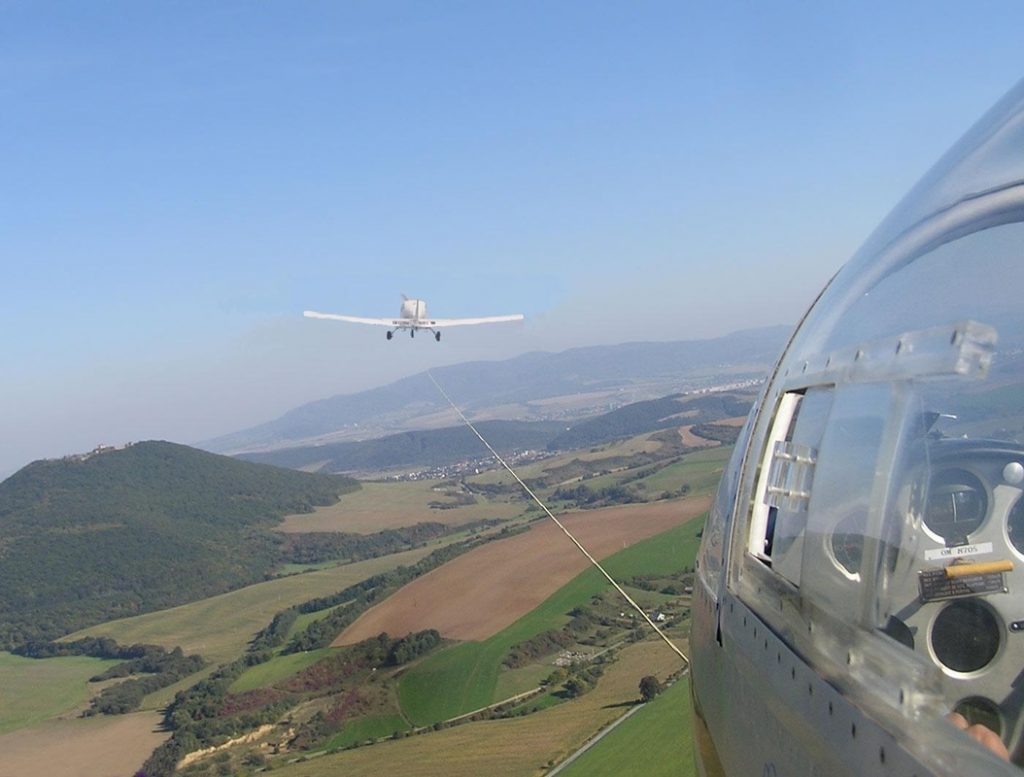
One of my many piloting jobs is as a glider tow pilot. For those not familiar with gliding, since a glider doesn’t have an engine, every time a glider pilot goes and flies, it’s a team effort. A powered airplane (anything from a Super Cub to a turbine powered Air Tractor) is attached to the glider via a tow rope, which is about 200 feet long. Once the glider pilot gives the go ahead over the airport’s CTAF, then the tow plane begins it’s takeoff roll, pulling the glider along behind it.
The glider becomes airborne prior to the tow plane, then the tow plane will circle the airport environment till it get’s to the pre-determined altitude to release the glider. Some tows are pattern tows and some are higher (not usually above 3,000 AGL), depending on the request from the glider pilot. Once the altitude is reached, the glider pilot pulls a handle in the glider to release the tow rope, then begins his glide. The rope stays attached to the tail of the tow plane, which in turn descends back down to the runway and lands. The tow plane also has a tow rope release handle in case of emergency.
On this particular tow, the plan was to tow the glider up to 3,000 AGL. Upon reaching 2,500 AGL, the glider pilot called me on the radio and stated that his rear canopy had opened up. I looked over my shoulder and sure enough, the rear canopy was fully opened while he was still in level flight behind me. I asked him if he wanted me to tow him closer to the field, but he didn’t reply.
Now, as an experienced tow pilot, I know a glider canopy popping open should not be an emergency situation. It’s definitely abnormal, but would be similar to a door or window popping open in a powered airplane. Not a big deal. If too much force from the relative wind is applied to the canopy, it would snap off; however, a glider can easily land without a rear canopy.
About 5 seconds after I radioed the pilot (and received no reply), I felt my tail instantaneously lift up into a completely vertical position, which caused my nose to go straight down. The next thing I knew, a whole lot of earth suddenly filled my windscreen and I was in what’s known as a graveyard spiral.
A graveyard spiral (as defined from the Airplane Flying Handbook pg 4-23), “is a descending turn during which airspeed and G-load can increase rapidly….the airplane is flying very tight circles, in a nearly vertical attitude and will be accelerating since it isn’t stalled.” It’s also known as a spiral dive.
Back to the story. At this point, I tried to reach for the glider release handle. Unfortunately, due to the shoulder straps holding me against the seat, plus the g’s, and also the quart of oil and tow bar that flew forward and hit me in the back of the head, I couldn’t reach it. I was semi-upside down at a certain point, which dislodged the oil and tow bar from the floor of the baggage compartment. They sailed over the seat and nearly gave me a concussion.
At this point, 2,500 feet above the ground, I had a choice to either fight for my life at a very low altitude or to sit back and become part of a big explosion.
I decided to fight for my life.
As I was spiraling to the ground, I felt the tow rope snap. Up to this point, I had still been attached to the glider. The rope snapping was a good thing, as my airplane was now under my control, not attached to, and being affected by, a glider (more on that later). I now had a lifeline, no pun intended.
After I felt the rope snap, my instincts and training kicked in. I initiated the spin recovery procedure using the PARE acronym. This task was difficult to do as I had a lot of debris flying from the rear of the plane to the front, blocking my view out of the windshield. There was also debris around my feet, hampering my ability to use the rudder pedals. The spiral finally stopped and I recovered approximately 500 feet above the tree tops. It took my heart a lot longer to stop spinning.
After barely regaining my emotions, I tried to evaluate the condition of the plane. Were all the pieces of the plane still there, was the engine damaged, did my control surfaces still work?
Once I advanced the throttle and saw an increase in my engine RPM, I started an immediate climb to give me altitude to get back to the airport. I had engine power but I wasn’t sure how long it would last if I had damage. Now, what they don’t teach you during spin training is that when this happens unexpectedly, you will become very disorientated. You have just been spiraling unexpectedly and your equilibrium will be out of whack. As I leveled out just over the tree tops, I was too low to visually see any landmarks, nor could I see the airport. Once I was able to climb, I was able to orient myself and figure out where the airport was.
I had to be very careful getting back to the airport and landing without radio communication, since my radio was knocked out with all of the FOD from the baggage area. Thankfully, the landing was uneventful. After I landed, I saw the glider limp in over the trees. The rear canopy was totally gone, while the front canopy and other parts of the glider had suffered major damage. Miraculously, my airplane wasn’t damaged, except for the wire from the radio which came loose during the spiral.
So, how did all this happen, you ask? Well, the glider pilot made 2 huge mistakes. First, in gliding, the moment the glider pilot loses visual sight of the tow plane, you are supposed to release the tow rope. He did not do that and almost killed both of us.
Second, as pilots we are taught to always fly the airplane first. Everything else, no matter what it is, always comes after flying the airplane. As I stated previously, the loose canopy is not an emergency situation, but since the glider pilot did not aviate first and was distracted, it was almost a fatal day for 2 people and 2 airframes.
So, what caused this chain of events? By getting distracted by the open canopy, the glider pilot inadvertently pulled back on the stick while trying to close the canopy. Then, by not releasing the glider from the tow plane, the glider pilot climbed rapidly with an excessive rate of climb while still being attached to me. The rapid climb is what pulled my tail up, causing my nose to drop and put me into the spiral. The tow rope snapping set into motion my recovery, since up till that point, I literally had no control. An extremely high lift wing was attached to my tail, pulling it up, and there was absolutely nothing I could do about it.
We all spend time practicing and demonstrating emergency maneuvers during our flight training and during flight reviews. Many times you might think, I’ll never need to use this stuff. Thankfully, some of the procedures I learned in the past kicked in at a time of need, even though my heart was beating out of my chest.
At some point in every pilot’s career, some type of spin training or Upset Recovery Training would be highly recommended. Then, when things go wrong, remember to always aviate first, then handle all the other things that need to be handled.
Interested in spin training or Upset Recovery Training (UPRT)? Check out the list of Malibu & M-Class Owner’s and Pilot’s Association (MMOPA) approved UPRT vendors and schedule UPRT training today.
by Lance Stick & Hank Gibson A couple of months ago, I had a life-threatening experience while flying. Thankfully, with my flight training, along with a lot of luck, I am here to talk about it. One of my many piloting jobs is as a glider tow pilot. For those not familiar with gliding, since…
2 Comments
Now the question is, where do you find those non-standard alternate minimums for people *not* using Foreflight?
Hi Theo, in almost all of the EFB apps, it’ll be wherever the arrival and departure info for that airport is stored. If you are looking at a Jepp plate, it’ll be on the airport information plate.




Now the question is, where do you find those non-standard alternate minimums for people *not* using Foreflight?
Hi Theo, in almost all of the EFB apps, it’ll be wherever the arrival and departure info for that airport is stored. If you are looking at a Jepp plate, it’ll be on the airport information plate.