Picking Up an IFR Clearance

Picking up an IFR clearance at first can seem very simple.  But, when taking off from an untowered field, especially if a pilot is based at a towered airport, it can be a little more complex.  Based at an untowered field?  The towered procedures are a little more streamlined, but still different.

Towered Airports

Class B or Class C

At Class B or Class C airports, there is a dedicated frequency to get an IFR clearance and VFR departure instructions called Clearance Delivery.  It is published in the airport facilities directory as well as most approach plates.  Before you call Clearance Delivery, get the ATIS and tell the controller you have it as well as where you are located on the airport.
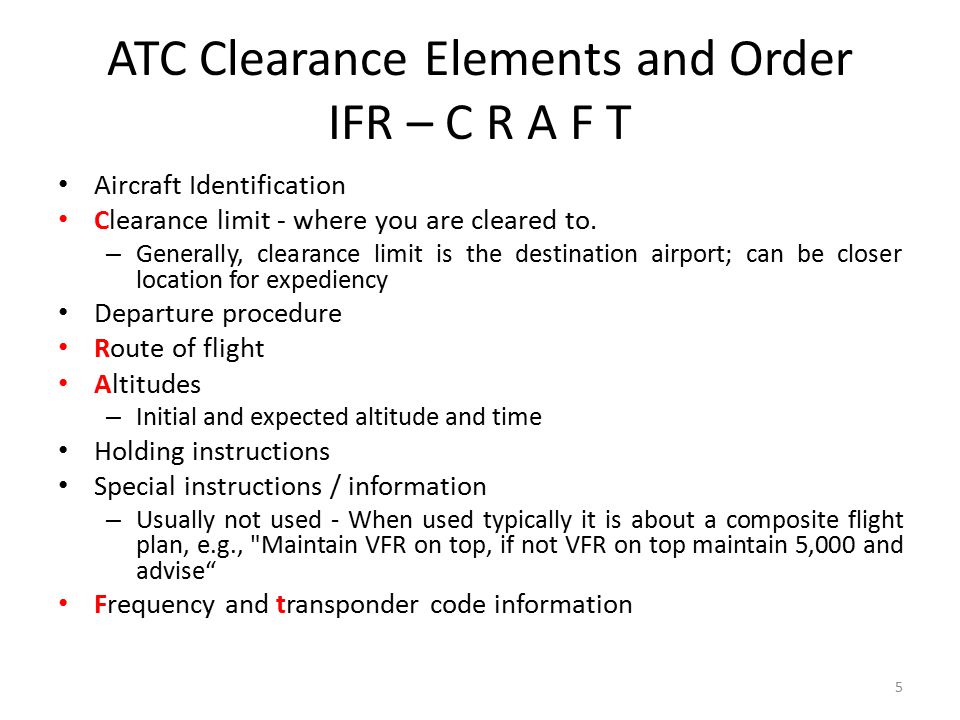
CRAFT

Class D

Some Class D airports have a Clearance Delivery frequency (see KADS, Addison, TX), but for the most part, you’ll get your IFR clearance on the Ground frequency.  If there is a dedicated Clearance Delivery frequency, the ATIS will specify whether or not to get your clearance on it or on ground control.

Class D towers are only part time towers, usually closing between 7pm and 10pm local time, depending on how busy the airspace is.  These airports usually have published Clearance Delivery frequencies to contact either the local approach control or center to pick up an IFR clearance on the ground.  They will be published on approach plates and in the A/FD.

Untowered Airports

Class E

There are a number of Class E airports that are Class E all the way down to the surface (see KLFK, Angelina County).  At these airports, there will either be a Clearance Delivery frequency or you call on the Center or Approach frequency to get your clearance (at KLFK, you call Center as there is no Clearance Delivery frequency.  At Temple, KTPL, there is a published Clearance Delivery frequency which you would be talking to Grey Approach).

Class G

There are two ways to pick up an IFR clearance at a Class G airport, one typically a little safer than the other.

The first option is to take off and maintain VFR while calling Center or Approach control.  They will give you your clearance making you IFR and allowing you to enter the clouds.  This option can be unsafe depending on the terrain surrounding the airport and how low the ceiling is.  If the ceiling is overcast at 1,000, you can legally remain VFR in Class G airspace at 500 AGL, but that isn’t the safest option and you might not be able to raise ATC at that altitude.

The second, and safer option, is to call on the phone.  Flight Service has a nationwide Clearance Delivery phone number that every pilot should have saved in their contacts (888-766-8267).  Typically, you want to wait to call them until after you are done with your runup because they only give you a five or ten minute window to get off the ground.  With bluetooth equipped headsets, this usually isn’t a problem.

Be prepared when calling Clearance Delivery on the phone to wait a few minutes.  Us pilots aren’t good at being patient sometimes, but the FSS has to call Center on the phone to get your clearance and release and this can take a few minutes.  Be prepared for that going in and just be patient.  Remember, this is the safer option!

There are a handful of Class G airports around the US that have a GCO, a Ground Communications Outlet. With a GCO, you tune up the frequency, then click the mic 4 times to talk to ATC or 6 times to talk to FSS.  Each mic click must be at least one second, so if you click the mic too quickly, it won’t work.

At certain airports that are underlying an approach control’s airspace, you can actually call the TRACON directly and get your clearance from them (5C1, the Boerne Stage Airport, for example.  San Antonio approach is the controlling agency and you can call them directly to pick up your clearance).  It’s a good practice to get the TRACON phone number and save that in your contacts as well.

Similar Posts

  • Spring Cirrus Austin, TX Get Together (CATGT)

    The South Central Cirrus Owner’s and Pilot’s Association (COPA) Region is hosting it’s second Fly In dinner at the Austin Executive Airport (KEDC) on Friday, October 8th, dubbed the Spring Cirrus Austin, TX Get Together.  The event is from 5:30-9pm.

    Like the first CATGT in October, there will be dinner ($25 per person), drinks, and several presentations.  Jack Long and Josh Marvil will speak about their trip around the world in a PC-12.  Ed McCombs and Eric Opiela will give a safety presentation about automation and task saturation.

    Plus, best of all, Cirrus is bringing a real live flying SF50 Vision Jet, plus a brand new SR22 G6 with the Garmin Perspective NXi panel.

    Fly in or drive to EDC.  The dinner will be in the Henrickson Jet Center’s main hangar.  You will need to RSVP so event organizers can get a proper head count.  The link to RSVP is here.

    Register for the CATGT before the slots are all filled up!

    The South Central Cirrus Owner’s and Pilot’s Association (COPA) Region is hosting it’s second Fly In dinner at the Austin Executive Airport (KEDC) on Friday, October 8th, dubbed the Spring Cirrus Austin, TX Get Together.  The event is from 5:30-9pm. Like the first CATGT in October, there will be dinner ($25 per person), drinks, and…

  • Redbird Migration at HYI

    migration-conference

    Redbird Skyport at the San Marcos Regional Airport will be hosting it’s 6th Annual Redbird Migration Flight Training Conference.  The event is focused on flight training and flight training providers.  Past speakers have included the president of Hartnell Propellers, the CEO of Big Red, and various Redbird Executives.

    The list of speakers for this year’s Migration has yet to be released, but it promises to be a good lineup.  Attendees every year always compliment Redbird on the event and the speakers they bring in.

    If you are a CFI or flight school owner interested in attending, check out Redbird’s event page to request an invitation.


    Redbird Skyport at the San Marcos Regional Airport will be hosting it’s 6th Annual Redbird Migration Flight Training Conference.  The event is focused on flight training and flight training providers.  Past speakers have included the president of Hartnell Propellers, the CEO of Big Red, and various Redbird Executives. The list of speakers for this year’s…

  • Garmin 530/430 Missed Approaches

    Flying a missed approach can be stressful enough.  When you haven’t done one in a while and your GPS isn’t showing you how to get to the missed approach point and you can’t remember which button to press, that adds a lot more stress.  Recipe for disaster?  Quite possibly!

    No need to fear, we are here to help.  The procedure for getting a Garmin 530 or 430 to give you missed approach guidance is actually simple and straightforward, if you know what to do!

    Note: Because of the variety of different autopilot configurations in different airplanes, this article will focus solely on the GPS.

    What the GPS is Thinking

    The way Garmin designed the Garmin 530 and Garmin 430 is to be as helpful to pilots as possible.  Their thinking was, 95% of the time, a pilot will make a landing on an instrument approach.  This is pretty accurate as most of the time, this is what happens.  Most general aviation pilots don’t fly approaches to minimums all that often, thus negating the need for a missed approach.

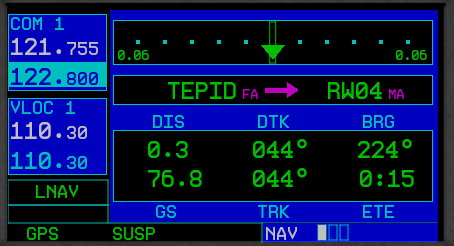
    Garmin Missed ApproachGarmin designed their software with this in mind.  When an airplane crosses the missed approach point, the GPS will go into what’s called suspend mode (a SUSP annunciation appears above the OBS key).  It will keep the missed approach point as the active waypoint because it assumes the pilot is going to land.

    This can be confusing to pilots.  This is what happens when software engineers and pilots come together. Engineers often believe they are smarter than pilots! (See the Airbus fly by wire roll out)

    The Procedure

    In the case of a missed approach, the button pushing on the GPS is actually relatively simple.  There is no SUSP key to take the GPS out of SUSP mode (thanks Garmin!).  Instead, you press the OBS key.  This will take the GPS out of SUSP mode, making the first waypoint on the missed approach procedure the active waypoint.  Your GPS will now give you guidance on the missed approach procedure.

    If you are going missed off an ILS, LOC, or VOR approach, then there is one more key you’ll have to press. Your CDI needle (whether it is digital or analog, an HSI or just a CDI gauge) will be reading off the NAV radio and your CDI indication on the GPS will be VLOC.  After you press the OBS key, press the CDI key on the GPS so you will start getting course guidance from the GPS again.

    That’s it.  Button pressing on the different autopilots will vary, but if you are familiar with yours, you’ll be able to tell it to follow the GPS and climb to the proper altitude.

    Flying a missed approach can be stressful enough.  When you haven’t done one in a while and your GPS isn’t showing you how to get to the missed approach point and you can’t remember which button to press, that adds a lot more stress.  Recipe for disaster?  Quite possibly! No need to fear, we are…

  • I Learn To Speak Seaplane

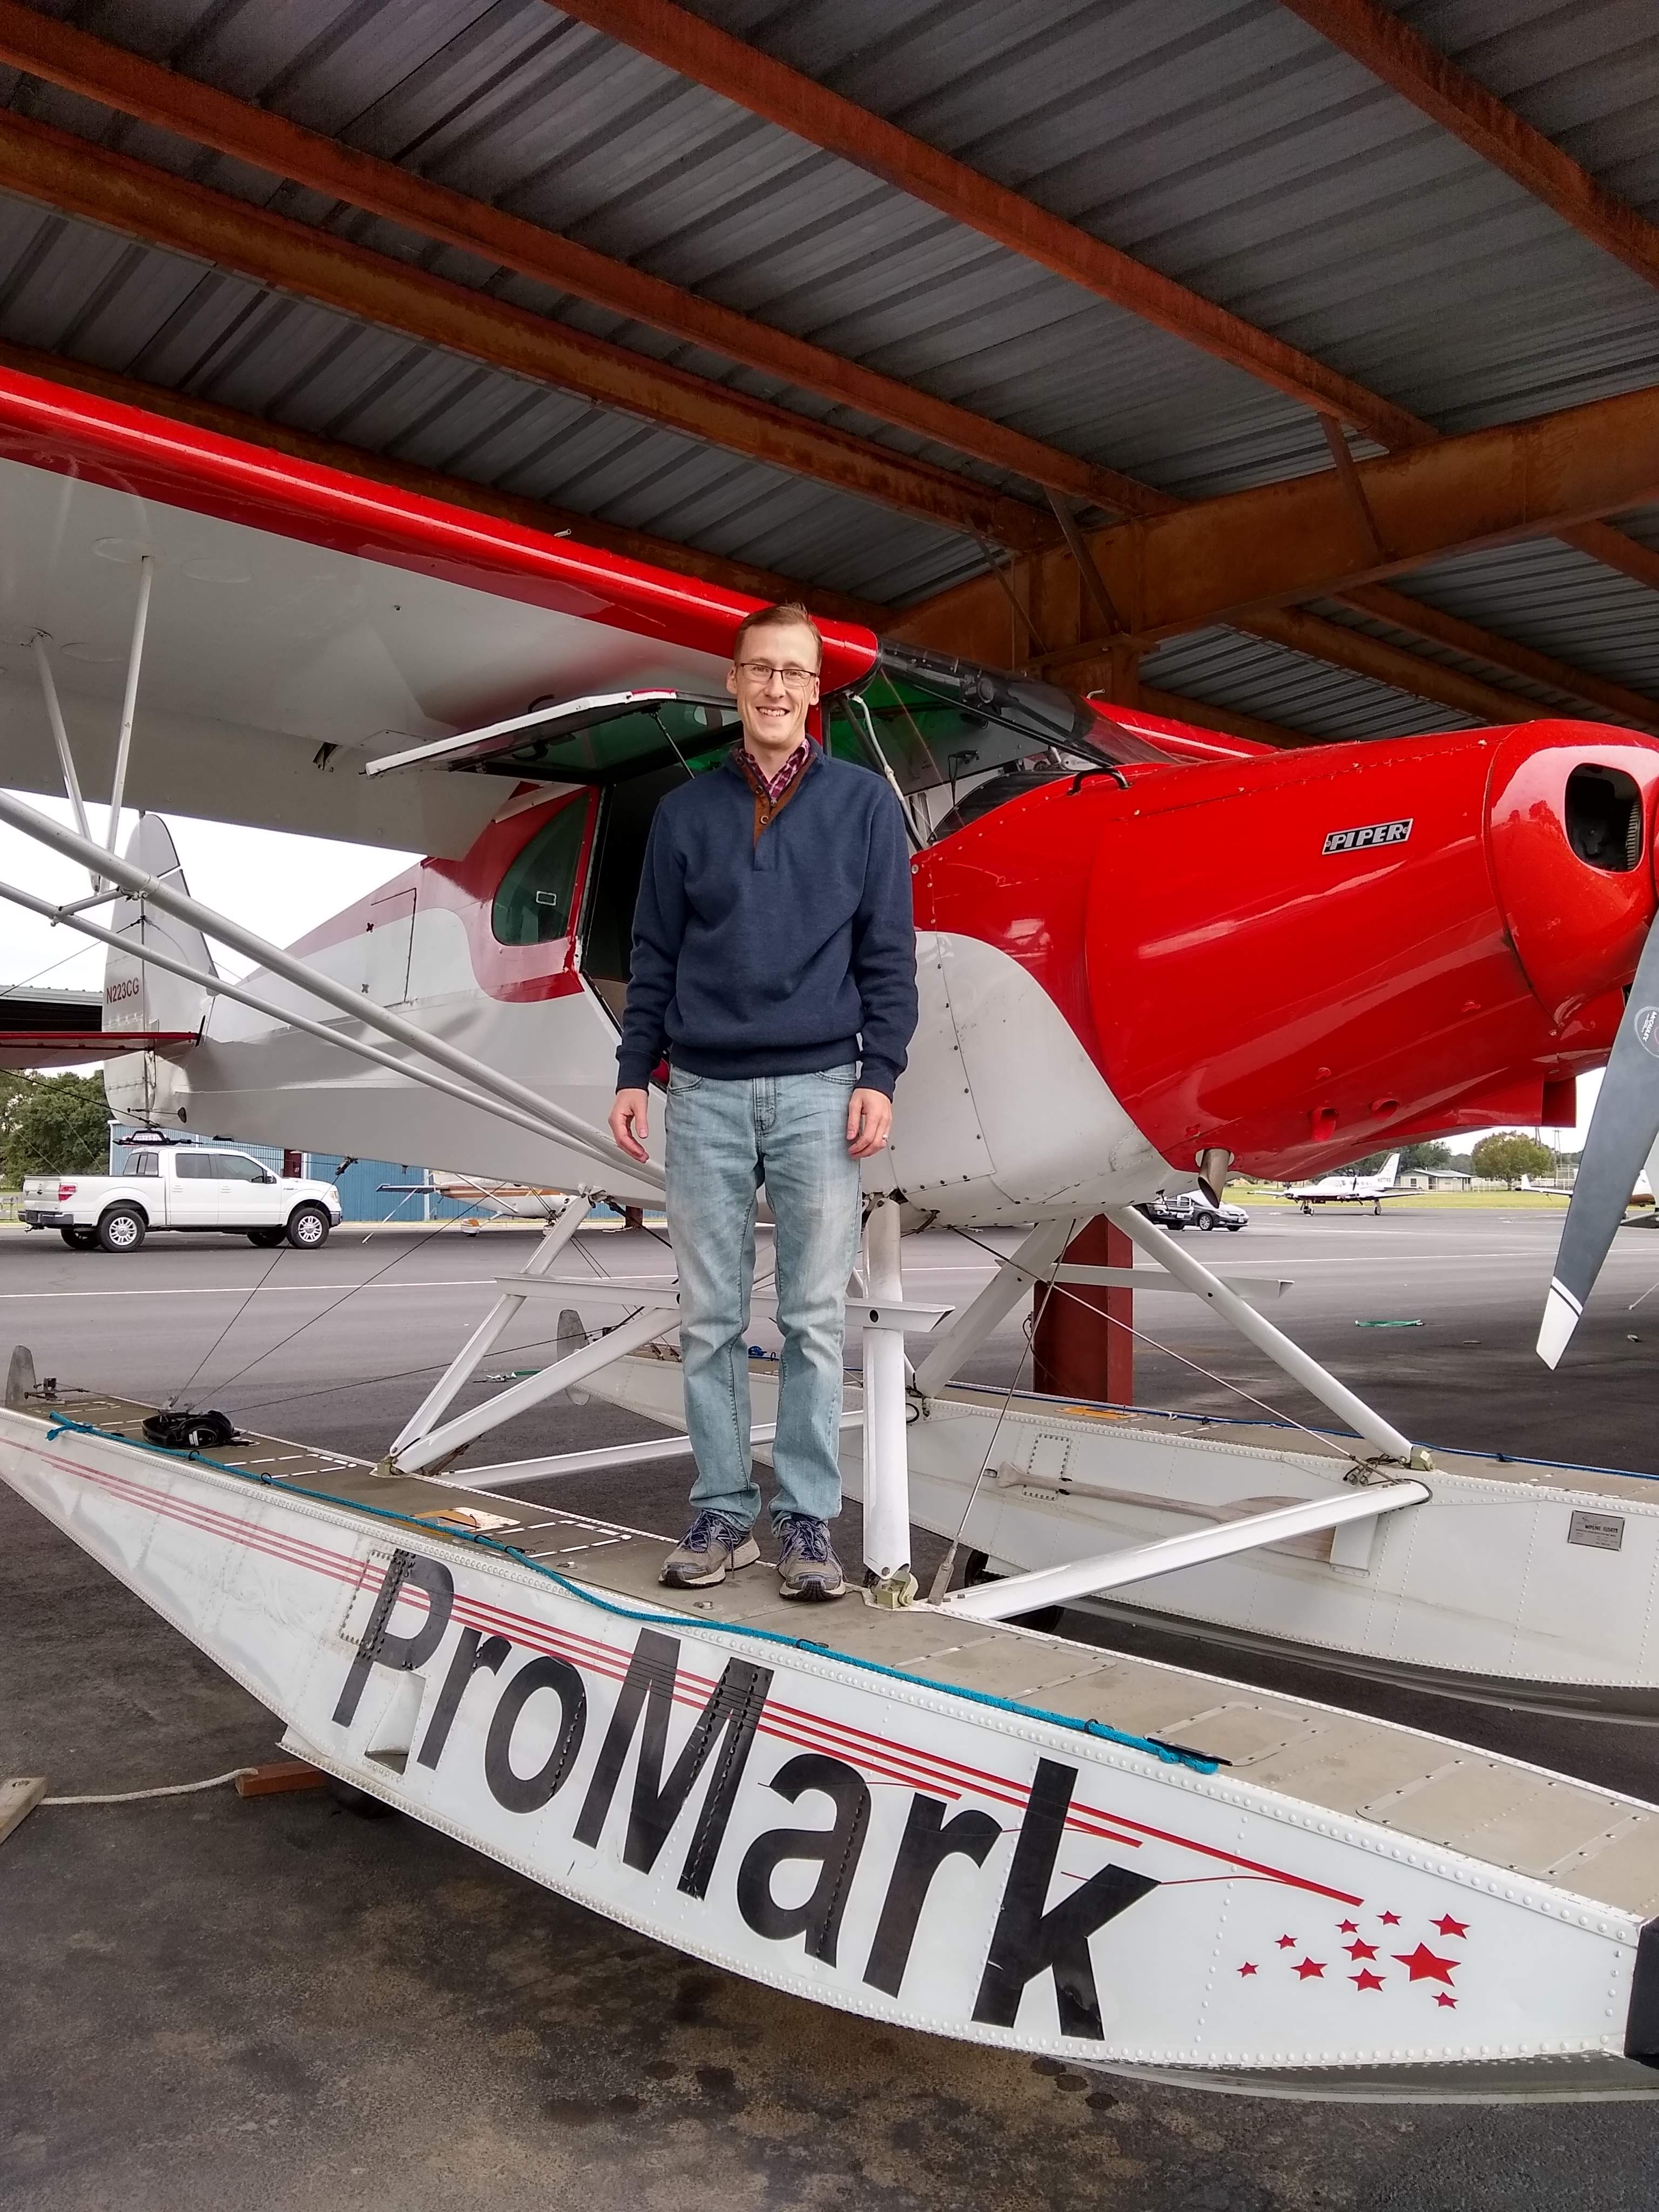
    From the time I started flying, I have always had the dream to learn how to fly a seaplane.  As I learned in November, it’s actually learning to land a seaplane, and the veterans call them floatplanes.

    ProMark Aviation at the Burnet Airport (KBMQ) offers a weekend float plane course that is high on fun and low on stress.  The school has a Piper PA12 Super Cruiser on amphibious floats (amphibs as I was corrected at one point.  I mean, if you’re going to fly a seaplane, er, floatplane, you have to know the lingo) that will land and takeoff on water, but does little else with ease and grace.  At 150 HP with those big floats and all the associated rigging hanging underneath the airplane, you are lucky to get to 500 feet before you get to your destination.

    We weren’t working on setting any speed records.  I was learning the lay of the water.  I learned about the step, the keel, pumping the floats, how to read the water, currents, ducks (yes, ducks and birds are important to know about when you are flying low on the water), buoys, docking, and ditching.  Step taxiing was fun as you are basically at 3/4 throttle screaming across the top of the water just below flying speed.  It’s the best way to taxi a seaplane (truly, it is.  You get more air in your engine, you can see better, and you are moving.  Just don’t try and turn sharp).

    Floatplanes also don’t have any shock absorbers, so the higher the wave, the more you get knocked around, so wind velocity and, in turn, wave height is very important.

    A very important nuance of an amphibious floatplane compared to a straight floatplane (one that doesn’t have wheels that come out of the floats), is at one point, you want to make sure your gear is down for landing (runway landing) and at another, you want to make absolutely sure your gear is up for landing (water landing).  If you land wheels down in the water, you will capsize, 100% of the time.  Thankfully from my good instruction, I did not capsize.

    Ken Wittekiend, my instructor, and I spent the majority of the weekend landing and taking off on Lake Buchanan (I was informed by locals it is pronounced “Buk-cannon”, not “Bue-cannon”), which is more open and therefore has more waves.  We did one landing on Inks Lake so my kids could see me land, which they thought was the best thing since cheese sticks.

    There is a check ride at the end of the training, but, as Ken reassured me, it’s the most fun check ride you’ll ever have.  I still hate check rides, but that one I think I hated least of all.

    I hope someday I can put my floatplane skills to practice, but for now, I can vouch that I now speak seaplane!

    From the time I started flying, I have always had the dream to learn how to fly a seaplane.  As I learned in November, it’s actually learning to land a seaplane, and the veterans call them floatplanes. ProMark Aviation at the Burnet Airport (KBMQ) offers a weekend float plane course that is high on fun…

  • Flying the Hudson River Corridor

    Ever since I moved out to the Philadelphia area, the Hudson River corridor in New York City has become one my favorite places to fly. It’s hard to overstate the beauty of the city from low over the river. Every time I have a family member or friend come to visit, I try and take them over to see the city from the air.

    Each time I fly up the river I can’t believe that we are actually allowed to do so, flying below the tops of the buildings and close enough that you feel that you could reach and out touch them. The draw back to the Hudson River Corridor is that it can be busy, intimidating, and confusing. However, with some reading and preparation, the Skyline flight is easy to do and extremely rewarding.

    Having the right weather is an important first step. The second step is try to arrive during ideal lighting conditions. If possible, select a smooth, calm day to make it easier to maintain a track down the correct side of the river. I always try and target arrival at the city around sunset. The view is spectacular any time of day, but having the lights from the city while the sun is just setting gives the best viewing. I’ve also flown over and done the whole flight after dark, which is always spectacular.

    View of the World Trade Center

    The first method of flying the river is to utilize VFR flight following. If the controllers aren’t too busy, they will provide advisories to aircraft that request the Skyline. The nice thing about doing it this way is that the controller will clear you into the NY bravo airspace and keep you above the traffic flying the Skyline in the VFR corridor below. This is the method that I have always preferred as I enjoy the added benefit of the traffic advisories and it’s nice not to worry about position reporting on the radio.

    If you want to get flight following, head toward the corridor and request the Skyline route with NY Approach. (Remember to stay clear of the Bravo until you’re cleared in!) Once you’re cleared into the Bravo and approaching the corridor, they will hand you off to Newark/ LaGuardia Tower for traffic advisories over the river. I like to approach from the south and ask for a 180 over the George Washington Bridge. This allows me to fly past the city a second time before exiting the corridor over the VZ (Verrazano Bridge) and heading back toward home.

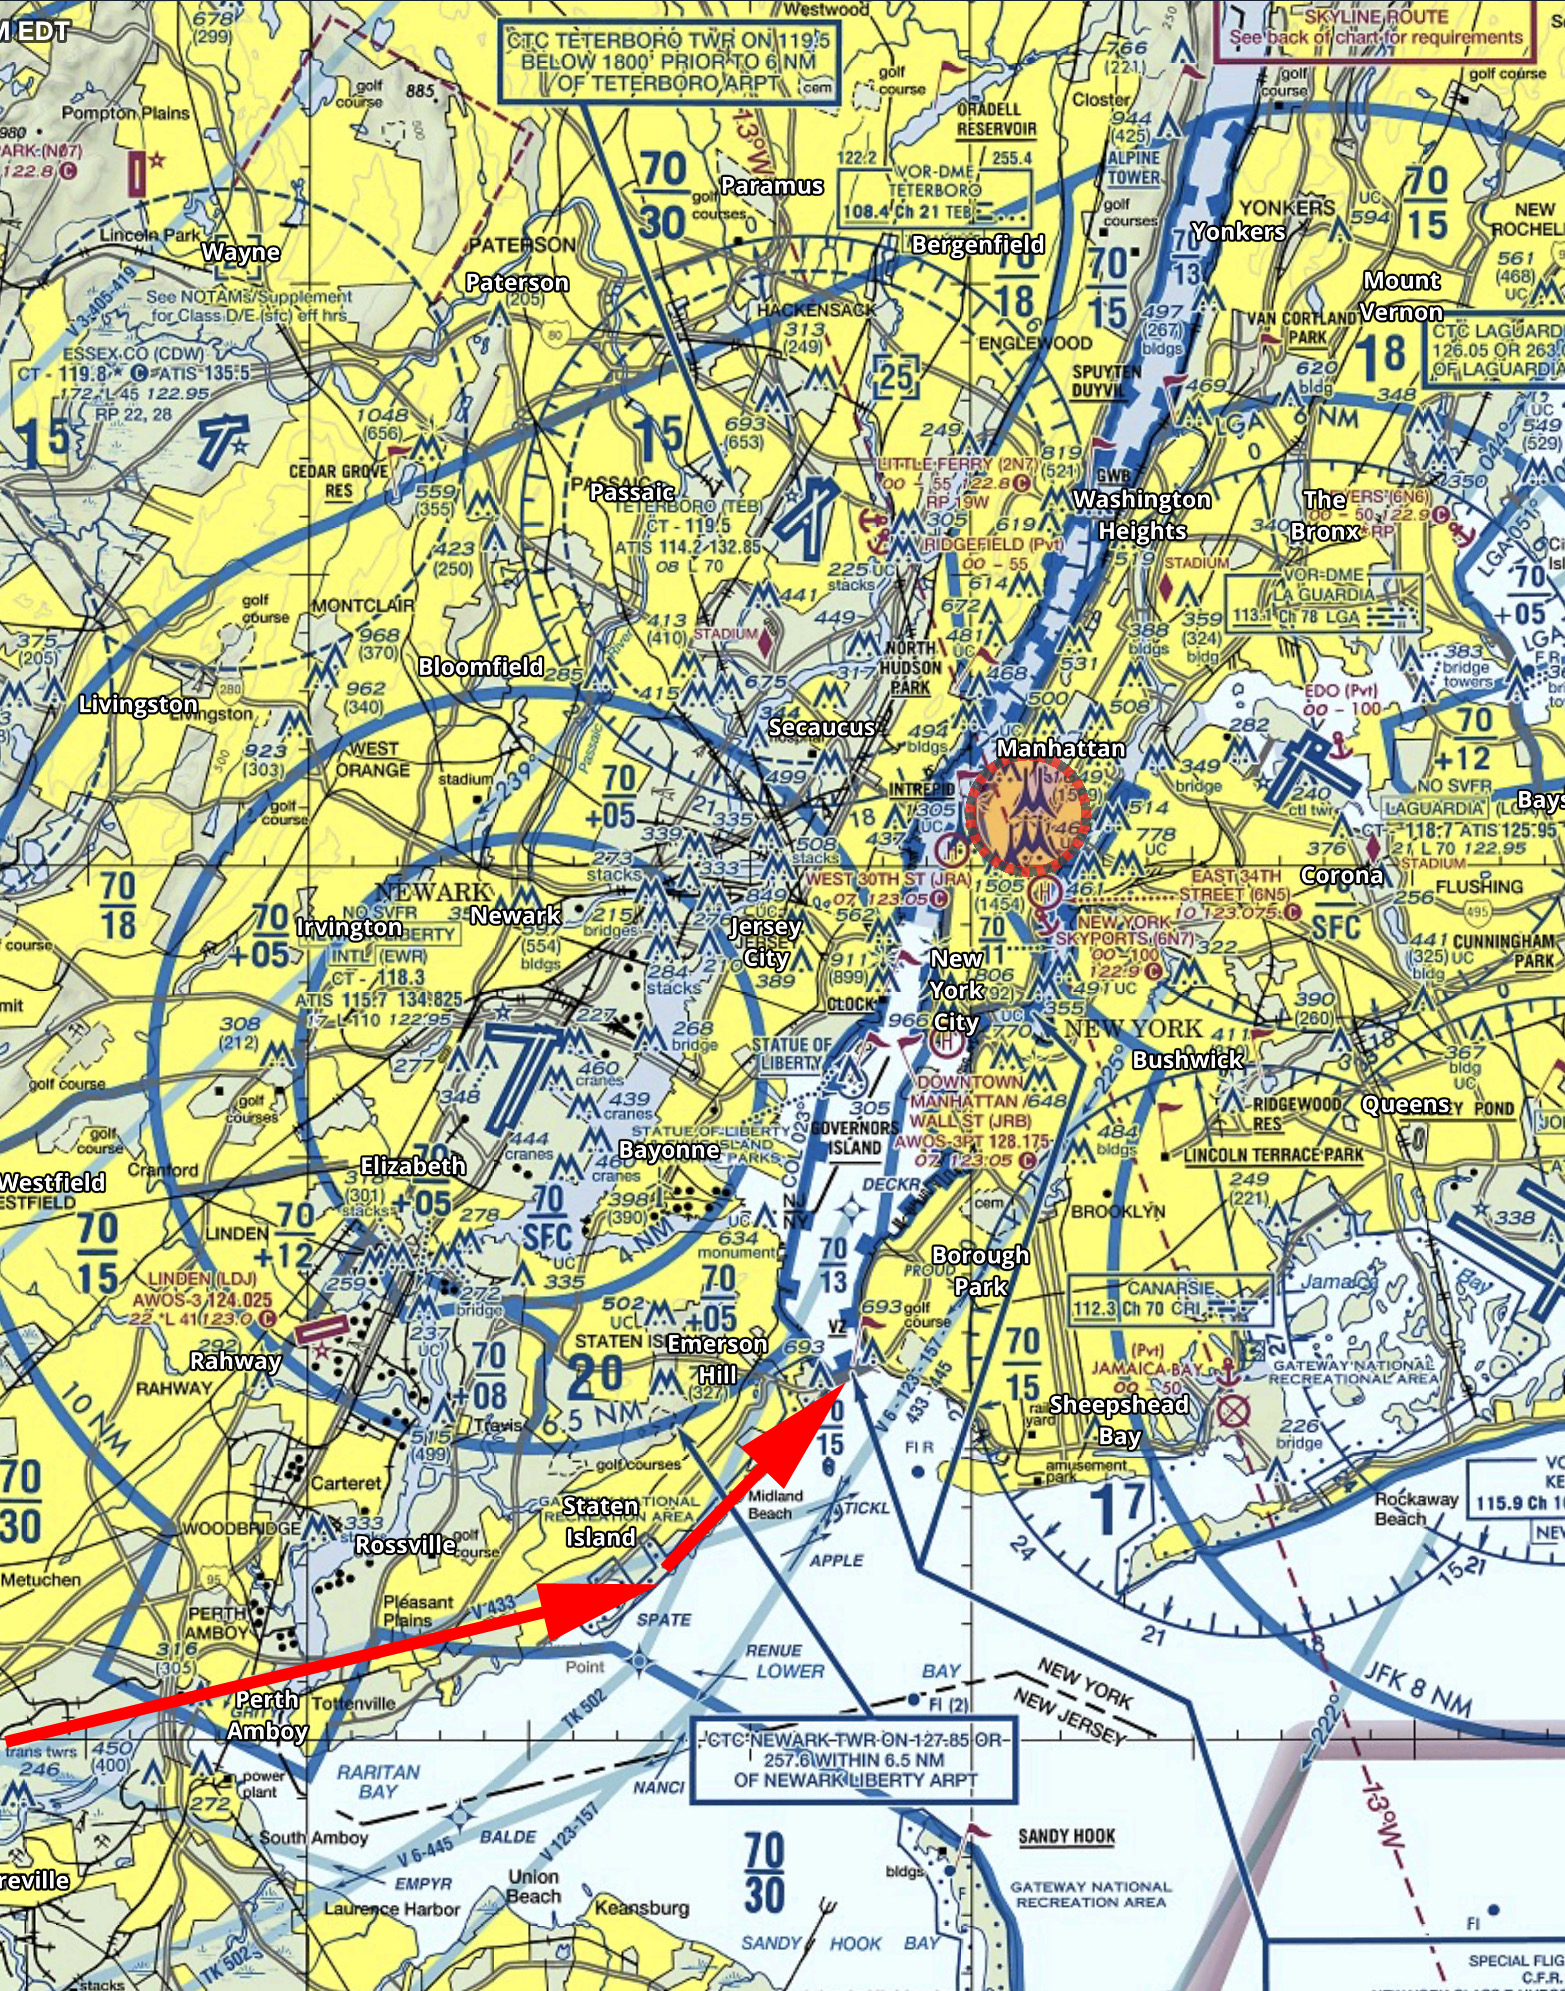
    In red is the path I typically fly. I descend to 1400’ and fly toward the APPLE intersection picking up the shoreline around Staten Island and hugging it until crossing the middle of the VZ. Newark normally clears me into the Bravo at 1400’ or 1500’ to fly up the corridor.

    Pros:

    • Better traffic Awareness
    • No position reports

    Cons:

    • Flying slightly higher reduces the view
    • If the controllers are busy, they may deny your request for advisories  
    • Can be intimidating to talk to NY Approach/ Newark/ LaGuardia 

    The other option is to fly in the VFR corridor. If you want to do it via this method there are just a few things you need to make sure you’re familiar with before you go. When in the VFR corridor you’ll need to make required position reports on a CTAF frequency. Make sure that you have the proper charts and have studied pictures of the landmarks so that you know what you’re looking for. I tend to plan on this as a backup in the event that the controllers won’t give me advisories.

    Pros:

    • Doesn’t require talking to controllers/ class B clearance
    • More freedom to select altitude and routing as desired

    Cons: 

    • Less traffic awareness
    • Required position reporting

    All the requirements and guidelines for flying the corridor can be found on the back of the NYC TAC chart. Any pilot flying the river is required to have one of these or a NYC helicopter route chart on board. If you’re using Foreflight, look in the Documents section under FAA Fly Charts and select the NYC TAC chart in order to read the back of page.

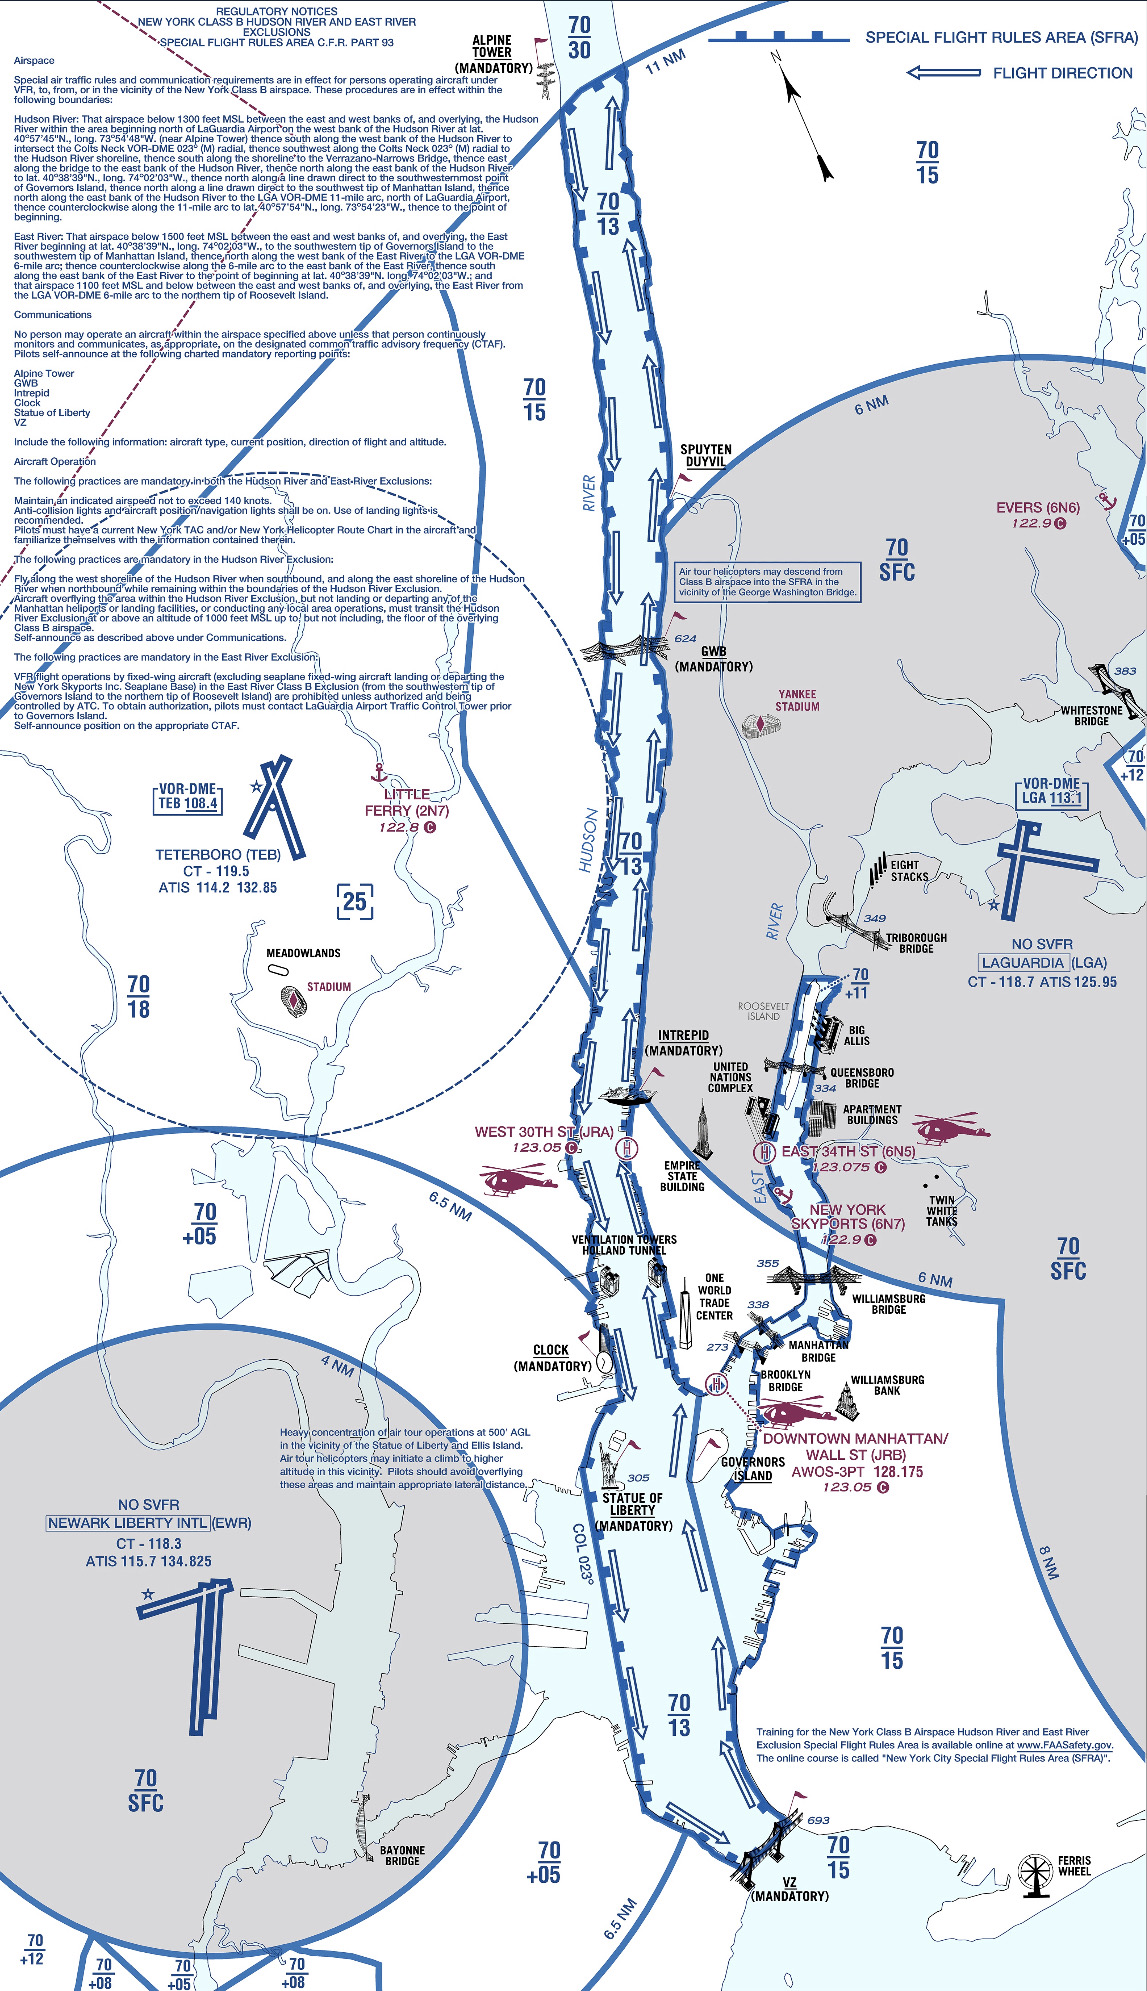
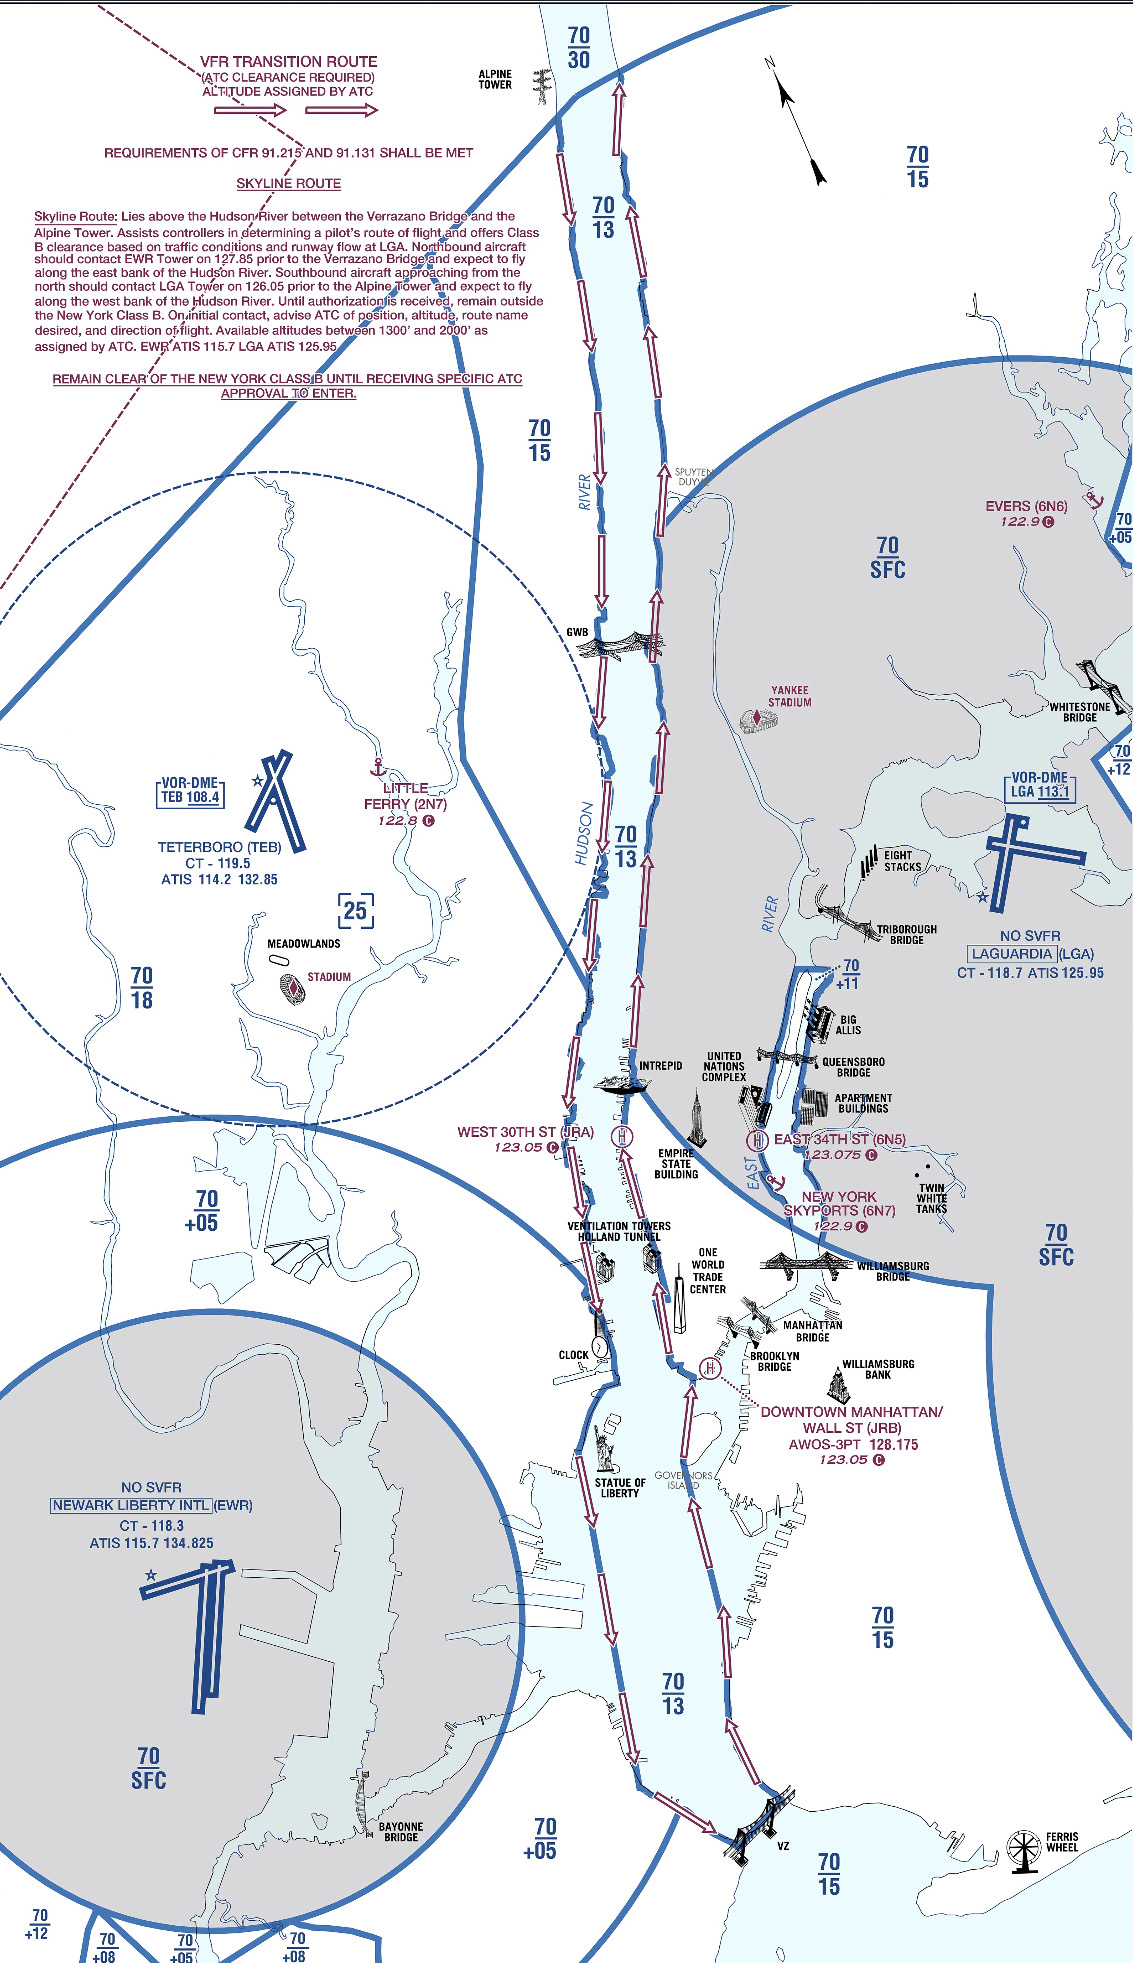
    Below you’ll find examples of the diagrams/ instructions printed on the back of the NYC TAC charts.

    You can see the traffic flow requires northbound airplanes to hug the east side of the river, while the southbound traffic stays on the west side. The VFR reporting positions (listed from North to South) are: Alpine Tower, George Washington Bridge, Intrepid aircraft carrier, Goldman Sachs (clock), Statue of Liberty, VZ (Verrazano Bridge). Each position report should include aircraft type, position, direction, and altitude.

    Other things to be aware of:
    NYC is always a hotspot for TFR’s. There are often TFR’s for baseball games or presidential movements so make sure to check before you head that way. Additionally, there is a speed restriction in place of 140 kts, though I’m not sure why anyone sightseeing would want to go that fast anyhow.

    I realize that all of the procedures and restrictions can be overwhelming, but with the proper preparation, the Hudson Skyline is one of the most incredible places in the world to operate an airplane. There are a lot of things that are easy to get excited about that don’t live up to expectation, but this isn’t one of them. I’ve never taken anyone to the river that wasn’t impressed by what they saw and that’s why I plan to keep going back.

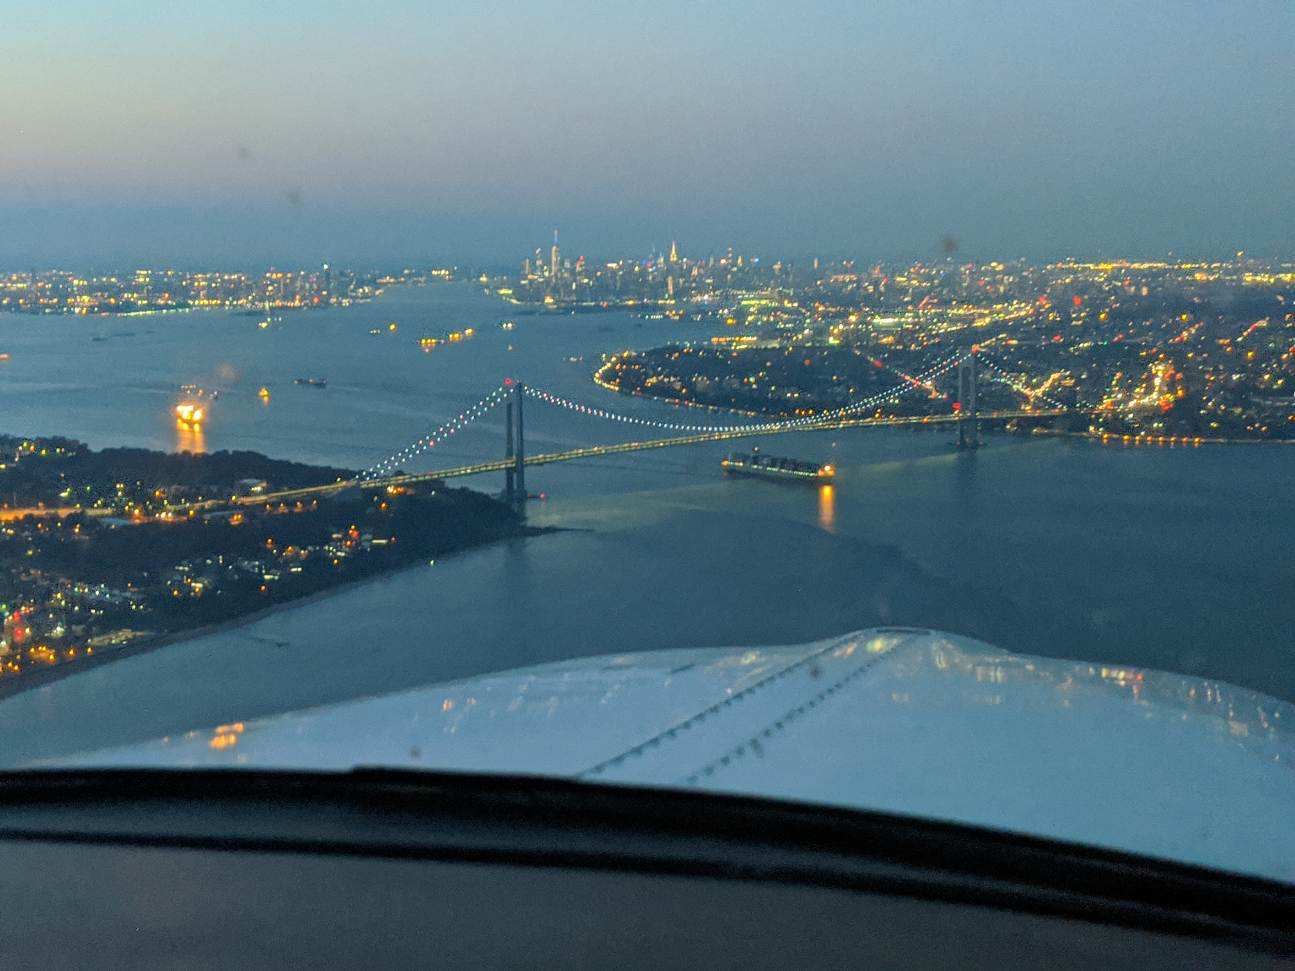
    About to cross the VZ looking north toward the city

    Ever since I moved out to the Philadelphia area, the Hudson River corridor in New York City has become one my favorite places to fly. It’s hard to overstate the beauty of the city from low over the river. Every time I have a family member or friend come to visit, I try and take…

  • 3 Tips to Better Landings

    In my 3,000+ hours of flight training, I have developed some tips and tricks to help people fly better.  With teaching landings, I have 3 specific tips that will make smoother landings every time, guaranteed.

    A Good Pattern

    A wise flight instructor whom I would love to give credit to (but don’t know who it is!) once said that a good landing starts off with a good traffic pattern.  So true!  A good landing all begins with the setup.  This is true for a VFR rectangular traffic pattern or an IFR instrument approach.  Flying the proper speeds and being at the proper AGL altitudes helps immensely in making a good landing. Being at 600 feet AGL on a 1/2 mile final (or the alternative of 60 feet off the ground on a mile final!) makes it hard to make a good landing.

    Proper Use & Understanding of Pitch and Power

    Once flaps are used in the pattern, the plane is now on the back side of the power curve (or in the region of reverse command).  Power is now being used to control the plane’s rate of descent while pitch is being used to control airspeed.  The key is, both pitch and power work together, so if the pilot changes the power, he’ll also need to change the pitch and vice versa.

    The common mistake I see here is when the airplane gets low on final, the pilot tends to (quite naturally) pitch up.  All this does is bleed off airspeed and cause the airplane to sink faster.  The proper input would be to add power, then adjust the pitch for airspeed.

    Look Down the Runway

    Now that we have gotten to the point of the round-out and touchdown, it’s the most important part.  The best thing the pilot can do to make the best landing possible, is to look at the trees at the end of the runway.  When I worked with college students, I told them to find the owl in the trees at the end of the runway.

    The tendency is to stare at the pavement (or concrete) the whole way down to the landing.  When a pilot’s eyes are fixated on the ground, this destroys his depth perception and causes a level off too low to the runway, resulting in a 3 point landing and/or a bounce.

    By looking at the trees at the end of the runway, this gives the pilot much better depth perception and allows him to properly judge where to level off the airplane.

    The question now is when should the pilot start looking at the trees?  My recommendation is crossing the threshold of the runway.  For some, it works better to start looking at the trees when turning final.  Others, right before the level off.  Regardless, find that owl!

    In my 3,000+ hours of flight training, I have developed some tips and tricks to help people fly better.  With teaching landings, I have 3 specific tips that will make smoother landings every time, guaranteed. A Good Pattern A wise flight instructor whom I would love to give credit to (but don’t know who it…

Leave a Reply

Your email address will not be published. Required fields are marked *