Landing Light Replacement

One evening this summer, my wife and I were flying down the southern shore of Long Island in my father’s E33 Bonanza. We enjoyed the sunset as we flew westbound and our plan was to fly the New York Hudson corridor, where we would arrive just after dark. As we approached New York’s airspace, two voices in my head started having a debate.

The first voice said: “You should turn on your landing light when you get to New York to make the airplane more visible.”

The other voice said: “That’s true, but I bet you’ll burn the landing light out”

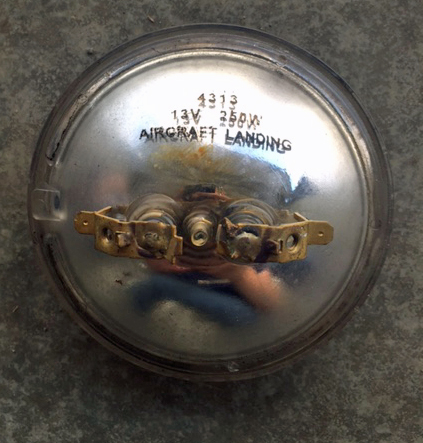
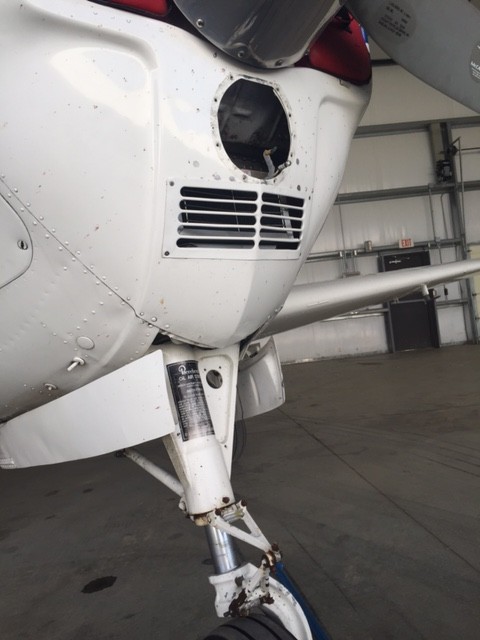
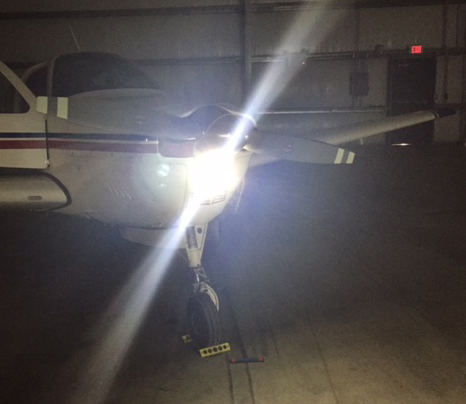
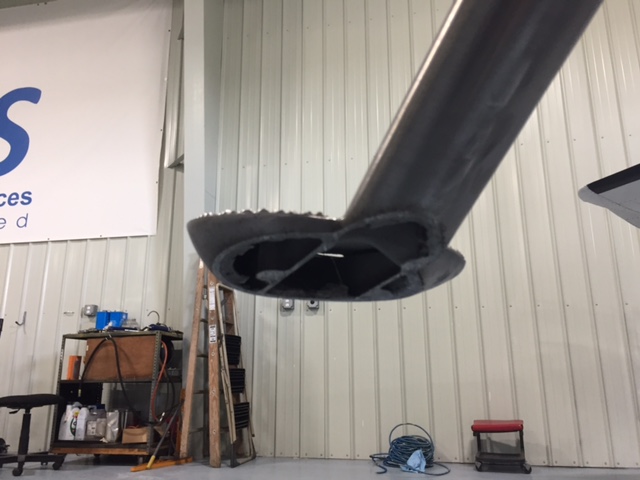
Well, as it turned out, both voices were right. My landing light fired right up when I needed it to fly the Hudson, but when it came time to land back home I had no such luck. Unfortunately, this was not the first time that I had been given the chance to practice my blackout landings. This Bonanza model has only one landing/ taxi light which is mounted in the lower cowling behind the propeller. This location is less than ideal because the filament in the bulb is fragile and can be damaged by engine vibration.

We landed uneventfully and after putting the airplane away, I decided it was time to look into upgrading the lighting to something a little more modern. I was unsure of my options, but seeing as the airplane needed a replacement bulb regardless, it seemed like a good opportunity to make a change.

After doing a little reading, I learned that HID or LED landing lights would be the best solution to my problem. I was familiar with LED aircraft lights, but had never heard of HID before.

Here is what I learned:

HID Landing Lights

HID, or High Intensity Discharge landing lights, create light by arcing electricity through a sealed gas capsule. They are brighter than LED and traditional incandescent, and the light created more closely resembles the look and feel of sunlight. HID installations require a ballast to carefully regulate the flow of electricity to the gas capsule and also require a “warm up” period after being turned on in order to reach their full brightness.

Fitting an aircraft with HID landing lights tends to be more expensive and time consuming than installing an LED light and would likely require involvement by an A&P/ IA. However, if you want the brightest light available, HID is probably the best bet.

Pros

  • Brighter, more natural looking light
  • Draws less power than standard bulbs
  • Long bulb life
  • Does not generate much heat

Cons

  • More expensive than other lighting options
  • Lights must “warm up” after being turned on
  • Cannot be pulsed easily
  • Cost/complexity of installations

LED Landing Lights

LED, or Light Emitting Diode landing lights, have no filament and work by moving electricity through diodes which are connected into a circuit. These lights have become very popular for many uses due to their simplicity, low cost, and brightness.

While not as bright as HID light, the LED lights require no “warm up period” and can be easily pulsed. LED lights draw much less power from the aircraft’s electrical system than traditional bulbs and boast incredible life length. LED bulb installation is very simple and can often serve as a direct replacement for the original lights.

Pros

  • Instant light (no warm up)
  • Incredible life length (>5,000 hours)
  • Low Cost
  • Simplicity of installation
  • Can be pulsed easily
  • Low power draw

Cons

  • Not as bright as HID lighting


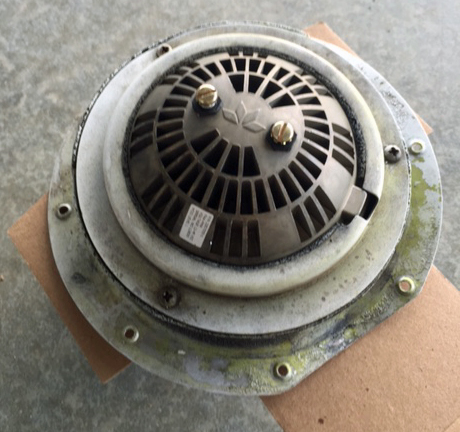
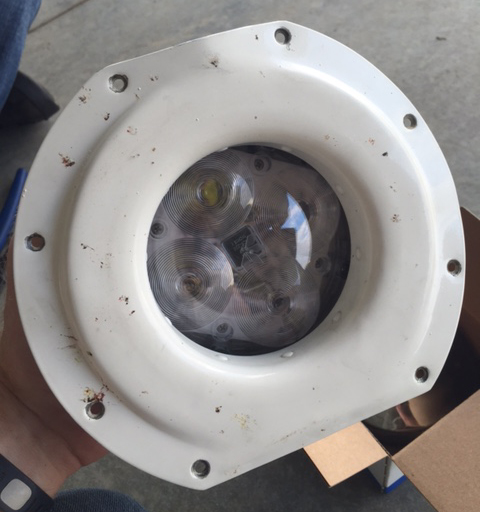
After weighing the options, I decided to replace the incandescent bulb in the Bonanza with an LED bulb. I read the reviews online and talked to some of my friends who work in aviation and eventually decided on the Lycoming Alphabeam. The Alphabeam is FAA/PMA approved and is available through Aircraft Spruce and other aviation parts vendors. The bulb cost around 250-300 dollars and I was able to install it as a direct replacement for our old light. All I had to do was take the old one out, put the new one in, and make a logbook entry.

Below are some pictures of the installation:
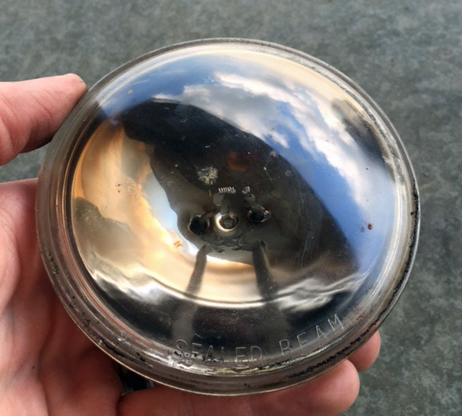
Last weekend I finally had an opportunity to take the airplane out after dark and see how the new light compared to the old one. I am pleased to say that it did a wonderful job and exceeded my expectations.

If you are interested in seeing a side by side comparison of the different lighting options, a quick Google search should provide what you are looking for. In my own experience, I would say that the LED light was brighter than the old light and did a very good job illuminating the taxiway and runway. It was extremely nice not to be concerned that my light wouldn’t work as I was setting up for landing at an unfamiliar field after dark. I also enjoyed feeling that I had the option to leave it on during climb and cruise in order to increase my visibility to other aircraft.

Many models of aircraft have multiple landing/ taxi lights installed which greatly reduces the likelihood of having to land without one. In our case, spending the extra money to upgrade to the LED bulb made sense because of the desire for increased reliability. If you are looking for a relatively inexpensive way to upgrade your airplane, LED or HID lighting may be something to consider.

Andrew Robinson is a 135 Charter Pilot and flight instructor who lives with his wife and 2 daughters in Pennsylvania.  He flies Pilatus PC-12s and instructs in Beechcraft Bonanzas.

Similar Posts

  • Piper PA46 Maintenance Shops

    Sometimes, it’s hard to find a good shop that does quality work and communicates well without charging a fortune. Luckily for the PA46 owner, there are lots of good options. Here are the Texas Top Aviation recommended Piper PA46 maintenance shops.

    Lubbock Aero (KLBB)/Abilene Aero (KABI)-Texas

    Lubbock Aero and Abilene Aero are owned by the same company. Both are Piper service centers. I have had some Piper PA46 maintenance interactions with Chad at Lubbock Aero over the last year and have been impressed.

    The folks at Lubbock Aero are friendly, knowledgeable, and keep the customer abreast of what’s going on with their airplane. I haven’t been to Abilene Aero, but I suspect that the same quality of service exists there as well.

    Chuck’s Aircraft (KEDC)-Austin, TX

    Chuck’s Aircraft has been a Cirrus Service Center for a number of years. Recently, Chuck’s put several mechanics through Kevin Mead’s M-Class which educates mechanics on the ins and outs of Piper PA46 maintenance. Chuck’s is a great, convenient spot to get your PA46 worked on.

    First Line Aero (KJSO)-Jacksonville, TX

    Located on the same airport as Casey Aviation, First Line Aero specializes in Piper PA46 maintenance. Walking up to their hangar, it’s loaded with Malibus, Mirages, JetProps, and Meridians. Charles Crossman, the owner, has been turning wrenches for a lot of years. Anyone recommended by Joe Casey has a stamp of approval in my book.

    Midwest Malibu (KHUT)-Hutchinson, KS

    One of 2 nationally renowned PA46 shops, owners bring their PA46s from all over the country to Midwest Malibu. Owner Tony Beauchamp has personally assisted multiple of my customers when they have gotten in AOG situations with their PA46s.

    Des Moines Flying Service (KDSM)-Des Moines, IA

    I have not had any direct interaction with Des Moines Flying Service, but I have several customers who have. The reviews have all indicated knowledgeable mechanics, good work, and good communication.

    Malibu Aerospace (KANE)-Blaine, MN

    Malibu Aerospace (the second nationally renowned Piper PA46 maintenance shop) has done many great things for the PA46 line of aircraft. From the M1 Cooling Mod that alters the lower cowl and add baffles for cooling air getting to where it needs to go, to the M5 TSIO 550C upgrade for the original PA46-310P, the Malibu Aerospace guys know what they are doing with the PA46.

    Hetrick Aviation (KTOP)-Topeka, KS

    I recently learned about Hetrick Aviation in Topeka. I met a customer there to pick up his plane where it was having a pre-buy and annual done. Keith Hetrick, the owner, has worked on a lot of PA46 airplanes and was very knowledgeable in my discussions with him. He is also a pilot, so he flies each airplane after maintenance is done to make sure no bugs are present when an owner picks it up.


    Those are the Texas Top Aviation recommended PA46 shops. Have another one to add? Post in the comments below and we’ll get it added to the list.

  • Garmin Smart Glide

    Recently, I was training a customer who had a brand new instrument panel installed in his TBM 700. The avionics shop that did the work (Abilene Aero, who I highly recommend for any panel installs, located at KABI) told us when we picked the plane up that the new Garmin GTN 750Xi had the most recent software update, which included the Garmin Smart Glide.

    I had never used the Garmin Smart Glide before, so I was eager to check it out during our training. When we got to engine failures, we pushed the Emergency button on the Home page of the GTN 750Xi, and then the magic happened.

    The plane was also equipped with a Garmin G600TXi PFD and the Garmin GFC 600 Autopilot. In order for Smart Glide to work, there has to be either a GTN 750Xi or GTN 650Xi installed, along with a G500TXi or G600TXi and a Garmin Autopilot. Garmin is working on getting the legacy G500 as well as the GI 275 and G5 to work with the above GPS units for Smart Glide as well.

    Here’s what happens. The plane loses it’s engine. The pilot’s workload and stress level suddenly goes way up. Trim the airplane for best glide, find the nearest airport, attempt restart. Do it quickly so you have time to focus on the glide. Oh yeah, squawk 7700 and declare your emergency. All the while plummeting toward the ground in a somewhat controlled crash. Yikes.

    Garmin Smart Glide takes over the flying part, allowing the pilot to handle the restart, while making it much easier to squawk, talk and plan the engine out landing. On the home page of the GTN 750Xi/650Xi, the pilot simply taps the Emergency icon on the bottom of the screen. The Autopilot comes on and goes into IAS mode and maintains best glide while descending. The GPS immediately analyzes the Glide Advisor, and turns to the nearest airport in the glide ring (if there is no airport within gliding distance, the GTN 750Xi advises the pilot). Then, the Autopilot flies directly to the Nearest airport, allowing the pilot the ability to take attempt a restart.

    Once it is determined that the engine won’t start, the Garmin Smart Glide has excellent situation awareness tools. On all screens, the pilot is constantly being advised of how high AGL the plane is currently, while advising also of how high AGL the plane will be over the airport that the glide is set up for. There is also a short cut on the screen to tap to squawk 7700 as well as runway length information at the airport.

    The Garmin Smart Glide Button wasn’t installed yet in the TBM, but that will make things even easier when it is (it will be certified in January). This is amazing technology that all Garmin GTN 750Xi pilots should have their software updated to. Remember, you have to have a Garmin Autopilot and a Garmin PFD for it all to work.

  • Jeppesen vs. Aeroservices Charts

    Many people ask, which set of charts is better? Should I use the FAA Aeroservices charts on Foreflight or pay extra for the Jeppesen charts? Since you have to pay for Jeppesen, they are probably better, right?

    I am not here to say which one is better as a chart preference is just that, a preference for one over the other or for certain features. After a while, muscle memory and routine take over and you probably wont even notice the difference.

    History

    In 1934, Elroy Jeppesen began making his own charts and sold them to other pilots. His little company grew into the giant Boeing chart company we know today. Jeppesen charts are used internationally and therefore include information that might otherwise seem common knowledge, like transition altitudes. The key is, you cannot get FAA Aeroservices charts for international destinations. Jeppesen is the only option for outside the US.

    National Aerospace Charting Office (NACO), or the new(er) name “Aeroservices” or FAA chart, whatever you decide to call them, are United States government issued charts. In addition to civilian use, Aeroservices charts are used by the military so there will be some terminology that does not apply to civilians. The best part about FAA Aeroservices charts are… they’re free!

    If you are in the middle of a transition or trying to decide which charts to use, you have come to the right place. Here are a few key differences.

    Obstacle Departure Procedure Chart
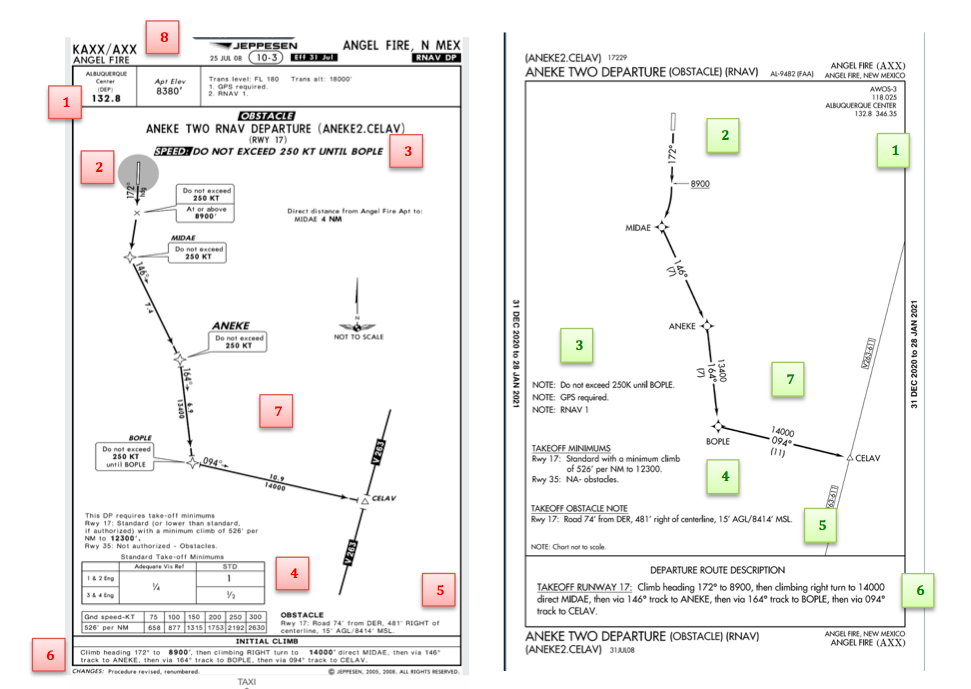
    KAXX (Angel Fire, New Mexico) ODP

    1. Frequencies: FAA Chart provides the AWOS so you have all departure frequencies in once place.
    2. Airport: Jeppesen highlight the airport, which is a nice feature so you can easily see the flow from the airport.
    3. Notes and Remarks: Jeppesen bolds the speed restriction all over the chart so you won’t miss it. All other requirements are in the top right corner. Note the transition altitude 18,000′. Since Jeppesen is used internationally, it is published on the chart since other countries have different transition altitudes. It takes up a chunk of chart real estate, but it’s clear, easy to read, and always in the same place. The FAA charts post all the requirements and restrictions as notes off to the side. Since it’s in the same space as the chart graphic, it’s easy for the eyes to catch while studying the plate.
    4. Take off Minimums: NOT APPLICABLE for PART 91 – however, it’s wise for all pilots to look and abide by them. Jeppesen displays the standard take off minimums table, as well as the rate of climb table, which is nice to have all in one place. The FAA chart gives the non standard information but you need to know/look up the rest in the Digital Terminal Procedures Supplemental document. (Hint: It’s in the Documents section of Foreflight)
    5. Take Off Obstacles: About the same on both charts
    6. Route Description: Similar on both charts, but larger font and clearer description on the FAA chart. When there are different routes from different runways, the FAA chart layout is really helpful.
    7. Graphic Layout: Jeppesen and FAA use the same graphics for all their different charts and plates which makes it easy to read once you are familiar with the respective charts. FAA charts are easy to read and distractions are kept to a minimum. Jeppesen charts make things bold and enlarge pertinent information so you won’t miss it.
    8. Airport altitude: This is only on the Jeppesen chart (the FAA chart doesn’t include it), but it is very helpful for situational awareness. As you brief the arrival altitudes, I think it’s important to have an idea what AGL you are at.

    Approach Charts

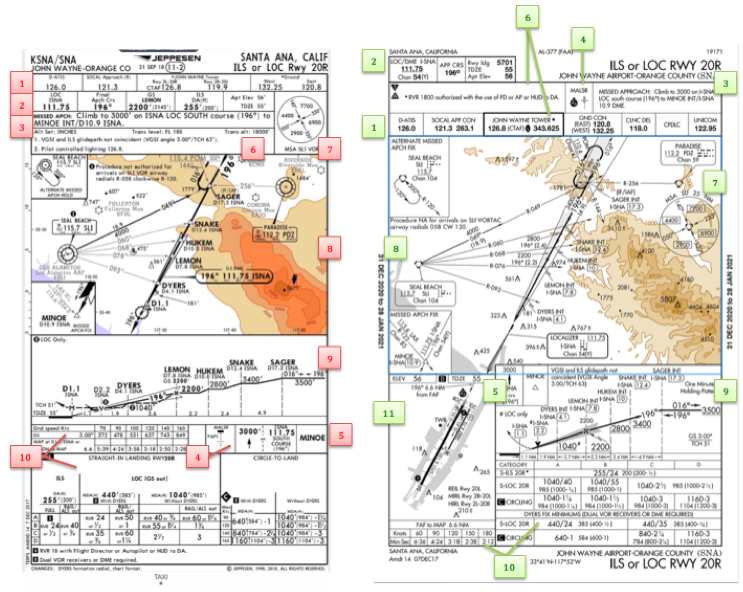
    One thing pilots love about Jeppesen approach charts is the clear set up for an approach brief. The top section is created as a “briefing strip” starting with the frequencies, then navigation frequencies, minimums, airport elevation and the missed approach. It’s very natural and user friendly.

    FAA charts have a slightly bigger picture of the approach planview, but the profile view and minimums section can get a bit cluttered. It can feel a little discontinuous when briefing the approach to bounce all over the page. However, some pilots really like the small airport diagram in the corner, which I find really helpful for situational awareness (particularly for students learning circle approaches). Non- standard alternate and takeoff minimums are also clearly noted, but unfortunately we must hunt elsewhere to find them. The Jeppesen alternate minimums and takeoff minimums will both be on the airport diagram

    1. Frequencies: Getting weather and tuning radios is easy on the Jeppesen charts – just follow the briefing strip. The frequency section on the FAA charts is still easy to read, but closer to the center of the page. It’s split up from the nav frequencies and other important briefing information.
      a. FAA charts are created by the government and have military specific information, which are the odd looking frequencies and channels on the chart.
    2. Approach Navigation: On a Jeppesen chart, you will continue to the next line to verify your frequency, course and set minimums (assuming you are straight in on the ILS). On the FAA chart, you will then have to skip to the top of the chart to get the frequency and course, and then scan to the bottom of the page to input your minimums. However, since you could be flying a localizer approach or a circle to land, it’s a good reminder that not everyone using this approach chart will be using the same Decision Altitude (DA). The FAA chart also includes runway distance information so pilots can make determinations of approach speeds and stopping distance if the runway is wet or icy.
    3. Missed Approach – Textual
    4. Approach Lighting
    5. Missed Approach- Graphical: The missed approach information is the same on both charts. The lighting information is key for determining a missed approach and is next to the missed approach text on the FAA chart. It’s found next to the missed approach graphic on the Jeppesen chart. Personally, I find it easier to find and read the lighting information on the Jeppesen chart. Remember, on both charts, the placement of the PAPI on the chart indicates the physical location of the lights (left or right of the runway).
    6. Notes: Both charts have a notes box, but they use them a little differently. Once again, remember that Jeppesen charts are used internationally and include the transition altitudes and altimeter setting info. On both charts, the notes section will be where other critical information will be shared which isn’t really applicable for this airport. On the FAA chart, the tower frequency is starred to note that there are operating hours (you’ll have to check the chart supplement AF/D to find out what those hours are). There is also an L next to the frequency to indicate it is the pilot controlled lighting frequency. You will also find the note about the VGSI and the Approach Glide path next to the profile view on the FAA chart, whereas the Jeppesen chart has that note in the notes section at the top. The FAA chart also has the T and an A in black triangles to note that this airport has non- standard alternate and take off minimums. Again, those are found in separate documents when using FAA charts and on the Airport Diagram when using Jeppesen charts.
    7. Minimum Sector Altitude: Similar on both charts, but in different locations (reminder: ATC vector altitudes may be lower. It is the pilot’s responsibility for safety of flight to maintain safe obstacle clearance, so if you are ever concerned about going below the MSA – just ask ATC).
    8. Planview: Other then differences in size, visuals, and text, the information displayed on both is very similar.
    9. Profile View: Again, the displays look different and pilots will have their preference, but the information is the same.
    10. Minimums: Jeppesen charts not only note the category for each approach with its designated letter, but also displays it in knots. It is recommended that if you increase your approach speed (based on flaps or gusty winds or perhaps a faster speed for a circle to land approach) that you should use the higher category minimums. The reference guide makes that easy to look up. The other benefit of the Jeppesen charts is right the table that contains the time from the final approach fix to the missed approach point for a localizer approach, it also shows the rate of descent with the associated ground speed to maintain a 3 degree glideslope. Now there is no excuse not to set pitch and power! The minimums posted in parenthesis are for the military, but RVR in statute miles is also included.
    11. Airport diagram: Only on the FAA charts, this particular feature is particularly useful for situational awareness. The arrow pointing to the runway shows the direction the approach is arriving from so planning a circle to land is a cinch. There is also a lot of other information that can be gathered from the airport diagram for quick reference or to help a disoriented pilot: lighting, displaced thresholds, closed taxiways, and runway placement and lengths. This is easily one of the best perks of an FAA chart.

    Arrival/ Departure Charts: Sewzy 5 Arrival KAUS

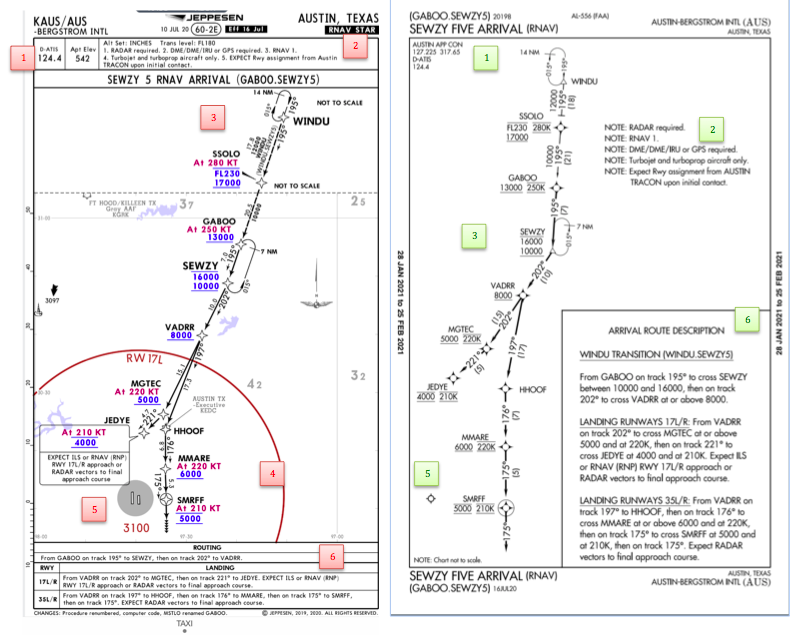
    The Jeppesen lay out is very attractive and draws the pilots eye in a clear way to all the important information. The colors pop out, so the required altitudes and speeds are easy to read and remember. The chart, which is the proper scale, shows MORAs , easy to find airports (and runway layouts) and is over all easy to follow. However, the texts, while very clearly laid out, are small and difficult to read and pushed to the very edges of the chart. FAA charts are simple and fairly easy to read, but the airports are not as obvious and the flow to the airport requires a good look. The table on the Jeppesen chart is a really nice format, but the text and Notes for arrivals on the FAA chart are easy to find and much easier to read quickly.

    1. Frequency: FAA charts include the approach frequency on the arrival, which is helpful for having radios tuned. During a busy time when the controller changes your frequency, all you have to do is verify the frequency you already set, rather then totally stop what you’re doing to switch it. The Jeppesen charts add the airport elevation next to the ATIS, which really aids situational awareness.
    2. Notes: Jeppesen notes are clearly numbered and tucked away nicely in a box, but the FAA chart notes pop out in the middle of the page and are easy to skim for pertinent information.
    3. Planview: I think Jeppesen is the clear winner here- it is so easy to read, it only takes one glance to know where the primary airport is and how the arrival flows. The chart being at the proper scale offers the pilot important geographical information and over all is a clean look. Notice the small series of arrows after SMRFF on the the Jeppesen chart; those indicate the pilot should expect radar vectors. The FAA charts include those instructions in the text, but I find the visual reference on the chart helpful. The FAA charts are equally clean, with altitude and speed restrictions easy to read even if they don’t jump out. When there are multiple airports that the arrival serves, the airports are clearly marked, though, I think it would be nice to have a little more information surrounding the primary airport for better situational awareness.
    4. MSA: only on the Jeppesen chart
    5. Primary airport: The runway alignment and grey highlight on the Jeppesen chart stands out very clearly, while the FAA airports are a little more obscure.
    6. Arrival route description: The table on the Jeppesen chart is easy to follow but the text is very small and pushed to the bottom. The route description is much easier to find and read on the FAA chart.

    Airport Diagram

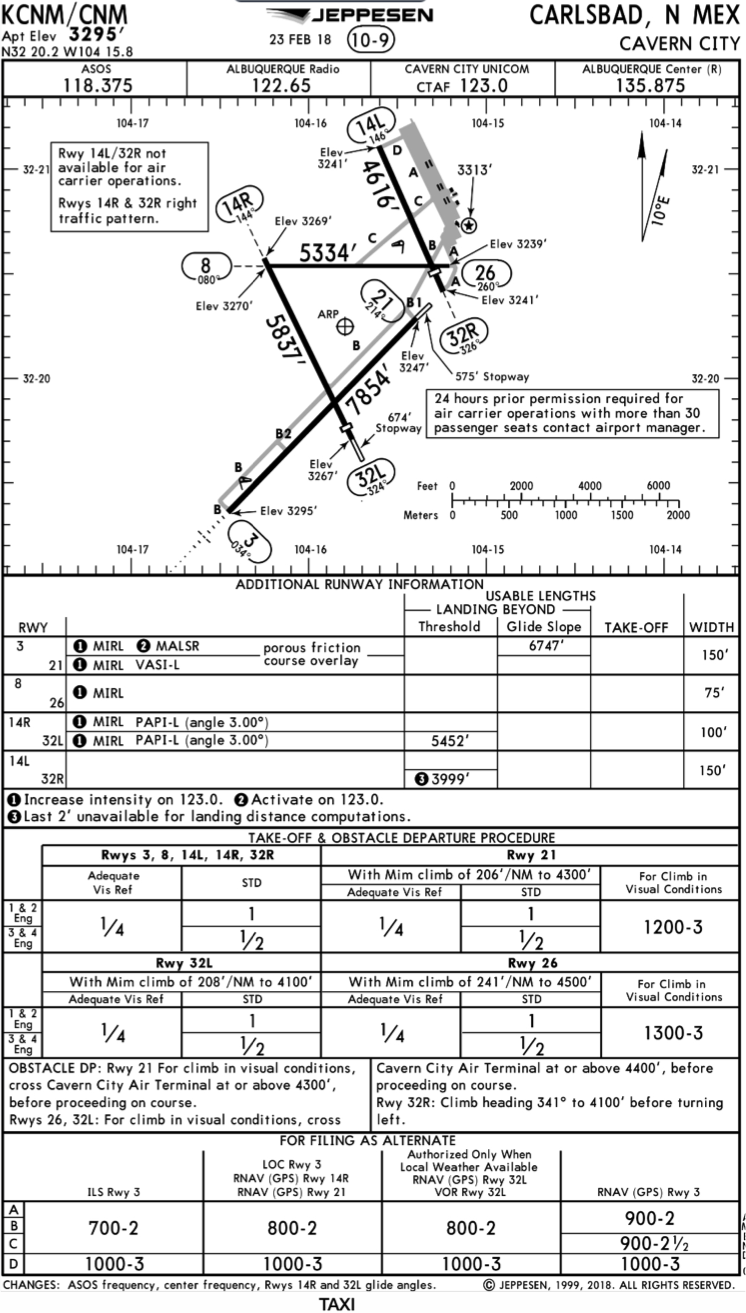
    The Jeppesen Airport Diagram page has it all: frequencies, airport diagram, runway info, take-off minimums, departure procedures and alternate minimums. It’s a one-stop shop. It makes preflight planning easy when its all at your fingertips.

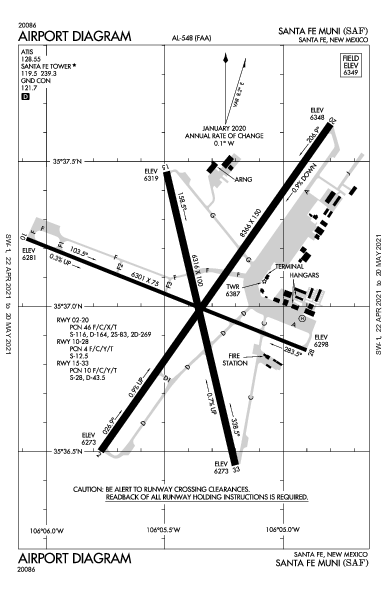
    The FAA charts usually require a little more searching for different pieces of airport information. The Airport Diagram itself is just the airport layout. Above, you will see a simple FAA Airport diagram. It’s clean and simple, perfect for a knee board print out.

    In the flight planning process, as you look at what approaches you will be using for the airport, you might see an A or T inside a triangle. Those indicate that you will need to look in the Alternate Minimum or Take off minimum documents for more information. The Takeoff Minimums document (see below) is also where you will find any obstacle departure procedures for that airport. Apps like Foreflight help you out by posting the take off minimums under the departure tab. Even though it’s a little more difficult to read, I didn’t crop out the airport information so you can see what it looks like in context.

    FAA Alternate Minimums on the Left and Takeoff Minimums and Obstacle Departure Procedures on the Right
  • Non-Standard Alternate Minimums

    When filing an IFR flight plan, part of the process is determining whether or not an alternate airport is required.  An alternate airport is required when the following conditions exist(as is outlined by the FAA in 91.169 (b)):

    The weather conditions at the destination airport

    • From 1 hour before your arrival time to 1 hour after your estimated time of arrival, the weather conditions are forecast to be below
    • 2,000 Feet AGL and/or
    • 3 statute miles visibility

    Let’s paint a scenario.  You are traveling from KSAT (San Antonio International Airport) to KHBV (Jim Hogg County Airport in Hebbronville, TX).  You start to file your flight plan and get down to the space where you put your alternate in.  Since Laredo (KLRD) is the closest airport with a TAF, you check Laredo’s TAF and see that the forecast conditions there at your ETA are ceilings 1,500 and visibility of 2sm.

    Based on this information, you need an alternate airport.  Now, the process of finding one.  In Part 91.169 (c), the forecast conditions at the alternate airport must be at or above:

    • 600 Feet AGL and 2sm visibility for a precision approach, or
    • 800 Feet AGL and 2sm visibility for a non-precision approach

    Alright, now we have some guidance.  Laredo is the nearest airport to KHBV, and we know the forecast from the above TAF showing the conditions are forecast to be above the alternate minimums outlined in Part 91, so let’s pick Laredo.  All done?

    Not quite.  A lot of airports have Non-Standard Alternate Minimums.  How do you figure out if they do?  The easiest way is to look at any approach plate for the airport.  In the notes section of the government plates, there will be a black triangle with an A in it.  That means there are non-standard alternate minimums published for that airport (in layman’s terms, different than the ones stated above in Part 91).

    ILS 17R KLRD

    Now the question is, where do you find those non-standard alternate minimums?  On Foreflight:

    • Go to the Airports page
    • Tap the Procedures button
    • Tap the Arrival button
    • Tap the Alternate Minimums option

    This brings up the IFR Alternate Minimums document for all the airports with non-standard alternate minimums in that area.  Scroll through to find Laredo.

    Non-Standard Alternate Minimums

    As you can see, there are several notes there concerning the different approaches into Laredo.  For our example, we’ll say the winds are out of the south and we are planning on flying the ILS 17R if we cannot get into KHBV and have to come to Laredo.  The note there is that the Alternate Minimums for the ILS 17R are actually 700 AGL ceilings and 2sm instead of the above state 600 AGL ceilings and 2sm, the procedure is NA if the tower is closed, and NA if the local weather isn’t received.

    What does this tell us?  If the forecasted ceilings at Laredo were below 600 AGL instead of 700 AGL, we would not be able to use LRD as an alternate airport if we were planning on flying the ILS 17R.  The RNAV approaches are all fair game, so a GPS equipped aircraft would have no problem.

    On top of that, some approaches at a certain airport are not authorized to be used in the case of the airport being used as an alternate.  At the Galveston airport (KGLS), the ILS 14 is NA as an alternate procedure, but all the RNAV approaches are available.


    Picking an alternate seems simple at first, but there are actually a lot of things to consider in the process.

    Need help remember all this stuff?  AOPA has put out a kneeboard sheet that helps all IFR pilots remember those important things when it comes to IFR flying.  Check it out here.

  • Stephanie Mertz Joins Texas Top Aviation

    Texas Top Aviation has added a new member to our instructing team. Stephanie Mertz was hired in March 2019 and will be specializing in G1000 & Instrument instruction.

    Stephanie graduated from LeTourneau University in Longview, Texas with a degree in Aeronautical Science, earning her commercial single and multi ratings while there. She began her aviation career in Ontario, California flying a Pilatus PC-12 for charter and medical trips. While operating the PC-12, she gained valuable experience flying all over the US and Mexico.

    In 2013, Stephanie moved back to East Texas with her husband where she worked as a contract pilot flying a variety of Citations as well as a Falcon 10. A few years later, she became involved in her local Ninety-Nines chapter and joined their mentorship program.

    After earning her CFI, CFII, and MEI, Stephanie returned to her alma mater to pass on her flying passions to college students through flight instructing. After a year of teaching at LeTourneau, she and her husband, with their first baby in tow, moved to the Austin area. Now she is instructing with Texas Top Aviation while acting as a mentor for other women working on achieving their flying dreams.

  • Embraer Legacy 450

    Brazilian manufacturer Embraer recently received FAA certification for it’s “mid-light” Legacy 450.  Capable of Mach .83 and a 2,500 mile range, this is one sweet airplane.  Embraer designers gave passengers headroom as the cabin stretches up to 6 feet in height down the center.  Complete with fly by wire controls and a full glass cockpit configuration, Embraer did a wonderful job with this airplane.  The club seats even fold down to a bed!

    The airplane’s list price is $16.5 million.  To learn more about the Legacy 450, visit Embraer’s website.

    Embraer Legacy 450

Leave a Reply

Your email address will not be published. Required fields are marked *