Takeoff briefings are one of those things that most pilots are taught when they first learn how to fly, but once they get into flying themselves around, quickly fall by the wayside. There is a reason student pilots are instructed to perform a takeoff briefing before departure. It gets them thinking about what the plan is after they get off the ground and what to do if something goes wrong.
Takeoff briefings are a good habit to get into. Airline crews do a takeoff briefing before every departure, even though they have performed a takeoff in that particular airplane thousands of times. It enhances safety and provides repetition, keeping that knowledge at the forefront of the crew’s minds.
In general aviation, a takeoff briefing should cover what the takeoff procedure is, what the abort plan is, and what the plan after takeoff is.
Takeoff Procedure
Most pilots fly the same airplane all the time, so the familiarity with what goes into a takeoff is there. But, habits should be formed to brief the takeoff procedure as part of the takeoff briefing. It doesn’t need to be extensive, just covering the basics of how the airplane is getting off the ground. Something like this:
Throttle setting (if turbo charged, will full throttle cause an overboost?)
Rotate speed
Expected takeoff roll
That’s it. Nothing fancy for the takeoff procedure.
Abort Plan
What is the plan if something goes wrong? It doesn’t have to be an engine failure, maybe the engine coughs when full power is added or maybe the engine doesn’t produce peak RPM. Maybe the takeoff roll is longer than anticipated and something doesn’t seem right. Maybe on climb out a door pops open. Maybe the engine fails at 1,000 feet. It’s good to keep the plan in the foreground for what to do if an abnormal or emergency situation takes place.
Brief the aborted takeoff procedure
Pick an abort point on the runway based on the expected ground roll
What is the procedure if the airplane isn’t off the ground by then?
What is the procedure if the engine quits on the runway?
Brief the engine failure procedure at low altitude
If the engine fails over the runway, will you try to land on the runway?
What altitude would you elect to turn back as opposed to landing straight ahead?
If the plane is too low to turn back, would you land straight ahead or aim left or right?
What airspeed will you aim to hold if the engine fails?
In a Cirrus, what is your minimum parachute deployment altitude?
After Takeoff Plan
After the airplane is off the ground, what’s the plan then? Are you staying in the pattern or departing the area? Do you need to adjust your power at a certain altitude? What altitude are you climbing to? What heading are you going to fly? Is your flight plan in your GPS? This is an excellent time to set up altitude and heading bugs if your airplane is so equipped.
Get in the habit of doing a takeoff briefing before you call the tower or announce your departure. It get’s your mind focused on the task at hand and then what is going to be happening next.
It’s winter time, so that means winter weather for the aviation community. For single engine piston pilots, that means dealing with icing conditions. For us Texan flyers, ice only presents an issue for maybe a week out of the year (the exception being for those Panhandle residents!), but it’s nice to have some protection.
Most single engine pistons do not come with ice protection from the factory and, of those that do, most are not Flight Into Known Icing (FIKI) approved. The systems are “get out of jail” systems that can reduce the amount of ice you pick up if you accidentally get into icing conditions and you are on your way out. The Cirrus SR22 line of aircraft has had the TKS system option since 2006, with the new FIKI system being available since 2010. The Cessna TTx has a FIKI option that was debuted in 2014.
The above mentioned airplanes use TKS systems. There are a handful of single engine pistons that use boots that are FIKI certified: the Piper PA46 line (Malibu, Mirage, and Matrix) and the Cessna P210 and T210 line (though not all are equipped with boots).
If you find yourself flying into wintry conditions often and want some protection for your clean wing airplane, there are some aftermarket options for a lot of airplanes now. Do note that all these systems do come with a pretty hefty price tag, but can be worth it if you fly into icing a good bit.
CAV Ice Protection TKS Systems
CAV Ice Protection is a TKS system outfitter. What is TKS fluid? According to Flying Magazine:
“TKS systems dispense an ethylene glycol-based fluid with a freezing point below minus 70 degrees F through porous titanium panels attached to the leading edge of the wing and empennage. The fluid is released through thousands of the panels’ laser-drilled holes, which are not much larger than the size of a human hair. As air flows over the wing and empennage, it disperses the fluid, coating the surfaces, and preventing the formation and adherence of ice.”
The advantages of a TKS system are the whole entire wing gets coated to get rid of any extra ice that adheres to the top or bottom of the wing surface. The disadvantage is there is only a finite amount of fluid, so when it runs out, you don’t have any more protection. The fluid also adds extra weight agains the useful load of the airplane.
CAV Offers a Basic TKS system for the following single engine piston aircraft:
Beech Bonanza
Cessna 182, 206, 210, 350, & 400
Columbia 350 & 400
Piper PA32
Mooney M20
CAV Offers a full FIKI System for the following single engine piston aircraft:
Ice Shield is another after market de-ice option. Ice Shield makes boots for wing leading edges. The advantage of boots is they activate instantaneously, getting rid of ice where it builds up first, on the wing leading edge. No running out of fluid and only the added weight of the system. Ice Shield also offers heated windscreens for several the Piper Saratoga line and the A36, B36, and G36 Bonanza line.
Ice Shield has boots for the following single engine piston aircraft:
One other company, Kelly Aerospace, makes an electric leading edge de-icer called the ThermaWing for the Cessna/Columbia 350/400 line. You can read a review of the ThermaWing here, or check out Kelly Aerospace’s website.
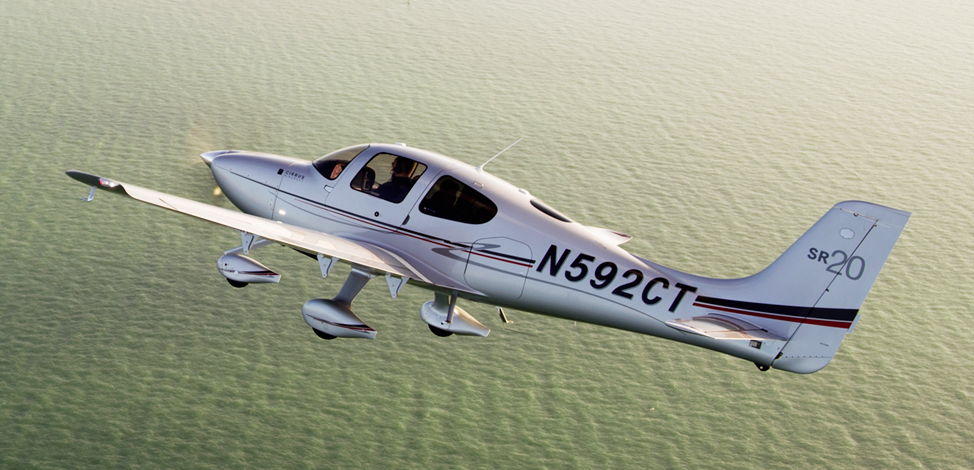
Ever wanted to be a Cirrus owner, but the economics of being a single owner just don’t make sense for you? If you’re in the San Marcos/New Braunfels/Austin area, you now have a chance to join a Cirrus SR20 partnership at the San Marcos Municipal airport, KHYI.
The Cirrus SR20 partnership group is looking for 2-4 more members to buy in to a 2006 or 2007 Cirrus SR20 GTS. The plane will be kept at KHYI and the group already has a hangar for it.
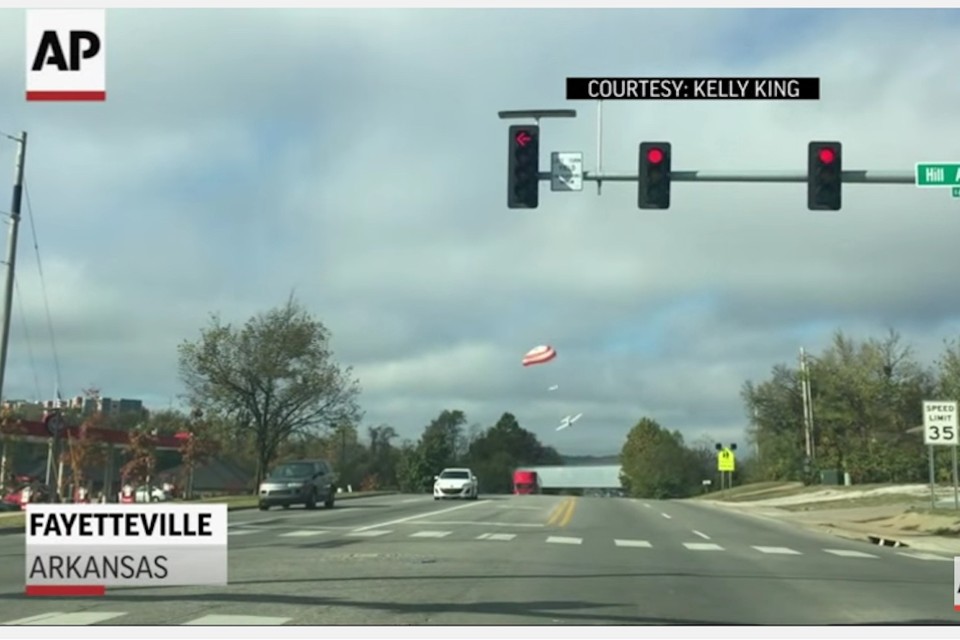
Cirrus CAPS pull #55 took place at the beginning of November over Fayatteville, AR. From initial reports, it appears a clamp broke on the oil cooler, causing a loss of oil pressure. It does not appear that the engine immediately quit, but an annunciator alerted the pilot that the engine was losing oil pressure. At this point, it appears the pilot elected to do an emergency descent to an airport below him, but ended up not timing it right, missing the airport and pulling the parachute.
As an experienced Cirrus flight instructor, there appears to be some suspect decision making in handling this operation. I teach in a Cirrus that if an oil light comes on, given that a pilot has some altitude to work with, it is a better option to physically shut the engine down, leaving control of the situation in the pilot’s hands. This way, the pilot knows when the engine is stopping and is prepared for it, instead of the engine acting erratically and causing problems on the descent.
After checking the engine gauges and shutting the engine down, a pilot should establish best glide first, not nose down and descend at a high rate trying to make an airport. Best glide gives the pilot many more options and a lot more altitude to work with, further allowing him/her to plan how to make an airport directly underneath the airplane.
To pontificate, it seems that if the pilot had adjusted the plane to best glide, instead of performing an emergency descent, there is the possibility that Drake Field would have been reachable, the chute would not have been needed, and the driver of the truck would not have had to visit the hospital. Hindsight is 20-20, but this may be an overall training and decision making issue that may need further emphasis.
The initial NTSB report as well as a link to the CBS story is below.
NTSB Identification: CEN16LA026
14 CFR Part 91: General Aviation
Accident occurred Tuesday, November 03, 2015 in Fayetteville, AR
Aircraft: CIRRUS DESIGN CORP SR22T, registration: N857SW
Injuries: 3 Minor, 1 Uninjured.
This is preliminary information, subject to change, and may contain errors. Any errors in this report will be corrected when the final report has been completed. NTSB investigators may not have traveled in support of this investigation and used data provided by various sources to prepare this aircraft accident report.
On November 3, 2015, at 0950 central standard time, a Cirrus SR22T airplane, N857SW, descended under the canopy of the cirrus airframe parachute system (CAPS) and landed on a road in Fayetteville, Arkansas. The pilot, pilot rated passenger and one person on the ground received minor injuries. One passenger in the back right seat was uninjured. The airplane was substantially damaged. The airplane was registered to WG Aviation LLC, Rogers, Arkansas, and operated by a private individual under the provisions of 14 Code of Federal Regulations Part 91 as a personal flight. Visual meteorological conditions prevailed at the time of the accident and an instrument flight rules (IFR) flight plan was filed. The flight departed from the Bentonville Municipal Airport (VBT), Bentonville, Arkansas, at 0934 and was en route to the Waco Regional Airport (ACT), Waco, Texas.
According to the pilot, after departure from ACT he leveled off around 10,000 ft mean sea level (MSL) and was in “VFR on top” conditions. The pilot noticed that the crew alerting system (CAS) flashed a yellow caution light for oil pressure; the engine was still producing power. The pilot notified air traffic control (ATC) of the issue and received vectors to the nearest airport, Drake Field Airport (FYV), Fayetteville, Arkansas. The pilot descended and maneuvered toward FYV as the CAS indicated a red warning light for oil pressure, which had dropped below 10 psi. The engine was producing inconsistent power as the airplane descended to 3,300 ft and FYV was still not in sight due to cloud coverage. The pilot was unable to maintain altitude and the airplane’s stall warning horned sounded. The pilot deployed the Cirrus airframe parachute system (CAPS) and descended to the ground. During the landing the airplane collided with a truck and then came to rest on a four lane road.
At 0953, the weather observation at FYV reported wind from 190 at 9 knots, gusting to 17 knots, 10 miles visibility, clear sky, temperature 61° F, dew point 57° F, and altimeter setting 30.11 inches of mercury.
An initial postaccident examination was conducted on November 4, 2015, in Fayetteville. Engine oil was observed on the underside of the fuselage. The oil cooler cross fitting was broken and oil was observed in the engine compartment.
The airplane’s recoverable data module and three data cards were removed and sent to the NTSB Vehicle Recorders Laboratory for download.
The airplane has been retained for further examination.
There are many different ways to upgrade an instrument panel. Putting in a 696 here, a JPI engine monitoring system there, even an Electronic HSI. But, if you want to swing for the fences and get a serious upgrade, you have to go for a complete glass instrument panel. For good measure, you might as well throw in a touch screen GPS while you are at it.
The Garmin G500
The Aspen EFD 2500
Which panel to go with? There are two mainstream options (Garmin and Aspen) and a handful of other companies that make glass panel replacements (Avidyne being one, King for a short period of time at the end of the last decade being another with the KFD 840). Around 2010, there were a lot of companies trying to get into the glass panel retrofit game, but many of the products didn’t gain a whole lot of popularity, leaving Garmin and Aspen at the top of the heap.
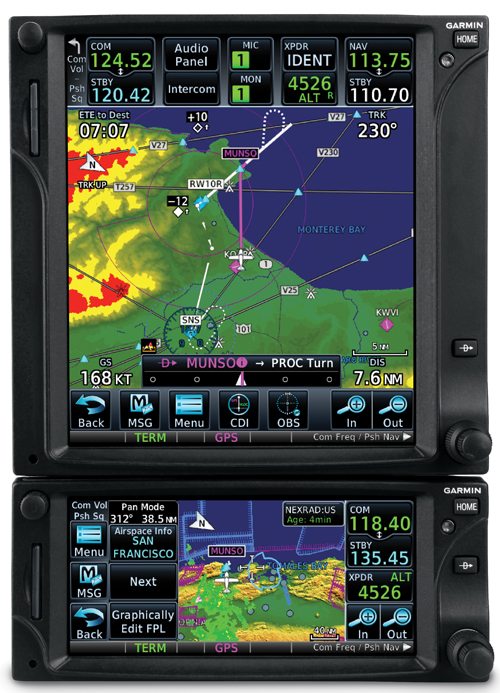
What about the touch screen GPS market? Garmin has this pretty much cornered as well, with Avidyne and King just getting into the game. The gap between Garmin’s GTN series and Avidyne and King is pretty wide.
The answer is pretty easy when it comes to the GPS (go with Garmin!), but not so easy when it comes to the panel. The G500 and the Aspen Evolution series are both excellent interfaces with strong reliability, so which one do you go with? Feature-wise, both have a lot of the same features: traffic, weather, terrain, synthetic vision, to name a few. The presentation for each feature is a little different between the two interfaces. It just depends on what you like better.
The nice thing about the Aspen system is you can go glass, but you have options on how much glass you want: 1 screen, 2 screens, or 3 screens? With the single screen PFD, you have all your instrumentation, traffic, weather, and optional synthetic vision. You don’t need the synthetic vision for the traffic and weather, as it shows up behind your HSI. It is an honest to goodness glass panel retrofit.
When you decide to upgrade to 2 screens, this is where Aspen has a leg up. The second screen is a completely redundant PFD and, if you get the 2 hour emergency backup battery installed, acts as the backup instrumentation to the main PFD. This means you can take out the old steam gauge standby instruments. This helps clean the panel up.
I personally don’t see the need for 3 screens, but maybe there is someone out there who needs it.
One selling point that Aspen has over Garmin is the wide variety of autopilots and GPS units that Aspen units are compatible with. The G500 is only compatible with King autopilots, it’s own GFC 700 autopilot (which would be a retrofit), some Collins autopilots, and the Century 21, 31, 41, and 2000. This does cover a wide array of autopilots, but it keeps some on the outside. Aspen, on the other hand, is compatible with most autopilots on the market.
Finally, let’s talk price. Going with an Aspen EFD 1000 PFD (this is the single screen Aspen) will run you somewhere in the area of $12,000. The price will vary based on the shop and the airplane. When you want to add a screen, it’s an additional $6,000. This is for the base, so if you want to add weather or synthetic vision, it’ll run you a little more.
The Garmin G500 comes in around $20,000, again depending on the shop and the airplane. The screens are bigger on the G500, which is kind of nice, and you are buying a Garmin product, which has a fabulous track record in the aviation industry.
Decisions, decisions. There really is no wrong answer here. Both are excellent products with very good track records. Both have really nice features and don’t hardly fail. Really, the choice comes down to what you want.
Need training on your upgraded GPS or glass panel retrofit? Contact Texas Top Aviation for thorough training on your new avionics today.
Are you ready to take part in one of the most exciting Texas aviation events of the year? Registration is now open for the 2025 Texas Top Aviation Fly-In, happening March 26th-28th, 2025, at the stunning Lajitas Golf Resort in Lajitas, Texas.
Whether you’re a pilot looking for a getaway, wanting to make new pilot buddies, or just seeking a one-of-a-kind adventure, the 2025 Texas Top Aviation Fly-In promises an unparalleled blend of community, aviation instruction, and scenic Big Bend recreation. Not to mention, great golf!
Why You Should Register
As one of the top 2025 Texas aviation events, this Fly-In features:
Two rounds of golf at the #1-ranked Black Jack’s Crossing Golf Course
Aviation seminars from industry leaders
Making new friends and seeing old ones at our group dinners
Non-golfing activities, like Jeep rentals, exploring Big Bend, or relaxing at the Resort spa
Spaces are limited, so secure your spot now for our 6th Annual Fly-In!
Event Highlights
Fly-In Golf Tournament
Enjoy two rounds of golf at Black Jack’s Crossing Golf Course:
Round 1: March 26th, 2025, 1:30 PM
Round 2: March 27th, 2025, 1:30 PM
Aviation Seminars
Learn from top experts on Thursday morning, March 27th, 2025:
Paul New: Cirrus and Cessna mechanic
Scott Williams: Aviation attorney
Travis Ulhorn: San Antonio Air Traffic Controller
Community and Connection
Relax and connect at evening group dinners starting at 7:30 PM.
Pricing
$1,475 per person (2 nights + golf) + tax
$1,100 per person (2 nights, no golf) + tax
$475 for non-golfing spouse + tax
Registration includes lodging and golf; food and beverages will be billed directly to the attendee.
Key Details
Golfers: Arrive by noon, March 26th, 2025
Non-Golfers: Arrive by dinner on March 26th
Complimentary shuttles provided from Lajitas International Airport (T89)
Register Today
Don’t miss out on one of the best Texas aviation events of the year. Register now and be part of the 2025 Texas Top Aviation Fly-In. Spaces are limited, so don’t wait!
Type Clubs Lead By Example with Standard Operating Practices
This article appeared in the May 2019 edition of EAA’s Sport Aviation Magazine. It is used with permission. For other articles by Charlie Precourt, please visit EAA.org and join for a full subscription.
Imagine a year when there are no fatal accidents in general aviation. Does that seem impossible? The airlines achieved that many years ago, and so can we if we focus on the right things in our safety pro- grams. In fact, the overall trend in GA accident rates over the last few years is very encouraging. AOPA’s Air Safety Institute published its annual GA Accident Scorecard recently (see www.EAA.org/ extras), revealing fatal accidents from 2008 to 2017 are down more than 30 percent. Nevertheless, there were 185 fatal accidents in 2017, so we still have a long way to go. But, there are many developments in safety programs across GA that can keep the trend going.
One such development that I’ve advocated through a couple of type clubs is establishing standard operating practices (SOP). When I flew for both the U.S. Air Force and NASA, we had what we called standard operating procedures. They were the law for our flying. That is, we had to follow them procedurally because the folks that paid our salaries said so. The objective was to ensure we all used the same playbook, minimizing the risk that one of us might develop a bad in-flight habit that increased risk to the organization.
One way to think about SOPs is to recognize the difference between procedure and technique. For example, you have to follow the manufacturer’s pilot’s operating handbook (procedure)where it says to lower the landing gear before landing. If you don’t, you are in for a bad day. However, it does not tell you exactly when to lower the gear; that’s left to technique.
In the middle, between procedure and technique, is a best practice. In this example, lowering the gear just before the final approach fix is a “standard practice.” It is the generally accepted “best” place to lower the gear. In GA, however, aircraft owners don’t generally answer to a boss, so I prefer the term practices instead of procedures.
However, whether or not someone is paying us to fly, following best practices just makes sense. If you have a good set of practices, they enable you to do things the same way every time, leaving lots of brain cells to manage the unusual, the things that might go wrong. The safest approach to accomplishing a flight task is one that leverages consistency. On the other hand, if you are inconsistent, doing flight tasks differently each time, you’ll always be struggling to keep up. So, in my involvement with the safety committees for both the Malibu Mirage Owners and Pilots Association and the Citation Jet Pilots Association, there has been broad acceptance of recently developed standard operating practices.
The good news in this development is that a culture of safety is growing broadly across most sectors of GA through these type club initiatives. Perhaps more importantly, there is much to learn from each other about the effectiveness of these various initiatives. EAA has seen a four-year drop of 47 percent in fatal accidents among homebuilts! So, there must be something right going on there — a major focus on appropriate transition training before flying a new homebuilt (as a standard operating practice) is paying off.
So, what is covered in the SOPs these type clubs have developed? The following outlines the kinds of standard practices other type clubs have set up and represent SOPs you could establish for yourself regardless of the type of aircraft you fly. You just have to fill in the blanks for your particular type and commit to sticking to them in your flying. These are notional and are practices (not mandatory procedures). They don’t tell you how to fly your aircraft; they give you things to think about when you do. If you take a bit of time to set your own SOPs and then stick with them, you’ll be a far safer pilot. Here are some ideas:
Duty Day
Set the maximum number of hours of flight time during a calendar day and rest hours off between flying days. One example is a maximum of eight hours in the air and a minimum of 10 hours off until flying again.
Cargo
Establish best practices for what you will carry as cargo. One example is no lithium batteries in the baggage compartment.
Flight Planning and Preparation
What are your limitations for the types of flight you’ll take on? Consider SOPs such as designating a suitable alternate airport for all flights. Another might be for first flights after significant maintenance, such as no flight at night or in IMC until a day-VMC functional check flight has been done.
Runway Field Length Guidelines
Establish an appropriate minimum field length for your aircraft and commit to not going into shorter fields. Consider sea level operations and high-altitude airports as well.
Surface Operations
What should be your maximum wind conditions for taxi, takeoff, or landing? Maximum acceptable crosswinds on landing? Set them in your SOP and stick to them.
En Route
Consider establishing practices like no non-operationally necessary conversation below 10,000 feet MSL, during any segment of an approach procedure, or during the last 1,000 feet before leveloff during climb or descent. Also consider declaring “minimum fuel” when the fuel state becomes less than fuel to destination plus 45 minutes at current burn, even if flying day VFR.
Approach and Landing
Consider establishing personal minimums in your SOPs for things like visual approaches. Perhaps use a 1,500-foot ceiling and 3 miles’ visibility for day and 5 miles for night, even though these exceed the FAA’s requirements.
Pilot Limitations, Training, & Currency
FAR Part 91 rules allow us to fly with pretty marginal levels of currency. Consider setting your own SOP to something more appropriate for the kind of aircraft you fly and the kind of flying you do in it. For example, consider these ideas as SOPs:
If you have less than 100 hours of time-in-type or have not flown at least 15 hours as pilot in command in the last 90 days, use a minimum planned fuel reserve of one hour.
Also, if flying IFR in this situation, use a minimum visibility for takeoff of 1 mile.
On instrument approaches, increase the published minimums by one- half mile visibility and add 200 feet to the decision altitude or minimum descent altitude.
Perform landings at a weight that allows a full stop in 60 percent of available runway length.
Consider an SOP that establishes you will fly with a CFI on a refresher flight before flying as pilot in command if you have not logged at least an hour of flight time and one takeoff and landing in an aircraft of the same type within the preceding 45 days.
Maneuver Standards
Wherever there are “techniques” associated with things like takeoffs and climbs, cruise, use of autopilot, power settings, and approaches and landings, you can write down your preferred technique as your own SOP. Describe each maneuver in enough detail (speeds, altitudes, power settings, configurations, etc.) to define a routine you will use each time. This ensures you fly consistently each flight and leverage the power of the standard operating practice, that is, to give you the bandwidth you need should you encounter an unexpected event or an emergency.
SOPs are among the exciting concepts underway to make safety programs work for us. Hats off to type clubs like MMOPA and CJP and many others that are taking the initiative. But even if you’re not in this kind of group, you can still set up your own SOPs. Let’s all look forward to our first year in GA without a fatal accident — and let’s make it soon! Fly safe!
Charlie Precourt is a former NASA chief astronaut, space shuttle commander, and Air Force test pilot. He built a VariEze, owns a Piper JetPROP, and is a member of the EAA board of directors.