Reading Weather Prog Charts

There are a multitude of weather products out there today to assist pilots in preparing for a flight.  Aviationweather.gov is the best source for getting all the information a pilot needs for planning a flight.  Aviationweather.gov is the National Weather Service’s source for all aviation related weather products.  When I teach about weather and weather briefings, I recommend to my students to utilize Aviationweather.gov in the planning stages, but still call the Flight Service Station to get a full fledged weather briefing before takeoff.

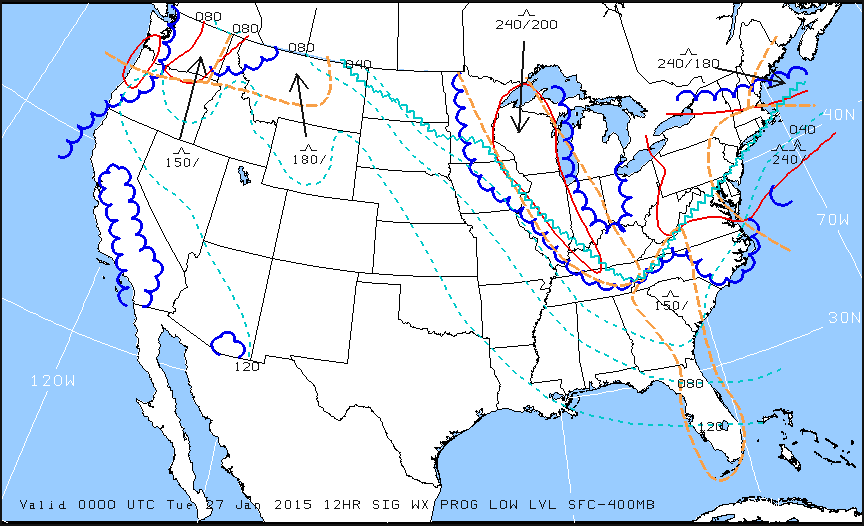
When preflight weather planning, one of the best ways to get a picture of what is happening over a broad area is utilizing the Low Level Significant Weather Prog charts.  The Prog chart gives a forecasted 12 and 24 hour picture of what type of weather to expect over the US.  The Prog chart gives the expected flight rules, areas of turbulence, and where the freezing level is located.  If you’re looking at the 4 panel view, the Surface Prog chart shows fronts, pressure areas, and areas of expected precipitation.  That covers just about everything, doesn’t it?

I believe the Prog charts are underutilized in planning.  Foreflight and Garmin Pilot have given easy access to radar pictures, satellite pictures, METARs, TAFs, and several other sources of weather information.  But, a lot of the easy access data you can get from those apps is current data (with the exception of the TAF) while a lot of the forecast data takes some hunting around.  So, products like Prog charts aren’t often utilized.

The other problem arises when pilots know about Prog charts, but don’t know how to read them, then don’t know how to find the legend to decipher the chart, the chart is often set aside and quickly forgotten about just because of a lack of knowledge.  Have no fear, though, as now we will use an example 4 panel Prog chart to decipher the lines and colorations.
Low Level Sig WX Prog

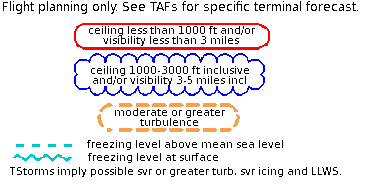
Just looking at the Low Level Significant Weather Prog Chart above, it can be a little confusing.  That’s why they make a legend!
Low Level Legend

Coupling the legend with the chart above, we can determine some things.  First, California, parts of the Pacific Northwest, a small part of southern Arizona, and a good portion of the Midwest and East coast are going to have marginal VFR conditions in the next 12 hours.  Wisconsin, Illinois, a good portion of the Northeast, and a small portion of the Pacific Northwest will suffer IFR from IFR conditions.  There are going to be a good amount of low level turbulence in the northern and eastern parts of the country.  Finally, the freezing level starts at the surface running in a jagged line across the midwest states and curling up into the Northeast.

That’s a good bit of information, isn’t it?  If a pilot is planning a VFR flight into the Northeast tonight, it would probably be best to wait for another day, according to this chart.

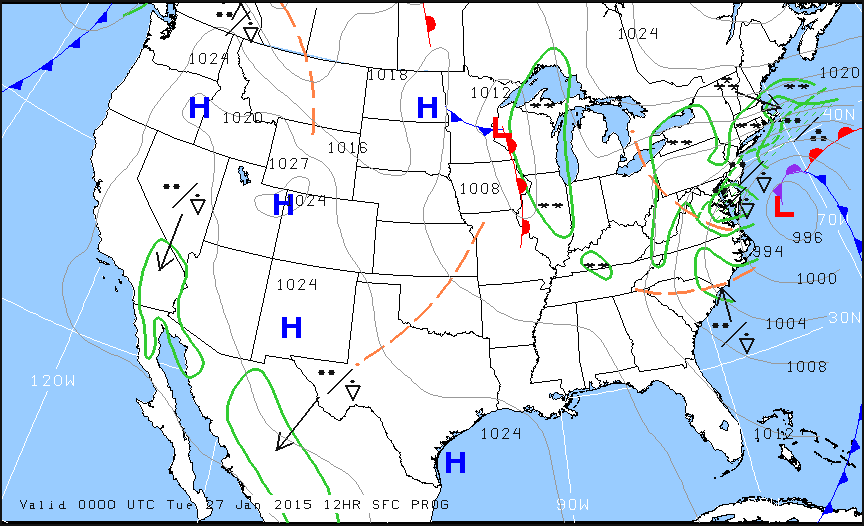
Now, to see what is causing the conditions above, we need to look at the Surface Prog Chart.
Surface Prog

The green circular areas above show that some form of precipitation is in that area.  The circular dots with the triangle located in Mexico and Baja California are depicting moderate rain showers.  If the triangle was gone, it would just be moderate rain.  In the northeast, all those symbols are showing moderate to heavy snow showers.  Across the plains, we see a lot of high pressure, meaning visibility and nice flying weather.

These charts are invaluable when it comes to flight planning, especially over long distances when the weather could be changing a lot over the period of your flight.  Put them to use the next time you are planning a trip and you’ll learn you have a much better picture of what the weather is doing.

Similar Posts

  • Diamond DA50 RG

    Diamond Aircraft announced in June that the company is going to bring it’s Diamond DA50 RG to market. The company expects European certification in early 2021 and FAA certification toward the end of 2021.

    This is not the first iteration of the Diamond DA50, but it is the first with retractable gear. Diamond is known for it’s use of Jet A burning piston engines and you can’t beat the efficiency. The technology in the Continental CD-300 Jet A piston engine is new, but it has been in development for a long time. Diamond advertises 180 knots on only 9 GPH, which is just about as efficient as you can get with a single engine piston.

    The addition of the retractable gear from previous iterations of the Diamond DA50 RG is a nice touch. Diamond already had the RG technology from the DA42 Twin Star as well as the more powerful cross country machine, the DA62. Equipping the single engine Diamond DA50 RG with retractable gear just makes sense. It definitely puts the airplane in a class of it’s own.

    Diamond’s website shows a nice roomy cabin in the DA50 RG with plenty of space to spread out, plus plenty of baggage. The fuel tanks only hold 50 gallons of Jet A (which still gives a 4 hour + range with an hour reserve at 9 GPH), so the payload, even with full fuel, is an eye popping 897 lbs, though Diamond’s site does not mention if that includes TKS, air conditioning, and oxygen. If it does, then compare that to a fully fueled Cirrus SR22T (which would give an equal speed) at 537 lbs and the Diamond DA50 RG has an argument.

    As with all new airplanes these days, the Diamond DA50 RG has the Garmin G1000 NXi complete with keypad and the GFC 700 autopilot with yaw damper. The interior has a 3 person bench seat for the back seat, which, at least to the naked eye, appears that it might actually fit 3 adults, albeit small ones. Diamond’s signature stick in the middle of the seat is still present for the front seats, but the right seat stick in the Diamond DA50 RG is removable for passenger comfort, a nice touch.

    The single engine piston market is a hard one to break in to since Cirrus has such a leg up on the competition. However, with a Jet A burning engine, a higher payload, and a roomier cabin, the Diamond DA50 RG might actually be able to make an impact. Look for this bird at Sun N Fun and Osh Kosh in 2021.

  • Lightspeed Tango Headset

    I recently purchased the new, wireless, Lightspeed Tango headset.  I’m a little OCD, so when a headset wire is banging against my shoulder while I’m trying to tune a radio or point something out, it’s a little annoying. A headset without the wires caught my eye.

    As I’ve stated before in a previous article, I really like Lightspeed headsets.  They are more comfortable than Bose, and a little bit more affordable too.  The noise canceling quality is very high in the different Lightspeed models.  I personally believe it got even better with the Lightspeed Tango.

    Lightspeed Tango

    Let’s talk about the obvious first.  Not having a wire connecting you to the headset jacks is really nice.  You’re not tethered to anything, so your head is free to move anywhere without getting yanked back in place. Lightspeed developed a new technology, called Lightspeed Link, which bypasses Bluetooth or Wifi and connects the Panel Interface to the headset wirelessly.

    The Link technology works pretty well.  The only problem I have noticed is in certain airplanes, I occasionally lose one ear, but after I wiggle the input wires around, the deaf ear comes back up.  It may be a loose connector in the plane itself.

    The really nice thing about the Lightspeed Tango is the fact that it doesn’t need AA batteries anymore. Lightspeed put rechargeable lithium ion batteries in both the Panel Interface and the headset.  You get 12 hours of battery life out of both, far surpassing any length of time you would want to be in an airplane.  If the battery dies, there is a handy aux cable that can connect the Panel Interface directly to the headset (the ion batteries recharge with the included wall charger and USB cables in 2 hours).

    Though the Lightspeed Tango is slightly heavier than the Zulu 2 due to the Link hardware and the lithium ion battery, it is still extremely comfortable.  The ear cups actually fit better over my ears and give me a better seal with glasses on then the Zulu 2 did.  As with all Lightspeed products, there is no squeezing of my head and the cushions on top of the headset sit very comfortably on top of my head.

    The Bluetooth is much simpler to use than the Zulu 2 and definitely simpler than the Bose A20.  Sound quality is very good for phone calls and music.  The volume control on the headset itself is set to make smaller adjustments so you don’t have to deal with wide swings in volume.

    Overall, I’m a big fan of the Lightspeed Tango.  I am recommending them to all the pilots I talk to.  Rolling in at $400 cheaper than the Bose, you can’t go wrong.

    Lightspeed Tango 3

  • The Go Around Button

    Back in the old days, when flying an approach in an early Cirrus SR22 (circa 2004; yes, in airplane technology, those were the old days), performing a missed approach procedure was a lot of work.  You were low to the ground and weren’t able to see the runway.  Then, you had to start climbing so you don’t hit the ground, then push a lot of buttons in order to get the GPS and autopilot set fly the missed approach procedure.  It was very easy to get distracted with button pushing, then forget to fly the airplane, putting yourself and passengers in very unsafe circumstances.  The go around button has changed all that.

    Going Missed the Old Fashioned Way

    Let’s stick with our example of the 2004 Cirrus.  The SR22 in 2004 was equipped with the Avidyne Entegra system, complete with dual Garmin 430 GPS units, and an STEC 55x Autopilot.  A very capable IFR flying machine (we could use the same example of a 2004 or 2005 Lancair Columbia 350 or 400 that was equipped the same way, except the screens were vertical instead of horizontal).

    Avidyne Cirrus Go Around Button

    We’ll use the ILS 15 at the Temple airport, KTPL, for our example.  You pass TPL, the outer marker at 1,683 with the glide slope already centered.  Everything is going well so far.  The number 1 Garmin 430 is set to VLOC and the autopilot is showing NAV and APR for the lateral guidance and GS on the vertical, tracking the glide slope.  The last weather report stated the clouds were Broken at 500 feet, so it appears like you’ll be able to get in on the approach.

    As you get closer to the Decision Altitude, the clouds aren’t letting up at all.  You hit 1,000 feet on your altimeter, 120 feet above the minimums, and you still can’t see a thing.  Another 100 feet lower doesn’t change anything, so you elect to proceed with the missed approach.  This means things are about to get busy.

    Here’s the process:

    • Fly the airplane first, meaning shut off the autopilot, pitch the nose up to about 7 degrees, TRIM, add full power, retract the flaps, and step on the right rudder
    • The Garmin 430 is now in SUSP mode, meaning the missed approach point is locked in as the active waypoint.  So, you have to press the OBS button to cause the GPS to cycle over to the missed approach procedure
    • You have to press the VLOC button on the Garmin 430 in order to change the CDI back to GPS
    • You have to re-engage the autopilot by pressing NAV twice (which engages GPS Steering mode)
    • You have to reset your altitude bug (if you hadn’t set it for the missed approach altitude previously)
    • You have to press VS and ALT on your autopilot to have the STEC continue the climb

    That’s a lot of work, isn’t it?  Plus, that’s an extensive amount of head down time in the cockpit, with your eyes looking elsewhere other than the instruments while hand flying.  All very low to the ground, I might add.  Can you see how this can be dangerous?  (Note:  The Avidyne IFD 550 has made this a little easier with automatically switching from VLOC to GPS and automatically engaging the missed approach procedure in the flight plan)

    The advent of the Go Around Button has streamlined the process, leading to safer operations where it matters most.  The functions of the Go Around Button vary based on the airplane, but here are three examples, the Garmin G1000 Cessna Corvalis TT, the Garmin G1000 Piper Mirage, and the Garmin Perspective Cirrus SR22.

    Cessna Corvalis TT

    We’ll take the above situation and swap out the airplanes.  Gone is the 2004 Cirrus SR22.  Insert a 2008 Cessna Corvalis TT, equipped with the Garmin G1000 suite and the GFC 700 autopilot.  The go around button is positioned directly above the twist in throttle.

    Cessna Corvalis G1000 Go Around Button

    When you push the Go Around Button, here’s what the system does:

    • Disconnects the Autopilot
    • Sets the Flight Director for 7.5 degrees pitch up (which is about your normal climb angle) and wings level
    • Switches the CDI back to GPS
    • Takes the GPS out of SUSP mode and cycles the flight plan to the first waypoint on the missed approach procedure

    Here’s what you have to do:

    • Follow the flight director by pitching the nose up and TRIM
    • Add full mixture, prop and throttle (prop & throttle should be full already)
    • Retract the flaps
    • Step on the right rudder
    • Re-engage the autopilot, then press NAV and VS (or FLC) and set your altitude bug if it isn’t already set

    Not too bad, eh?  Makes the whole situation streamlined and safer.

    Piper PA46-350P Mirage

    Same situation, different airplane.  You’ll notice the procedure for the Piper Mirage is almost exactly the same as the  Corvalis procedure.  The difference between the two airplanes is where the autopilot controller is.  In the Corvalis, the autopilot controller is positioned on the left side of the MFD, making it easy to scan back and forth while pushing buttons on the autopilot.

    The Piper Mirage autopilot controller is positioned below both screens and in front of the power quadrant. With this positioning, the pilot’s eyes have to go a lot further to see which autopilot button he is pushing. In this case, it becomes very important to get the airplane climbing and trimmed before going down to engage the autopilot.

    As in the Corvalis, here is what the Go Around button does:

    • Disconnects the Autopilot
    • Sets the Flight Director for 7.5 degrees pitch up (which is about your normal climb angle) and wings level
    • Switches the CDI back to GPS
    • Takes the GPS out of SUSP mode and cycles the flight plan to the first waypoint on the missed approach procedure

    And here’s what you have to do:

    • Follow the flight director by pitching the nose up, then TRIM
    • Add full mixture, prop and throttle (prop & throttle should be full already)
    • Retract the flaps
    • Step on the right rudder
    • Re-engage the autopilot, then press NAV and VS (or FLC) and set your altitude bug if it isn’t already set

    Cirrus SR22

    Cirrus Perspective Go Around Button

    This time, we’ll use the 2010 Cirrus SR22T with the Garmin Perspective and GFC 700 Autopilot. One thing I really like about how Cirrus configured their system is where the Go Around button is.  It’s actually on the throttle itself, making it much more intuitive.  This way, you can press the Go Around button while adding full throttle.

    There is one major difference between the Garmin Perspective in the Cirrus and the G1000 in the Corvalis. When you press the Go Around button in the Cirrus, the autopilot actually stays on.

    Here’s what happens when you press the Go Around button in the Cirrus:

    • Flight Director pitches to 7.5 degrees pitch up and wings level
    • AP Mode switches to Go Around mode, following the flight director
    • GPS comes out of SUSP mode
    • CDI switches back to GPS

    All the pilot really has to do is add power, take the flaps up, then press NAV on the GFC 700 to get the autopilot following the missed approach procedure.

    If you aren’t familiar with the Go Around button or haven’t used the one in your plane lately, it’s good to go up with a knowledgeable instructor and fly a couple of approaches where you perform the published missed approach afterward.  That way, he or she can assist you through the first missed approach, then give you pointers until  you get comfortable with the Go Around button.

  • Jet A Fueling Mismanagement

    I’m sure at this point, most pilots in Texas have heard about the Cessna 421 that went down two weeks ago in Lufkin.  The Golden Eagle suffered a dual engine failure (the pilot lost the first at 2300 feet, then the second at 1700 feet) in IMC on climb out.  He broke out at 1,000 AGL miraculously lined up with US 59, south of the Lufkin airport.  The pilot had to dodge a car as he was attempting his landing, stalled the airplane, sheared off the landing gear, then slid into the median.  No one died, but lots of bumps and bruises.  All were airlifted to Houston.

    Jet A Lufkin Plane Crash

    The cause was a lineman at LFK put Jet A in the 421, which is a piston airplane and takes 100LL Avgas.  The story that I saw said the pilot and two passengers were returning to Houston from Kansas City and diverted to LFK due to weather.  They landed in driving rain and spent the night.  I have not seen any reports saying whether the pilot sumped the tanks or not the following morning.

    There were several factors that led to this accident.  If you take one factor out, the accident probably wouldn’t have happened.  Let’s take a look at the sequence of events.

    The 421 arrived in a driving rain storm, so the pilot and passengers probably disembarked quickly to get out of the weather.  Factor number 1 presents itself here.  We don’t know whether or not the pilot told the lineman to put Avgas in it or not (he may have just said fill it up), so we’ll leave that aside.

    Understandably, the pilot dashed inside to get out of the rain, but they neglected to monitor the fueling.  Whether or not the fueling took place that night or the next morning, we can’t say.  I have started to greatly encourage my customers to monitor the fueling of their airplanes, especially when it’s a fuselage that can either have Avgas piston engines or Jet A turboprops, as is the case with the Cessna 421.

    Factor number 2, we already know about.  The lineman messed up and put the wrong fuel in.  If their was uncertainty about what type of fuel, he would have been prudent to await the return of the pilot to ask, even if that meant delaying the pilot’s departure.

    Factor number 3 is the matter of sumping the fuel.  We don’t know if the pilot sumped the fuel or not. The tricky thing about sumping is Jet A doesn’t settle out of Avgas like water does unless it sits for a long, long time.  The two ways to determine if you have Jet A in your Avgas airplane are to smell it, as Jet A has a very strong diesel smell, or do the paper towel test.  The paper towel test consists of dumping a fuel sample onto a paper towel, then let the Avgas evaporate.  If you are left with a nasty, oily residue, you’ve got Jet A in your tanks (not to mention it will smell like diesel).

    To prevent misfueling of your airplane, take the following steps:

    • Be specific in telling the lineman what type of fuel you want, not just “fill ‘er up”
    • Monitor the fueling and watch which truck pulls up to your airplane
      • This is especially important with fuselages that can have either Pistons or Turbo-Prop engines, like the PA-46 line or the Twin Cessna line
    • Always sump your fuel, definitely smell it, and if there are any doubts, try a paper towel test
  • 2022 Texas Top Aviation Fly In is in the Books!

    Thank you to everyone who made the 2022 Texas Top Aviation Fly In at the Hilton Santa Fe Buffalo Thunder Resort a success!

    We had 22 attendees and 12 airplanes make it out to beautiful Santa Fe, New Mexico for the week.

    After 2 days of very competitive golf, Chris Travland was our 2022 Texas Top Aviation Fly In Golf Tournament Champion.

    While you are out in Santa Fe on your next trip, go check out the Rancho de Chimaya restaurant. It was excellent and a true New Mexican experience.

    Mark your calendars for the 2023 Texas Top Aviation Dallas Fly In at the Westin Stonebriar Resort in Frisco, TX. McKinney National Airport (KTKI) will be our host airport. The event will be April 12th-April 14th, 2023. Hope to see you all there!

  • Merry Christmas 2018

    So the Word became human and made his home among us. He was full of unfailing love and faithfulness. And we have seen his glory, the glory of the Father’s one and only Son (John 1:14).

    From the Texas Top Aviation family (Hank, Kelsey, Everett, Cooper, and Cord) to your family, we wish you a Merry Christmas!  We are thankful for how the Lord has blessed us this year.  We pray for blessings on your family this coming year.

    Keep the wheel side down and the sunny side up!

    Merry Christmas!

3 Comments

  1. I think you left out an important part of the picture. Maybe it’s there, but I can’t find it. The question is WHEN?
    The footnote tells when it was issued, but not WHEN it applies. Is it a statement of present conditions? Or is it a forecast of conditions at some future time? Somewhere that information is available, but I can’t find it.
    Albert Holt
    AL@holtmarinesystems.com

    1. Hi Albert, at the bottom of the Prog Chart itself, there is an issue time, then directly below it, there is a valid time. That valid time is when it applies. Surface Analysis charts are current, but Prog charts are always forecast. Unless of course, they haven’t been updated, then it’s showing what was supposed to take place in the past.

Leave a Reply

Your email address will not be published. Required fields are marked *