You are at cruising altitude and your flight is going just as planned. All of that can change, sometimes without much warning, and you, the non-pilot, are now in charge. Would you know what to do?
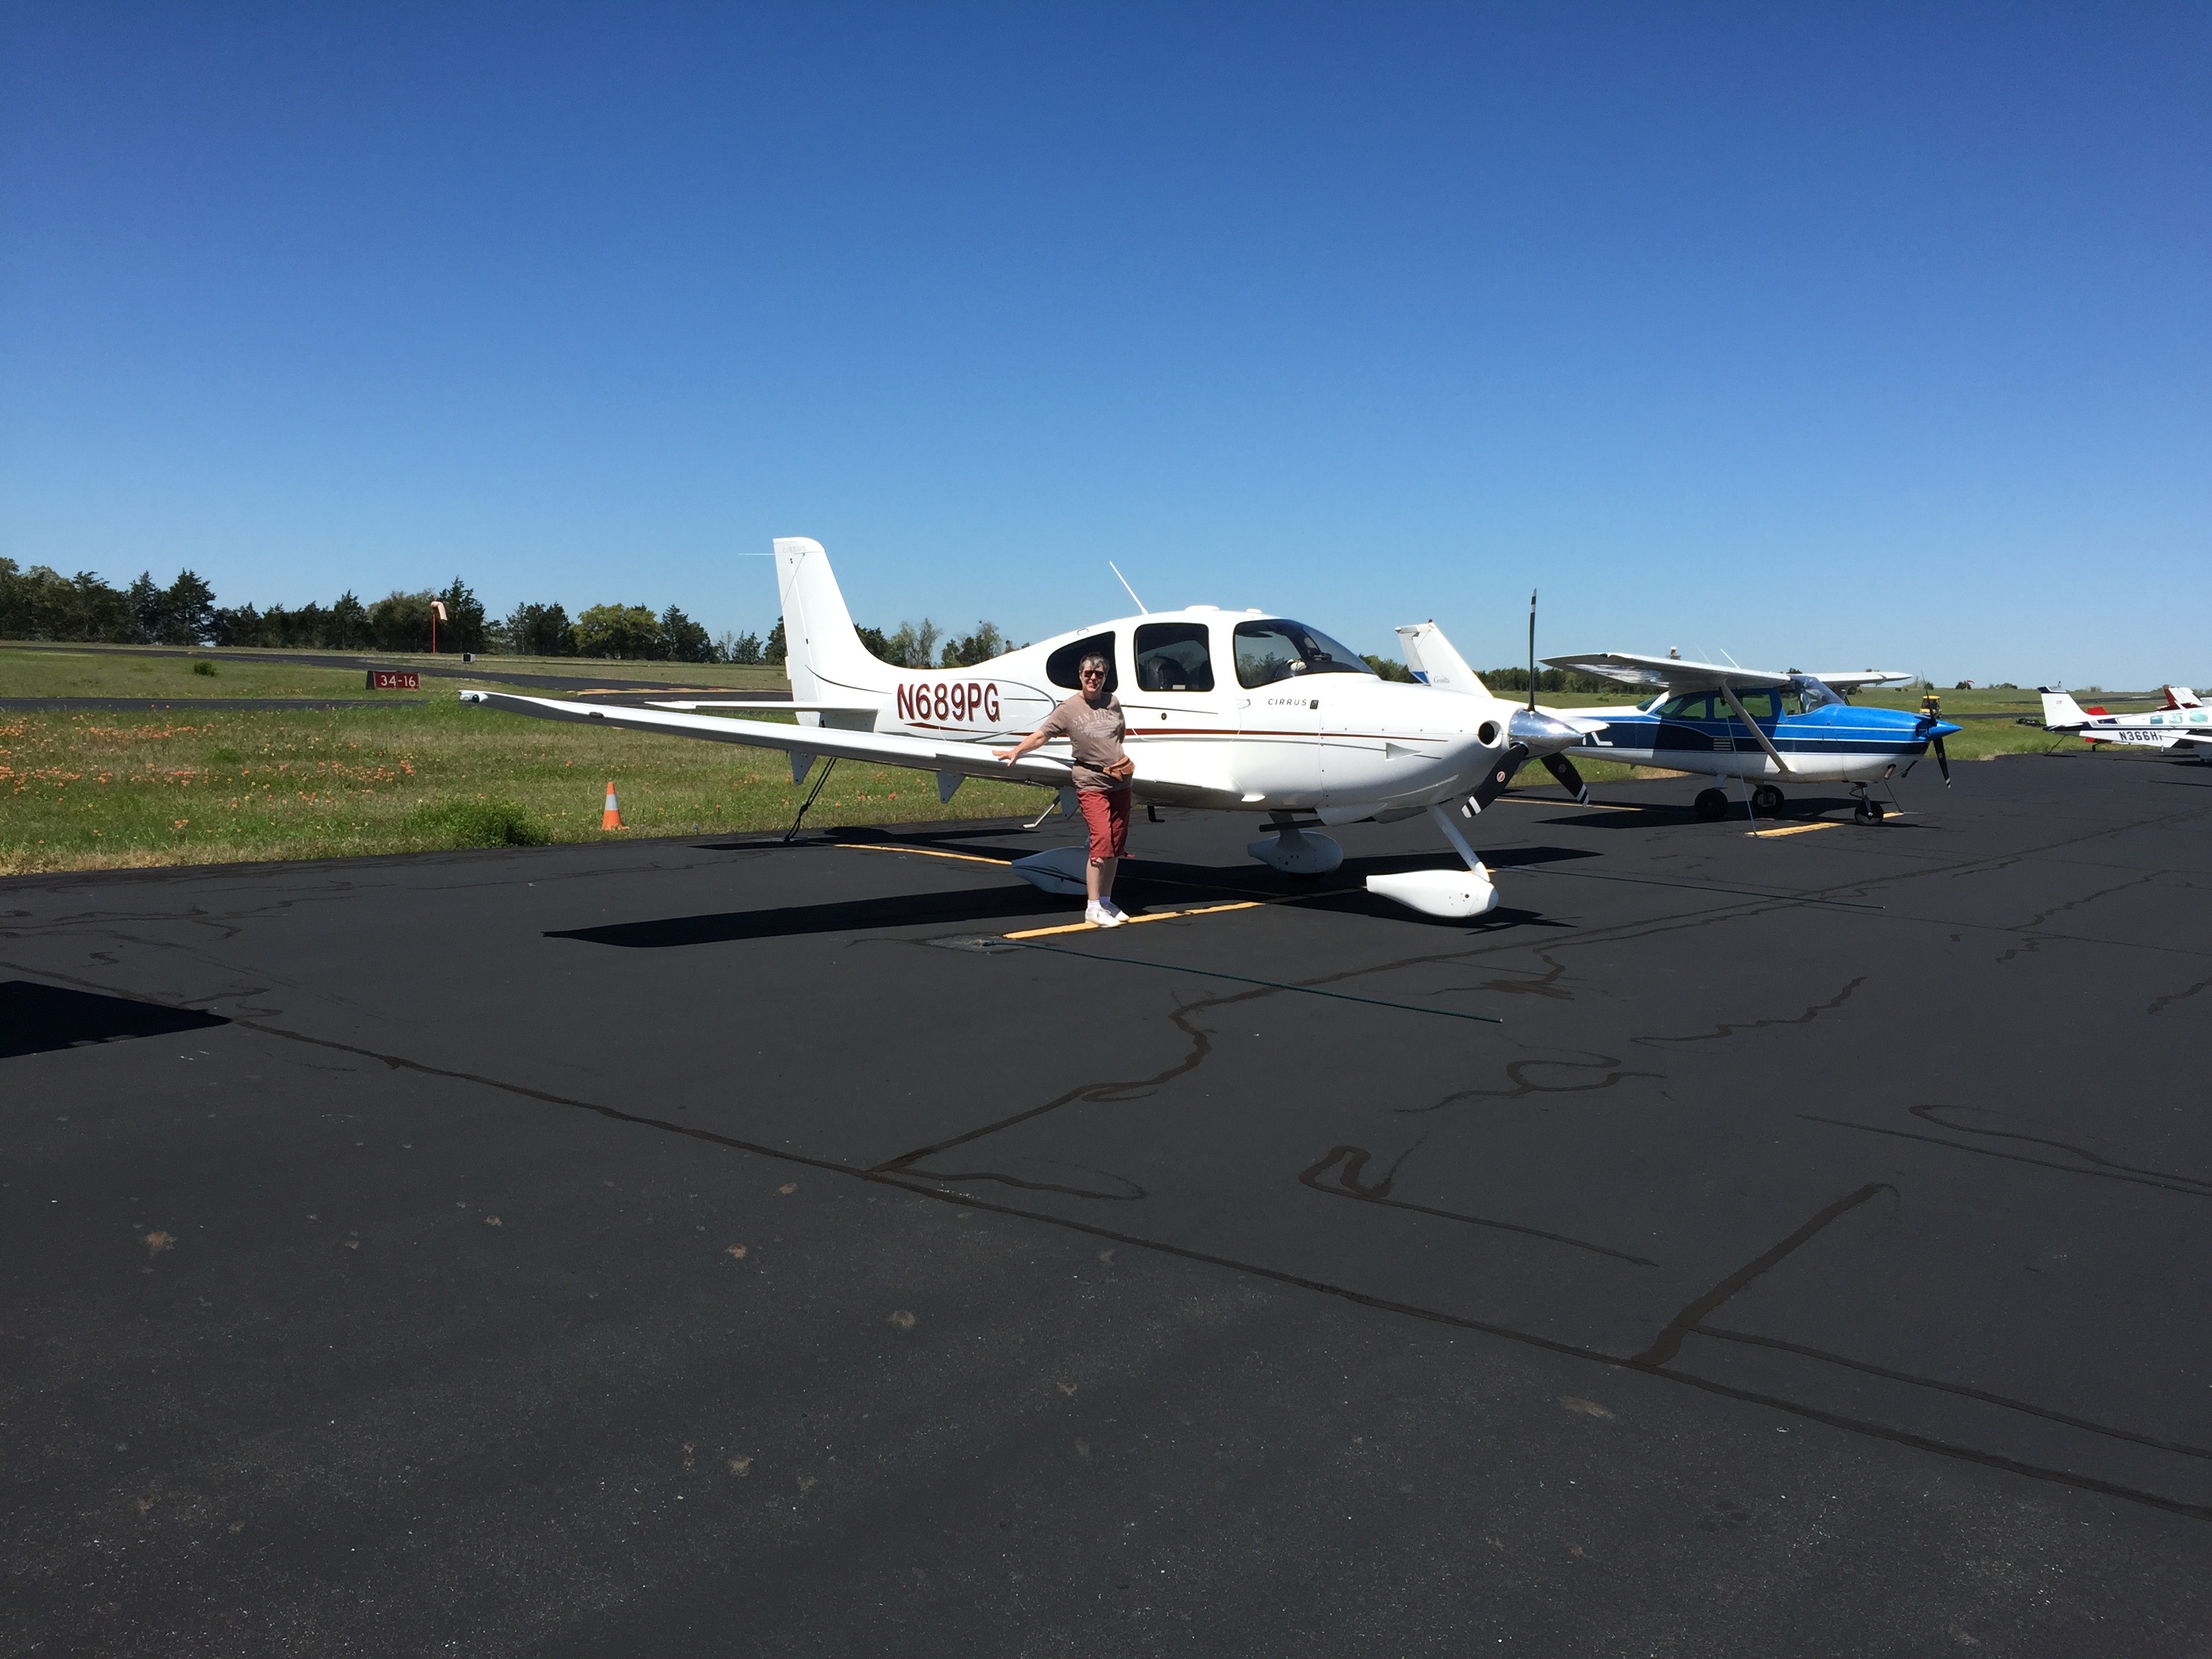
This was a scary thought for me until I attended a seminar developed for the non-flyer at a Cirrus Owners Pilot Association (COPA) fly-in. Cirrus is the only small plane with a parachute as standard, so I thought all I had to do in an emergency was pull the chute. It’s a little more complicated than that!
I learned the vast majority of pilot incapacitation happens when the plane is at cruising altitude, so there is time to find a solution.
I was taught ten basic steps to follow to bring the plane safely to the ground.
First attempt to revive the pilot. If he is choking, it is possible to do a Heimlich maneuver from the side. This may dislodge whatever is blocking his airway and solve the problem. If he is experiencing hypoxia, turn off the heat, open all vents, and, if you have on board oxygen, use it. Also, if you can, get instructions on how to descend to a lower altitude. If the pilot is unconscious due to a heart attack or other medical emergency, there are still things you can do from the right seat.
Engage the autopilot if it isn’t already on and move the pilot off the controls. *
Ensure you are connected to the radio. If you hear ATC or other pilots, you are.
Send an electronic trouble message. Set the transponder to 7-7-0-0 to identify your plane to ATC. This will cause your plane to be highlighted on ATC radar screens.
ATC will most likely contact you asking what is your emergency. If this does not happen, you will need to transmit a Mayday call. All non-pilot passengers should know how to use the radio to get help, if they know nothing else.
With help from ATC, decide where you want to go.
Use the autopilot to fly in the direction suggested by ATC. I was taught that ultimately the choice of where to deploy the parachute is up to me because I am now the PIC, pilot in command.
Ensure that seat belts are secure and the emergency hammer is between your legs (so you have it to break a window to escape if needed).
Pull the parachute handle.
On the way down, shut down the engine and brace for impact.
After landing, move away from the plane, into the wind. Stay nearby and wait for help.
The seminar covered specific procedures to accomplish these basic steps, what to do if you don’t get a response from ATC, what to say in a Mayday transmission, how to fly a heading, how to check fuel levels, shut down the engine, etc. After the seminar, I felt much more comfortable about what to do if my pilot suddenly lost consciousness.
I was also told to practice what I had learned to avoid panicking in an emergency situation. There are so many things the person in the right seat can do under normal circumstances to practice. Learn how to set heading bugs, learn where the plane’s Electronic Locator Transmitter (ELT) is located and how to activate it. This will help rescuers locate the airplane. Learn how to assess your fuel levels. Practice making routine radio transmissions. Observe what your pilot does and ask questions if you don’t understand something.
Knowing what to do in an emergency situation will give you a sense of control over what will happen to you, your pilot, and any passengers on board your plane. If you have never considered taking a lesson or two for the non-pilot, find yourself an instructor, and learn what you need to know for your plane. Hopefully you will never have to use it, but if you do, you will be ready to be the PIC who lands the plane.
Anne and her husband Stephen are the proud owners of a Cirrus SR20. They plan to put the airplane to better use once Stephen retires. Anne has a background in desktop publishing and writing.
When filing an IFR flight plan, part of the process is determining whether or not an alternate airport is required. An alternate airport is required when the following conditions exist(as is outlined by the FAA in 91.169 (b)):
The weather conditions at the destination airport
From 1 hour before your arrival time to 1 hour after your estimated time of arrival, the weather conditions are forecast to be below
2,000 Feet AGL and/or
3 statute miles visibility
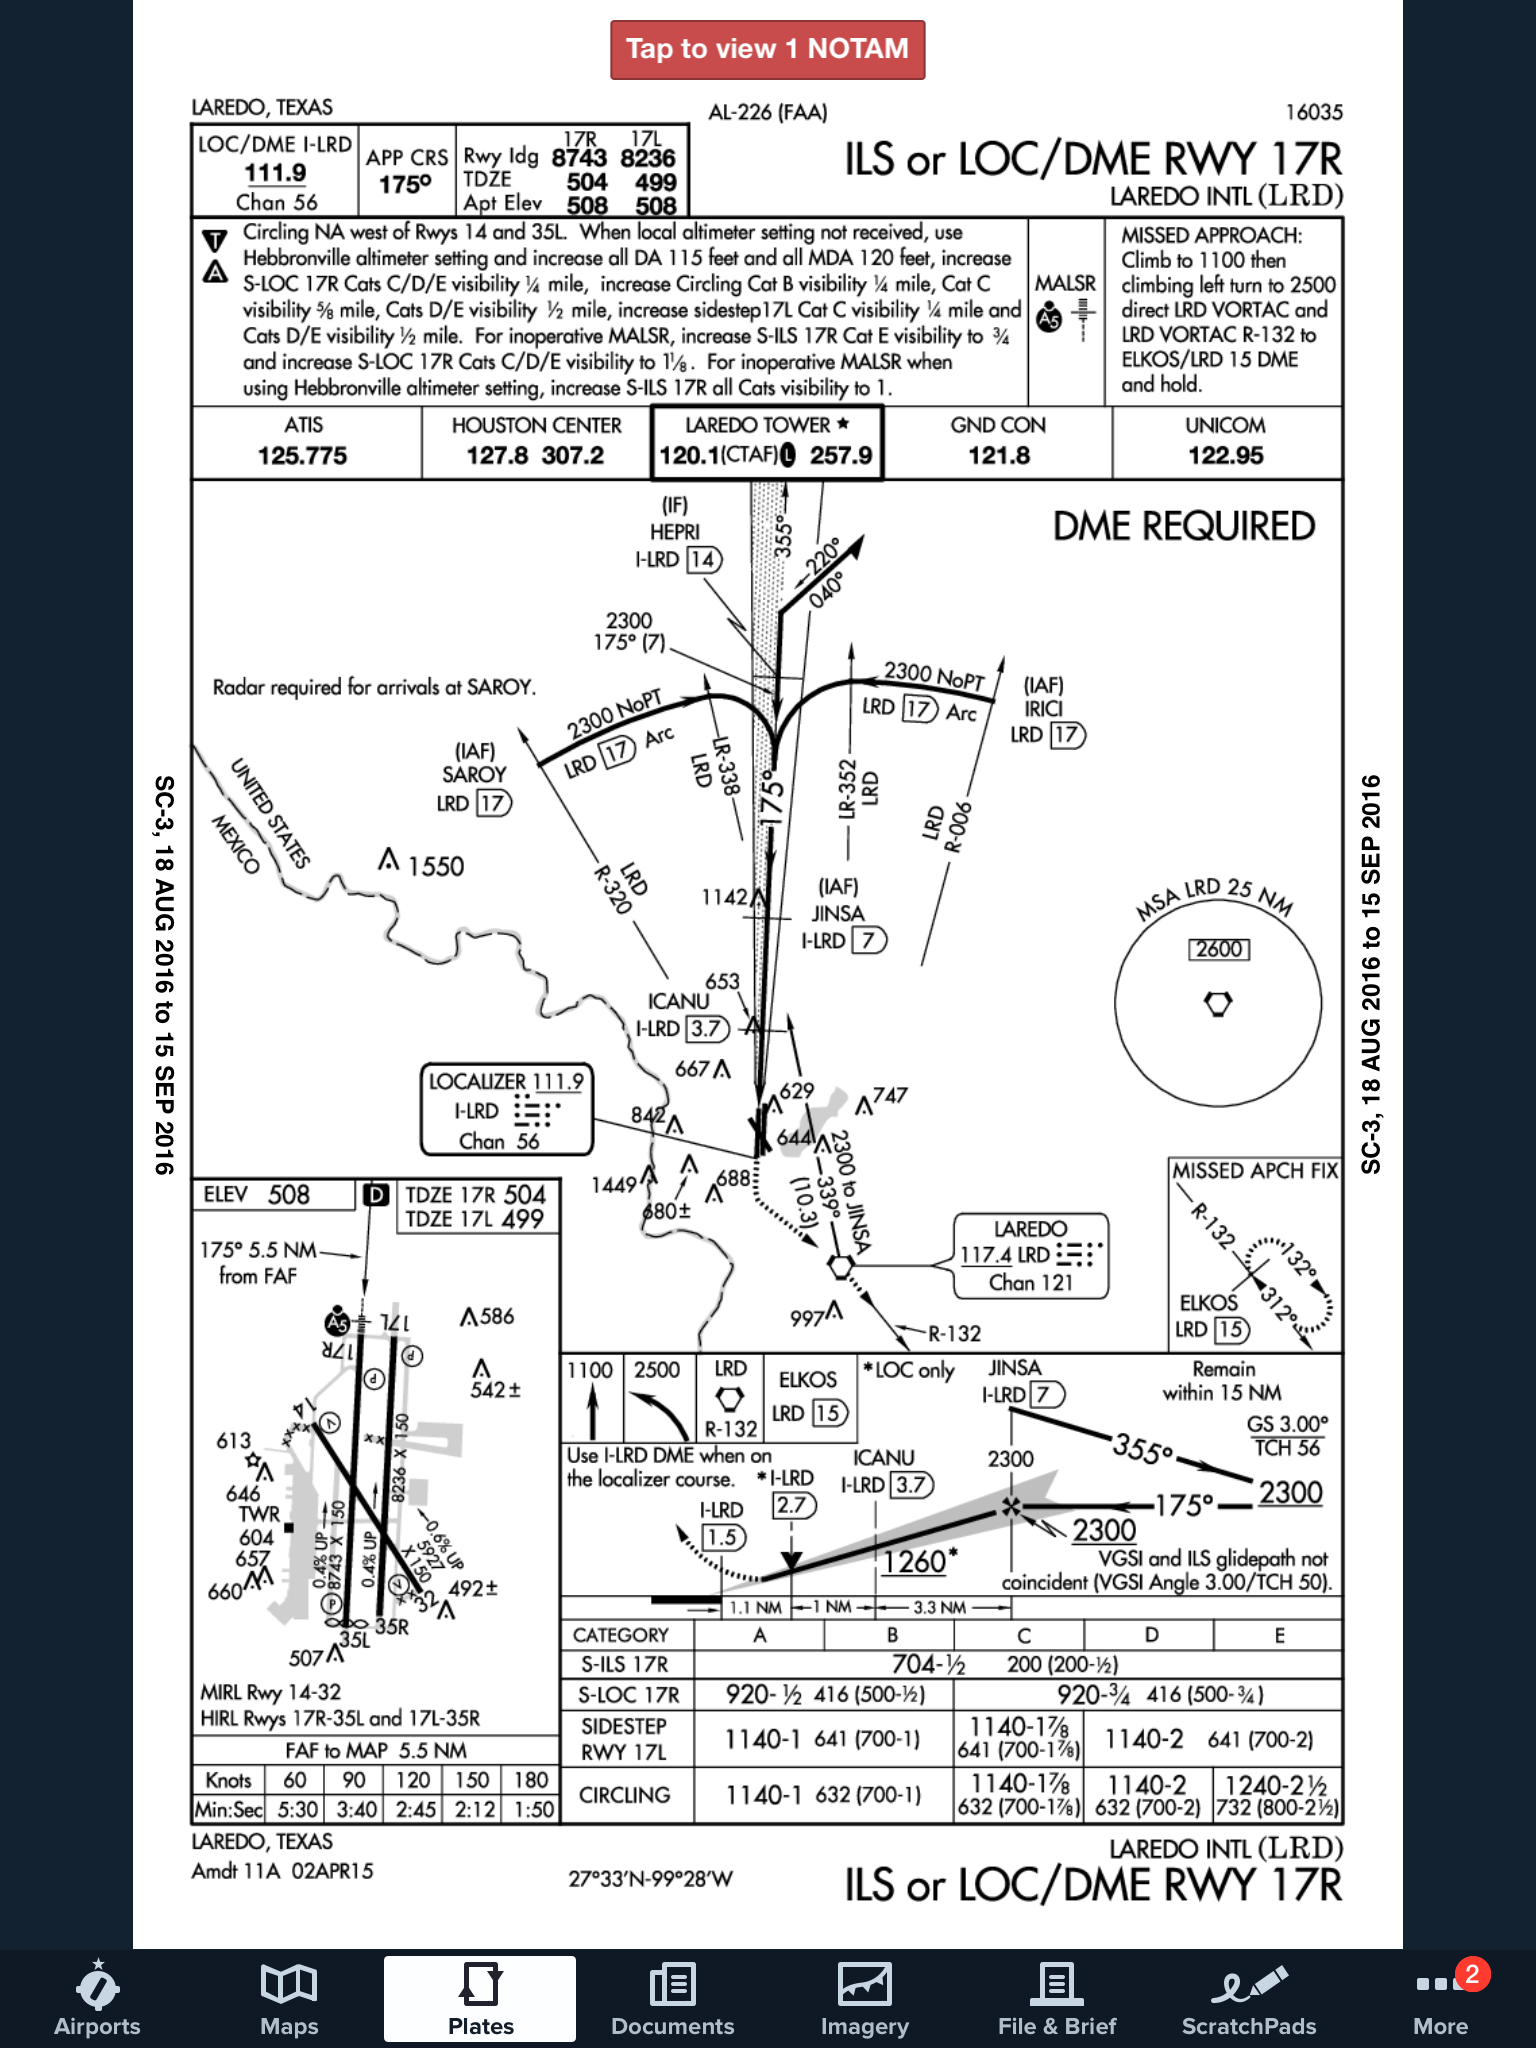
Let’s paint a scenario. You are traveling from KSAT (San Antonio International Airport) to KHBV (Jim Hogg County Airport in Hebbronville, TX). You start to file your flight plan and get down to the space where you put your alternate in. Since Laredo (KLRD) is the closest airport with a TAF, you check Laredo’s TAF and see that the forecast conditions there at your ETA are ceilings 1,500 and visibility of 2sm.
Based on this information, you need an alternate airport. Now, the process of finding one. In Part 91.169 (c), the forecast conditions at the alternate airport must be at or above:
600 Feet AGL and 2sm visibility for a precision approach, or
800 Feet AGL and 2sm visibility for a non-precision approach
Alright, now we have some guidance. Laredo is the nearest airport to KHBV, and we know the forecast from the above TAF showing the conditions are forecast to be above the alternate minimums outlined in Part 91, so let’s pick Laredo. All done?
Not quite. A lot of airports have Non-Standard Alternate Minimums. How do you figure out if they do? The easiest way is to look at any approach plate for the airport. In the notes section of the government plates, there will be a black triangle with an A in it. That means there are non-standard alternate minimums published for that airport (in layman’s terms, different than the ones stated above in Part 91).
Now the question is, where do you find those non-standard alternate minimums? On Foreflight:
Go to the Airports page
Tap the Procedures button
Tap the Arrival button
Tap the Alternate Minimums option
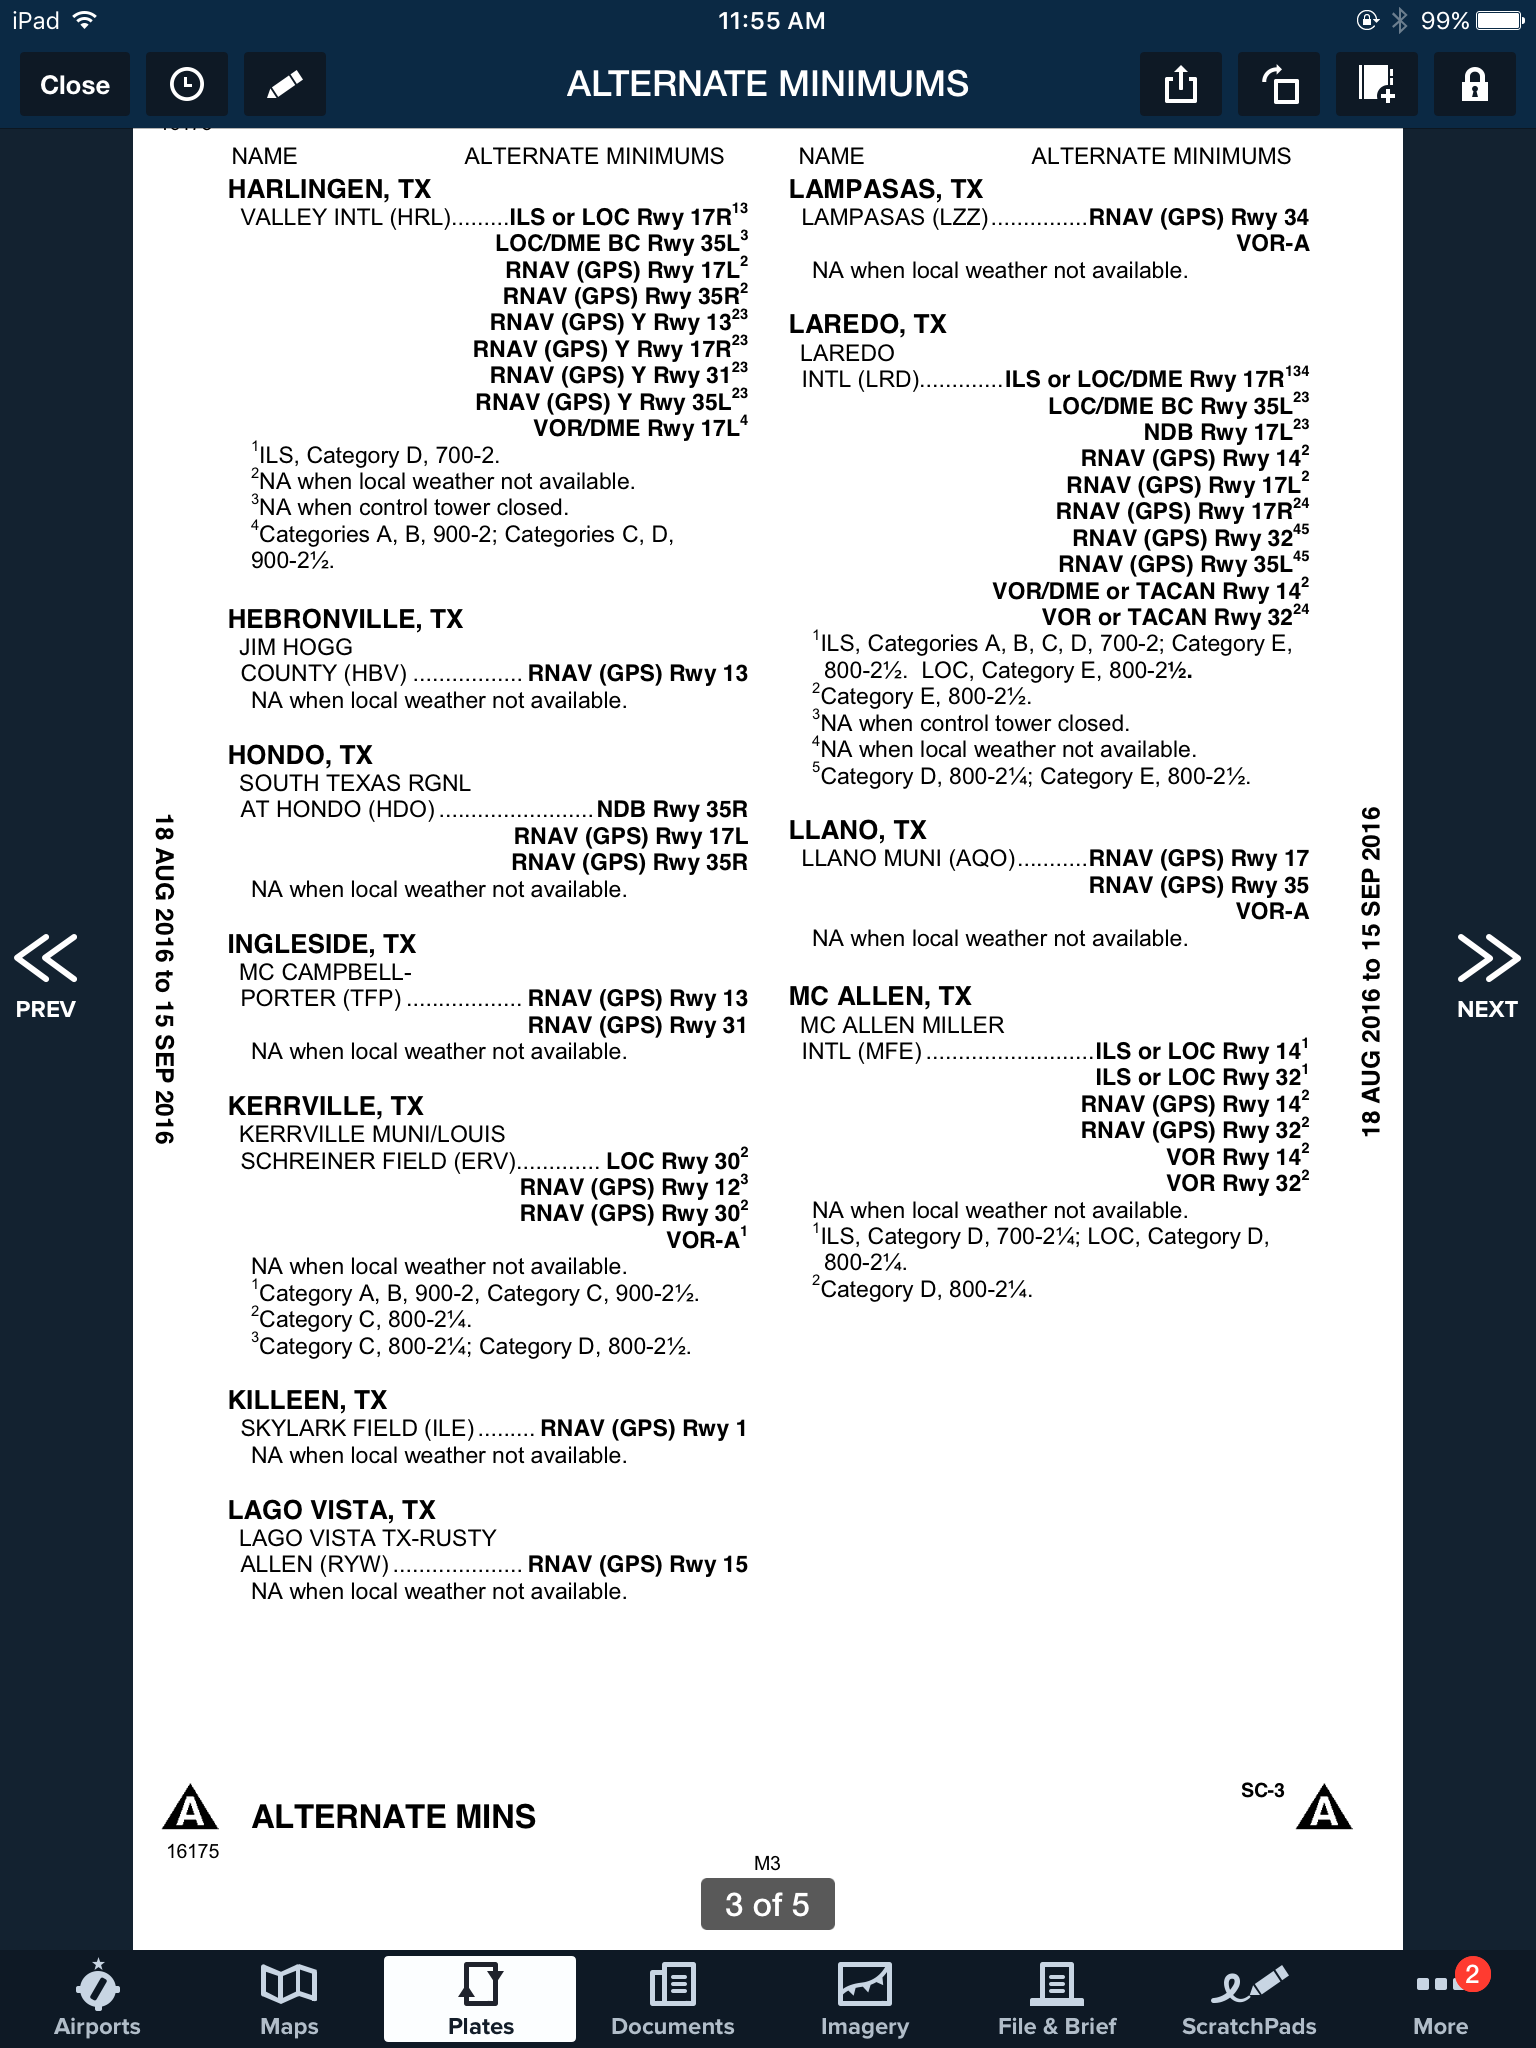
This brings up the IFR Alternate Minimums document for all the airports with non-standard alternate minimums in that area. Scroll through to find Laredo.
As you can see, there are several notes there concerning the different approaches into Laredo. For our example, we’ll say the winds are out of the south and we are planning on flying the ILS 17R if we cannot get into KHBV and have to come to Laredo. The note there is that the Alternate Minimums for the ILS 17R are actually 700 AGL ceilings and 2sm instead of the above state 600 AGL ceilings and 2sm, the procedure is NA if the tower is closed, and NA if the local weather isn’t received.
What does this tell us? If the forecasted ceilings at Laredo were below 600 AGL instead of 700 AGL, we would not be able to use LRD as an alternate airport if we were planning on flying the ILS 17R. The RNAV approaches are all fair game, so a GPS equipped aircraft would have no problem.
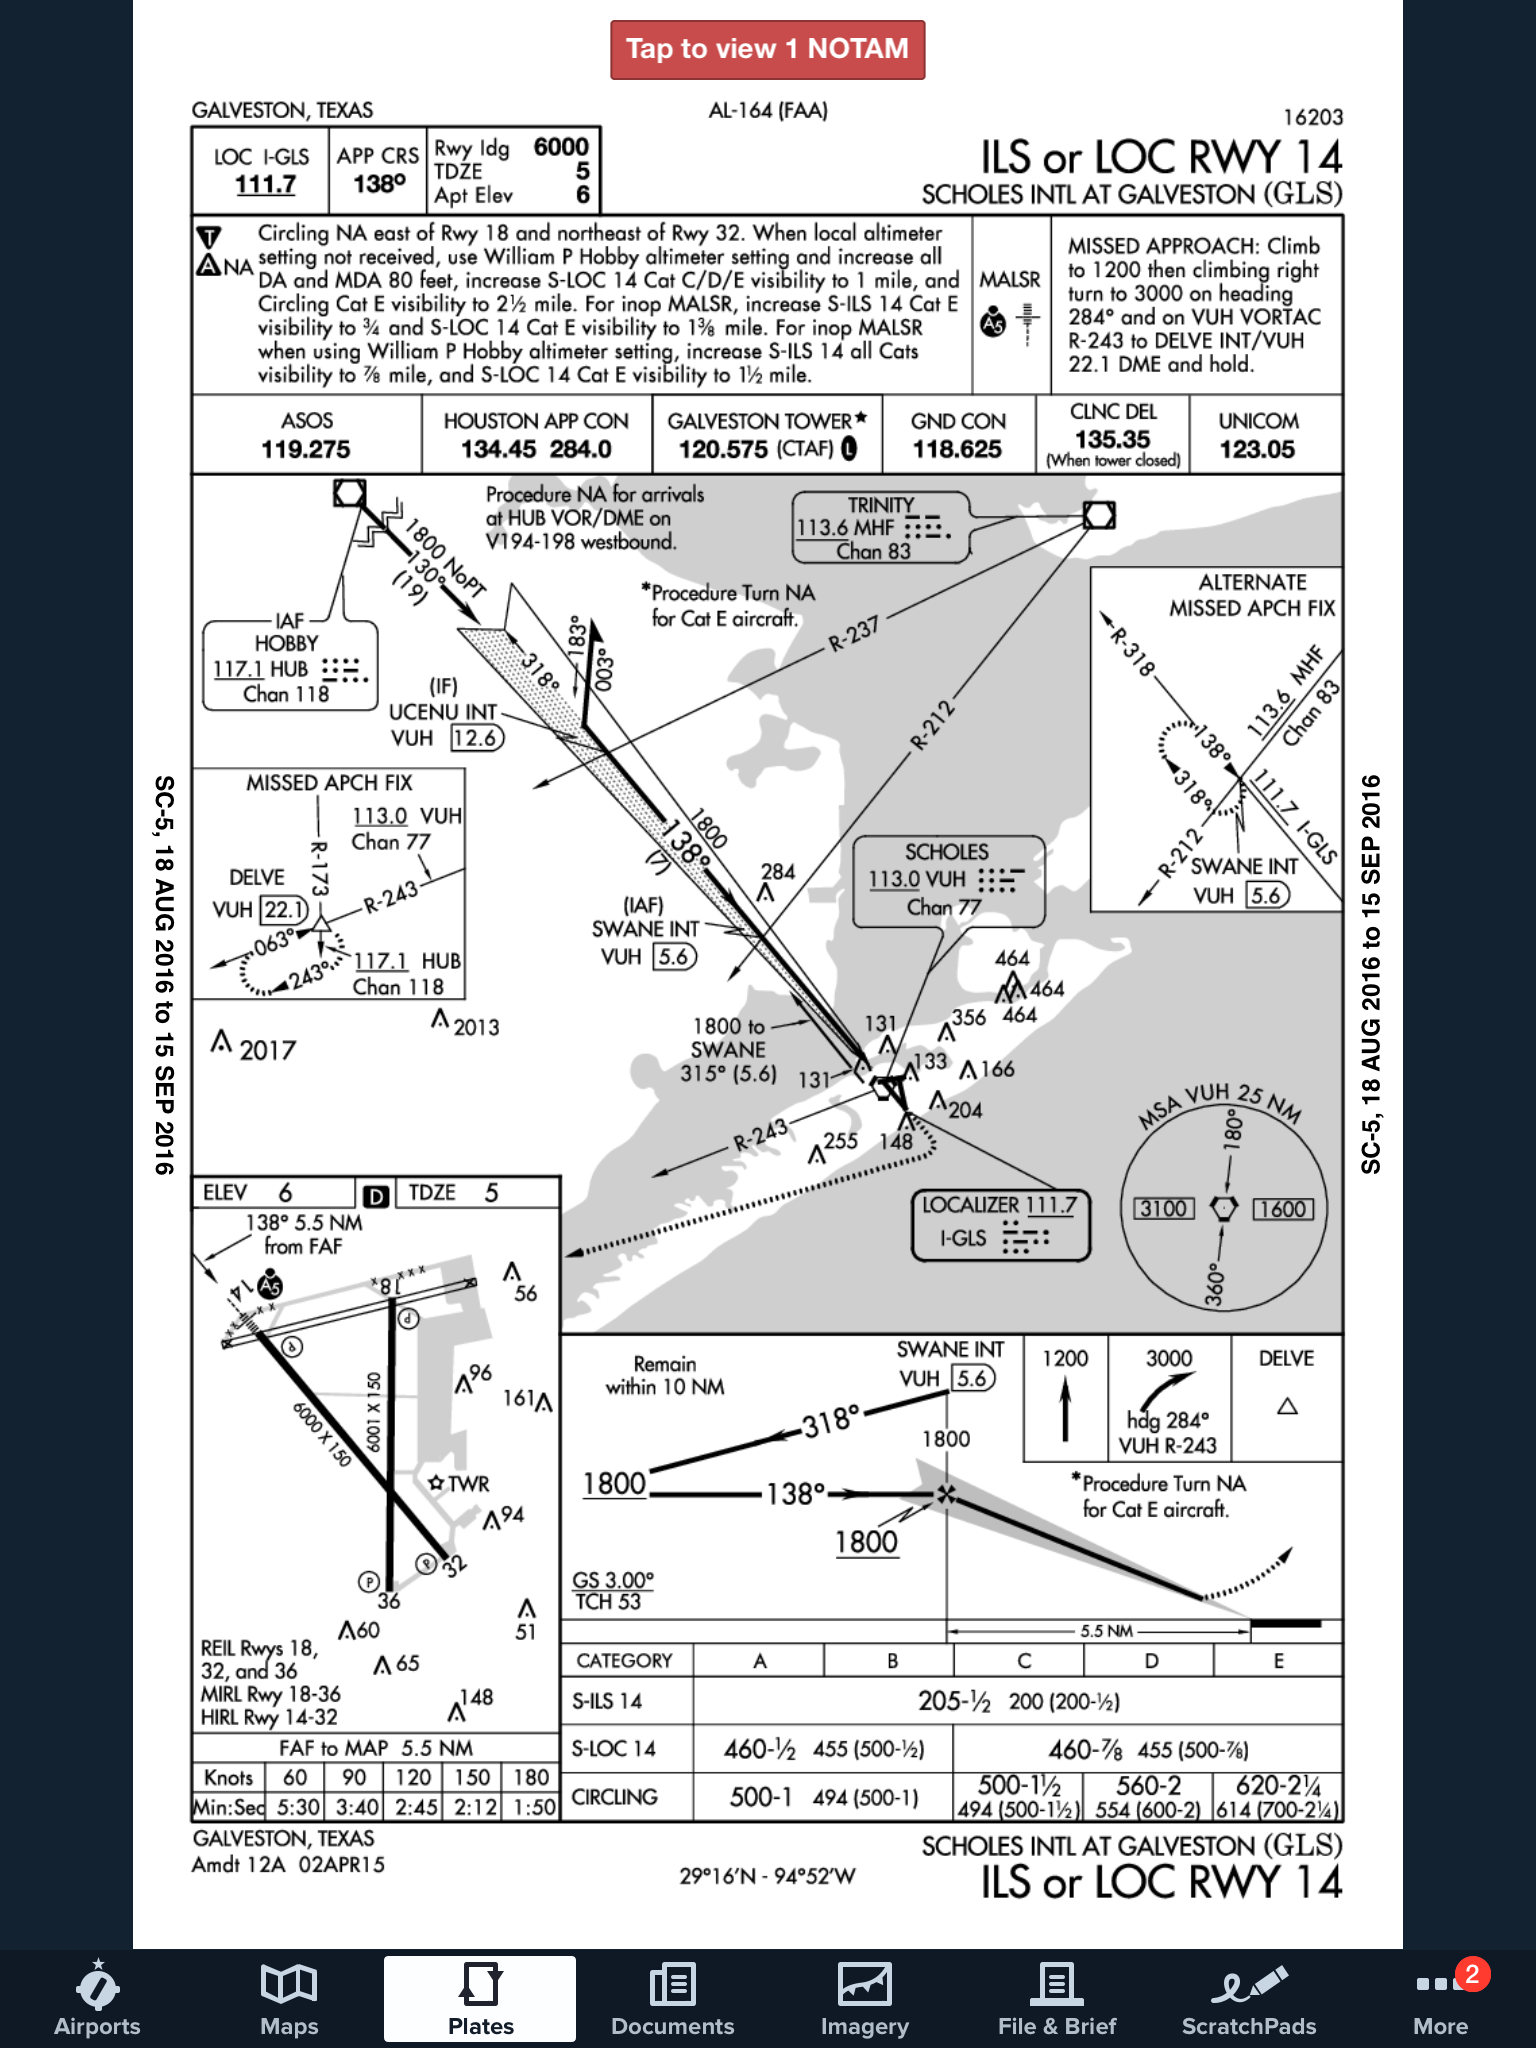
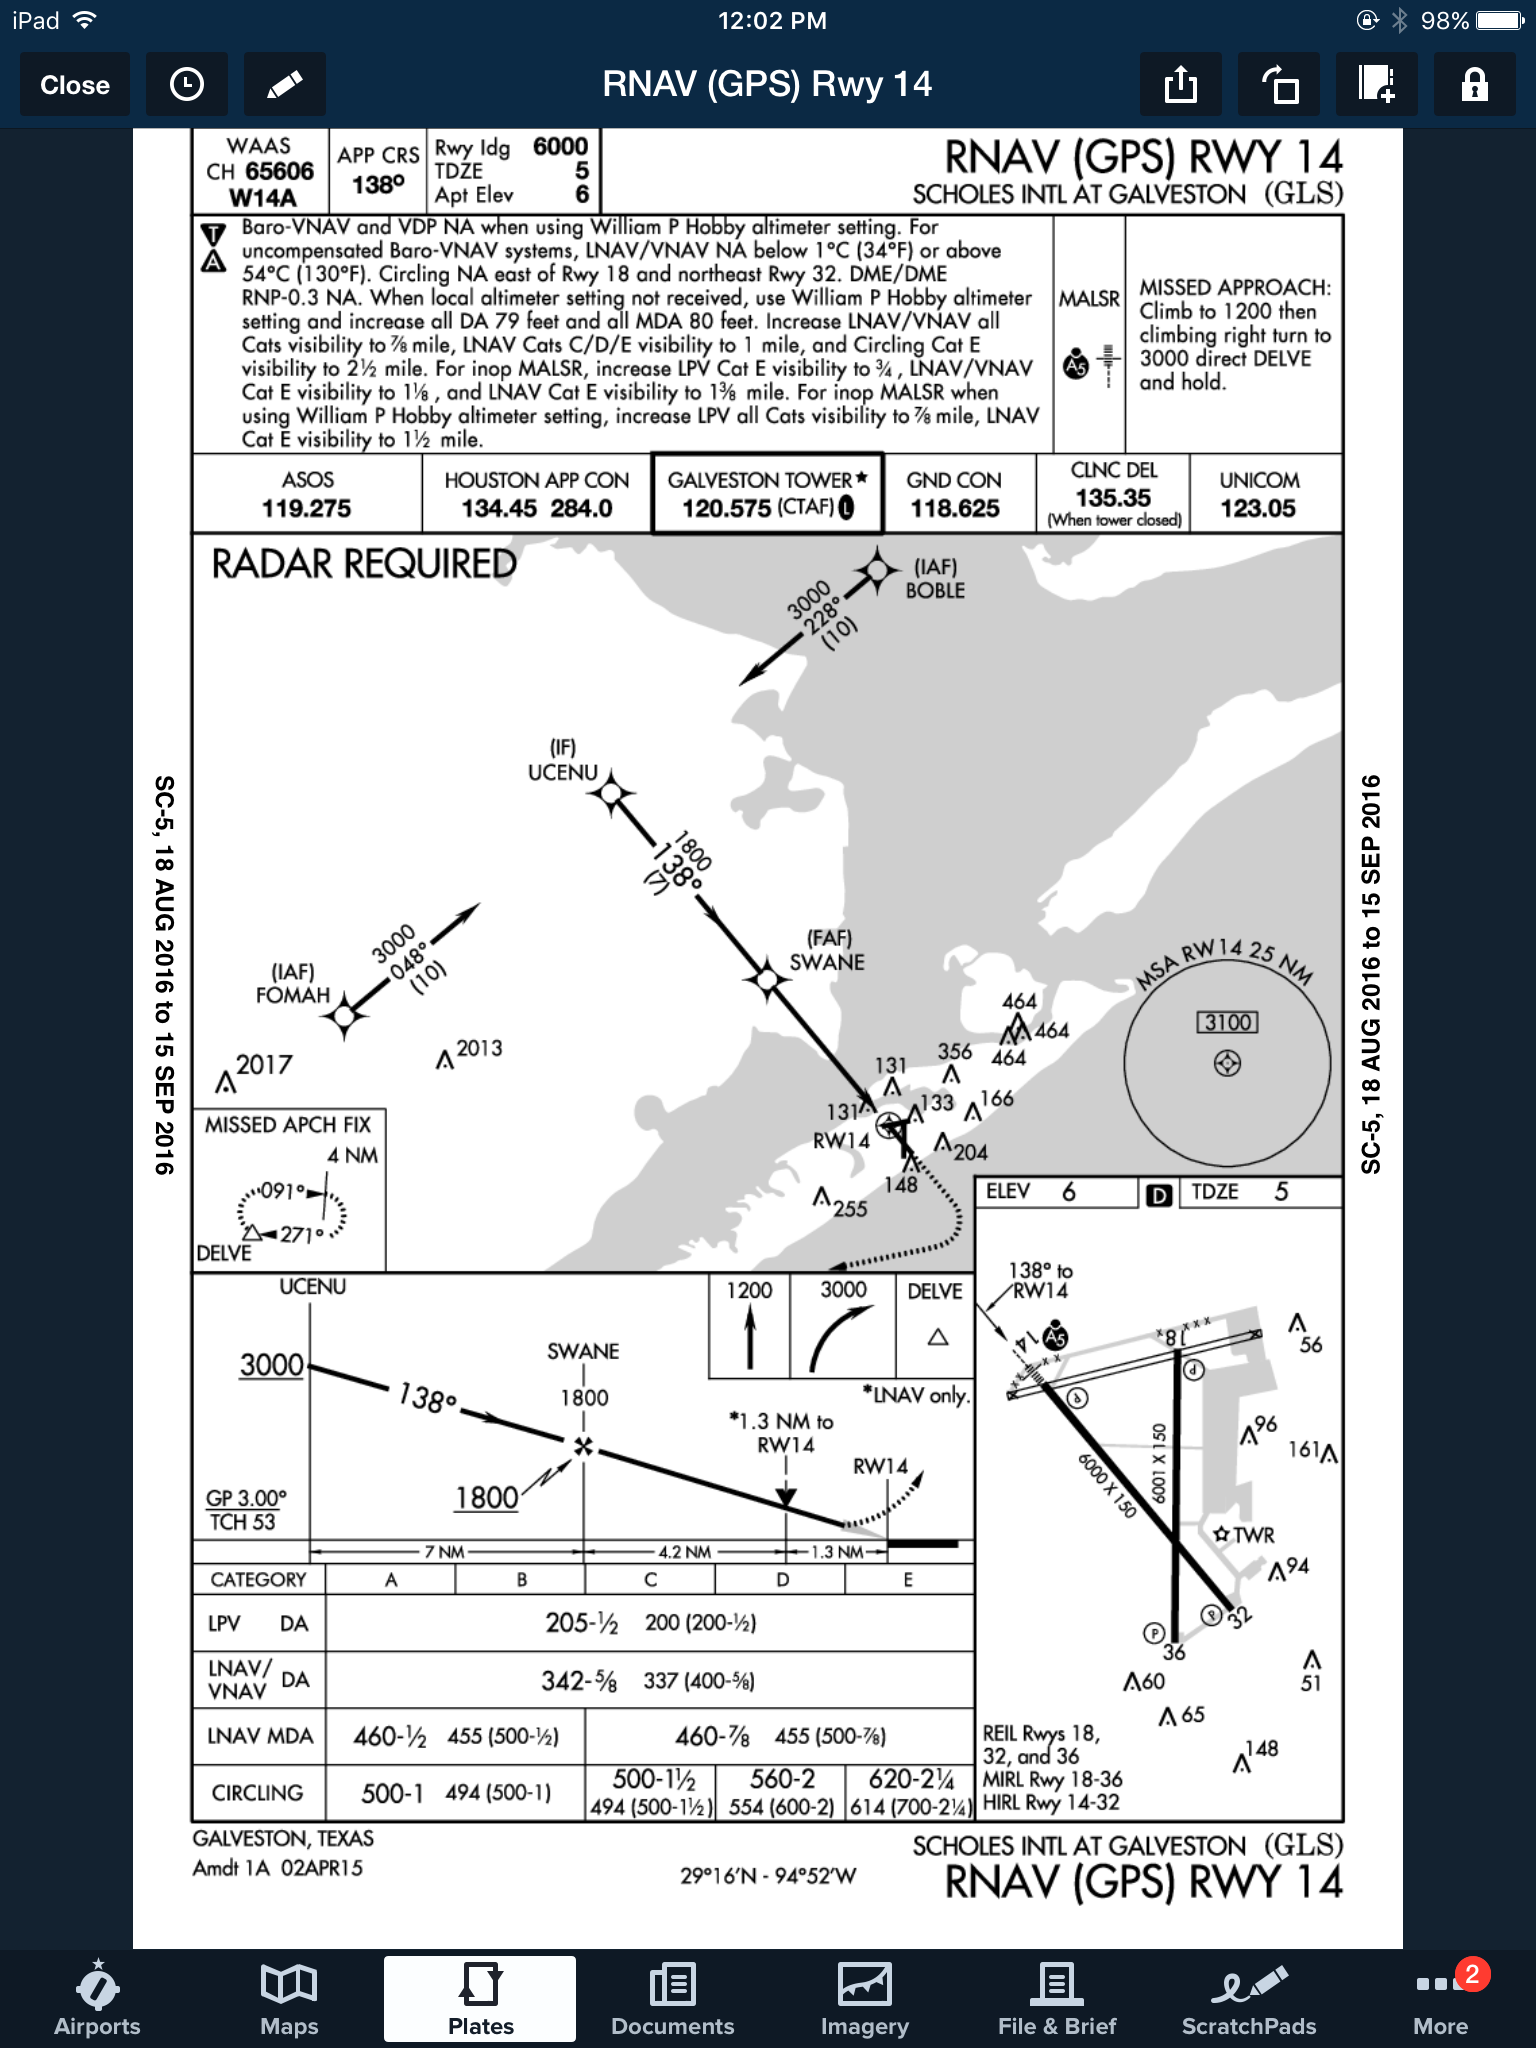
On top of that, some approaches at a certain airport are not authorized to be used in the case of the airport being used as an alternate. At the Galveston airport (KGLS), the ILS 14 is NA as an alternate procedure, but all the RNAV approaches are available.
Picking an alternate seems simple at first, but there are actually a lot of things to consider in the process.
Need help remember all this stuff? AOPA has put out a kneeboard sheet that helps all IFR pilots remember those important things when it comes to IFR flying. Check it out here.
When filing an IFR flight plan, part of the process is determining whether or not an alternate airport is required. An alternate airport is required when the following conditions exist(as is outlined by the FAA in 91.169 (b)): The weather conditions at the destination airport From 1 hour before your arrival time to 1 hour…
The Garmin GTN 750 is an awesome piece of equipment. Garmin tried to make the user interface with the touch screen as simple as possible (though there still is a bit of a learning curve when moving up from a Garmin 530W). Garmin also integrated several key features that the 530W did not have that makes flying with a Garmin GTN 750 in IFR all that much better.
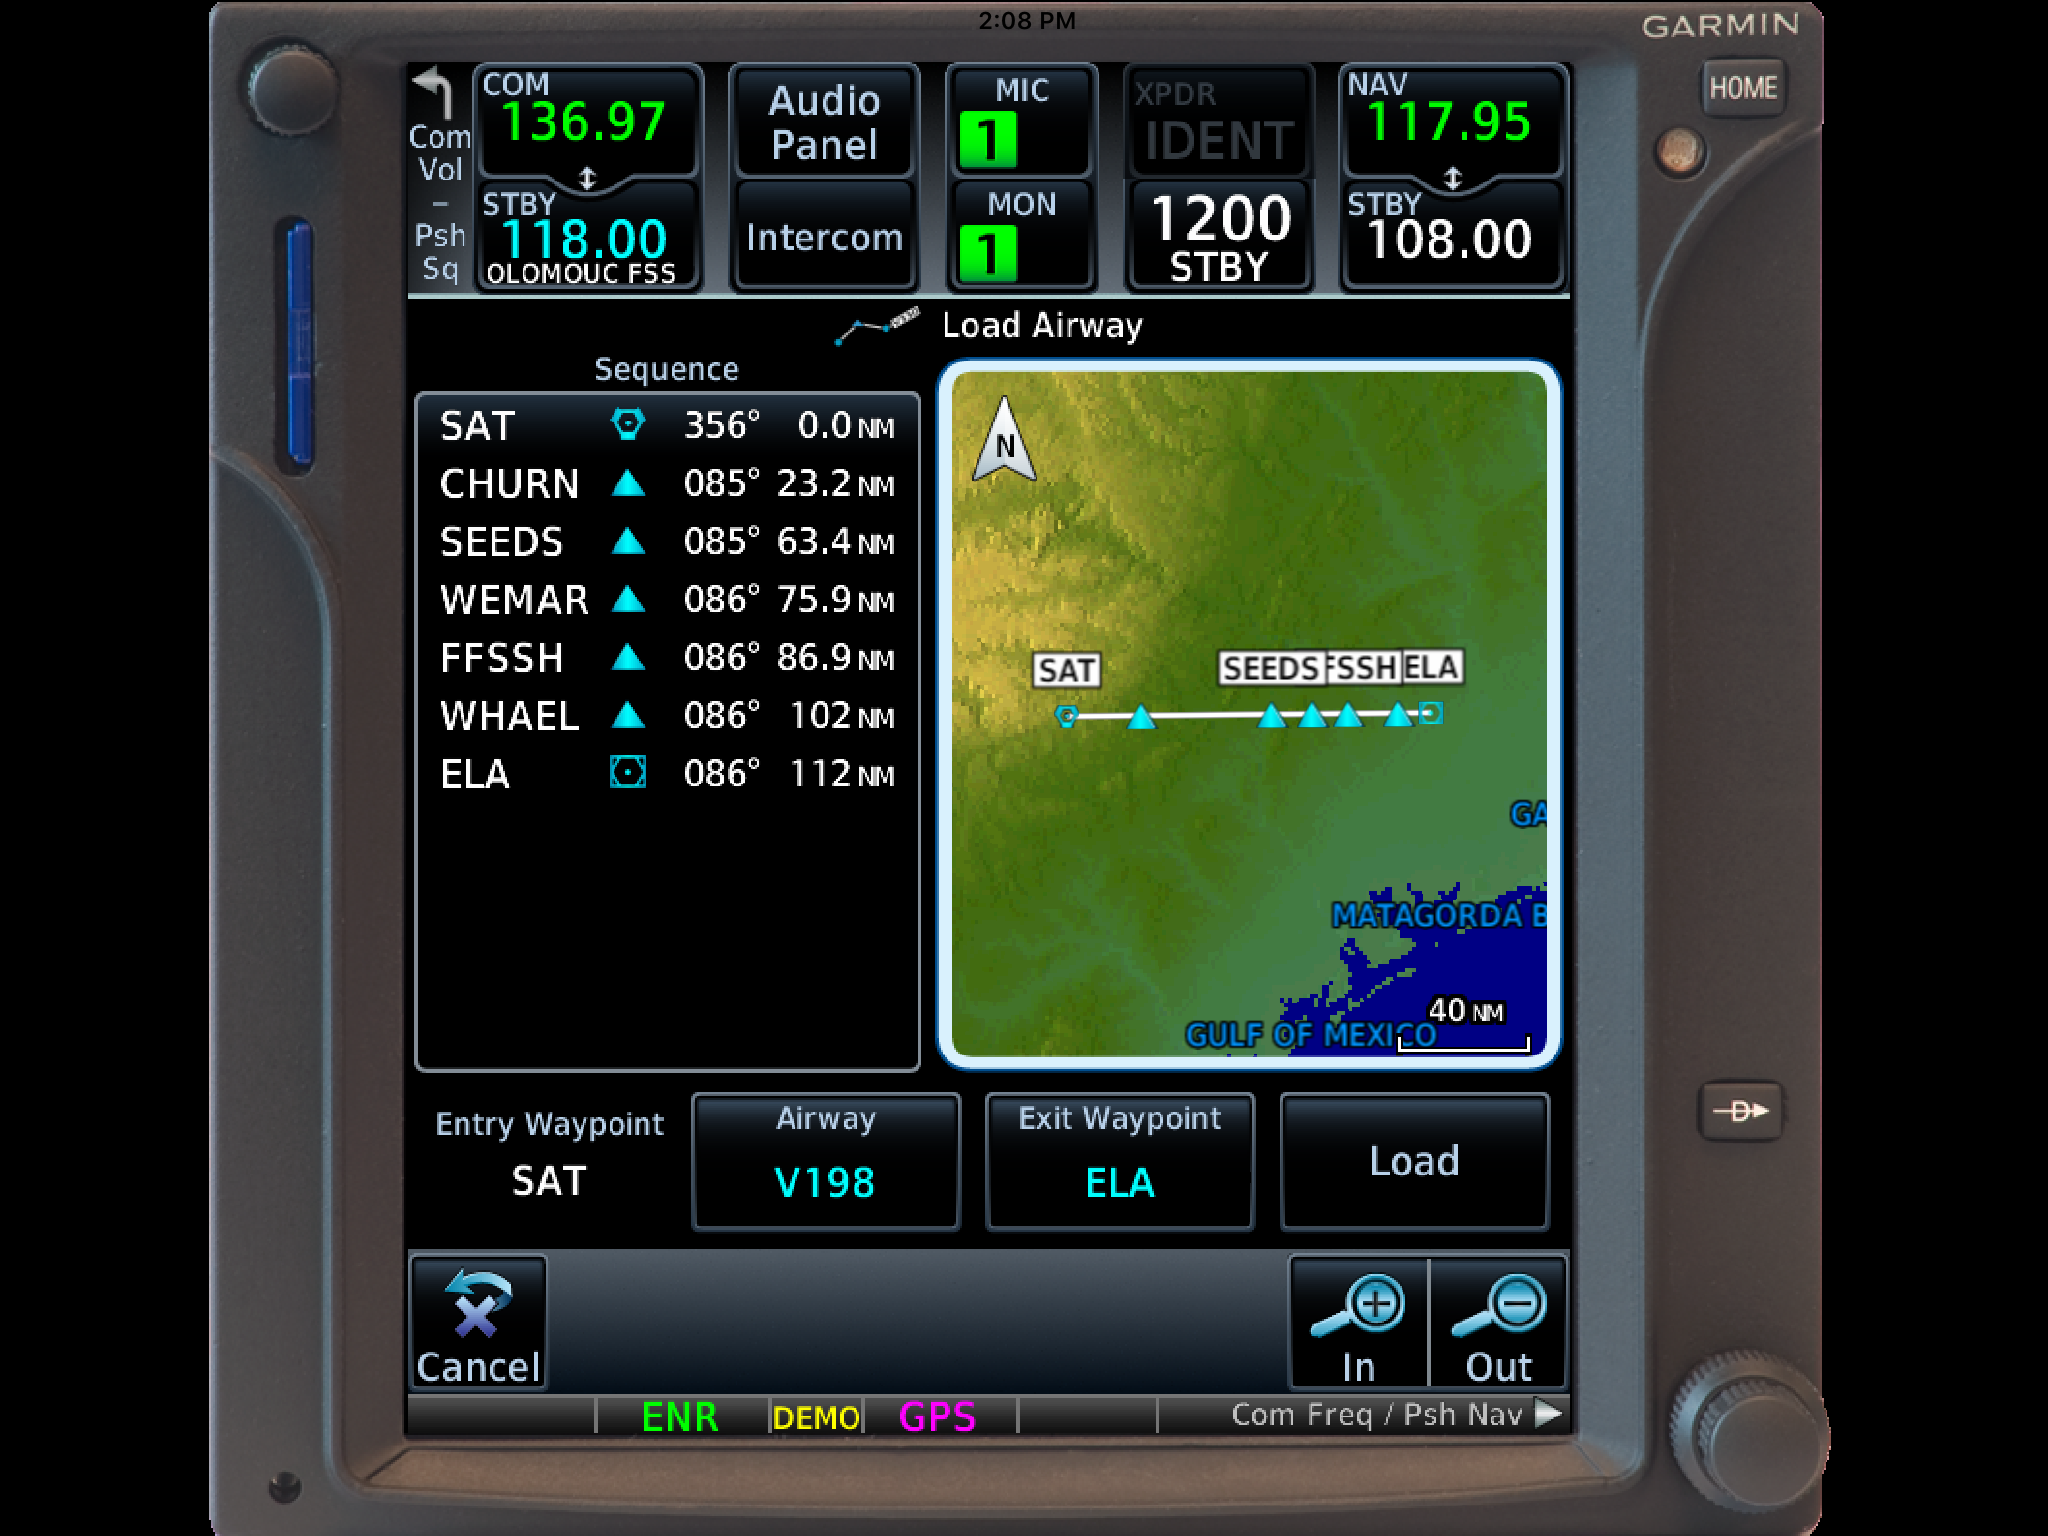
The two features of the Garmin GTN 750 I want to focus on today are the “Load Airway” feature and the “Hold at Waypoint” feature. If a pilot isn’t looking for these specifically, they can actually be a bit hard to find. The “Load Airway” feature is especially handy when flying IFR long distances with several airways as part of the clearance. Here’s how to utilize both.
Load Airway
On your flight plan page, insert the waypoint that you will be joining the airway, or, if your clearance was radar vectors to join an airway, then insert the waypoint on the airway that begins the leg you will be joining on.
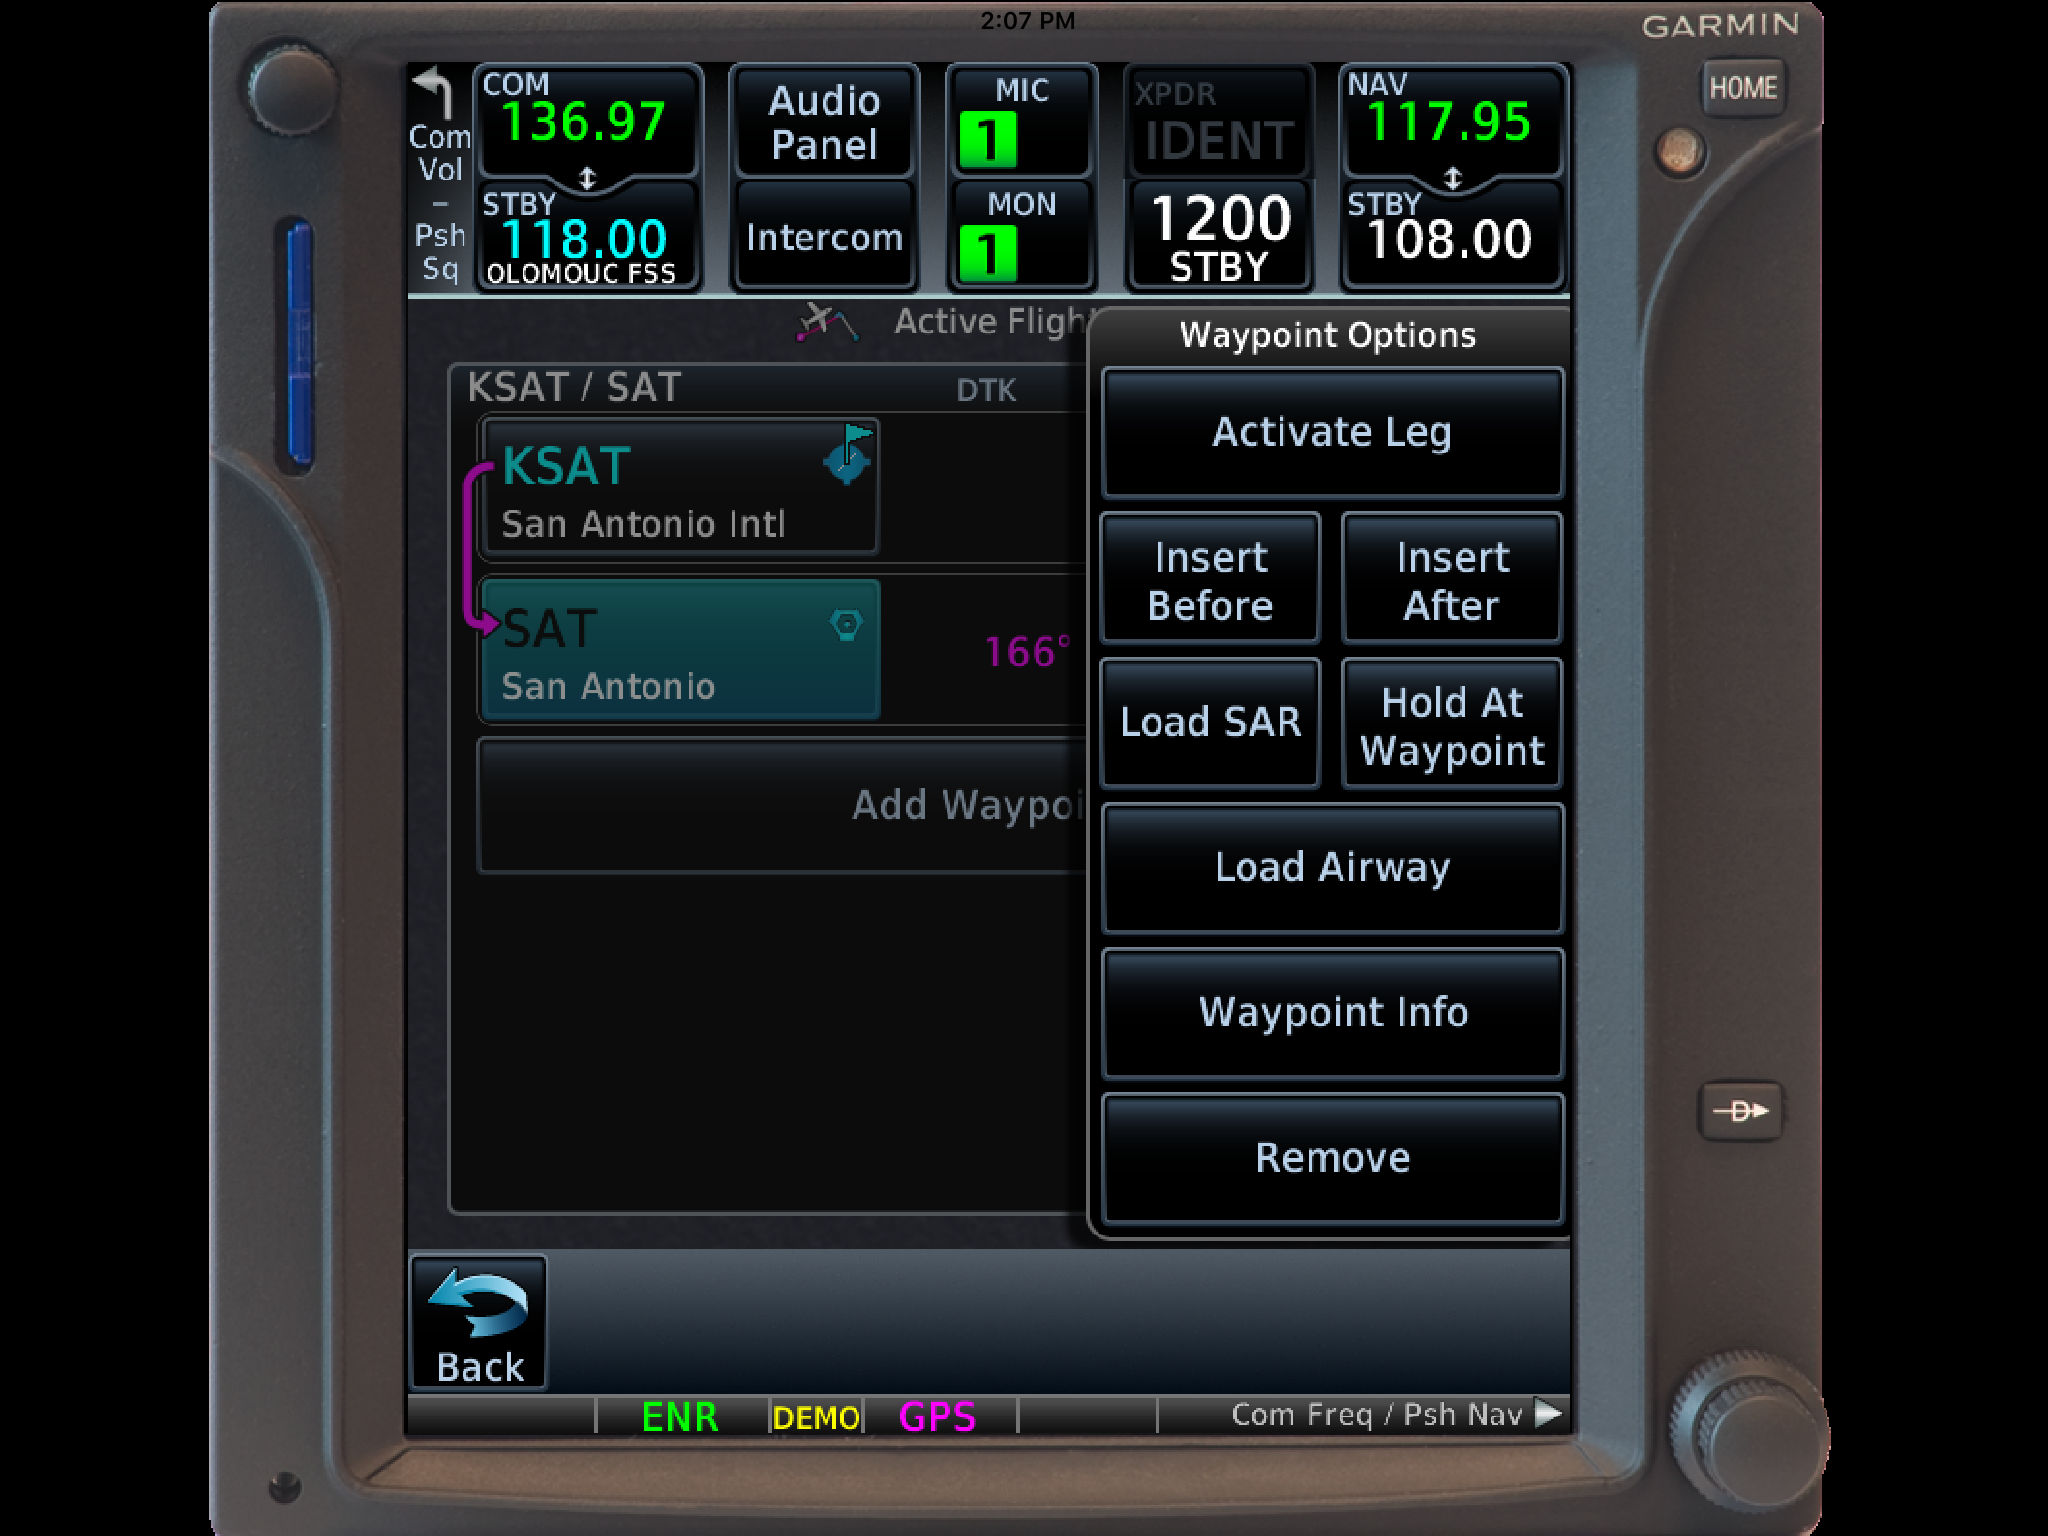
Tap the waypoint you just inserted.
A menu will pop up. Tap Load Airway.
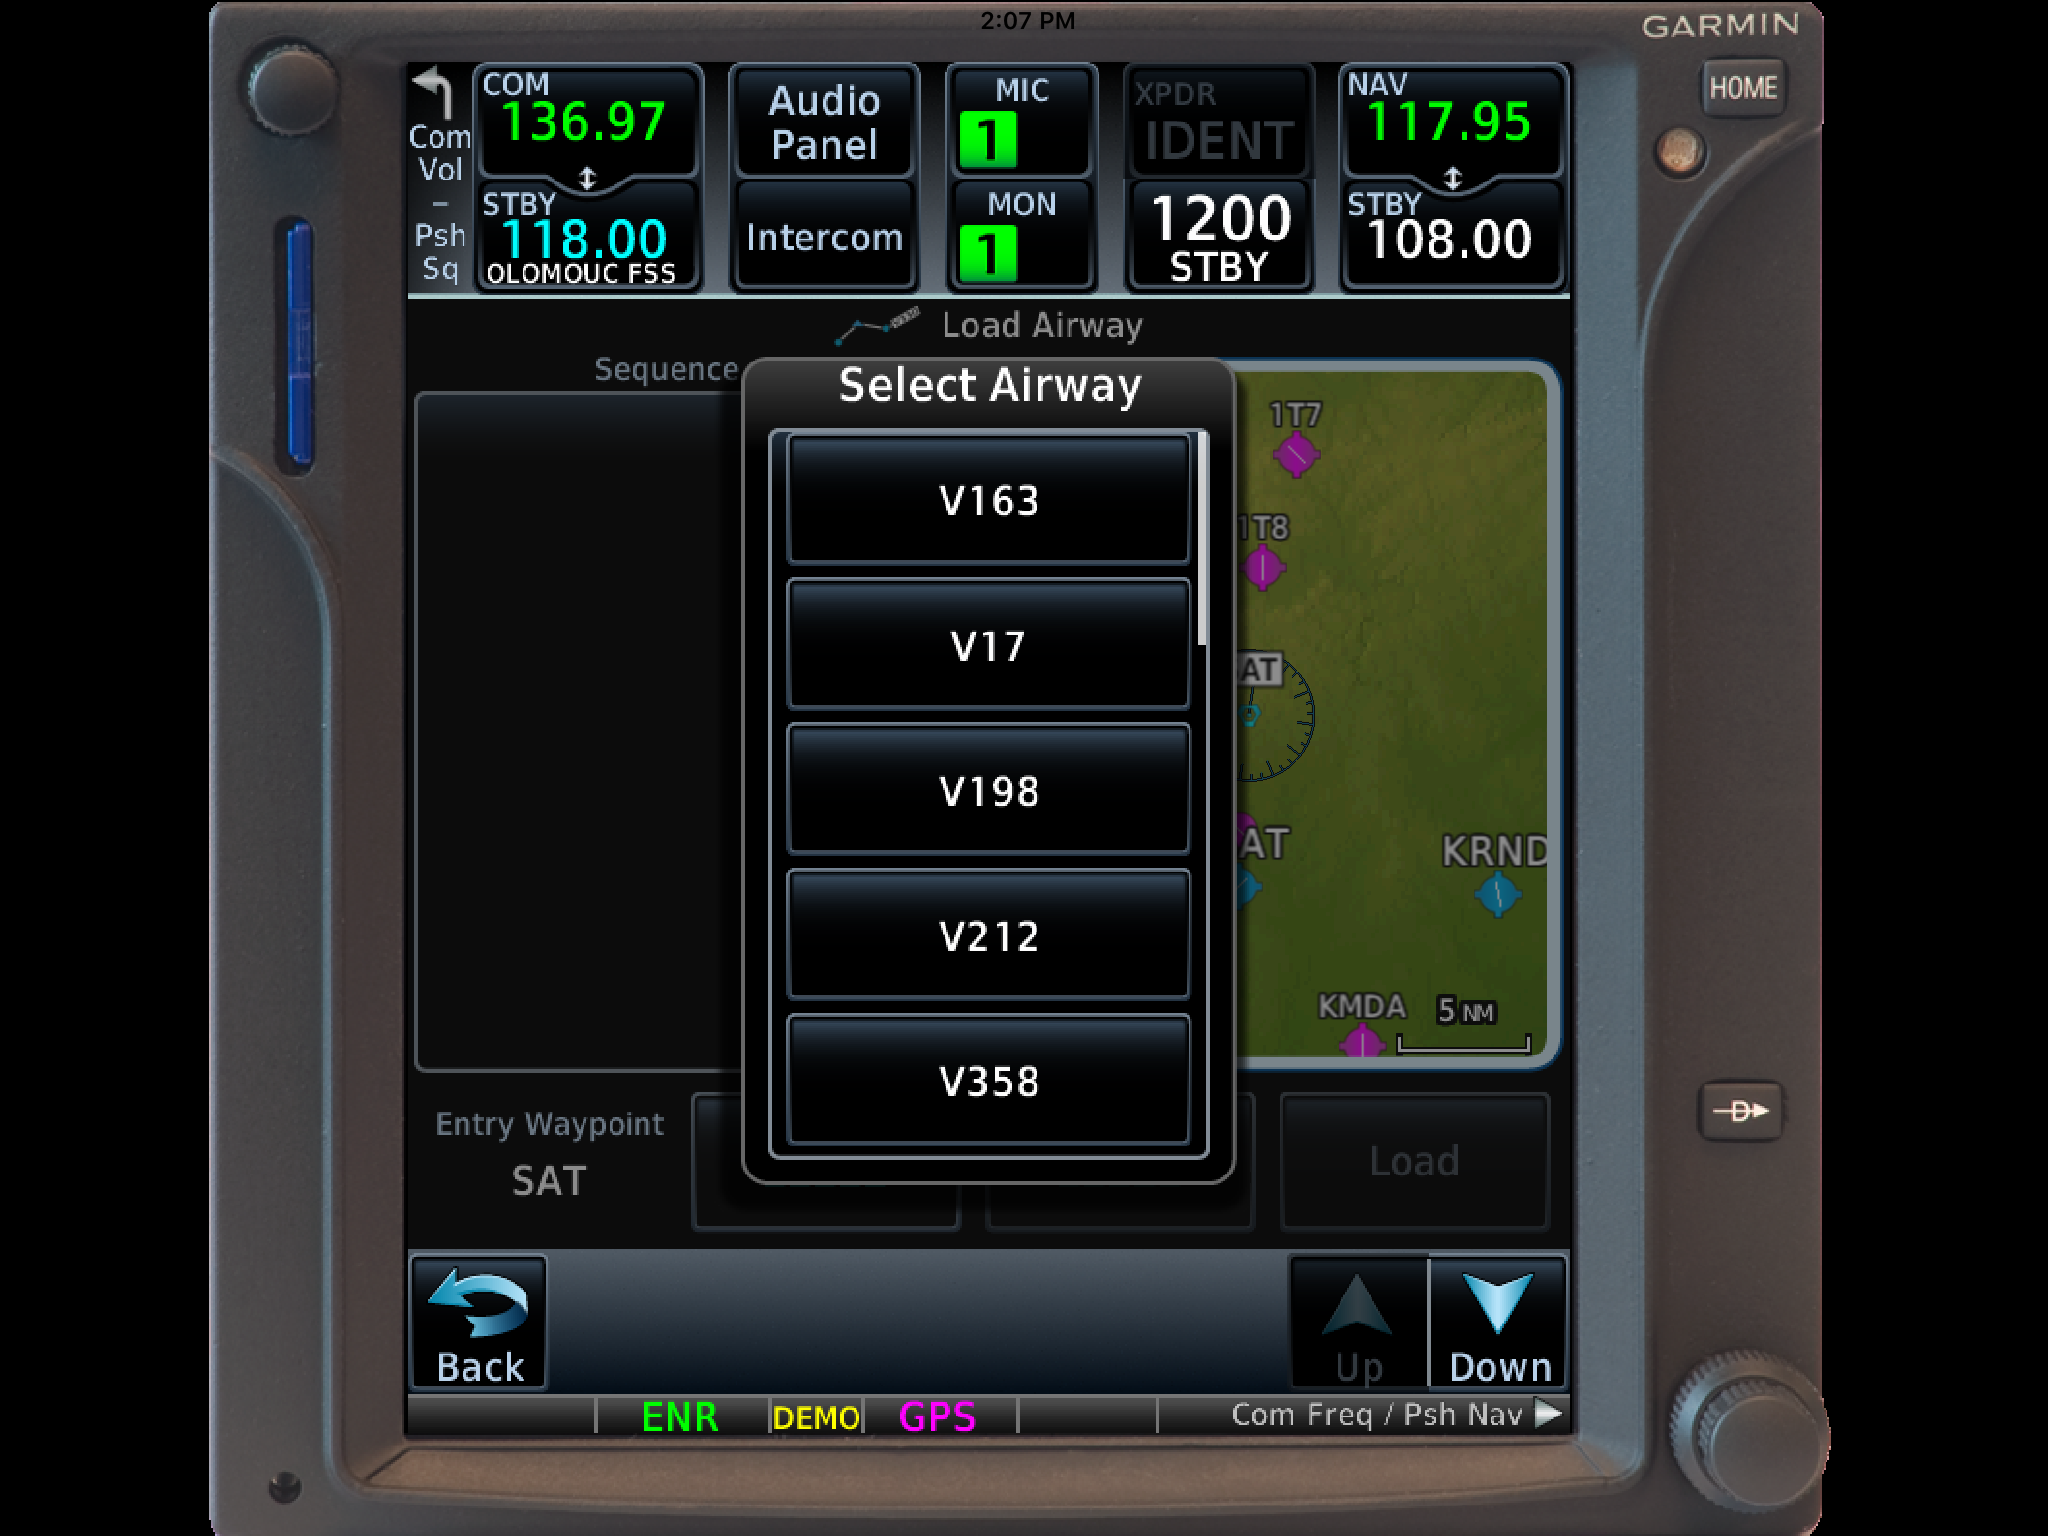
Select the Airway you want from the next menu that pops up.
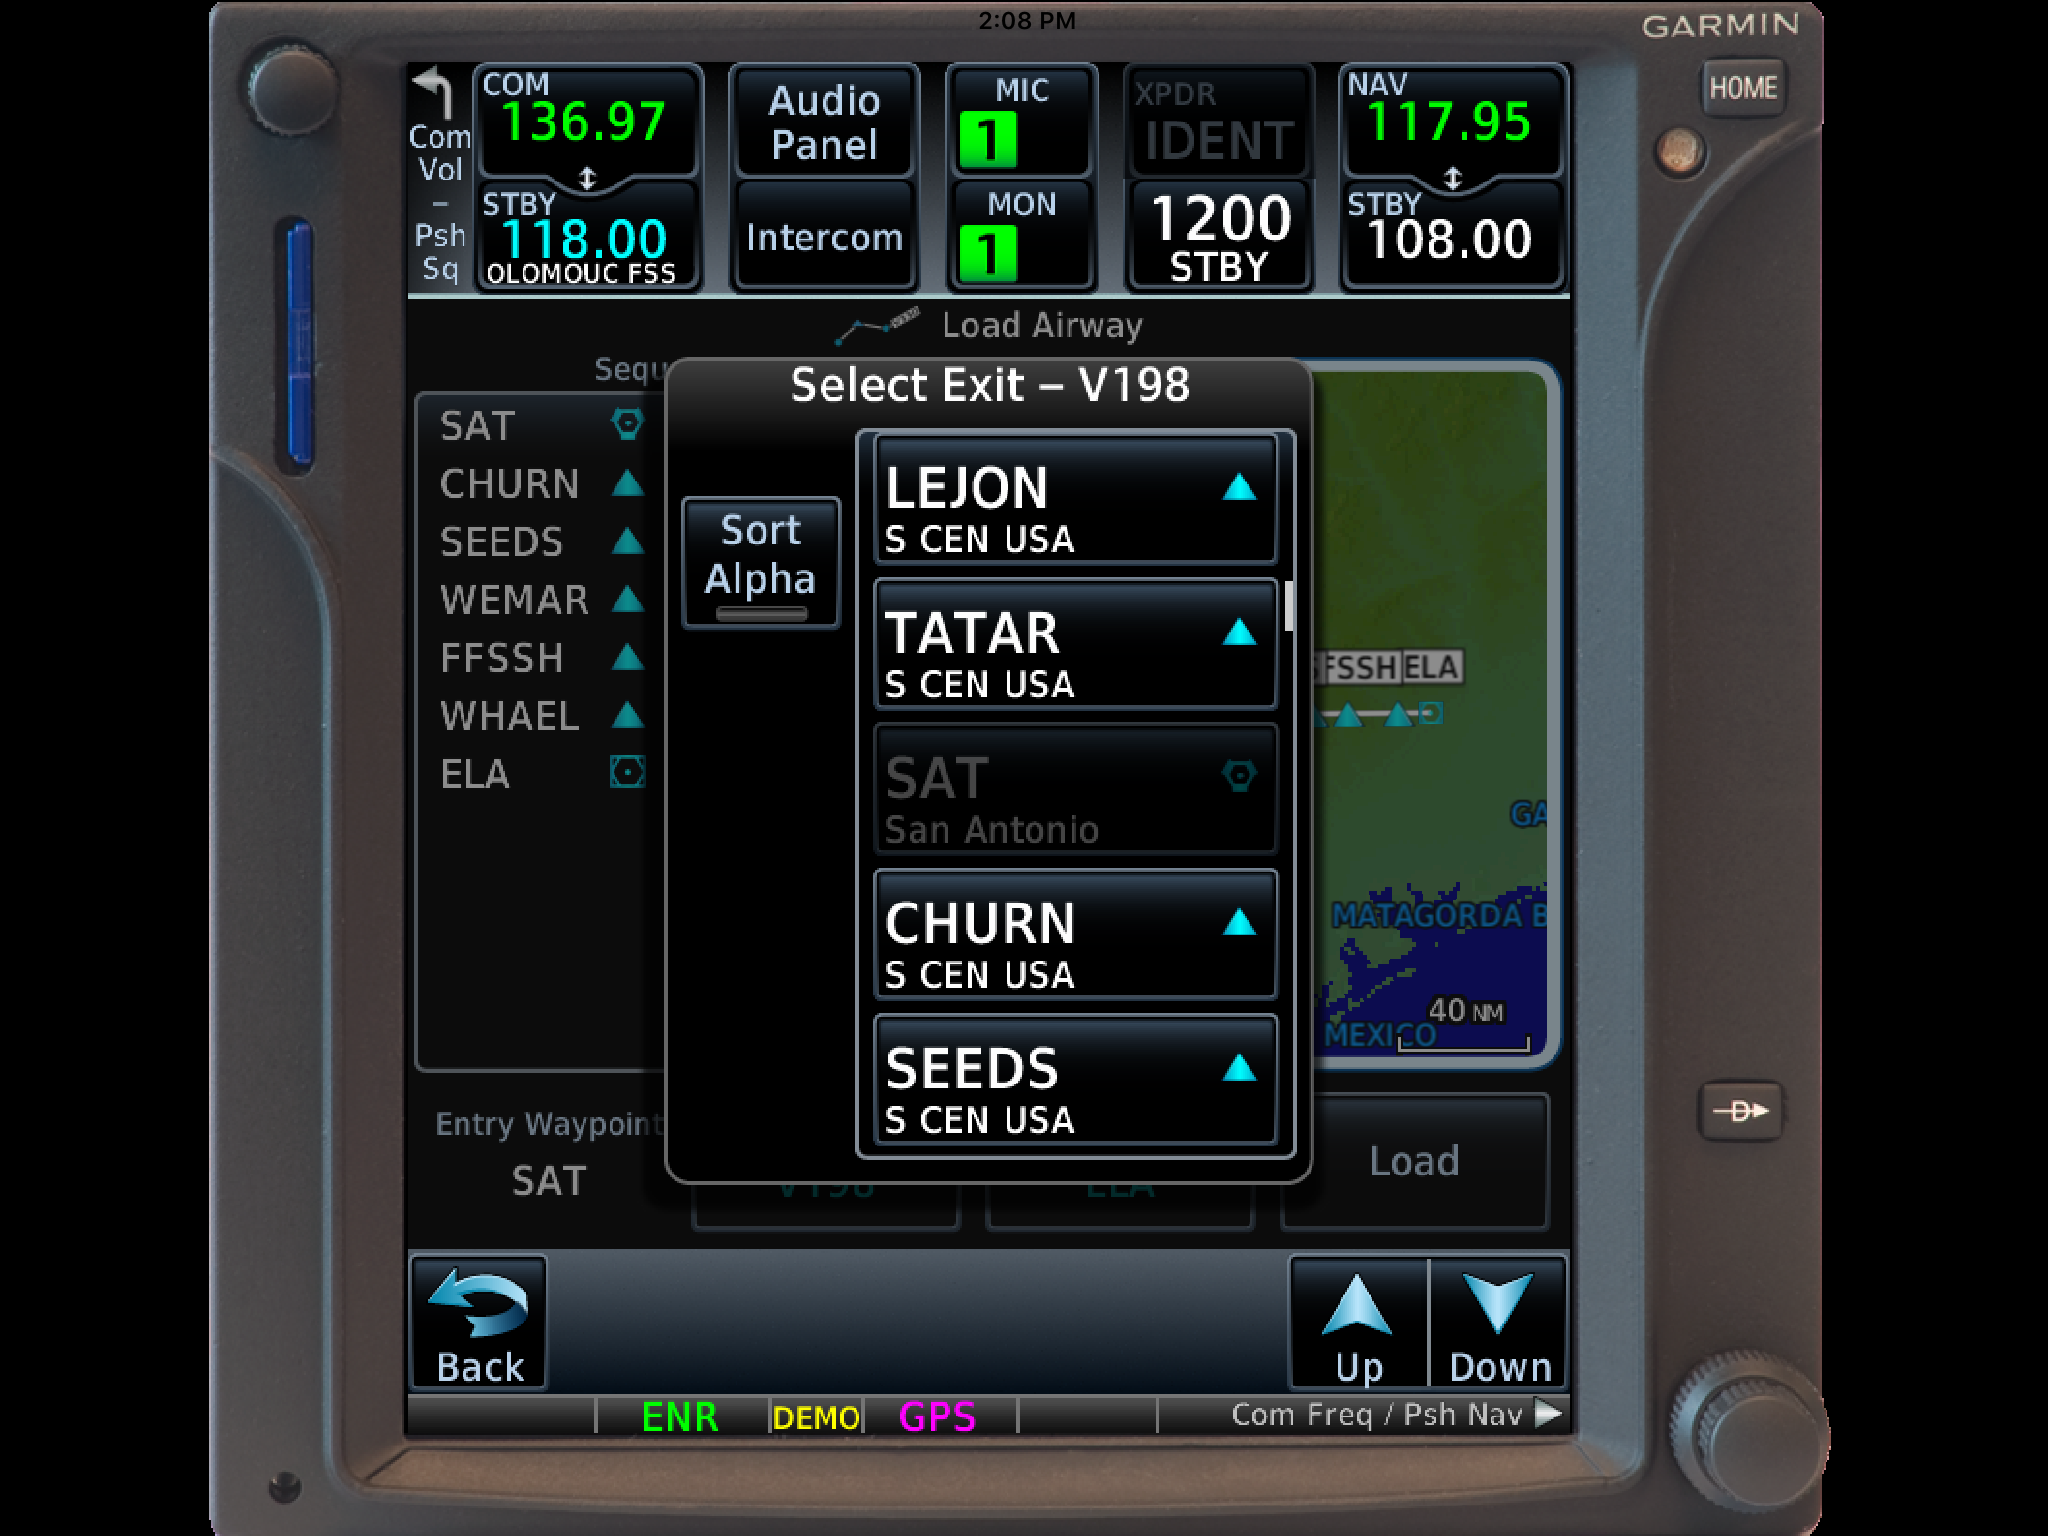
Then, a list of waypoints will display to exit the airway. Select the waypoint where you will be exiting the airway.
Note: Garmin defaults to listing these waypoints alphabetically. If you unselect the “Sort Alpha” option, it will sort the waypoints by direction and distance from the entry waypoint. This is a little more practical, easier to work with, and how I recommend doing it. This way you can either scroll up or down depending on the direction of travel on the airway and find your exit waypoint.
Tap Load.
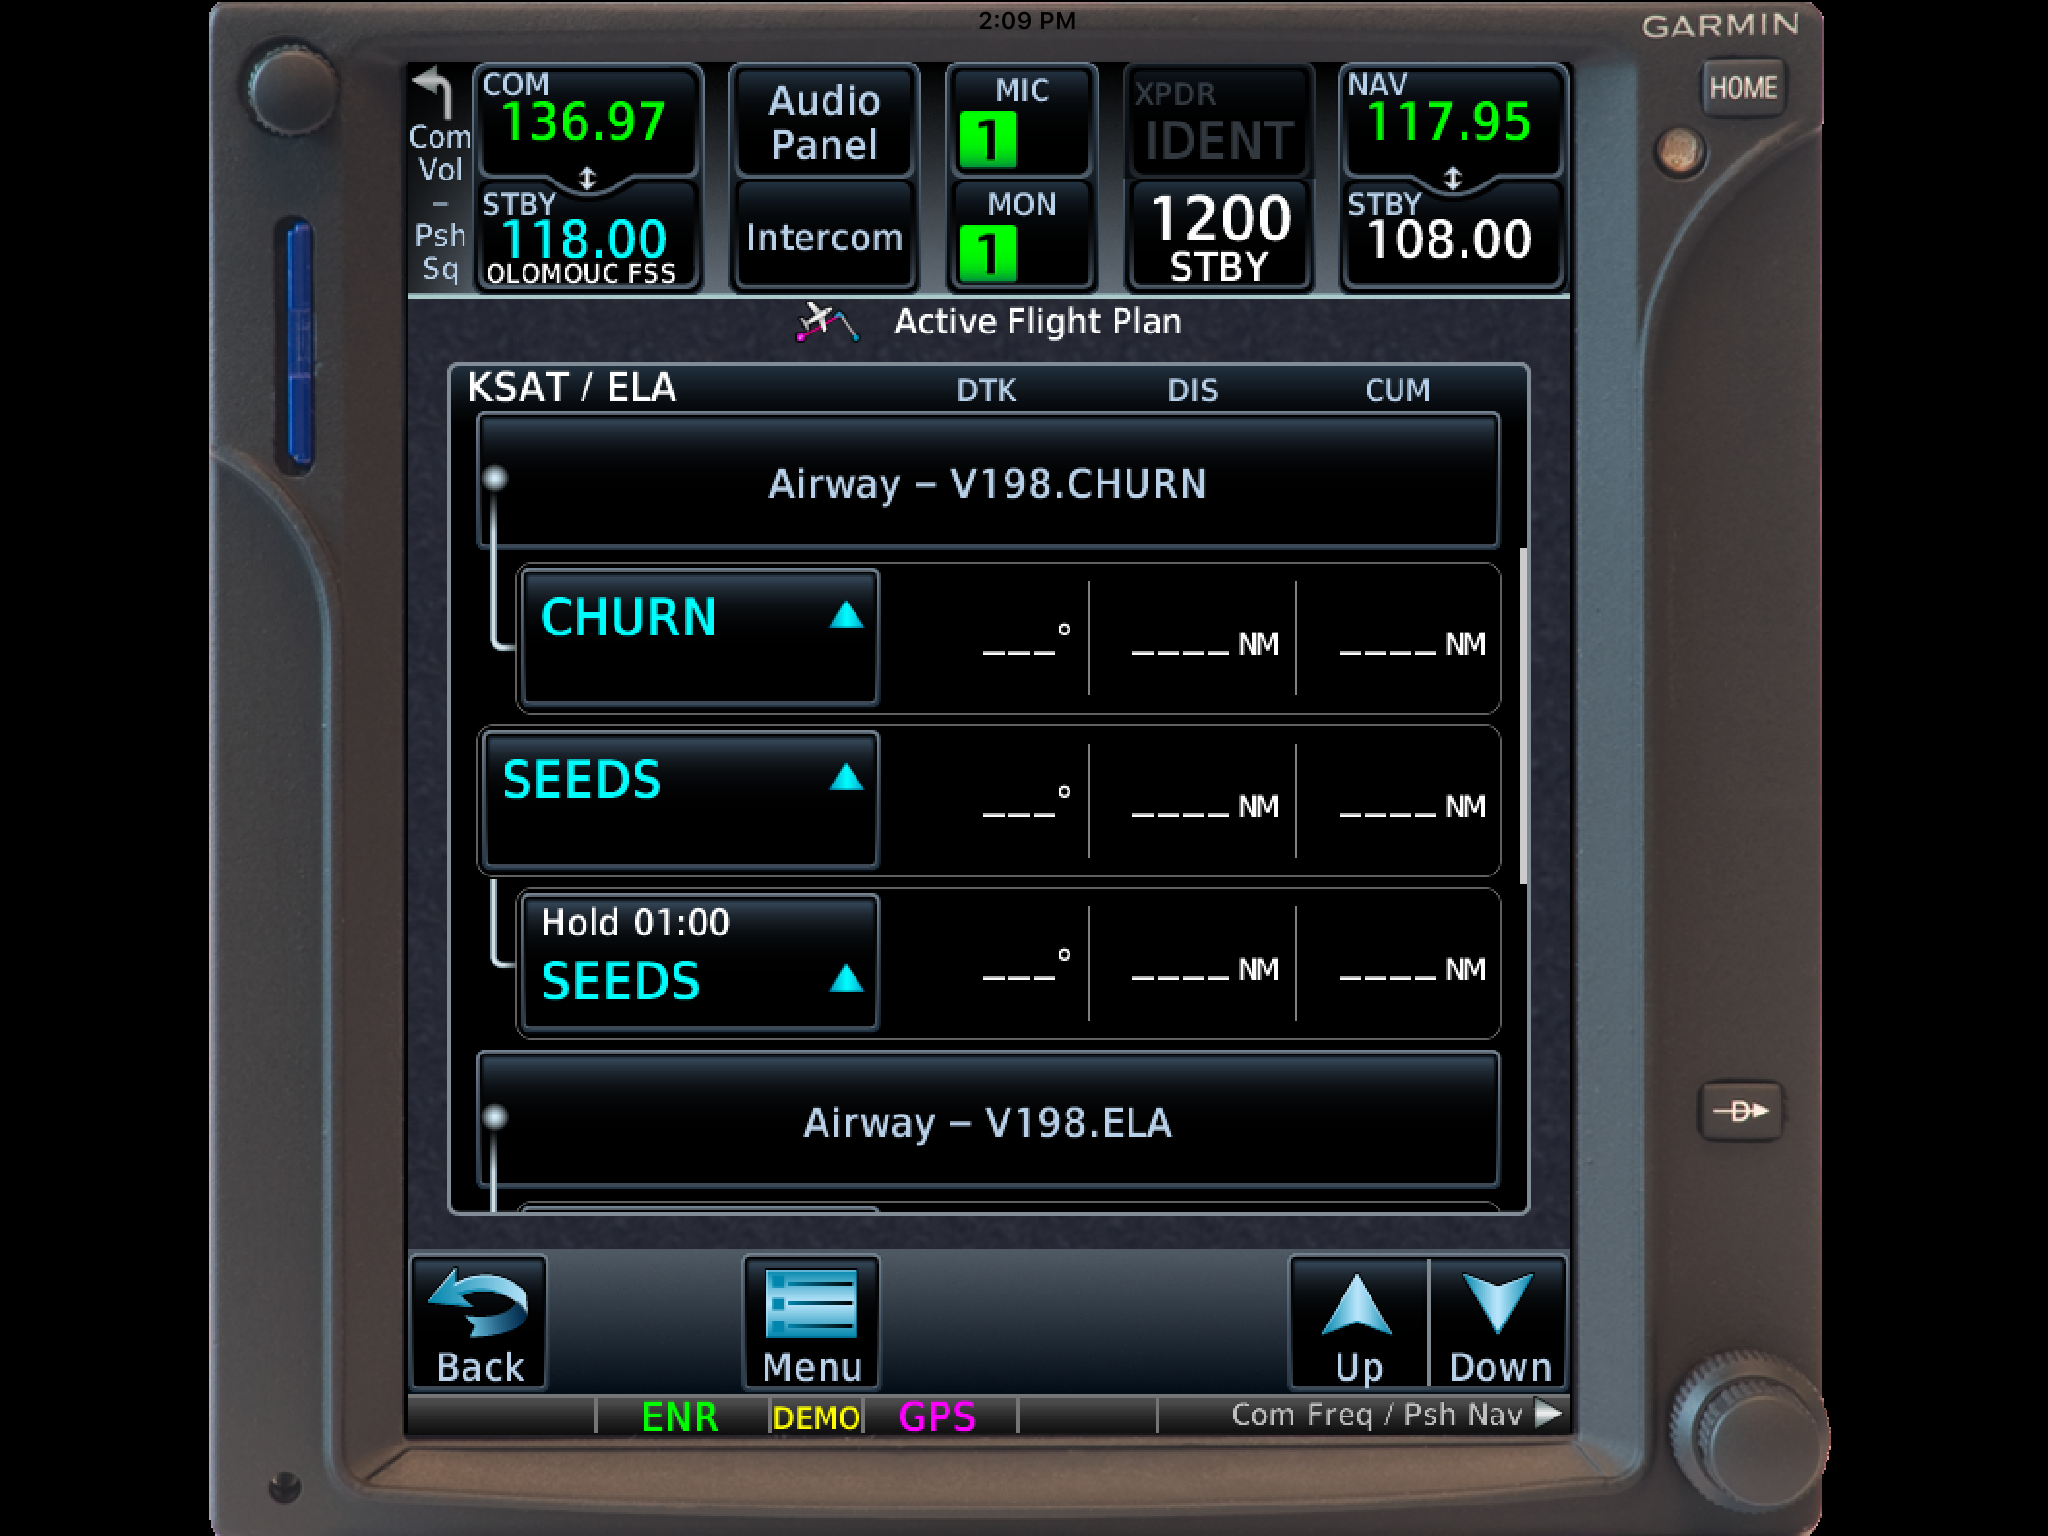
The Airway and all the waypoints in between your entry and exit waypoints appear in your flight plan.
If you are getting vectors to join the airway, you’ll need to use the Activate Leg function to activate the leg you will be joining the airway on.
On the Flight Plan page, tap the waypoint that ends the leg you want to activate.
On the menu that pops up, tap Activate Leg.
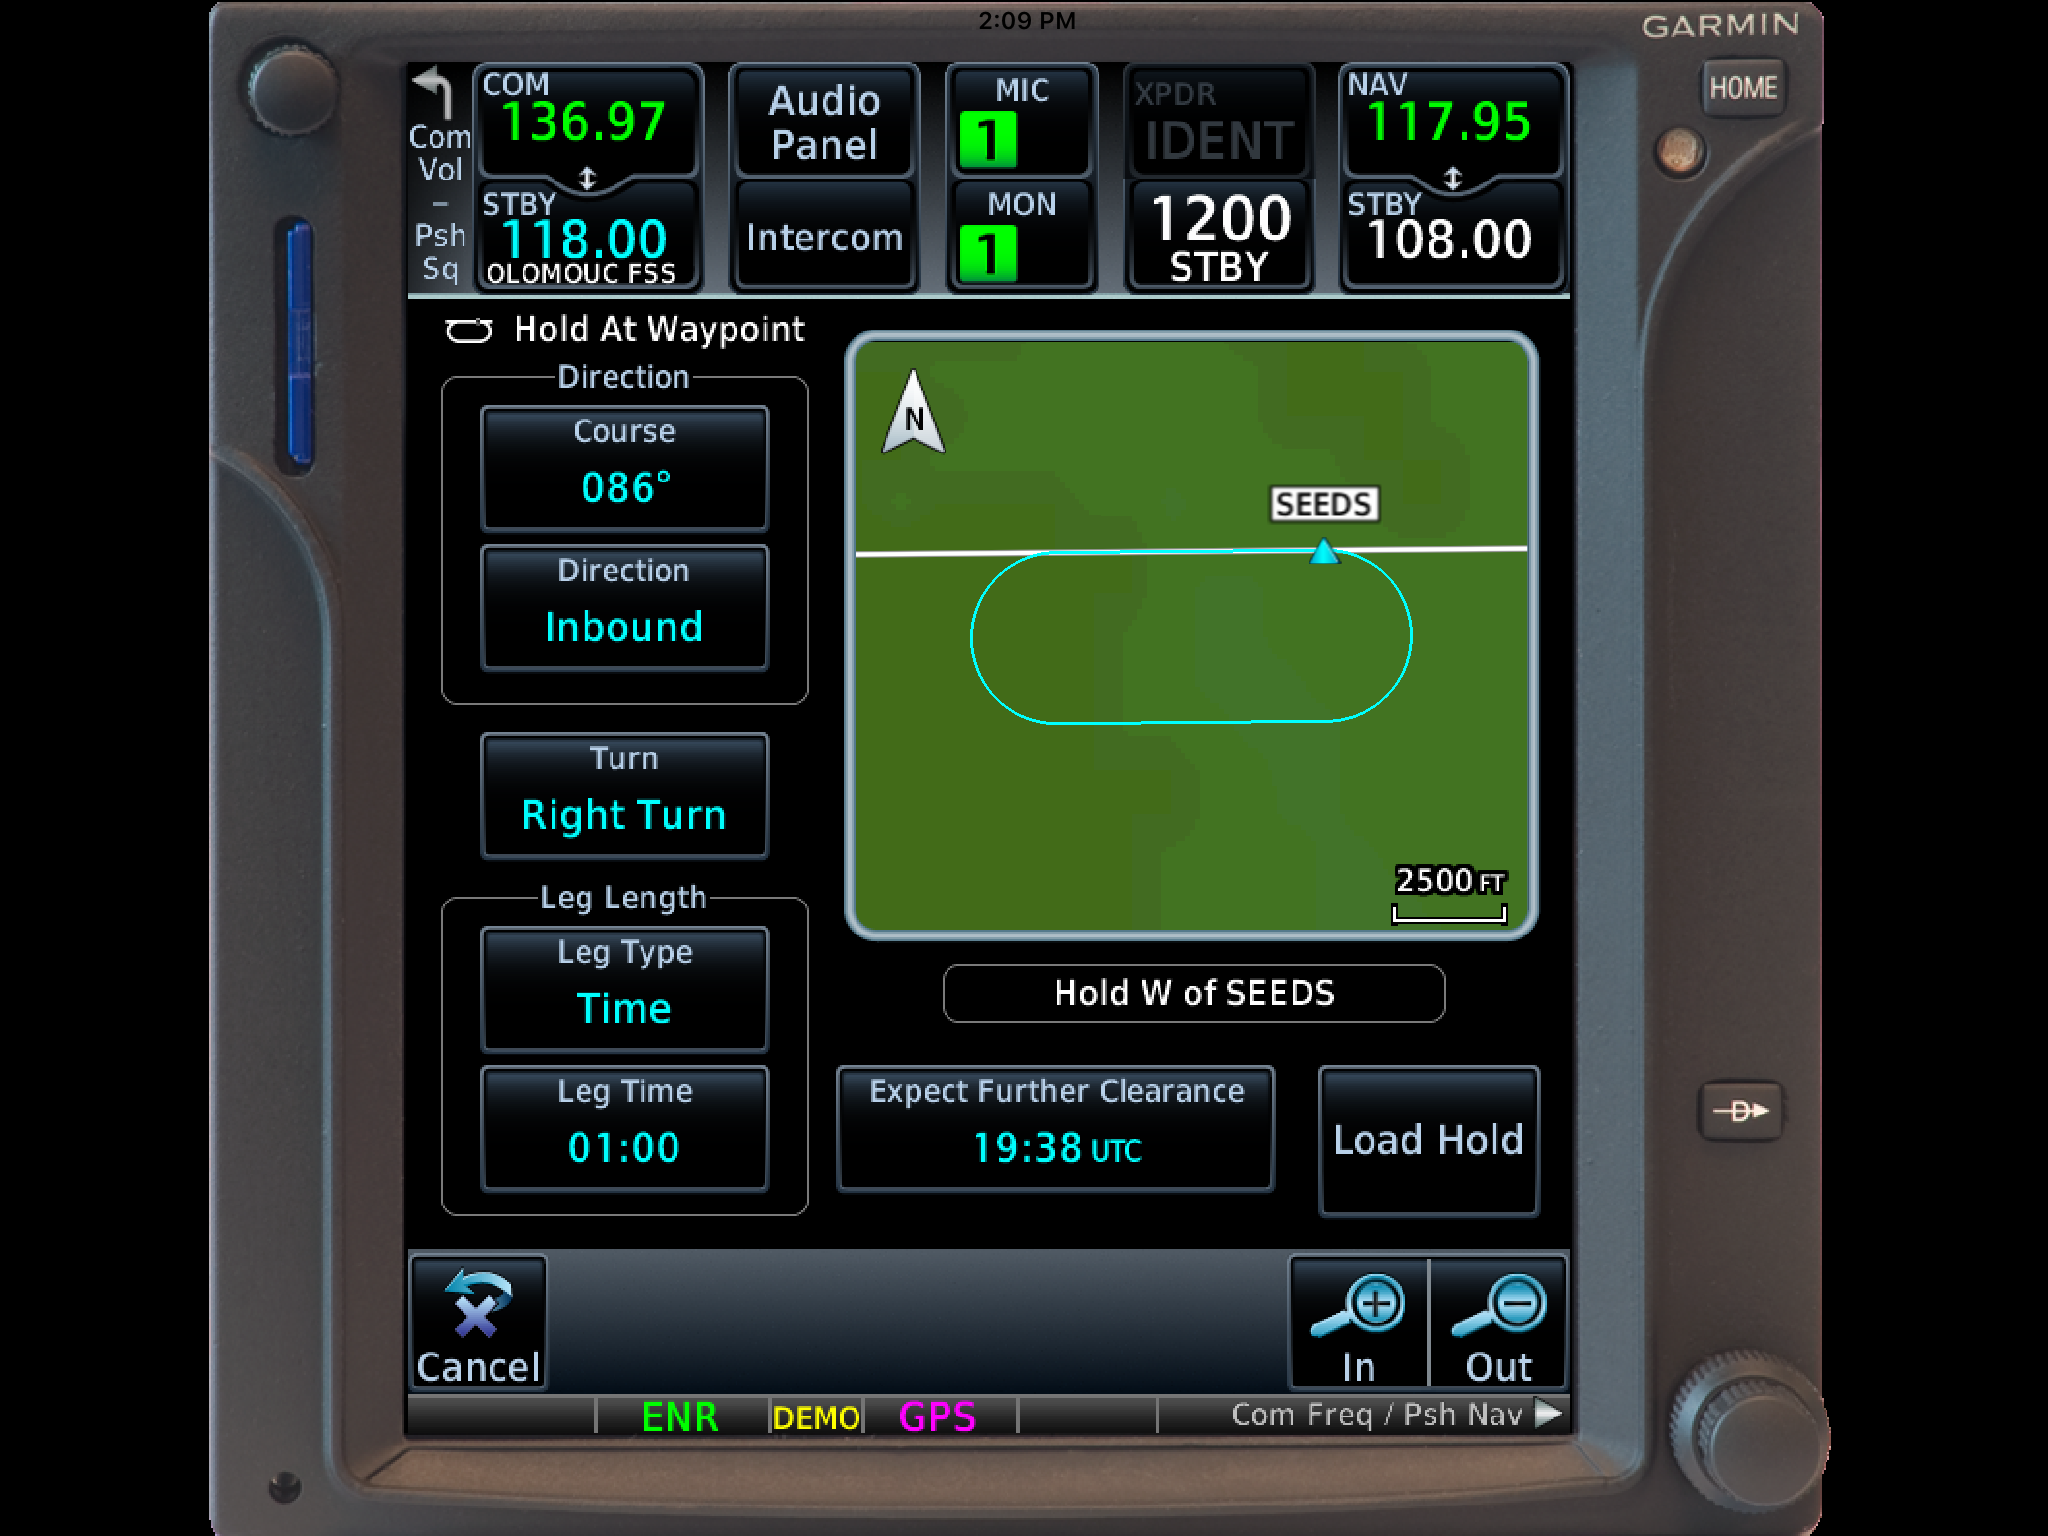
Hold At Waypoint
The Garmin GTN 750 allows pilots to place a holding pattern at any waypoint that is in the Nav Database (or any user created waypoint). Here’s how to do it.
On the Flight Plan page, tap the Waypoint that you want to hold at.
On the menu that pops up, tap Hold At Waypoint
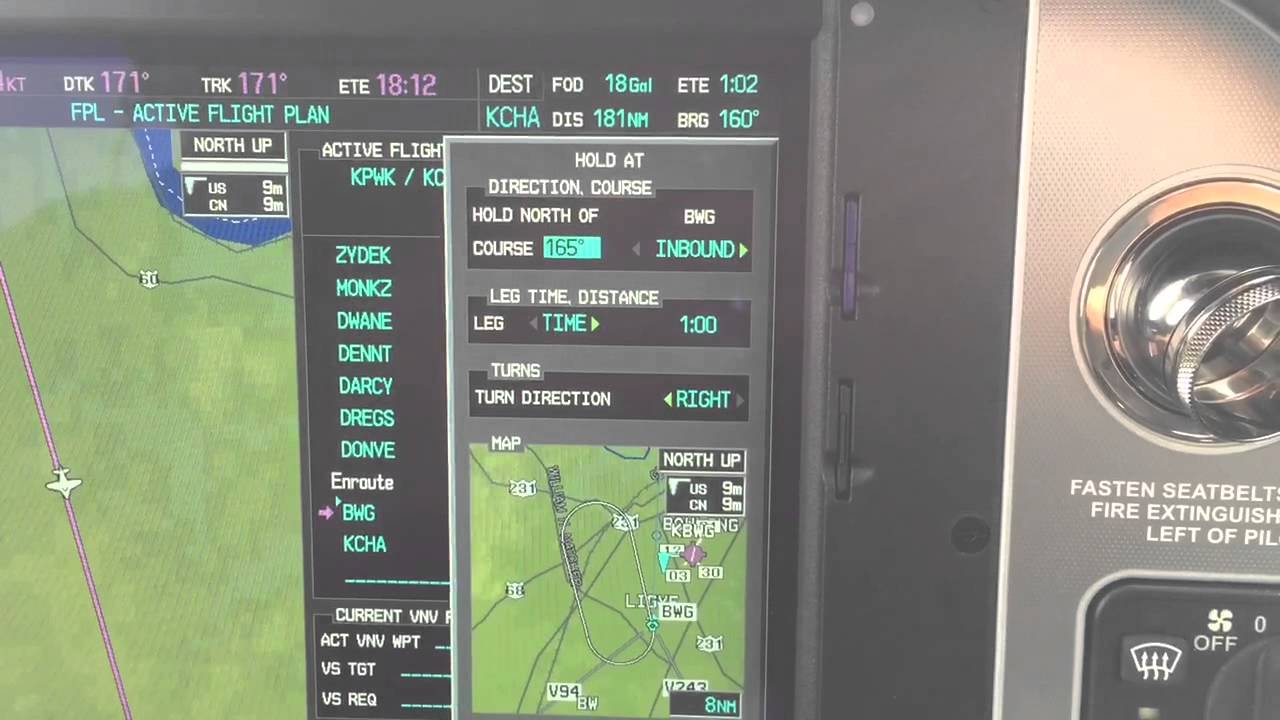
On the next menu that pops up, input either the inbound or outbound course, right or left turns, leg time or distance, and the EFC time, then tap Load.
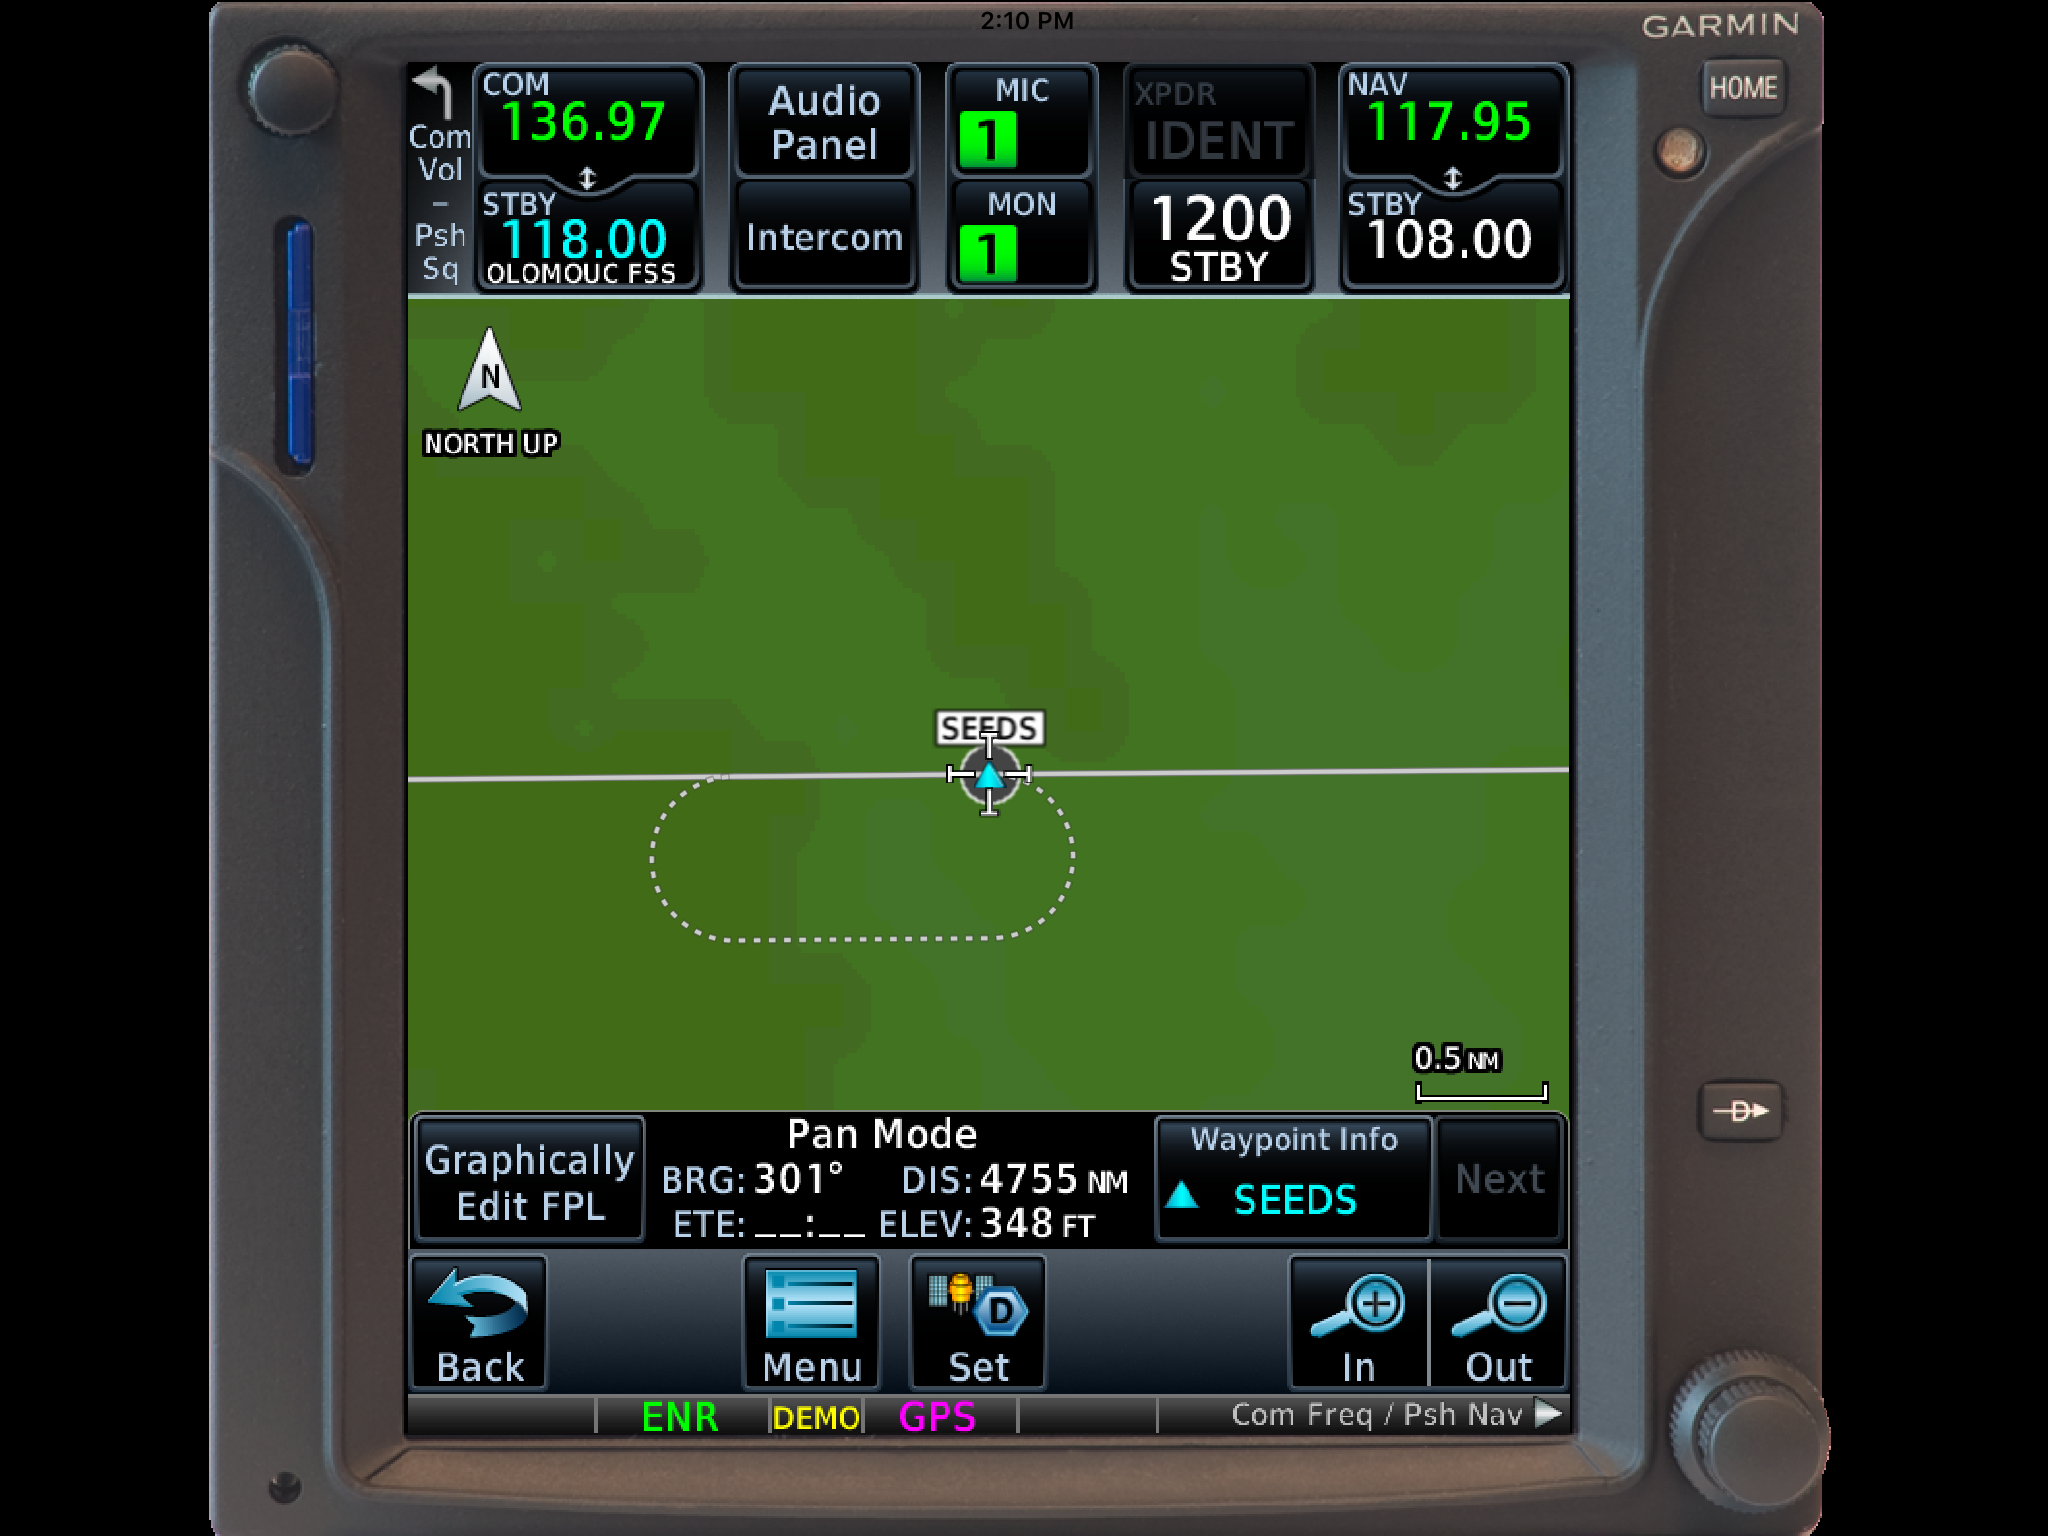
You will see the hold now as a Waypoint in your flight plan.
Once the hold is entered, the GPS will go into Suspend mode, suspending the Flight Plan Waypoint Sequencing. Once you are ready to depart the hold, you will have to tap Unsuspend before crossing the holding point on the inbound leg, then the GPS will resume normal waypoint sequencing.
These are 2 of the really cool, gee-wiz features of the Garmin GTN 750. Following the above steps will make IFR flying much easier for the pilot, as well as much more enjoyable!
The Garmin GTN 750 is an awesome piece of equipment. Garmin tried to make the user interface with the touch screen as simple as possible (though there still is a bit of a learning curve when moving up from a Garmin 530W). Garmin also integrated several key features that the 530W did not have that…
If you have been searching “Cirrus SR22T for sale” or reading up on the Cirrus Vision Jet, you are looking at genuinely excellent airplanes. Both have earned their reputations. This is not an article about why you should not buy one. It is about a third airplane that almost never shows up in a Cirrus search — and what the numbers look like when you set it next to the two you are already considering.
190 ktDA62 Cruise
762 lbFull-Fuel Payload
648 nmRange, 4 Adults + Bags
1 WeekTraining, No Travel
What the Cirrus SR22T Gets Right
Let us start where we should. The SR22T is one of the most successful piston singles ever built, and for good reason. Turbo-normalized power that holds performance up high. A Perspective+ flight deck that is about as good as glass gets in a single. Side-yoke handling most pilots fall for inside ten minutes. And CAPS — the whole-airframe parachute that changed how our whole industry talks about safety.
Add strong resale, a deep service network, and one of the best owner communities in aviation, and you have an airplane that is very hard to argue with. If you fly two people and light bags on 300 to 500 nautical mile legs, we would tell you to go buy one — and we would help you find the right one. We also teach Cirrus SR20, SR22 and SR22T training here in Texas, so this is not an outsider’s opinion of the airplane.
The conversation changes when the mission grows.
Cirrus SR22T vs. Diamond DA62: The Numbers Side by Side
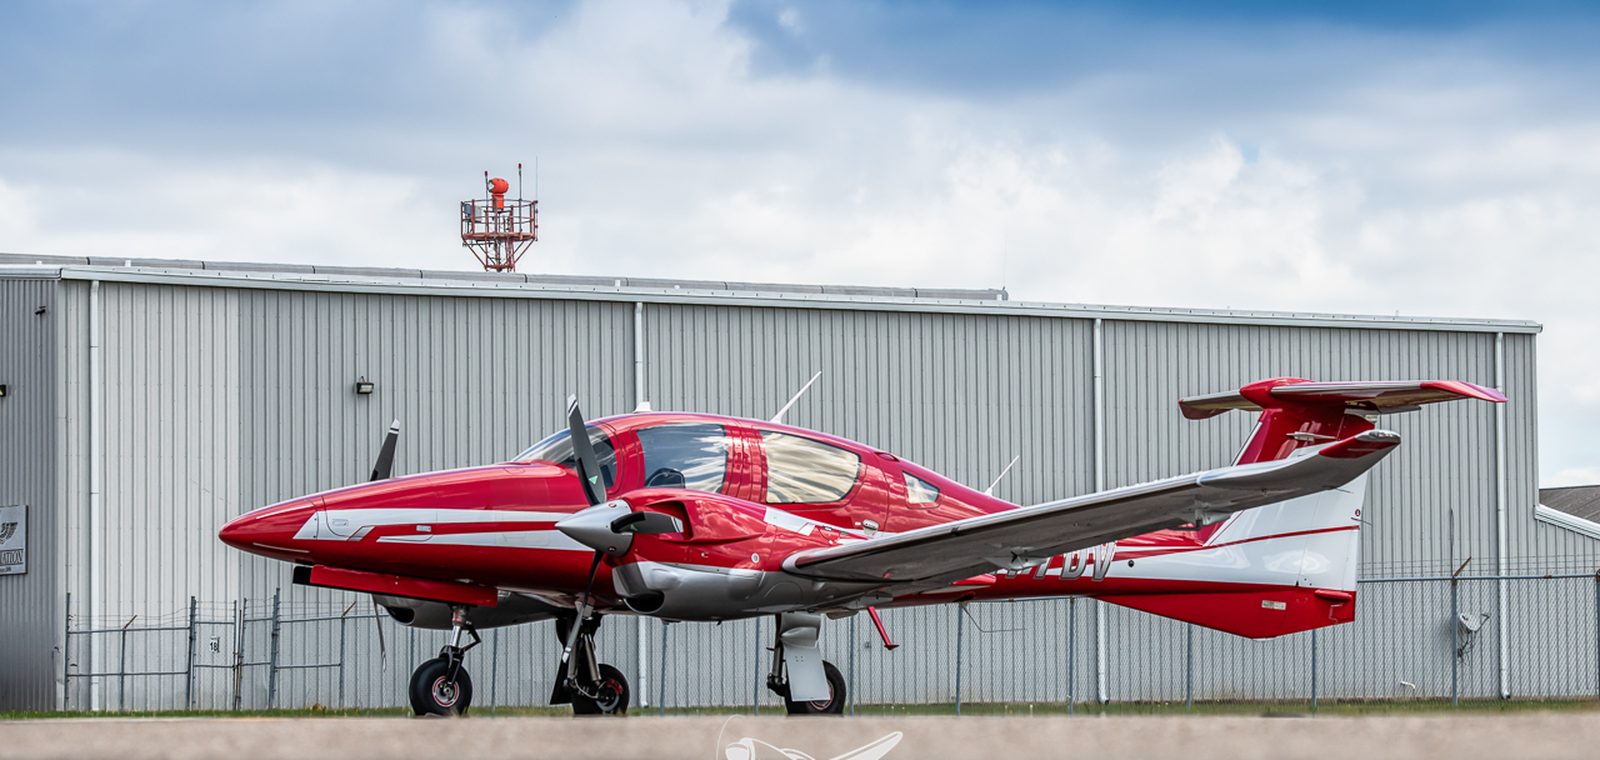
The Diamond DA62 is a seven-seat, twin-engine, Jet-A-burning composite airplane that most Cirrus shoppers have never sat in — usually because it simply never came up in the search. Here is how the two line up on the numbers that matter.
Specification
Cirrus SR22T
Diamond DA62
Cruise speed
184 KTAS @ 85% power / 10,000 ft
190 KTAS @ 90% power / 10,000 ft
Fuel burn
18.3 GPH @ 85% (16.4 GPH @ 75%)
19 GPH total (9.5 GPH per engine)
Fuel type
100LL AvGas
Jet-A (~$1.75/gal cheaper)
Seats / rows
5 seats, 2 rows
7 seats, 3 rows
Useful load
~1,125 lb (3,600 lb MTOW)
1,341 lb (5,071 lb MTOW)
Full-fuel payload
~575 lb
762 lb
Range, 4 adults + 75 lb bags (835 lb)
~320–350 nm
~648 nm (45-min reserve)
Takeoff over 50-ft obstacle
2,080 ft
1,575 ft
Landing over 50-ft obstacle
2,535 ft
1,447 ft
Single-engine service ceiling
—
11,000 ft
Engine-out redundancy
CAPS parachute
Second engine
Recurring safety-system cost
~$20,000 CAPS repack / 10 yr
None
Rating required
High-performance endorsement
Multi-engine (~1 week, at home)
Cirrus SR22T figures are taken from the Cirrus SR22T G6 Pilot’s Operating Handbook (P/N 13772-007, Reissue A): cruise at ISA and 3,400 lb, takeoff and landing over a 50-ft obstacle at sea level, ISA and 3,600 lb max gross.
Read that speed line carefully, because it is closer than the marketing on either side suggests. At 10,000 feet the DA62 has about six knots on the SR22T — real, but hardly decisive. Climb higher and the advantage flips outright: the SR22T is turbo-normalized, so at 18,000 feet the POH shows 198 KTAS on the same 18.3 gallons an hour, comfortably faster than the DA62. If raw speed is what you are buying, the Cirrus has a genuine answer.
Where the DA62 separates itself is everything around the speed. It burns Jet-A, which runs roughly $1.75 a gallon under 100LL at most FBOs and is available at airports where AvGas gets harder to find every year. And the full-fuel payload gap is 187 pounds. Payload is where light-airplane trip plans quietly fall apart.
Four Adults, Bags, and the Range That Actually Matters
Spec sheets get written for two people. Real trips are not flown that way.
Load four adults and 75 pounds of luggage — call it 835 pounds — and the SR22T has to leave fuel on the ramp. On a typical G6 empty weight that leaves room for roughly 48 of its 92 usable gallons, and realistic range lands around 320 to 350 nautical miles with IFR reserves. Put that same 835 pounds into a DA62 and you are looking at roughly 648 nautical miles with a 45-minute reserve.
To be fair to the airplane: with full fuel and two people aboard, the SR22T is genuinely long-legged. The POH shows 763 nm at 10,000 feet and 791 nm at 18,000 feet on a 45-minute reserve. The range only collapses when you fill the seats — which is precisely the mission this comparison is about.
That is not a rounding error. That is one fuel stop versus none on a Texas-to-Colorado weekend. And the DA62 does it across three rows, with two seats still open behind you.
About the Cirrus Vision Jet G1
If your search has moved from the SR22T up to the Vision Jet, that airplane deserves real credit too. Cirrus did something nobody else managed: a single-pilot personal jet, with CAPS, delivered in volume, flown successfully by owner-operators. That is a genuine achievement in this industry, and we teach Cirrus Vision Jet training ourselves.
The G1 specifically, though, asks for a level of commitment that surprises a lot of first-time jet buyers.
Cirrus Vision Jet G1: What Ownership Actually Asks Of You
Acquisition: approximately $1.8 million.
Fuel burn: 60–70 GPH of Jet-A.
Full-fuel payload: only 300–400 lb — roughly two adults and a soft bag.
Range: about 800 nm on paper, but heavily payload-limited in practice.
Type rating: a full FAA type rating is required — roughly two weeks of initial training in Knoxville, Tennessee.
Insurance dual: 25+ hours of additional dual instruction beyond the type rating.
Recurrent: annual simulator recurrent training back in Knoxville, at $15,000–$25,000 per year, every year.
Runway: 3,192 ft takeoff / 3,011 ft landing over a 50-ft obstacle.
Climb: drops to 1,100–1,200 fpm at heavier weights, and loses thrust at high density altitude airports — exactly where you want margin.
Worth saying plainly: the G2 and G2+ are meaningfully more capable airplanes — better payload, better hot-and-high performance, updated flight deck. That is a different and more interesting conversation, and one we are glad to have. Everything above is specific to the G1, because the G1 is the airplane most often cross-shopped at DA62 money.
Compare that training path to the DA62. A multi-engine rating is all that is required — roughly one week, typically at your home airport, with no hotel and no travel. There is no annual sim requirement in another state, and no recurring five-figure training line item on the budget.
Runway Numbers Open Up the Map
Performance over a 50-foot obstacle is where your airport list gets long or short. The DA62 clears it in about 1,575 feet on takeoff and 1,447 feet on landing. The SR22T needs 2,080 and 2,535 feet. The Vision Jet G1 needs 3,192 and 3,011 feet.
That is roughly 500 feet less than the SR22T on departure and nearly 1,100 feet less on arrival — and against the G1 the gap is wider still. Practically, that difference is what gets you into the shorter ranch, lake and mountain-adjacent strips that a lot of the best flying runs on. That is not a spec. That is a different set of weekends.
The Parachute and the Second Engine
CAPS is a real safety system and we will not say otherwise. It has saved lives, and it deserves the respect it gets. It also carries a cost most buyers do not budget for: the rocket and canopy repack runs about $20,000 every ten years, and it is not optional.
The DA62 answers the same question a different way. Lose an engine and you still have one making power, turning counter-rotating props, managed by a FADEC that keeps it to a single lever per side. One number to know either way: the DA62 single-engine service ceiling is 11,000 feet, so on one engine it will hold altitude over most terrain but not over the high country. Neither answer is wrong — they are two philosophies about the same risk. The DA62 version just does not come with a recurring five-figure bill.
Frequently Asked Questions
Is the Diamond DA62 faster than a Cirrus SR22T?
Only down low, and only slightly. At 10,000 feet the Diamond DA62 cruises at 190 KTAS at 90% power on 19 GPH of Jet-A total, while the Cirrus SR22T G6 POH shows 184 KTAS at 85% power on 18.3 GPH of 100LL. Higher up the SR22T is the faster airplane — its turbo-normalized engine holds 198 KTAS at 18,000 feet on the same fuel flow. The DA62 advantage is fuel cost, payload and runway, not raw speed.
How much can a Diamond DA62 carry compared to a Cirrus SR22T?
The DA62 carries a 762 lb full-fuel payload across seven seats in three rows. The Cirrus SR22T has a useful load of about 1,125 lb and a full-fuel payload of roughly 575 lb. Loaded with four adults and 75 lb of bags — 835 lb total — the DA62 flies about 648 nm with a 45-minute reserve, while the SR22T is closer to 350 nm.
What training does a Cirrus Vision Jet G1 require compared to a Diamond DA62?
The Vision Jet G1 requires a full FAA type rating: about two weeks of initial training in Knoxville, Tennessee, plus 25+ hours of additional dual for insurance, plus annual simulator recurrent back in Knoxville that runs $15,000–$25,000 per year on an ongoing basis. The Diamond DA62 requires only a multi-engine rating — about one week, usually at your home airport, with no travel.
Can a Diamond DA62 use shorter runways than a Cirrus SR22T or Vision Jet?
Yes. Over a 50-foot obstacle the DA62 takes off in about 1,575 ft and lands in about 1,447 ft. The Cirrus SR22T needs about 2,080 ft and 2,535 ft, and the Cirrus Vision Jet G1 needs about 3,192 ft and 3,011 ft. The Vision Jet G1 also sees climb rate fall to 1,100–1,200 fpm at heavier weights and loses thrust at higher density altitude airports.
Does the Diamond DA62 have a whole-airframe parachute like Cirrus CAPS?
No. The DA62 redundancy is a second engine rather than a parachute. One practical difference in ownership cost: the Cirrus CAPS repack runs about $20,000 every ten years and is mandatory, while the DA62 has no equivalent recurring safety-system expense.
Shopping a Cirrus SR22T or Cirrus Vision Jet? A numbers-first look at how both compare to the Diamond DA62 on speed, payload, range, runway performance and the real cost of training.
Texas Top Aviation is proud to announce that Hank Gibson has completed the training to become an American Bonanza Society Instructor, or ABS Instructor. He is now qualified to give instruction in Beech Aircraft.
As an ABS Instructor, Hank brings over 2800 hours of flying experience in a variety of aircraft to the cockpit of Beechcraft. Along with his ABS Instructor Designation, Hank is also a Cirrus Standardized Instructor Pilot (CSIP) and a Cessna FITS Accepted Instructor in both Cessna high and low wing piston aircraft (CFAI+). Hank is proud to add the ABS Instructor designation to his list of qualifications.
The process of becoming an ABS Instructor is quite comprehensive. The coursework consists of 20 powerpoint lessons covering anything and everything related to flying Debonairs, Bonanzas, Travel Airs, and Barons. The ABS Instructor course is quite in depth and detailed, giving the graduate a full understanding of the Beechcraft piston line of aircraft. To find out more about ABS Instructors, see the ABS website.
Hank is now giving initial and recurrent training in Beech Debonairs and Bonanzas. Please visit the Texas Top Aviation Bonanza Training page for more information on Bonanza and Debonair initial and recurrent training. Interested in Bonanza or Debonair training with a qualified ABS Instructor? Contact Texas Top Aviation today!
Texas Top Aviation is proud to announce that Hank Gibson has completed the training to become an American Bonanza Society Instructor, or ABS Instructor. He is now qualified to give instruction in Beech Aircraft. As an ABS Instructor, Hank brings over 2800 hours of flying experience in a variety of aircraft to the cockpit of…
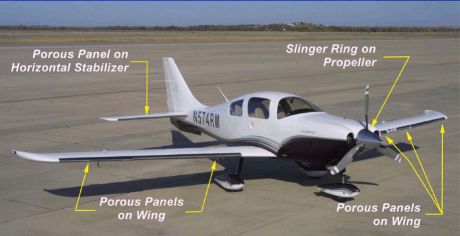
When cleaning airplanes, the majority of people don’t know how to properly maintain their TKS panels. TKS panels provide wing leading edge, horizontal stabilizer leading edge, and, in the case of FIKI airplanes, vertical stabilizer leading edge de-icing protection. For those not familiar with them, they are metal strips that have thousands of holes drilled into them where the TKS fluid seeps out. They have become quite prevalent on Cirrus aircraft, the Cessna TTx, and Mooney aircraft manufactured in the last decade or so. The system is also known as a weeping wing system.
Being on the leading edges, these panels pick up bugs very easily. For the uninitiated, it would make sense to just use normal airplane cleaner to spray the panels and scrub the bugs. Don’t!
Using anything that contains Methyl Ethyl Ketone (MEK) as that can harm the TKS bladders behind the panels. Any aircraft cleaner containing wax could cause the pores to clog, preventing the TKS fluid from properly seeping onto the wing.
What’s the best thing to do? Soap and water with a soft cloth is a good start (again, make sure it doesn’t have wax in it. Dish soap would be suitable). No hose available? Just simply turn the TKS system on, let it run till you start to see fluid drip off the wings onto the ground, and use the fluid to clean the panels.
A soft cloth would work fine, but, if the panels are really buggy, take a green scouring pad to do some scrubbing. Just make sure the scrubbing motion is up and down with the grain, not side to side. You can find the green scouring sponges on the dishwashing aisle in the grocery store. Just leave one in the hangar for when you need it.
When cleaning airplanes, the majority of people don’t know how to properly maintain their TKS panels. TKS panels provide wing leading edge, horizontal stabilizer leading edge, and, in the case of FIKI airplanes, vertical stabilizer leading edge de-icing protection. For those not familiar with them, they are metal strips that have thousands of holes drilled…
The latest Garmin software version on the Garmin G1000 and Cirrus Perspective by Garmin has a really neat feature. It gives the pilot the ability to create a hold at any fix, VOR, NDB, or even airport. If the point is in the GPS database, a hold can be created over it.
How does it work? Here are the steps.
Let’s say ATC tells you to hold over an intersection on a Victor Airway that you are already on. Since you are tracking the airway already, the airway should be in your flight plan complete with all the waypoints on it.
Bring up your flight plan and highlight the waypoint to hold at. Press the menu key. Using the big knob, scroll down to highlight the hold at waypoint option at the bottom of the bottom of the menu. Press enter.
Now you can build the hold. You select what the inbound or outbound course will be. Select a timed hold or a distance hold. Then select left or right hand turns. You can even input your expect further clearance time. Press enter and now you have a hold as a waypoint in your flight plan. Assuming you have a WAAS unit, the autopilot will fly the hold for you.
If you are ever told to “Hold Present Position,” Garmin has you covered. Simply press menu on the flight plan page, scroll down to Hold Present Position, then follow the prompts on the screen to build a hold at your present position.
The latest Garmin software version on the Garmin G1000 and Cirrus Perspective by Garmin has a really neat feature. It gives the pilot the ability to create a hold at any fix, VOR, NDB, or even airport. If the point is in the GPS database, a hold can be created over it. How does it…