|

Cirrus Simulator Training

Let’s face it: airplanes are not the best classrooms. The propeller is running, the engine is making lots of noise, the pilot is attempting to multi-task and the instructor is barking orders. That’s almost as much overstimulation as being a parent to 4 kids under 10 (I have experience in that arena!). That’s even before takeoff!

At Texas Top Aviation, we have observed many situations where a simulator would be an excellent way to introduce different concepts and supplement training. Now, in our Austin Executive (KEDC) office, we finally have a really good simulator.

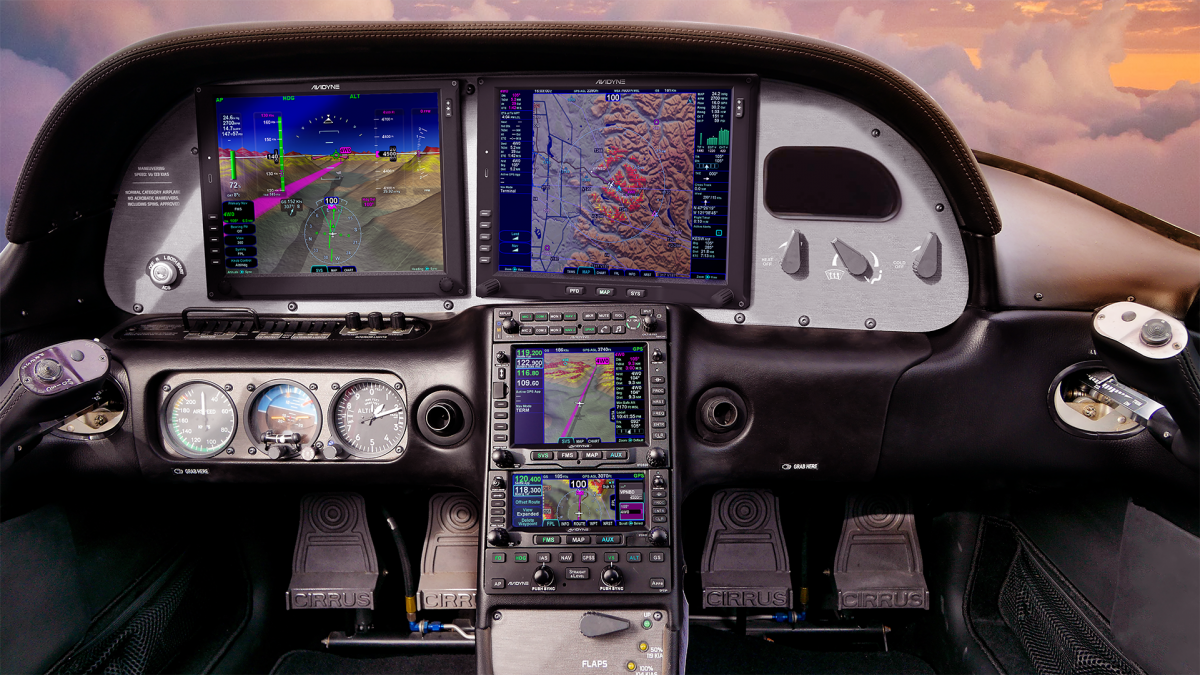
Meet the Noble Flight Simulator, the next best thing to a Cirrus cockpit. With the Noble Flight Simulator, we can duplicate 6 different types of Cirrus aircraft (G3 SR22, G3 SR22T, G5 SR22, G5 SR22T, G6 SR22, and G6 SR22T). The Garmin Perspective panel easily swaps between the G3 and G5 configuration to the G6 configuration, so the buttons are all in the proper places.
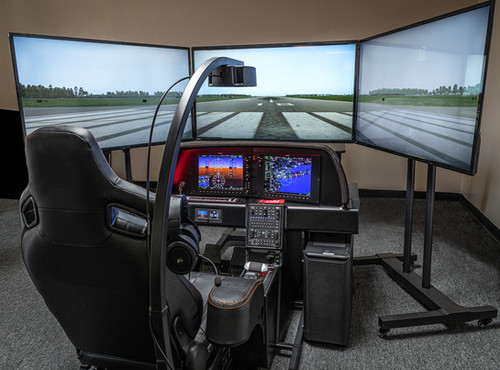
Having button pushing problems? The simulator is the place to practice.

Want to experience actual emergencies? An engine failure is a lot less stressful in a simulator.

Want to pull CAPS (Cirrus Airframe Parachute System)? The Noble Flight Simulator has a realistic CAPS handle with the same amount of pull pressure that the CAPS handle in the airplane has.

Need an IPC or want to practice approaches? All approaches done on a Noble Flight Simulator are luggable, plus a full IPC can be accomplished.

Want to save fuel? The Noble Flight Simulator is for you!

To top it all off, the Noble Flight Simulator that Texas Top Aviation has is classified as an Advanced Aircraft Training Device. It is certified to the highest standards of non-motion simulators, allowing pilots working toward their private and instrument ratings to log a significant amount of time toward that certificate or rating. Up to 20 hours of IFR training is allowed to be logged in an AATD toward an instrument rating. That’s huge!

Texas Top Aviation is also developing a CAPS specific course to expose Cirrus pilots to the many different scenarios where pulling CAPS would be necessary. This teaches Aeronautical Decision Making to Cirrus pilots who struggle with the decision of whether or not to pull CAPS. Look for CAPS course information under our Aircraft Training page later this summer.

Interested in checking the simulator out? Contact us today!

Similar Posts

  • Make The Upgrade to Pressurization

    Are oxygen cannulas rubbing your nostrils raw?

    Is turbulence giving you back problems?

    Would you like to be above the bumps, breathing without tubes stuck up your nose or a mask on?  Would you like a quiet ride?

    Sounds like you need pressurization.  Need more convincing?

    What’s that you say?  You don’t have a multi-engine rating?  You don’t want to spend the money on a turbo prop?

    Have no fear, there are options galore for you to choose from in the single engine piston marketplace, both certified aircraft and experimental.

    A word of caution, though; once you go pressurized, you don’t go back….

    Here is my review of the certified, pressurized single engine piston options.

    Piper PA46 Malibu/Mirage/M350

    In 1983, Piper shocked the world with an amazing airplane.  The pressurized, Continental TSIO-520 (310 HP) powered PA46 Malibu hit the market in the fall of that year taking the piston world by storm.  A six seat, cabin class, pressurized single engine piston that easily cruised at 190-200 knots while only burning 16-17 GPH. It was awesome.  It even had an air stair door that felt like getting on a private jet.

    I love the original Continental powered Malibu, specifically the ’86-’88 models.  Piper initially had hydraulic flaps, which were clunky and had several issues (most notably, the hydraulic system would randomly kick offline while the flaps were in motion at very in-opportune moments).  Piper switched to the electric flaps in ’86, making the ’86-’88 year models very desirable.

    Unfortunately for Piper, the Continental TSIO-520 was not the engine manufacturer’s best product.  There were several Malibu crankshaft problems and engine failures, so much so that Piper decided to go with the Lycoming TIO-540 engine in 1989, creating the Malibu Mirage (all the current Malibu’s operating the -520 engine have been overhauled many times over, so there are no safety concerns with the -520 engine).  The Lycoming powered Mirage (350 HP), cruises a little bit faster than the Continental powered Malibu, but burns about 5 more GPH.  Piper still makes the Mirage, now dubbed the M350, complete with the Garmin G1000 NXi panel.

    The 4 seat, cabin class back seat is very roomy (unlike a Bonanza or Saratoga).  There is plenty of rooms for bags, both behind the back seat and in the handy nose compartment, which is wide enough to fit golf clubs, minus the driver.  The 1600 pound useful load (880 pound payload with full fuel), allows for a lot of people and gear to be loaded on board.  The airplane is a little stingy on CG, though.  You do not want to have a CG that is out of the rear limits.

    The airplane is fun to fly.  It has a heavy elevator, similar to a Bonanza, which requires a lot of trim on landing.  It’s very long wings cause it to float a bit on landing if the pilot comes in too fast.  It’s very docile in stalls and extremely comfortable for cross country flying.  The air conditioning system works very well, though it is still hot on the front seats when sitting on the ramp on a Texas July afternoon.

    Many of the airplanes have upgraded to glass panels.  Most are still equipped with the King KFC 150 autopilot, some with a Yaw Damper, some not.  The KFC 150 is a good autopilot, but when Garmin certifies their GFC 600 for the PA46, that will be a popular retrofit.

    If I had my pick, I would buy an ’86-’88 Malibu with an upgraded Continental TSIO-550 engine.  Climbs a bit better and does a bit better in cruise than the original -520 engine.  See why here.

    I would rate the PA46 line as the best pressurized single engine piston option out there.

    Cessna P210 Centurion

    The P210 was introduced by Cessna in 1978.  It also came with the Continental TSIO-520 engine that the Malibu was certified with.  Climbing at about 700-800 fpm (equal to the Malibu), the P210 cruises at around 190 KTAS as well, burning around 17-18 GPH.  Like the Malibu, the P210 had a Continental TSIO-520 power plant, but, unlike the Malibu, the P210 makes the pilot work to keep the CHTs cool.  With smaller cowl openings and a tighter cowl, cooling isn’t as good as the Malibu.

    Even though the P210 has six seats, the forward facing, Cessna style 3 rows aren’t quite as comfortable as the Malibu.  The single door on the pilot’s side makes loading and unloading a bit of a chore (especially compared to the air stair door in the Malibu).  The third row of seats isn’t extremely useful, as the ceiling is lower and the proximity of the second row of seats decreases the amount of leg room, making it uncomfortable for a full size adult.  Most operators remove the pilot’s side second row seat to add an aisle to get to the back row for people and bags.  It also has a smaller cabin then the Malibu.

    There is less baggage in the P210, with the singular baggage compartment accessed through a baggage door behind the cabin.  The Air conditioning system is also not as good as the Malibu.

    It’s hard to get the P210 out of CG and overloaded.  A useful load of 1500 pounds (with 90 gallons of fuel, it drops to only 960 pounds) allows the airplane to be loaded to the gills without being overweight.

    There are some engine upgrades out there for the P210 (the Silver Eagle conversion puts a Rolls Royce turboprop on it).  The best piston conversion is the Vitatoe Conversion that swaps the engine out for a Continental Turbo-Normalized IO-550, which is a much better engine than the -520.  You still have to monitor the CHTs, but cooling is less of an issue.  These are much higher priced on the market, though.

    Because of the size of the cabin and the true reputation the P210 has of being a maintenance hog, I would rate it below the PA46 line.

    Extra EA-400

    There are 3 pressurized, single engine piston airplanes out there today: the Piper PA46, the Cessna P210, and the Extra EA-400.  Extra is the famous German aerobatic aircraft manufacturer that created the Extra 300 and 330.  In the early 2000s, Extra tried it’s hand at the pressurized single market with the EA-400 (Extra also tried to get into the single engine turbo-prop market with the EA-500, but the project fizzled before much progress was made).  Sadly, only 27 EA-400s were built before the company ran into financial trouble.

    The concept sounds cool.  A fully composite, pressurized, liquid cooled, cabin class piston.  The engine was the Continental TSIOL-550, liquid cooled power plant.  Liquid cooling means no concern about hot CHTs while you are climbing.  The problem with the engine is that there are so few liquid cooled Continental engines out there, finding a mechanic familiar with one could be an issue.

    I have never flown an Extra 400, but there are several floating around out there.  Most have steam gauges and the STEC-55x autopilot.  The price on the only one on Controller right now is comparable to the P210N but above the Continental powered Malibu.

    If you are in the market, an Extra 400 might be fun to test fly and who knows, you might fall in love with it!

    Experimental Options

    There are a handful of experimental pressurized singles out there.  I have not flown any of them, so I can’t be a good resource on recommending them.  Here is the list, however.

    Lancair Evolution Piston

    Lancair IV-P

    Lancair ES-P

    Lancair LX7

    As far as availability on the market goes, there are 8 Malibus on Controller (1 1986 model) ranging from $315,000 and down, 24 Mirages ranging from $705,000 (equipped with the Garmin G1000) and down, 25 P210s ranging from $405,000 and down, and 2 Extra EA 400s, priced at $369,000 and down.  Check out the available Experimental Lancair options here.

    Have you decided to upgrade, but don’t know what to buy or how to buy it?  Check out Texas Top Aviation’s Acquisition Services.  We’ll get you the best airplane for you, your mission, and your budget.  Contact Us today to find out more information.

  • New Houston Airspace Procedures

    If you are based in Houston, or heading into or out of the Houston airspace under IFR, have you updated your charts?  If not, you may hear a clearance stating: “N67889, cleared to Amarillo via the BORRN 1 Departure, CRGER Transition, Direct.  Climb via the departure, expect 8000 in 10 minutes.  Departure frequency 123.8, Squawk 3365.”  You manage to get the clearance written down, but have completely messed up the spelling of both BORRN and CRGER, so you have no idea where the intersections are.  After stumbling through a readback, you ask ground to spell the fixes for you.

    Then, more bad news.  You haven’t updated your GPS cards yet, so the departure isn’t in your 430.  It’s an RNAV only departure, so you can’t fly it based on the NAV Radio.  You were planning on updating your iPad when you got to Amarillo, so you don’t have the departure on there, either.

    This has probably already happened to a few people today already.

    Houston airspace got a major overhaul today.  There are 20 new DPs and 29 new STARs guiding IFR traffic into and out of Houston airspace (including one named the DOOBI 1 Arrival, named after the Dooby Brothers band).

    The FAA’s goal in all these changes, according to AOPA, is to “bring fuel efficiencies, time efficiencies, and reduce carbon emissions” (from Benet J. Wilson’s May 15th article on AOPA.com).  The FAA issued a NOTAM today valid until June 6th describing what routes for pilots to file.  The NOTAM also contains contingency plans for pilots flying without updated charts (like our example above).

    Pilots should expect these wide scale procedure additions and changes to start showing up in other Class B airspace across the country.  As always, make sure those charts are updated, GPS databases are current, and you do some studying of your route before you file your flight plan.

  • Cirrus G2 Vision Jet

    Well, that was fast.

    In January, Cirrus announced the Generation 2 SF50 Vision Jet.  After getting the Generation 1 Vision Jet certified in late 2016, Cirrus didn’t waste any time in starting in on improvements.

    The improvements are pretty sweet, making the G2 Vision Jet even easier to fly and step into for Cirrus’ target market, SR22 owners.

    Here are the improvements on the G2 Vision Jet.

    RVSM Approval

    The G2 Vision Jet has received RVSM approval, allowing the airplane to fly at 31,000 feet.  RVSM stands for Reduced Vertical Separation Minimums (read more about RVSM here).  RVSM airspace starts at 28,000 feet, the G1 Vision Jet’s ceiling.  Now that the G2 Vision Jet is RVSM certified, it can fly at 31,000 feet.

    For piston pilots, you are left scratching your head as to the advantage of this.  In a jet, the higher you go, the thinner the air, so the faster you go, and the less fuel you burn since the thin air needs less fuel to mix with.  This caps out at a certain altitude and the speed begins dropping and you start losing efficiency (even though the fuel burn is quite low).

    According to Cirrus, at 31,000 feet, the G2 Vision Jet cruises over 300 KTAS and gets a range boost to almost 1,200 nm.

    Garmin Perspective Touch+

    Cirrus & Garmin have taken the new NXi interface and paired it with the Garmin Perspective Touch to create the Touch+.  You can read about the improvements on the NXi here, all of which are included in the Touch+ in the G2 Vision Jet.

    The big improvement that is included in the Touch+ is Autothrottle capability.  An Autothrottle is integrated with the autopilot.  It automatically adjusts power settings and speeds based on the phase of flight without the pilot having to touch the throttle.  Pretty cool.

    New Cabin

    The G2 Vision Jet has a redesigned cabin as well, making it an extremely passenger friendly airplane.  The second row has been redesigned and equipped with a center console.  There is also a drop down TV screen that allows passengers to connect their mobile devices to it to watch movies or videos while traveling (no internet on board, yet.  That’ll probably be the G3 Vision Jet!).

    Cirrus also put in more noise reduction in the cabin, creating a quieter ride for passengers.  Cirrus also allows for multiple different seating configurations, depending on the needs of the owner.

    As always, Cirrus is on the leading edge of airplane technology, creating airplanes that are easy as well as fun to fly.  I’m excited to see how they continue to improve the design to both the SR22 and the Vision Jet.

  • Cirrus Austin, Texas Get Together

    The South Central Cirrus Owner’s and Pilot’s Association (COPA) Region is hosting a Fly In dinner at the Austin Executive Airport (KEDC) on Friday, October 8th.  The event is from 5-9pm.  There will be a cash bar, a catered dinner ($25/person), a special guest speaker, and great mingling amongst the Cirrus owners and pilots in our region!

    Fly in or drive to EDC.  The dinner will be in the Henrickson Jet Center’s main hangar.  You will need to RSVP so event organizers can get a proper head count.  The link to RSVP is here.

    Cirrus Aircraft will be bringing two new 2016 SR22s that will be available for viewing.

    Register for the CATGT before the slots are all filled up!

    cirrus-sr22-sunset

  • Fuel Planning

    A few years ago I took off out of Chicago’s Dupage airport (KDPA) in a Bonanza headed for Deck Airport (9D4), a small uncontrolled airport about 60nm to the west of Philadelphia. It was late November and, unfortunately, due to some unexpected ice, I found myself flying a significant portion of the flight at 4-5,000 feet instead of the 11,000’ at which I had originally planned. This was an issue because I was burning significantly more fuel at 4,000’ than I would have at 11,000’. I did my fuel planning math and came to the conclusion that I would still make it to 9D4 with the required minimums. On I flew, watching the number on the totalizer decrease.

    I arrived at 9D4 after dark. Although I didn’t think I would need one, I ended up having to fly an approach to get down below the cloud deck. My troubles weren’t over. After breaking out of the clouds, I was terrified to realize that the runway lights weren’t working.

    Now, I had a problem. I was in a relatively unfamiliar area in marginal VFR at night and I was quickly running out of options as far as my fuel was concerned. Fortunately for me, 9D4 is located 14nm north of Lancaster Airport (KLNS), which is a towered airport with very nice approaches and facilities. Also working in my favor was the fact that Lancaster was reporting VFR. I headed as quickly as I could for Lancaster and landed uneventfully.

    When I landed I had the required fuel minimums on the airplane, but I managed to scare myself pretty thoroughly. I realized that while I had been forced to deal with some unexpected complications: icing forcing me down several hours before my planned descent and inoperative runway lights that were not listed in the airport NOTAMs. I was very blessed that Lancaster was so close by and that I was able to land without having make an approach. Had LNS not been VFR, I could have easily burned through another 15 minutes of fuel maneuvering for and executing an approach. If, for some reason I’d had to go missed or perform a hold, I would have gone through my remaining fuel pretty quickly. To me, this is a classic example of “just because it’s legal, doesn’t mean it’s safe.” I realized I needed to change how I did my fuel planning.

    Since then, I have enforced a personal minimum: 18 gallons must be on the Bonanza at the time I reach my destination. If things change un-expectedly enroute and I realize I won’t make it to my airport with at least 18 gallons, I stop. I had always tried to have an hour of fuel on board as a reserve, but having a hard number is an easy way for me to make decisions.

    Having a fuel totalizer installed in an airplane is a really nice way to upgrade the panel and give the pilot a clearer idea of how much gas is being burned/ how much is remaining. The totalizer installed in our Bonanza is a JPI Fuel Flow 450. It has a lot of nice features which make fuel management chores much easier. If a totalizer is something that you are considering installing in your aircraft, or if you have one already, here are a few things that I’ve learned from my experience flying with them.


    • While helpful, don’t rely too heavily on the totalizer to do your fuel math for you. Similar to the negative effect that using GPS navigation can have on a pilot’s ability to navigate via a chart, over dependence on digital fuel systems can lead to problems. A fuel totalizer should be telling you what you already know, not doing all your math for you. Do your fuel math and confirm it with the totalizer. If it failed, you should still know how much you have and how much is needed.
    • Likewise, don’t rely completely on the accuracy of a totalizer. Technology isn’t perfect, and if the instrument isn’t quite calibrated correctly, the numbers could be wrong. Fuel information is absolutely critical, and thus warrants constant monitoring and double checking. When you do arrive at your destination, keep track of how much fuel the airplane takes and compare it to the numbers on the totalizer to verify its accuracy.
    • Unless you are flying an airplane which has a “both” setting, you will still need to be keeping track of how much fuel is available in the aircraft’s individual tanks. For example: our Bonanza has two tanks, but the totalizer doesn’t keep track of that information. If I don’t remember to switch tanks, I can run one completely dry and the digital read out will indicate the remaining gas in the other tank. The totalizer won’t indicate anything about the individual tank quantity until the engine quits and the flow drops to zero.


    Pictured below on the left is a fuel selector from a Piper Aerostar. The airplane has two selector valves and three fuel tanks. While the system is not difficult to use, it does require proper understanding and regular monitoring to ensure that the fuel is distributed correctly. The picture on the right is the selector out of an A36 Bonanza. I love the simplicity of the Bonanza’s fuel system, but it still takes attention and intention on the part of the pilot to keep track of how much gas is available on either side.


    • The JPI unit that we have installed on our airplane even has an “hours and minutes remaining” screen as well as a “fuel required” screen. The totalizer actually talks to the GPS and is able to tell me how much gas I will need to get to my destination. Just remember that those numbers are computed only at the current flow and do not take into account the potential increases/ decreases in consumption which will occur as power settings are changed for descent and arrival into the airport. I may feel pretty good about my hours and minutes remaining when I’m sitting at 12,000 feet, but when center makes me descend to 5,000’ and I’m still an hour away from my destination, endurance will decrease. It also can’t take into account any additional flight time that may be required to shoot approaches, hold, or divert.
    • Have you ever heard of “G.I.G.O?” It stands for “Garbage In, Garbage Out.” What it means is that the information which the fuel totalizer is giving the pilot is only as good as the information that the pilot gave it at the beginning of the flight. The totalizer in our Bonanza does not have any method of checking the quantity in the fuel tanks. At start up the pilot inputs the amount of fuel on board the airplane and the totalizer keeps track of how much is burned which is then subtracted from that inputted number. Ergo, if the amount of fuel is not updated or is incorrect, the fuel total numbers displayed will be inaccurate. If a pilot told the computer that the tanks had been topped off, but didn’t verify it, the fuel could be exhausted and the totalizer would still indicate that there was fuel available. It is, therefore, VERY IMPORTANT to confirm the airplane is fueled to the amount desired (visually if possible) and use the fuel gauges in the airplane to verify the accuracy of the totalizer.
    • Use a timer: I like to use the timer on my phone to remind me when it is time to switch the fuel tanks. If I set the phone to vibrate and put it in my pocket, it will remind me to change tanks at the desired time if I haven’t remembered to otherwise. It’s also nice because I can write down exactly at what time (or quantity) I changed tanks so I can keep very accurate track of how much fuel I have in any given tank. This is especially helpful in airplanes that have more than two fuel tanks. Another option is setting the timer on a Garmin 430, 530, or G1000 to give an alert or message reminding the pilot to change tanks at a preset time.


    It shouldn’t come as news to anyone that the importance of fuel planning cannot be overstated. I personally know multiple people who have run airplanes out of fuel because their planning wasn’t quite right or the weather changed and they were unwilling to take the time to stop. In the case of my Bonanza story earlier in this article, it was obvious to me before I even landed that I should have picked a fuel stop when it became apparent that I would arrive at my destination with less than my desired one hour margin.

    The technology that we have now to help us keep track of our fuel usage is wonderful, but use it as an aid; not as your only source of fuel calculation. Remember to verify the amount of fuel on the airplane before you go because the number on the totalizer won’t mean anything if it doesn’t match the amount in the tanks! Above all, don’t be afraid to stop and get fuel when you need it. I’d rather have to tell the passengers that we need to stop for gas than deal with the potential consequences of running out.

    Andrew Robinson is a 135 Charter Pilot and flight instructor who lives with his wife and 2 daughters in Pennsylvania.  He flies Pilatus PC-12s and instructs in Beechcraft Bonanzas.

  • Garmin Perspective Tips & Tricks

    The Garmin Perspective and Perspective + are awesome pieces of equipment.  There is so much a pilot can do with this system that it can sometimes get overwhelming. There are two very important features of the Garmin Perspective that all IFR pilots need to know, but are tricky to do if the correct buttons aren’t pushed.

    The two features of the Garmin Perspective I want to focus on today are the “Load Airway” feature and the “Hold at Waypoint” feature.  The “Load Airway” feature is especially handy when flying IFR long distances with several airways as part of the clearance.  Here’s how to utilize both on the Garmin Perspective.

    Load Airway

    • On your flight plan page, insert the waypoint where you will be joining the airway, or, if your clearance was radar vectors to join an airway, then insert the waypoint on the airway that begins the leg you will be joining on
    • Press the Menu key on the keypad
    • A menu will pop up. Scroll down to highlight Load Airway
    • Highlight the Airway you want from the next menu that pops up then press Enter
    • Then, a list of waypoints will display to exit the airway. Highlight the waypoint where you will be exiting the airway and Press Enter
    • The cursor will then move down to Load at the bottom of the menu. Press Enter to load the airway
    • The Airway and all the waypoints in between your entry and exit waypoints appear in your flight plan
    • If you are getting vectors to join the airway, you’ll need to use the Activate Leg function to activate the leg you will be joining the airway on
      • On the Flight Plan page, highlight the waypoint that ends the leg you want to activate
      • Look for the ACT LEG soft key on the lower right hand side of the MFD and press
      • This Activates the leg on the airway. Then, just simply fly the heading assigned by ATC until the CDI needle centers showing you are on the airway

    Hold At Waypoint

    The Garmin Perspective allows pilots to place a holding pattern at any waypoint that is in the Nav Database (or any user created waypoint).  Here’s how to do it.

    • On the Flight Plan page, highlight the Waypoint that you want to hold over and press Menu on the keypad
    • On the menu that pops up, highlight Hold At Waypoint and press Enter
    • On the next menu that pops up, input either the inbound or outbound course, right or left turns, leg time or distance, and the EFC time, then highlight Load and press Enter
    • You will see the hold now as a Waypoint in your flight plan

Leave a Reply

Your email address will not be published. Required fields are marked *