Flying a missed approach can be stressful enough. When you haven’t done one in a while and your GPS isn’t showing you how to get to the missed approach point and you can’t remember which button to press, that adds a lot more stress. Recipe for disaster? Quite possibly!
No need to fear, we are here to help. The procedure for getting a Garmin 530 or 430 to give you missed approach guidance is actually simple and straightforward, if you know what to do!
Note:Because of the variety of different autopilot configurations in different airplanes, this article will focus solely on the GPS.
What the GPS is Thinking
The way Garmin designed the Garmin 530 and Garmin 430 is to be as helpful to pilots as possible. Their thinking was, 95% of the time, a pilot will make a landing on an instrument approach. This is pretty accurate as most of the time, this is what happens. Most general aviation pilots don’t fly approaches to minimums all that often, thus negating the need for a missed approach.
Garmin designed their software with this in mind. When an airplane crosses the missed approach point, the GPS will go into what’s called suspend mode (a SUSP annunciation appears above the OBS key). It will keep the missed approach point as the active waypoint because it assumes the pilot is going to land.
This can be confusing to pilots. This is what happens when software engineers and pilots come together. Engineers often believe they are smarter than pilots! (See the Airbus fly by wire roll out)
The Procedure
In the case of a missed approach, the button pushing on the GPS is actually relatively simple. There is no SUSP key to take the GPS out of SUSP mode (thanks Garmin!). Instead, you press the OBS key. This will take the GPS out of SUSP mode, making the first waypoint on the missed approach procedure the active waypoint. Your GPS will now give you guidance on the missed approach procedure.
If you are going missed off an ILS, LOC, or VOR approach, then there is one more key you’ll have to press. Your CDI needle (whether it is digital or analog, an HSI or just a CDI gauge) will be reading off the NAV radio and your CDI indication on the GPS will be VLOC. After you press the OBS key, press the CDI key on the GPS so you will start getting course guidance from the GPS again.
That’s it. Button pressing on the different autopilots will vary, but if you are familiar with yours, you’ll be able to tell it to follow the GPS and climb to the proper altitude.
Let’s say you’re flying in the mountains of Colorado on a cloudy day. There’s a solid layer from the surface all the way up to 14,000 feet. You’re inbound to Eagle (KEGE) on the RNAV (GPS) D approach. There are mountains next to you and below you, but you aren’t concerned since you can see them all. The base of the last reported overcast layer was 3,000 feet, so you know you’ll break out before the MDA and land no problem.
At 11,100 over AWACC, you clearly see the top of the mountain below you. You are comfortably above it. You already have the runway in sight as well. You pop out of the clouds on the approach at 9,700 feet, spot the airport and follow the tower’s instructions to circle north of the runway for a left base for runway 7.
How could you see the mountains inside the clouds? You have Synthetic Vision installed on your glass panel, that’s how.
Aspen Synthetic Vision
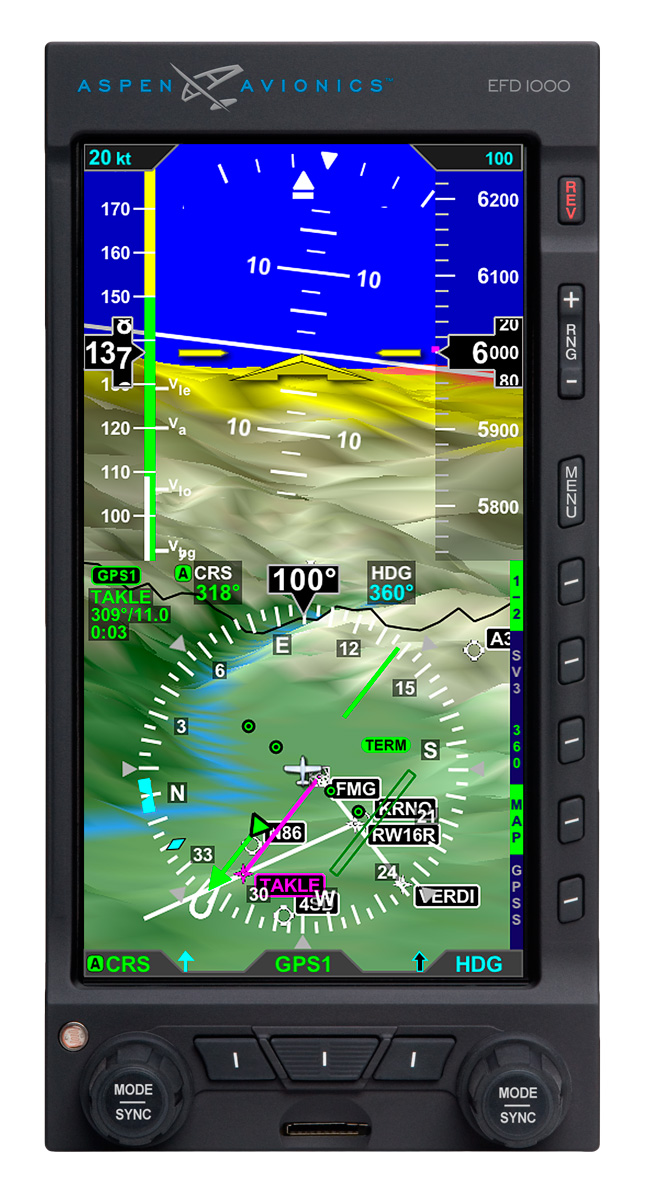
Synthetic Vision, which has actually been around since the ’70s when NASA and the US Military first developed it, was first FAA certified for the Gulfstream PlaneView flight deck in 2009. Garmin, Avidyne, and Aspen are the main general aviation manufacturers of synthetic vision these days. All Garmin PFDs are now equipped with Synthetic Vision while Aspen gives you the option to upgrade to Synthetic Vision when you get one of their PFDs installed. Avidyne gives you Synthetic Vision in their R9 upgrade for the Cirrus.
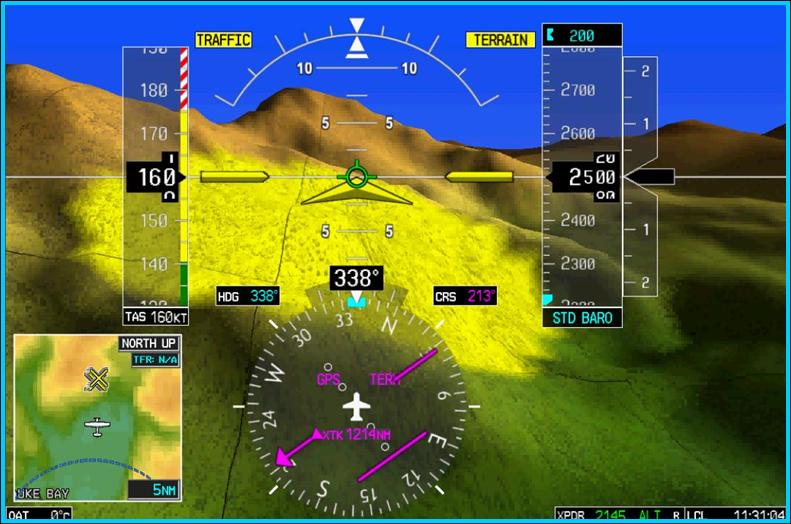
What is Synthetic Vision? Basically, it’s a 3-D picture on the primary flight display showing terrain, obstacles, traffic, and runways. It greatly enhances situation awareness in areas of terrain or high obstacles during IFR conditions or at night.
The goal behind the development of Synthetic Vision was to decrease the amount of controlled flight into terrain (CFIT) accidents. A CFIT accident consists of a perfectly airworthy airplane flown by a pilot (or autopilot) unintentionally into terrain. These accidents can happen in low visibility conditions or at night, but the reason is mainly due to the pilot losing track of his position in relation to obstacles or terrain (or water as was the case with JFK Jr.).
With Synthetic Vision, the goal is to enhance pilot knowledge of what is around the airplane at all times. When you’re at altitude, the terrain below you looks flat. When you start descending down amongst the rocks, the hills or mountains start to rise up on your screen. For those used to the coloration with the 2-D terrain feature on a GPS unit, it translates very easily to the terrain coloration on a Synthetic Vision equipped PFD. Terrain that is between 100 and 500 feet below the aircraft is shown as yellow, while terrain closer than 100 feet is depicted as red.
Garmin Synthetic Vision
One neat feature on Garmin units is the Highway in the Sky. When a pilot puts a course or a flight plan in the GPS, the PFD displays magenta boxes at the altitude selected displaying the route. It’s handy when hand flying to just “fly through the boxes.” They also display descent angles on approaches.
Synthetic Vision is still optional on Garmin and Aspen units, but I highly recommend springing for it. It will give you a higher level of safety and keep you out of the rocks.
Let’s say you’re flying in the mountains of Colorado on a cloudy day. There’s a solid layer from the surface all the way up to 14,000 feet. You’re inbound to Eagle (KEGE) on the RNAV (GPS) D approach. There are mountains next to you and below you, but you aren’t concerned since you can see…
Many people ask, which set of charts is better? Should I use the FAA Aeroservices charts on Foreflight or pay extra for the Jeppesen charts? Since you have to pay for Jeppesen, they are probably better, right?
I am not here to say which one is better as a chart preference is just that, a preference for one over the other or for certain features. After a while, muscle memory and routine take over and you probably wont even notice the difference.
History
In 1934, Elroy Jeppesen began making his own charts and sold them to other pilots. His little company grew into the giant Boeing chart company we know today. Jeppesen charts are used internationally and therefore include information that might otherwise seem common knowledge, like transition altitudes. The key is, you cannot get FAA Aeroservices charts for international destinations. Jeppesen is the only option for outside the US.
National Aerospace Charting Office (NACO), or the new(er) name “Aeroservices” or FAA chart, whatever you decide to call them, are United States government issued charts. In addition to civilian use, Aeroservices charts are used by the military so there will be some terminology that does not apply to civilians. The best part about FAA Aeroservices charts are… they’re free!
If you are in the middle of a transition or trying to decide which charts to use, you have come to the right place. Here are a few key differences.
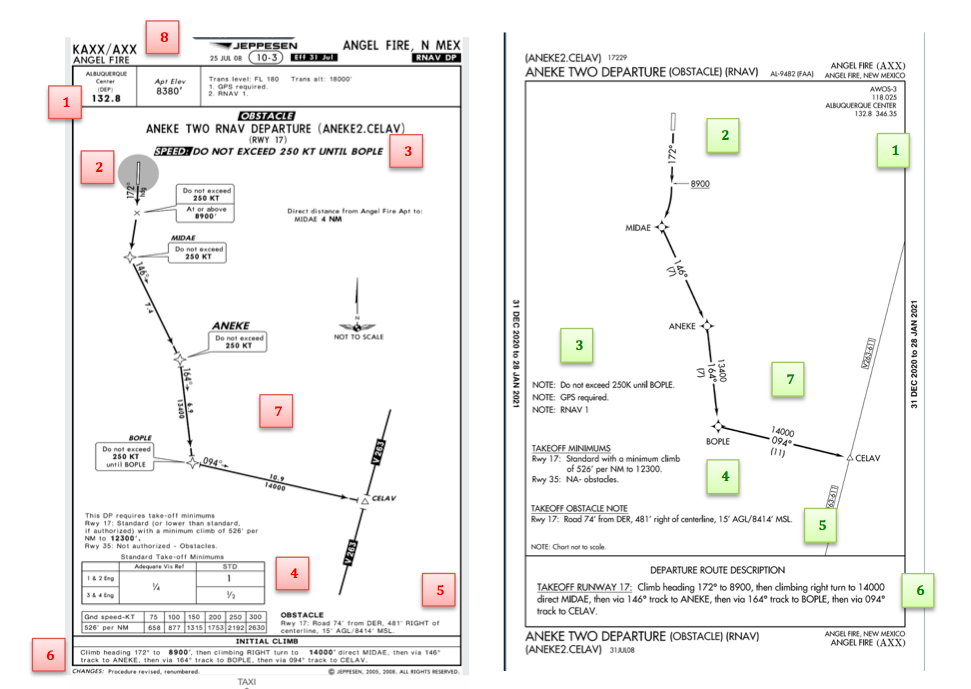
Obstacle Departure Procedure Chart KAXX (Angel Fire, New Mexico) ODP
Frequencies: FAA Chart provides the AWOS so you have all departure frequencies in once place.
Airport: Jeppesen highlight the airport, which is a nice feature so you can easily see the flow from the airport.
Notes and Remarks: Jeppesen bolds the speed restriction all over the chart so you won’t miss it. All other requirements are in the top right corner. Note the transition altitude 18,000′. Since Jeppesen is used internationally, it is published on the chart since other countries have different transition altitudes. It takes up a chunk of chart real estate, but it’s clear, easy to read, and always in the same place. The FAA charts post all the requirements and restrictions as notes off to the side. Since it’s in the same space as the chart graphic, it’s easy for the eyes to catch while studying the plate.
Take off Minimums: NOT APPLICABLE for PART 91 – however, it’s wise for all pilots to look and abide by them. Jeppesen displays the standard take off minimums table, as well as the rate of climb table, which is nice to have all in one place. The FAA chart gives the non standard information but you need to know/look up the rest in the Digital Terminal Procedures Supplemental document. (Hint: It’s in the Documents section of Foreflight)
Take Off Obstacles: About the same on both charts
Route Description: Similar on both charts, but larger font and clearer description on the FAA chart. When there are different routes from different runways, the FAA chart layout is really helpful.
Graphic Layout: Jeppesen and FAA use the same graphics for all their different charts and plates which makes it easy to read once you are familiar with the respective charts. FAA charts are easy to read and distractions are kept to a minimum. Jeppesen charts make things bold and enlarge pertinent information so you won’t miss it.
Airport altitude: This is only on the Jeppesen chart (the FAA chart doesn’t include it), but it is very helpful for situational awareness. As you brief the arrival altitudes, I think it’s important to have an idea what AGL you are at.
Approach Charts
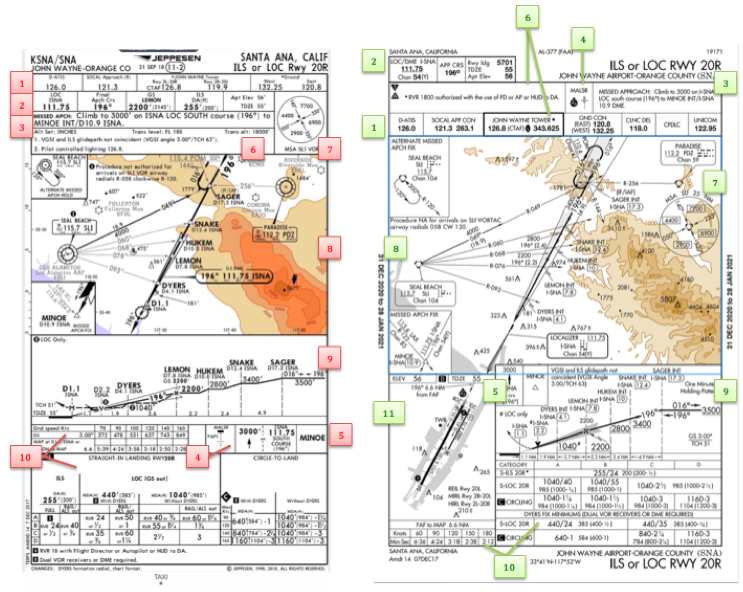
One thing pilots love about Jeppesen approach charts is the clear set up for an approach brief. The top section is created as a “briefing strip” starting with the frequencies, then navigation frequencies, minimums, airport elevation and the missed approach. It’s very natural and user friendly.
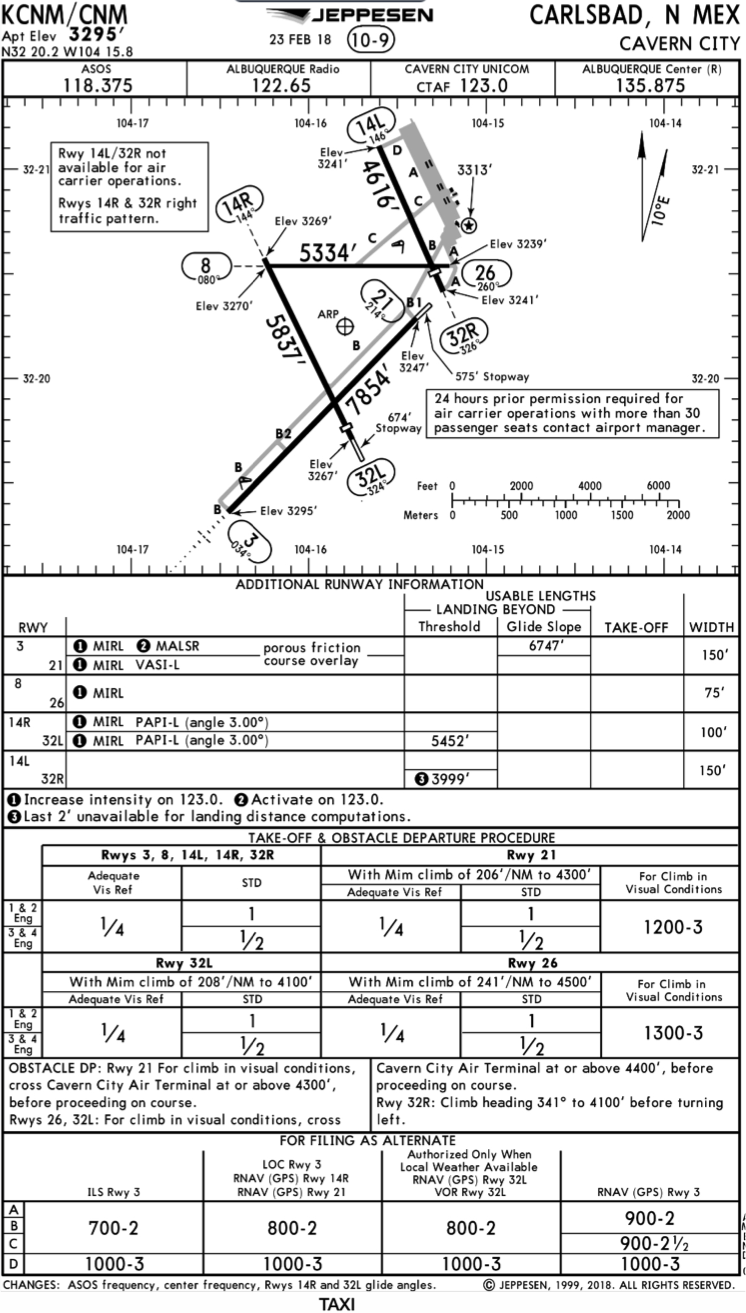
FAA charts have a slightly bigger picture of the approach planview, but the profile view and minimums section can get a bit cluttered. It can feel a little discontinuous when briefing the approach to bounce all over the page. However, some pilots really like the small airport diagram in the corner, which I find really helpful for situational awareness (particularly for students learning circle approaches). Non- standard alternate and takeoff minimums are also clearly noted, but unfortunately we must hunt elsewhere to find them. The Jeppesen alternate minimums and takeoff minimums will both be on the airport diagram
Frequencies: Getting weather and tuning radios is easy on the Jeppesen charts – just follow the briefing strip. The frequency section on the FAA charts is still easy to read, but closer to the center of the page. It’s split up from the nav frequencies and other important briefing information. a. FAA charts are created by the government and have military specific information, which are the odd looking frequencies and channels on the chart.
Approach Navigation: On a Jeppesen chart, you will continue to the next line to verify your frequency, course and set minimums (assuming you are straight in on the ILS). On the FAA chart, you will then have to skip to the top of the chart to get the frequency and course, and then scan to the bottom of the page to input your minimums. However, since you could be flying a localizer approach or a circle to land, it’s a good reminder that not everyone using this approach chart will be using the same Decision Altitude (DA). The FAA chart also includes runway distance information so pilots can make determinations of approach speeds and stopping distance if the runway is wet or icy.
Missed Approach – Textual
Approach Lighting
Missed Approach- Graphical: The missed approach information is the same on both charts. The lighting information is key for determining a missed approach and is next to the missed approach text on the FAA chart. It’s found next to the missed approach graphic on the Jeppesen chart. Personally, I find it easier to find and read the lighting information on the Jeppesen chart. Remember, on both charts, the placement of the PAPI on the chart indicates the physical location of the lights (left or right of the runway).
Notes: Both charts have a notes box, but they use them a little differently. Once again, remember that Jeppesen charts are used internationally and include the transition altitudes and altimeter setting info. On both charts, the notes section will be where other critical information will be shared which isn’t really applicable for this airport. On the FAA chart, the tower frequency is starred to note that there are operating hours (you’ll have to check the chart supplement AF/D to find out what those hours are). There is also an L next to the frequency to indicate it is the pilot controlled lighting frequency. You will also find the note about the VGSI and the Approach Glide path next to the profile view on the FAA chart, whereas the Jeppesen chart has that note in the notes section at the top. The FAA chart also has the T and an A in black triangles to note that this airport has non- standard alternate and take off minimums. Again, those are found in separate documents when using FAA charts and on the Airport Diagram when using Jeppesen charts.
Minimum Sector Altitude: Similar on both charts, but in different locations (reminder: ATC vector altitudes may be lower. It is the pilot’s responsibility for safety of flight to maintain safe obstacle clearance, so if you are ever concerned about going below the MSA – just ask ATC).
Planview: Other then differences in size, visuals, and text, the information displayed on both is very similar.
Profile View: Again, the displays look different and pilots will have their preference, but the information is the same.
Minimums: Jeppesen charts not only note the category for each approach with its designated letter, but also displays it in knots. It is recommended that if you increase your approach speed (based on flaps or gusty winds or perhaps a faster speed for a circle to land approach) that you should use the higher category minimums. The reference guide makes that easy to look up. The other benefit of the Jeppesen charts is right the table that contains the time from the final approach fix to the missed approach point for a localizer approach, it also shows the rate of descent with the associated ground speed to maintain a 3 degree glideslope. Now there is no excuse not to set pitch and power! The minimums posted in parenthesis are for the military, but RVR in statute miles is also included.
Airport diagram: Only on the FAA charts, this particular feature is particularly useful for situational awareness. The arrow pointing to the runway shows the direction the approach is arriving from so planning a circle to land is a cinch. There is also a lot of other information that can be gathered from the airport diagram for quick reference or to help a disoriented pilot: lighting, displaced thresholds, closed taxiways, and runway placement and lengths. This is easily one of the best perks of an FAA chart.
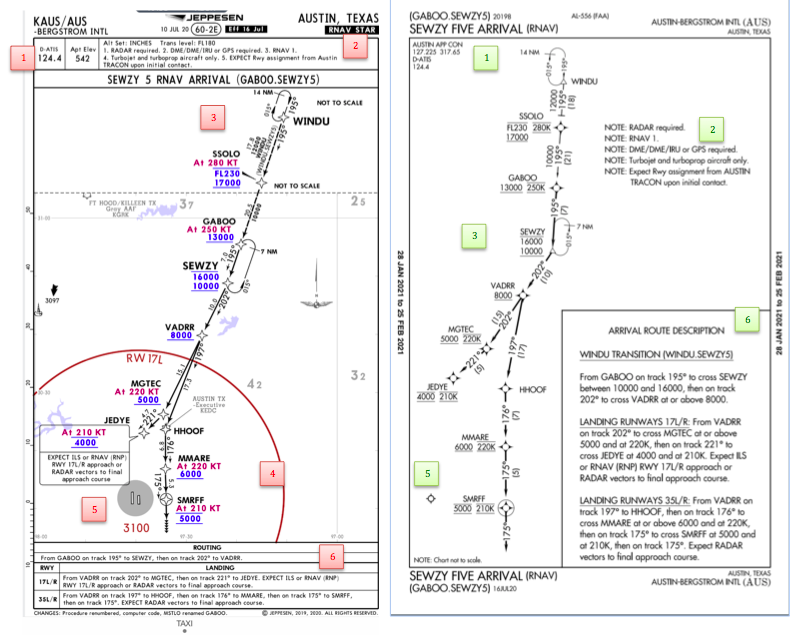
Arrival/ Departure Charts: Sewzy 5 Arrival KAUS
The Jeppesen lay out is very attractive and draws the pilots eye in a clear way to all the important information. The colors pop out, so the required altitudes and speeds are easy to read and remember. The chart, which is the proper scale, shows MORAs , easy to find airports (and runway layouts) and is over all easy to follow. However, the texts, while very clearly laid out, are small and difficult to read and pushed to the very edges of the chart. FAA charts are simple and fairly easy to read, but the airports are not as obvious and the flow to the airport requires a good look. The table on the Jeppesen chart is a really nice format, but the text and Notes for arrivals on the FAA chart are easy to find and much easier to read quickly.
Frequency: FAA charts include the approach frequency on the arrival, which is helpful for having radios tuned. During a busy time when the controller changes your frequency, all you have to do is verify the frequency you already set, rather then totally stop what you’re doing to switch it. The Jeppesen charts add the airport elevation next to the ATIS, which really aids situational awareness.
Notes: Jeppesen notes are clearly numbered and tucked away nicely in a box, but the FAA chart notes pop out in the middle of the page and are easy to skim for pertinent information.
Planview: I think Jeppesen is the clear winner here- it is so easy to read, it only takes one glance to know where the primary airport is and how the arrival flows. The chart being at the proper scale offers the pilot important geographical information and over all is a clean look. Notice the small series of arrows after SMRFF on the the Jeppesen chart; those indicate the pilot should expect radar vectors. The FAA charts include those instructions in the text, but I find the visual reference on the chart helpful. The FAA charts are equally clean, with altitude and speed restrictions easy to read even if they don’t jump out. When there are multiple airports that the arrival serves, the airports are clearly marked, though, I think it would be nice to have a little more information surrounding the primary airport for better situational awareness.
MSA: only on the Jeppesen chart
Primary airport: The runway alignment and grey highlight on the Jeppesen chart stands out very clearly, while the FAA airports are a little more obscure.
Arrival route description: The table on the Jeppesen chart is easy to follow but the text is very small and pushed to the bottom. The route description is much easier to find and read on the FAA chart.
Airport Diagram
The Jeppesen Airport Diagram page has it all: frequencies, airport diagram, runway info, take-off minimums, departure procedures and alternate minimums. It’s a one-stop shop. It makes preflight planning easy when its all at your fingertips.
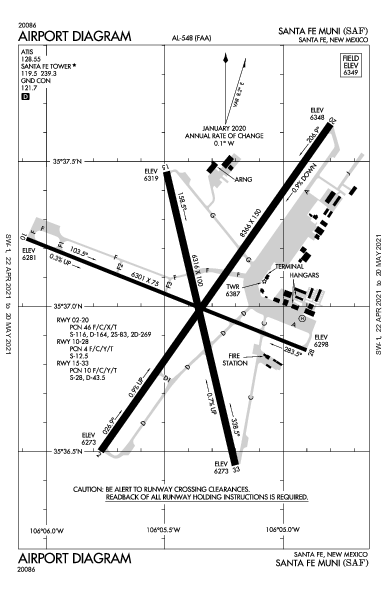
The FAA charts usually require a little more searching for different pieces of airport information. The Airport Diagram itself is just the airport layout. Above, you will see a simple FAA Airport diagram. It’s clean and simple, perfect for a knee board print out.
In the flight planning process, as you look at what approaches you will be using for the airport, you might see an A or T inside a triangle. Those indicate that you will need to look in the Alternate Minimum or Take off minimum documents for more information. The Takeoff Minimums document (see below) is also where you will find any obstacle departure procedures for that airport. Apps like Foreflight help you out by posting the take off minimums under the departure tab. Even though it’s a little more difficult to read, I didn’t crop out the airport information so you can see what it looks like in context.
FAA Alternate Minimums on the Left and Takeoff Minimums and Obstacle Departure Procedures on the Right
Many people ask, which set of charts is better? Should I use the FAA Aeroservices charts on Foreflight or pay extra for the Jeppesen charts? Since you have to pay for Jeppesen, they are probably better, right? I am not here to say which one is better as a chart preference is just that, a…
A couple of months ago, I had a life-threatening experience while flying. Thankfully, with my flight training, along with a lot of luck, I am here to talk about it.
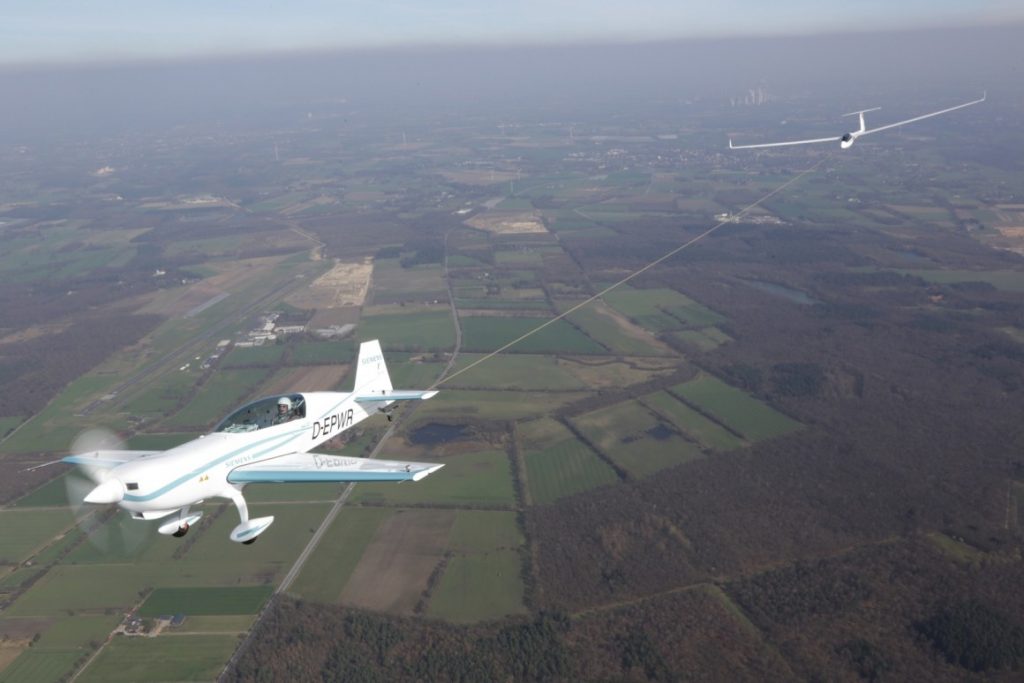
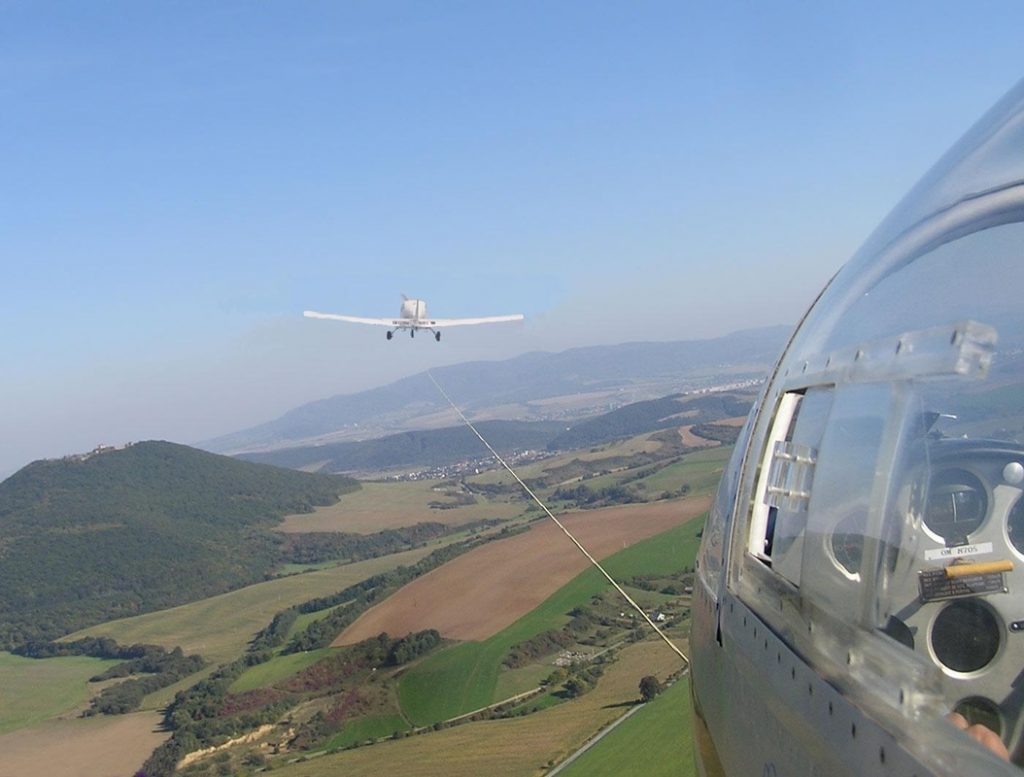
One of my many piloting jobs is as a glider tow pilot. For those not familiar with gliding, since a glider doesn’t have an engine, every time a glider pilot goes and flies, it’s a team effort. A powered airplane (anything from a Super Cub to a turbine powered Air Tractor) is attached to the glider via a tow rope, which is about 200 feet long. Once the glider pilot gives the go ahead over the airport’s CTAF, then the tow plane begins it’s takeoff roll, pulling the glider along behind it.
The glider becomes airborne prior to the tow plane, then the tow plane will circle the airport environment till it get’s to the pre-determined altitude to release the glider. Some tows are pattern tows and some are higher (not usually above 3,000 AGL), depending on the request from the glider pilot. Once the altitude is reached, the glider pilot pulls a handle in the glider to release the tow rope, then begins his glide. The rope stays attached to the tail of the tow plane, which in turn descends back down to the runway and lands. The tow plane also has a tow rope release handle in case of emergency.
On this particular tow, the plan was to tow the glider up to 3,000 AGL. Upon reaching 2,500 AGL, the glider pilot called me on the radio and stated that his rear canopy had opened up. I looked over my shoulder and sure enough, the rear canopy was fully opened while he was still in level flight behind me. I asked him if he wanted me to tow him closer to the field, but he didn’t reply.
Now, as an experienced tow pilot, I know a glider canopy popping open should not be an emergency situation. It’s definitely abnormal, but would be similar to a door or window popping open in a powered airplane. Not a big deal. If too much force from the relative wind is applied to the canopy, it would snap off; however, a glider can easily land without a rear canopy.
About 5 seconds after I radioed the pilot (and received no reply), I felt my tail instantaneously lift up into a completely vertical position, which caused my nose to go straight down. The next thing I knew, a whole lot of earth suddenly filled my windscreen and I was in what’s known as a graveyard spiral.
A graveyard spiral (as defined from the Airplane Flying Handbook pg 4-23), “is a descending turn during which airspeed and G-load can increase rapidly….the airplane is flying very tight circles, in a nearly vertical attitude and will be accelerating since it isn’t stalled.” It’s also known as a spiral dive.
Back to the story. At this point, I tried to reach for the glider release handle. Unfortunately, due to the shoulder straps holding me against the seat, plus the g’s, and also the quart of oil and tow bar that flew forward and hit me in the back of the head, I couldn’t reach it. I was semi-upside down at a certain point, which dislodged the oil and tow bar from the floor of the baggage compartment. They sailed over the seat and nearly gave me a concussion.
At this point, 2,500 feet above the ground, I had a choice to either fight for my life at a very low altitude or to sit back and become part of a big explosion.
I decided to fight for my life.
As I was spiraling to the ground, I felt the tow rope snap. Up to this point, I had still been attached to the glider. The rope snapping was a good thing, as my airplane was now under my control, not attached to, and being affected by, a glider (more on that later). I now had a lifeline, no pun intended.
After I felt the rope snap, my instincts and training kicked in. I initiated the spin recovery procedure using the PARE acronym. This task was difficult to do as I had a lot of debris flying from the rear of the plane to the front, blocking my view out of the windshield. There was also debris around my feet, hampering my ability to use the rudder pedals. The spiral finally stopped and I recovered approximately 500 feet above the tree tops. It took my heart a lot longer to stop spinning.
After barely regaining my emotions, I tried to evaluate the condition of the plane. Were all the pieces of the plane still there, was the engine damaged, did my control surfaces still work?
Once I advanced the throttle and saw an increase in my engine RPM, I started an immediate climb to give me altitude to get back to the airport. I had engine power but I wasn’t sure how long it would last if I had damage. Now, what they don’t teach you during spin training is that when this happens unexpectedly, you will become very disorientated. You have just been spiraling unexpectedly and your equilibrium will be out of whack. As I leveled out just over the tree tops, I was too low to visually see any landmarks, nor could I see the airport. Once I was able to climb, I was able to orient myself and figure out where the airport was.
I had to be very careful getting back to the airport and landing without radio communication, since my radio was knocked out with all of the FOD from the baggage area. Thankfully, the landing was uneventful. After I landed, I saw the glider limp in over the trees. The rear canopy was totally gone, while the front canopy and other parts of the glider had suffered major damage. Miraculously, my airplane wasn’t damaged, except for the wire from the radio which came loose during the spiral.
So, how did all this happen, you ask? Well, the glider pilot made 2 huge mistakes. First, in gliding, the moment the glider pilot loses visual sight of the tow plane, you are supposed to release the tow rope. He did not do that and almost killed both of us.
Second, as pilots we are taught to always fly the airplane first. Everything else, no matter what it is, always comes after flying the airplane. As I stated previously, the loose canopy is not an emergency situation, but since the glider pilot did not aviate first and was distracted, it was almost a fatal day for 2 people and 2 airframes.
So, what caused this chain of events? By getting distracted by the open canopy, the glider pilot inadvertently pulled back on the stick while trying to close the canopy. Then, by not releasing the glider from the tow plane, the glider pilot climbed rapidly with an excessive rate of climb while still being attached to me. The rapid climb is what pulled my tail up, causing my nose to drop and put me into the spiral. The tow rope snapping set into motion my recovery, since up till that point, I literally had no control. An extremely high lift wing was attached to my tail, pulling it up, and there was absolutely nothing I could do about it.
We all spend time practicing and demonstrating emergency maneuvers during our flight training and during flight reviews. Many times you might think, I’ll never need to use this stuff. Thankfully, some of the procedures I learned in the past kicked in at a time of need, even though my heart was beating out of my chest.
At some point in every pilot’s career, some type of spin training or Upset Recovery Training would be highly recommended. Then, when things go wrong, remember to always aviate first, then handle all the other things that need to be handled.
Interested in spin training or Upset Recovery Training (UPRT)? Check out the list of Malibu & M-Class Owner’s and Pilot’s Association (MMOPA) approved UPRT vendors and schedule UPRT training today.
by Lance Stick & Hank Gibson A couple of months ago, I had a life-threatening experience while flying. Thankfully, with my flight training, along with a lot of luck, I am here to talk about it. One of my many piloting jobs is as a glider tow pilot. For those not familiar with gliding, since…
Texas Top Aviation is proud to announce that Hank Gibson has completed the training to become an American Bonanza Society Instructor, or ABS Instructor. He is now qualified to give instruction in Beech Aircraft.
As an ABS Instructor, Hank brings over 2800 hours of flying experience in a variety of aircraft to the cockpit of Beechcraft. Along with his ABS Instructor Designation, Hank is also a Cirrus Standardized Instructor Pilot (CSIP) and a Cessna FITS Accepted Instructor in both Cessna high and low wing piston aircraft (CFAI+). Hank is proud to add the ABS Instructor designation to his list of qualifications.
The process of becoming an ABS Instructor is quite comprehensive. The coursework consists of 20 powerpoint lessons covering anything and everything related to flying Debonairs, Bonanzas, Travel Airs, and Barons. The ABS Instructor course is quite in depth and detailed, giving the graduate a full understanding of the Beechcraft piston line of aircraft. To find out more about ABS Instructors, see the ABS website.
Hank is now giving initial and recurrent training in Beech Debonairs and Bonanzas. Please visit the Texas Top Aviation Bonanza Training page for more information on Bonanza and Debonair initial and recurrent training. Interested in Bonanza or Debonair training with a qualified ABS Instructor? Contact Texas Top Aviation today!
Texas Top Aviation is proud to announce that Hank Gibson has completed the training to become an American Bonanza Society Instructor, or ABS Instructor. He is now qualified to give instruction in Beech Aircraft. As an ABS Instructor, Hank brings over 2800 hours of flying experience in a variety of aircraft to the cockpit of…
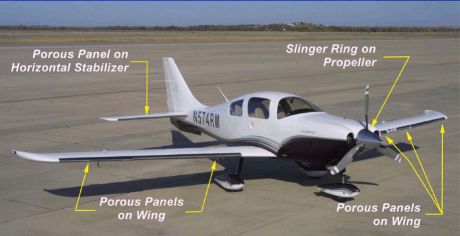
When cleaning airplanes, the majority of people don’t know how to properly maintain their TKS panels. TKS panels provide wing leading edge, horizontal stabilizer leading edge, and, in the case of FIKI airplanes, vertical stabilizer leading edge de-icing protection. For those not familiar with them, they are metal strips that have thousands of holes drilled into them where the TKS fluid seeps out. They have become quite prevalent on Cirrus aircraft, the Cessna TTx, and Mooney aircraft manufactured in the last decade or so. The system is also known as a weeping wing system.
Being on the leading edges, these panels pick up bugs very easily. For the uninitiated, it would make sense to just use normal airplane cleaner to spray the panels and scrub the bugs. Don’t!
Using anything that contains Methyl Ethyl Ketone (MEK) as that can harm the TKS bladders behind the panels. Any aircraft cleaner containing wax could cause the pores to clog, preventing the TKS fluid from properly seeping onto the wing.
What’s the best thing to do? Soap and water with a soft cloth is a good start (again, make sure it doesn’t have wax in it. Dish soap would be suitable). No hose available? Just simply turn the TKS system on, let it run till you start to see fluid drip off the wings onto the ground, and use the fluid to clean the panels.
A soft cloth would work fine, but, if the panels are really buggy, take a green scouring pad to do some scrubbing. Just make sure the scrubbing motion is up and down with the grain, not side to side. You can find the green scouring sponges on the dishwashing aisle in the grocery store. Just leave one in the hangar for when you need it.
When cleaning airplanes, the majority of people don’t know how to properly maintain their TKS panels. TKS panels provide wing leading edge, horizontal stabilizer leading edge, and, in the case of FIKI airplanes, vertical stabilizer leading edge de-icing protection. For those not familiar with them, they are metal strips that have thousands of holes drilled…
I took a Piper Malibu to Cabo San Lucas a few weeks back. This was my second trip flying to Mexico, but the first where I arranged everything. Cabo is a beautiful place and the MMSL airport is a fabulous facility. For those who haven’t been fying to Mexico before, MMSL is the place to go. The folks there are extremely helpful and do most of the paperwork for you. You just have to pass along your information to them.
Flying to Mexico and back out is different than flying in the US. First of all, don’t forget your passport. The authorities on both sides frown upon that. You’ll probably get sent back to the US (or sent back to Mexico if you are on your return trip). Your aircraft also needs, Mexican insurance (talk to your US insurance agent) a radio license, and a customs decal.
Second, you’ll have to file an ICAO specific flight plan for flying to Mexico. This is available on Foreflight now, but I really like Fltplan.com’s way of doing it. I don’t fly internationally enough to remember what everything means, but Fltplan.com does a great job of walking pilots through the the different classifications. It’s almost impossible to get confused.
Third, you have to fill out an eAPIS form. This has to be done at least 24 hours prior to departure from the US, but it can be done as far in advance as you’d like. If your departure time changes or your passengers change, you can edit the eAPIS form to bring it current.
Flying to Mexico IFR is a lot simpler than flying VFR. I have only flown IFR and it is very easy. I’m already on a flight plan, already squawking a discreet code, and already on radar, so there really isn’t any way I can mess up the ADIZ penetration. I really recommend going in and out of Mexico IFR instead of VFR.
Once you land in Mexico, you have to close your IFR flight plan. The tower doesn’t do this for you. After clearing customs, you’ll have to pay a landing fee and sign your flight plan confirming you have arrived and closing it out.
When departing, you have to file another eAPIS 24 hours in advance. Wherever you plan on clearing Customs in the US, you’ll need to call the Customs office no less than 1 hour, but not more than 23 hours before arrival. It’s called an Advanced Notice of Arrival.
You’ll need to fill out a paper flight plan before departing, clear customs again to leave, then away you go.
There are a lot of really fun getaways in Mexico and flying there doesn’t have to be difficult. When you have the right information, flying to Mexico can be a breeze!
I took a Piper Malibu to Cabo San Lucas a few weeks back. This was my second trip flying to Mexico, but the first where I arranged everything. Cabo is a beautiful place and the MMSL airport is a fabulous facility. For those who haven’t been fying to Mexico before, MMSL is the place to…
16 Comments
Thank you! For this in depth answer to a problem I have been perplexed with… Just press the OBS button for the missed on an RNAV or the OBS and then the CDI for a VLOC approach. Simple as that… Thanx
I blew my IFR check ride because I hadn’t seen this article!! Now I know and am much better prepared for my retest….now if only my wallet was as prepared!
Good article, thanks. I know it’s several years later, but here are my two cents. The GNS480 (Apollo CNX-80) did it better by assuming the pilot would do a missed approach and having everything set for a missed. If the pilot lands, then so be it… nothing is lost.
But why force the pilot to push more buttons on their GPS when they have a bunch of more important stuff to do with the plane to go missed (power, flaps, gear, pitch, etc). Garmin got it wrong, imho. I’ve been flying the 480 for years and am using a simulator that has a 430. I much prefer the 480 for every aspect of flight.
Martha, you have a couple different options. If it is the exact same approach you just flew and you are getting vectors to final, all you have to do is press the PROC key, then highlight Activate Vectors to Final and press Enter. Then everything resets and the final approach course will be your active leg with your FAF as your active waypoint.
If you are flying another approach to the same airport, use PROC and Select Approach to select the new approach.
If you are flying an approach at another airport, the quickest way to set things up is press the Direct To key, dial in the new airport, then use PROC from there.
All of these options will take the GPS out of SUSP mode.
Hi Martha, it’s very simple. If you go missed on one approach and want to try the same approach again, just press the PROC key, then activate the approach again to go to the same IAF that you just flew the approach with. If you are going to get vectors, then use Activate Vectors to Final.
So on the 430/530waas can you just do the 1st 2 steps for the missed? Say climb 2000 then climbing right turn to 180 degrees. Then the gps will depict the radial or the other part to the hold and then give you the heading to fly?
One of my aircraft with a dual 430/530 setup actually won’t go in to suspend mode on a missed approach. Instead it just over fly’s the waypoint and then starts counting up whilst it then directs you to the next nearest waypoint… I assume it must be a setting issue but as yet I have been unable to work it out. Any ideas?
Hi Grant, I haven’t heard of that one before. The Flight Plan doesn’t go to the next leg (or the first fix on the missed approach)? That would be an avionics shop question.
On an LPV aprch when removing the hold, the Garmin 530 goes into suspend mode, also.Should the suspend mode be removed to fly the aprch? I know you could activate vectors to final but I am curious as to what happens if you leave it in suspend mode. Thanks all.
Hi Tony, I’m assuming this happens when you are on the wrong side of the IAF that the hold was drawn on? Meaning, the FAC is 180, but you are headed 360 and you haven’t passed abeam the IAF yet. IF that is the case, then once you go direct to the IAF that you deleted the hold from, the 530 will go out of suspend. If you are getting vectors, you are correct and can activate vectors to final, or could press OBS to unsuspend manually.
When flying a GPS approach and navigating directly to a way point on the approach ,How do I configure my Garmin 400 to hold at fix that say center wants me to hold At . For example, I’m flying into Sun Valley on The GPS 31 and center says “ fly direct to Presn” hold as published make one circuit then cleared for approach.
Hi Scott, I’m assuming a Garmin 400 is a Garmin 430 without the Nav/Com. I looked at the approach plate and PRESN is the Missed Approach point as well as one of the IAFs. If Center gives you the above instruction, you have to jump through a few hoops to get this to work. First, load the approach into the Garmin with PRESN as the transition. Then, when Center tells you to go direct to it, since the published hold is part of the Missed Approach, on your Flight Plan page, go down to the PRESN missed approach waypoint, press Direct To, and enter twice. This will cause the GPS to go into the hold. Then, on your inbound leg back to PRESN, go back up to the PRESN IAF in your GPS flight plan, highlight it, press Direct To, enter twice, and then it will cycle over to the approach.

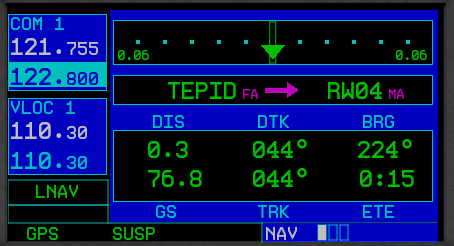 Garmin designed their software with this in mind. When an airplane crosses the missed approach point, the GPS will go into what’s called suspend mode (a SUSP annunciation appears above the OBS key). It will keep the missed approach point as the active waypoint because it assumes the pilot is going to land.




Thank you! For this in depth answer to a problem I have been perplexed with… Just press the OBS button for the missed on an RNAV or the OBS and then the CDI for a VLOC approach. Simple as that… Thanx
I blew my IFR check ride because I hadn’t seen this article!! Now I know and am much better prepared for my retest….now if only my wallet was as prepared!
Good article, thanks. I know it’s several years later, but here are my two cents. The GNS480 (Apollo CNX-80) did it better by assuming the pilot would do a missed approach and having everything set for a missed. If the pilot lands, then so be it… nothing is lost.
But why force the pilot to push more buttons on their GPS when they have a bunch of more important stuff to do with the plane to go missed (power, flaps, gear, pitch, etc). Garmin got it wrong, imho. I’ve been flying the 480 for years and am using a simulator that has a 430. I much prefer the 480 for every aspect of flight.
What if you don’t want to do the published miss but are getting vectors for another “try” – same ILS approach?
Martha, you have a couple different options. If it is the exact same approach you just flew and you are getting vectors to final, all you have to do is press the PROC key, then highlight Activate Vectors to Final and press Enter. Then everything resets and the final approach course will be your active leg with your FAF as your active waypoint.
If you are flying another approach to the same airport, use PROC and Select Approach to select the new approach.
If you are flying an approach at another airport, the quickest way to set things up is press the Direct To key, dial in the new airport, then use PROC from there.
All of these options will take the GPS out of SUSP mode.
Hi Martha, it’s very simple. If you go missed on one approach and want to try the same approach again, just press the PROC key, then activate the approach again to go to the same IAF that you just flew the approach with. If you are going to get vectors, then use Activate Vectors to Final.
So on the 430/530waas can you just do the 1st 2 steps for the missed? Say climb 2000 then climbing right turn to 180 degrees. Then the gps will depict the radial or the other part to the hold and then give you the heading to fly?
Yes, that is correct.
One of my aircraft with a dual 430/530 setup actually won’t go in to suspend mode on a missed approach. Instead it just over fly’s the waypoint and then starts counting up whilst it then directs you to the next nearest waypoint… I assume it must be a setting issue but as yet I have been unable to work it out. Any ideas?
Hi Grant, I haven’t heard of that one before. The Flight Plan doesn’t go to the next leg (or the first fix on the missed approach)? That would be an avionics shop question.
On an LPV aprch when removing the hold, the Garmin 530 goes into suspend mode, also.Should the suspend mode be removed to fly the aprch? I know you could activate vectors to final but I am curious as to what happens if you leave it in suspend mode. Thanks all.
Hi Tony, I’m assuming this happens when you are on the wrong side of the IAF that the hold was drawn on? Meaning, the FAC is 180, but you are headed 360 and you haven’t passed abeam the IAF yet. IF that is the case, then once you go direct to the IAF that you deleted the hold from, the 530 will go out of suspend. If you are getting vectors, you are correct and can activate vectors to final, or could press OBS to unsuspend manually.
When flying a GPS approach and navigating directly to a way point on the approach ,How do I configure my Garmin 400 to hold at fix that say center wants me to hold At . For example, I’m flying into Sun Valley on The GPS 31 and center says “ fly direct to Presn” hold as published make one circuit then cleared for approach.
Hi Scott, I’m assuming a Garmin 400 is a Garmin 430 without the Nav/Com. I looked at the approach plate and PRESN is the Missed Approach point as well as one of the IAFs. If Center gives you the above instruction, you have to jump through a few hoops to get this to work. First, load the approach into the Garmin with PRESN as the transition. Then, when Center tells you to go direct to it, since the published hold is part of the Missed Approach, on your Flight Plan page, go down to the PRESN missed approach waypoint, press Direct To, and enter twice. This will cause the GPS to go into the hold. Then, on your inbound leg back to PRESN, go back up to the PRESN IAF in your GPS flight plan, highlight it, press Direct To, enter twice, and then it will cycle over to the approach.
Great article! I found the explanation of Garmin 530/430 missed approaches easy to understand, thanks for breaking it down!