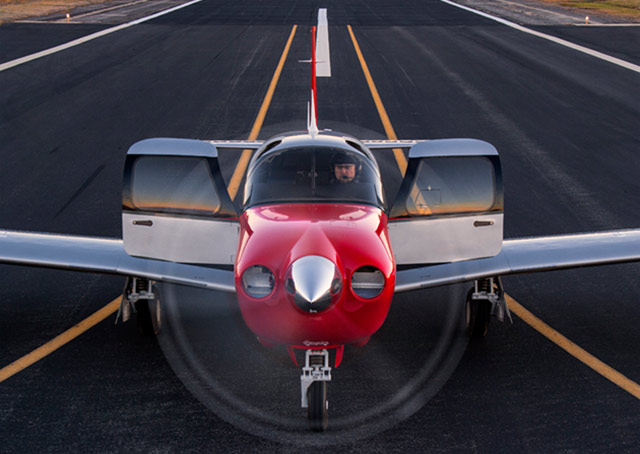
Mooney announced last week the redesign of their current Ovation and Acclaim models. The biggest change that Mooney pilots will love is the addition of a pilot’s door, allowing the pilot to enter on the left side instead of having to crawl over the passenger seat.
Other upgrades include a keypad for easier data entry on the G1000 and an all in one, digital standby instrument that includes attitude, airspeed, and altitude.
This raises the question, will Piper and Beechcraft follow suit?
It was a rainy Thursday afternoon and I was eating lunch with my family when my phone rang. My wife and I had just been discussing how miserable the weather was, so it was only natural that about 30 minutes later I was soaking wet and sitting in one of our Aerostars getting ready to take off for Ohio. I didn’t have much information about who I would be flying, or why, but I knew that I was going to pick someone up to fly them home; something about a missing airplane. So off I went into the muck. My biggest concern at that point being whether or not my clothes would ever dry out.
I arrived uneventfully and walked happily into the FBO, but found myself quickly in a very different atmosphere. It turned out I had two passengers to pick up, a husband and wife, and they had arrived at the FBO before me. As I walked in the door, the wife received a phone call. The person on the phone told her that search teams had found her father’s airplane crashed in the woods and that he was dead. I learned the rest of the details quickly and it was hard to stomach.
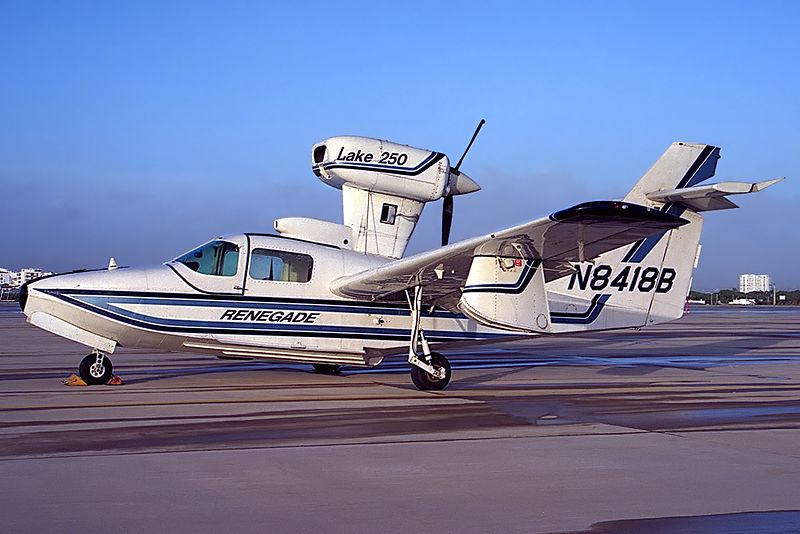
She was travelling home that day to be with family until they were able to locate her father. She was pregnant with her first baby and was in her third trimester. The baby was to be her dad’s first grandchild. He’d owned a Lake Amphibian for years and had stayed at home to work while his wife was out of town. He was last seen leaving work on Tuesday of that week and was reported missing on Thursday by his co-workers. Airport security footage showed him pulling the airplane out and taking off at 20:48 (after sunset) on Tuesday night.
After a few minutes we loaded the Aerostar and took off. It was the saddest flight I’ve ever done. Understandably, my passanger sobbed on and off from the time she got off the phone until we landed a couple of hours later. The weather seemed appropriate as we flew along through the rain and were greeted at our destination by a grief stricken family and a few reporters.
I said a sad goodbye and left, but I couldn’t help but think about their situation. It really hit close to home with me as it was easy to draw parallels between my family and theirs: she was very close in age to me and pregnant with her first child. My wife and I were new parents. Her dad had owned his airplane for about the same length of time that my dad has owned his Bonanza. Additionally, it isn’t uncommon for my parents to go a couple days without being able to reach each other because they both travel.
A Lake 250, the same type of aircraft involved in the accident.
But what happened..?
In the time since the accident, the NTSB has published their findings and unfortunately, it makes the situation sadder. It was completely avoidable.
Airport security cameras showed that after removing the airplane from the hangar, the pilot did not complete a preflight inspection or even a walkaround of any kind. He simply climbed in and left. The investigators were unable to find any traces or odor of fuel in the wreckage, nor any mechanical abnormalities with the airplane. In fact, according to the report, the engine was put on a test stand and ran perfectly. It would seem that the pilot simply never checked the fuel quantity and took off. The airport cameras captured the take off and a bright flash about 30 seconds after the aircraft departed.
Here is an excerpt from the report:
The National Transportation Safety Board determines the probable cause(s) of this accident as follows: The pilot’s attempted 180-degree return to the runway immediately after takeoff in dark night conditions, which resulted in collision with trees and terrain. Also causal was the pilot’s inadequate preflight inspection, which resulted in a takeoff with little-to-no fuel on board the airplane.
Interestingly, the report also details their ability to use logbook information and fuel receipts to show the airplane was taken on a long cross country on its last flight and likely not fueled again.
Another thing which stuck out in my mind upon learning the details of the crash was how important it is to let someone know when you’re going flying. Having another person know roughly when a flight is leaving, where it’s going and and when to expect it back could potentially save the lives of the people on board. In the case of this accident, the pilot didn’t alert anyone that he was going flying and therefore, no one realized he was missing for 2 days.
From reading the NTSB report I don’t get the impression that he survived the crash, but I can’t help thinking about the possibility that he, or others in similar circumstances, could survive a crash and then die from their injuries because no one knew to look for them. When I flew charter, we weren’t legally allowed to take off VFR without letting someone at the company know the details of the flight. I’ve adopted this as my personal policy as well. One text message could be the difference between being rescued or not.
Finally, every pilot should ensure that a proper walk around is completed! It’s easy to assume everything is okay with an airplane, especially one that no one else has access too. In addition to a thorough preflight, I like to walk all the way around the airplane and visual check fuel caps, doors, chocks, ropes, etc., immediately before getting in to ensure that everything is ready. I know a couple of pilots who have taken off with various panels and compartments open simply because they got distracted during their walk around and never closed them. (A good policy is to never walk away and leave something open). Perhaps even more mind boggling is that he apparently didn’t look at the fuel gauges after start up and before take off. I also have to wonder how much fuel he had remaining upon completion of the previous flight.
“Aviation in itself is not inherently dangerous. But to an even greater degree than the sea, it is terribly unforgiving of any carelessness, incapacity or neglect” is likely a familiar quote to just about every pilot. It is often written on a poster with a picture of an old timey bi-plane hanging out of a tree, but I think that it is absolutely on point. Carelessness in the preflight and neglecting basic pilot responsibilities (in this case fuel planning) cost this father his life and his opportunity to meet his first grandchild.
I know this article is a real downer, but it’s supposed to be. Its tragic that accidents take place which are completely avoidable. Obviously this case was beyond the normal realm of carelessness and neglect, but, we as pilots need to be extremely careful not to get so comfortable with an airplane that we stop doing the things which are so basic and important to safety. One of my professors in school used to say “aviation is fun, but it plays for keeps,” which is an effective way to remind myself how important it is to do it right.
*Out of respect to the family, I have not included any specific names, tail numbers or airports in this article.
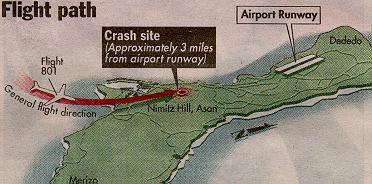
I ran across the story about the Korean Air flight that crashed in Guam in the late ’90s the other day. It was a 747 that hit the side of hill about 3 miles short of the runway, killing most of the people on board. The flight was at night (arrival time was about 1:30am) and the pilot’s lost sight of the runway on a visual approach due to inadvertent IMC entry. They didn’t execute a missed approach soon enough, got too low, and crashed.
These were experienced pilots, mind you, who had flown into that airport a number of times. They were experienced enough to know when to execute a go around. There were several other factors that led up to the crash, but, ultimately, they lost sight of the runway due to inadvertent IMC entry.
To all the VFR pilots out there, what do you do if you accidentally fly into a cloud? It’s a lot easier to encounter inadvertent IMC at night, simply because you can’t see the clouds in front of you. It is no less dangerous during the day, either.
So, we’re going back to the basics today. What really is the best course of action for a VFR pilot when flying into a cloud? One option (and in my opinion, the best option) is to turn around. Immediately start scanning your instruments, execute a shallow banked 180 degree turn while maintaining altitude, and fly out of the cloud you just flew into. If you have an autopilot, turn it on immediately and let it do the turn.
What if you were descending or climbing when you encountered the inadvertent IMC? In this case, just reverse whatever you were just doing. If you were descending, climb. If you were climbing, descend. Caution is needed, though, as climbing or descending when flying on instruments for an inexperienced IFR pilot could lead to a greater chance of disorientation.
One thing that could assist in spotting those clouds at night is turning the cockpit lights down. This will allow you to see outside a little bit better and start to notice when those ground lights are disappearing.
Most VFR pilots only do instrument flying on flight reviews. That doesn’t lead to a very high level of proficiency, so go out and grab your instructor and tell him to put you under the hood once a month. You’ll be a better pilot overall for it.
IFR pilots, taking a note from the Korean Air flight; if you lose sight of the runway on a visual approach, especially at night, go missed and ask for the instrument approach procedure. Don’t try and duck down below the clouds as there may be a hill or a mountain directly below you.
The Garmin GTN 750 is an awesome piece of equipment. Garmin tried to make the user interface with the touch screen as simple as possible (though there still is a bit of a learning curve when moving up from a Garmin 530W). Garmin also integrated several key features that the 530W did not have that makes flying with a Garmin GTN 750 in IFR all that much better.
The two features of the Garmin GTN 750 I want to focus on today are the “Load Airway” feature and the “Hold at Waypoint” feature. If a pilot isn’t looking for these specifically, they can actually be a bit hard to find. The “Load Airway” feature is especially handy when flying IFR long distances with several airways as part of the clearance. Here’s how to utilize both.
Load Airway
On your flight plan page, insert the waypoint that you will be joining the airway, or, if your clearance was radar vectors to join an airway, then insert the waypoint on the airway that begins the leg you will be joining on.
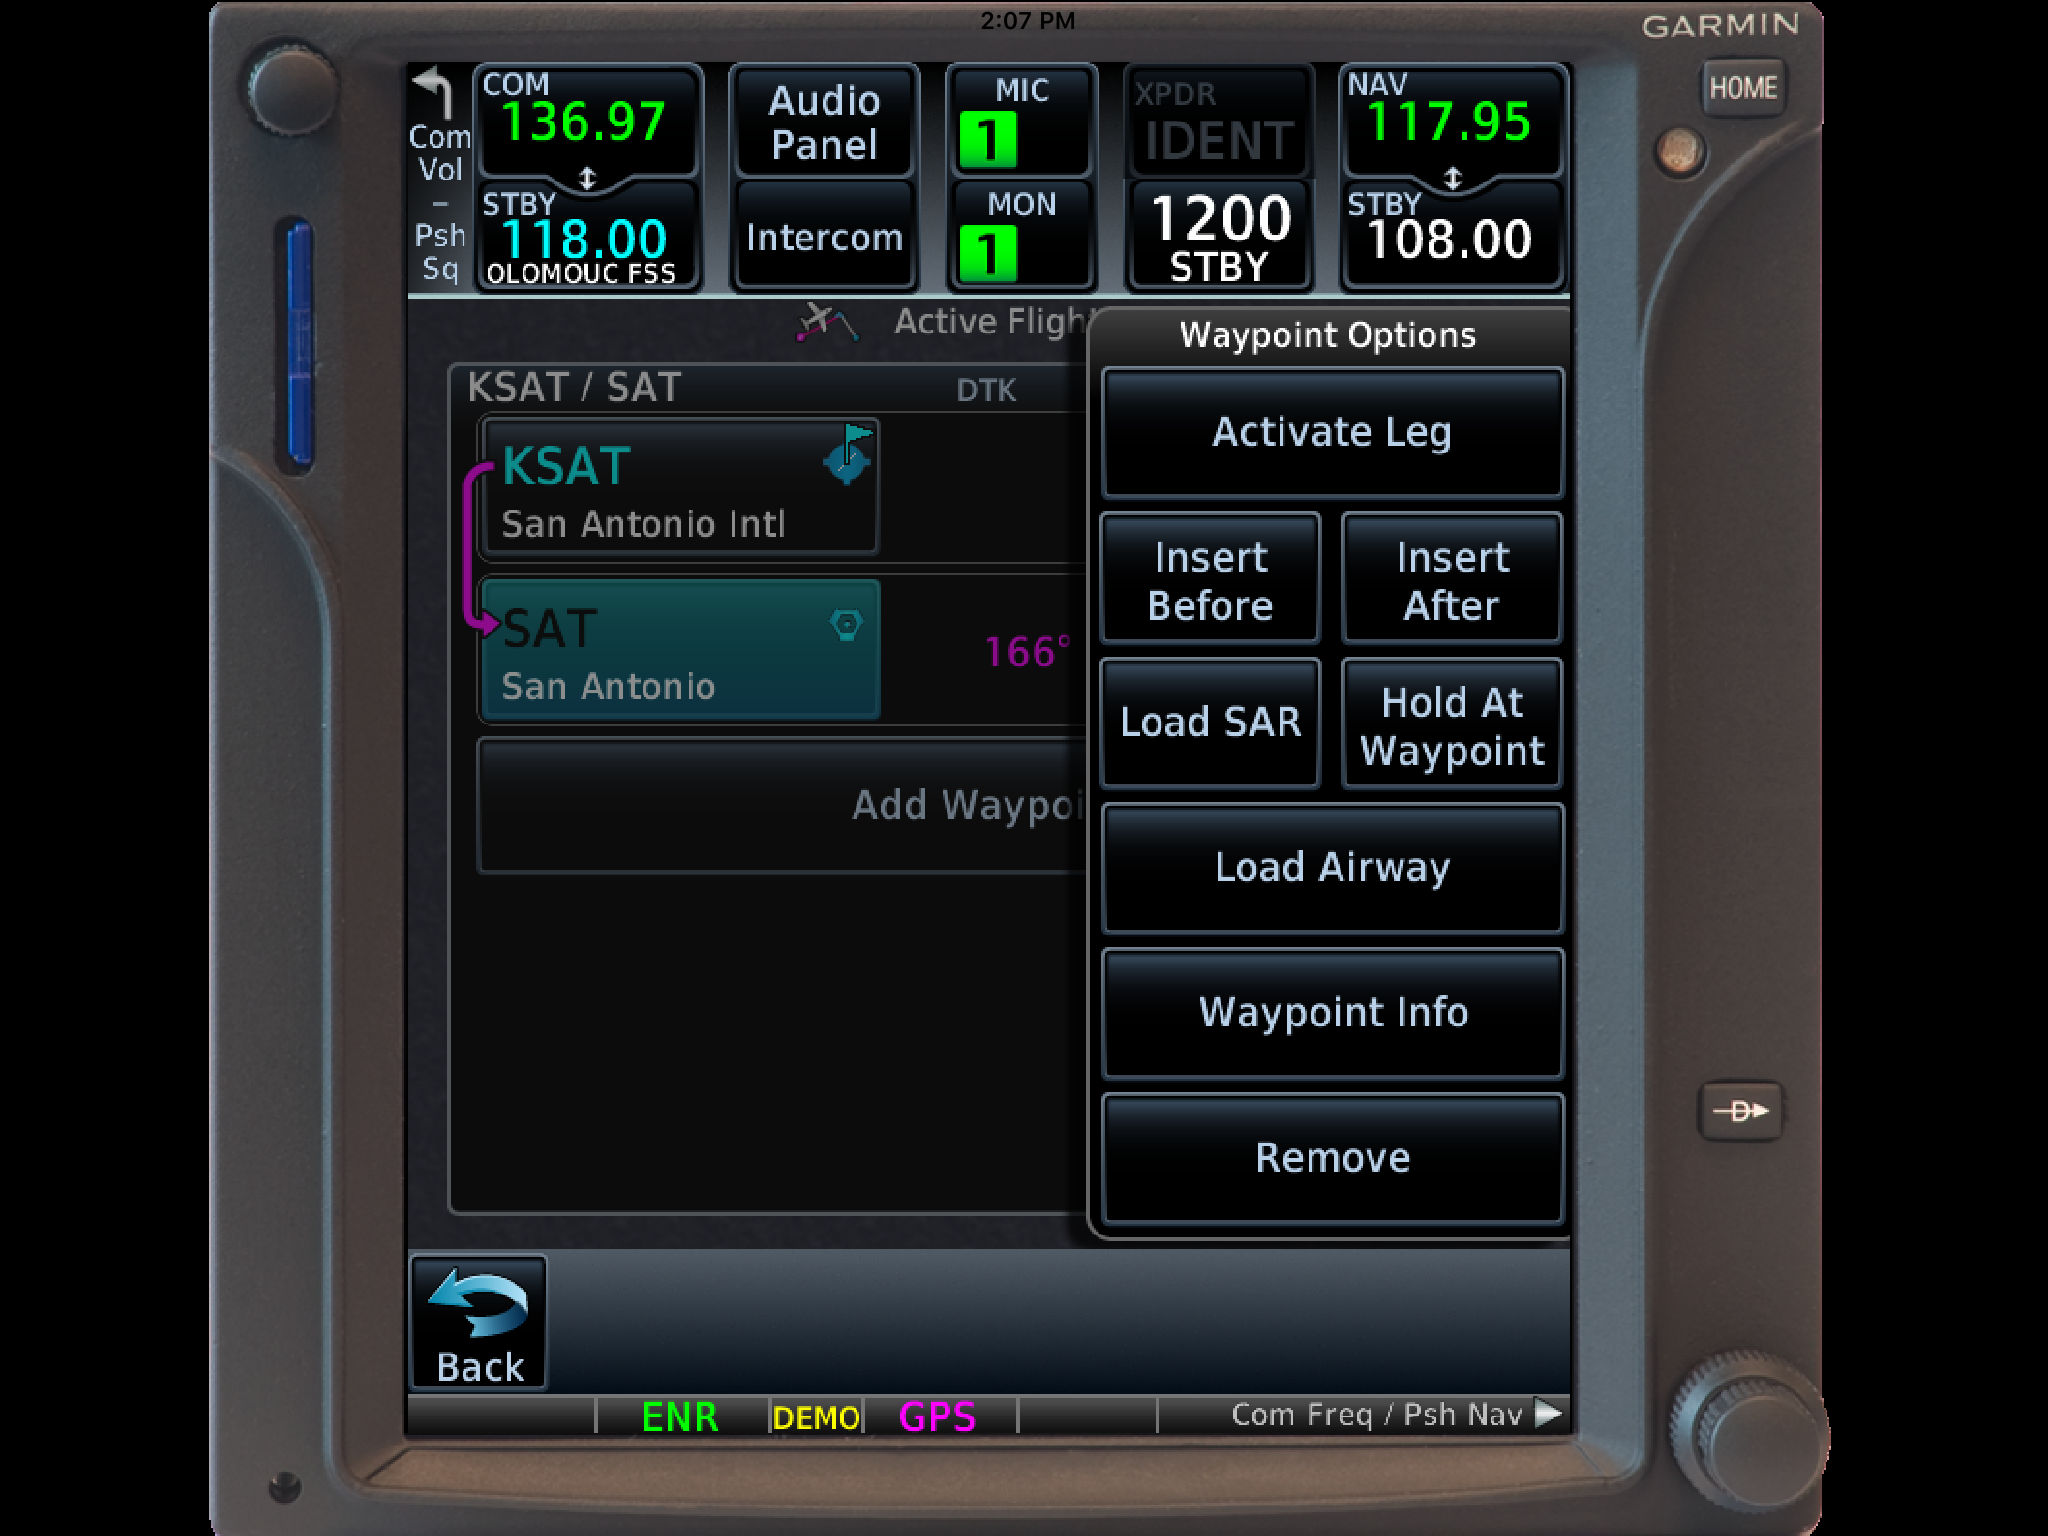
Tap the waypoint you just inserted.
A menu will pop up. Tap Load Airway.
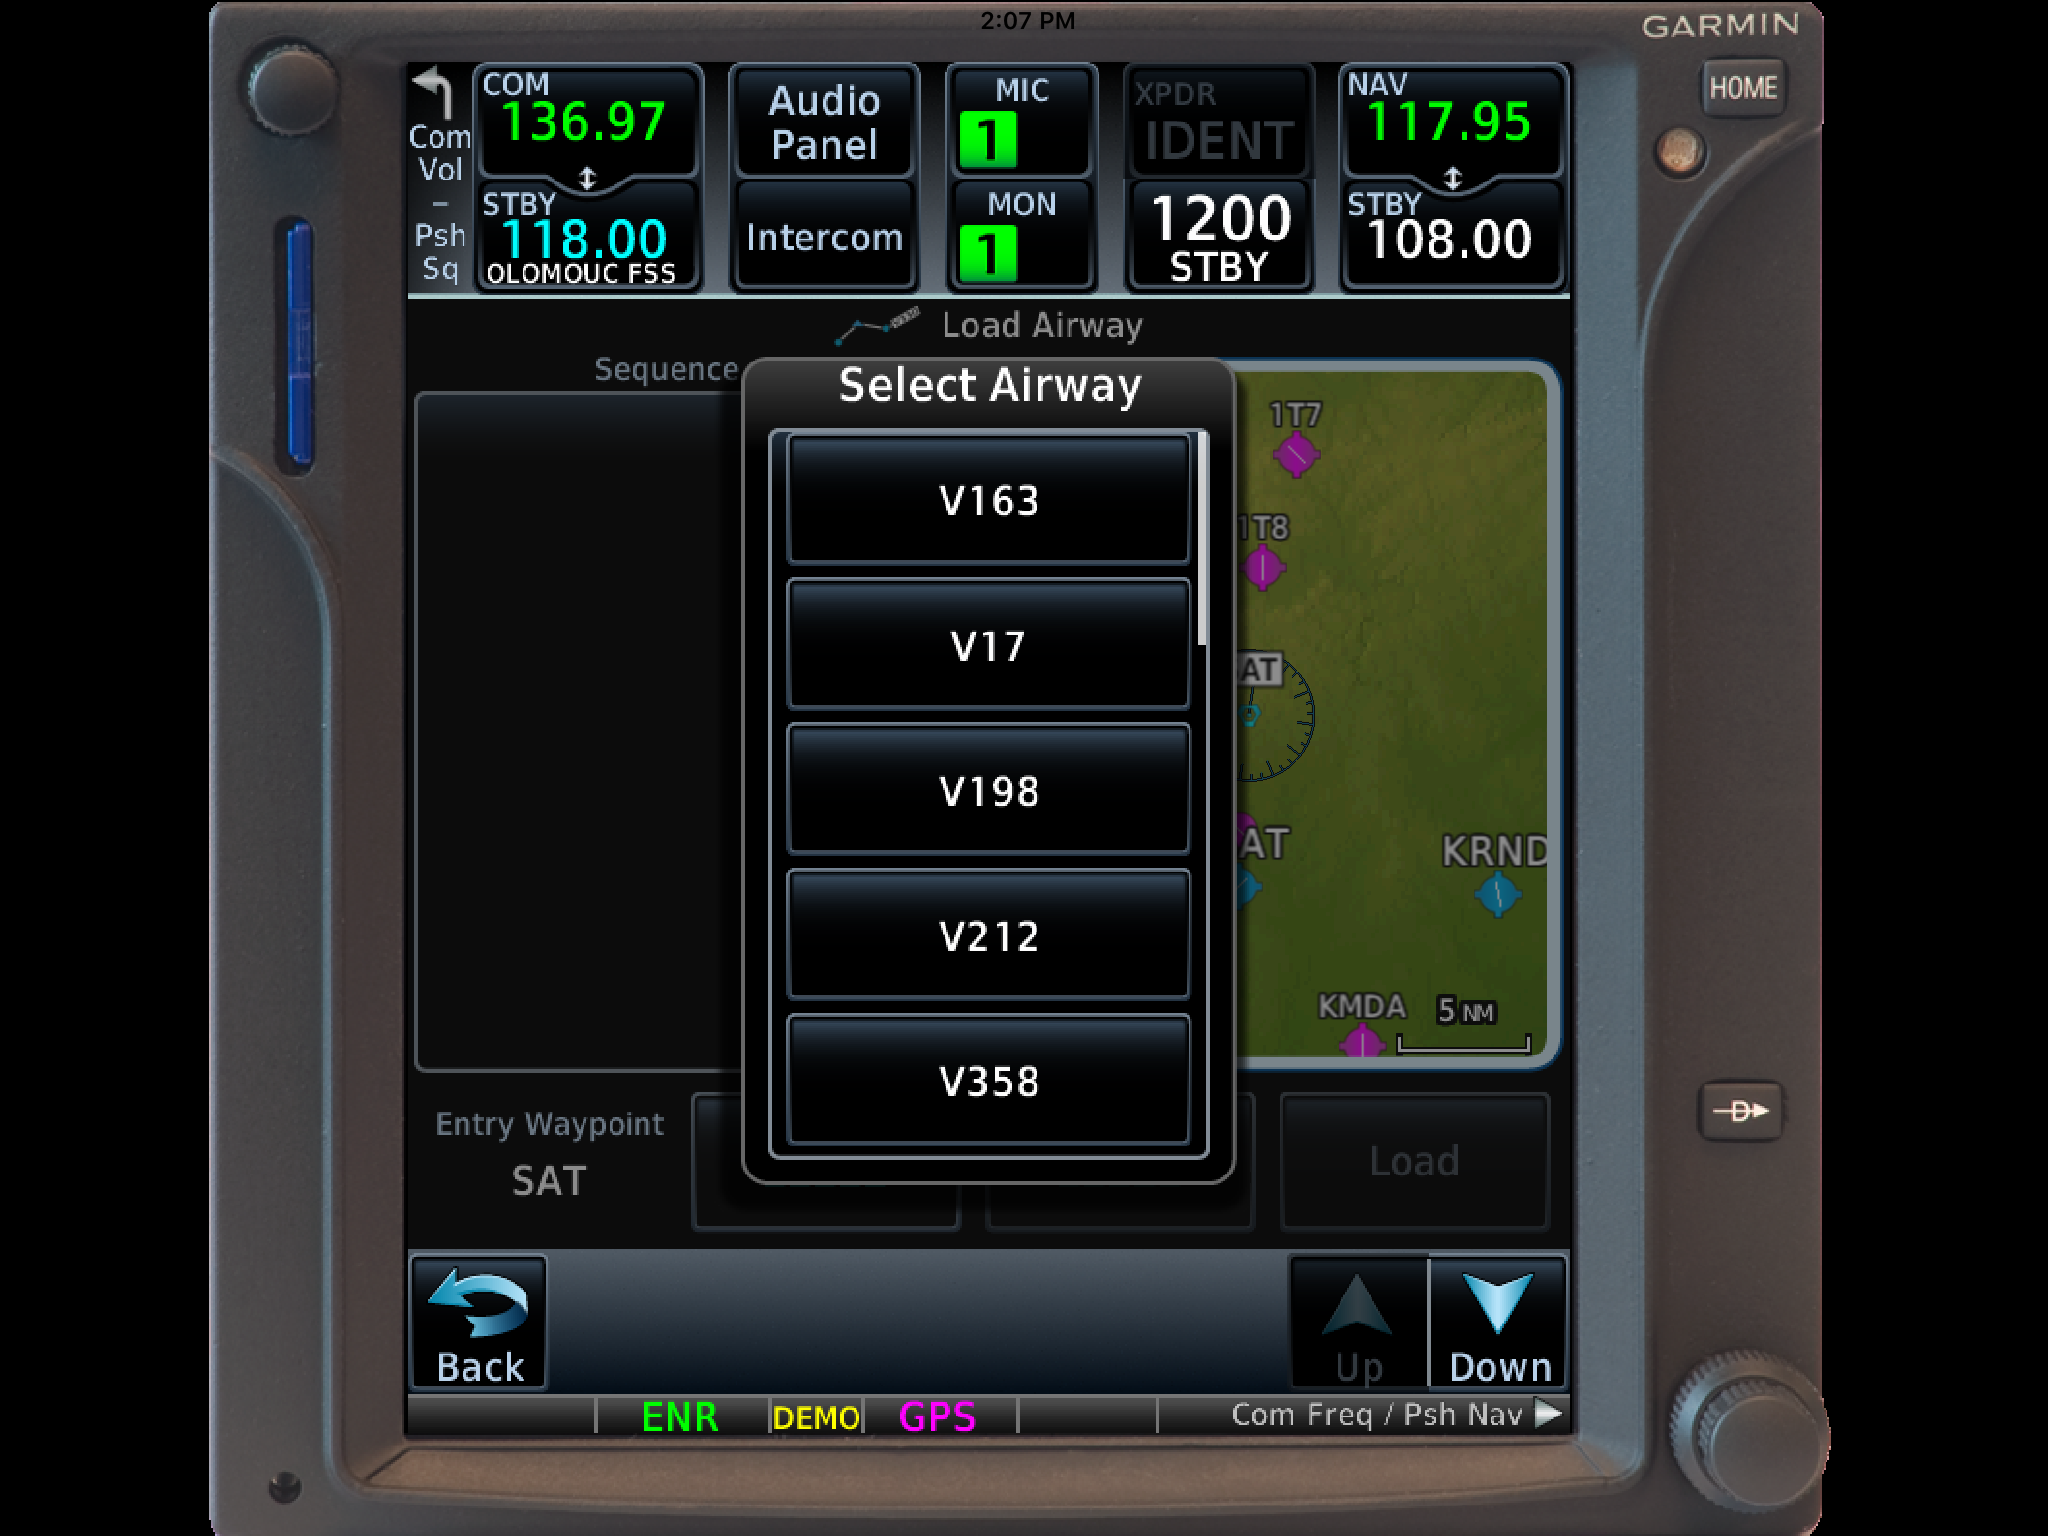
Select the Airway you want from the next menu that pops up.
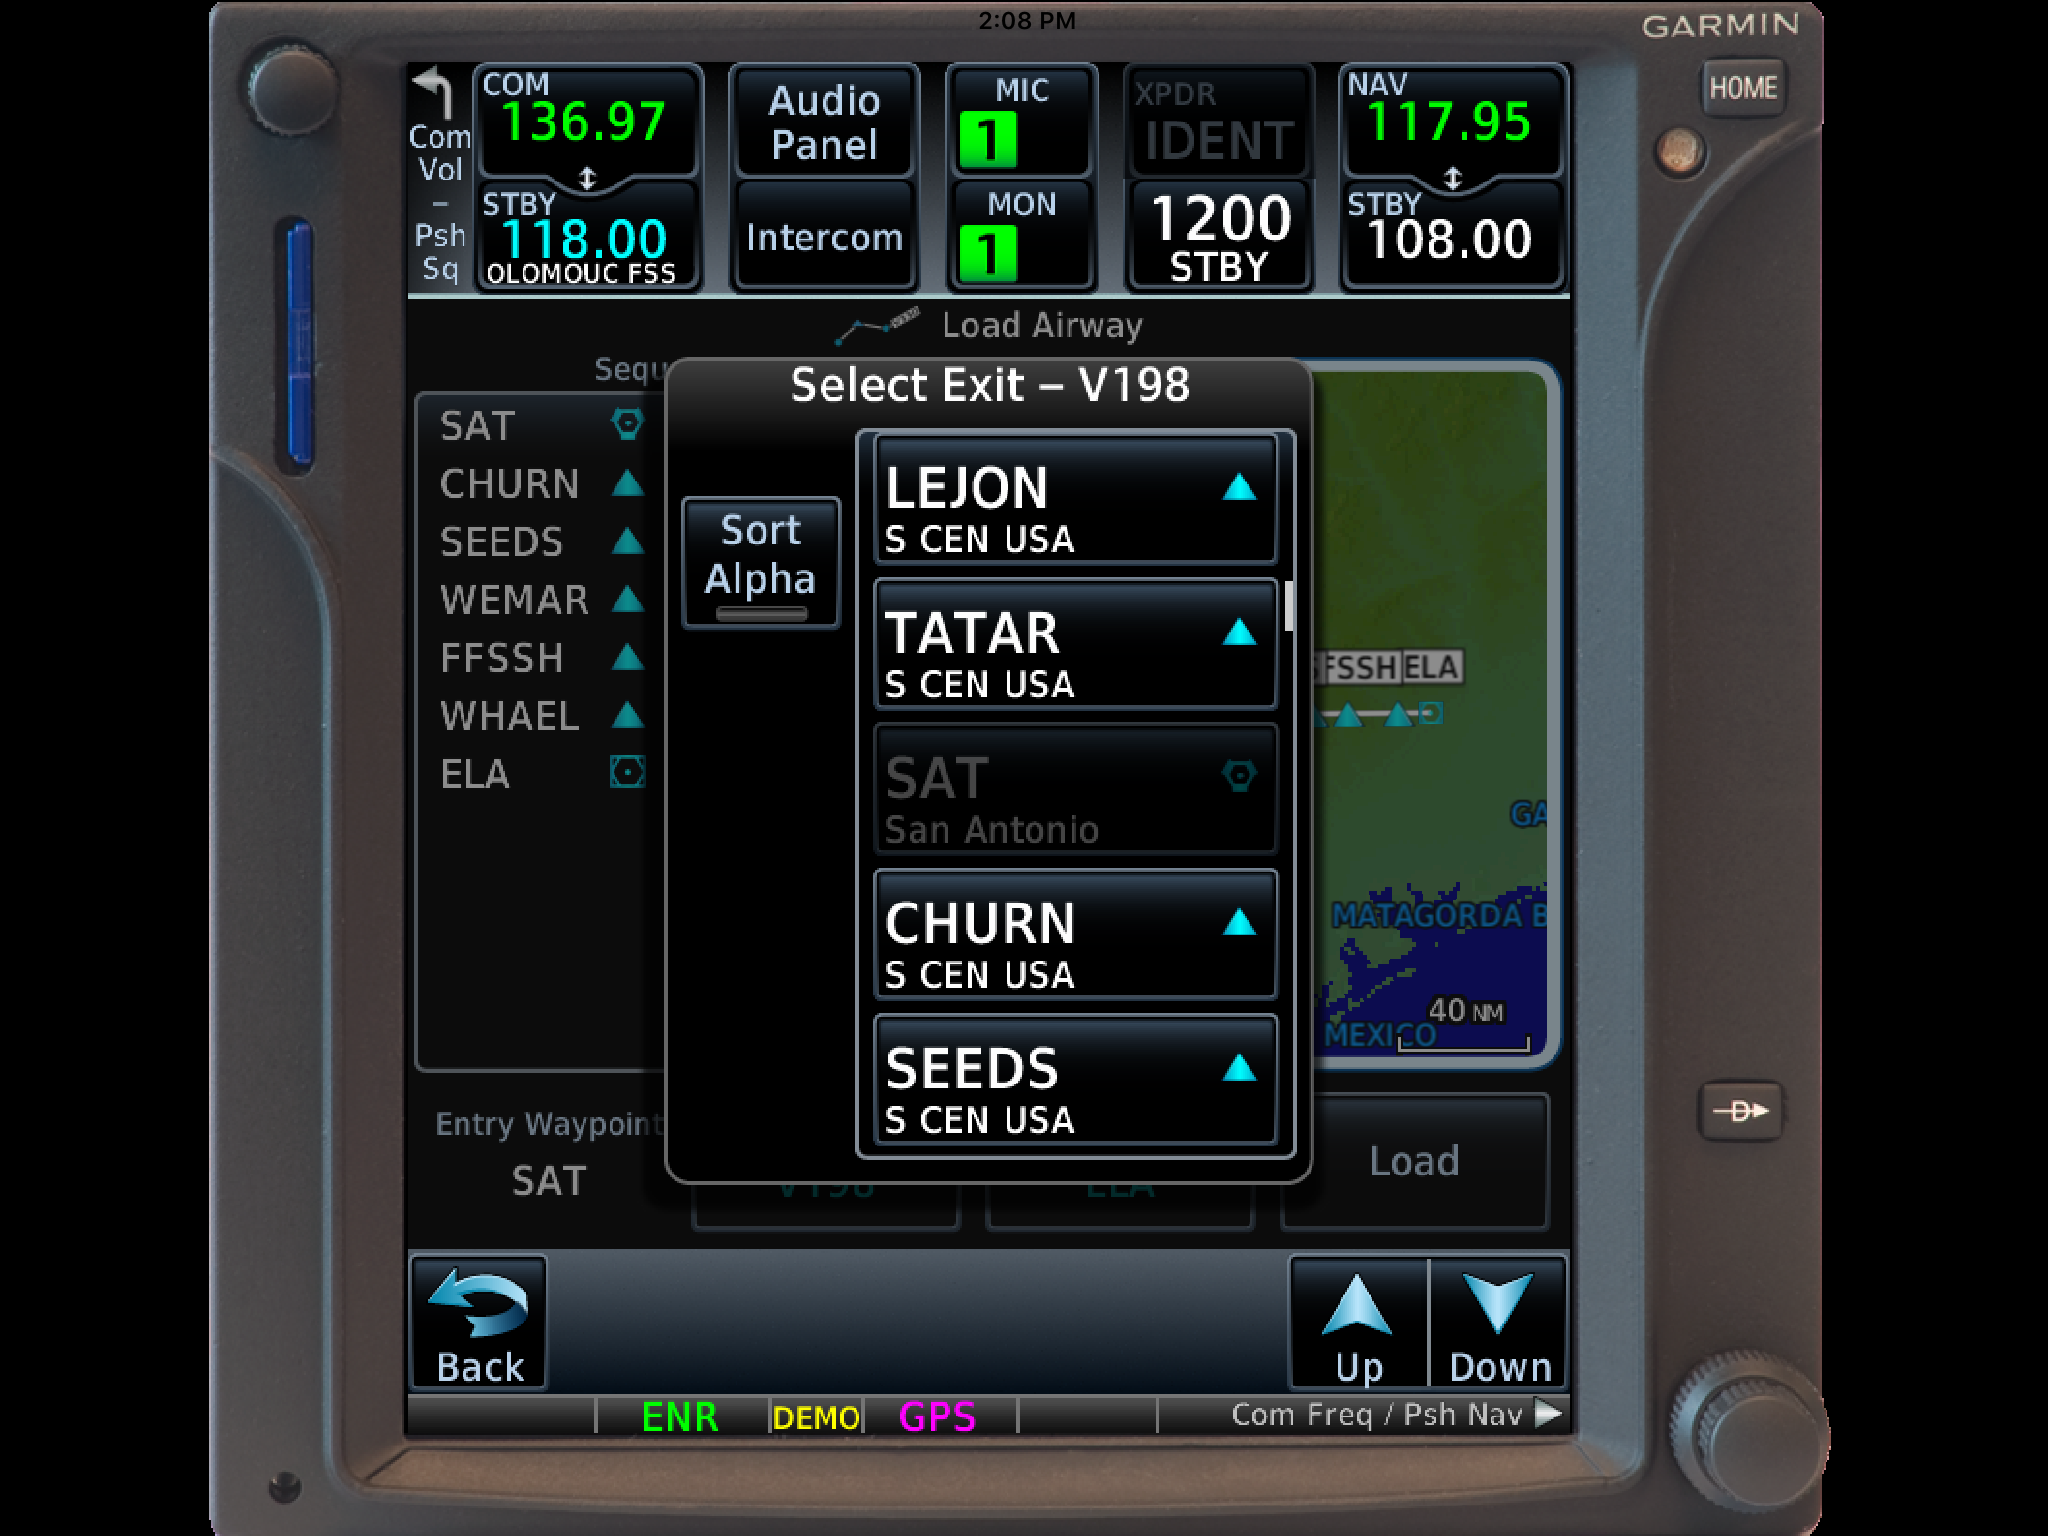
Then, a list of waypoints will display to exit the airway. Select the waypoint where you will be exiting the airway.
Note: Garmin defaults to listing these waypoints alphabetically. If you unselect the “Sort Alpha” option, it will sort the waypoints by direction and distance from the entry waypoint. This is a little more practical, easier to work with, and how I recommend doing it. This way you can either scroll up or down depending on the direction of travel on the airway and find your exit waypoint.
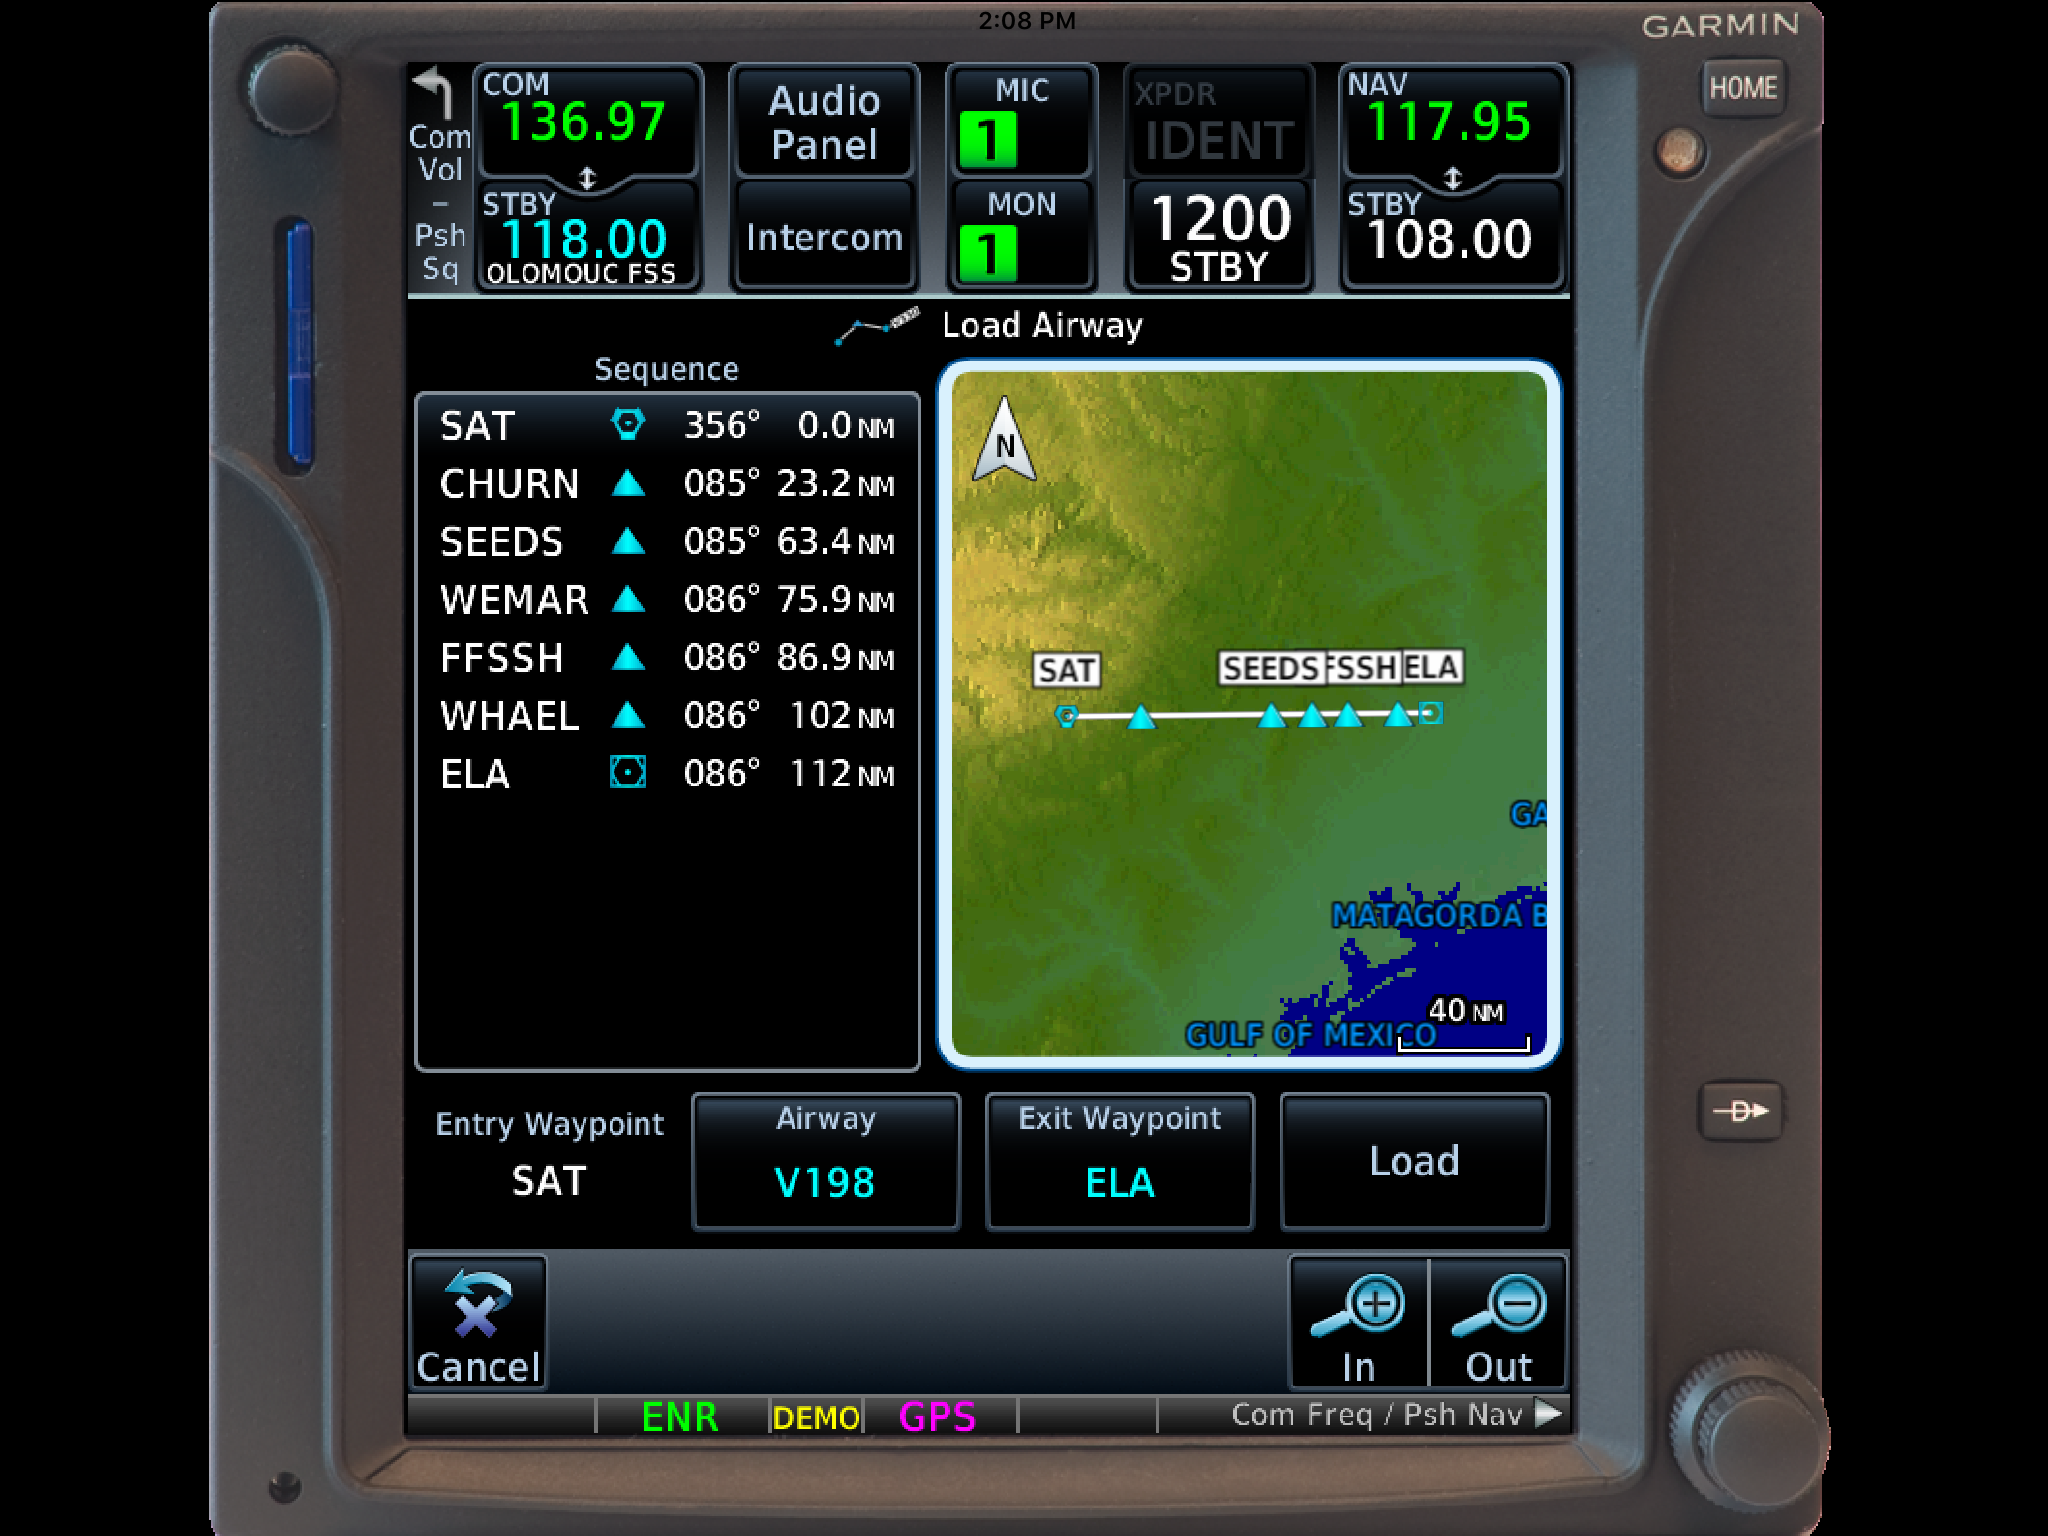
Tap Load.
The Airway and all the waypoints in between your entry and exit waypoints appear in your flight plan.
If you are getting vectors to join the airway, you’ll need to use the Activate Leg function to activate the leg you will be joining the airway on.
On the Flight Plan page, tap the waypoint that ends the leg you want to activate.
On the menu that pops up, tap Activate Leg.
Hold At Waypoint
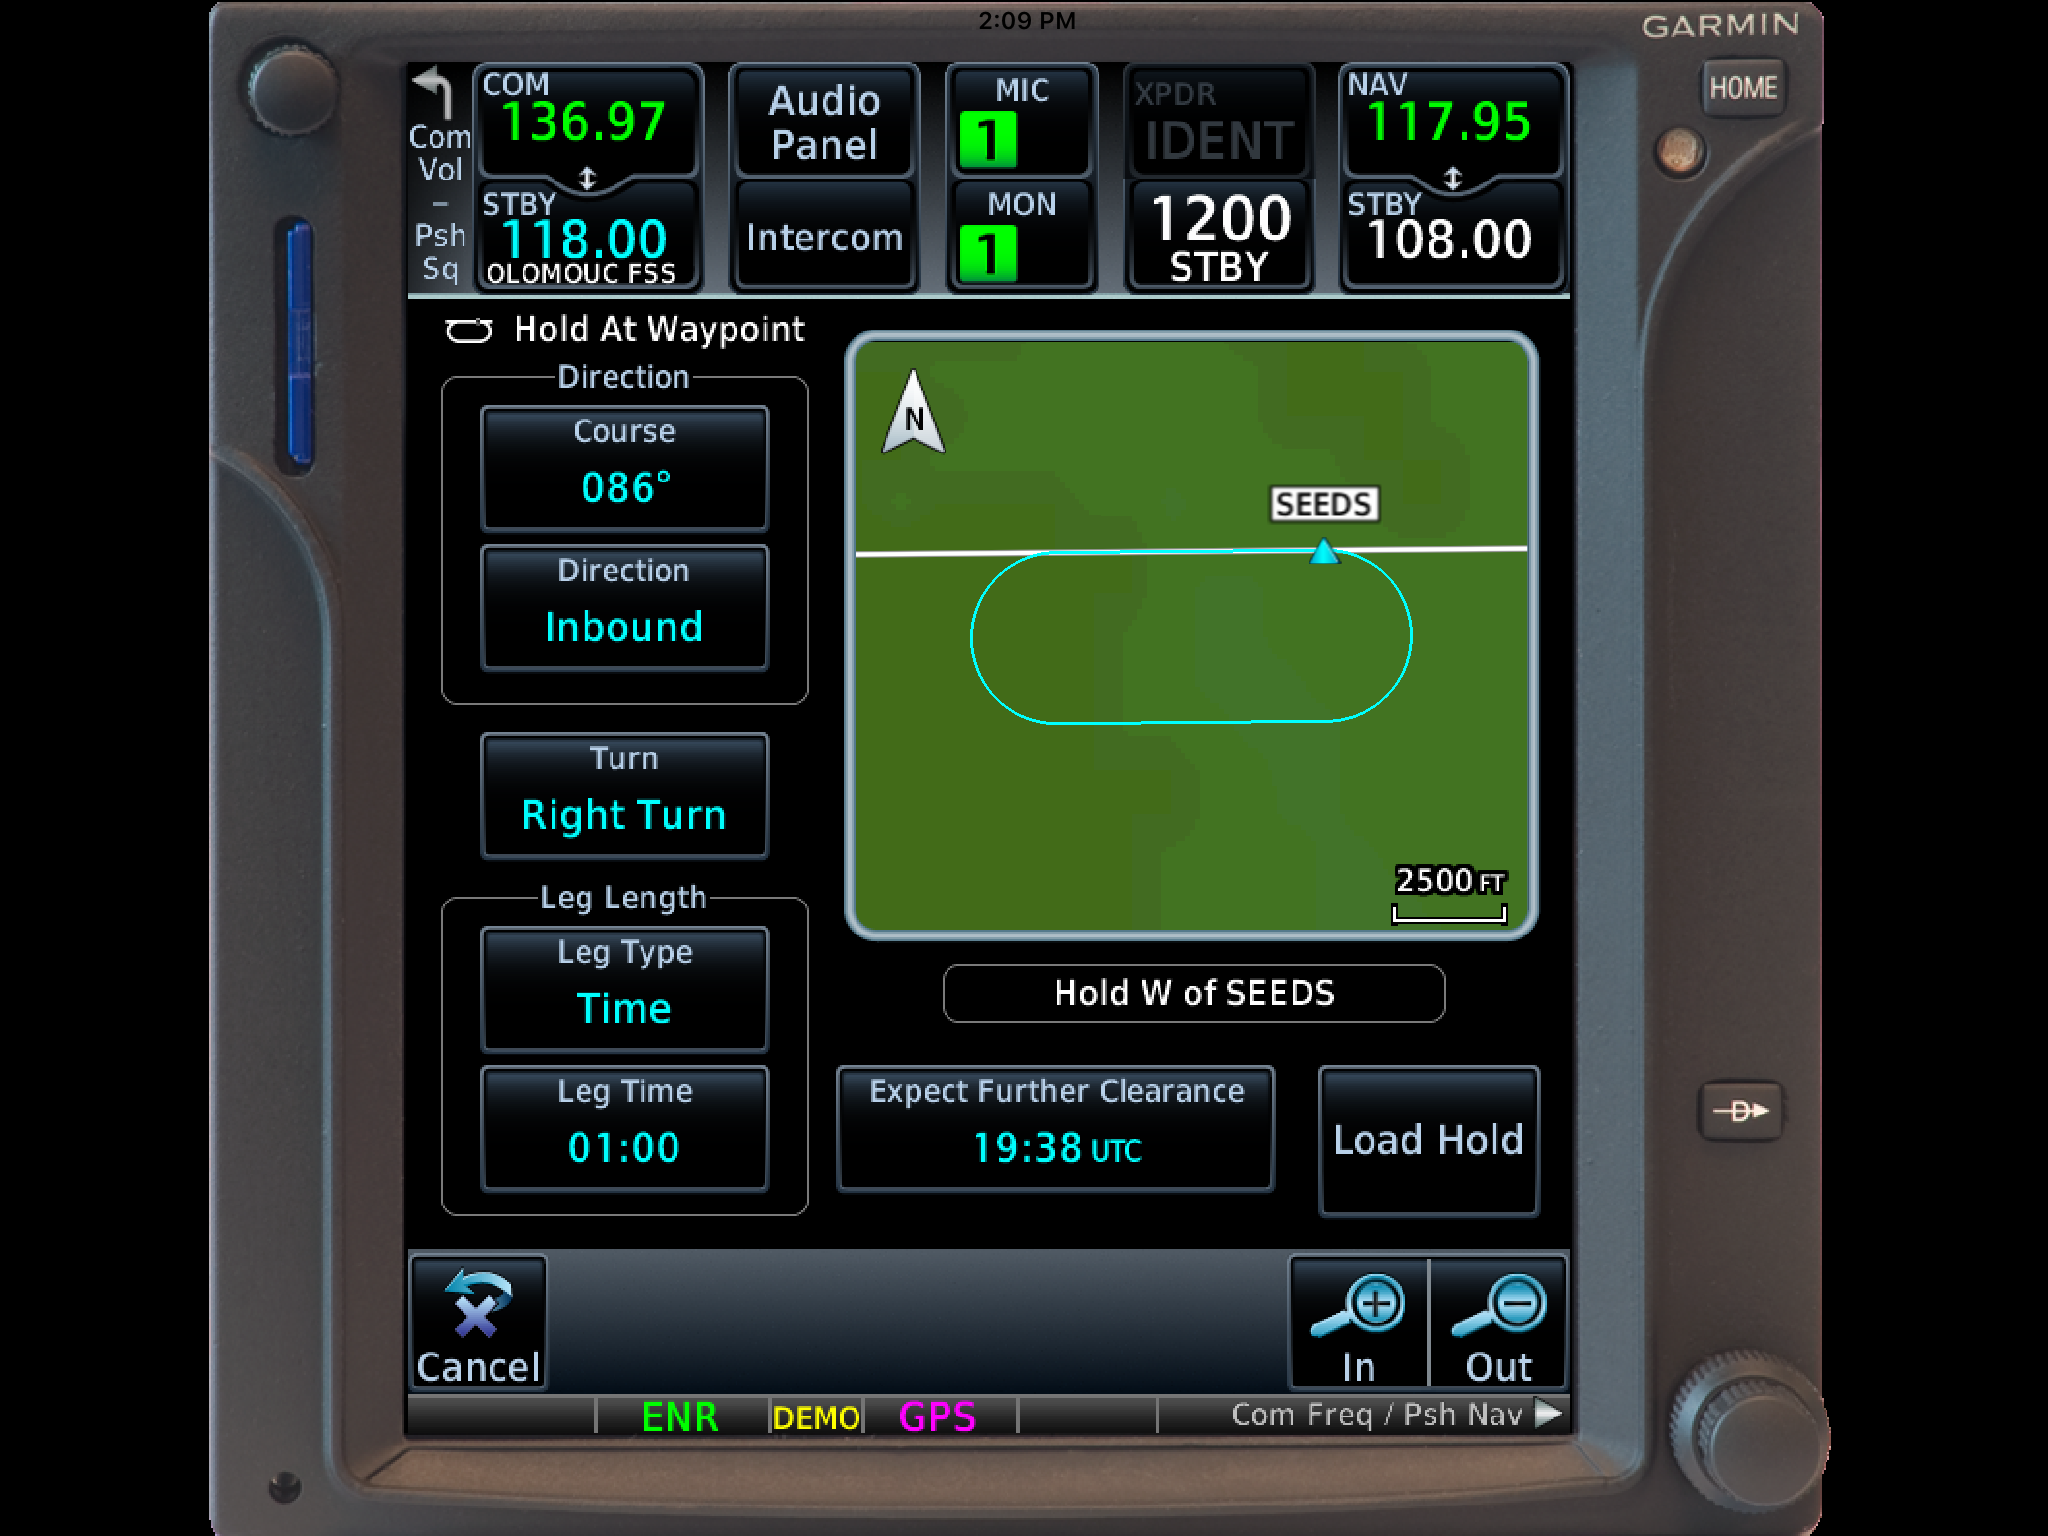
The Garmin GTN 750 allows pilots to place a holding pattern at any waypoint that is in the Nav Database (or any user created waypoint). Here’s how to do it.
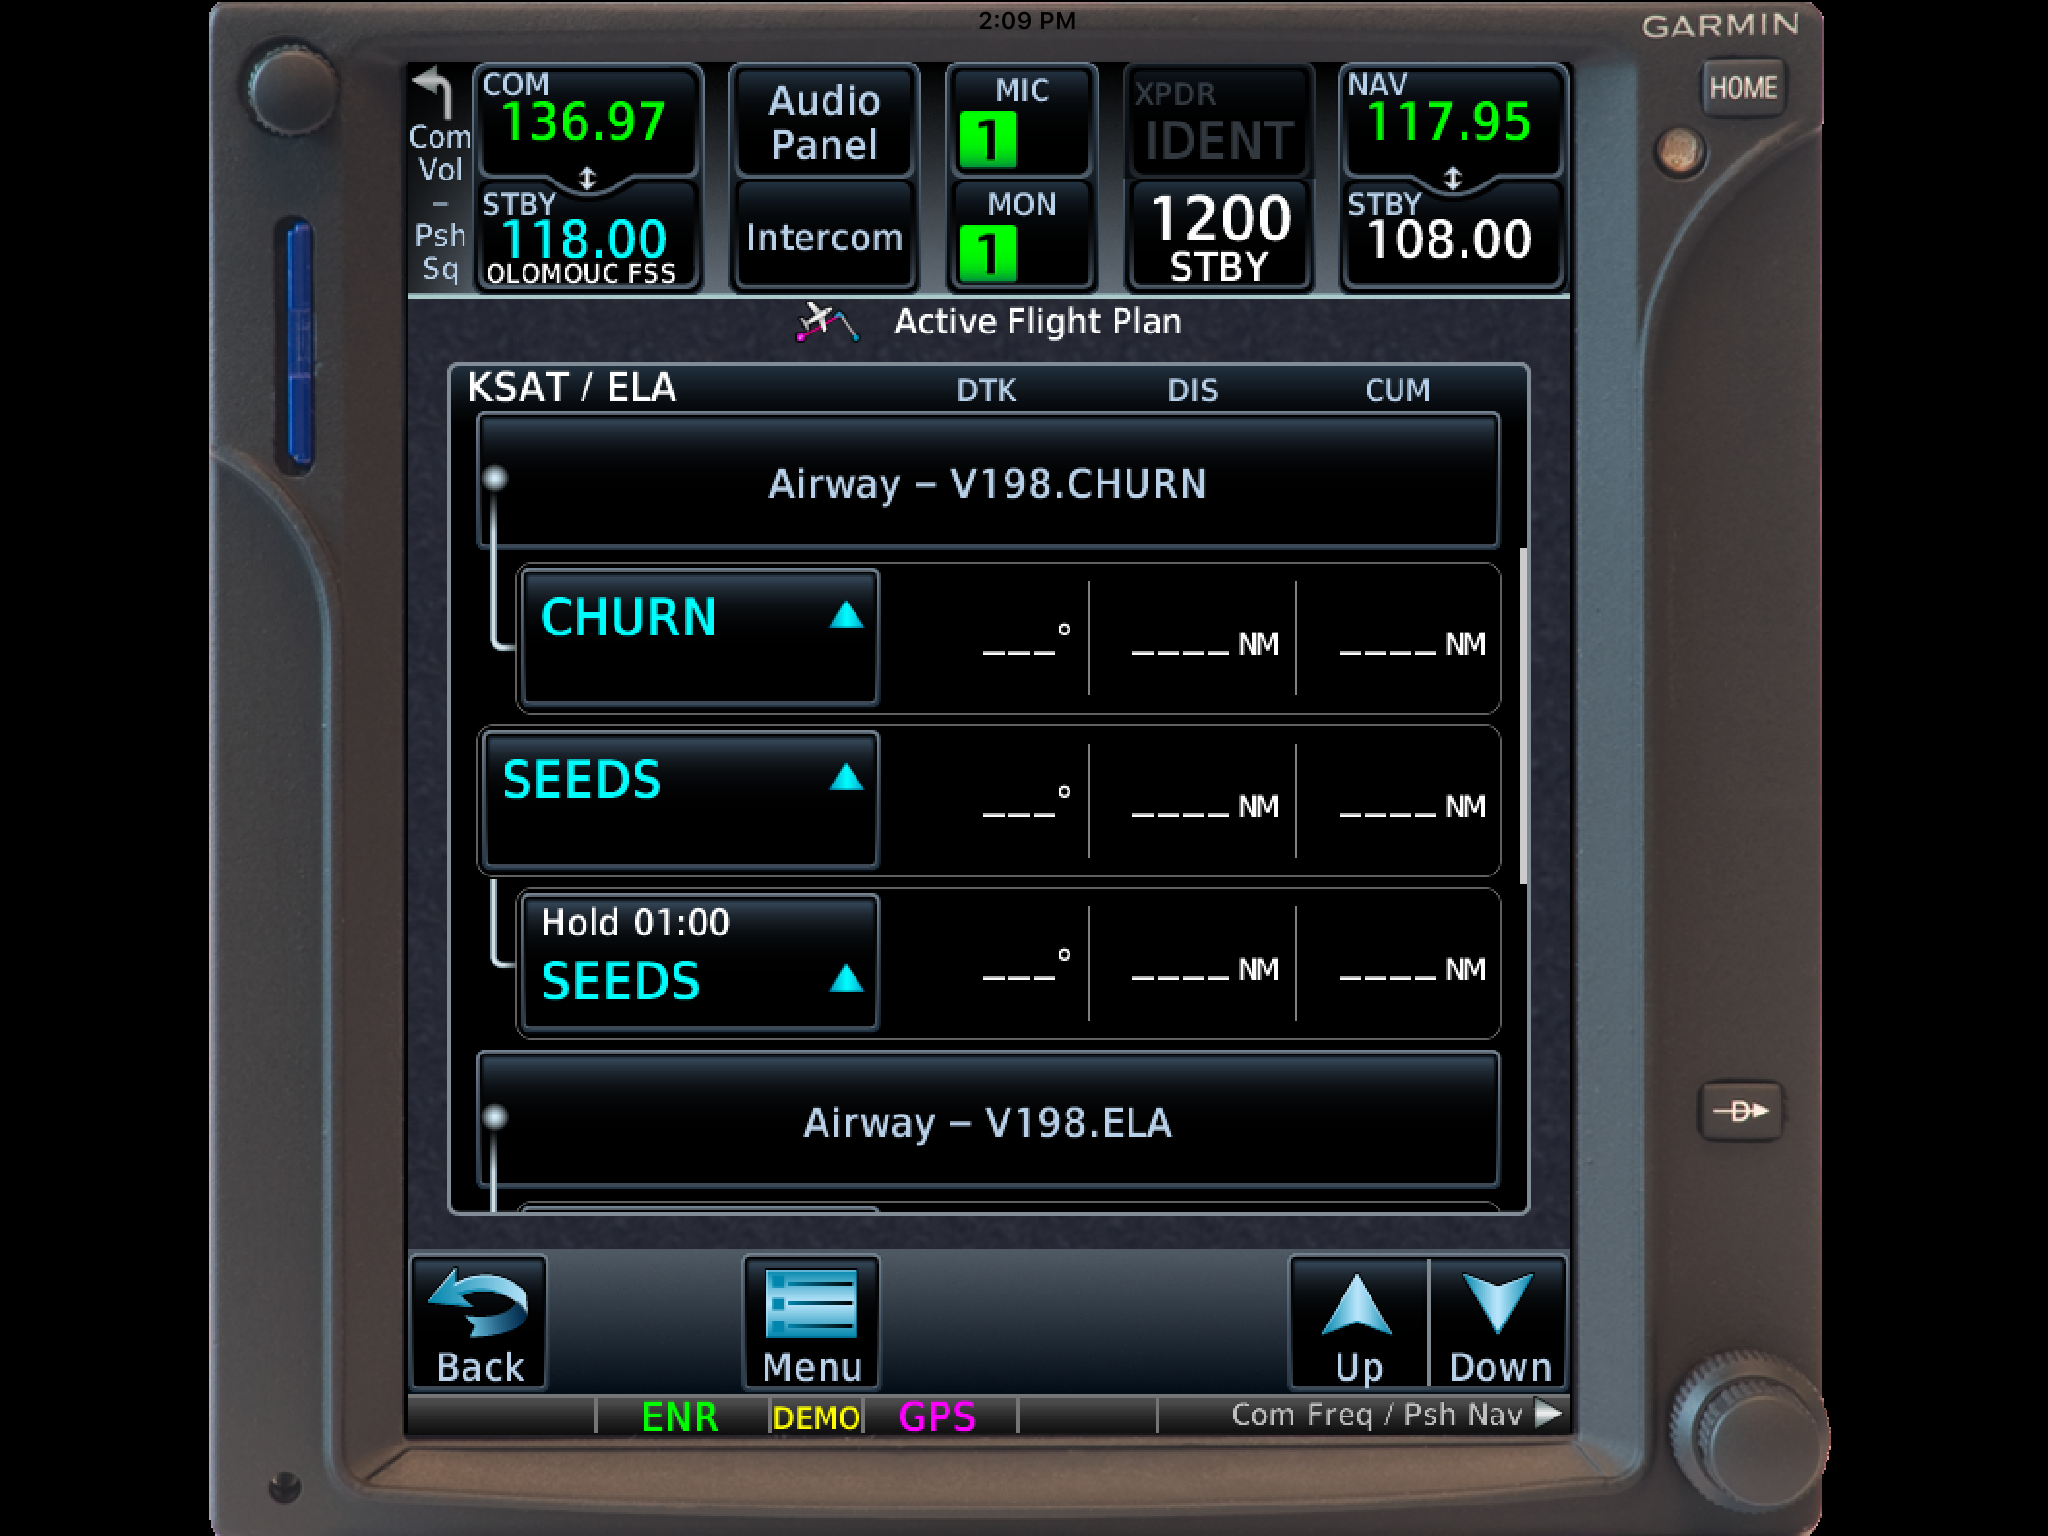
On the Flight Plan page, tap the Waypoint that you want to hold at.
On the menu that pops up, tap Hold At Waypoint
On the next menu that pops up, input either the inbound or outbound course, right or left turns, leg time or distance, and the EFC time, then tap Load.
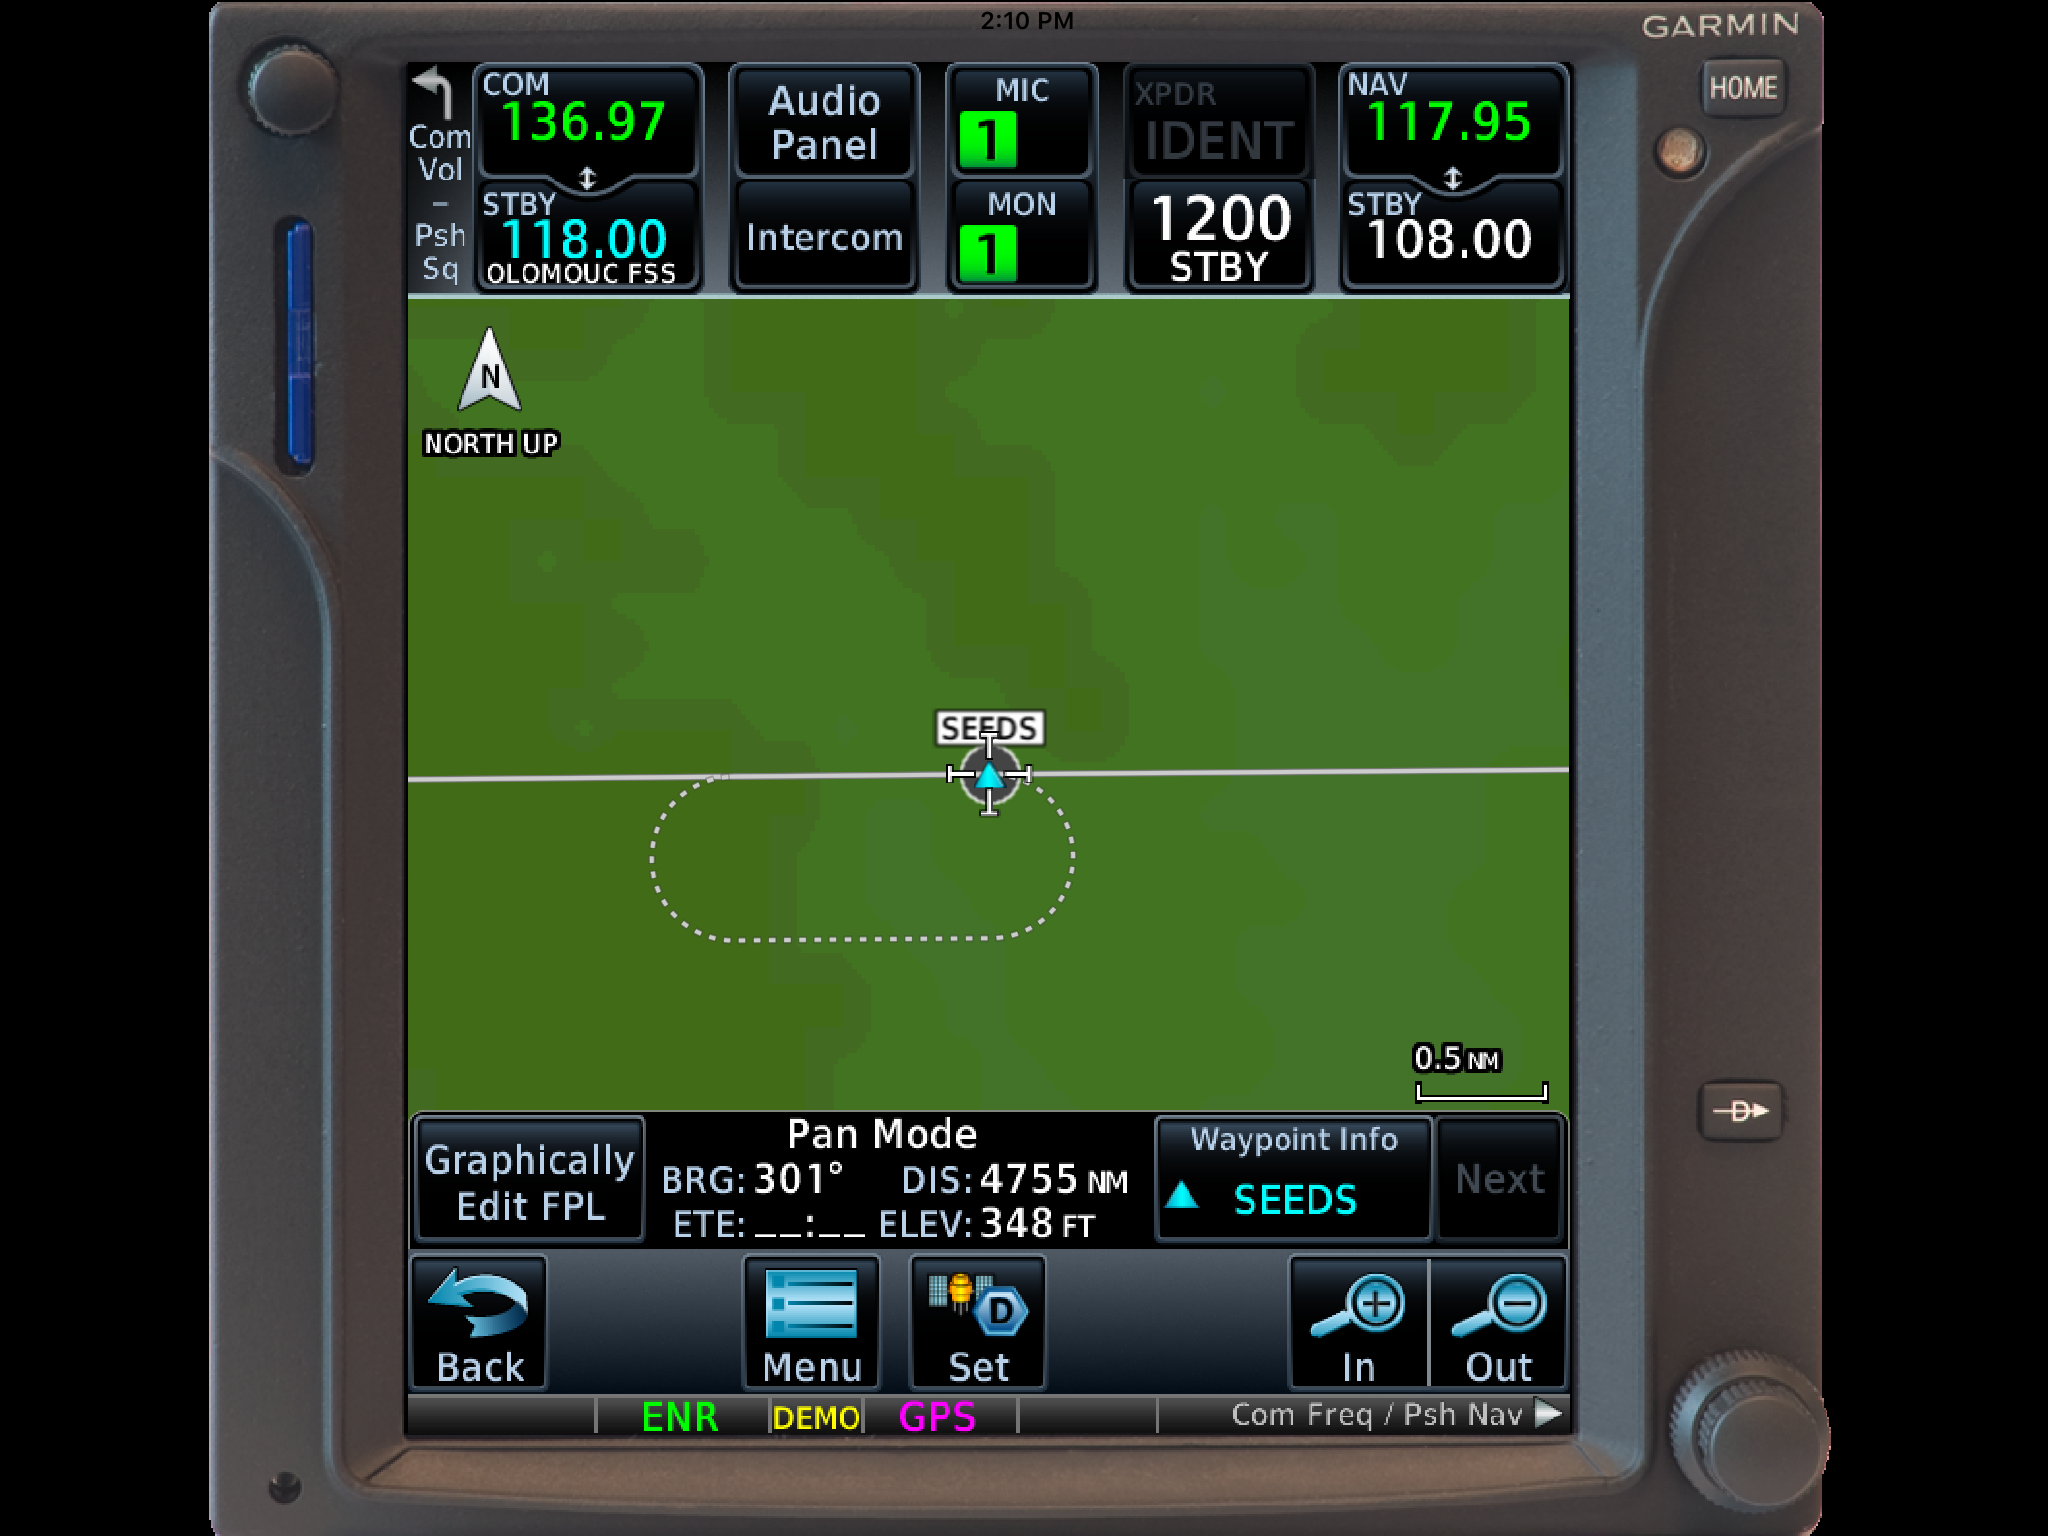
You will see the hold now as a Waypoint in your flight plan.
Once the hold is entered, the GPS will go into Suspend mode, suspending the Flight Plan Waypoint Sequencing. Once you are ready to depart the hold, you will have to tap Unsuspend before crossing the holding point on the inbound leg, then the GPS will resume normal waypoint sequencing.
These are 2 of the really cool, gee-wiz features of the Garmin GTN 750. Following the above steps will make IFR flying much easier for the pilot, as well as much more enjoyable!
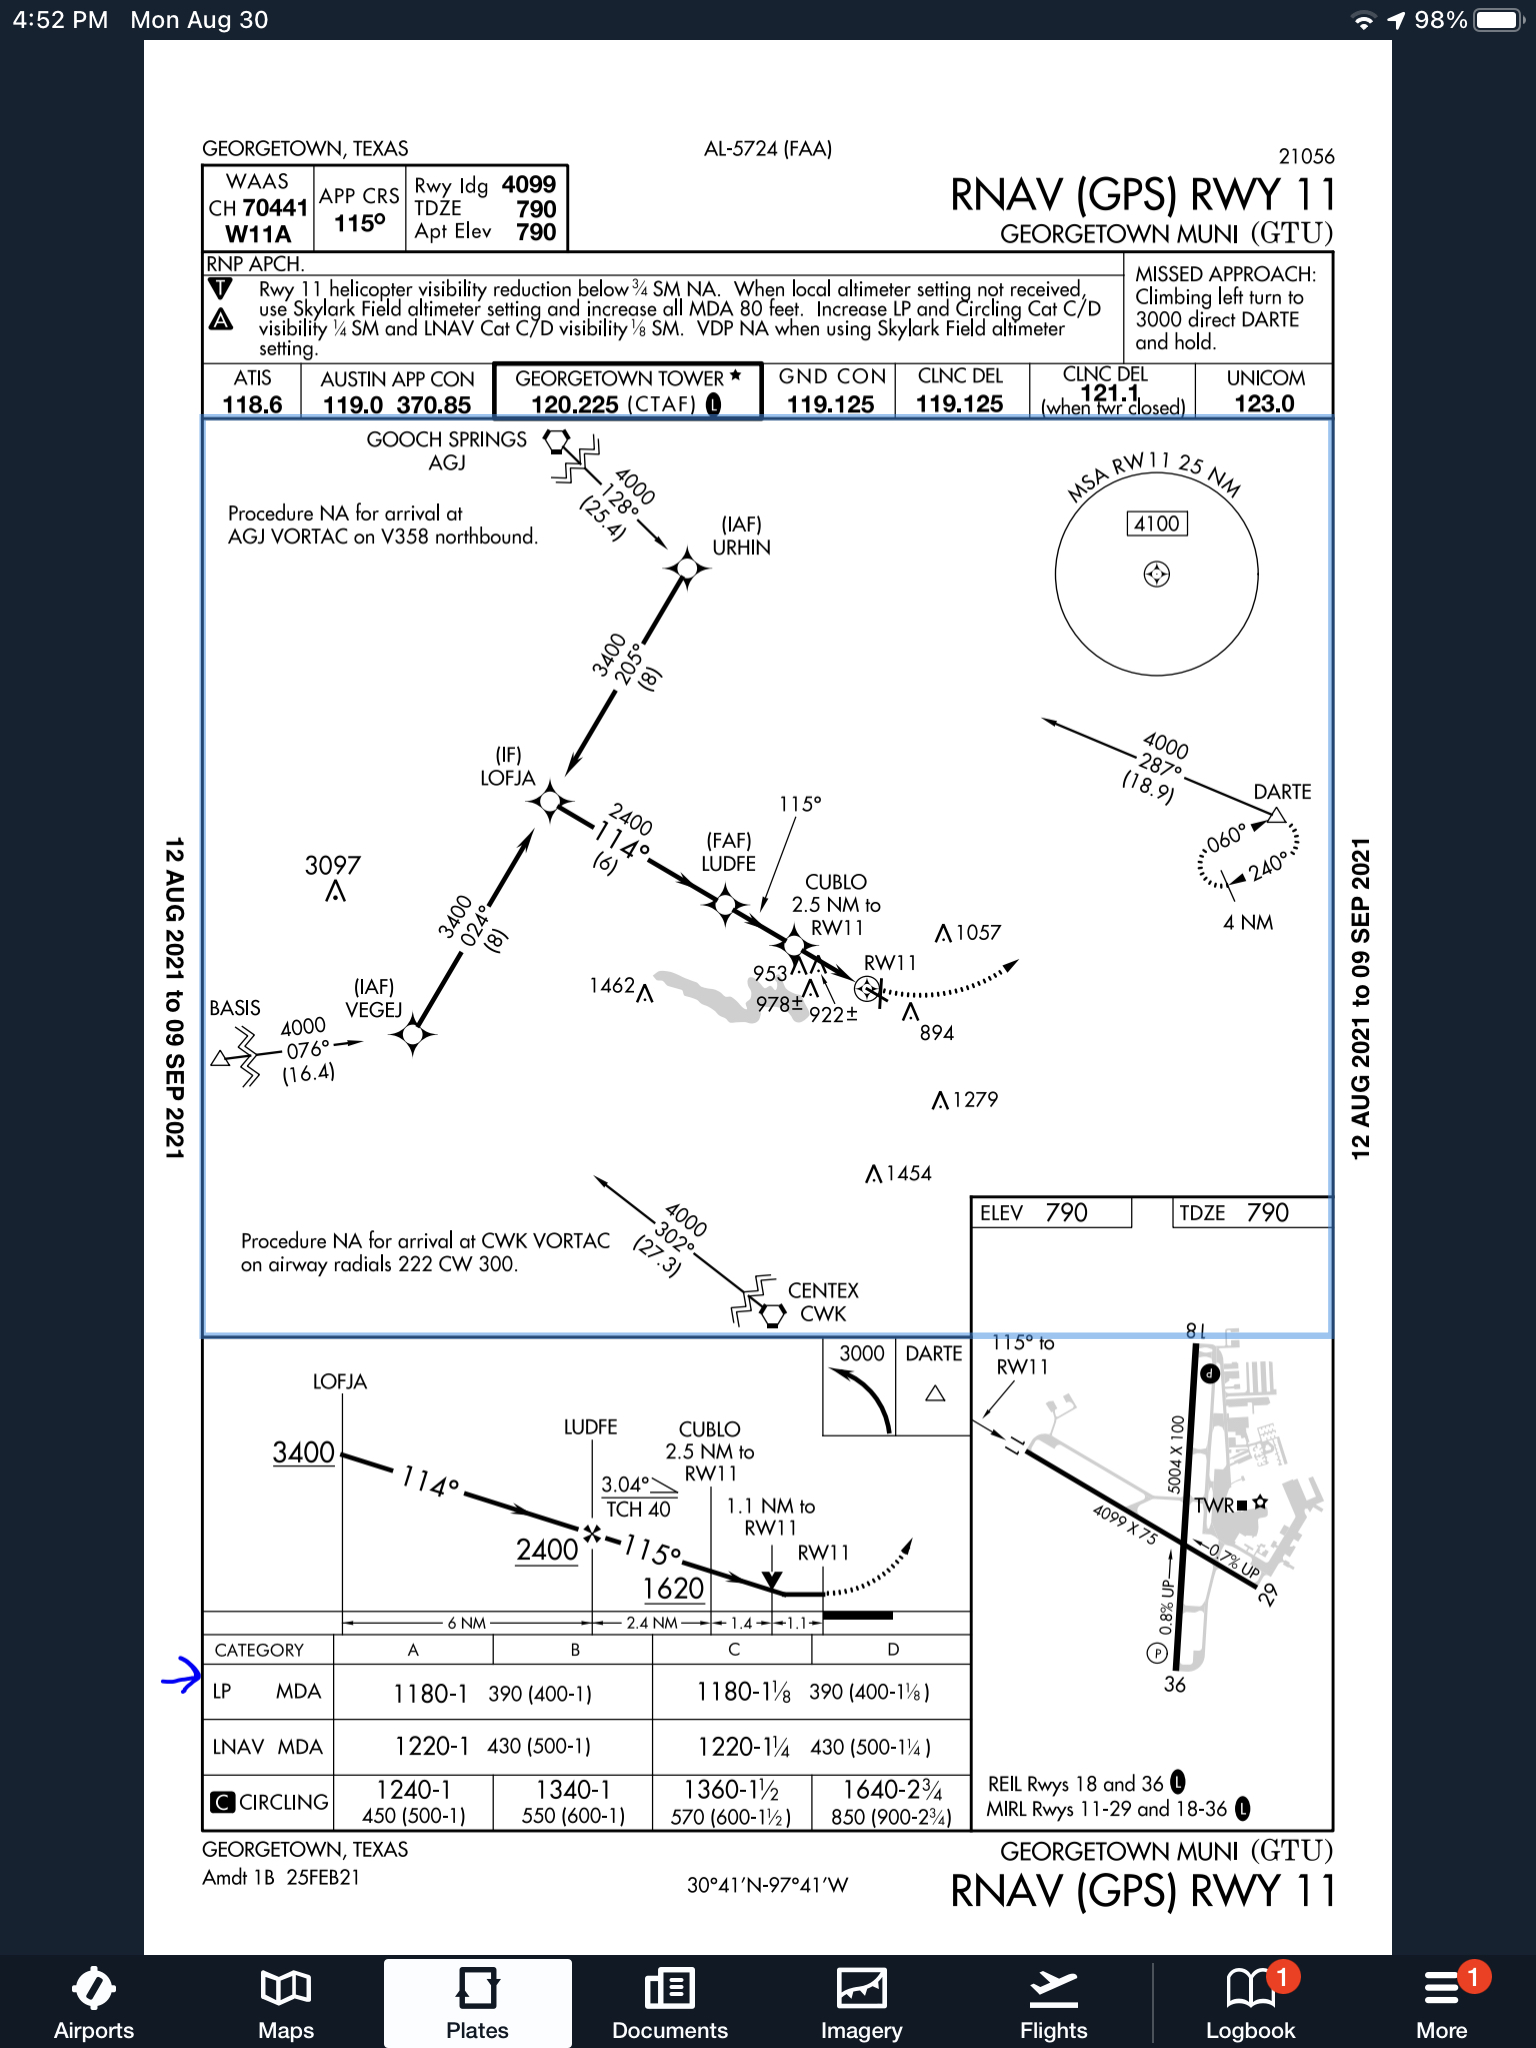
When flying a WAAS GPS approach, there are several different levels of WAAS signal that a GPS receiver can get. The most precise is an LPV signal. LPV stands for Localizer Performance with Vertical guidance. An LPV approach has the lowest minimums of all the WAAS GPS approaches, typically in the range of 200-300 feet AGL. A GPS glide path (GP) is guaranteed with an LPV approach and the minimum altitude is a decision altitude (DA).
Just like a localizer, an LPV course width get’s tighter and the CDI becomes more sensitive the closer the plane get’s to the runway. Even though the LPV approach minimums are so low and the approach is down to a DA, they still aren’t considered precision approaches by the FAA (which leads to some extra planning when selecting an airport as an alternate that only has GPS approaches, since the AIM specifies only the LNAV minimum are to be considered if an alternate airport only has GPS approaches, bringing the 800 foot ceiling requirement to bear)
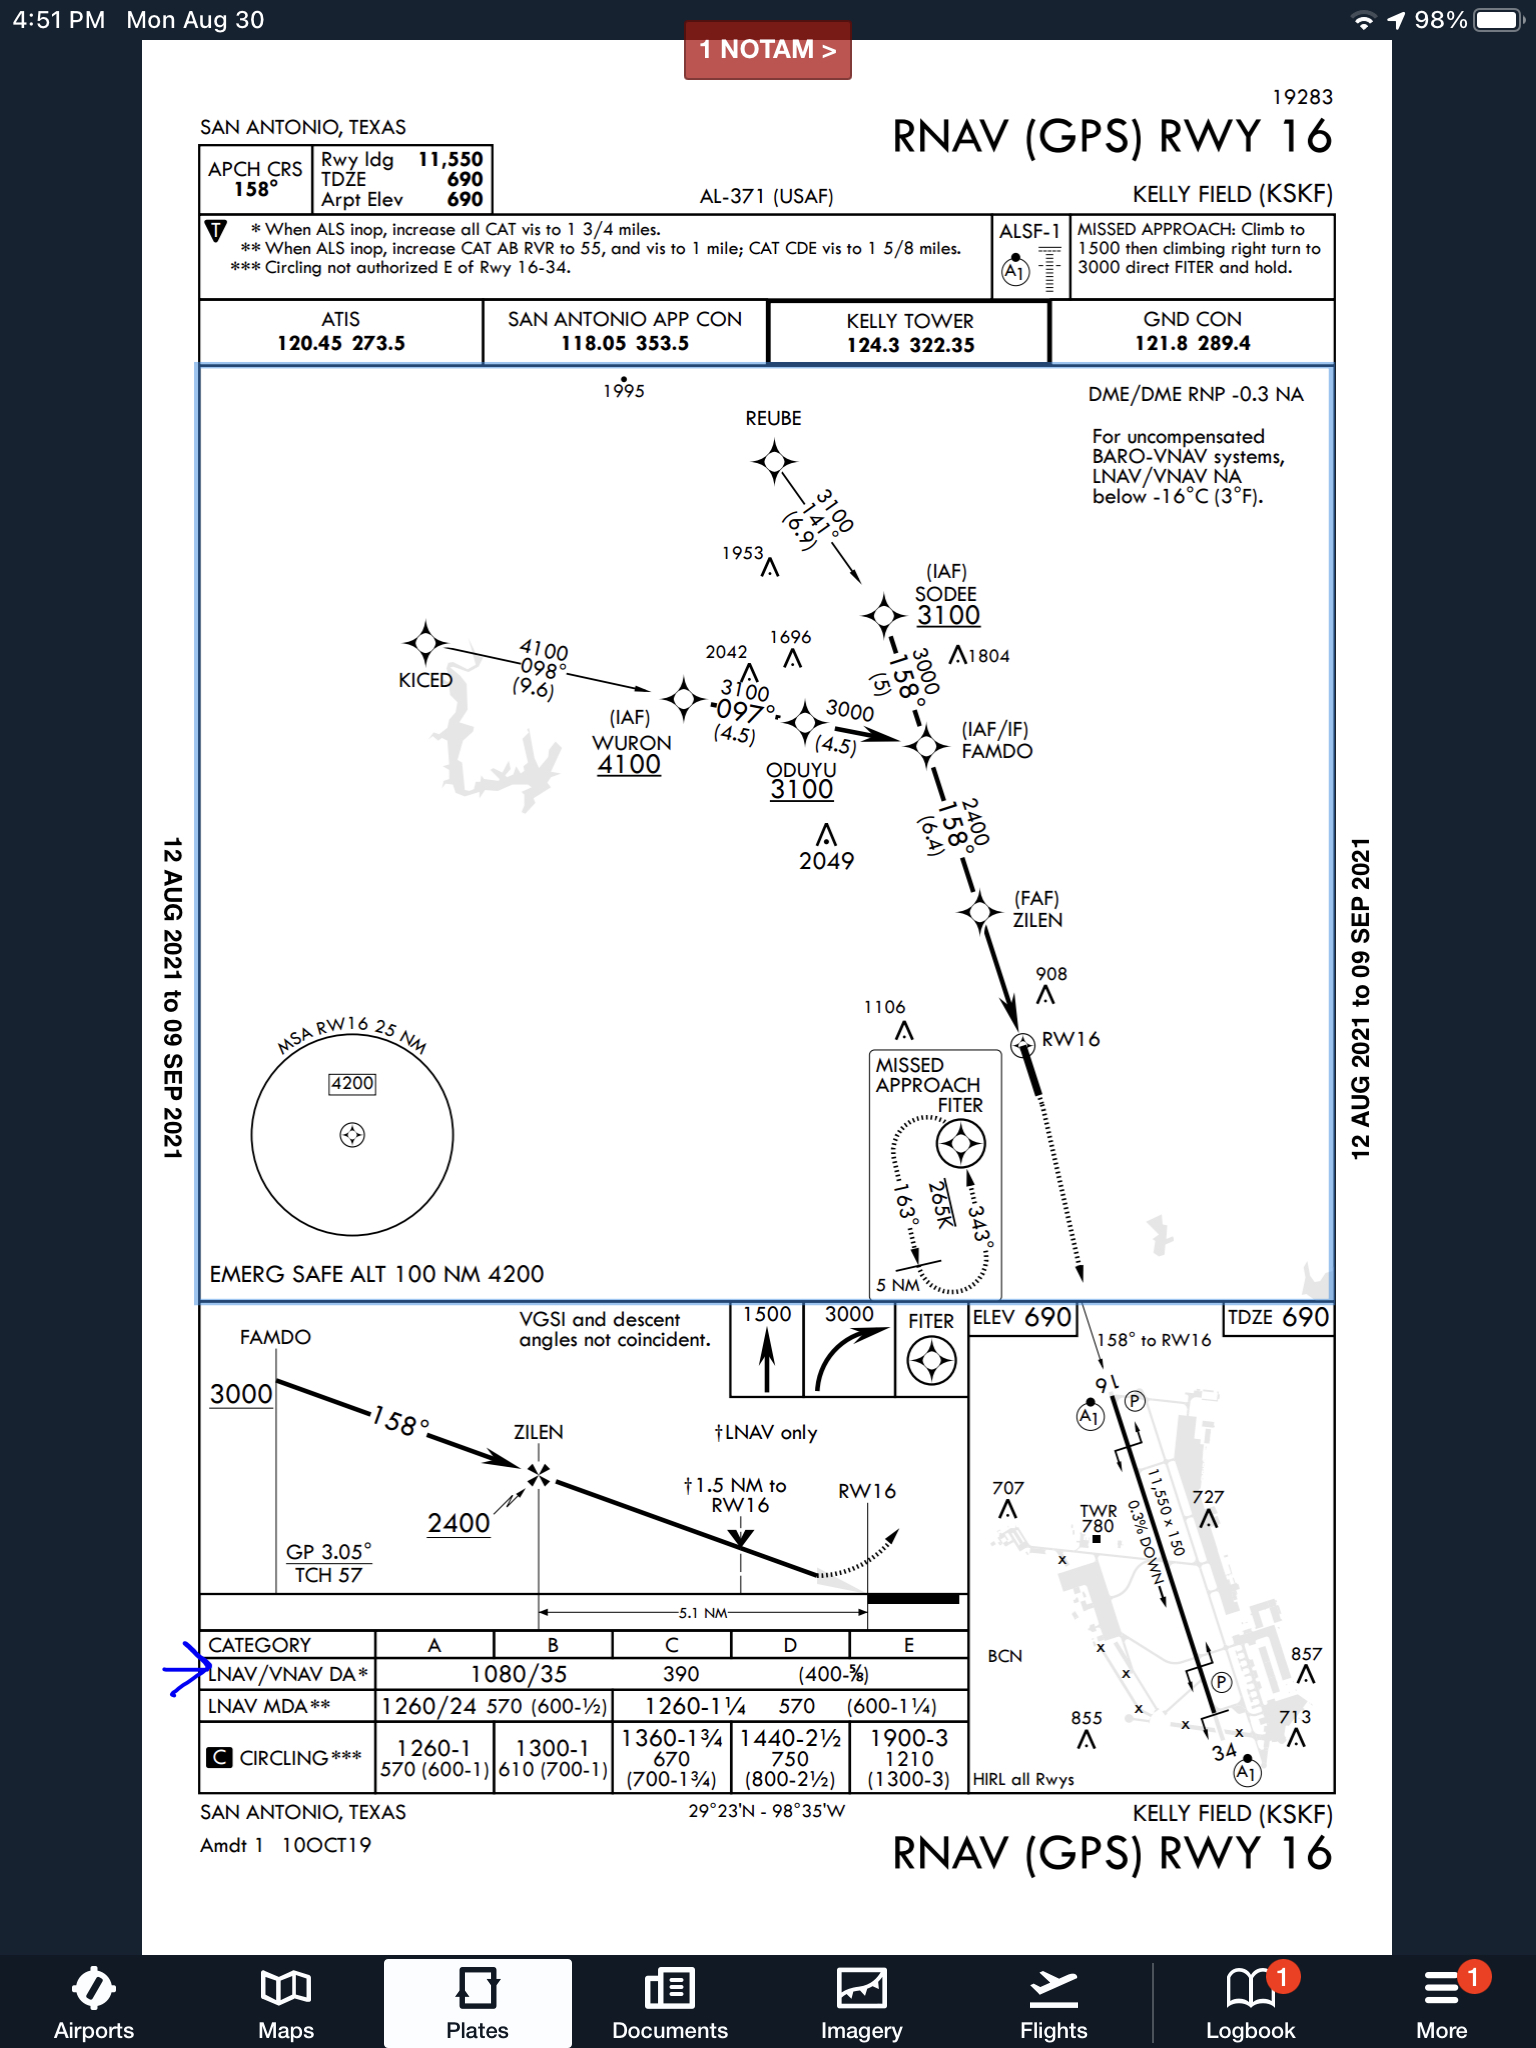
An LNAV/VNAV approach is still a WAAS approach that has a GPS glidepath, but is slightly different than an LPV approach. An LNAV/VNAV final approach course does not get more sensitive the closer the plane gets to the runway. The smallest course width on an LNAV/VNAV approach is 0.3 miles either side of center. LNAV/VNAV approaches will, most of the time, have higher minimums than LPV approaches and can have minimums no lower than 250′ AGL.
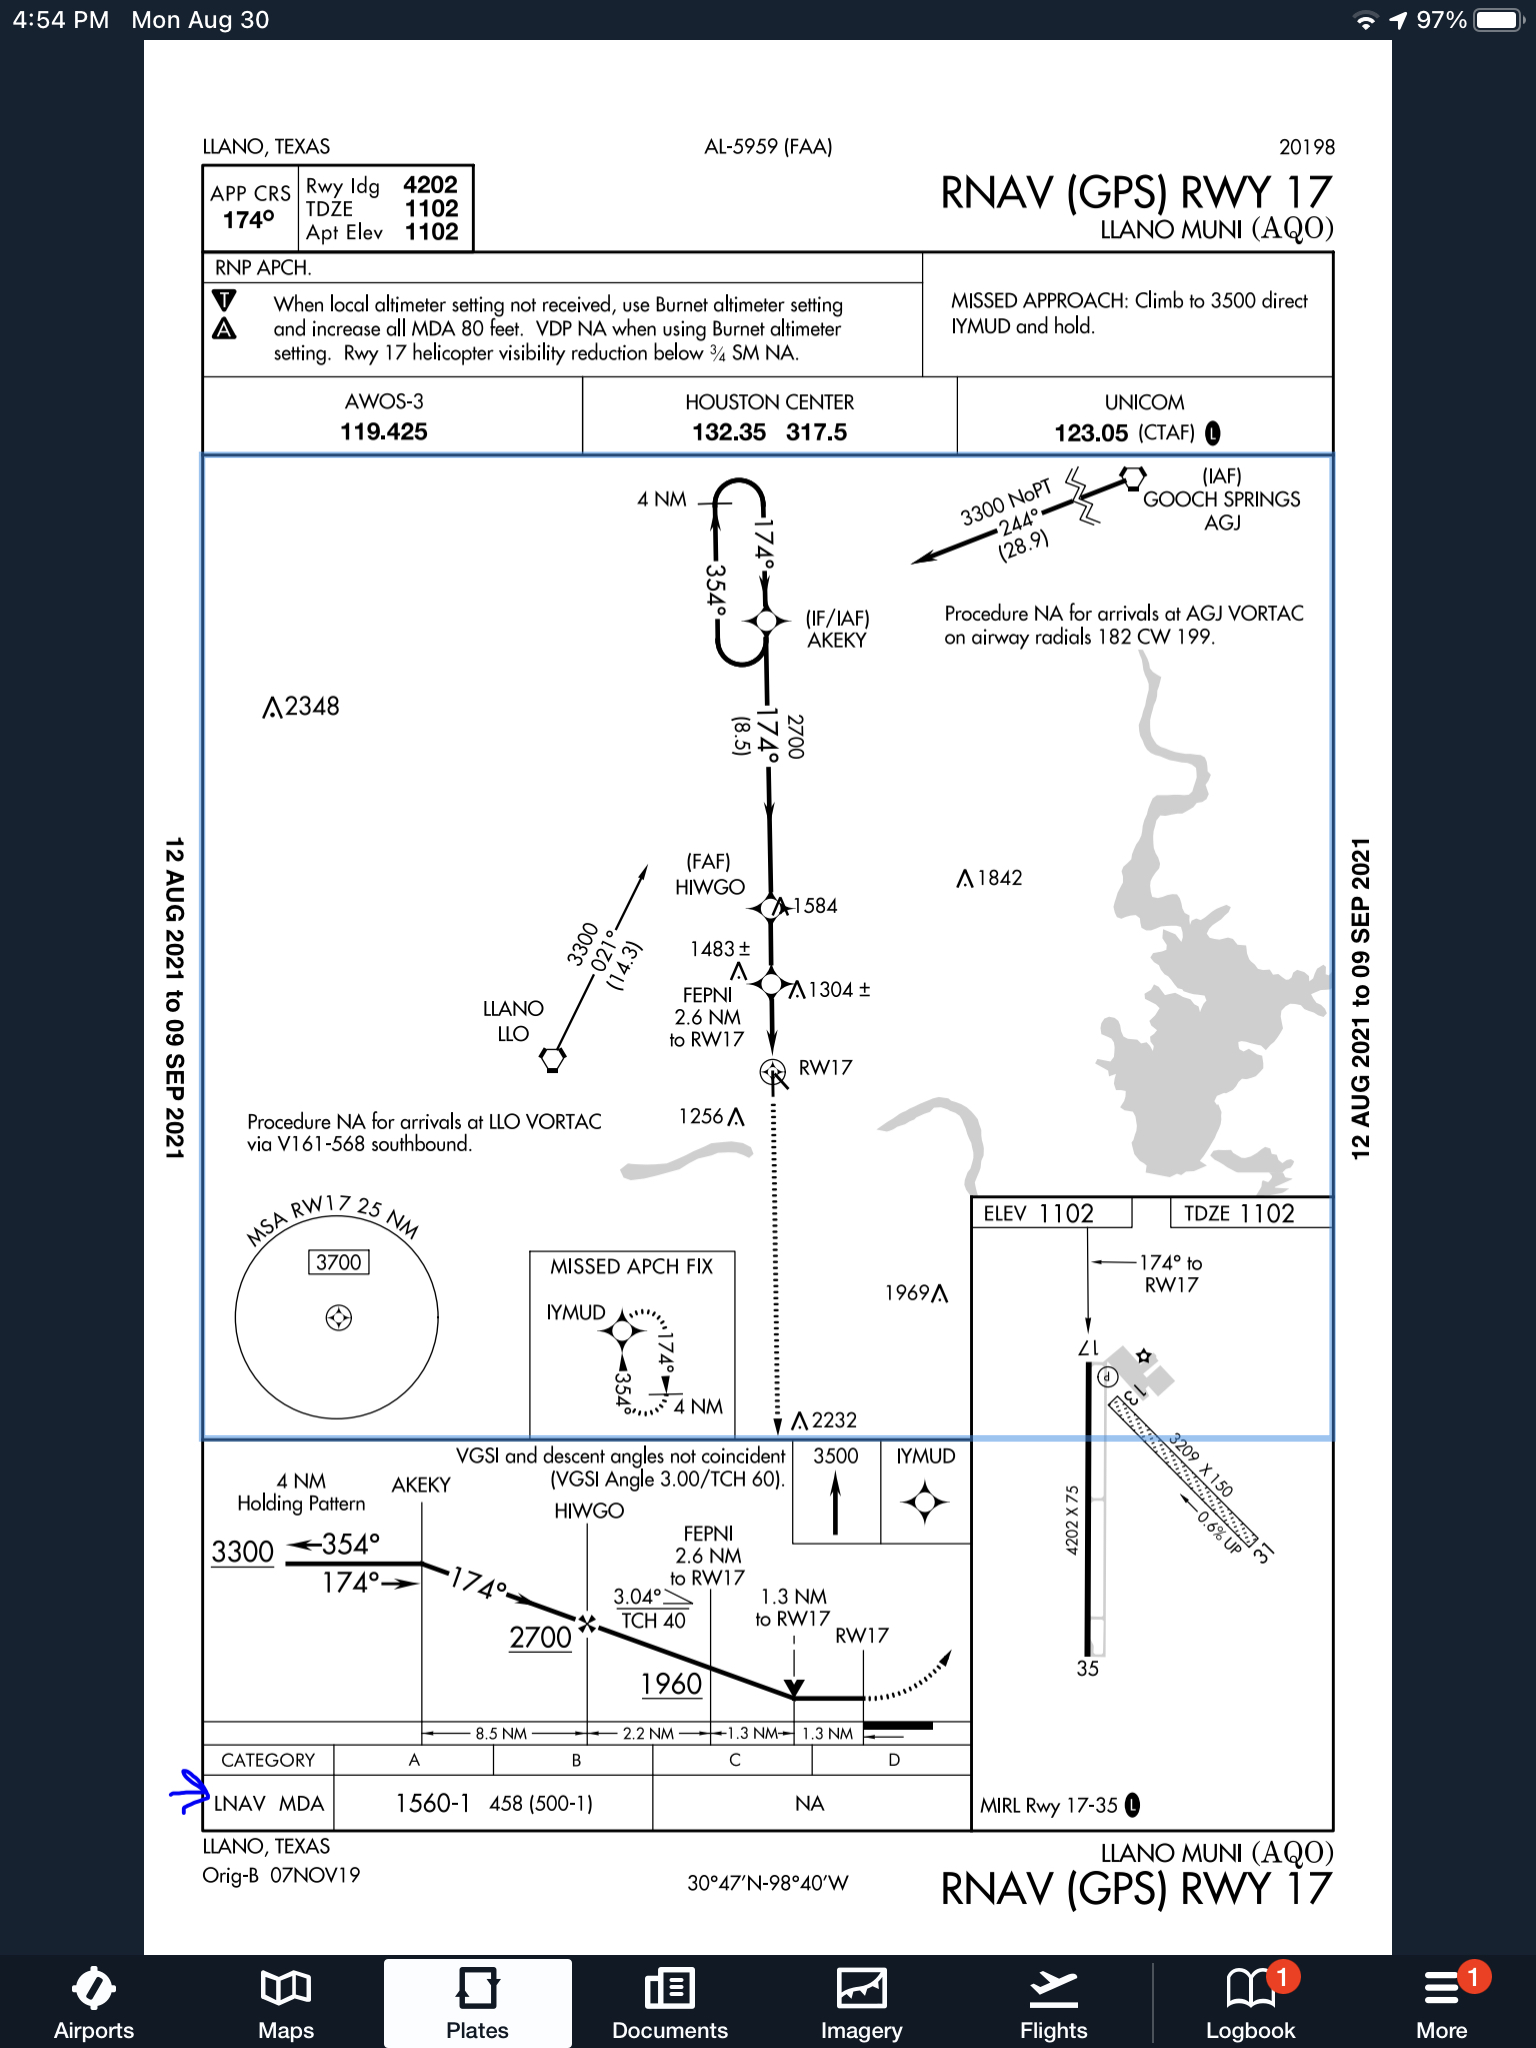
The third type of WAAS approach is strictly a non-precision approach with a Minimum Descent Altitude (MDA). These are designated LP approaches, which stands for Localizer Performance. These are like old school Localizer only approaches that, similar to the lateral portion of an LPV approach, the course width tightens the closer to the runway that a pilot is. There is no glide path by definition of an LP approach, though there is a caveat.
Now, by looking at an approach plate that is a WAAS approach, but only has LP minimums listed, a pilot would assume there would be no glide path. Depending on what type of GPS unit the airplane has, that pilot could be wrong. Garmin Perspective units (Cirrus G1000), all GTN 750s and GTN 650s, All G1000 NXi units, most Garmin 430W and 530W, and all Avidyne IFD 550/540 and 440 units will display an advisory glide path on an LP approach, designated LP+V.
What does LP+V indicate? An advisory glide path is just advisory, but it is totally legal to follow down on a non-precision LP approach. The kicker is obstacle clearance is not guaranteed and the pilot needs to keep an eye on minimum altitudes at the different waypoints on the approach. The big thing I tell people is, when you arrive at the MDA and the runway is in sight, following the advisory glide path below the MDA could get you in trouble with obstacles. Don’t just hone in on your instruments when you break out of the clouds. Look out the windscreen and make sure you won’t hit anything.
If you arrive at the MDA on the advisory glide path and the runway isn’t in sight, DON’T GO BELOW THE MDA! Most autopilots won’t level off at the MDA, even if that altitude is set in the altitude pre-select, so this will involve turning off the autopilot before the MDA and manually leveling off, or engaging the altitude mode of your autopilot at the MDA.
One other type of GPS approach that you will encounter is an LNAV approach. This is a non-WAAS approach down to an MDA, but your GPS unit may still give you a +V. Most modern ones will.
I am an iPad user, but I have an Android phone. I had been using a junky aviation weather app that just gave meters and TAFs, but seemed to have been programmed in a foreign language (un-decoded TAFs notwithstanding). I wanted something more robust, but didn’t see the need to pay for a Garmin Pilot subscription since Foreflight on my iPad was my main EFB (Electronic Flight Bag) I use in the airplane.
When I upgraded my phone, I decided I had to find something better. I have a WIFI only iPad, so I utilize my phone to take quick glances at weather reports or when I want to see the radar without having to tether my iPad to my phone. The app I had wasn’t cutting it.
That’s when I found FltPlan Go. We are all familiar with FltPlan.com. It’s what a lot of corporate pilots use to file flight plans. I’ve used it some, but there is a large amount of data it needs to set up an airplane. Since I already have all the airplanes I need in Foreflight, I don’t use it that much since I didn’t want to do the setup. It is rather handy as it spits out flight logs and has a lot of pre-loaded performance numbers for different makes and models.
FltPlan Go is FltPlan.com‘s app. It is very user friendly, easy to use, and, most importantly, free! You can get METARs, TAFs, NOTAMs, Airport Diagrams, approach plates, full weather reports for airports including radar, maps, and a whole lot more. As far as I can tell, it is a full fledged EFB. I haven’t really scratched the surface on all the features in using mine, but it is quite robust from the little bit of poking around I’ve done.
I’m still a Foreflight guy, but if you want something else or you have an Android phone and don’t want to pay for Garmin Pilot or WingXPro, check out FltPlan Go. It’s a winner.
I was flying in the Rio Grande Valley in south Texas a few weeks ago and heard an IFR clearance given to a King Air that pricked my ears up. It was a clearance from CRP to LRD, but the routing was one you don’t hear too often anymore. Because of active military airspace, the routing was via a radial and DME off the CRP VOR (so a point defined by the radial and DME) to another radial and DME point off the LRD VOR.
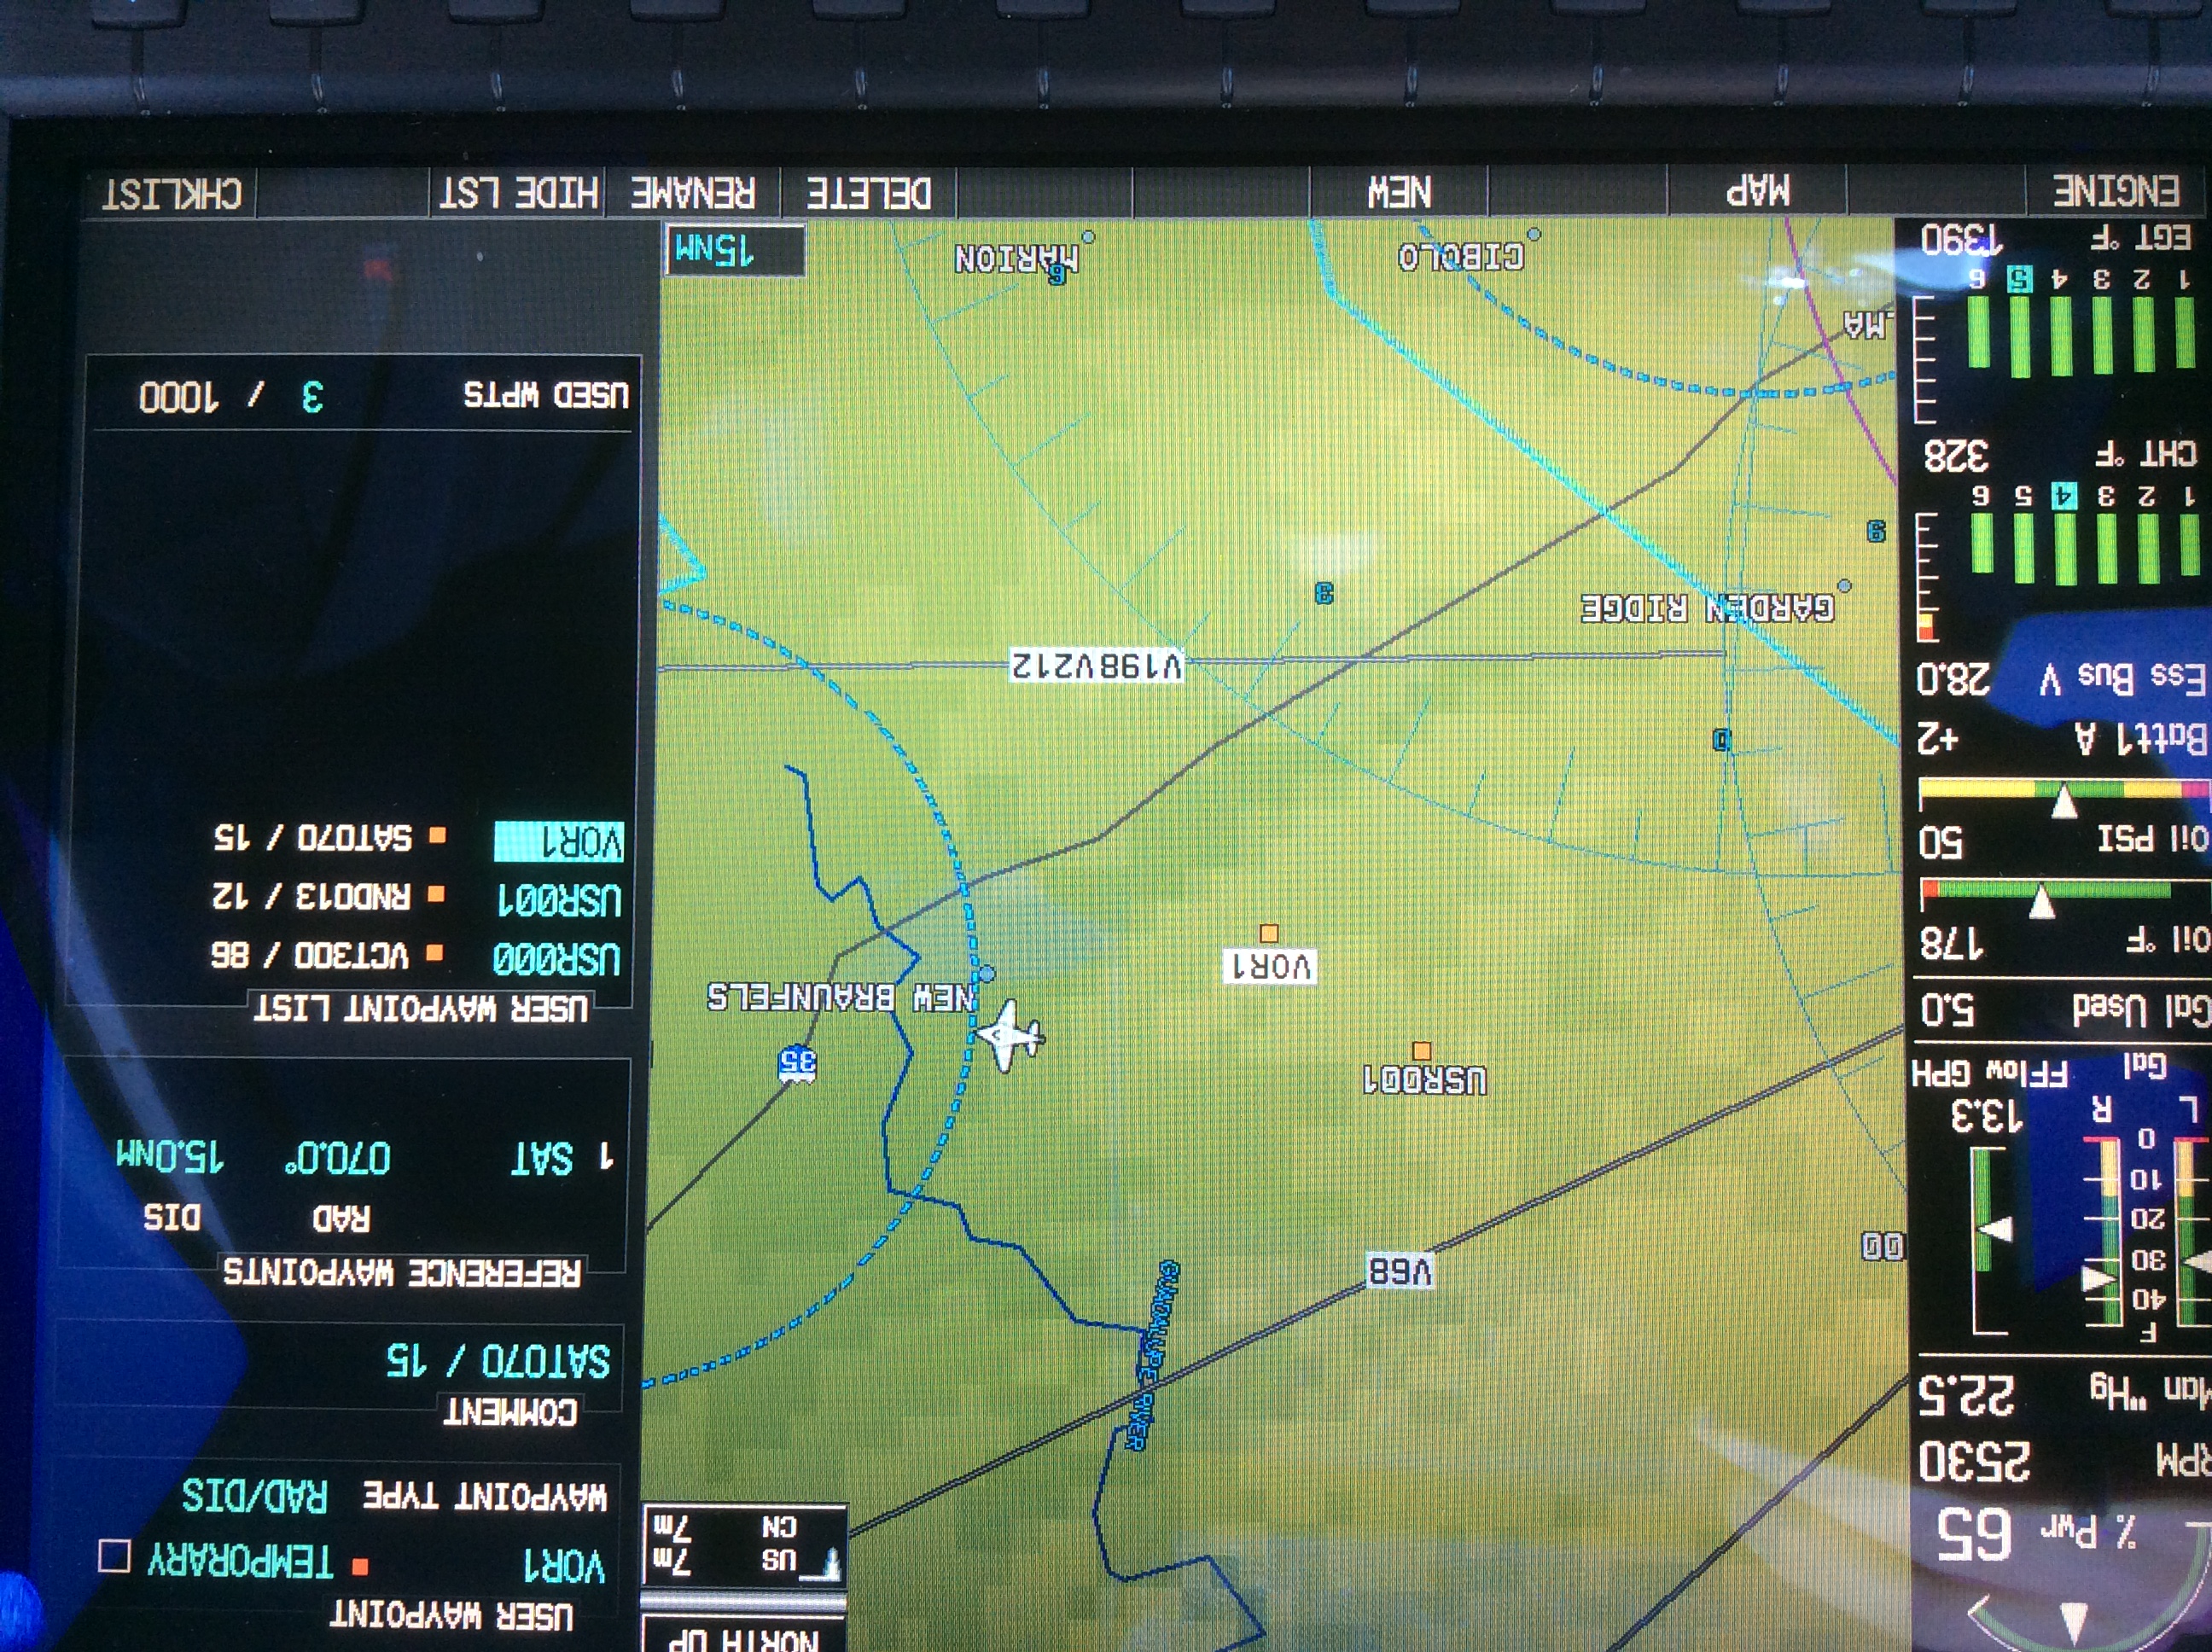
It took me a second to think about how to do this the easiest (without setting up the VOR and watching the DME). After a moment’s thought, it’s actually a snap with the G1000. You create 2 user waypoints, one for each Radial/DME spot, then put those 2 user waypoints in your Flight Plan.
Here’s how.
Step 1
Using the big knob, go to the Waypoint chapter. Once there, scroll down to the User Waypoint page using the small knob.
Step 2
Press the New soft key. If you want to name the waypoint something specific, you can do that at the top of the page. If not, it will default to something like VOR 1 or VOR 2.
Step 3
Under Waypoint Type, use the small knob to select RAD/DIS (stands for Radial/Distance).
Step 4
Under Reference Waypoints, again using the small knob (or your keypad), type or dial in the VOR identifier, the radial from that VOR, and the DME distance. Press enter and you are done.
Once you have both User Waypoints created, then just put them in your flight plan (if you forget what you named them, you can just go back to the User Waypoint page), and off you go.




 Most VFR pilots only do instrument flying on flight reviews. That doesn’t lead to a very high level of proficiency, so go out and grab your instructor and tell him to put you under the hood once a month. You’ll be a better pilot overall for it.