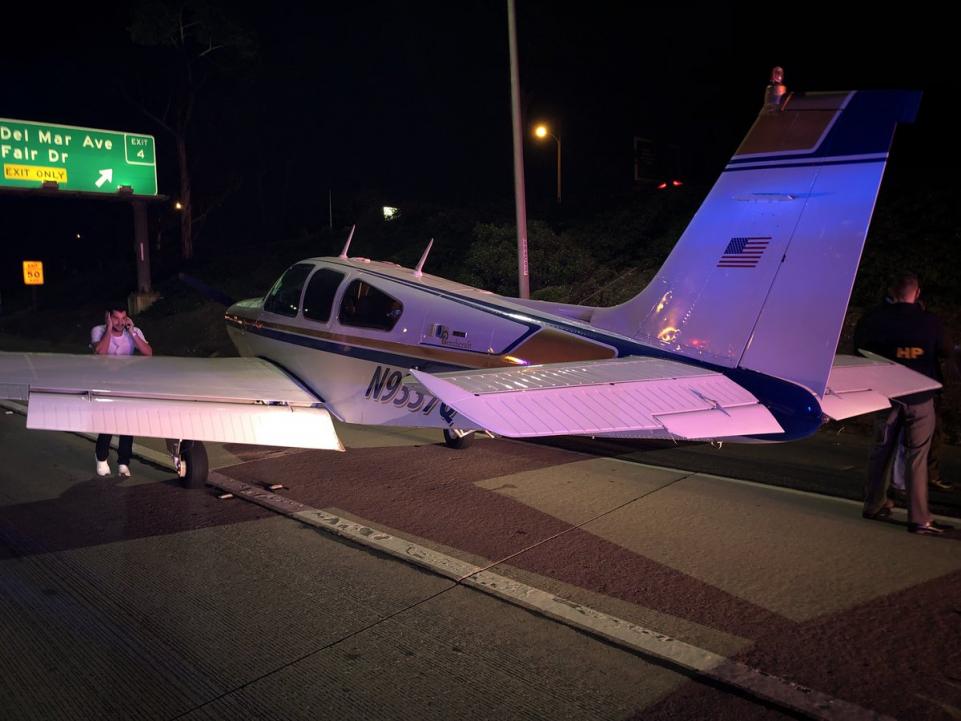
Oh, Deer (Part 3)

Read Part 1 & Part 2

Throughout the whole event, I learned quite a few things both about flying and about myself. Here are some of the lessons which I have taken away from the accident:

  1. No flight is routine: When I took off that morning I was about as relaxed as I could have been while going to fly. I was flying an airplane that I knew well, in beautiful weather, to familiar airports and even carrying passengers which I had taken on this exact trip more than a dozen times. The accident brought into startling clarity that anything can happen at any time. I had done everything right that morning (preflight, weather briefing, planning, etc) , and none of that did anything to stop the deer from jumping out onto the runway. All we can do is ensure the items we do have control over are covered and try to be prepared to deal with anything else that arises. This ties directly into my next point:
  2. Making sure everything is correct: When you do go fly, make sure that you have all your paperwork and personal details taken care of. I can think of a few times over the course of my flying career where something wasn’t quite right with the paperwork, or perhaps I had forgotten my wallet and I was tempted to go fly anyway. “It’s 8pm on Sunday, I’m not going to get ramp checked.” Well, I can assure you that the paperwork and questionnaires which were required to be submitted to the FAA, NTSB, and Insurance companies would have uncovered any discrepancies in my logbooks, currency, or legality. It isn’t worth the risk of flying without having everything in place just in case something happens. It isn’t just a random ramp check which can get a pilot into trouble.
  3. Ask for help: The story of my collision with a deer would have had a very different outcome if it weren’t for the help that I received from countless the people on the ground. If you’re ever in a situation where you could use a hand, don’t be afraid to ask for help. If I had simply turned around and landed back at Wings, I wouldn’t even have had any idea that my landing gear was missing! The people in the control tower, the maintenance guys, the approach controllers in Philly, the emergency responders, and many more people all played their part in orchestrating a successful outcome.
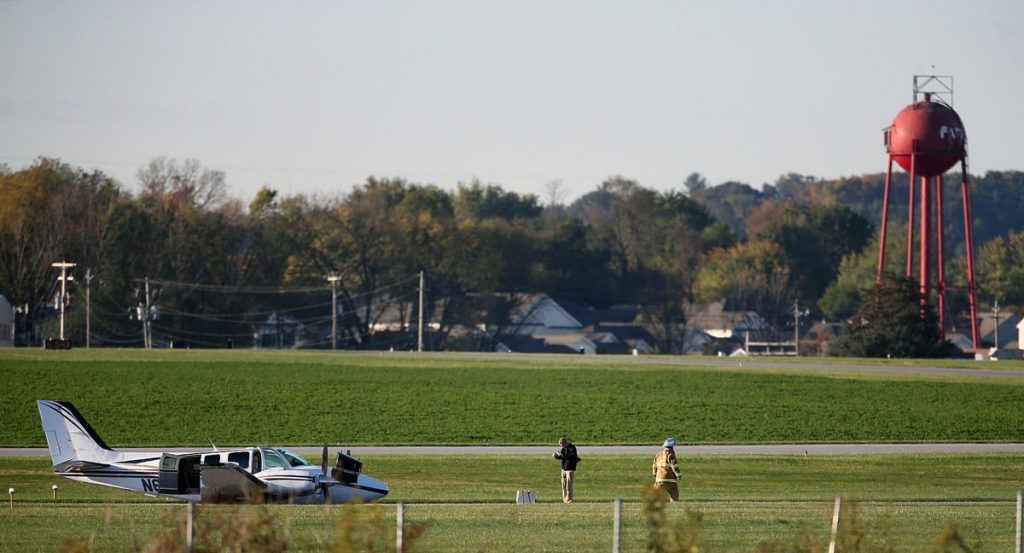
    Airplane sitting on the runway after the firefighters had checked it out
    Photo credit: www.lancasteronline.com
  4. Dealing with the Paperwork: I have had dealings with the FAA before, but never for an accident. I was afraid that the investigation would be a witch hunt and I would have to defend myself while someone poured over all my planning and paperwork looking for potential errors. But, my fears were totally unfounded. Although I did have to answer many phone calls, write many reports, and fill out much paperwork, the FAA, NTSB, and Insurance companies were very patient in waiting for my responses and even complimentary in how the situation played out. I really enjoyed working with all of them and appreciated their encouragement and help.
  5. Emotional Response: After the dust had settled and the smoke had cleared, I was left standing on the side of the runway with the passengers and my boss. I offered to fly them back to Philadelphia or continue to Pittsburgh and assured our Chief Pilot that I was feeling fine and ready to fly again. Fortunately, there wasn’t a need. Over the next week or two, I noticed a change in myself. I wasn’t fine. I have never had headaches, but shortly after I landed I developed a headache that didn’t go away for days. I had trouble focusing on anything and I had trouble finding motivation to do much but sit and stare at a wall. I wasn’t sharp and I caught myself making silly mistakes in my normally routine activities. I wasn’t depressed, or sad, it was just an unwanted mental and physiological response to the stress and shock of what happened that morning in the Baron. I didn’t feel like myself for quite some time and I even found myself a little on edge whenever I lined up for takeoff on subsequent charters for while afterward. Eventually I started to feel normal again, but it was a slow process.
  6. Feather the Props: I can’t tell you what a difference it makes when those props go from wind milling to feathered. It became clear to me that feathering a prop could make a huge difference in deciding the outcome of an emergency situation.
  7. Good training and checklists usage: This one is pretty straight forward, but it’s worth mentioning. Good training and proficiency make all the difference when the odds are against you. Make sure that you use all your resources when your back is against the wall, and that includes the checklists. Under the stress of the flight I had forgotten to close the cowl flaps and would likely have landed with them open without the aid of the Emergency Procedures Checklist. This would have resulted in unnecessary damage to the airframe.
  8. No need to rush: There is no denying that I had things stacked in my favor that day. I had nice weather, extra gas, daylight hours, and even the luxury of landing at my home airport. But, regardless of all those variables, there is no need to rush into anything. Ask questions, find answers and come up with a plan. Obviously not all emergencies present the pilot with the luxury of time, but use all time and resources you have to your advantage.
  9. Polish up those procedures: The deer accident really made me want to go out and brush up on all the emergency procedures which I hadn’t performed since my last checkride. The realization that I could need any of them at any time was really hit home after I hit that deer. Additionally, make sure you know who to call if something ever does happen.
  10. Know the systems: Familiarity with the systems on the airplane makes it easier to troubleshoot and solve issues on the fly and makes it easier to spot a problem in the first place. Knowing how systems work and what their normal indications should be helps make decisions regarding when to divert and where to land easier.
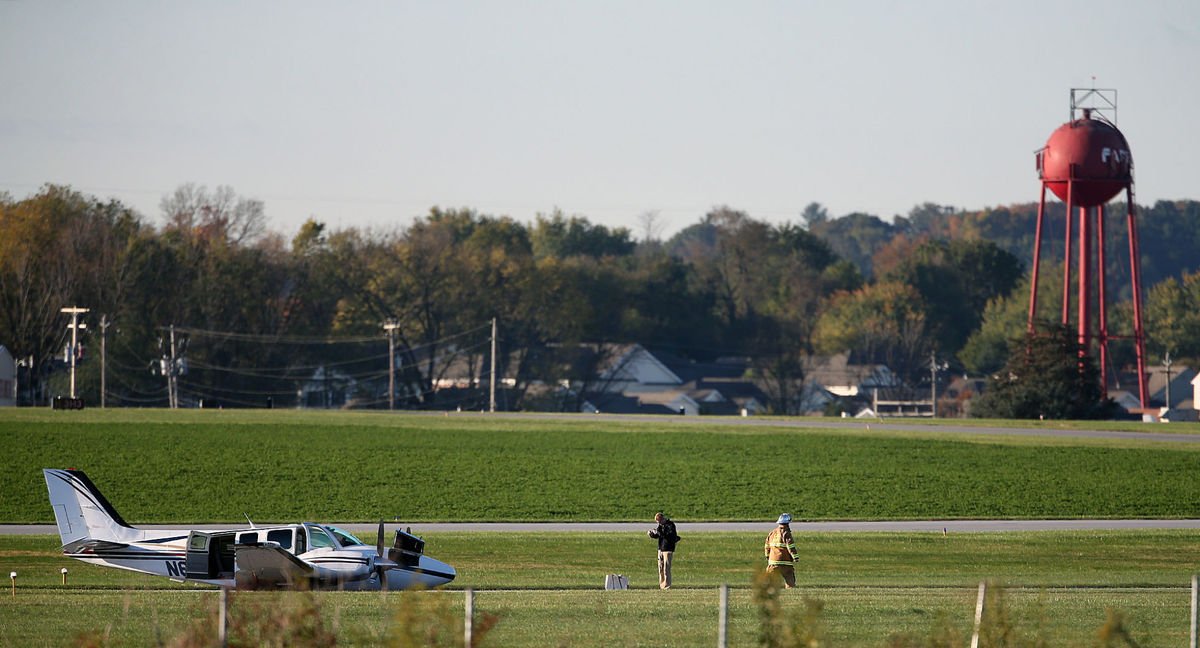
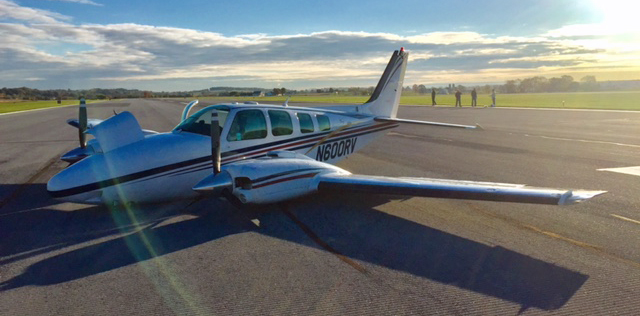
The irony isn’t lost on me that the last article that I wrote for this newsletter dealt with how to avoid making gear up landings and the high cost required to repair one. I never would have imagined when I wrote that article last fall that I would be writing one only a few months later detailing my own gear up landing.

The bottom line is that there is nothing a person can do to prepare for every situation which might arise throughout the course of a flight, and it’s also impossible to know which emergency you may have to deal with if a situation arises. All we can do is stack odds in our favor by making sure that we address the things within our control such as aircraft maintenance, careful flight planning, checking weather, and having personal minimums set in place to keep us from flying outside of our skill sets and comfort zones.

Additionally, ensuring that you are knowledgeable and proficient in your aircraft’s procedures will give you the best chance for success. When things start going wrong, keep calm, and ask for help. Work the problem instead of guessing or rushing into a less than desirable solution. No one wants to be caught in an emergency like a deer in a landing light!
Andrew Robinson is an airline pilot for Piedmont Airlines.  He is a former 135 Charter Pilot and flight instructor who lives with his wife and 2 daughters in Pennsylvania.  He instructs in Beechcraft Bonanzas.

Similar Posts

  • TBM Debuts the 960 at Sun N Fun

    This is a Press Release from Daher’s website, the maker of the TBM 960.

    Sun ‘n Fun Aerospace Expo, Lakeland, Florida, April 5, 2022 – Daher today unveiled the latest high-end version of its TBM pressurized single turboprop aircraft family – the TBM 960 – which incorporates Pratt & Whitney Canada’s advanced PT6E-66XT engine and a fully digital e-throttle, along with a digitally-controlled cabin that incorporates an all-new environmental control system, LED ambience lighting and electrically-dimmable windows.

    The TBM 960 was introduced at the Sun ‘n Fun Aerospace Expo in Lakeland, Florida, where Daher is exhibiting the first production airplane (exhibit stand #MD-22B).

    “The TBM 960 is the quintessential TBM, representing the fifth evolution of our very fast turboprop aircraft family since the TBM 900-series’ introduction in 2014,” commented Nicolas Chabbert, the Senior Vice President of Daher’s Aircraft Division. “It takes the maximum advantage of today’s turboprop technology to provide digital control of the engine and the propeller.”

    The TBM 960 retains the rapid speed of Daher’s TBM family while enabling lower fuel consumption. At Daher’s recommended cruise setting of 308 kts., the fuel consumption is only 57 U.S. gallons per hour, which is a 10% fuel economy compared to maximum cruise setting for more sustainability.

    At the heart of this latest TBM version is the intelligent PT6E-66XT powerplant and Hartzell Propeller’s five-blade RaptorTM composite propeller, both of which are linked to the dual-channel digital Engine and Propeller Electronic Control System (EPECS).

    With the EPECS, the PT6E-66XT’s startup is fully automated after a single-switch activation. The cockpit’s power lever is an e-throttle, using a single forward position from takeoff to landing – with the EPECS optimizing powerplant performance throughout the flight envelope while

    Daher unveils the TBM 960 at Sun ‘n Fun Aerospace Expo

    reducing pilot workload by integrating all functions and protecting the engine’s life. Analysis of engine parameters is driven by 100-plus smart data inputs.

    The RaptorTM propeller is fully integrated into the propulsion system. It is specifically designed to reduce overall weight and improve the TBM 960’s takeoff distance, climb and cruise speed. Turning at 1,925 rpm during maximum power output, the Raptor contributes to limiting noise and vibration. Its sound level during takeoff is just 76.4 decibels, meeting the most stringent international noise standards.

    With its G3000® integrated flight deck, the TBM 960 retains Daher’s e-copilot® concentration of technological innovation and safety systems in the TBM, which can be compared to an “electronic copilot.” This includes an icing protection system, flight envelope monitoring through the Electronic Stability and Protection (ESP) and the Under-speed Protection (USP) systems, the Emergency Descent Mode (EDM) function, as well as the game-changing HomeSafeTM emergency autoland system.

    New to the TBM 960 is the Garmin GWXTM 8000 doppler weather radar with advanced surveillance features such as lightning and hail prediction, turbulence detection, zero blind range for close-in returns, and ground clutter suppression. The TBM 960 also is the first application of Garmin’s GDL® 60 next-generation data transmitter for automatic database upload and interconnection with mobile devices.

    The TBM 960’s Prestige cabin extends Daher’s use of digital power inside the aircraft, featuring an all-new environmental control system, LED ambience strip lighting integrated into both sides of the overhead ceiling panel, and electronically-dimmable windows – all controlled by a PassengerComfortDisplay(PCD). Enhancementsinthecabin’sstyleandcomfortalsoinclude new ergonomically enhanced seats, USB-A and USB-C power plugs, individual cupholders and headset hangers for each occupant.

    For the TBM 960, a fifth TBM paint scheme – called Sirocco, based on the creativity of French designer Alexandre Echasseriau – has been added to the aircraft’s style customization possibilities.

    The TBM 960 has been certified by EASA (the European Union Aviation Safety Agency); with certification by the U.S. FAA (Federal Aviation Administration) currently underway. Deliveries will begin in the first half of 2022.

    With the new aircraft’s launch, Daher’s TBM family is now offered in two versions: the TBM 960 and TBM 910.

    About Daher – www.daher.com

  • Non-Standard Alternate Minimums

    When filing an IFR flight plan, part of the process is determining whether or not an alternate airport is required.  An alternate airport is required when the following conditions exist(as is outlined by the FAA in 91.169 (b)):

    The weather conditions at the destination airport

    • From 1 hour before your arrival time to 1 hour after your estimated time of arrival, the weather conditions are forecast to be below
    • 2,000 Feet AGL and/or
    • 3 statute miles visibility

    Let’s paint a scenario.  You are traveling from KSAT (San Antonio International Airport) to KHBV (Jim Hogg County Airport in Hebbronville, TX).  You start to file your flight plan and get down to the space where you put your alternate in.  Since Laredo (KLRD) is the closest airport with a TAF, you check Laredo’s TAF and see that the forecast conditions there at your ETA are ceilings 1,500 and visibility of 2sm.

    Based on this information, you need an alternate airport.  Now, the process of finding one.  In Part 91.169 (c), the forecast conditions at the alternate airport must be at or above:

    • 600 Feet AGL and 2sm visibility for a precision approach, or
    • 800 Feet AGL and 2sm visibility for a non-precision approach

    Alright, now we have some guidance.  Laredo is the nearest airport to KHBV, and we know the forecast from the above TAF showing the conditions are forecast to be above the alternate minimums outlined in Part 91, so let’s pick Laredo.  All done?

    Not quite.  A lot of airports have Non-Standard Alternate Minimums.  How do you figure out if they do?  The easiest way is to look at any approach plate for the airport.  In the notes section of the government plates, there will be a black triangle with an A in it.  That means there are non-standard alternate minimums published for that airport (in layman’s terms, different than the ones stated above in Part 91).

    ILS 17R KLRD

    Now the question is, where do you find those non-standard alternate minimums?  On Foreflight:

    • Go to the Airports page
    • Tap the Procedures button
    • Tap the Arrival button
    • Tap the Alternate Minimums option

    This brings up the IFR Alternate Minimums document for all the airports with non-standard alternate minimums in that area.  Scroll through to find Laredo.

    Non-Standard Alternate Minimums

    As you can see, there are several notes there concerning the different approaches into Laredo.  For our example, we’ll say the winds are out of the south and we are planning on flying the ILS 17R if we cannot get into KHBV and have to come to Laredo.  The note there is that the Alternate Minimums for the ILS 17R are actually 700 AGL ceilings and 2sm instead of the above state 600 AGL ceilings and 2sm, the procedure is NA if the tower is closed, and NA if the local weather isn’t received.

    What does this tell us?  If the forecasted ceilings at Laredo were below 600 AGL instead of 700 AGL, we would not be able to use LRD as an alternate airport if we were planning on flying the ILS 17R.  The RNAV approaches are all fair game, so a GPS equipped aircraft would have no problem.

    On top of that, some approaches at a certain airport are not authorized to be used in the case of the airport being used as an alternate.  At the Galveston airport (KGLS), the ILS 14 is NA as an alternate procedure, but all the RNAV approaches are available.


    Picking an alternate seems simple at first, but there are actually a lot of things to consider in the process.

    Need help remember all this stuff?  AOPA has put out a kneeboard sheet that helps all IFR pilots remember those important things when it comes to IFR flying.  Check it out here.

  • Cirrus SR20 Partnership Forming at KHYI

    Ever wanted to be a Cirrus owner, but the economics of being a single owner just don’t make sense for you? If you’re in the San Marcos/New Braunfels/Austin area, you now have a chance to join a Cirrus SR20 partnership at the San Marcos Municipal airport, KHYI.

    The Cirrus SR20 partnership group is looking for 2-4 more members to buy in to a 2006 or 2007 Cirrus SR20 GTS.  The plane will be kept at KHYI and the group already has a hangar for it.

    For more information, please contact Texas Top Aviation at info@txtopaviation.com.

    Cirrus SR20 Training


  • The Go Around Button

    Back in the old days, when flying an approach in an early Cirrus SR22 (circa 2004; yes, in airplane technology, those were the old days), performing a missed approach procedure was a lot of work.  You were low to the ground and weren’t able to see the runway.  Then, you had to start climbing so you don’t hit the ground, then push a lot of buttons in order to get the GPS and autopilot set fly the missed approach procedure.  It was very easy to get distracted with button pushing, then forget to fly the airplane, putting yourself and passengers in very unsafe circumstances.  The go around button has changed all that.

    Going Missed the Old Fashioned Way

    Let’s stick with our example of the 2004 Cirrus.  The SR22 in 2004 was equipped with the Avidyne Entegra system, complete with dual Garmin 430 GPS units, and an STEC 55x Autopilot.  A very capable IFR flying machine (we could use the same example of a 2004 or 2005 Lancair Columbia 350 or 400 that was equipped the same way, except the screens were vertical instead of horizontal).

    Avidyne Cirrus Go Around Button

    We’ll use the ILS 15 at the Temple airport, KTPL, for our example.  You pass TPL, the outer marker at 1,683 with the glide slope already centered.  Everything is going well so far.  The number 1 Garmin 430 is set to VLOC and the autopilot is showing NAV and APR for the lateral guidance and GS on the vertical, tracking the glide slope.  The last weather report stated the clouds were Broken at 500 feet, so it appears like you’ll be able to get in on the approach.

    As you get closer to the Decision Altitude, the clouds aren’t letting up at all.  You hit 1,000 feet on your altimeter, 120 feet above the minimums, and you still can’t see a thing.  Another 100 feet lower doesn’t change anything, so you elect to proceed with the missed approach.  This means things are about to get busy.

    Here’s the process:

    • Fly the airplane first, meaning shut off the autopilot, pitch the nose up to about 7 degrees, TRIM, add full power, retract the flaps, and step on the right rudder
    • The Garmin 430 is now in SUSP mode, meaning the missed approach point is locked in as the active waypoint.  So, you have to press the OBS button to cause the GPS to cycle over to the missed approach procedure
    • You have to press the VLOC button on the Garmin 430 in order to change the CDI back to GPS
    • You have to re-engage the autopilot by pressing NAV twice (which engages GPS Steering mode)
    • You have to reset your altitude bug (if you hadn’t set it for the missed approach altitude previously)
    • You have to press VS and ALT on your autopilot to have the STEC continue the climb

    That’s a lot of work, isn’t it?  Plus, that’s an extensive amount of head down time in the cockpit, with your eyes looking elsewhere other than the instruments while hand flying.  All very low to the ground, I might add.  Can you see how this can be dangerous?  (Note:  The Avidyne IFD 550 has made this a little easier with automatically switching from VLOC to GPS and automatically engaging the missed approach procedure in the flight plan)

    The advent of the Go Around Button has streamlined the process, leading to safer operations where it matters most.  The functions of the Go Around Button vary based on the airplane, but here are three examples, the Garmin G1000 Cessna Corvalis TT, the Garmin G1000 Piper Mirage, and the Garmin Perspective Cirrus SR22.

    Cessna Corvalis TT

    We’ll take the above situation and swap out the airplanes.  Gone is the 2004 Cirrus SR22.  Insert a 2008 Cessna Corvalis TT, equipped with the Garmin G1000 suite and the GFC 700 autopilot.  The go around button is positioned directly above the twist in throttle.

    Cessna Corvalis G1000 Go Around Button

    When you push the Go Around Button, here’s what the system does:

    • Disconnects the Autopilot
    • Sets the Flight Director for 7.5 degrees pitch up (which is about your normal climb angle) and wings level
    • Switches the CDI back to GPS
    • Takes the GPS out of SUSP mode and cycles the flight plan to the first waypoint on the missed approach procedure

    Here’s what you have to do:

    • Follow the flight director by pitching the nose up and TRIM
    • Add full mixture, prop and throttle (prop & throttle should be full already)
    • Retract the flaps
    • Step on the right rudder
    • Re-engage the autopilot, then press NAV and VS (or FLC) and set your altitude bug if it isn’t already set

    Not too bad, eh?  Makes the whole situation streamlined and safer.

    Piper PA46-350P Mirage

    Same situation, different airplane.  You’ll notice the procedure for the Piper Mirage is almost exactly the same as the  Corvalis procedure.  The difference between the two airplanes is where the autopilot controller is.  In the Corvalis, the autopilot controller is positioned on the left side of the MFD, making it easy to scan back and forth while pushing buttons on the autopilot.

    The Piper Mirage autopilot controller is positioned below both screens and in front of the power quadrant. With this positioning, the pilot’s eyes have to go a lot further to see which autopilot button he is pushing. In this case, it becomes very important to get the airplane climbing and trimmed before going down to engage the autopilot.

    As in the Corvalis, here is what the Go Around button does:

    • Disconnects the Autopilot
    • Sets the Flight Director for 7.5 degrees pitch up (which is about your normal climb angle) and wings level
    • Switches the CDI back to GPS
    • Takes the GPS out of SUSP mode and cycles the flight plan to the first waypoint on the missed approach procedure

    And here’s what you have to do:

    • Follow the flight director by pitching the nose up, then TRIM
    • Add full mixture, prop and throttle (prop & throttle should be full already)
    • Retract the flaps
    • Step on the right rudder
    • Re-engage the autopilot, then press NAV and VS (or FLC) and set your altitude bug if it isn’t already set

    Cirrus SR22

    Cirrus Perspective Go Around Button

    This time, we’ll use the 2010 Cirrus SR22T with the Garmin Perspective and GFC 700 Autopilot. One thing I really like about how Cirrus configured their system is where the Go Around button is.  It’s actually on the throttle itself, making it much more intuitive.  This way, you can press the Go Around button while adding full throttle.

    There is one major difference between the Garmin Perspective in the Cirrus and the G1000 in the Corvalis. When you press the Go Around button in the Cirrus, the autopilot actually stays on.

    Here’s what happens when you press the Go Around button in the Cirrus:

    • Flight Director pitches to 7.5 degrees pitch up and wings level
    • AP Mode switches to Go Around mode, following the flight director
    • GPS comes out of SUSP mode
    • CDI switches back to GPS

    All the pilot really has to do is add power, take the flaps up, then press NAV on the GFC 700 to get the autopilot following the missed approach procedure.

    If you aren’t familiar with the Go Around button or haven’t used the one in your plane lately, it’s good to go up with a knowledgeable instructor and fly a couple of approaches where you perform the published missed approach afterward.  That way, he or she can assist you through the first missed approach, then give you pointers until  you get comfortable with the Go Around button.

  • Cirrus Braking Systems: A Hot Topic

    You just bought your Cirrus SR22. You do some flying, and soon find yourself with a brake temp sticker that isn’t white anymore. You remember from your transition training that any color other than white is a no go. You now ponder…. I don’t remember getting on the brakes hard, or riding the brakes while taxiing, but sure enough they aren’t white anymore. You now start thinking that all the horrible rumors of Cirrus brakes are true. They overheat so fast!

    I would like to share some little-known facts about the Cirrus factory equipped braking system. Following the procedures below can help make the brakes last a little longer. There is also a very popular STC that allows upgraded brakes to be installed on all SR series aircraft. More to come on that.

    Notice the Top Yellow sticker is far darker than the Bottom. The Yellow temperature indicator turns at 300 Degrees, while the bottom Blue indicator turns at 330 Degrees. This is an indication to the pilot that if the bottom sticker has turned colors, that the braking system has exceeded 330 degrees and is in need of servicing.

    Above is a photograph of an SR22 G1 braking system with turned brake temp stickers. The first things you may notice is that there are in fact two brake temperature stickers. We can only see the bottom blue sticker from the inspection port on the wheel pants. The other is higher on the caliper; in order to see it, the wheel pant must be removed. This isn’t common knowledge because there is no mention of this additional indicator in the POH.

    Now you may be asking yourself, what can I do to extend the service life of my factory equipped Cirrus brakes? Here are some tips. First, always taxi at 1000 RPM and use the rudder as much as you can while only tapping the brakes. This is not fool proof, since sometimes, depending on the grade, you will have no choice but to utilize brake tapping to keep the aircraft going straight. Taxiing is not typically where the brakes get overheated, though, but this is still a good practice to follow.

    What we tend to see is that the Cleveland brakes are generally overheated on landing. We always recommend to make sure your final approach speed is not excessive, land in the first 1/3 of the runway, and let the aircraft rollout to a smooth stop. What tends to happen is that the aircraft is too fast, and the pilot tries to exit at a certain taxi way, or brakes hard and continues to ride the brakes after landing during taxi. If you do your best to avoid these habits, it will serve you well.

    This braking system remained unchanged all the way until the 2016 G5 Cirrus SR series. Starting in 2016, the factory equipped G5 and G6 Cirrus SR series all now come standard with a single piston hydraulic braking system from Beringer. The Cirrus Beringer brakes far exceed the braking power and durability of the old system. The new system is more robust, withstands heat better, and is is very well built. There is also an option for an upgraded dual caliper system to increase durability and stopping power. A braking system STC for the older Cirrus G1 through early G5 models was created to upgrade those airplanes to the better stopping power and cooling of the Cirrus Beringer brakes.

    Seen above is a page from a Beringer catalog highlighting the Cirrus SR series STC kits. Your local Cirrus service center will be able to quote prices for the kits. We have over 1000Hrs spent behind Beringer equipped Cirrus aircraft and the difference is quite apparent. The pilot has better control of the aircraft, no spongy pedal, and the confidence to get the plane stopped without possibly overheating the braking system. This, in our opinion, is one of the best upgrades you can do to your Cirrus.
    Above is what an STC upgraded braking kit from Beringer looks like, as well as the new temperature indicator for the pre/post flight inspection. Notice the black spot on the left hand picture. These brakes have been overheated.

    One other difference for a pilot to note is that once upgraded to the Cirrus Beringer brakes, there is only one temperature indicator and it changes color at a whopping 450 Degrees Fahrenheit! Needless to say, it can handle some heat! The new temperature indicator is now Orange in color and turns grey/black when overheated.

    On the left are the original Cirrus factory brakes. On the right is the caliper to the new Beringer brakes for a Cirrus.
    Dual Caliper Cirrus Beringer Brakes

    The Cirrus Beringer brakes upgrade is quite a step up in the world of slowing down. However, this doesn’t mean that they are completely issue free. There is one little-known problem with Beringer brakes that is not that big of a deal and can be fixed with relative ease.

    The rotor on the Beringer braking systems is “free floating,” meaning it is not necessarily “fixed” in position when secured down to the spindle. It is “keyed” into the wheel rim with the male and female side interlocking.

    The brakes occasionally will get noisy, causing a “knocking” noise when brakes are applied. This noise is caused by the small metal tabs that tighten up the space between the wheel and the brake rotor. This is so the small tabs wear with use instead of the aluminum rim that they are fixed to. So, if your Beringers are making a knocking noise when brakes applied, this is most likely your culprit.

    These gaps above are the “keyed” position where the rotor finds home in the rim. Without these tabs that wear with use, we would be replacing the rim more often than the much cheaper replaceable tabs.

    It is highly recommended to upgrade your original Cirrus factory brakes to the new Beringer braking system. You will deal with less maintenance, less chance of a brake overheat, and less confusion on whether or not your brakes are airworthy. For more info, you can check out the Cirrus website for the single or dual caliper Beringer brakes.


    Zach Anderson is a Cirrus Standardized Instructor Pilot (CSIP) for Texas Top Aviation. Zach comes from a auto mechanic background and is very familiar with the ins and outs of maintenance. He started working for Texas Top Aviation in December 2020.

  • Garmin G1000 Updates

    You have just received the keys of your shiny new (to you) airplane complete with a beautiful Garmin G1000 glass panel flight deck. Synthetic Vision, WAAS, and ADS-B are all installed. You are ready to cruise in high technology.

    You turn on the PFD and MFD and notice one problem. All your databases are expired. No big deal, right? Your Garmin 530W was easy as pie to update with it’s single data card.

    You start looking around and can’t find the data card. Then you notice that there are several SD cards in slots on the panels. SD cards won’t fit in your Blue Jepp Skybound card reader. Confusion sets in which quickly leads to full on panic.

    What have you gotten yourself into?!

    No need to fear, Texas Top Aviation is here to help with your Garmin G1000 database update confusion (and hopefully not panic).

    Database Update Providers

    First, you have to choose who to get your Garmin G1000 updates from. You have two options. One is Garmin (fly.garmin.com; always use either Firefox or Chrome to update, don’t use Safari). The other is Jeppesen.

    Honestly, there is no difference between the data that each provides. If you had a 530 or 430 before, you used Jepp already. Just keep the Jepp account, call them, and have them get you set up for your Garmin G1000 updates.

    If you didn’t have a Jepp account before, I would use Garmin, for a couple of reasons. You get multiple downloads in case you mess something up (Jepp NavData gives 1 download per month, while Safe Taxi, etc. you get 2-3). On Jepp, you have to call in and have them reset the account, which can be a pain if it’s after hours or a Saturday or Sunday.

    The other problem with Jepp is since Boeing bought Jeppesen, I have found it extremely difficult to find online where to set up a new account and purchase databases. Yes, you can always call, but, again, problematic after hours or on a weekend.

    The only problem with Fly Garmin for your Garmin G1000 updates is Garmin is constantly updating their program. You have to update their downloader quite often, which can be a bit frustrating.

    I’m going to use Fly Garmin as my example.

    What to Buy

    Garmin gives you a couple of different bundle options for your Garmin G1000 updates, the OnePak and the PilotPak. The main difference between the two is the PilotPak includes approach charts that display on your PFD and the OnePak doesn’t. Therefore, the OnePak is about $200 cheaper.

    Both include Navigation Data, SafeTaxi, Obstacles, Airport Directory, Terrain, and the BaseMap.

    How to Update

    Once you have followed all the instructions on Garmin’s website (or gotten Jeppesen set up), here is what to put on which SD card.

    NOTE: YOU WILL NEED TO PURCHASE ONE OR TWO BLANK SD CARDS FOR THE NAVIGATION DATABASES. DO NOT PUT THE NAVIGATION DATA ON THE SD CARD THAT IS ALREADY IN THE TOP SLOT ON THE MFD. THAT IS FOR ENGINE DATA LOGGING ONLY. NO NAVIGATION DATA SHOULD EVER BE PUT THAT ON THAT CARD.

    Bottom Card, PFD

    • SafeTaxi
    • Obstacles

    Bottom Card, MFD

    • SafeTaxi
    • Obstacles
    • Airport Directory
    • Flite Charts

    Top Card, PFD & MFD (This is the new blank SD card(s) you bought)

    NOTE: REMOVE THE TOP SD CARD IN THE MFD THAT IS ALREADY IN THE SLOT AND DON’T PUT ANY DATABASE INFORMATION ON IT.

    • Navigation Data

    Garmin G1000 NXi Users (or Cirrus Perspective + Users)

    Ignore everything above and put all databases on the bottom card of the MFD. You have database sync, so you don’t have to mess with multiple cards. When you do an update though, go to the AUX chapter on the MFD and scroll down to the Databases page. Ensure that all dates match what you just put on the SD Card.


    For you Jeppesen users, check out the new Bad Elf Wombat updater that works with the iPad JDM app for updates.

Leave a Reply

Your email address will not be published. Required fields are marked *