|

PIREP: IFR Clearances at Uncontrolled Airports

There is great news coming for all IFR pilots who utilize the multitude of uncontrolled airports across the US.

From the beginning of aviation time, the process of getting an IFR clearance at an uncontrolled airport has been arduous. For airports under Center controlled airspace, you had to dial the Clearance Delivery line, which ported you to Flight Service. Then you sat on hold till someone picked up, gave them your information, then sat on hold again while they called the Center. Finally, after what seemed like an eternity, the briefer came back with your clearance and departure instructions.

On a busy day, this could take ten to fifteen minutes, which can be really annoying when a pilot is trying to take off and get somewhere.

In my opinion, this also led to a lot of unsafe (and probably illegal) VFR departures when conditions were either clearly IFR or unsafe if buzzing around at low altitudes and high speeds in Class G airspace.

RCO’s (Remote Communications Outlet, 2nd column, halfway down) and Clearance Delivery Frequencies are in place at some airports, but by and large, the above process was how you got your clearance.

Departing from a TRACON controlled airport usually was easier and quicker. The TRACON has a direct line that is available for pilots to call to speak directly with a controller, but not all these phone numbers are published.

As of June 20th, the FAA is implementing this at all uncontrolled airports. On the chart supplement for all IFR charts across the US (not including Alaska), the FAA will publish the Center phone numbers and remaining TRACON phone numbers for pilots to call directly to receive their IFR clearances and departure instructions, and to cancel their IFR flight plans (A lot of TRACONs already have their phone number published).

Flight Service will no longer be taking IFR flight plan cancellations. Pilots will still be able to cancel with Center or TRACON in the air, but will now need to call the number on the chart supplement on the ground for cancellation.

Now that the FAA is modernizing this process, hopefully more pilots will decide to call on the ground for their clearance on a MVFR or IFR day instead of taking off and trying to pick it up in the air.

Finding the Chart Supplement on Foreflight

Where is the Chart Supplement? I’m so glad you asked.

Before iPads, everyone carried around the green book, officially known as the Airport/Facilities Directory, or A/FD. With the advent of Foreflight & Garmin Pilot & others, all the information in the A/FD is now easily accessible in each of the Apps.

Foreflight may integrate the clearance delivery phone number for each airport into their airport information page, but in the meantime, here is how to find the Chart Supplement.

On Foreflight, go to Documents along the bottom of the App. In the Catalog on the left, tap FAA. Chart Supplement will be about 1/3 of the way down the page. Tap that, then tap the region you need and it will download into your Documents Library.

Once it is downloaded, check the Table of Contents for FAA Telephone Numbers and NWS. Go to that page and scroll through to find the Center or TRACON you are needing, then dial the number.

Happy Flying!

Similar Posts

  • PIREP: Austin Bergstrom Recovering After Flood Damage

    The massive storms that rolled through the Austin Bergstrom and San Antonio areas last Friday not only put a dent in the landscape, they put a dent in the skies too.

    The Austin Bergstrom (KAUS) control tower suffered significant flood damage Friday.  6 inches of rainfall in an hour caused water to come pouring into the first floor of the tower, flooding the radar room and knocking out the power.  This led to transmission outages for the tower, ground control, clearance delivery and the ATIS.  Similar to the Chicago Center fire last year (though this was a much smaller section of airspace), the area normally controlled by Austin Approach was replaced by a big, gaping radar hole.

    By 8:45am on Friday morning, the Austin Bergstrom airport actually closed.  One runway eventually opened back up Friday afternoon, but massive delays and cancellations had already taken place.  All the ILS approaches were down and Houston Center had taken over the airspace normally occupied by Austin Approach control.

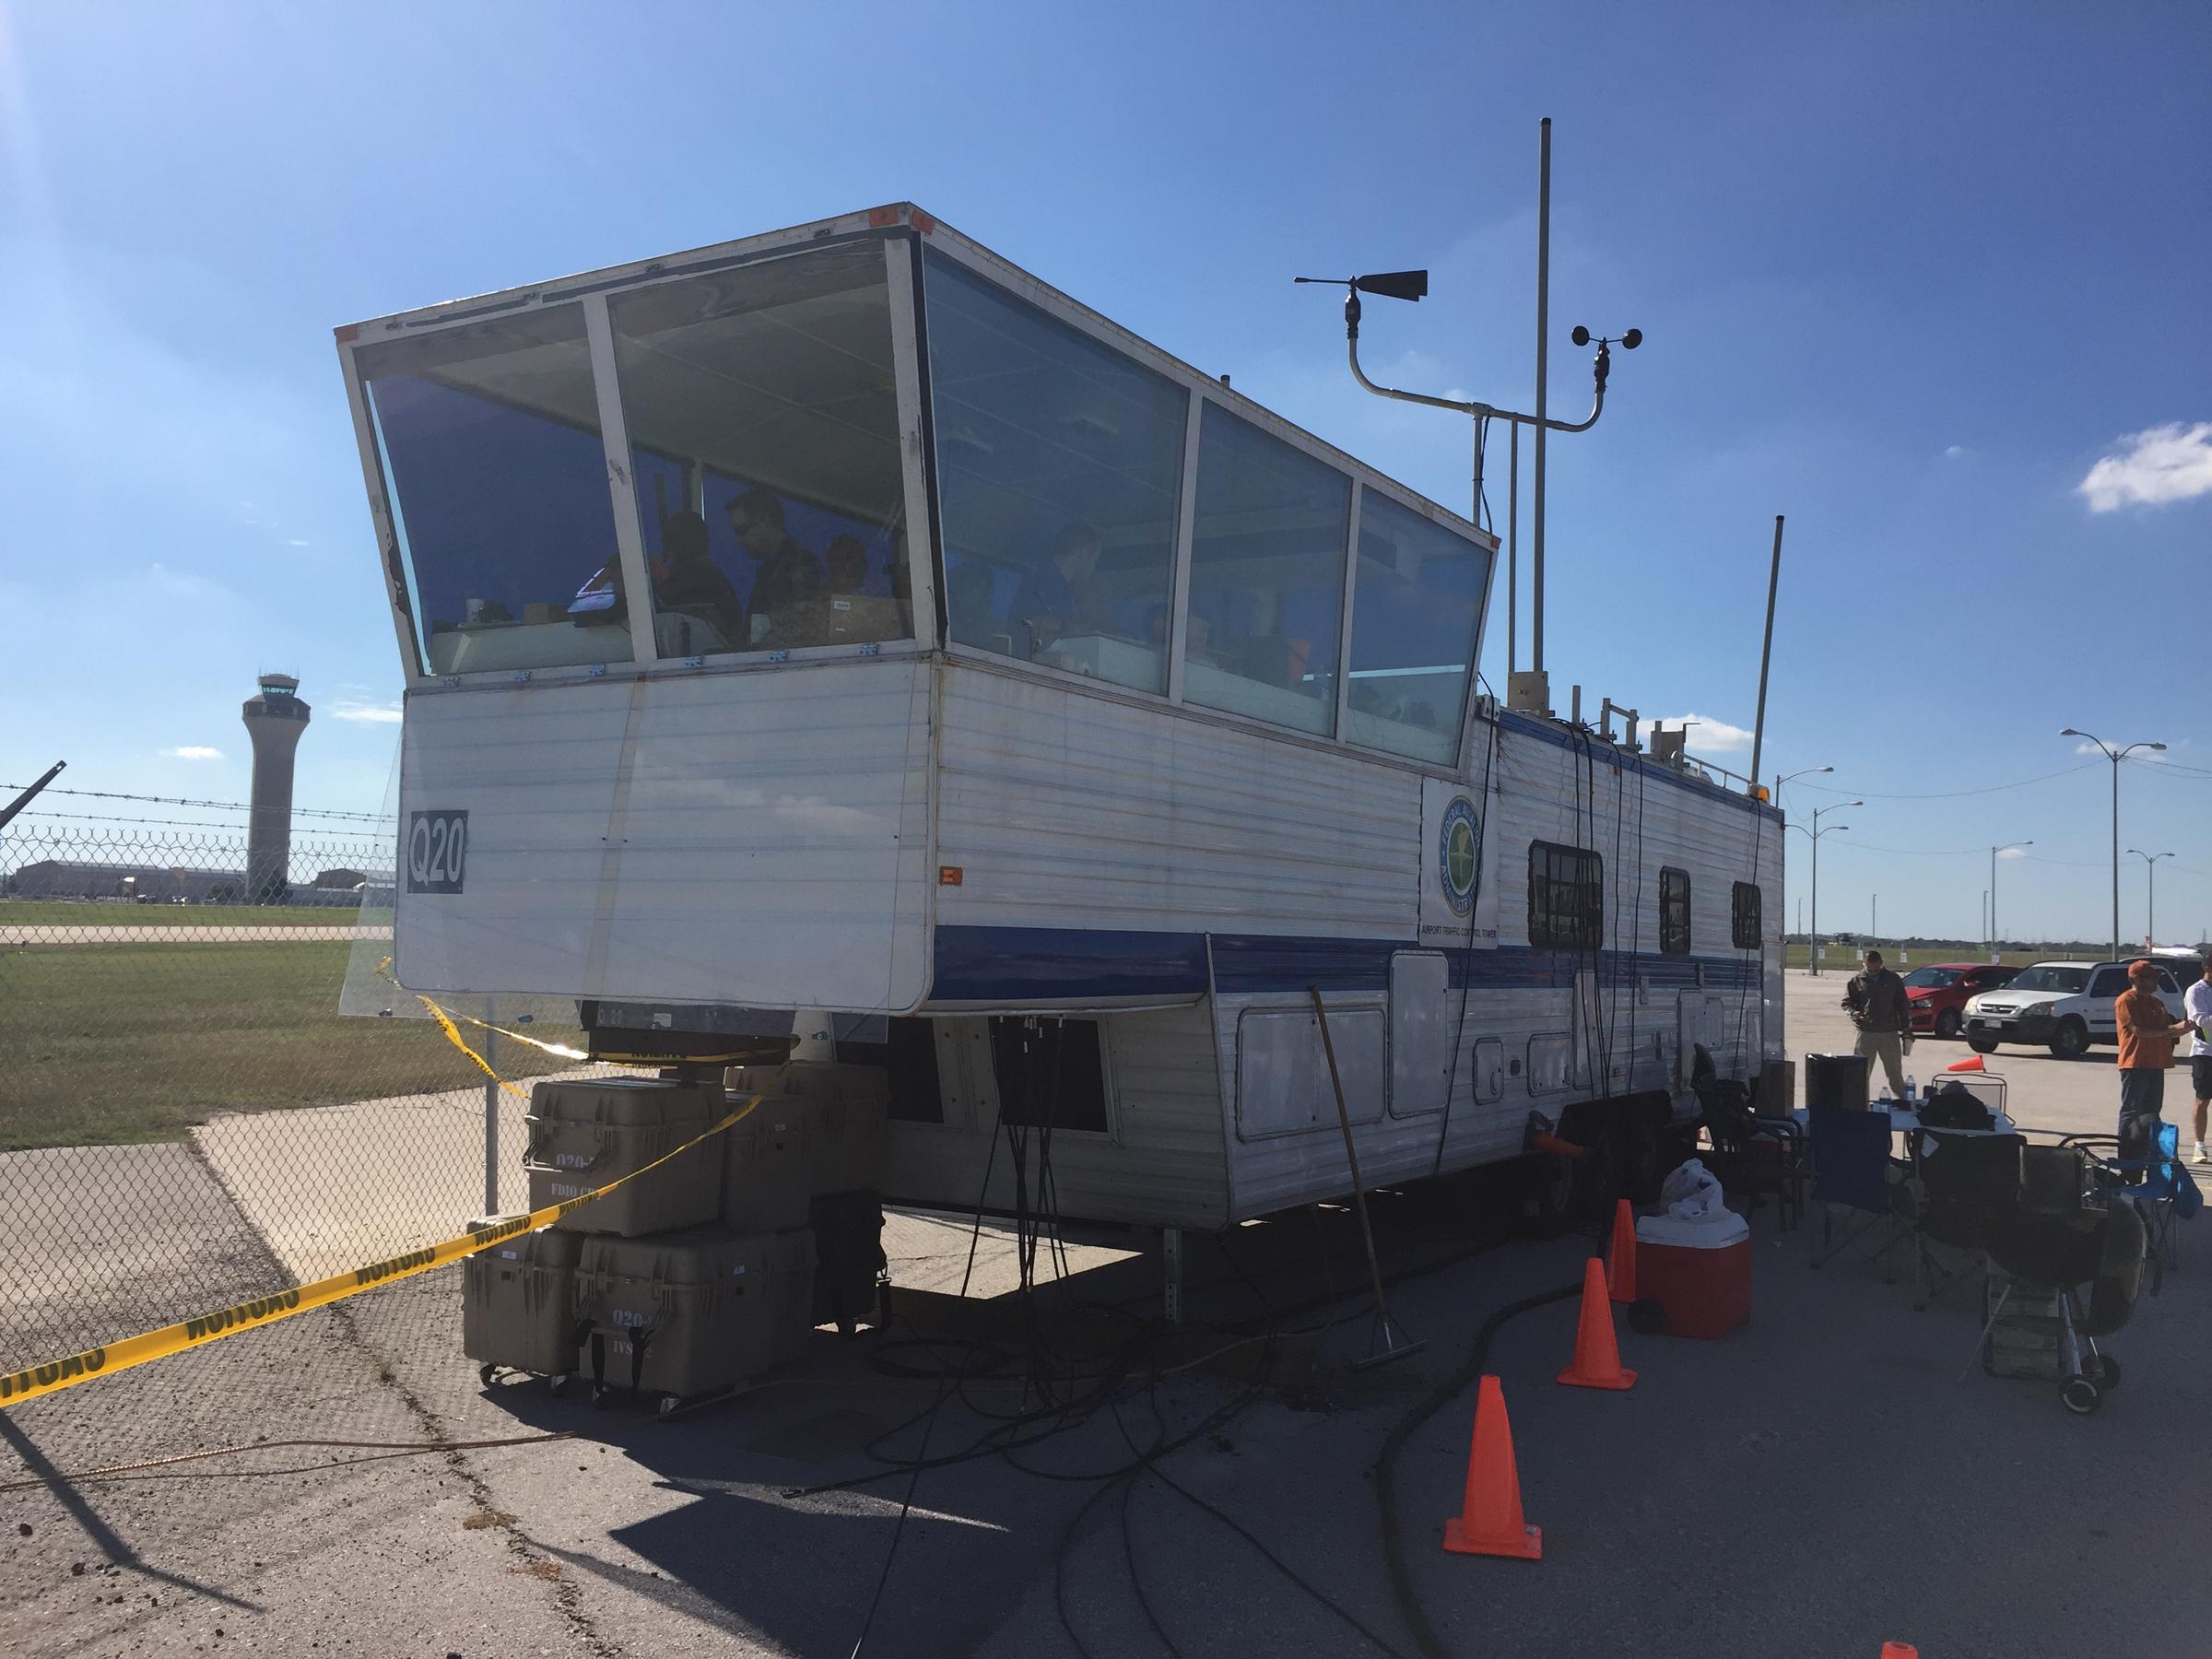
    Austin Temprorary Tower

    A temporary, emergency tower vehicle was brought in by the FAA (it’s essentially an RV with communications and a giant window) by the end of the weekend.  All arrivals and departures were restricted to 17L and 35R.

    Due to the radar outage, I heard there was as much as a 4 hour delay even for planes coming into Austin Bergstrom from Dallas, and that was in VMC conditions on Sunday and Monday.  Tuesday and Wednesday brought IMC conditions which only enhanced the delays.

    The latest news is that Austin Approach will be opening back up, but in a satellite base in San Antonio.  The Austin controllers will be using the SAT radar room and will be receiving their radar picture via satellite.  The approach frequencies should be up and running today or tomorrow.  The Austin Bergstrom tower is up and running and most of the ILS approaches are operational at this point.

    In the meantime, expect delays going in and out of Austin.  If you don’t have to get to AUS, EDC, or GTU, you’re better off delaying a day or two until Austin Approach is back up and running.

    The massive storms that rolled through the Austin Bergstrom and San Antonio areas last Friday not only put a dent in the landscape, they put a dent in the skies too. The Austin Bergstrom (KAUS) control tower suffered significant flood damage Friday.  6 inches of rainfall in an hour caused water to come pouring into…

  • Need To Breath


    I got a call today from a friend asking me about oxygen requirements.  That got my brain pondering about the different items the FAA would like all pilots to know. I did a little refreshing and found several other tidbits directly from the FAA that I thought worth sharing. No matter what you’re flying, I think these apply to all of us. 

    First off, what are our general oxygen requirements? If you jump on over to the FAR’s and take a look at 91.211 you’ll see: 

    1. At cabin pressure altitudes above 12,500ft MSL to 14,000ft MSL, pilots
    required to use oxygen unless the segment is less than 30 minutes of flight.

    2. At cabin pressure altitudes above 14,000ft MSL, the crew is required to use
    oxygen.

    3. At cabin pressure altitudes above 15,000ft MSL, each occupant must be
    provided the use of oxygen. This doesn’t necessarily mean they have to use it.


    Things get a little more in depth when you get to pressurized aircraft.

    These requirements are also listed in 91.211: 

    1. If you’re flying above Flight Level 250, a 10 minute supply of oxygen is
    required for each person onboard.

    2. If you’re flying above Flight Level 350-410, and one pilot leaves their seat, the other pilot will be required to wear an oxygen mask, unless both seats are equipped with quick-donning oxygen masks.


    There are three basic components to any oxygen system in an aircraft:  the storage system, the delivery system, and the mask or cannula. First, there are several types of storage systems. 

    Gaseous aviators breathing oxygen is the first. This is the standard green tank that everyone is familiar with. There are two types of tanks. Either the high- pressure with 1800-2200 psi or the low pressure tank with 400-450 psi. The major issue with these and General Aviation aircraft is weight. Some of these tanks can get bulky and heavy and therefore don’t work for everyone. 

    Liquid aviators breathing oxygen or LOX is another form of storage. The major advantage of LOX is that it has a 900 to 1 expansion ratio, meaning that 1 liter of liquid oxygen can be expanded into 900 gaseous liters of Aviators Breathing Oxygen. The disadvantages of LOX are they are extremely volatile and have to be stored at -197F. If it comes in contact with exposed skin, severe frost bite can occur. 

    Sodium chlorate candles or oxygen generators have a weight advantage like LOX. They’re essentially a canister that when activated mix sodium chloride and iron powder and produce oxygen. They general have a 600 to 1 expansion ratio, which goes back to the weight savings. However, once these are started they are very hard to stop. Another disadvantage is these devices produce a fair amount of heat, so proper precautions need to be taken. 

    Next are the delivery systems. The main systems are Continuous Flow, Diluter Demand, and Pressure Demand. Continuous Flow, is exactly as it sounds. The oxygen is allowed to flow continuously from the tank to the user. The benefits of continuous flow are you don’t need a complicated mask or regulator. The downside to this system is since it continuously pumps oxygen, you’re wasting oxygen when you exhale. Most of continuous flow systems are used on aircraft that generally fly below 28,000 feet. 

    Diluter Demand was designed to fix the negative of the Continuous Flow systems. Diluter Demand only sends oxygen to the user when the user inhales. The system also allows cabin air to be introduced in, sending the perfect mixture of oxygen to the user when needed. These systems are very efficient and generally tend to be used up to 40,000 feet. 

    Pressure Demand is designed to essentially “over inflate” the users lungs. This will basically pressurize the the users lugs and allow the user to fly above 40,000 feet. This is needed at flights above FL400 because 100% oxygen without positive pressure will not suffice. 

    The final portion of the oxygen system is the mask or cannula. Nasal cannulas generally are more comfortable and are regulated to 18,000 feet service altitude. Masks come in a couple different variants. From re-breathers to quick-donning, most masks accomplish the same task with a few small differences. Quick-donning must be able to be put on within five seconds and are rated up to FL400. 

    Since that was a lot of information, what does all of it mean to you? Most fair weather flyers will never run into any of this. However, the high performance owner/operator will run into oxygen use situations a fair amount. Taking the family up to Colorado on a ski trip, jumping up to 12,500 feet to get above some weather, or flying above 5,000 feet at night on a long xc are all situations where you may want to have oxygen on board. 

    If you are planning on doing any of this type of flying or are currently doing these types of flights, training is a must. If you’ve never been in an altitude chamber, I would highly recommend it. In college, I went with a group to Oklahoma City to the FAA’s headquarters where they hold a class on Hypoxia and High Altitude flying. It’s very informative to be in the chamber as it simulates being oxygen deprived. You get to see how you’ll react and what kind of symptoms you’ll have when in a loss of oxygen situation. Each person has different symptoms, so it’s important to see how you will react.

    It’s also good to fly with an experienced instructor. Finding an instructor who will allow you to learn in a safe environment is worth its weight in gold. 


    Ryne Bergren is currently a First Officer with Mesa Airlines in the CRJ 900. Ryne has experience in many different areas of aviation, from corporate to airlines to teaching to ferrying across the Atlantic Ocean. His passion is for all things that travel across the big blue sky.

    I got a call today from a friend asking me about oxygen requirements.  That got my brain pondering about the different items the FAA would like all pilots to know. I did a little refreshing and found several other tidbits directly from the FAA that I thought worth sharing. No matter what you’re flying, I…

  • Brady Texas Fly In (KBBD)

    6th Annual Armed Forces Weekend Celebration & Fly-In, May 20-21, in Brady, TX and Curtis Field (KBBD)!

    Friday Night on the Square – FREE

    Fly-In Saturday, 9-4 – FREE

    A Night in London with Sentimental Journey Orchestra
    Saturday night 7-11 PM
    Tickets for Dinner & Dance, $30 available at www.morganmilitaryaviationmuseum.com.

    Some fuel is available for warbirds! Please contact the airport if you would like to bring one!

    Warbirds

    6th Annual Armed Forces Weekend Celebration & Fly-In, May 20-21, in Brady, TX and Curtis Field (KBBD)! Friday Night on the Square – FREE Fly-In Saturday, 9-4 – FREE A Night in London with Sentimental Journey Orchestra Saturday night 7-11 PM Tickets for Dinner & Dance, $30 available at www.morganmilitaryaviationmuseum.com. Some fuel is available for…

  • Garmin Perspective Missed Approaches

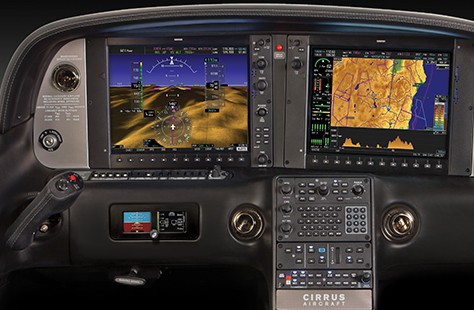
    Are you a Cirrus pilot with a Garmin Perspective?  Still can’t figure out the use of the go around button?  Read on!

    When it comes to flying an instrument approach, we as pilots are assuming we are going to land.  Most of the time, we won’t even take off if the ceilings or visibilities are below the minimums for an approach.  95% of the time, we do land.

    There is the other 5% of the time when something unexpected happens, whether we get a full scale deflection, or we don’t see the runway at the published minimums, and we have to perform a missed approach.

    When instructing, missed approach procedures are actually what I see the most deficiency in when instructing an instrument rated pilot.  It’s not necessarily configuring the airplane for a missed approach procedure, it’s the button pushing involved in setting up the GPS properly.  When a pilot isn’t proficient in the button pushing, that button pushing distracts the pilot from actually flying the airplane, which can lead to a dangerous situation.

    I am going to spend a few articles on flying a missed approach with different GPS and different autopilot configurations.  Today, I will be addressing the Garmin Perspective with a GFC 700 Autopilot, which is what all Cirrus Aircraft after 2009 are equipped with.

    The Garmin Perspective Missed Approach Procedure

    Once the decision to execute a missed approach has been made, here is the step by step procedure:

    • Full Mixture and Full Throttle
    • Simultaneously push the Go Around button on the underside of the throttle.  This does the following:
      • Sets the Garmin Perspective Flight Director to Go Around Mode (7.5 degrees pitch up and wings level)
      • Takes the Garmin Perspective GPS out of Suspend Mode
      • Switches the CDI back to GPS mode if it is in a different mode
      • Garmin Perspective with GFC 700 Autopilot stays on
    • Flaps up
    • Confirm airplane is climbing
    • Set altitude bug for missed approach altitude (assuming it isn’t there already)
    • Set NAV mode and IAS mode on the Garmin Perspective GFC 700 Autopilot

    Garmin perspective

    That’s it.  When Garmin and Cirrus got together to create the Garmin Perspective with the GFC 700 Autopilot, they tried to make as simple but robust system as possible.  Once you have the procedure down for the right buttons to press, then the procedure is relatively straight forward.

    Are you a Cirrus pilot with a Garmin Perspective?  Still can’t figure out the use of the go around button?  Read on! When it comes to flying an instrument approach, we as pilots are assuming we are going to land.  Most of the time, we won’t even take off if the ceilings or visibilities are…

  • Cirrus Autopilot Check

    In the Pre-Takeoff Checklist for any Cirrus aircraft, it calls for pilots to perform a Cirrus Autopilot Check.  It is prudent to check the autopilot before your flight to ensure that all aspects of the autopilot are working properly.  The only problem is, the checklist doesn’t spell out how to perform the Cirrus Autopilot Check.  You would have to go to the POH for the airplane, which is usually in the back seat or a bag somewhere and therefore hard to get to, in order to find the procedure.

    The procedure for checking the autopilot is slightly different depending on what autopilot is in your airplane.  The procedures for all three are below.

    S-TEC 55x

    • Sync the heading bug to your current heading
    • Activate heading mode on the autopilot
    • Twist the heading bug left and right to ensure the ailerons move left and right
    • Sync the heading bug to your current heading
    • Activate vertical speed mode on the autopilot
    • Move the vertical speed bug (or the vertical speed on the altitude pre-selector if you have a steam gauge Cirrus) up and down to ensure the elevator moves accordingly
    • Ensure you can overpower the autopilot
    • Press the autopilot disconnect switch to ensure the autopilot shuts off


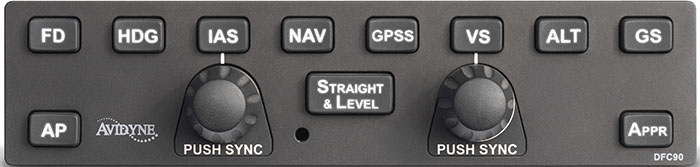
    Avidyne DFC 90

    • Press the AP button to activate the autopilot
    • Ensure AP, ROLL, and PITCH Annunciations are depicted in green on the top of the PFD
    • Set the heading bug 90 degrees from the current heading
    • Press the HDG button on the autopilot
    • Ensure the ailerons are moving in the proper direction and HDG is annunciated on the top of the PFD
    • Ensure you can overpower the autopilot
    • Press the autopilot disconnect switch on the stick and ensure the autopilot has disconnected


    DFC90

    Garmin GFC 700

    • Press the AP button to activate the autopilot
    • Ensure you can overpower the autopilot
    • Press the autopilot disconnect switch on the stick to ensure the autopilot has disconnected

    In the Pre-Takeoff Checklist for any Cirrus aircraft, it calls for pilots to perform a Cirrus Autopilot Check.  It is prudent to check the autopilot before your flight to ensure that all aspects of the autopilot are working properly.  The only problem is, the checklist doesn’t spell out how to perform the Cirrus Autopilot Check….

  • The Go Around Button

    Back in the old days, when flying an approach in an early Cirrus SR22 (circa 2004; yes, in airplane technology, those were the old days), performing a missed approach procedure was a lot of work.  You were low to the ground and weren’t able to see the runway.  Then, you had to start climbing so you don’t hit the ground, then push a lot of buttons in order to get the GPS and autopilot set fly the missed approach procedure.  It was very easy to get distracted with button pushing, then forget to fly the airplane, putting yourself and passengers in very unsafe circumstances.  The go around button has changed all that.

    Going Missed the Old Fashioned Way

    Let’s stick with our example of the 2004 Cirrus.  The SR22 in 2004 was equipped with the Avidyne Entegra system, complete with dual Garmin 430 GPS units, and an STEC 55x Autopilot.  A very capable IFR flying machine (we could use the same example of a 2004 or 2005 Lancair Columbia 350 or 400 that was equipped the same way, except the screens were vertical instead of horizontal).

    Avidyne Cirrus Go Around Button

    We’ll use the ILS 15 at the Temple airport, KTPL, for our example.  You pass TPL, the outer marker at 1,683 with the glide slope already centered.  Everything is going well so far.  The number 1 Garmin 430 is set to VLOC and the autopilot is showing NAV and APR for the lateral guidance and GS on the vertical, tracking the glide slope.  The last weather report stated the clouds were Broken at 500 feet, so it appears like you’ll be able to get in on the approach.

    As you get closer to the Decision Altitude, the clouds aren’t letting up at all.  You hit 1,000 feet on your altimeter, 120 feet above the minimums, and you still can’t see a thing.  Another 100 feet lower doesn’t change anything, so you elect to proceed with the missed approach.  This means things are about to get busy.

    Here’s the process:

    • Fly the airplane first, meaning shut off the autopilot, pitch the nose up to about 7 degrees, TRIM, add full power, retract the flaps, and step on the right rudder
    • The Garmin 430 is now in SUSP mode, meaning the missed approach point is locked in as the active waypoint.  So, you have to press the OBS button to cause the GPS to cycle over to the missed approach procedure
    • You have to press the VLOC button on the Garmin 430 in order to change the CDI back to GPS
    • You have to re-engage the autopilot by pressing NAV twice (which engages GPS Steering mode)
    • You have to reset your altitude bug (if you hadn’t set it for the missed approach altitude previously)
    • You have to press VS and ALT on your autopilot to have the STEC continue the climb

    That’s a lot of work, isn’t it?  Plus, that’s an extensive amount of head down time in the cockpit, with your eyes looking elsewhere other than the instruments while hand flying.  All very low to the ground, I might add.  Can you see how this can be dangerous?  (Note:  The Avidyne IFD 550 has made this a little easier with automatically switching from VLOC to GPS and automatically engaging the missed approach procedure in the flight plan)

    The advent of the Go Around Button has streamlined the process, leading to safer operations where it matters most.  The functions of the Go Around Button vary based on the airplane, but here are three examples, the Garmin G1000 Cessna Corvalis TT, the Garmin G1000 Piper Mirage, and the Garmin Perspective Cirrus SR22.

    Cessna Corvalis TT

    We’ll take the above situation and swap out the airplanes.  Gone is the 2004 Cirrus SR22.  Insert a 2008 Cessna Corvalis TT, equipped with the Garmin G1000 suite and the GFC 700 autopilot.  The go around button is positioned directly above the twist in throttle.

    Cessna Corvalis G1000 Go Around Button

    When you push the Go Around Button, here’s what the system does:

    • Disconnects the Autopilot
    • Sets the Flight Director for 7.5 degrees pitch up (which is about your normal climb angle) and wings level
    • Switches the CDI back to GPS
    • Takes the GPS out of SUSP mode and cycles the flight plan to the first waypoint on the missed approach procedure

    Here’s what you have to do:

    • Follow the flight director by pitching the nose up and TRIM
    • Add full mixture, prop and throttle (prop & throttle should be full already)
    • Retract the flaps
    • Step on the right rudder
    • Re-engage the autopilot, then press NAV and VS (or FLC) and set your altitude bug if it isn’t already set

    Not too bad, eh?  Makes the whole situation streamlined and safer.

    Piper PA46-350P Mirage

    Same situation, different airplane.  You’ll notice the procedure for the Piper Mirage is almost exactly the same as the  Corvalis procedure.  The difference between the two airplanes is where the autopilot controller is.  In the Corvalis, the autopilot controller is positioned on the left side of the MFD, making it easy to scan back and forth while pushing buttons on the autopilot.

    The Piper Mirage autopilot controller is positioned below both screens and in front of the power quadrant. With this positioning, the pilot’s eyes have to go a lot further to see which autopilot button he is pushing. In this case, it becomes very important to get the airplane climbing and trimmed before going down to engage the autopilot.

    As in the Corvalis, here is what the Go Around button does:

    • Disconnects the Autopilot
    • Sets the Flight Director for 7.5 degrees pitch up (which is about your normal climb angle) and wings level
    • Switches the CDI back to GPS
    • Takes the GPS out of SUSP mode and cycles the flight plan to the first waypoint on the missed approach procedure

    And here’s what you have to do:

    • Follow the flight director by pitching the nose up, then TRIM
    • Add full mixture, prop and throttle (prop & throttle should be full already)
    • Retract the flaps
    • Step on the right rudder
    • Re-engage the autopilot, then press NAV and VS (or FLC) and set your altitude bug if it isn’t already set

    Cirrus SR22

    Cirrus Perspective Go Around Button

    This time, we’ll use the 2010 Cirrus SR22T with the Garmin Perspective and GFC 700 Autopilot. One thing I really like about how Cirrus configured their system is where the Go Around button is.  It’s actually on the throttle itself, making it much more intuitive.  This way, you can press the Go Around button while adding full throttle.

    There is one major difference between the Garmin Perspective in the Cirrus and the G1000 in the Corvalis. When you press the Go Around button in the Cirrus, the autopilot actually stays on.

    Here’s what happens when you press the Go Around button in the Cirrus:

    • Flight Director pitches to 7.5 degrees pitch up and wings level
    • AP Mode switches to Go Around mode, following the flight director
    • GPS comes out of SUSP mode
    • CDI switches back to GPS

    All the pilot really has to do is add power, take the flaps up, then press NAV on the GFC 700 to get the autopilot following the missed approach procedure.

    If you aren’t familiar with the Go Around button or haven’t used the one in your plane lately, it’s good to go up with a knowledgeable instructor and fly a couple of approaches where you perform the published missed approach afterward.  That way, he or she can assist you through the first missed approach, then give you pointers until  you get comfortable with the Go Around button.

    Back in the old days, when flying an approach in an early Cirrus SR22 (circa 2004; yes, in airplane technology, those were the old days), performing a missed approach procedure was a lot of work.  You were low to the ground and weren’t able to see the runway.  Then, you had to start climbing so…

One Comment

Leave a Reply

Your email address will not be published. Required fields are marked *