Want to make it better than a Cirrus or a Cessna TTx?
Meet the team at RDD creating the LX7. Just make sure you are sitting down as you are about to be blown away.
RDD (Research. Design. Development) is a professional building company for the Lancair line of experimental aircraft (Lancair unveiled the Mako at Osh Kosh this summer, which performs slightly less than the advertised values of the LX7, but is available as a new kit). For those unfamiliar with the experimental world, when an experimental kit is bought, the owner/builder can build the entire aircraft himself, partially build it then send it to a completion center, or have a professional build company put it together. This last option is what RDD did with Lancair aircraft before Lancair moved from Oregon to Uvalde, TX.
Once Lancair was sold, RDD started thinking on how to make the IV-P better. Boy, did they. What resulted is the LX7.
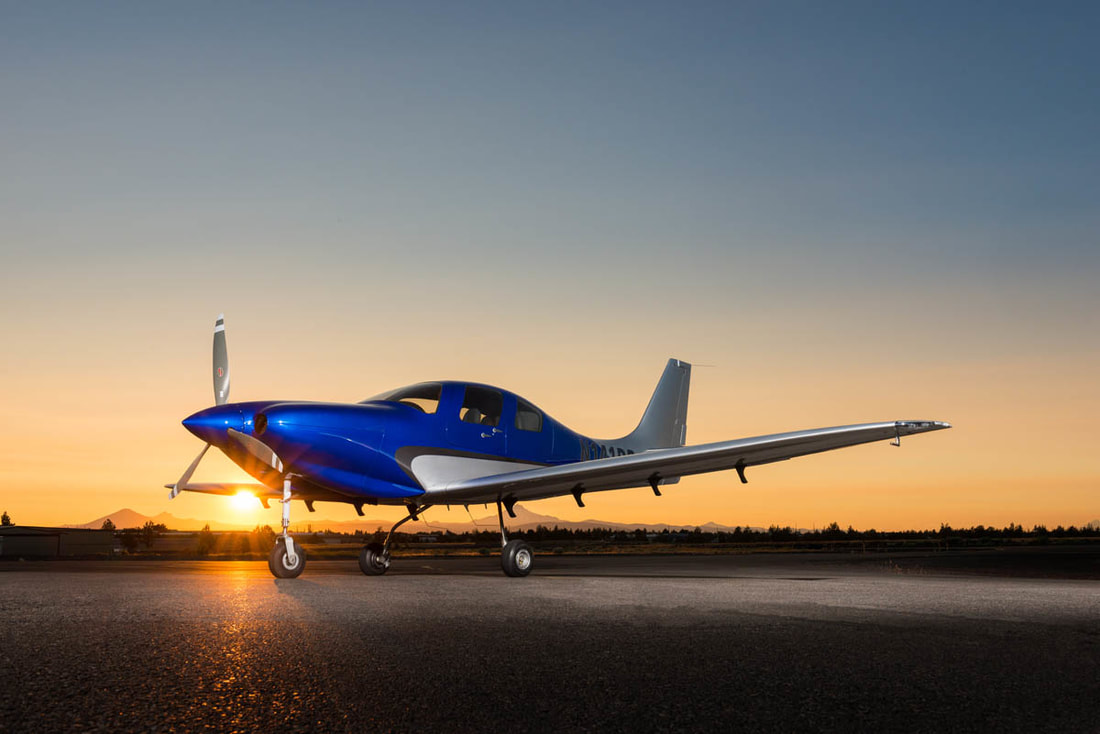
The LX7 is a retractable gear, single engine piston, pressurized aircraft that sits 4. See it on the ramp and it looks like a Lancair or a Columbia. Sit in the cockpit and you’ll know something is different.
Starting with the power plant, RDD put a Continental TSIO 550-E engine in the IV-P airframe, giving the airplane 350 HP. They redesigned the wing to hold 180 gallons of usable fuel and a much better stalling envelope (anyone who has looked at a Lancair IV or IV-P wing knows that there isn’t much wiggle room with angle of attack on those airplanes), lowering the stall speed to 62 knots dirty.
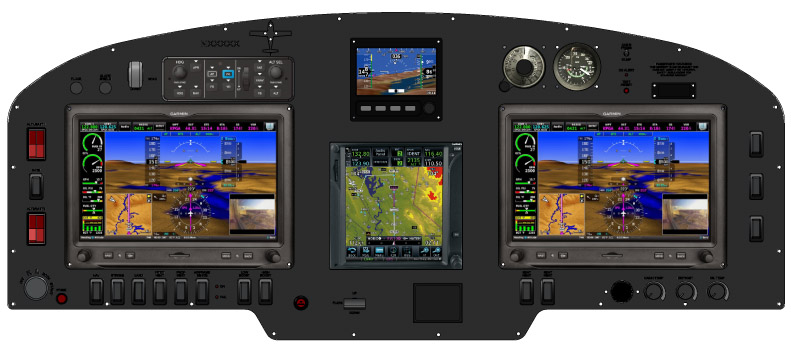
The cabin is roomier and the panel is beautiful. Equipped with 2 or 3 Garmin G3X Touch panels (the experimental equivalent of the G2000), plus a GTN 750 and a fully digital backup flight instrument from Grand Rapids, plus ESP technology built in to the autopilot, this plane seems like a pilot’s dream.
I haven’t even gotten to the best part: the speed. Being pressurized, the LX7 has a 25,000 foot service ceiling where it can achieve cruise speeds of 260 knots at best power (24 GPH) and 250 knots at best economy (18 GPH).
Yes, I did just say 250 knots at 18 GPH in a single engine piston.
Worried about an experimental? The airframe is equipped with a full BRS system similar to the Cirrus SR22, keeping everyone safe and sound.
There is one flying LX7 currently and RDD is working on 3 more. The price tag for the full conversion is $550,000. The kicker is, the owner has to provide the Lancair IV-P airframe. There are currently 10 Lancair IV-Ps for sale on Controller, varying in price from $200,000-$400,000, bringing the total price of the project to $750,000-$950,000. Owners who already have a IV-P or a IV-P kit can send it on over to RDD to get started on their project.
A Piper PA46 partnership is being formed in the San Antonio area. Two to three partners are being sought to purchase either a Piper PA46-310P Malibu or a ’90s model Piper PA46-350P Mirage.
The Piper PA46 Malibu is the original Piper PA46 airframe. It is equipped with a Continental TSIO 520, 310HP engine (though many have been upgraded to the Continental TSIO 550C engine, which is a great upgrade), is complex, and pressurized (the best feature about the airplane!). The six seat airframe travels around 185-190 KTAS at FL200 on 16-17 GPH, giving an incredible range with 120 gallons of fuel.
The Piper Mirage is what Piper designated the PA46 when it switch to the Lycoming TIO 540 350HP engine in 1989. The airframe remained the same, but the engine eeks out a few more KTAS at 22-25 GPH depending on how high the cruise altitude is.
Both the Piper Malibu and the ’90s model Mirage are equipped with the KFC 150 autopilot. A lot of the Piper PA46 airframes still have a Garmin 530W/430W or dual 430Ws, but a large number have been upgraded to the Garmin GTN 750/650, while a few have opted for the Avidyne IFD 540/440 GPS units. There are a fair number still with steam gauges, while some have upgraded to Aspen units or the Garmin G500 or G500TXi.
If you are located in the San Antonio area and interested in a 3-4 way partnership on a Piper PA46, please Contact Us. The purchase price will be between $300,000-$450,000, so only interested parties that can afford a budget of $100,000-$150,000 please.
The plane will be based at Stinson Field (KSSF) or New Braunfels (KBAZ).
A lot of my customers ask me which airplane that I train in is my favorite. The Cirrus and the Columbia both are very good airplanes, but if I had my pick, I’d go with a Piper PA46, specifically an ’86-’88 Malibu.
I love the Piper PA46. 6 seat, cabin class, pressurization, air conditioning, great ramp appeal, 17 GPH (in the Continental TSIO 520 or 550; Piper changed to the Lycoming TIO 540 in ’89, which you run rich of peak and burn 22 GPH, decreasing a little bit of the awesomeness). What more can you ask for? The interior is roomy, there is plenty of baggage space in the nose and in the rear of the cabin. They are downright fabulous airplanes. Plus, you can get into a nice one that has had some panel upgrades and a mid time engine for around $300,000. That’s not bad.
Cessna tried to make a pressurized single with the P210, but it just doesn’t match up with the Piper PA46. The Piper has more room, more baggage space, a higher max differential pressure and service ceiling, and better air conditioning to boot!
Don’t know much about the Piper PA46? It’s been called several things. Originally, it was the Malibu, with a Continental engine. Now the TSIO 520 was not one of Continental’s better motors. However, most of the original Malibus have been upgraded to the much better TSIO 550C engine, which is a great product. Cruise around at almost 200 knots at FL200 and burn only 17 GPH. It’s beautiful.
Piper changed to the Lycoming engine in 1989 and changed the name to the Malibu Mirage, later shortened to just Mirage.
Then, in 2016, Piper upgraded a lot of the avionics, cleaned up the panel, and dubbed it the M350.
Piper made the ill fated decision in the mid 2000s to quit making the Saratoga and instead make an unpressurized version of the PA46 called the Matrix. It didn’t last long, only about 10 years or so, and hasn’t been very popular (see: don’t buy one). Piper took the best part about the PA46, the pressurization, and took it away, leaving an airplane that you still have to wear oxygen in to get the advertised high speeds in the upper teens and flight levels. Who wants to be cruising around in a cabin class airplane with oxygen on? Piper needs to bring the Saratoga back to give folks a low level, high performance option.
What would be my dream Piper PA46? As stated above, an ’86-’88 model Malibu (Piper started off with hydraulic flaps in the ’84-’85 models and it wasn’t a very good system. They changed to electric flaps in ’86) with a Continental TSIO 550C upgrade. The Garmin autopilot isn’t out yet, so I’d go with the STEC 3100 Autopilot w/ a Yaw Damper (the airplane originally came with a King KFC 150, which is a really good autopilot, but most of them are getting old and are getting difficult to fix. King’s replacement KFC 325 is still slogging through certification. Garmin’s GFC 600 would be ideal, but that isn’t expected to be certified for the PA46 fleet till late this year). A single Garmin 10.6″ G500 TXi with EIS tied to a Garmin GTN 750 GPS with a Garmin GTR 225 Nav/Comm as the number 2 radio.
Then I just put gas in it and go. That would be my kind of airplane.
You just bought your Cirrus SR22. You do some flying, and soon find yourself with a brake temp sticker that isn’t white anymore. You remember from your transition training that any color other than white is a no go. You now ponder…. I don’t remember getting on the brakes hard, or riding the brakes while taxiing, but sure enough they aren’t white anymore. You now start thinking that all the horrible rumors of Cirrus brakes are true. They overheat so fast!
I would like to share some little-known facts about the Cirrus factory equipped braking system. Following the procedures below can help make the brakes last a little longer. There is also a very popular STC that allows upgraded brakes to be installed on all SR series aircraft. More to come on that.
Notice the Top Yellow sticker is far darker than the Bottom. The Yellow temperature indicator turns at 300 Degrees, while the bottom Blue indicator turns at 330 Degrees. This is an indication to the pilot that if the bottom sticker has turned colors, that the braking system has exceeded 330 degrees and is in need of servicing.
Above is a photograph of an SR22 G1 braking system with turned brake temp stickers. The first things you may notice is that there are in fact two brake temperature stickers. We can only see the bottom blue sticker from the inspection port on the wheel pants. The other is higher on the caliper; in order to see it, the wheel pant must be removed. This isn’t common knowledge because there is no mention of this additional indicator in the POH.
Now you may be asking yourself, what can I do to extend the service life of my factory equipped Cirrus brakes? Here are some tips. First, always taxi at 1000 RPM and use the rudder as much as you can while only tapping the brakes. This is not fool proof, since sometimes, depending on the grade, you will have no choice but to utilize brake tapping to keep the aircraft going straight. Taxiing is not typically where the brakes get overheated, though, but this is still a good practice to follow.
What we tend to see is that the Cleveland brakes are generally overheated on landing. We always recommend to make sure your final approach speed is not excessive, land in the first 1/3 of the runway, and let the aircraft rollout to a smooth stop. What tends to happen is that the aircraft is too fast, and the pilot tries to exit at a certain taxi way, or brakes hard and continues to ride the brakes after landing during taxi. If you do your best to avoid these habits, it will serve you well.
This braking system remained unchanged all the way until the 2016 G5 Cirrus SR series. Starting in 2016, the factory equipped G5 and G6 Cirrus SR series all now come standard with a single piston hydraulic braking system from Beringer. The Cirrus Beringer brakes far exceed the braking power and durability of the old system. The new system is more robust, withstands heat better, and is is very well built. There is also an option for an upgraded dual caliper system to increase durability and stopping power. A braking system STC for the older Cirrus G1 through early G5 models was created to upgrade those airplanes to the better stopping power and cooling of the Cirrus Beringer brakes.
Seen above is a page from a Beringer catalog highlighting the Cirrus SR series STC kits. Your local Cirrus service center will be able to quote prices for the kits. We have over 1000Hrs spent behind Beringer equipped Cirrus aircraft and the difference is quite apparent. The pilot has better control of the aircraft, no spongy pedal, and the confidence to get the plane stopped without possibly overheating the braking system. This, in our opinion, is one of the best upgrades you can do to your Cirrus.Above is what an STC upgraded braking kit from Beringer looks like, as well as the new temperature indicator for the pre/post flight inspection. Notice the black spot on the left hand picture. These brakes have been overheated.
One other difference for a pilot to note is that once upgraded to the Cirrus Beringer brakes, there is only one temperature indicator and it changes color at a whopping 450 Degrees Fahrenheit! Needless to say, it can handle some heat! The new temperature indicator is now Orange in color and turns grey/black when overheated.
On the left are the original Cirrus factory brakes. On the right is the caliper to the new Beringer brakes for a Cirrus.Dual Caliper Cirrus Beringer Brakes
The Cirrus Beringer brakes upgrade is quite a step up in the world of slowing down. However, this doesn’t mean that they are completely issue free. There is one little-known problem with Beringer brakes that is not that big of a deal and can be fixed with relative ease.
The rotor on the Beringer braking systems is “free floating,” meaning it is not necessarily “fixed” in position when secured down to the spindle. It is “keyed” into the wheel rim with the male and female side interlocking.
The brakes occasionally will get noisy, causing a “knocking” noise when brakes are applied. This noise is caused by the small metal tabs that tighten up the space between the wheel and the brake rotor. This is so the small tabs wear with use instead of the aluminum rim that they are fixed to. So, if your Beringers are making a knocking noise when brakes applied, this is most likely your culprit.
These gaps above are the “keyed” position where the rotor finds home in the rim. Without these tabs that wear with use, we would be replacing the rim more often than the much cheaper replaceable tabs.
It is highly recommended to upgrade your original Cirrus factory brakes to the new Beringer braking system. You will deal with less maintenance, less chance of a brake overheat, and less confusion on whether or not your brakes are airworthy. For more info, you can check out the Cirrus website for the single or dual caliper Beringer brakes.
Zach Anderson is a Cirrus Standardized Instructor Pilot (CSIP) for Texas Top Aviation. Zach comes from a auto mechanic background and is very familiar with the ins and outs of maintenance. He started working for Texas Top Aviation in December 2020.
I took a Piper Malibu to Cabo San Lucas a few weeks back. This was my second trip flying to Mexico, but the first where I arranged everything. Cabo is a beautiful place and the MMSL airport is a fabulous facility. For those who haven’t been fying to Mexico before, MMSL is the place to go. The folks there are extremely helpful and do most of the paperwork for you. You just have to pass along your information to them.
Flying to Mexico and back out is different than flying in the US. First of all, don’t forget your passport. The authorities on both sides frown upon that. You’ll probably get sent back to the US (or sent back to Mexico if you are on your return trip). Your aircraft also needs, Mexican insurance (talk to your US insurance agent) a radio license, and a customs decal.
Second, you’ll have to file an ICAO specific flight plan for flying to Mexico. This is available on Foreflight now, but I really like Fltplan.com’s way of doing it. I don’t fly internationally enough to remember what everything means, but Fltplan.com does a great job of walking pilots through the the different classifications. It’s almost impossible to get confused.
Third, you have to fill out an eAPIS form. This has to be done at least 24 hours prior to departure from the US, but it can be done as far in advance as you’d like. If your departure time changes or your passengers change, you can edit the eAPIS form to bring it current.
Flying to Mexico IFR is a lot simpler than flying VFR. I have only flown IFR and it is very easy. I’m already on a flight plan, already squawking a discreet code, and already on radar, so there really isn’t any way I can mess up the ADIZ penetration. I really recommend going in and out of Mexico IFR instead of VFR.
Once you land in Mexico, you have to close your IFR flight plan. The tower doesn’t do this for you. After clearing customs, you’ll have to pay a landing fee and sign your flight plan confirming you have arrived and closing it out.
When departing, you have to file another eAPIS 24 hours in advance. Wherever you plan on clearing Customs in the US, you’ll need to call the Customs office no less than 1 hour, but not more than 23 hours before arrival. It’s called an Advanced Notice of Arrival.
You’ll need to fill out a paper flight plan before departing, clear customs again to leave, then away you go.
There are a lot of really fun getaways in Mexico and flying there doesn’t have to be difficult. When you have the right information, flying to Mexico can be a breeze!
Throughout the whole event, I learned quite a few things both about flying and about myself. Here are some of the lessons which I have taken away from the accident:
No flight is routine: When I took off that morning I was about as relaxed as I could have been while going to fly. I was flying an airplane that I knew well, in beautiful weather, to familiar airports and even carrying passengers which I had taken on this exact trip more than a dozen times. The accident brought into startling clarity that anything can happen at any time. I had done everything right that morning (preflight, weather briefing, planning, etc) , and none of that did anything to stop the deer from jumping out onto the runway. All we can do is ensure the items we do have control over are covered and try to be prepared to deal with anything else that arises. This ties directly into my next point:
Making sure everything is correct: When you do go fly, make sure that you have all your paperwork and personal details taken care of. I can think of a few times over the course of my flying career where something wasn’t quite right with the paperwork, or perhaps I had forgotten my wallet and I was tempted to go fly anyway. “It’s 8pm on Sunday, I’m not going to get ramp checked.” Well, I can assure you that the paperwork and questionnaires which were required to be submitted to the FAA, NTSB, and Insurance companies would have uncovered any discrepancies in my logbooks, currency, or legality. It isn’t worth the risk of flying without having everything in place just in case something happens. It isn’t just a random ramp check which can get a pilot into trouble.
Ask for help: The story of my collision with a deer would have had a very different outcome if it weren’t for the help that I received from countless the people on the ground. If you’re ever in a situation where you could use a hand, don’t be afraid to ask for help. If I had simply turned around and landed back at Wings, I wouldn’t even have had any idea that my landing gear was missing! The people in the control tower, the maintenance guys, the approach controllers in Philly, the emergency responders, and many more people all played their part in orchestrating a successful outcome.
Airplane sitting on the runway after the firefighters had checked it out Photo credit: www.lancasteronline.com
Dealing with the Paperwork: I have had dealings with the FAA before, but never for an accident. I was afraid that the investigation would be a witch hunt and I would have to defend myself while someone poured over all my planning and paperwork looking for potential errors. But, my fears were totally unfounded. Although I did have to answer many phone calls, write many reports, and fill out much paperwork, the FAA, NTSB, and Insurance companies were very patient in waiting for my responses and even complimentary in how the situation played out. I really enjoyed working with all of them and appreciated their encouragement and help.
Emotional Response: After the dust had settled and the smoke had cleared, I was left standing on the side of the runway with the passengers and my boss. I offered to fly them back to Philadelphia or continue to Pittsburgh and assured our Chief Pilot that I was feeling fine and ready to fly again. Fortunately, there wasn’t a need. Over the next week or two, I noticed a change in myself. I wasn’t fine. I have never had headaches, but shortly after I landed I developed a headache that didn’t go away for days. I had trouble focusing on anything and I had trouble finding motivation to do much but sit and stare at a wall. I wasn’t sharp and I caught myself making silly mistakes in my normally routine activities. I wasn’t depressed, or sad, it was just an unwanted mental and physiological response to the stress and shock of what happened that morning in the Baron. I didn’t feel like myself for quite some time and I even found myself a little on edge whenever I lined up for takeoff on subsequent charters for while afterward. Eventually I started to feel normal again, but it was a slow process.
Feather the Props: I can’t tell you what a difference it makes when those props go from wind milling to feathered. It became clear to me that feathering a prop could make a huge difference in deciding the outcome of an emergency situation.
Good training and checklists usage: This one is pretty straight forward, but it’s worth mentioning. Good training and proficiency make all the difference when the odds are against you. Make sure that you use all your resources when your back is against the wall, and that includes the checklists. Under the stress of the flight I had forgotten to close the cowl flaps and would likely have landed with them open without the aid of the Emergency Procedures Checklist. This would have resulted in unnecessary damage to the airframe.
No need to rush: There is no denying that I had things stacked in my favor that day. I had nice weather, extra gas, daylight hours, and even the luxury of landing at my home airport. But, regardless of all those variables, there is no need to rush into anything. Ask questions, find answers and come up with a plan. Obviously not all emergencies present the pilot with the luxury of time, but use all time and resources you have to your advantage.
Polish up those procedures: The deer accident really made me want to go out and brush up on all the emergency procedures which I hadn’t performed since my last checkride. The realization that I could need any of them at any time was really hit home after I hit that deer. Additionally, make sure you know who to call if something ever does happen.
Know the systems: Familiarity with the systems on the airplane makes it easier to troubleshoot and solve issues on the fly and makes it easier to spot a problem in the first place. Knowing how systems work and what their normal indications should be helps make decisions regarding when to divert and where to land easier.
The irony isn’t lost on me that the last article that I wrote for this newsletter dealt with how to avoid making gear up landings and the high cost required to repair one. I never would have imagined when I wrote that article last fall that I would be writing one only a few months later detailing my own gear up landing.
The bottom line is that there is nothing a person can do to prepare for every situation which might arise throughout the course of a flight, and it’s also impossible to know which emergency you may have to deal with if a situation arises. All we can do is stack odds in our favor by making sure that we address the things within our control such as aircraft maintenance, careful flight planning, checking weather, and having personal minimums set in place to keep us from flying outside of our skill sets and comfort zones.
Additionally, ensuring that you are knowledgeable and proficient in your aircraft’s procedures will give you the best chance for success. When things start going wrong, keep calm, and ask for help. Work the problem instead of guessing or rushing into a less than desirable solution. No one wants to be caught in an emergency like a deer in a landing light!
Andrew Robinson is an airline pilot for Piedmont Airlines. He is a former 135 Charter Pilot and flight instructor who lives with his wife and 2 daughters in Pennsylvania. He instructs in Beechcraft Bonanzas.
“AOPA Rusty Pilot presented by AOPA Ambassador Pat Brown at Tempus Training Solutions”
Topic: A Rusty Pilots Seminar
On Saturday, July 16, 2016 at 09:00 Central Daylight Time
Location:
Tempus Training Solutions
2080 Airport Dr.
San Marcos, TX 78666
Select Number:
EA2769634
Description:
Life may have gotten in the way, but the dream of flight can be yours again. Returning to the skies is not as difficult as most rusty pilot think. We’re inviting you back in the cockpit and will help you get there. Come and participate in a FREE Rusty Pilot program with fellow lapsed pilots. We will help you understand what’s changed in aviation since you’ve last took the controls and brush up on your aviation knowledge. The Rusty Pilot program is developed by AOPA in partnership with local flight training providers in order to create the best environment for getting you back in the air and a part of the general aviation community.
It is easier than most people think:
No FAA checkride or test
Medical may not be required
As a Bonus, by attending, you get two to three hours of free ground instruction towards your flight review!
One Comment