Thunderstorms are not to be taken lightly. I know you have probably heard that many times in your flying career. Weather related accidents account for approximately 25% of airline and GA accidents.
The Airman’s Information Manual suggests giving a 20 mile berth around thunderstorms. If you are an experienced aviator or a newbie please take this piece of advice seriously. At one flight school where I taught, we had the policy of maintaining a 25 mile buffer around isolated thunderstorms. A bit excessive you think? Maybe, but safety is a good thing!
On this particular day, I was operating a Bell Jet Ranger helicopter during a power line patrol. Power line patrol by itself offers numerous challenges. The job consists of flying along electric power transmission lines at approximately 40 feet above the ground at 40 knots. The crew consisted of me (the pilot) and an observer. The observer is an employee of the power company and it is his job to determine which line(s) will be patrolled during the given day. As I fly along the lines, the observer is checking for anything out of the ordinary such as broken, cracked, or even shot out insulators, excessively large bird nests at the top of structures, or woodpecker holes in wooden poles. The observer knows the lines and he is also a great help in letting me know there is a crossing, and potentially higher, line in our flight path. That makes him a true safety asset! It was late afternoon during the summer and we were about to finish up for the day. We only had about another 10 miles of line to follow before calling it a day. Up ahead, I noticed an isolated thunderstorm near our power line. I could see the heavy rain falling below the anvil shaped leading clouds. It appeared to be well beyond the end of our day’s work so we pressed on.
As we drew closer to the thunderstorm, we were suddenly tossed up on our left side like a dog toy in mid-flight! It seemed like we were 90 degrees to our normal cruise attitude and, to make it worse, we had the doors off on that hot summer day. I was able to recover and we did an immediate about face and high tailed it home. Forget the rest of that line, tomorrow is another day.
The destructive force of thunderstorms cannot be overstated. In addition to extremely heavy rain, they can contain strong wind shear, large hail, and severe turbulence, each of which can damage or destroy an aircraft. Take care when one of these bad boys is near your flight path. Give it plenty of respect and a lots of room, for safety’s sake.
Alan VanDoren is a 7000 hour ATP pilot. He has flown both fixed wing and helicopters as a police pilot, missionary pilot, flight instructor, and most recently as an EMS pilot. He has flown in five countries around the world and also teaches university level aviation courses in his spare time.
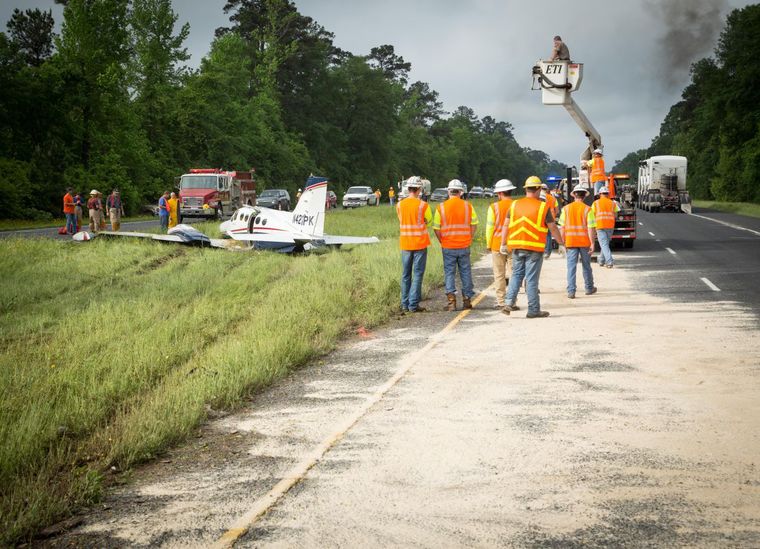
I’m sure at this point, most pilots in Texas have heard about the Cessna 421 that went down two weeks ago in Lufkin. The Golden Eagle suffered a dual engine failure (the pilot lost the first at 2300 feet, then the second at 1700 feet) in IMC on climb out. He broke out at 1,000 AGL miraculously lined up with US 59, south of the Lufkin airport. The pilot had to dodge a car as he was attempting his landing, stalled the airplane, sheared off the landing gear, then slid into the median. No one died, but lots of bumps and bruises. All were airlifted to Houston.
The cause was a lineman at LFK put Jet A in the 421, which is a piston airplane and takes 100LL Avgas. The story that I saw said the pilot and two passengers were returning to Houston from Kansas City and diverted to LFK due to weather. They landed in driving rain and spent the night. I have not seen any reports saying whether the pilot sumped the tanks or not the following morning.
There were several factors that led to this accident. If you take one factor out, the accident probably wouldn’t have happened. Let’s take a look at the sequence of events.
The 421 arrived in a driving rain storm, so the pilot and passengers probably disembarked quickly to get out of the weather. Factor number 1 presents itself here. We don’t know whether or not the pilot told the lineman to put Avgas in it or not (he may have just said fill it up), so we’ll leave that aside.
Understandably, the pilot dashed inside to get out of the rain, but they neglected to monitor the fueling. Whether or not the fueling took place that night or the next morning, we can’t say. I have started to greatly encourage my customers to monitor the fueling of their airplanes, especially when it’s a fuselage that can either have Avgas piston engines or Jet A turboprops, as is the case with the Cessna 421.
Factor number 2, we already know about. The lineman messed up and put the wrong fuel in. If their was uncertainty about what type of fuel, he would have been prudent to await the return of the pilot to ask, even if that meant delaying the pilot’s departure.
Factor number 3 is the matter of sumping the fuel. We don’t know if the pilot sumped the fuel or not. The tricky thing about sumping is Jet A doesn’t settle out of Avgas like water does unless it sits for a long, long time. The two ways to determine if you have Jet A in your Avgas airplane are to smell it, as Jet A has a very strong diesel smell, or do the paper towel test. The paper towel test consists of dumping a fuel sample onto a paper towel, then let the Avgas evaporate. If you are left with a nasty, oily residue, you’ve got Jet A in your tanks (not to mention it will smell like diesel).
To prevent misfueling of your airplane, take the following steps:
Be specific in telling the lineman what type of fuel you want, not just “fill ‘er up”
Monitor the fueling and watch which truck pulls up to your airplane
This is especially important with fuselages that can have either Pistons or Turbo-Prop engines, like the PA-46 line or the Twin Cessna line
Always sump your fuel, definitely smell it, and if there are any doubts, try a paper towel test
I’m sure at this point, most pilots in Texas have heard about the Cessna 421 that went down two weeks ago in Lufkin. The Golden Eagle suffered a dual engine failure (the pilot lost the first at 2300 feet, then the second at 1700 feet) in IMC on climb out. He broke out at 1,000…
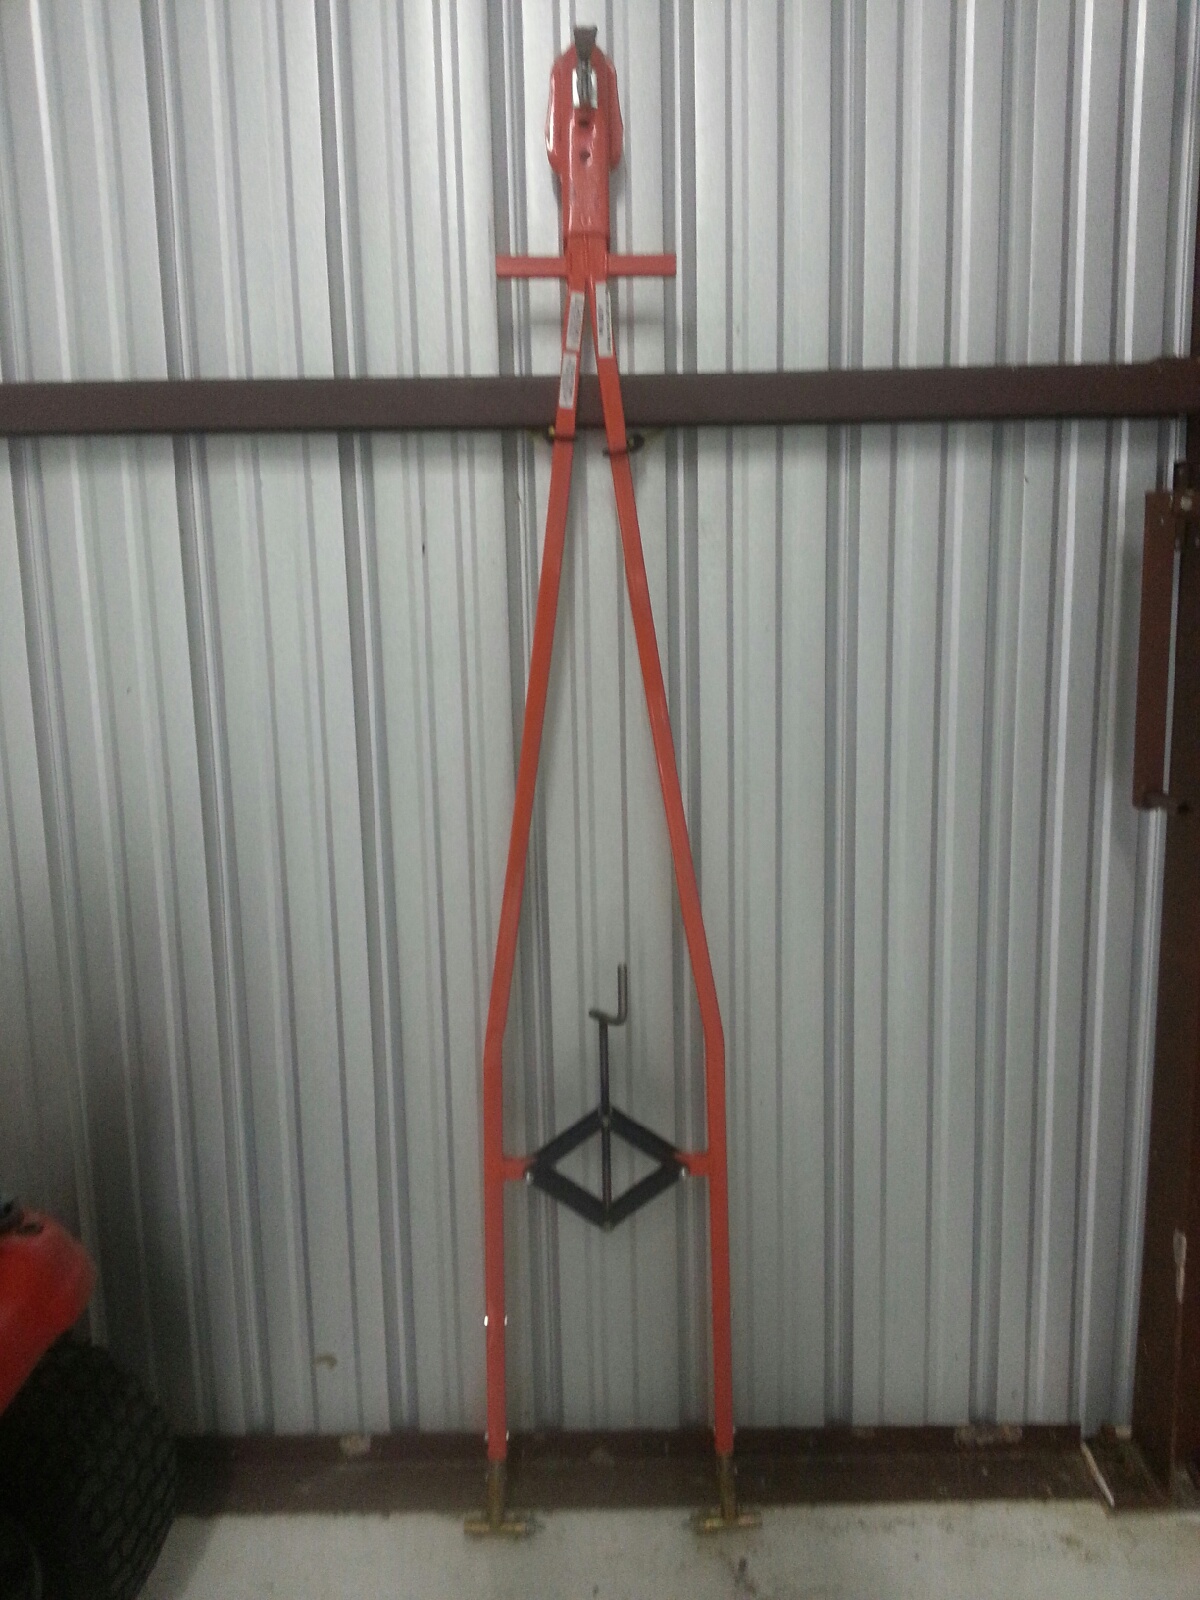
In the market for a tow-bar? This one is basically brand new and hasn’t been used all that much. It has the Cirrus connections on it as well. For more information, contact Texas Top Aviation.
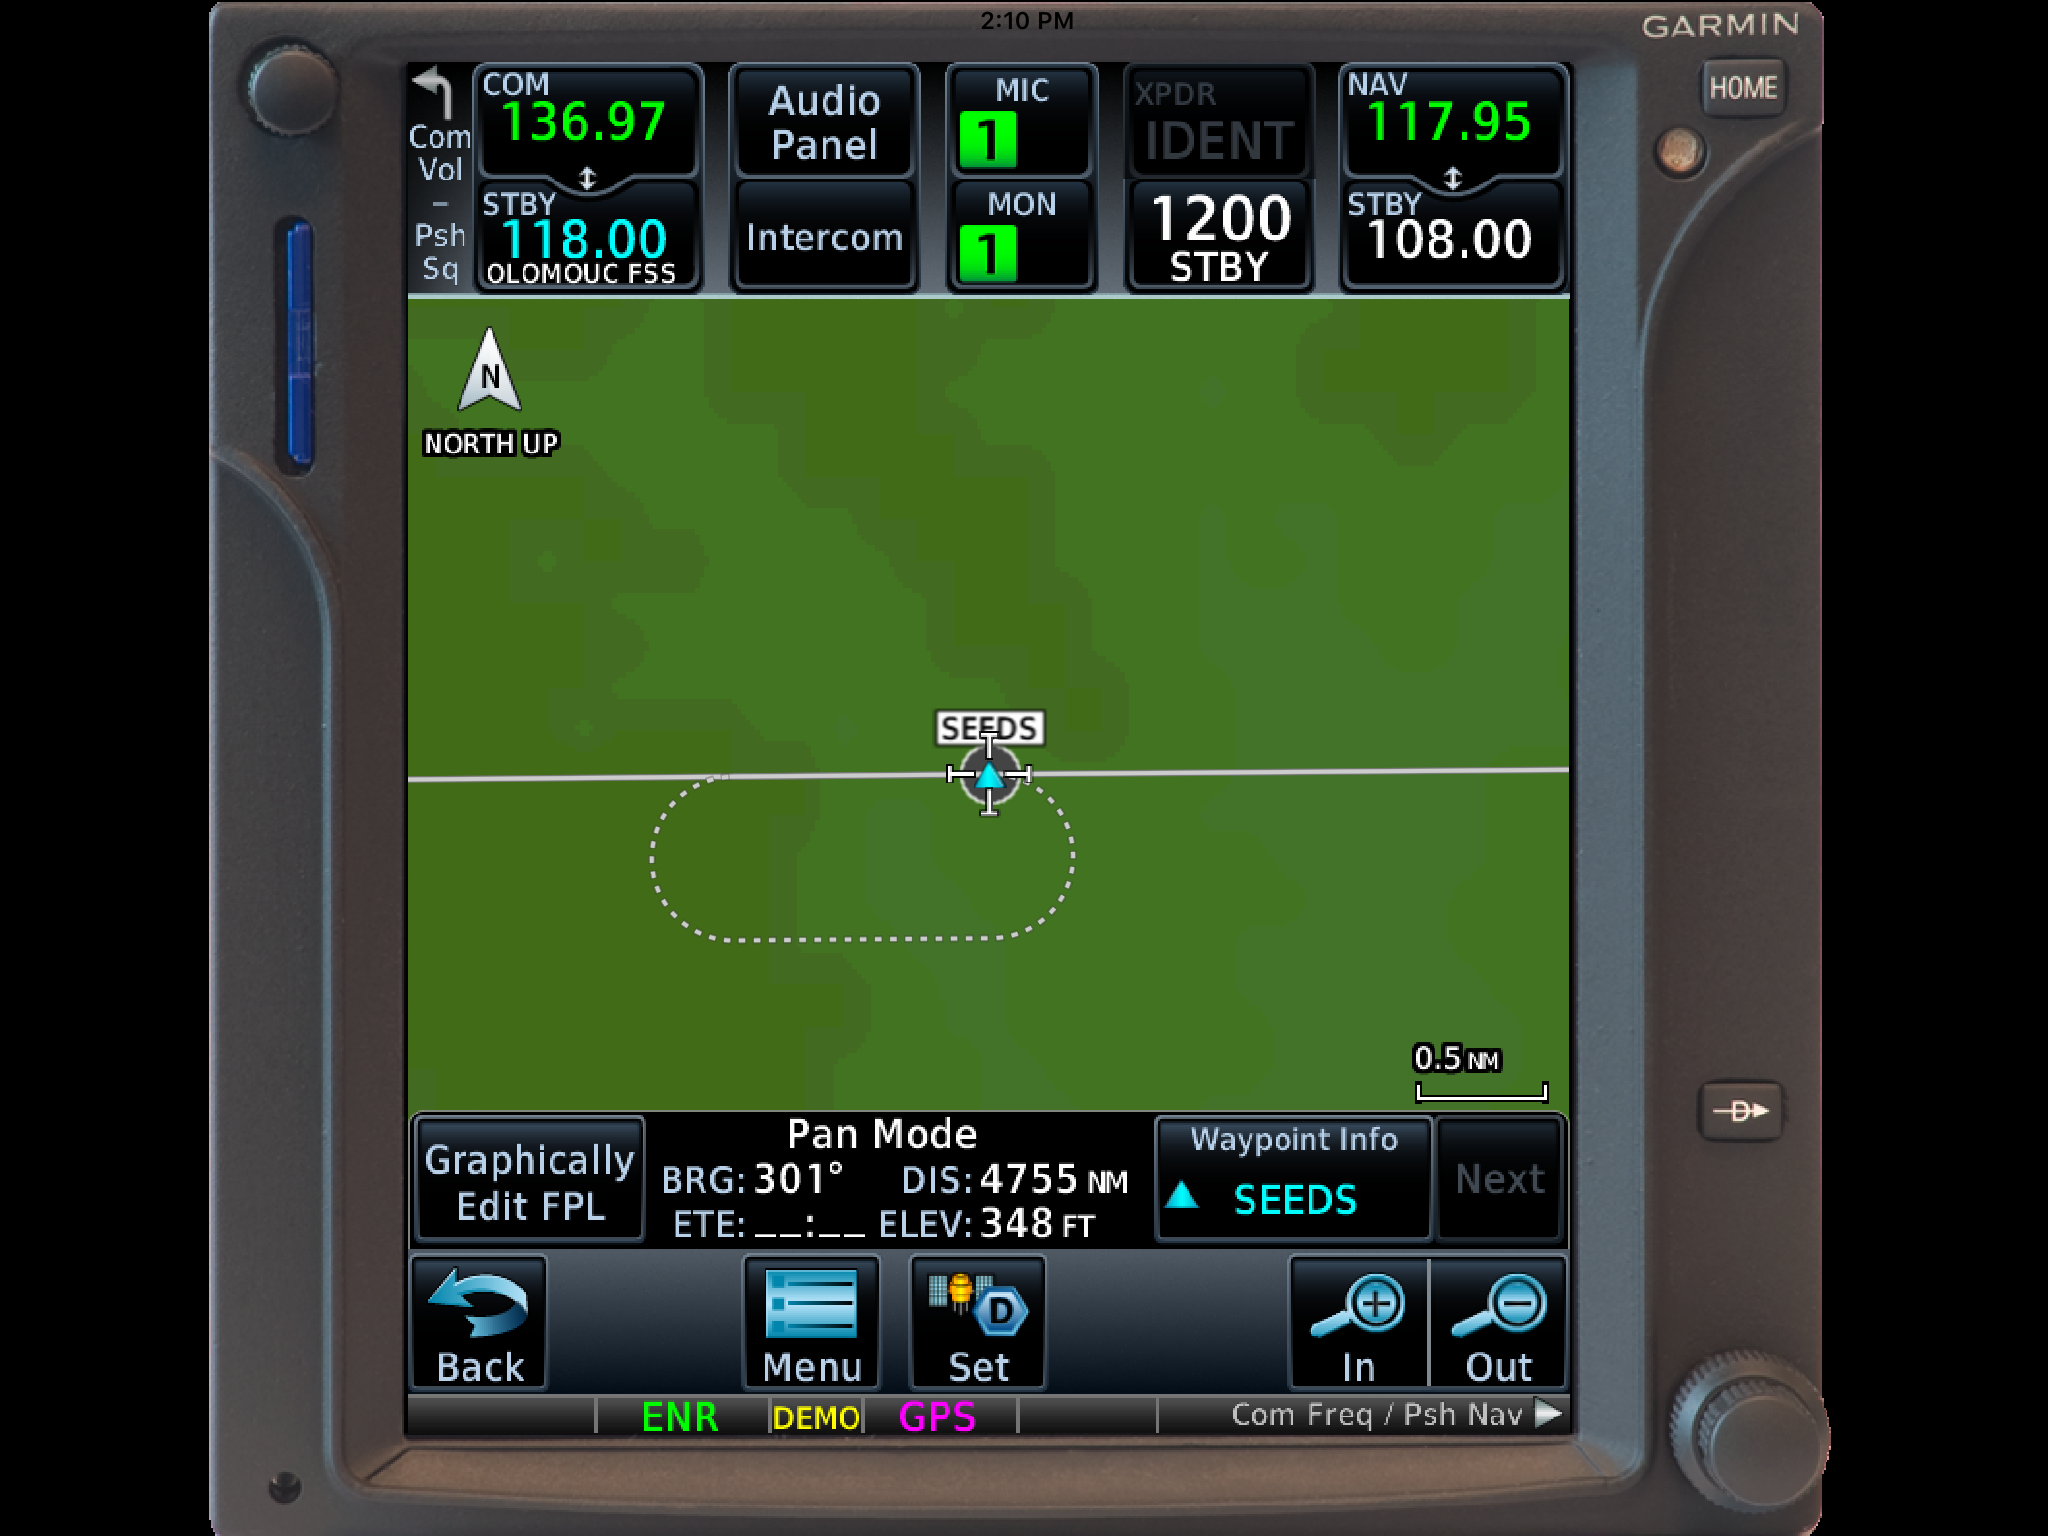
The Garmin GTN 750 is an awesome piece of equipment. Garmin tried to make the user interface with the touch screen as simple as possible (though there still is a bit of a learning curve when moving up from a Garmin 530W). Garmin also integrated several key features that the 530W did not have that makes flying with a Garmin GTN 750 in IFR all that much better.
The two features of the Garmin GTN 750 I want to focus on today are the “Load Airway” feature and the “Hold at Waypoint” feature. If a pilot isn’t looking for these specifically, they can actually be a bit hard to find. The “Load Airway” feature is especially handy when flying IFR long distances with several airways as part of the clearance. Here’s how to utilize both.
Load Airway
On your flight plan page, insert the waypoint that you will be joining the airway, or, if your clearance was radar vectors to join an airway, then insert the waypoint on the airway that begins the leg you will be joining on.
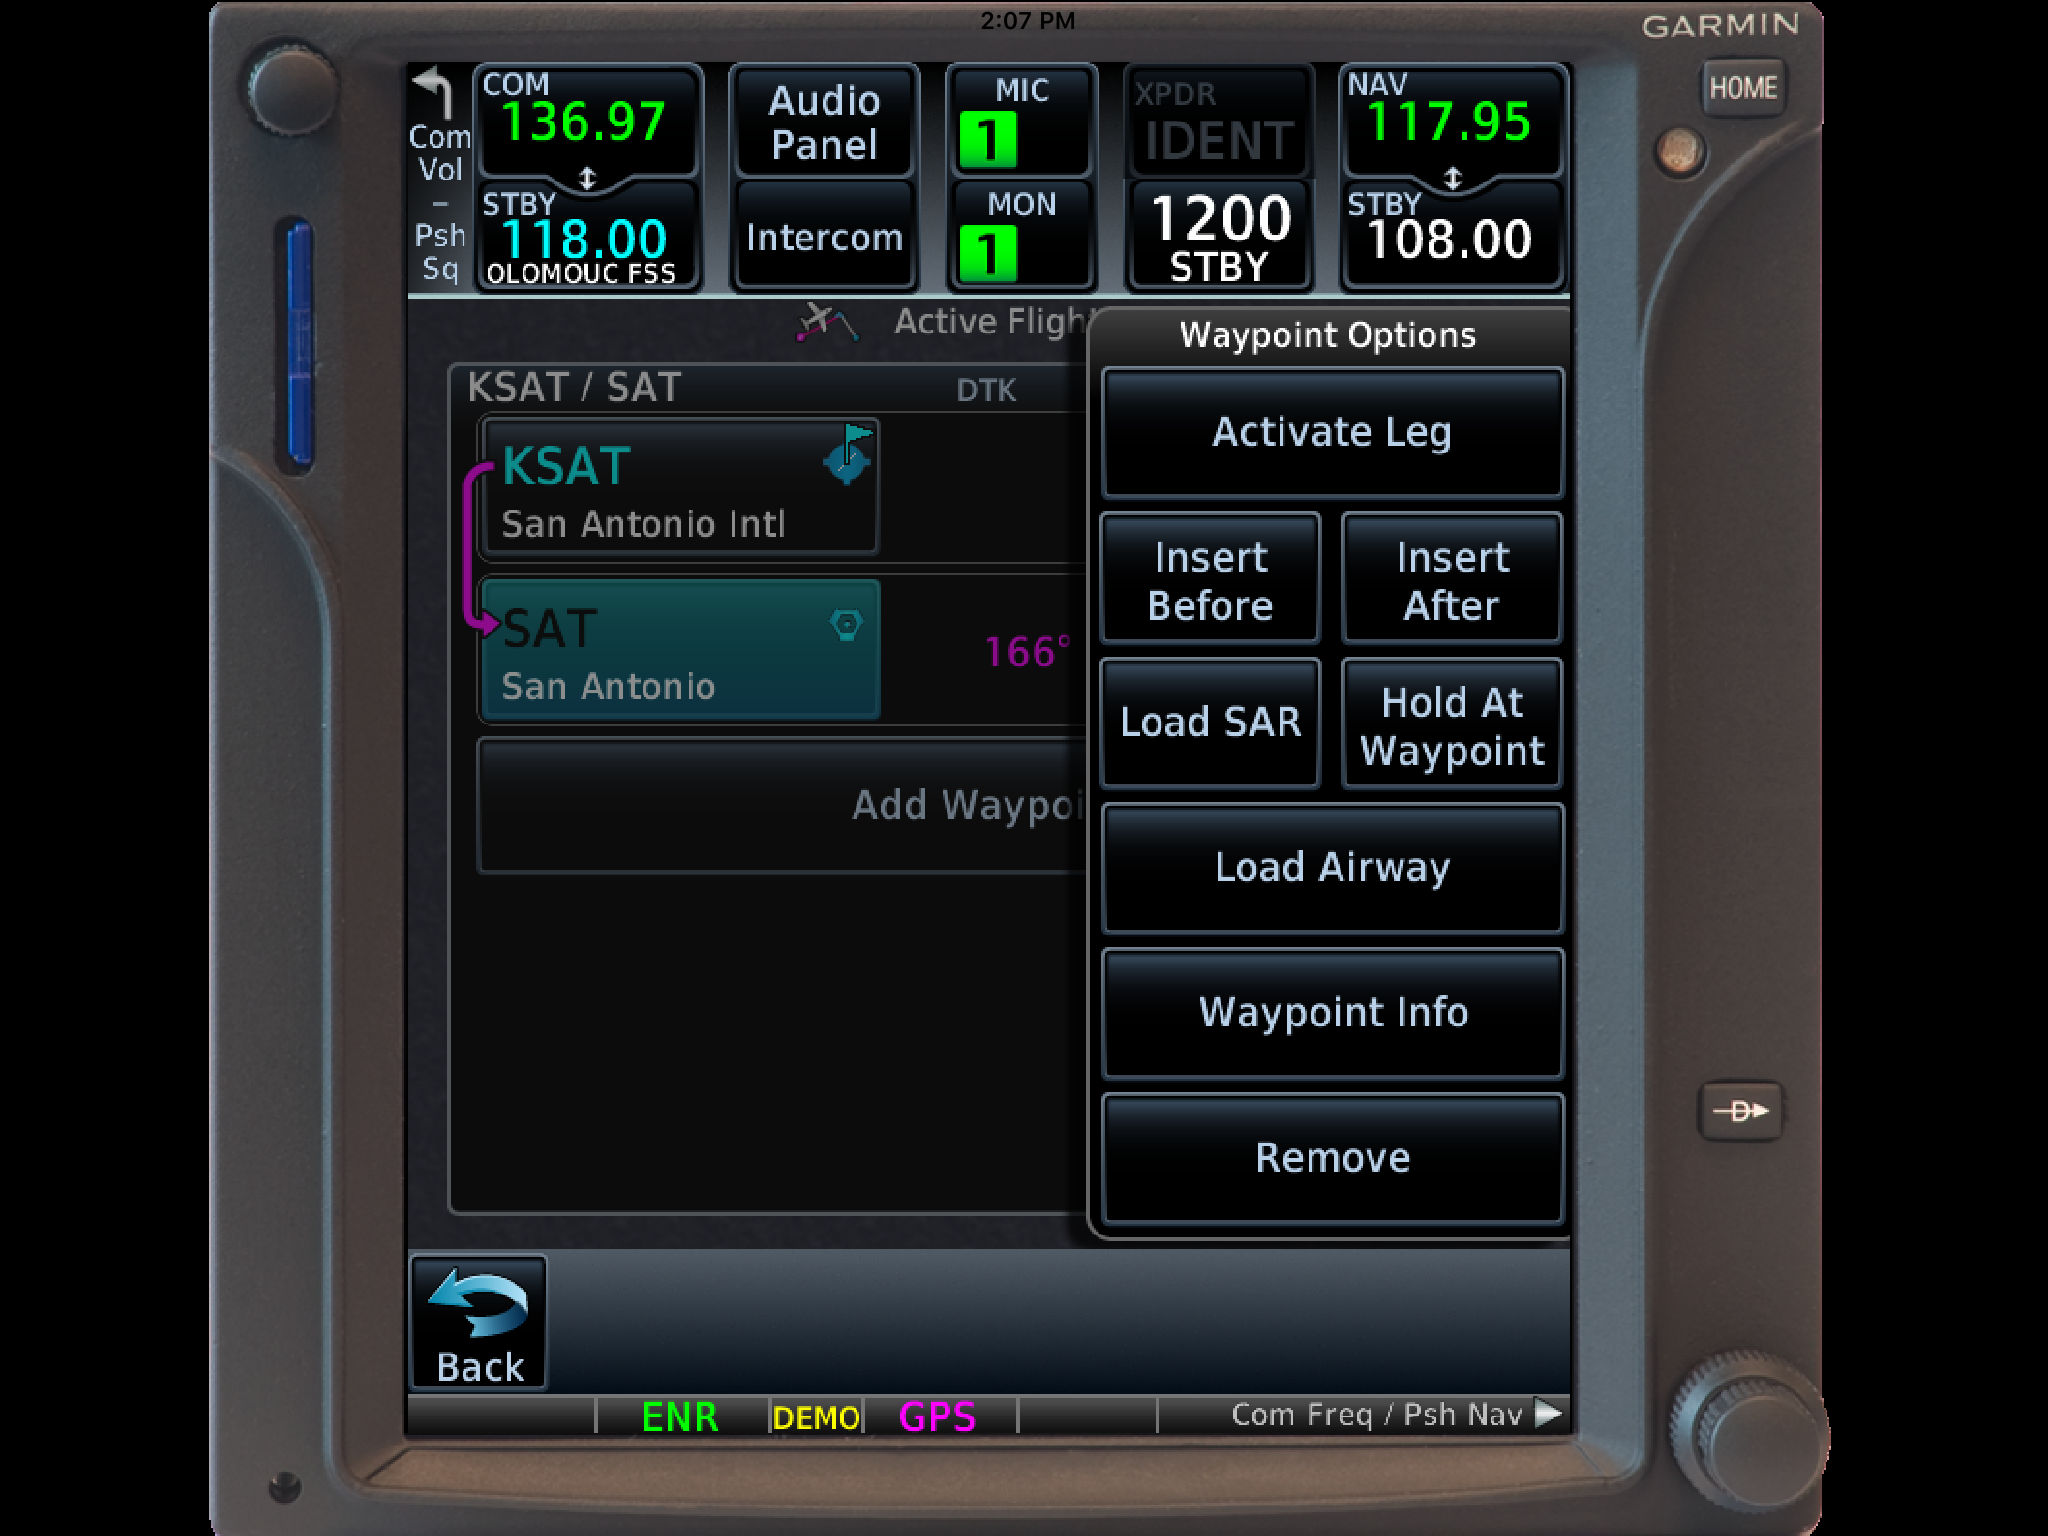
Tap the waypoint you just inserted.
A menu will pop up. Tap Load Airway.
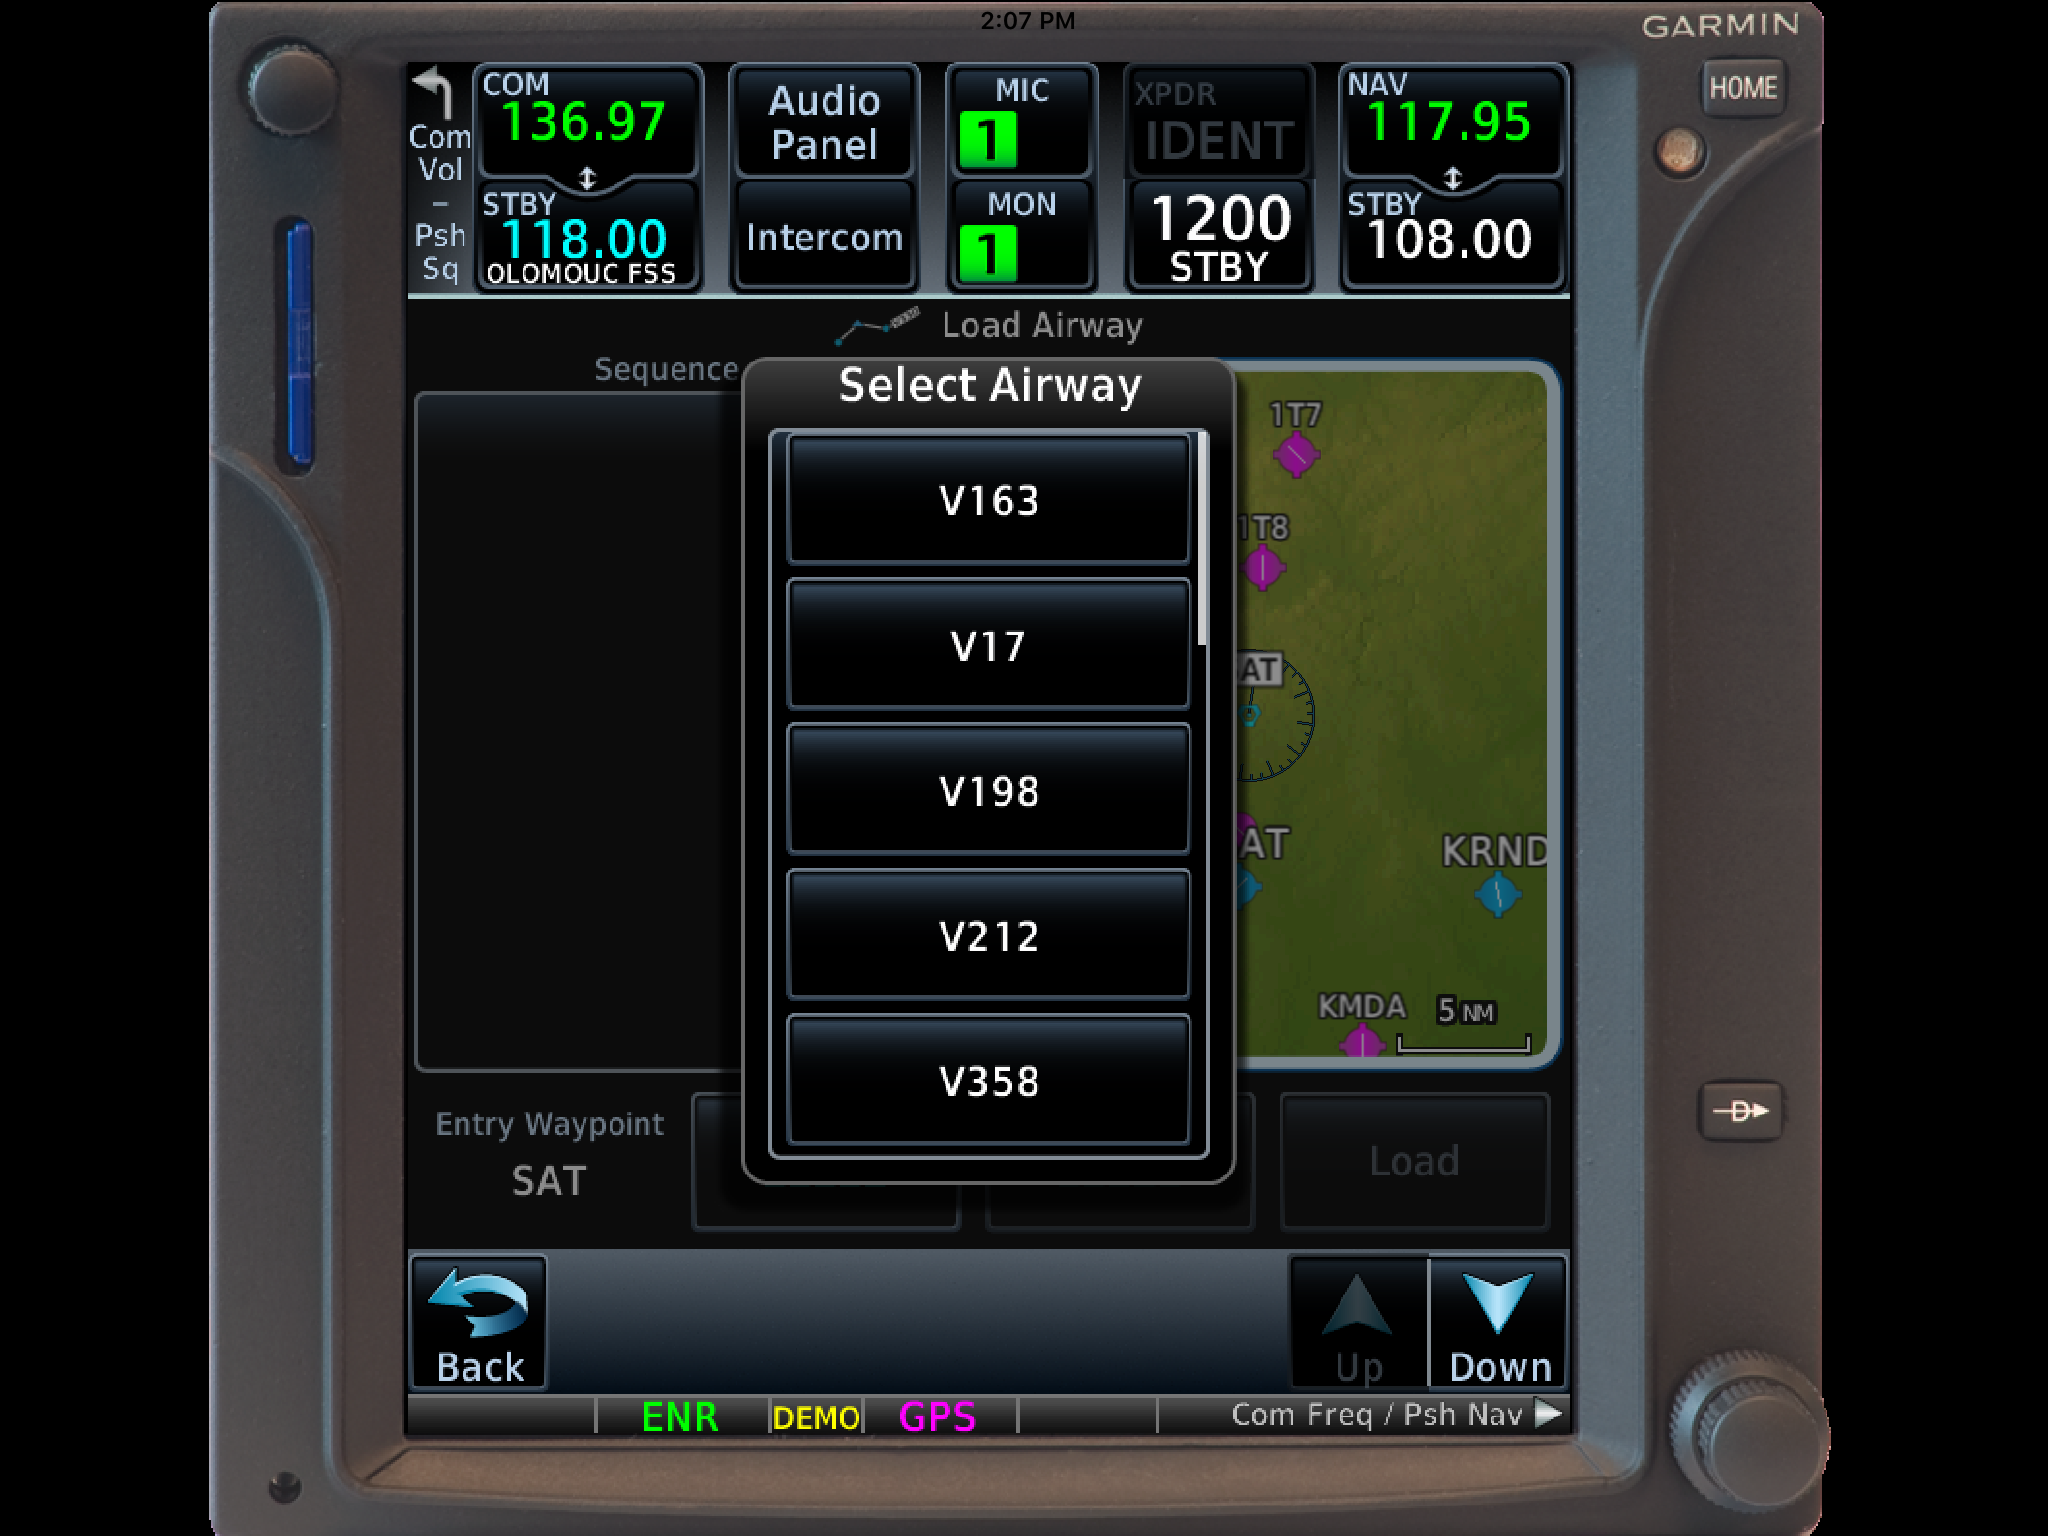
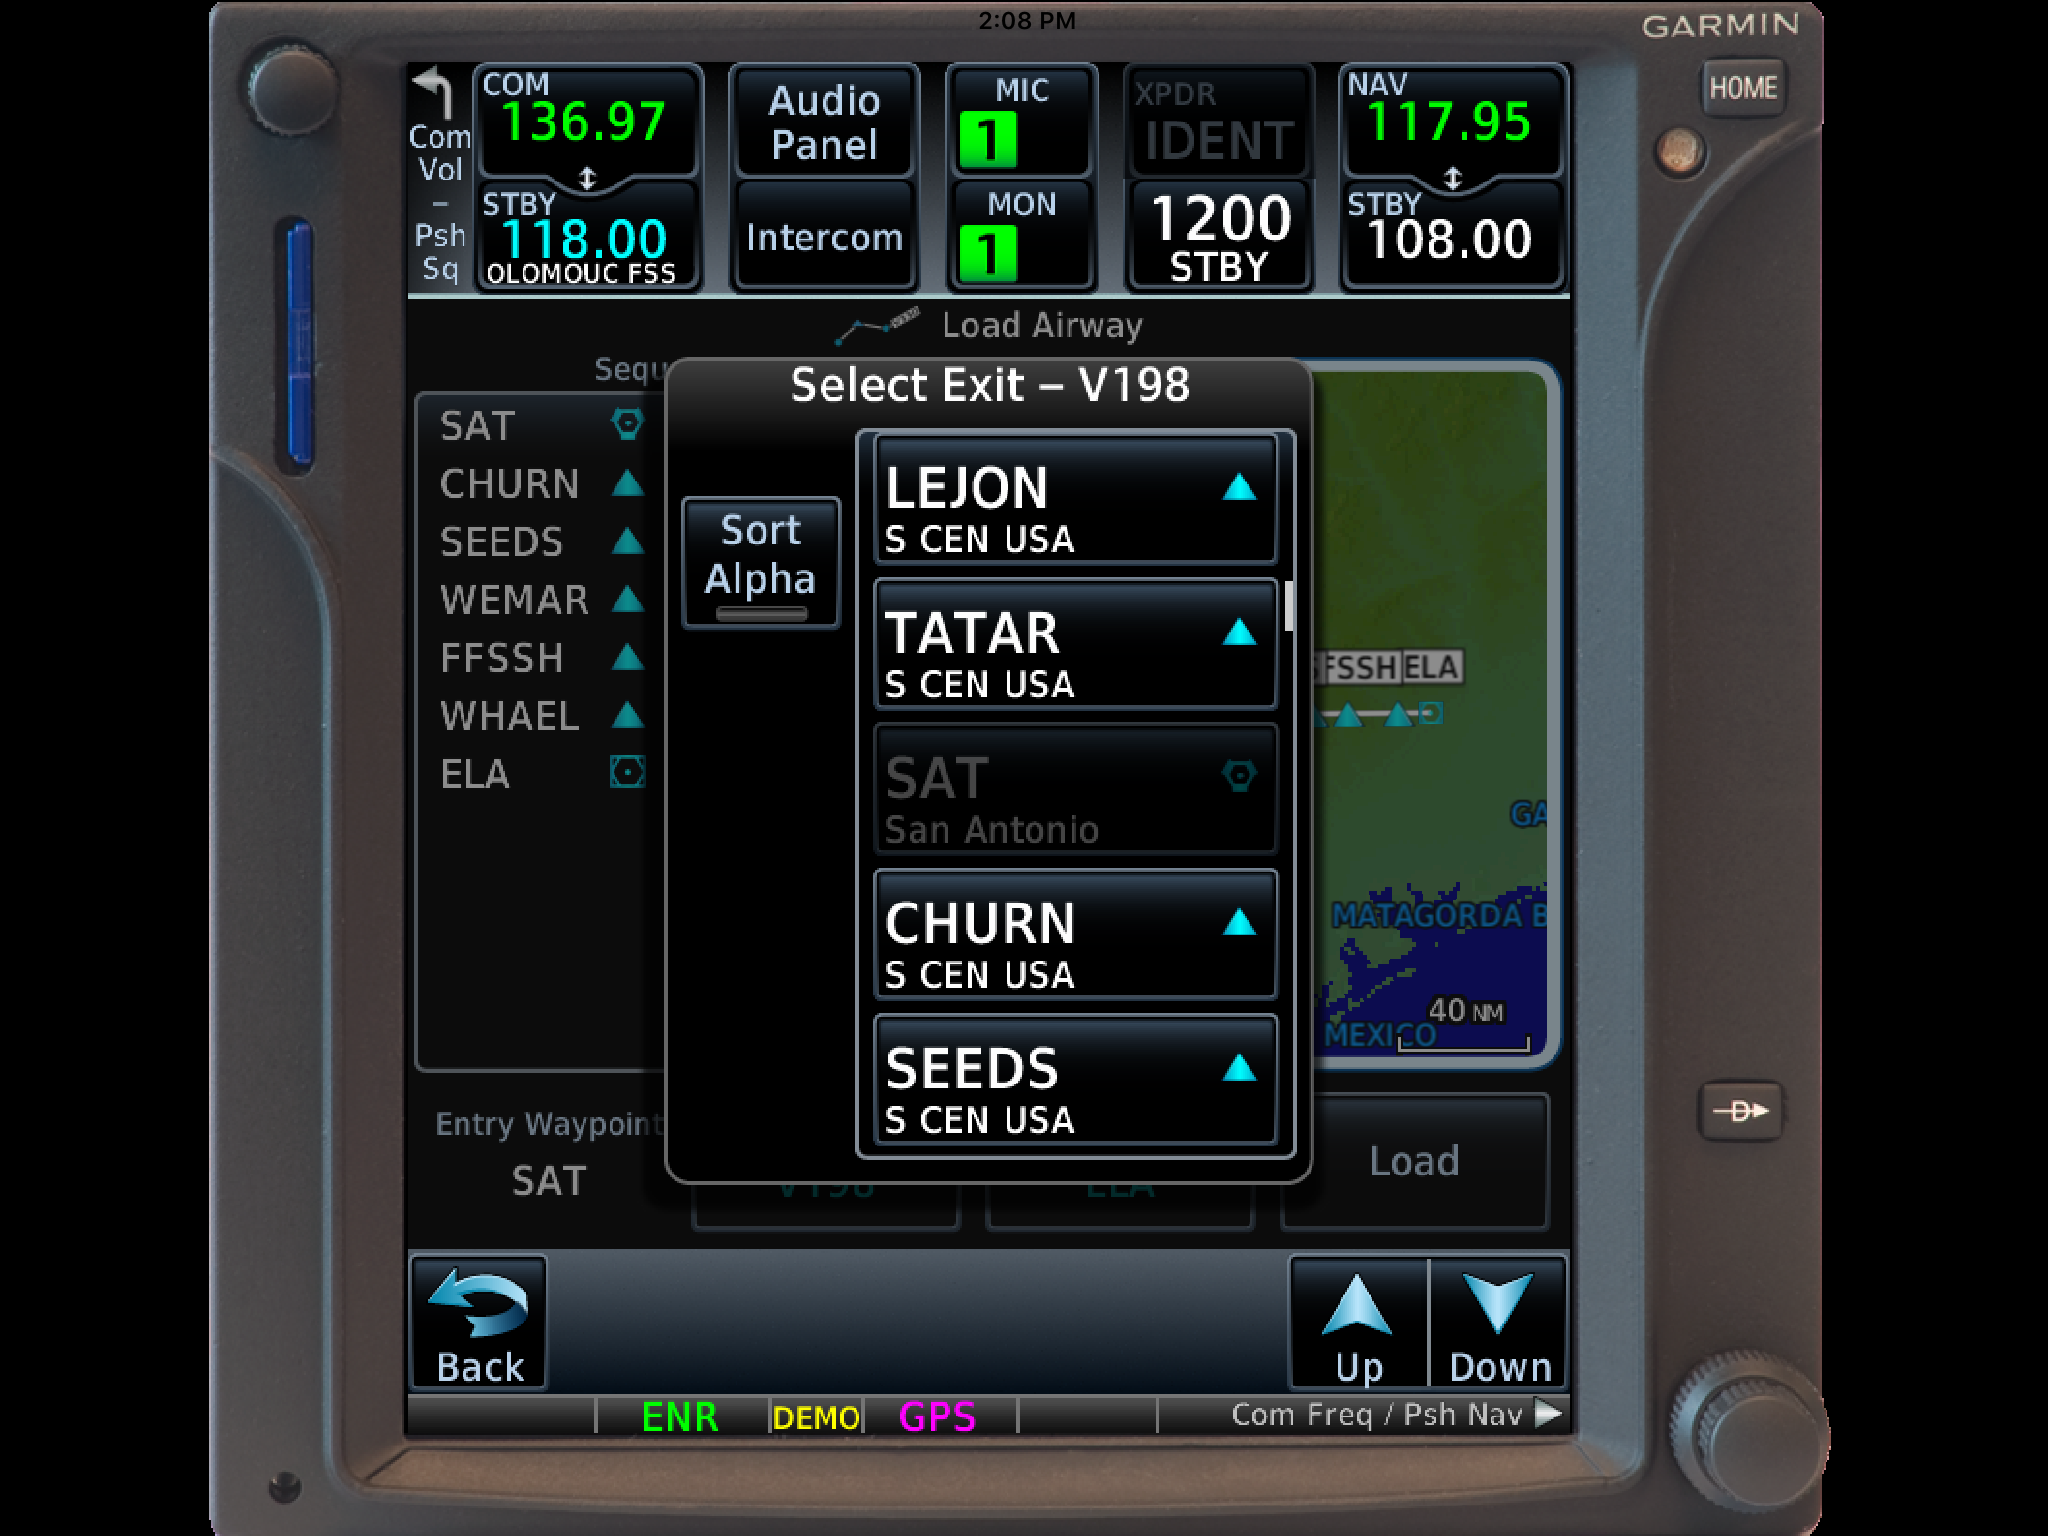
Select the Airway you want from the next menu that pops up.
Then, a list of waypoints will display to exit the airway. Select the waypoint where you will be exiting the airway.
Note: Garmin defaults to listing these waypoints alphabetically. If you unselect the “Sort Alpha” option, it will sort the waypoints by direction and distance from the entry waypoint. This is a little more practical, easier to work with, and how I recommend doing it. This way you can either scroll up or down depending on the direction of travel on the airway and find your exit waypoint.
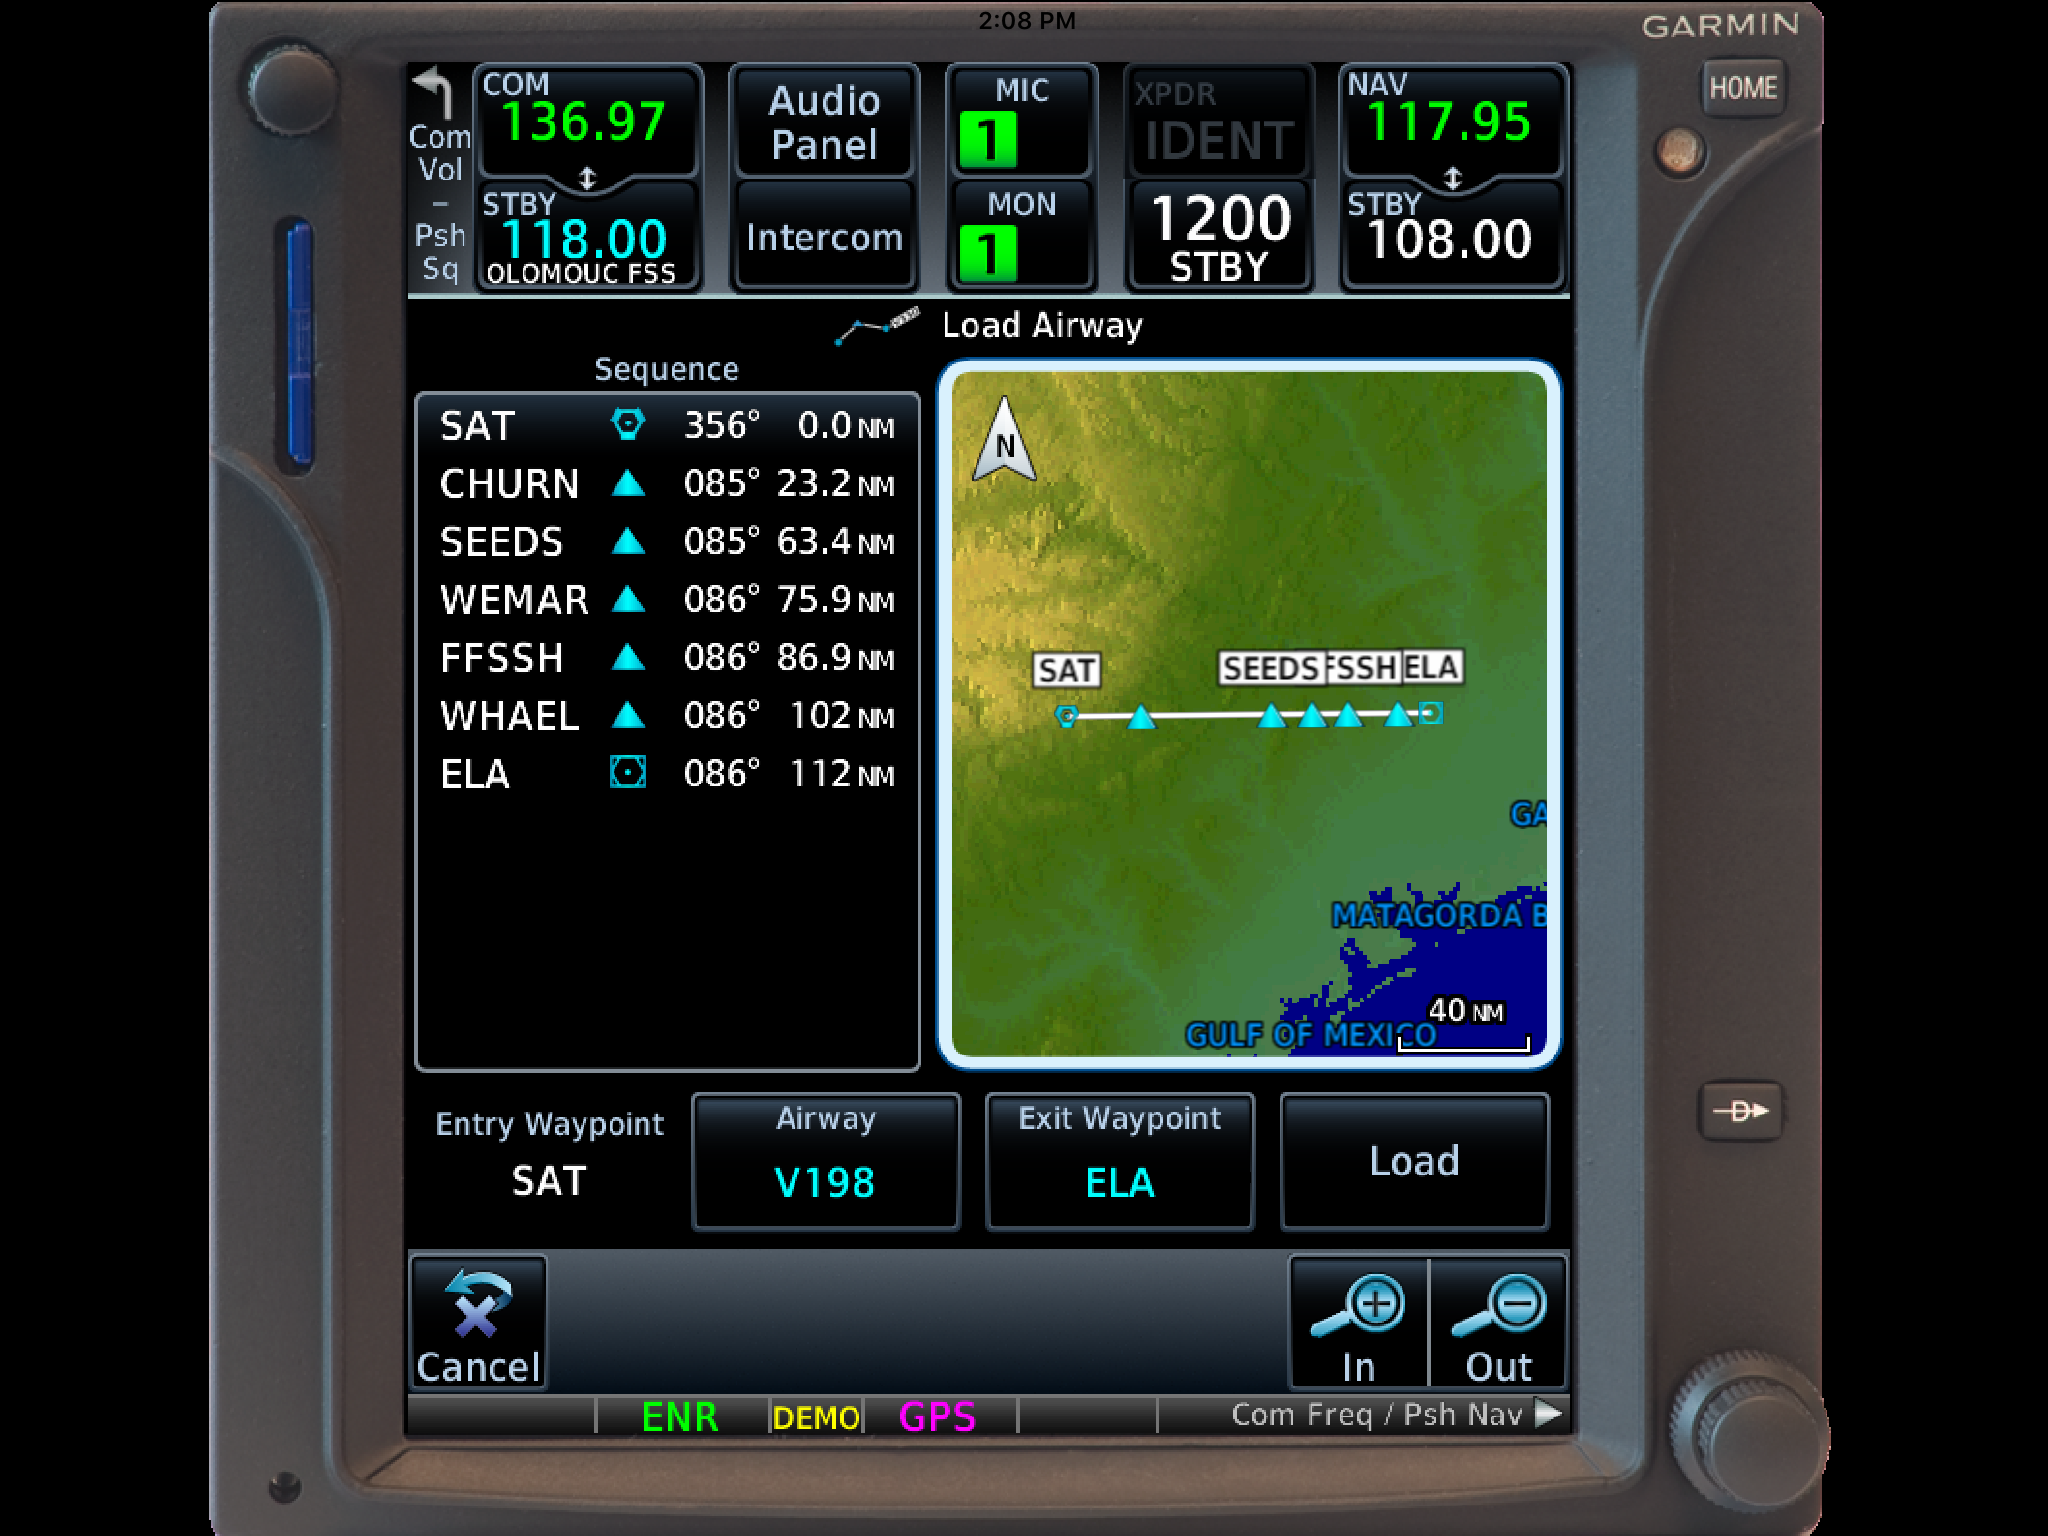
Tap Load.
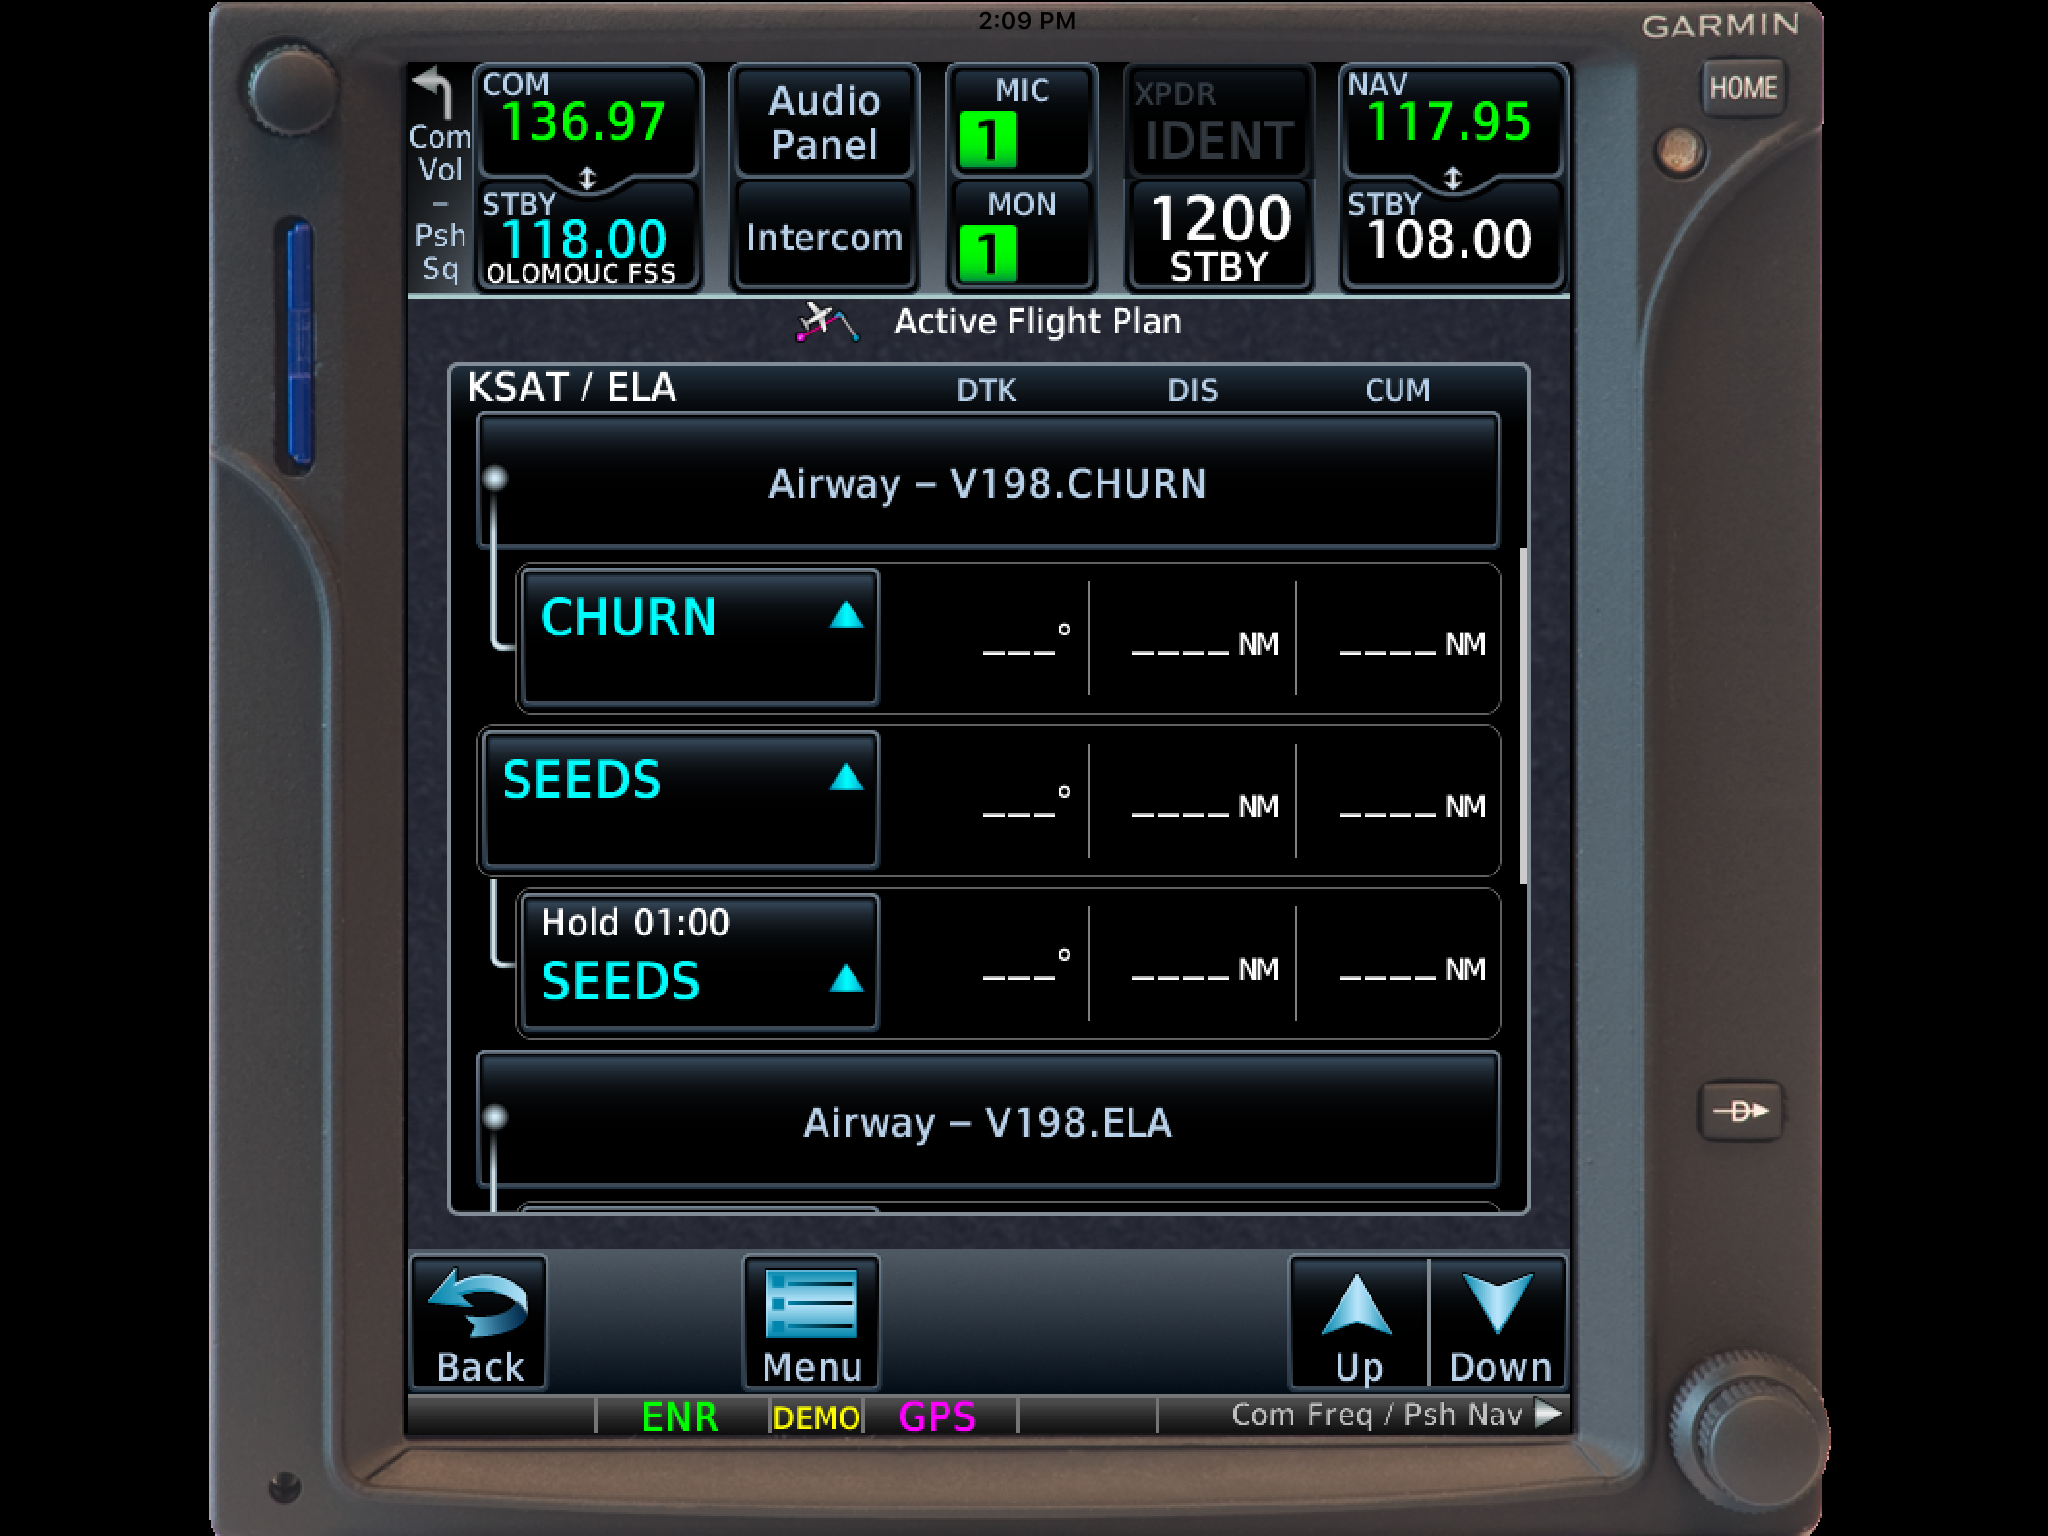
The Airway and all the waypoints in between your entry and exit waypoints appear in your flight plan.
If you are getting vectors to join the airway, you’ll need to use the Activate Leg function to activate the leg you will be joining the airway on.
On the Flight Plan page, tap the waypoint that ends the leg you want to activate.
On the menu that pops up, tap Activate Leg.
Hold At Waypoint
The Garmin GTN 750 allows pilots to place a holding pattern at any waypoint that is in the Nav Database (or any user created waypoint). Here’s how to do it.
On the Flight Plan page, tap the Waypoint that you want to hold at.
On the menu that pops up, tap Hold At Waypoint
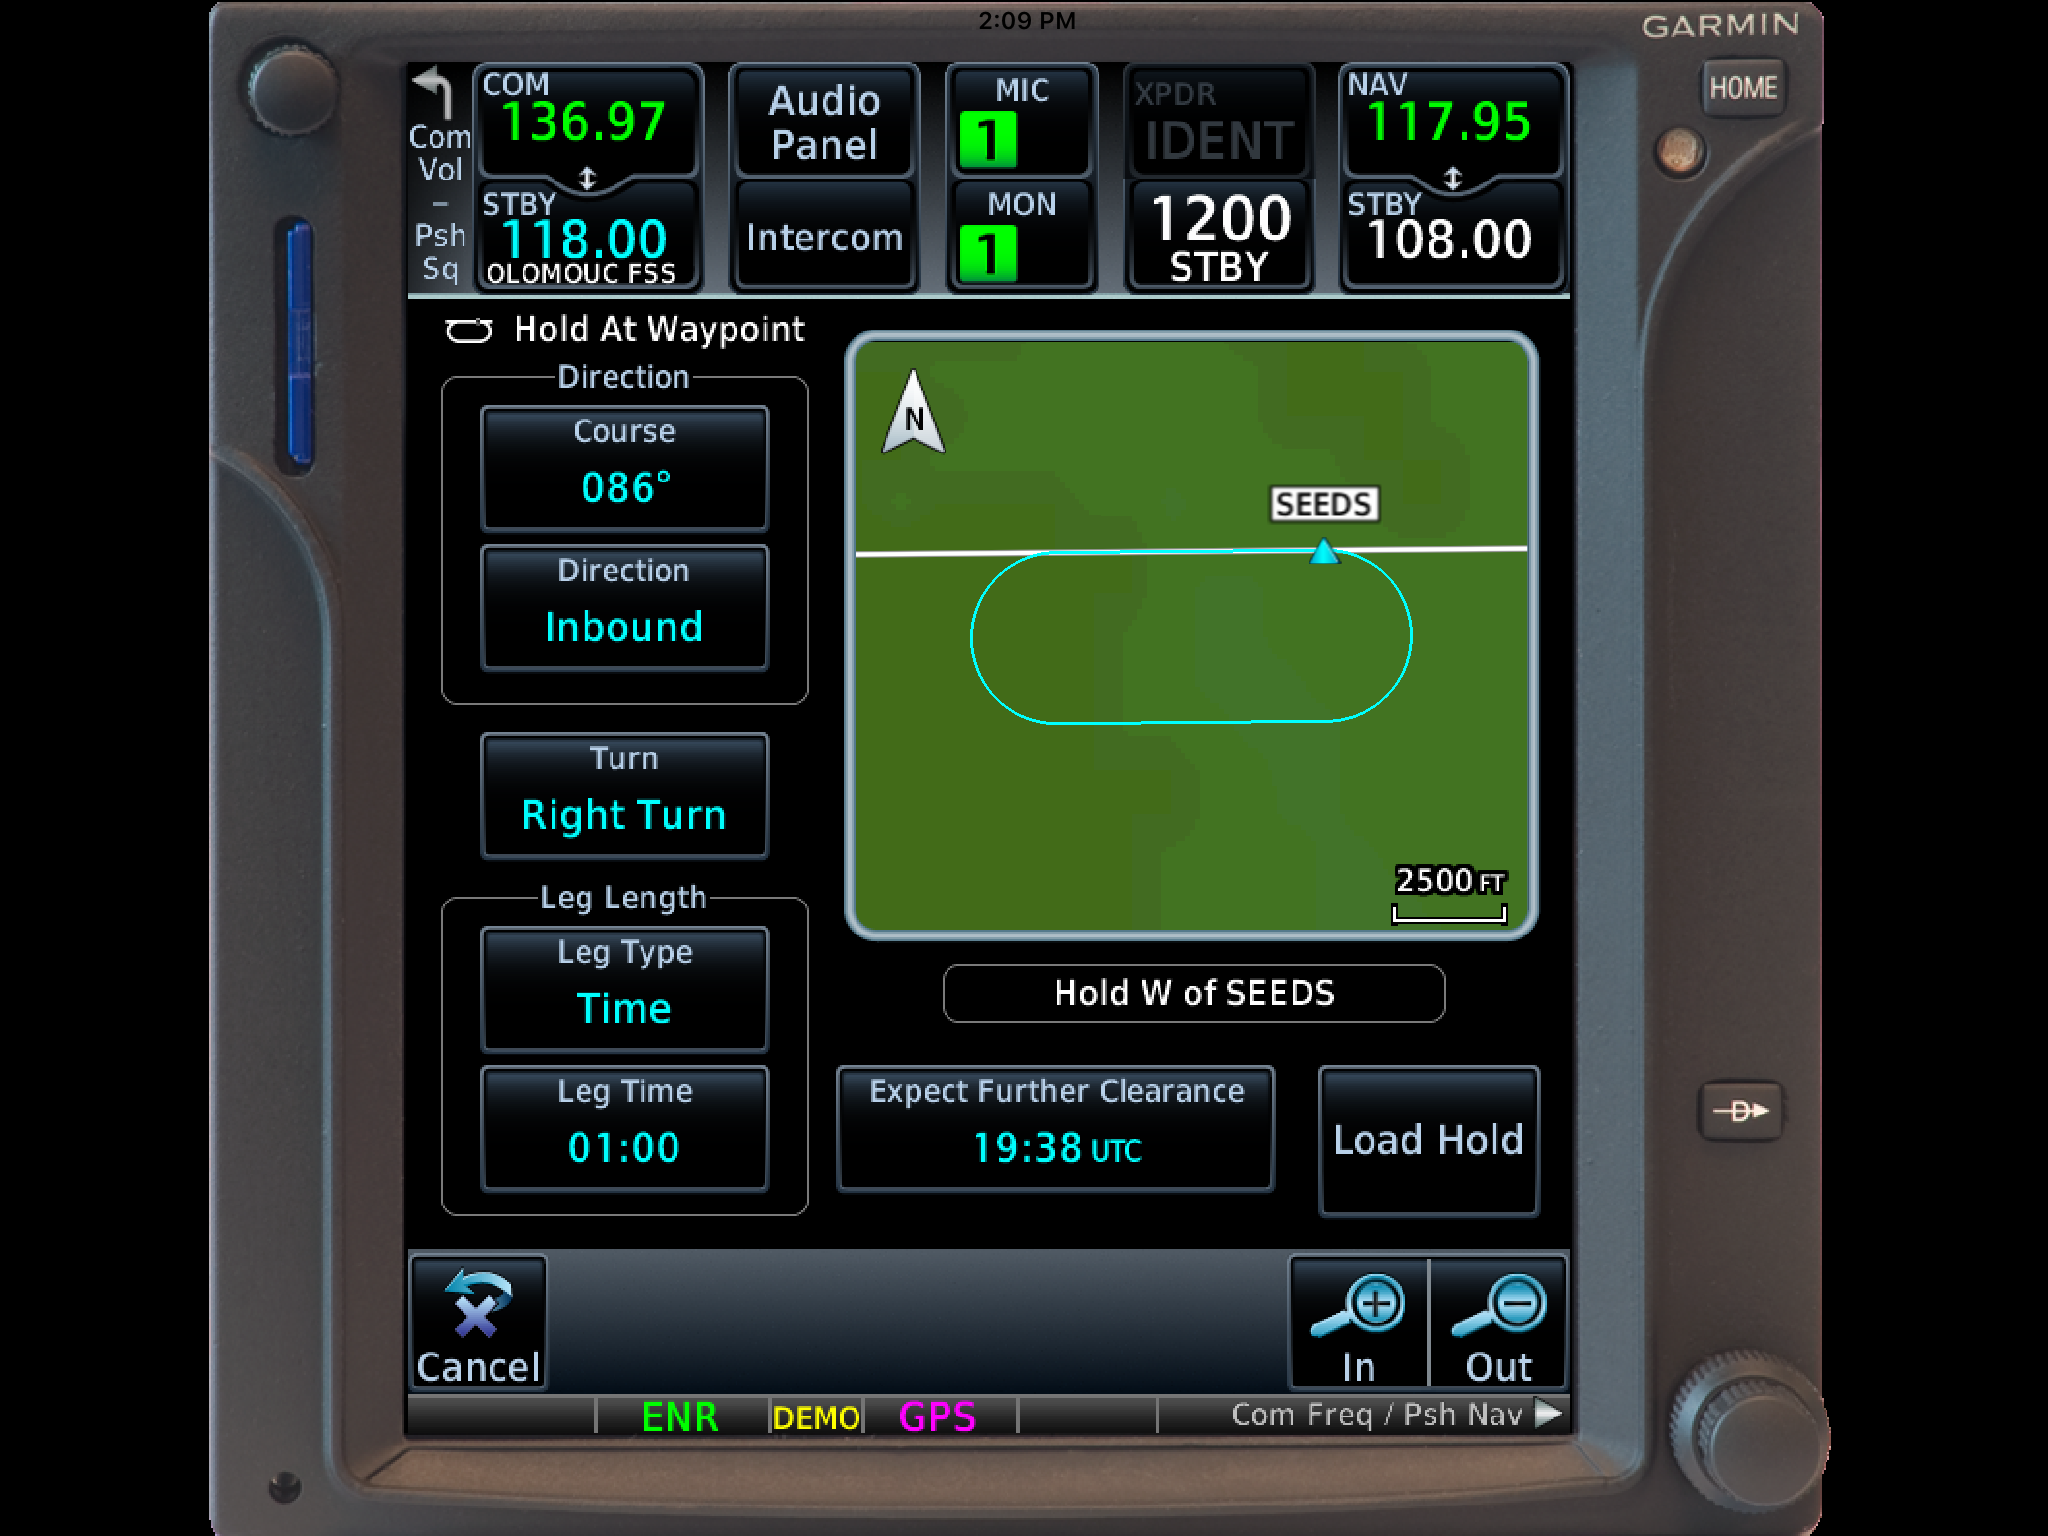
On the next menu that pops up, input either the inbound or outbound course, right or left turns, leg time or distance, and the EFC time, then tap Load.
You will see the hold now as a Waypoint in your flight plan.
Once the hold is entered, the GPS will go into Suspend mode, suspending the Flight Plan Waypoint Sequencing. Once you are ready to depart the hold, you will have to tap Unsuspend before crossing the holding point on the inbound leg, then the GPS will resume normal waypoint sequencing.
These are 2 of the really cool, gee-wiz features of the Garmin GTN 750. Following the above steps will make IFR flying much easier for the pilot, as well as much more enjoyable!
The Garmin GTN 750 is an awesome piece of equipment. Garmin tried to make the user interface with the touch screen as simple as possible (though there still is a bit of a learning curve when moving up from a Garmin 530W). Garmin also integrated several key features that the 530W did not have that…
On the evening of November 3rd, 2015, I was returning to my home airport of Lancaster from Pittsburgh in my company’s Aerostar, after being out on charter all day. It was dark out as I entered the traffic pattern at Lancaster. After an uneventful approach, I was cleared to land behind a Mooney. The spacing looked good as I turned final, but, as I was nearing the threshold, I started to become concerned that the Mooney wouldn’t be clear of the runway in time for me to land. At that moment, over the radio I heard an uncomfortable transmission from the Mooney pilot: “Tower, Mooney ABC has landed gear up.”
It took the tower controller a minute to grasp what was going on, and I was on about a 1-2 mile final when I was instructed to go around. Thankfully, the Mooney came to a stop in such a position that I was able to use the other intersecting runway, and was on the ground only a few minutes later. I can assure you, however, that I’ve never checked my “3 green” so many times in one traffic pattern as after that incident. Thankfully, no one was hurt, but there sure was an impressive amount of emergency equipment on the runway as I taxied back to my hangar.
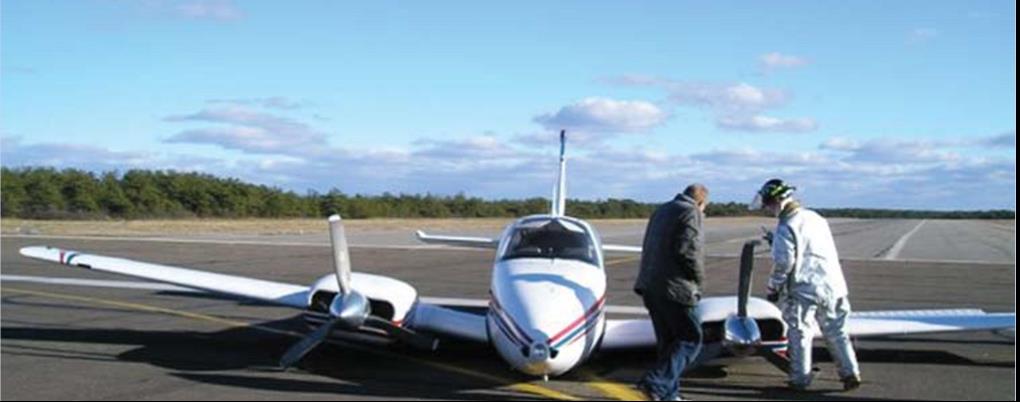
In aviation, there’s a saying that goes: “There are two types of pilots. Those who have landed with their gear up, and those that will.” I don’t like that saying. The potential of a gear up landing (as a result of pilot error) is something that has always been a risk that I have worked hard to avoid. Not only is a gear up landing embarrassing; but it’s also an extremely expensive black mark on any pilot’s career.
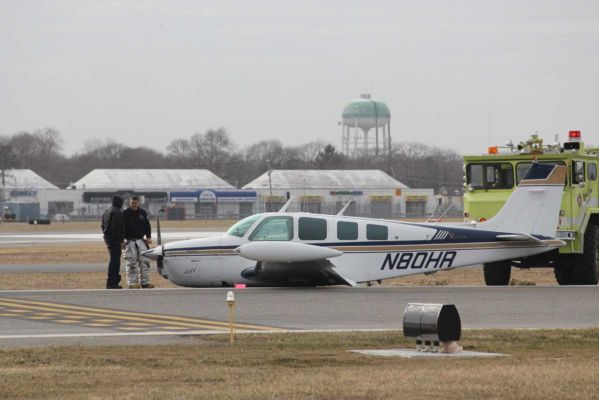
Not a good day. (Photo credit: http://www.newsday.com/long-island/suffolk/plane-lands-at-republic-with-no-wheels-1.2735131)
According to a July 2006, article in Aviation Consumer, the estimated cost of repairs following a gear up landing for an A-36 Bonanza would be about $27,000 and about 3 weeks of down time. 25 years ago, even my beloved E33 Bonanza was the victim of a gear up landing. While it was neither me nor my dad flying our airplane that day, the event stays in its history and reduces its value should the time ever come to sell it.
That incident in 1990 resulted in approximately $25,000-30,000 in repairs. The cause of the incident was classic: the pilot put the gear down at the normal time, but then had his downwind extended by tower. He brought the gear back up to fly the longer downwind, but forgot to put it back down later when he was cleared to land. Like many pilots, he had a set routine time when he normally put the gear down, and when his routine was changed, he didn’t remember to lower the gear once more.
Unfortunately, no matter what experience level one may be at, no pilot is immune to the possibility of such a mistake. The following are 5 tips that I have learned in my time flying that have helped myself and others minimize the chance of a gear-up landing occurring:
Know your aircraft systems: What are the operating perimeters on your airplane’s gear warning system? Most airplanes have a designated speed or power setting at which the gear warning horn will sound in the event that the gear isn’t down and locked. In the Aerostar that I was flying, the gear horn was supposed to come on at 15” of manifold pressure with the gear up, but in practice, it didn’t come on until much lower than that. It has since been adjusted, but at the time it was important for me to know that if I had left the gear up, the horn wouldn’t have sounded in a timely enough manner for me to go around, much less lower it prior to touchdown. Most likely it would have just added to the noise of metal on concrete as I pulled the power all the way back in the landing flare.
Don’t override gear-up warning systems: They were put there for a reason! Even if you’re out doing maneuvers and the horn is blasting in your ear for half an hour, resist the temptation to simply pull the circuit breaker or push the warning silencer to make it shut up. If a pilot disables the gear-up warning horn and then later forgets to put the gear down on landing, he or she will have a much worse headache on their hands than the one that the horn would have given them.
Use your checklists and memory items: It doesn’t matter how much a pilot knows about his or her airplane, or the procedures for it. Distractions happen. Mistakes Happen. Always consult the checklist for confirmation that you’ve accomplished all the essential tasks before landing. Additionally, if you haven’t already, work on developing call outs which you perform out loud regardless of whether you are alone in the airplane or not. Whenever I’m landing an airplane, I start with my flows, go through my GUMPS (Gas-Under carriage- mixture- props- seat belt) checks, then do the printed checklist, and finally when on short final I call out “short final, cleared to land, three green.” I’ve had several passengers tease me about doing the “three green” call out while I was flying aircraft that didn’t have retractable landing gear. But, I’d much rather be in the habit of checking every time regardless of what I’m flying than forgetting to check when it is necessary.
Use your available resources and develop healthy habits: If I have someone riding with me, I generally ask them to confirm that there are 3 green lights glowing on the instrument panel. Even if that person isn’t a pilot, they will probably enjoy the opportunity to be involved, and it’s a good way for me to stay in the habit of checking the gear lights to ensure that everything is properly down and locked. I’ve also found that intentionally leaving your hand on the gear lever until you have gear safe lights is a good idea. Forcing yourself to keep your hand on the handle until you have the all important lights obligates you to actually observe the indications instead of simply throwing the lever and moving onto something else. This way, if you only get an indication of 2 greens you’ll be aware of it right away and have more time to respond appropriately. It also helps you to learn the normal length of time it takes for the gear to extend or retract, which will be helpful to you to be aware of any abnormalities in the gear system.
Upgrade your aircraft’s gear-up warnings: There’s a variety of ways you can improve your aircraft’s ability to warn you of a potential gear-up landing. For student pilots or pilots new to complex aircraft, it could be something as simple as a red post-it note on the panel to remind you to verify the gear position prior to landing. Or, if you own an aircraft that doesn’t have an effective way to warn the pilot of a gear-up landing, consider investing in an aftermarket gear-up warning system – surely the extra price of such an upgrade is a small amount next to the cost of repairing the damage from a gear-up landing!
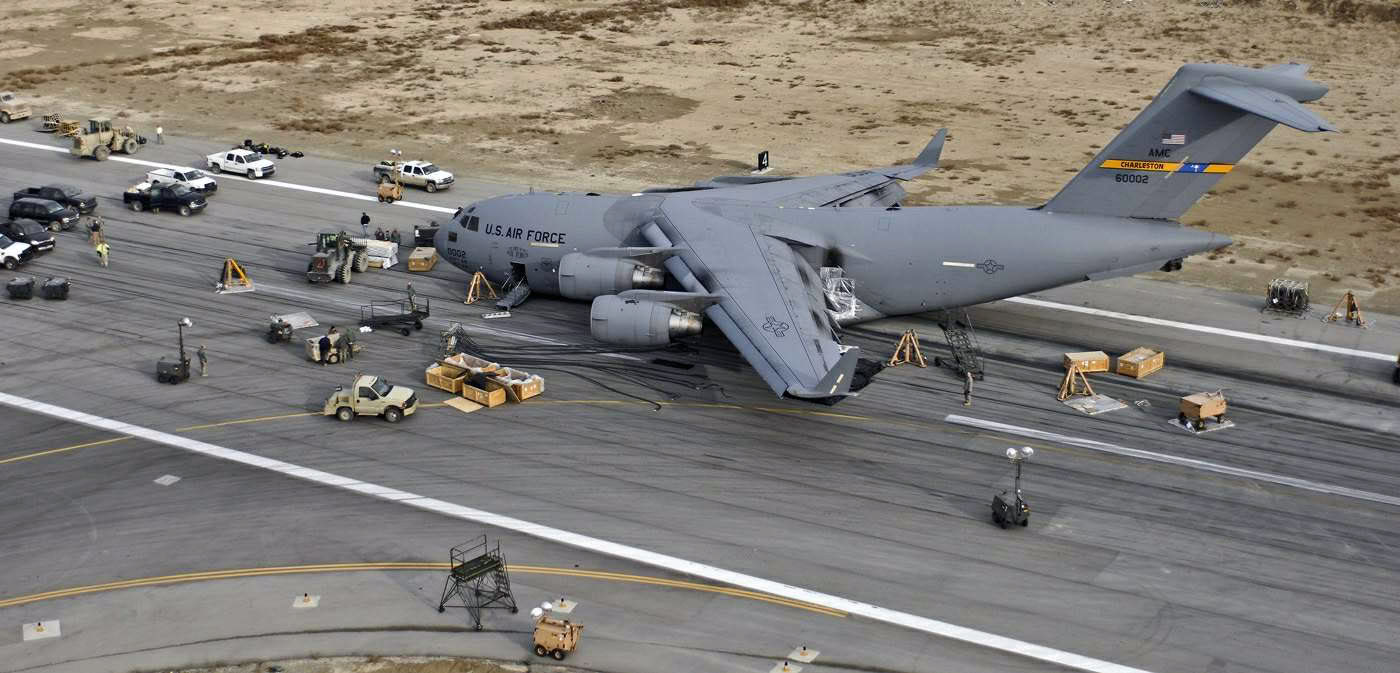
It can happen to anyone! The gear handle in this C-17 was in the “UP” position. (Photo Credit:https://theaviationist.com/2009/02/09/c-17-gear-up-landing-in-bagram-images/)
Always remember, regardless of experience, no pilot is immune to the possibility of a gear up landing. The best way to safeguard yourself is to discipline yourself in the use of flows, checklists, and call outs. Things like gear warning horns, visual reminders, and other systems are a useful back up, but they shouldn’t be relied upon to save your bacon if you don’t get the gear down at the proper time. Fortunately, in most gear up landings, the pilot and passengers are able to walk away uninjured – but that doesn’t lessen the embarrassment or financial burden of the event. So, keep your chin up, your gear down, and remember….THREE GREEN
On the evening of November 3rd, 2015, I was returning to my home airport of Lancaster from Pittsburgh in my company’s Aerostar, after being out on charter all day. It was dark out as I entered the traffic pattern at Lancaster. After an uneventful approach, I was cleared to land behind a Mooney. The spacing…
What’s the most cost effective glass panel retrofit? There are several options out there (and it seems like more coming each Sun ‘N’ Fun or Osh Kosh event), but the consensus is the Aspen EFD 1000 or 1500, right? At $12,000 installed, it’s about $8,000-$10,000 cheaper than the Garmin G500 (though you can make the argument that when you add a second screen and SVT to the Aspen, the price is about the same).
I am here to blow your mind. What if you could get a glass panel retrofit that is a complete AHRS system with airspeed and altitude, plus a slaved HSI that auto slews to your GPS and a 4 hour backup battery so you can throw your steam attitude indicator away, for only $4,600, plus installation?
I am not crazy.
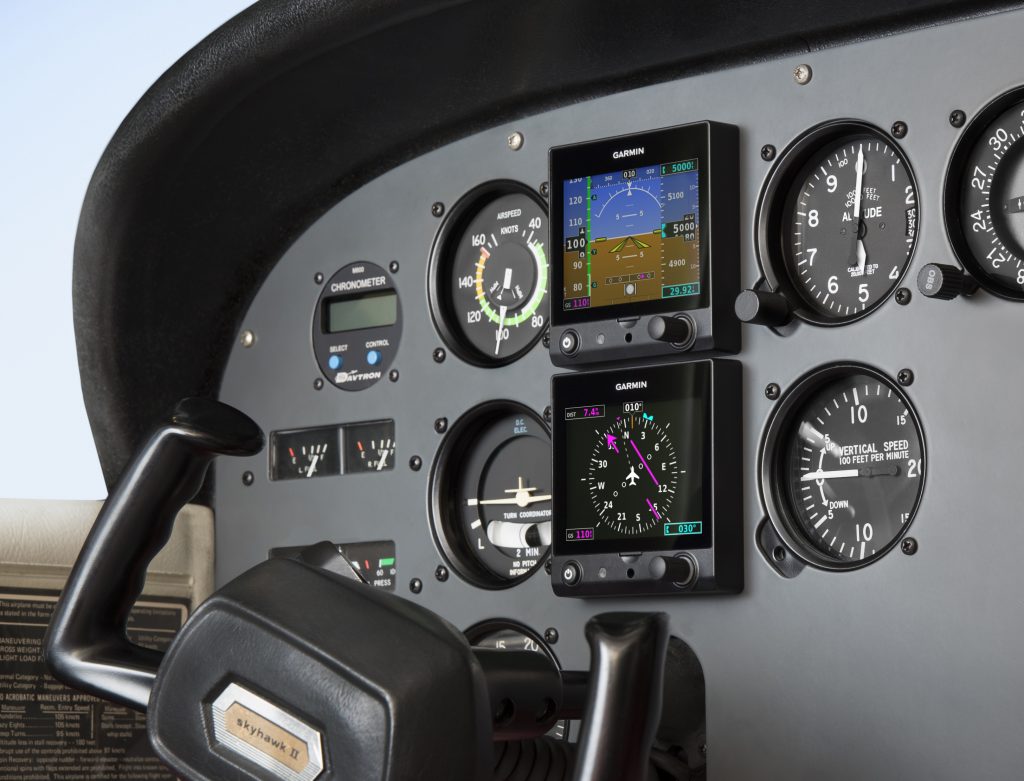
The Garmin G5 debuted last year when the FAA relaxed it’s regulations to allow more experimental avionics into certified airplanes. The single G5 was a big hit. The 3.5 inch screen fit nicely into the hole that the traditional attitude indicator left, giving pilots a glass attitude, airspeed and altimeter options for less than $2,500.
In March, Garmin brought out the HSI version of the G5. Equipped with a low cost magnetometer, the DG/HSI version is a complete replacement for the traditional DG/HSI. The unit also displays ground speed and distance (received from the GPS information), while auto-slewing to the GPS flight plan, so the CDI needle will move on it’s own, eliminating the annoying need for the pilot to set the course on the HSI (and ridding the GPS of the message that pops up reminding the pilot to set the course).
The dual units provide a complete backup Attitude in the case of a display failure. The reversionary mode you get with the Garmin G1000 and the Garmin G500 is also present in the dual G5s. This eliminates the need for a backup steam gauge attitude indicator, freeing up panel space for an engine monitor or some other toy. The G5 units can also be equipped with 4 hour backup batteries in case of electrical failure.
The price for the dual G5 setup is very reasonable at just under $4,600 plus installation (which, according to Garmin, should be pretty simple as the units act as plug and play instruments). The AHRS unit is available stand alone for under $2,200 while the DG/HSI unit standalone runs just under $2,600.
What’s the most cost effective glass panel retrofit? There are several options out there (and it seems like more coming each Sun ‘N’ Fun or Osh Kosh event), but the consensus is the Aspen EFD 1000 or 1500, right? At $12,000 installed, it’s about $8,000-$10,000 cheaper than the Garmin G500 (though you can make the…
Yes, you heard correctly. Last fall, Cirrus released a program called Cirrus Embark. The Cirrus Embark program offers 3 Free Days of Training to new purchasers of used Cirrus aircraft. The 3 Days is equivalent to the Cirrus VFR Transition Training Course.
Previously, Cirrus offered free factory training to anyone who purchased a new Cirrus from the Cirrus factory. Now, anyone buying a used Cirrus gets the same offer through Cirrus Embark at their home airport with a local CSIP training provider.
IFR pilot? No problem. The Cirrus IFR Advanced Transition Training Course is 5 days in length, but the Cirrus Embark program covers the first 3, reducing the out of pocket pay to only 2 days.
Free training? Yes, you heard correctly. Last fall, Cirrus released a program called Cirrus Embark. The Cirrus Embark program offers 3 Free Days of Training to new purchasers of used Cirrus aircraft. The 3 Days is equivalent to the Cirrus VFR Transition Training Course. Previously, Cirrus offered free factory training to anyone who purchased a…

 It was late afternoon during the summer and we were about to finish up for the day. We only had about another 10 miles of line to follow before calling it a day. Up ahead, I noticed an isolated thunderstorm near our power line. I could see the heavy rain falling below the anvil shaped leading clouds. It appeared to be well beyond the end of our day’s work so we pressed on.