|

Contact Approaches

Almost all IFR pilots are familiar with visual approaches and what the requirements are in order to fly a visual approach. As a refresher, the Instrument Procedures Handbook defines a Visual Approach as “an ATC authorization for an aircraft on an IFR flight plan to proceed visually to the airport of intended landing; it is not an [Instrument Approach Procedure]” (page 4-56).

For ATC to issue a Visual Approach, the pilot must have the airport or the traffic to follow in sight. Once the pilot reports the airport or the traffic in sight, ATC can clear the aircraft for a visual approach.

A limiting factor for a visual approach is ATC’s Minimum Vectoring Altitude. “This altitude, based on terrain and obstruction clearance, provides controllers with minimum altitudes to vector aircraft in and around a particular location” (Instrument Procedures Handbook page 1-42). ATC has to restrict aircraft to these MVAs, which can sometimes be quite high due to terrain or obstacles in the vicinity of the airport.

Every pilot has been in a situation with a high MVA that ATC can’t get them below, but it’s solidly MVFR or VFR at the destination airport. The MVA keeps the pilot in the clouds, so a visual approach isn’t possible since the pilot can’t see the airport or the traffic to follow. This can lead to extra time to go out and fly an approach.

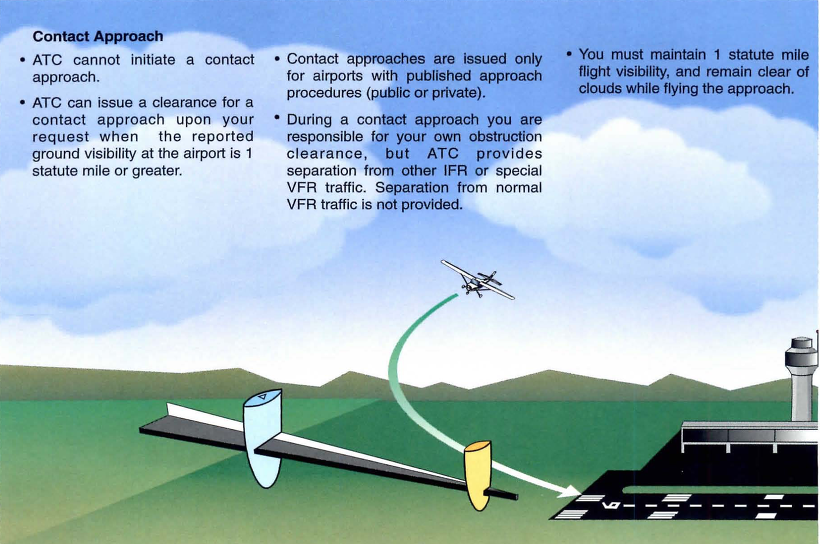
Enter a Contact Approach. A Contact Approach is different then a Visual Approach. “The main differences between a visual approach and a contact approach are: a pilot must request a contact approach, while a visual approach may be assigned by ATC or requested by the pilot; and a contact approach may be approved with 1sm visibility if the flight can remain clear of clouds, while a visual approach requires the pilot to have the airport in sight, or a preceding aircraft to be followed, and the ceiling must be at least 1,000 feet AGL with at least 3sm visibility” [Instrument Procedures Handbook page 4-57].

Here’s the simplified explanation: A pilot does not have to have the airport in sight to request a contact approach. All that is required is for the airport to be reporting at least 1sm visibility and for the pilot to remain clear of clouds.
When would this be helpful for an IFR pilot? Good question. Here’s a scenario.

Pilot Smalls is about 20 minutes from his destination, which is an uncontrolled airport with only one approach to runway 17. He is approaching from the south and the initial approach fix for the approach to 17 is about 15 miles north of the airport. The airport is under Center control. When he has arrived at this destination in the past, Center usually could only vector him down to 4,000 AGL. He is very familiar with this airport and the surrounding area as he comes to this destination at least 2-3 times a month for business.

Pilot Smalls listens to the AWOS, which is reporting a 2500 foot scattered layer and 10 miles visibility. He knows it is right traffic for 17 since there is a 2,000 foot antenna on the east side of the field. There is some hilly terrain around, but all the terrain is well below pattern altitude and doesn’t cause a safety issue.

Looking out at the clouds, Pilot Smalls observes that the cloud layer is scattered to broken, but more scattered on the west side of the airport, with several large openings that he can see the ground through. Center asks for his approach request and Pilot Smalls requests a visual approach. Center gives him a descent to 4,000 AGL, their MVA for the area. They tell him to report the airport in sight for the visual approach.

At 4,000 AGL, Pilot Smalls is going through the scattered layer of clouds, but can see the ground in between the clouds and deems he has room to maneuver safely between the clouds and stay clear of them. He can’t see the airport, so a visual approach seems unlikely. He can’t cancel IFR because then he would have to keep the VFR cloud clearance and visibility requirements in Class E airspace (1,000 feet above, 500 below and 2sm horizontally), which isn’t possible in this case.

5 miles from the airport, ATC states, “N12345, I’m going to have to send you out for the approach since you don’t have the airport in sight.” Pilot Smalls then requests a Contact Approach. ATC clears him for the Contact Approach to his destination, so Pilot Smalls descends through a break in the clouds, remaining clear of clouds, until he gets below the base of the ceiling. He maneuvers onto the right downwind, lands and cancels IFR.

Contact approaches can be useful at controlled and uncontrolled airports. The first time you request one, do so with a higher ceiling and some room to maneuver to keep your safety margins. After you’ve done a few, you can determine what your personal minimums are for a Contact Approach.

I would not recommend doing a Contact Approach at an airport you are unfamiliar with. It’s vital to know what obstacles are around since on a Contact Approach, the pilot is now responsible for traffic avoidance and terrain avoidance, whereas on a visual approach, ATC resumes that responsibility.

For more reading on Contact Approaches and another good scenario, check out Bold Method’s article on Contact Approaches.


Similar Posts

  • PIREP: IFR Clearances at Uncontrolled Airports

    There is great news coming for all IFR pilots who utilize the multitude of uncontrolled airports across the US.

    From the beginning of aviation time, the process of getting an IFR clearance at an uncontrolled airport has been arduous. For airports under Center controlled airspace, you had to dial the Clearance Delivery line, which ported you to Flight Service. Then you sat on hold till someone picked up, gave them your information, then sat on hold again while they called the Center. Finally, after what seemed like an eternity, the briefer came back with your clearance and departure instructions.

    On a busy day, this could take ten to fifteen minutes, which can be really annoying when a pilot is trying to take off and get somewhere.

    In my opinion, this also led to a lot of unsafe (and probably illegal) VFR departures when conditions were either clearly IFR or unsafe if buzzing around at low altitudes and high speeds in Class G airspace.

    RCO’s (Remote Communications Outlet, 2nd column, halfway down) and Clearance Delivery Frequencies are in place at some airports, but by and large, the above process was how you got your clearance.

    Departing from a TRACON controlled airport usually was easier and quicker. The TRACON has a direct line that is available for pilots to call to speak directly with a controller, but not all these phone numbers are published.

    As of June 20th, the FAA is implementing this at all uncontrolled airports. On the chart supplement for all IFR charts across the US (not including Alaska), the FAA will publish the Center phone numbers and remaining TRACON phone numbers for pilots to call directly to receive their IFR clearances and departure instructions, and to cancel their IFR flight plans (A lot of TRACONs already have their phone number published).

    Flight Service will no longer be taking IFR flight plan cancellations. Pilots will still be able to cancel with Center or TRACON in the air, but will now need to call the number on the chart supplement on the ground for cancellation.

    Now that the FAA is modernizing this process, hopefully more pilots will decide to call on the ground for their clearance on a MVFR or IFR day instead of taking off and trying to pick it up in the air.

    Finding the Chart Supplement on Foreflight

    Where is the Chart Supplement? I’m so glad you asked.

    Before iPads, everyone carried around the green book, officially known as the Airport/Facilities Directory, or A/FD. With the advent of Foreflight & Garmin Pilot & others, all the information in the A/FD is now easily accessible in each of the Apps.

    Foreflight may integrate the clearance delivery phone number for each airport into their airport information page, but in the meantime, here is how to find the Chart Supplement.

    On Foreflight, go to Documents along the bottom of the App. In the Catalog on the left, tap FAA. Chart Supplement will be about 1/3 of the way down the page. Tap that, then tap the region you need and it will download into your Documents Library.

    Once it is downloaded, check the Table of Contents for FAA Telephone Numbers and NWS. Go to that page and scroll through to find the Center or TRACON you are needing, then dial the number.

    Happy Flying!

  • Determining Pattern Altitude

    Figuring out the pattern altitude at an airport should be pretty simple, right?  But, in this day of helpful technology, most pilots actually get it wrong.  How can you always get it right?  Well, it just takes about an extra 15 seconds.  Here’s how.

    Traffic Pattern
    John Wayne Airport Traffic Patterns

    As outlined in the Aeronautical Information Manual, section 4-3-3, “traffic pattern altitudes for propeller-driven aircraft generally extend from 600 feet to as high as 1,500 feet above the ground.”  Further, in the Pilot’s Handbook of Aeronautical Knowledge on page 13-10, it states:  “1,000 AGL is recommended pattern altitude unless established otherwise.”

    Okay, so for piston driver’s, we’ve got it narrowed down to 1,000 AGL (Above Ground Level for those who don’t like acronyms).  But wait!  There’s that very important phrase at the end of the last quote:  “unless established otherwise.”  That means not all airports have traffic pattern altitudes of 1,000 AGL, or else they wouldn’t put that line in there!

    How do you find out what the TPA (Traffic Pattern Altitude) is for a certain airport if it’s not 1,000 AGL?  Great question!  Your first guess is probably to look on Foreflight.  Though this is a good start, it is not the full answer.

    Let’s use an example.  Look up KAQO, the Llano Airport on Foreflight.  At the top of the page, the airport elevation is stated as 1,101′ MSL and the pattern altitude is stated as 1,902′ MSL.  From what we just learned, 1,902′ MSL is not 1,000 AGL, so is 1,902′ MSL otherwise established?

    On the Airports page with KAQO pulled up, tap the A/FD tab, second to last on the left.  Scroll down to Llano Muni.  Read the whole entry.  Does it state in the entry that pattern altitude is different than 1,000 AGL?  It sure doesn’t.  So, because it is not otherwise established, pattern altitude at KAQO is 2,102′ MSL not 1,902′ MSL.

    Where did Foreflight get that?  I have no idea.  Too often, though, pilots look at the Foreflight pattern altitude and don’t actually check the Airport Facilities Directory (A/FD).  Then, they get the pattern altitude wrong.

    What does it look like when pattern altitude is otherwise established?  Look up KSGR, Sugar Land Regional, on your Foreflight app.  Foreflight states the elevation as 82′ MSL and the Pattern Altitude as 1,000′ MSL.  Is this correct?  Well, tap that A/FD button again and let’s find out.

    On the second line of the A/FD entry, it says TPA-See Remarks.  Down in the remarks section, we find the following:

    TPA-1000 (918) single engine piston acft, TPA-1500 (1418) for twin and turbojet acft, TPA-500 (418) for helicopters within 2NM.

    Foreflight got it right this time for single engine pistons, but if you are in a twin, the pattern altitude is different.  What’s the lesson here?  Always check the A/FD and don’t always go by what Foreflight says.  The A/FD is always right and usually has a little more detail to help set you straight.

    One last thing.  Both the AIM and the Pilot’s Handbook of Aeronautical Knowledge, when talking about pattern altitude, state, “When operating at an airport, traffic pattern altitudes should be maintained unless otherwise required by the applicable distance from cloud criteria in…section 91.155.”  91.155 defines basic VFR weather minimums.  So, to fully interpret what the AIM is saying, we have to take into account the type of airspace we are in to determine if we can safely and legally operate at pattern altitude at a particular airport.

    For example, let’s say we are at KCVB, the Castroville Airport.  Pattern altitude there is 1,602 feet, which is 829 AGL.  CVB is Class G airspace up to 700 AGL, then Class E above that.  Let’s say there is a 700 AGL broken cloud layer.  Pattern altitude is 829 AGL, so you won’t be able to get up that high with a broken ceiling.  What altitude can you do pattern work at to stay legal?

    Class G VFR weather minimums during the day below 1,200 AGL is 1 SM visibility and clear of clouds.  So, legally, you could fly at 699 AGL (which at CVB would be 1,472 MSL) while in the pattern and be legal.  Safe?  Maybe, but probably not if you are skimming the base of the clouds.  Is 1300 MSL a safer pattern altitude in this example?  Well, that is 527 AGL, so probably not, since towers tend to stick up that high sometimes.

    Let’s go back to KSGR and put a 1,000 AGL overcast ceiling there.  SGR is Class D airspace and we already determined pattern altitude there was 1,000 MSL for piston singles.  VFR visibility and cloud clearance requirements in Class D airspace are 1,000 feet above clouds, 500 feet below clouds, and 2,000 feet horizontally from the clouds with 3 SM visibility.  In order to stay 500 feet below the clouds, you would be flying a 582 MSL pattern.  Safe?  Probably not, though it is legal.

    To summarize, don’t take Foreflight’s word for pattern altitude.  Cross reference the A/FD (it only takes 15 seconds at the most) to verify.  If it’s cloudy, it’s really best to stay on the ground, but if you want to find out your legal pattern altitude with a cloud deck, cross reference 91.155.  I don’t recommend flying below pattern altitude because it is there for a reason.

  • Angle of Attack (AOA)

    You are hand-flying an in-the-weather descent, power back, heading for the FAF. You start a 30 degree banked turn at your lead point to cross the FAF, when your passenger behind you gasps. Looking over your shoulder, you see he has spilled his drink into his lap…too bad for him! However, when you turn your head back to your panel, your inner ear tumbles and you see 45 degrees of bank, 15 degrees nose low, airspeed increasing.

    Congratulations! You have managed to get distracted and sucked into an unusual attitude recovery. By the book, you should roll wings level, pull to the horizon, and adjust power as necessary to keep the airspeed within limits. In this scenario, if you had not experienced vertigo, you might have been able to roll to less than 30 degrees of bank, recover your turn, pull the nose up to less than the original descent attitude, pulled a bit of power to slow back to your desired penetration speed and then resumed your desired ground track. However, this would only be appropriate if you had full situational awareness as to the deviations caused by the look over your shoulder, plus full confidence that the moderate corrective actions would put you back on your desired flight path.

    As a military aviator, I learned unusual attitude recoveries based upon hard maneuvering at extreme pitch and bank angles. In the hard-maneuvering environment, an unusual attitude could be 90 degrees straight up, airspeed decreasing below 120 kts…or 80 degrees nose low, 135 degrees of bank, airspeed increasing through 500 kts… etc. In these cases, understanding angle of attack, or AOA, is critical to maintaining controlled flight and returning to a normal attitude.

    In an extreme nose-high attitude, a military aviator is trained to roll the aircraft to 90 degrees of bank, ease off the back-stick pressure to reduce AOA, add power as required, and allow the nose to slice back towards level, rolling to wings level as the nose approaches the horizon. If nose low, the recovery procedure is to roll rapidly, within asymmetric g limits, until wings level, then to pull at optimum g loading to recover to level flight. For the nose-low recovery, power was normally reduced until airspeed could be assessed and brought under control. However, when doing the nose-low pullout at 7-9 gs, pulling the power for too long would leave you much to slow to resume combat.

    The AOA gauge on a fighter’s glare shield is a primary reference during hard maneuvering and for landing. The AOA for optimum maneuvering is 13 degrees, displayed as the green circle or “green donut” on the gauge. The red chevron on top represents a slow condition of 15 degrees or more and the yellow lower chevron represents 11 degrees or less.

    For normal landing in the F-16C, the pilot slows to 220 kts and configures abeam the touchdown point while mentally computing the final approach airspeed of 136 kts plus 4 additional knots for each 1000 lbs of fuel. When rolling off the perch and flying the final turn, the pilot would usually only glance once at the airspeed once to ensure final turn airspeed of 180 kts while using the AOA sight gauge as the primary indicator of a best performance turn. As long as the AOA was green donut (13 degrees) or less, you would not stall. If on speed and 13 degrees wasn’t going to get you around the turn to line up with the runway, you knew you were going to overshoot. You never wanted to see the red chevron of 15 degrees or more as that meant you were too slow, pulling too hard, and in danger of building an un-recoverable sink rate!

    Few GA aircraft are currently equipped with AOA indicators, though there are several after market devices available for retrofit. However, knowing the impact of AOA and how to manage it is vital to safe aviating, even without an AOA gauge. The bottom line is, as long as you don’t ask the wing to produce more angle of attack than it can handle, you won’t stall.

    Practicing final turn stalls, to know what the wing feels like as you get too slow or pull too much on the controls, increasing AOA past the critical point, will keep you safe when you encounter that unexpected overshooting wind or you find yourself inadvertently on too tight of a downwind leg. Better to overshoot or take it around to try again, than to pull too hard and exceed critical AOA.


    Mike Hostage is a retired USAF pilot with 37 years of experience, flying a wide variety of aircraft.  An instructor pilot for more than half of his 4800 flight hours, Mike is currently qualified in a Cirrus SR-22T and regularly flies his two homebuilt sailplanes.

  • BendixKing Throws It’s Hat in the Glass Panel Ring

    Two pilots walk into an FBO.  “Nice airplane,” Pilot 1 says to Pilot 2.  “What kind of panel do you have in it?”

    “I just went all glass,” Pilot 2 says.  “Put in the Garmin G500 TXi, a GTN 750, and upgraded to the GFC 600 Autopilot.  Even put in the Mid-Continent standby instruments.  It’s a pretty sweet set up.  What about you?”

    “Wow, sounds like it!” Pilot 1 responds.  “I went a different route.  I liked all my old BendixKing instruments, so I stuck with the company.  I put in a BendixKing AeroVue Touch panel, a BendixKing KSN 770 touch screen GPS, kept my KFC 225 autopilot, got the ADS-B out compliant BendixKing KT 74 transponder, and finished it off with a King AeroFlight KI 300 Digital Backup instrument.”

    Wait, what?  BendixKing?

    Yes, my friends, BendixKing is still around.

    We are all used to the latest and greatest Garmin products these days.  Don’t get me wrong, Garmin and Aspen make great retro-fit products for your instrument panel, while Garmin and Avidyne are at the top of the touch-screen GPS market, but don’t forget about BendixKing.  They are staying in the game too.

    BendixKing announced in April the xVue Touch for experimental aircraft, with the STC for the AeroVue Touch for certified aircraft coming later this summer.  The xVue and AeroVue touch are pretty nifty units, comparable in features to what Garmin is doing with the G500 TXi and G600 TXi.  It will be difficult to claw back into a competitive market share with Garmin, but BendixKing might find a niche market of followers.

    Let’s take a look at the unit.

    BendixKing AeroVue Touch

    Now, I have not used the BendixKing AeroVue Touch or the xVue Touch, only read about them.  But, what I’ve read sounds pretty cool.  The display has really good resolution (BendixKing brags it is the highest screen resolution available), synthetic vision that comes standard (Garmin & Aspen charge extra for synthetic vision), plus VFR Sectional Charts & IFR High and Low Enroute charts, making paper charts even more obsolete.

    The display is 10.1 inches and can be easily swapped between a full screen instrument mode or a split screen setup as seen above.  Apparently, BendixKing has 3-D moving maps available on the AeroVue Touch too, which is standard.

    The one thing Garmin has on the BendixKing AeroVue Touch right now is engine information.  The G500TXi has a full complement of engine gauges available; the AeroVue Touch doesn’t, yet.  BendixKing says it’s in the works, as well as radio information and autopilot control.  I’m assuming the future autopilot control software would mean you could remotely mount an autopilot controller and input all functions from the AeroVue Touch display.  The nice thing about these future upgrades is all the software updates are free through BendixKing.

    The sticker price for the forthcoming unit is going to be about $12,600.  Garmin’s 10.5 inch G500 TXi is $16,000, while Aspen doesn’t offer anything quite that big.

    BendixKing KSN 770

    I’ve been keeping my eye on the BendixKing KSN 770 Touchscreen WAAS GPS for a few years now.  It never really has caught on quite like the Garmin GTN 750 or the Avidyne IFD 540.  BendixKing took the same route that Avidyne did in creating a hybrid touch GPS (or mini-MFD if you want to look at it that way) where a pilot can perform functions either using the touch screen or utilizing soft keys on the edges.  I like the hybrid touch approach as I have been bounced around in turbulence while trying to tap something into a Garmin GTN 750 and it can prove difficult.

    Similar to the AeroVue Touch, BendixKing utilized split screen technology in the KSN 770.  It’s a full WAAS unit that is already certified.  It’s sticker price is $14,200, compared to the Garmin GTN 750 at $17,200 and the Avidyne IFD 540 at $15,000.

    Other BendixKing Gadgets

    Here are some other BendixKing Gadgets both available now and in the works:

  • Avidyne IFD 440 Receives Certification

    Avidyne’s plug and play replacement for the Garmin 430, the Avidyne IFD 440, finally received certification from the FAA last week.  The touch screen GPS unit is being marketed as a simple swap out for the Garmin 430.  This release follows up Avidyne’s release last year of the IFD 540, also a plug and play replacement, but for the Garmin 530.

    The features and touch screen of the GPS units sound quite nifty, but it will be hard for Avidyne to compete with the GTN 750 and 650 from Garmin.  The unit prices for the IFD 540 and 440 will be less (and installation is simpler), but we will see how the company does.

    Avidyne IFD 440

    The STC allows for installation in 1,000 makes and models of aircraft, according to the company, so there are a lot of possibilities for installs.

    In conjunction, Avidyne also released a new version of it’s software for both GPS units.  According to Avidyne, this will unlock multiple features that enhances the capabilities of both units.

    To read more on the IFD 440 and it’s bigger brother, the IFD 540, check out Avidyne’s website.

  • Flying Eyes Sunglasses

    I am on a mission in flying for my head to be as comfortable as possible.  I’m currently going through the process of experimenting with different ANR headsets to see which ones squeeze my head the least (which I’ll be writing a future article about).  In the meantime, I decided to focus on sunglasses.

    I wear glasses (can’t do contacts anymore since they irritate my eyes), so anytime I have a headset on, I have frames running underneath my ear cups.  I had a pair of prescription sunglasses for years that were okay, but still caused soreness above my ears after more than 3 hours of flying.  I routinely fly 4-5 hours a day in training folks, so I had to find a better solution.

    I saw an ad in Flying Magazine one month for Flying Eyes sunglasses.  It was a relatively new company with a cool concept.  A pilot started the company with the goal to create as thin a pair of sunglasses frames as possible to increase the comfort and decrease the ANR loss when wearing sunglasses.  What the company came up with is pretty cool.

    The ultra-thin frames on the all the different Flying Eyes models are made out of Resilamide.  The material is so strong that the frames can be bent back and forth while not breaking.  The company even brags that the frames are virtually unbreakable.  I had to try these out.

    I ordered a pair of the Golden Eagle Sport sunglasses.  The process of getting prescription lenses in them was no big deal and took about a week.  The eyeglasses shop initially thought the shape of the lens could be an issue, but it proved no problem at all.  The lens manufacturer even managed to chip the frames, but Flying Eyes sent a new set of frames for free, even though it was not at all their fault.

    In about a month and a half of flying with them, they are very comfortable.  Some squeeze on the side of my head after extended periods of wear underneath a headset, but I’m exploring headset options currently (see above).  Much improved over my last set of sunglasses.

    Flying Eyes offers several different frame models, some of which are prescription compatible and some which aren’t.  The Golden Eagle Sport frames run about $180.  Orders can be placed on the Flying Eyes website.

    Ordering new sunglasses from Flying Eyes?  Use this link to receive 10% off your order.

Leave a Reply

Your email address will not be published. Required fields are marked *