Garmin 530/430 Missed Approaches

Garmin 530/430 Missed Approaches

14 Comments

Flying a missed approach can be stressful enough.  When you haven’t done one in a while and your GPS isn’t showing you how to get to the missed approach point and you can’t remember which button to press, that adds a lot more stress.  Recipe for disaster?  Quite possibly!

No need to fear, we are here to help.  The procedure for getting a Garmin 530 or 430 to give you missed approach guidance is actually simple and straightforward, if you know what to do!

Note: Because of the variety of different autopilot configurations in different airplanes, this article will focus solely on the GPS.

What the GPS is Thinking

The way Garmin designed the Garmin 530 and Garmin 430 is to be as helpful to pilots as possible.  Their thinking was, 95% of the time, a pilot will make a landing on an instrument approach.  This is pretty accurate as most of the time, this is what happens.  Most general aviation pilots don’t fly approaches to minimums all that often, thus negating the need for a missed approach.

Garmin Missed Approach
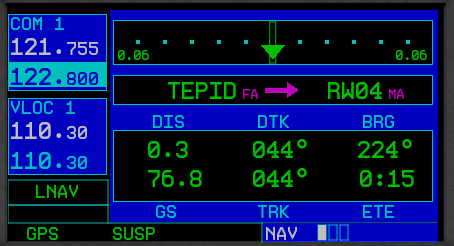
Garmin designed their software with this in mind.  When an airplane crosses the missed approach point, the GPS will go into what’s called suspend mode (a SUSP annunciation appears above the OBS key).  It will keep the missed approach point as the active waypoint because it assumes the pilot is going to land.

This can be confusing to pilots.  This is what happens when software engineers and pilots come together. Engineers often believe they are smarter than pilots! (See the Airbus fly by wire roll out)

The Procedure

In the case of a missed approach, the button pushing on the GPS is actually relatively simple.  There is no SUSP key to take the GPS out of SUSP mode (thanks Garmin!).  Instead, you press the OBS key.  This will take the GPS out of SUSP mode, making the first waypoint on the missed approach procedure the active waypoint.  Your GPS will now give you guidance on the missed approach procedure.

If you are going missed off an ILS, LOC, or VOR approach, then there is one more key you’ll have to press. Your CDI needle (whether it is digital or analog, an HSI or just a CDI gauge) will be reading off the NAV radio and your CDI indication on the GPS will be VLOC.  After you press the OBS key, press the CDI key on the GPS so you will start getting course guidance from the GPS again.

That’s it.  Button pressing on the different autopilots will vary, but if you are familiar with yours, you’ll be able to tell it to follow the GPS and climb to the proper altitude.

VFR Flight Plans in the Modern Age

0 Comments

Raise your hand if, after you have officially become a pilot by passing your private pilot check ride, you consistently file VFR flight plans with Flight Service.

Anybody?

Okay, let’s revise the question.  Raise your hand if you have filed VFR flight plans at least 5 times in the last year.

Okay, one or two hands go up.

That’s it?

To be perfectly honest, I have filed VFR Flight Plans twice (I think) in the last year.  The only reason I did was because I was flying in an area that had poor radar/radio communications and I wanted someone to know where I was (I was ferrying an airplane through southern Oregon and northern Nevada which is mountainous and is hard to get coverage into at lower altitudes).  I was so unaccustomed to doing it that I nearly forgot to call and close my flight plan.

FlightPlanForm

This is a common complaint amongst pilots concerning VFR flight plans.  It’s extremely easy to get to your destination, hop in the car and completely forget to close your VFR flight plans.  Thankfully, now a days, the Flight Service Station will typically call the number you put in your VFR flight plans (your cell phone number most of the time) to make sure you are on the ground before initiating search and rescue services.

Another complaint is that it is cumbersome to call the Flight Service Station after departing to open the VFR flight plans.  This is especially true in a busy airspace area or if the pilot is getting a VFR Flight Following and talking to ATC on a different frequency.

I still think it is a great idea to file and utilize VFR flight plans.  If you don’t show up at your destination, someone will come looking for you which could mean the difference between getting stranded after an off airport landing and getting a warm cup of coffee at the end of the day.  Even if the you get flight following from ATC, it’s still good to file a flight plan.

Lockheed Martin, who runs all the Flight Service Stations across the US, heard these complaints from pilots and decided to come into the modern age and make it easier to open and close flight plans.  They developed EasyActivate and EasyClose.

These services are very simple.  Just go to Lockheed Martin’s Flight Service Station website, set up a new account, then file VFR flight plans to see the services in action.

File your VFR flight plans first, through calling the FSS or on your favorite iPad app.  Then, for EasyActivate, you’ll receive an email 30 minutes prior to your ETD with a link in it.  Simply click/tap on the link and your flight plan is activated.  No having to call FSS in the air, no having to try to get them on the ground.  Just tap the link and you’re good to go.

For EasyClose, you’ll receive an email 30 minutes prior to your ETA at your destination.  When you get on the ground, you’ll see the email in your phone or iPad and you just tap the link and your flight plan is closed.  Since we all have our phones and iPads with us constantly, there will be no more forgetting to close the flight plan and getting that angry call from the FSS.

Sign up is quick and easy.  All Lockheed Martin needs is your email address, last name and phone number. They’ll send you the password to set up your account.  Log in (they will have you change your password immediately), then just click on EasyActivate/EasyClose up at the top.  You have to register the email address you want (you can also put in a phone number to receive a text message, and you can put multiple email addresses and phone numbers if you’d like), then you are all set to go.

Lightspeed Tango Headset

0 Comments

I recently purchased the new, wireless, Lightspeed Tango headset.  I’m a little OCD, so when a headset wire is banging against my shoulder while I’m trying to tune a radio or point something out, it’s a little annoying. A headset without the wires caught my eye.

As I’ve stated before in a previous article, I really like Lightspeed headsets.  They are more comfortable than Bose, and a little bit more affordable too.  The noise canceling quality is very high in the different Lightspeed models.  I personally believe it got even better with the Lightspeed Tango.

Lightspeed Tango

Let’s talk about the obvious first.  Not having a wire connecting you to the headset jacks is really nice.  You’re not tethered to anything, so your head is free to move anywhere without getting yanked back in place. Lightspeed developed a new technology, called Lightspeed Link, which bypasses Bluetooth or Wifi and connects the Panel Interface to the headset wirelessly.

The Link technology works pretty well.  The only problem I have noticed is in certain airplanes, I occasionally lose one ear, but after I wiggle the input wires around, the deaf ear comes back up.  It may be a loose connector in the plane itself.

The really nice thing about the Lightspeed Tango is the fact that it doesn’t need AA batteries anymore. Lightspeed put rechargeable lithium ion batteries in both the Panel Interface and the headset.  You get 12 hours of battery life out of both, far surpassing any length of time you would want to be in an airplane.  If the battery dies, there is a handy aux cable that can connect the Panel Interface directly to the headset (the ion batteries recharge with the included wall charger and USB cables in 2 hours).

Though the Lightspeed Tango is slightly heavier than the Zulu 2 due to the Link hardware and the lithium ion battery, it is still extremely comfortable.  The ear cups actually fit better over my ears and give me a better seal with glasses on then the Zulu 2 did.  As with all Lightspeed products, there is no squeezing of my head and the cushions on top of the headset sit very comfortably on top of my head.

The Bluetooth is much simpler to use than the Zulu 2 and definitely simpler than the Bose A20.  Sound quality is very good for phone calls and music.  The volume control on the headset itself is set to make smaller adjustments so you don’t have to deal with wide swings in volume.

Overall, I’m a big fan of the Lightspeed Tango.  I am recommending them to all the pilots I talk to.  Rolling in at $400 cheaper than the Bose, you can’t go wrong.

Lightspeed Tango 3

MODAERO NextGen Aviation Festival

0 Comments

Looking for something different to do this Spring Break week?

Modaero

Consider checking out the First Annual MODAERO NextGen Aviation Festival in Conroe, TX.  It’s a fly in event, complete with camping opportunities, at the Lone Star Executive Airport, KCXO.  The festival itself is being held right next door to the airport at the Lone Star Convention Center.

What’s the draw, do you ask?  Not only are there going to be representatives from all the major aircraft manufacturer’s (along with tons of airplanes), there will be a multitude of speakers and live music.  There are even drone races!  The live music sets the event apart from the well known national fly in events like Osh Kosh and Sun N Fun.  It’s a different type of Festival, geared toward the younger generation of pilots.

For more information or to register, check out MODAERO’s website.  The festival runs from Wednesday through Saturday, March 16-19.

Garmin Perspective Missed Approaches

0 Comments

Are you a Cirrus pilot with a Garmin Perspective?  Still can’t figure out the use of the go around button?  Read on!

When it comes to flying an instrument approach, we as pilots are assuming we are going to land.  Most of the time, we won’t even take off if the ceilings or visibilities are below the minimums for an approach.  95% of the time, we do land.

There is the other 5% of the time when something unexpected happens, whether we get a full scale deflection, or we don’t see the runway at the published minimums, and we have to perform a missed approach.

When instructing, missed approach procedures are actually what I see the most deficiency in when instructing an instrument rated pilot.  It’s not necessarily configuring the airplane for a missed approach procedure, it’s the button pushing involved in setting up the GPS properly.  When a pilot isn’t proficient in the button pushing, that button pushing distracts the pilot from actually flying the airplane, which can lead to a dangerous situation.

I am going to spend a few articles on flying a missed approach with different GPS and different autopilot configurations.  Today, I will be addressing the Garmin Perspective with a GFC 700 Autopilot, which is what all Cirrus Aircraft after 2009 are equipped with.

The Garmin Perspective Missed Approach Procedure

Once the decision to execute a missed approach has been made, here is the step by step procedure:

  • Full Mixture and Full Throttle
  • Simultaneously push the Go Around button on the underside of the throttle.  This does the following:
    • Sets the Garmin Perspective Flight Director to Go Around Mode (7.5 degrees pitch up and wings level)
    • Takes the Garmin Perspective GPS out of Suspend Mode
    • Switches the CDI back to GPS mode if it is in a different mode
    • Garmin Perspective with GFC 700 Autopilot stays on
  • Flaps up
  • Confirm airplane is climbing
  • Set altitude bug for missed approach altitude (assuming it isn’t there already)
  • Set NAV mode and IAS mode on the Garmin Perspective GFC 700 Autopilot

Garmin perspective

That’s it.  When Garmin and Cirrus got together to create the Garmin Perspective with the GFC 700 Autopilot, they tried to make as simple but robust system as possible.  Once you have the procedure down for the right buttons to press, then the procedure is relatively straight forward.