Garmin G1000 Updates

Garmin G1000 Updates

0 Comments

You have just received the keys of your shiny new (to you) airplane complete with a beautiful Garmin G1000 glass panel flight deck. Synthetic Vision, WAAS, and ADS-B are all installed. You are ready to cruise in high technology.

You turn on the PFD and MFD and notice one problem. All your databases are expired. No big deal, right? Your Garmin 530W was easy as pie to update with it’s single data card.

You start looking around and can’t find the data card. Then you notice that there are several SD cards in slots on the panels. SD cards won’t fit in your Blue Jepp Skybound card reader. Confusion sets in which quickly leads to full on panic.

What have you gotten yourself into?!

No need to fear, Texas Top Aviation is here to help with your Garmin G1000 database update confusion (and hopefully not panic).

Database Update Providers

First, you have to choose who to get your Garmin G1000 updates from. You have two options. One is Garmin (fly.garmin.com; always use either Firefox or Chrome to update, don’t use Safari). The other is Jeppesen.

Honestly, there is no difference between the data that each provides. If you had a 530 or 430 before, you used Jepp already. Just keep the Jepp account, call them, and have them get you set up for your Garmin G1000 updates.

If you didn’t have a Jepp account before, I would use Garmin, for a couple of reasons. You get multiple downloads in case you mess something up (Jepp NavData gives 1 download per month, while Safe Taxi, etc. you get 2-3). On Jepp, you have to call in and have them reset the account, which can be a pain if it’s after hours or a Saturday or Sunday.

The other problem with Jepp is since Boeing bought Jeppesen, I have found it extremely difficult to find online where to set up a new account and purchase databases. Yes, you can always call, but, again, problematic after hours or on a weekend.

The only problem with Fly Garmin for your Garmin G1000 updates is Garmin is constantly updating their program. You have to update their downloader quite often, which can be a bit frustrating.

I’m going to use Fly Garmin as my example.

What to Buy

Garmin gives you a couple of different bundle options for your Garmin G1000 updates, the OnePak and the PilotPak. The main difference between the two is the PilotPak includes approach charts that display on your PFD and the OnePak doesn’t. Therefore, the OnePak is about $200 cheaper.

Both include Navigation Data, SafeTaxi, Obstacles, Airport Directory, Terrain, and the BaseMap.

How to Update

Once you have followed all the instructions on Garmin’s website (or gotten Jeppesen set up), here is what to put on which SD card.

NOTE: YOU WILL NEED TO PURCHASE ONE OR TWO BLANK SD CARDS FOR THE NAVIGATION DATABASES. DO NOT PUT THE NAVIGATION DATA ON THE SD CARD THAT IS ALREADY IN THE TOP SLOT ON THE MFD. THAT IS FOR ENGINE DATA LOGGING ONLY. NO NAVIGATION DATA SHOULD EVER BE PUT THAT ON THAT CARD.

Bottom Card, PFD

  • SafeTaxi
  • Obstacles

Bottom Card, MFD

  • SafeTaxi
  • Obstacles
  • Airport Directory
  • Flite Charts

Top Card, PFD & MFD (This is the new blank SD card(s) you bought)

NOTE: REMOVE THE TOP SD CARD IN THE MFD THAT IS ALREADY IN THE SLOT AND DON’T PUT ANY DATABASE INFORMATION ON IT.

  • Navigation Data

Garmin G1000 NXi Users (or Cirrus Perspective + Users)

Ignore everything above and put all databases on the bottom card of the MFD. You have database sync, so you don’t have to mess with multiple cards. When you do an update though, go to the AUX chapter on the MFD and scroll down to the Databases page. Ensure that all dates match what you just put on the SD Card.


For you Jeppesen users, check out the new Bad Elf Wombat updater that works with the iPad JDM app for updates.

The Importance of a Pre-Buy Inspection

0 Comments

There are multiple ways to save money during the aircraft buying process. To start, since you are buying an airplane, you have some means of positive income in order to afford an airplane. Airplanes come in all different shapes and sizes and usually, an airplane can be found to fit almost any budget, whether is a $20,000 Texas Taildragger all the way up to a multi-million dollar jet.

One way is to stay within your budget. There will always be a shinier, newer, lower time airplane that is just above where you set your budget at. Don’t reach for it! There is a reason you set your budget where you did.

Another way is to shop around and get multiple insurance quotes. Your agent is in charge of engaging underwriters who are going to evaluate you and your airplane as risks, then price a policy accordingly. With most airplanes, you should get multiple quotes to see what fits you best. Beware though, because sometimes, you can get a lower rate, but it will require more training, so you end up shelling out more money in the long run. If you find a policy you like, but the training seems skewed or the liability isn’t high enough, you can always have your agent ask the underwriter to modify the quote. You are still in charge.

Finally, if you evaluate your mission and see that your budget can’t afford an airplane that carries enough or goes fast enough, look into taking on a partner or two to help with costs. Be thorough in vetting your potential partners as a good partnership is worth it’s weight in gold, but a bad one is downright unpleasant and often times hard to get out of. Find pilots who have the same mindset & personality you do and treat their stuff the same way you do. Try to take a ride in their car or go to their house, then you’ll see what kind of shape they will keep the airplane in.

The best way to cost yourself more money in the aircraft buying process?

Don’t do a pre-buy inspection.

A pre-buy inspection takes place after negotiations and once a Purchase Agreement is in place. You are pretty much set on the airplane, you just want a third party mechanic who is knowledgeable on that make and model of airplane (and this is a very important point) to go over it and make sure that it is sound from a mechanical standpoint. The buyer, you, want someone who has never had an association with the seller since the mechanic will be your representative in the process and you want him answering to you.

If you have used a broker or a buyer’s agent, that person should have already gone through the logbooks for you, so you’ll have a basic idea of the history of the airplane. However, knowledgeable mechanics find things all the time that turn out to be the responsibility of the seller to repair since it happened on their watch. Without a pre-buy, you would end up having to pay for that in the not to distant future.

Here is an example of where not doing a pre-buy can cost a lot of money.

An owner bought a late ’70s model Citation ISP, one of the very first Citations ever made. It had been based in Florida (salt & humidity + aircraft don’t mix well) for a while. The buyer didn’t use a broker, but thankfully had someone look through the maintenance history of the airplane. Since it was so old, the logbook reviewer didn’t have time to do anything but a basic overview, but he gave the thumbs up to the buyer.

The buyer decided he just wanted a boroscope inspection and the seller’s mechanics to look over the airplane. Remember what I said before about a third party mechanic? Well, these mechanics didn’t do a very thorough job. When the buyer took delivery of the plane, after about 10 hours of flying, he already had an $18,000-$25,000 maintenance bill.

You may say, well that’s a jet. Jet’s have specialized maintenance and need a more extensive pre-buy inspection.

On the contrary, in my 8 years in the training business, I have seen Cirrus, Piper PA46s, Bonanzas and several other piston engine airplanes that either didn’t have a pre-buy done or the pre-buy was done by someone who didn’t know that airframe. Lo and behold, things started breaking and adding up very quickly that would have been discovered on a good pre-buy inspection.

Don’t skip on the pre-buy inspection. They usually run a few thousand dollars, but save tons of money in the long run.

MMOPA Master Aviator Program

0 Comments

Last fall, the Malibu & M-Class Owner’s and Pilot’s Association (MMOPA) announced a new program to encourage and enhance safety, the Master Aviator Program.

The MMOPA Master Aviator Program was designed as a system to recognize those in the Piper PA46 community who strive to become the best pilots they can be. Each year, those who have achieved each of the levels in the program will be honored at the MMOPA Convention (the 2020 MMOPA Convention will be in Tucson in the spring of 2020) by getting Wings pinned on.

What is the heart behind the MMOPA Master Aviator Program, you ask? Here’s a quote from the MMOPA Website:

This program is the result of MMOPA having identified areas of flight operation that need improvement to increase safety. It provides a path forward for training for the PA46 pilot, honors those pilots that elect to participate in the MMOPA Master Aviator Program, and rewards those pilots that progress upwards to ultimately reach the highest level (MMOPA Master Aviator).

The main focus areas of the MMOPA Master Aviator Program are pilot flight experience (flying more during a year increases skills), stall/spin awareness, and operations in the runway environment (improper aircraft handling during takeoff, landing, and go around, with a particular emphasis on rudder control).

The MMOPA Master Aviator Program tackles these three areas in each of the different levels of achievement: Aviator, Senior Aviator, and Master Aviator.

To achieve the Aviator Wings, a PA46 pilot must do the following:

  • Complete Initial Training with an Approved Training Provider
  • Fly 100 total hours in a PA46
  • Attend an Approved Mid-Year Training Event (M-Class, MMSTF, MMOPA Safety Standown, MMOPA Maintenance Standown, to name a few)
  • Attend the MMOPA Convention once in the last 3 years
  • No accidents/incidents in a PA46 in the last 3 years

To achieve the Senior Aviator Wings, a PA46 pilot must have received their Aviator Wings and do the following:

  • Completed at least one yearly Recurrent Training Event
  • Fly 200 total hours in a PA46
  • Go through an approved Upset/Recovery Training course provided by an approved training provider
  • Attend the MMOPA convention once in the last 3 years
  • No accidents/incidents in a PA46 in the last 3 years

To achieve the Master Aviator Wings, a PA46 pilot must have received their Senior Aviator Wings and do the following:

  • Completed at least two yearly Recurrent Training Events
  • Fly 300 total hours in a PA46
  • Receive a tailwheel endorsement
  • Attended the MMOPA convention once in the last 3 years
  • No accidents/incidents in a PA46 in the last 3 years

To incentive PA46 pilots, MMOPA offers a $400 voucher to program participants to accomplish the Aviator Mid Year Training, the Senior Aviator Upset/Recovery Training, and the Master Aviator Tailwheel Training. A PA46 pilot is only eligible for one voucher per year.

I received the Master Aviator Award at the MMOPA Convention this year. All told, there were close to 40 participants who received one of the three levels of achievement at the MMOPA Convention in Amelia Island, FL this year.

Interested in applying to be a part of the MMOPA Master Aviator Program? You can find out more information on MMOPA’s website.

PIREP: IFR Clearances at Uncontrolled Airports

1 Comment

There is great news coming for all IFR pilots who utilize the multitude of uncontrolled airports across the US.

From the beginning of aviation time, the process of getting an IFR clearance at an uncontrolled airport has been arduous. For airports under Center controlled airspace, you had to dial the Clearance Delivery line, which ported you to Flight Service. Then you sat on hold till someone picked up, gave them your information, then sat on hold again while they called the Center. Finally, after what seemed like an eternity, the briefer came back with your clearance and departure instructions.

On a busy day, this could take ten to fifteen minutes, which can be really annoying when a pilot is trying to take off and get somewhere.

In my opinion, this also led to a lot of unsafe (and probably illegal) VFR departures when conditions were either clearly IFR or unsafe if buzzing around at low altitudes and high speeds in Class G airspace.

RCO’s (Remote Communications Outlet, 2nd column, halfway down) and Clearance Delivery Frequencies are in place at some airports, but by and large, the above process was how you got your clearance.

Departing from a TRACON controlled airport usually was easier and quicker. The TRACON has a direct line that is available for pilots to call to speak directly with a controller, but not all these phone numbers are published.

As of June 20th, the FAA is implementing this at all uncontrolled airports. On the chart supplement for all IFR charts across the US (not including Alaska), the FAA will publish the Center phone numbers and remaining TRACON phone numbers for pilots to call directly to receive their IFR clearances and departure instructions, and to cancel their IFR flight plans (A lot of TRACONs already have their phone number published).

Flight Service will no longer be taking IFR flight plan cancellations. Pilots will still be able to cancel with Center or TRACON in the air, but will now need to call the number on the chart supplement on the ground for cancellation.

Now that the FAA is modernizing this process, hopefully more pilots will decide to call on the ground for their clearance on a MVFR or IFR day instead of taking off and trying to pick it up in the air.

Finding the Chart Supplement on Foreflight

Where is the Chart Supplement? I’m so glad you asked.

Before iPads, everyone carried around the green book, officially known as the Airport/Facilities Directory, or A/FD. With the advent of Foreflight & Garmin Pilot & others, all the information in the A/FD is now easily accessible in each of the Apps.

Foreflight may integrate the clearance delivery phone number for each airport into their airport information page, but in the meantime, here is how to find the Chart Supplement.

On Foreflight, go to Documents along the bottom of the App. In the Catalog on the left, tap FAA. Chart Supplement will be about 1/3 of the way down the page. Tap that, then tap the region you need and it will download into your Documents Library.

Once it is downloaded, check the Table of Contents for FAA Telephone Numbers and NWS. Go to that page and scroll through to find the Center or TRACON you are needing, then dial the number.

Happy Flying!

Guardian Seven Trauma

0 Comments

First Aid Kit on Steroids

We have all seen the little first aid kits that a pilot can get to carry in an airplane. It usually has some bandaids, maybe some gauze, and some antibiotic ointment. Very helpful in the even that your paper VFR chart cuts your finger when you are unrolling it.

What happens if you crash in a harsh environment and you have some actual injuries to take care of?

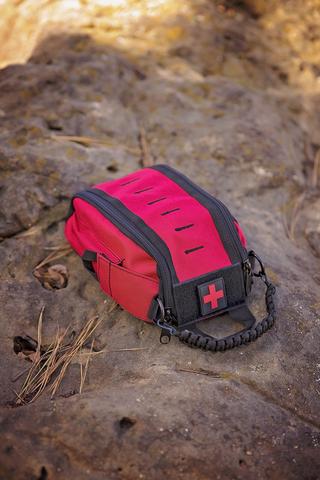
Enter the Guardian Seven Trauma G7-Alpha Trauma and Egress Kit. It literally is a First Aid Kit on steroids.

Guardian Seven Trauma has put together a kit that contains just about anything you need to take care of an injury from an airplane crash. Plus, the kit only weighs less than 2 pounds. It easily mounts in an aircraft and can be opened with only one hand.

The kit contains:

  • CAT Tourniquet
  • Quick Clot Z Hold Hemostatic Gauze
  • 4″ Emergency Trauma Dressing
  • Nasal Airway
  • ARS Needle
  • HyFin Chest Seal Twin Pack
  • (4) 3″ Gauze Rolls
  • Triangle Bandage
  • Mylar Blanket
  • Leatherman Z Rex Tool (for emergency egress)
  • Trauma Shears
  • Roll of Medical Tape
  • Bear Claw Glove Kit
  • Permanent Marker
  • Multi Purpose Paracord Handle
  • Nylon Straps with Buckles (2)
  • Medical Patch

Want to upgrade your first aid kit? Visit Guardian Seven’s website to order the G7-Alpha kit.