Synthetic Vision Technology

Let’s say you’re flying in the mountains of Colorado on a cloudy day.  There’s a solid layer from the surface all the way up to 14,000 feet.  You’re inbound to Eagle (KEGE) on the RNAV (GPS) D approach.  There are mountains next to you and below you, but you aren’t concerned since you can see them all.  The base of the last reported overcast layer was 3,000 feet, so you know you’ll break out before the MDA and land no problem.

At 11,100 over AWACC, you clearly see the top of the mountain below you.  You are comfortably above it. You already have the runway in sight as well.  You pop out of the clouds on the approach at 9,700 feet, spot the airport and follow the tower’s instructions to circle north of the runway for a left base for runway 7.

How could you see the mountains inside the clouds?  You have Synthetic Vision installed on your glass panel, that’s how.
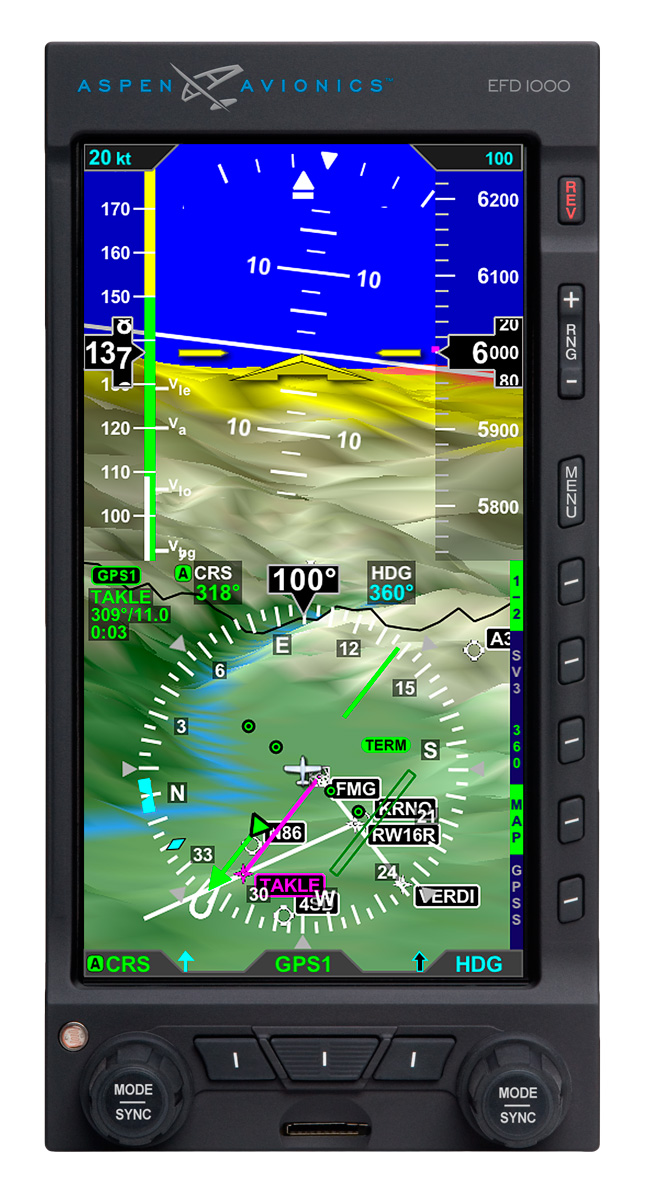
Aspen Synthetic Vision

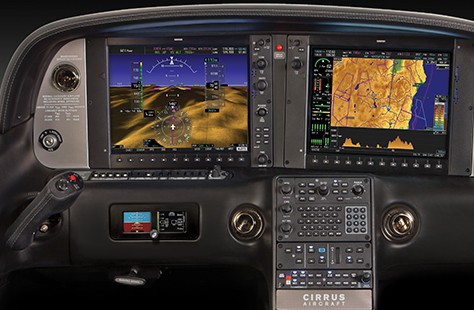
Synthetic Vision, which has actually been around since the ’70s when NASA and the US Military first developed it, was first FAA certified for the Gulfstream PlaneView flight deck in 2009.  Garmin, Avidyne, and Aspen are the main general aviation manufacturers of synthetic vision these days.  All Garmin PFDs are now equipped with Synthetic Vision while Aspen gives you the option to upgrade to Synthetic Vision when you get one of their PFDs installed.  Avidyne gives you Synthetic Vision in their R9 upgrade for the Cirrus.

What is Synthetic Vision?  Basically, it’s a 3-D picture on the primary flight display showing terrain, obstacles, traffic, and runways.  It greatly enhances situation awareness in areas of terrain or high obstacles during IFR conditions or at night.

The goal behind the development of Synthetic Vision was to decrease the amount of controlled flight into terrain (CFIT) accidents.  A CFIT accident consists of a perfectly airworthy airplane flown by a pilot (or autopilot) unintentionally into terrain. These accidents can happen in low visibility conditions or at night, but the reason is mainly due to the pilot losing track of his position in relation to obstacles or terrain (or water as was the case with JFK Jr.).

With Synthetic Vision, the goal is to enhance pilot knowledge of what is around the airplane at all times. When you’re at altitude, the terrain below you looks flat.  When you start descending down amongst the rocks, the hills or mountains start to rise up on your screen.  For those used to the coloration with the 2-D terrain feature on a GPS unit, it translates very easily to the terrain coloration on a Synthetic Vision equipped PFD. Terrain that is between 100 and 500 feet below the aircraft is shown as yellow, while terrain closer than 100 feet is depicted as red.
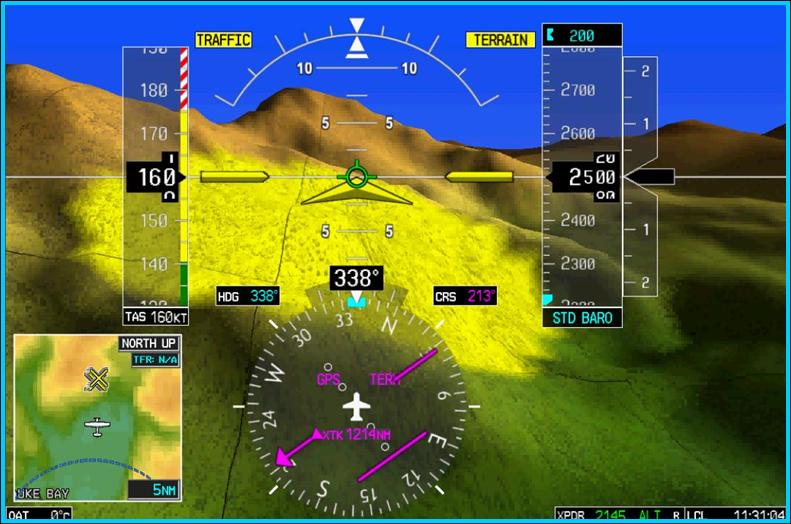
Garmin Synthetic Vision


One neat feature on Garmin units is the Highway in the Sky.  When a pilot puts a course or a flight plan in the GPS, the PFD displays magenta boxes at the altitude selected displaying the route.  It’s handy when hand flying to just “fly through the boxes.”  They also display descent angles on approaches.

Synthetic Vision is still optional on Garmin and Aspen units, but I highly recommend springing for it.  It will give you a higher level of safety and keep you out of the rocks.

Similar Posts

  • PIREP: Austin Executive Opens a Control Tower

    Austin Executive Airport opened a control tower on Friday, February 23rd 2018.  The airport is now officially Class D airspace.  The charts and A/FD are not updated yet to reflect the tower, but there is a NOTAM with the tower and ground frequency information.  The tower hours are from 6am to 10pm.  The weather frequency remains the same.

    Make sure you check those NOTAMs if you are headed to KEDC anytime soon!

    KEDC Tower Frequency:  120.3

    KEDC Ground:  119.45

  • Flying the Hudson River Corridor

    Ever since I moved out to the Philadelphia area, the Hudson River corridor in New York City has become one my favorite places to fly. It’s hard to overstate the beauty of the city from low over the river. Every time I have a family member or friend come to visit, I try and take them over to see the city from the air.

    Each time I fly up the river I can’t believe that we are actually allowed to do so, flying below the tops of the buildings and close enough that you feel that you could reach and out touch them. The draw back to the Hudson River Corridor is that it can be busy, intimidating, and confusing. However, with some reading and preparation, the Skyline flight is easy to do and extremely rewarding.

    Having the right weather is an important first step. The second step is try to arrive during ideal lighting conditions. If possible, select a smooth, calm day to make it easier to maintain a track down the correct side of the river. I always try and target arrival at the city around sunset. The view is spectacular any time of day, but having the lights from the city while the sun is just setting gives the best viewing. I’ve also flown over and done the whole flight after dark, which is always spectacular.

    View of the World Trade Center

    The first method of flying the river is to utilize VFR flight following. If the controllers aren’t too busy, they will provide advisories to aircraft that request the Skyline. The nice thing about doing it this way is that the controller will clear you into the NY bravo airspace and keep you above the traffic flying the Skyline in the VFR corridor below. This is the method that I have always preferred as I enjoy the added benefit of the traffic advisories and it’s nice not to worry about position reporting on the radio.

    If you want to get flight following, head toward the corridor and request the Skyline route with NY Approach. (Remember to stay clear of the Bravo until you’re cleared in!) Once you’re cleared into the Bravo and approaching the corridor, they will hand you off to Newark/ LaGuardia Tower for traffic advisories over the river. I like to approach from the south and ask for a 180 over the George Washington Bridge. This allows me to fly past the city a second time before exiting the corridor over the VZ (Verrazano Bridge) and heading back toward home.

    In red is the path I typically fly. I descend to 1400’ and fly toward the APPLE intersection picking up the shoreline around Staten Island and hugging it until crossing the middle of the VZ. Newark normally clears me into the Bravo at 1400’ or 1500’ to fly up the corridor.

    Pros:

    • Better traffic Awareness
    • No position reports

    Cons:

    • Flying slightly higher reduces the view
    • If the controllers are busy, they may deny your request for advisories  
    • Can be intimidating to talk to NY Approach/ Newark/ LaGuardia 

    The other option is to fly in the VFR corridor. If you want to do it via this method there are just a few things you need to make sure you’re familiar with before you go. When in the VFR corridor you’ll need to make required position reports on a CTAF frequency. Make sure that you have the proper charts and have studied pictures of the landmarks so that you know what you’re looking for. I tend to plan on this as a backup in the event that the controllers won’t give me advisories.

    Pros:

    • Doesn’t require talking to controllers/ class B clearance
    • More freedom to select altitude and routing as desired

    Cons: 

    • Less traffic awareness
    • Required position reporting

    All the requirements and guidelines for flying the corridor can be found on the back of the NYC TAC chart. Any pilot flying the river is required to have one of these or a NYC helicopter route chart on board. If you’re using Foreflight, look in the Documents section under FAA Fly Charts and select the NYC TAC chart in order to read the back of page.

    Below you’ll find examples of the diagrams/ instructions printed on the back of the NYC TAC charts.

    You can see the traffic flow requires northbound airplanes to hug the east side of the river, while the southbound traffic stays on the west side. The VFR reporting positions (listed from North to South) are: Alpine Tower, George Washington Bridge, Intrepid aircraft carrier, Goldman Sachs (clock), Statue of Liberty, VZ (Verrazano Bridge). Each position report should include aircraft type, position, direction, and altitude.

    Other things to be aware of:
    NYC is always a hotspot for TFR’s. There are often TFR’s for baseball games or presidential movements so make sure to check before you head that way. Additionally, there is a speed restriction in place of 140 kts, though I’m not sure why anyone sightseeing would want to go that fast anyhow.

    I realize that all of the procedures and restrictions can be overwhelming, but with the proper preparation, the Hudson Skyline is one of the most incredible places in the world to operate an airplane. There are a lot of things that are easy to get excited about that don’t live up to expectation, but this isn’t one of them. I’ve never taken anyone to the river that wasn’t impressed by what they saw and that’s why I plan to keep going back.

    About to cross the VZ looking north toward the city

  • Lightspeed Tango Headset

    I recently purchased the new, wireless, Lightspeed Tango headset.  I’m a little OCD, so when a headset wire is banging against my shoulder while I’m trying to tune a radio or point something out, it’s a little annoying. A headset without the wires caught my eye.

    As I’ve stated before in a previous article, I really like Lightspeed headsets.  They are more comfortable than Bose, and a little bit more affordable too.  The noise canceling quality is very high in the different Lightspeed models.  I personally believe it got even better with the Lightspeed Tango.

    Lightspeed Tango

    Let’s talk about the obvious first.  Not having a wire connecting you to the headset jacks is really nice.  You’re not tethered to anything, so your head is free to move anywhere without getting yanked back in place. Lightspeed developed a new technology, called Lightspeed Link, which bypasses Bluetooth or Wifi and connects the Panel Interface to the headset wirelessly.

    The Link technology works pretty well.  The only problem I have noticed is in certain airplanes, I occasionally lose one ear, but after I wiggle the input wires around, the deaf ear comes back up.  It may be a loose connector in the plane itself.

    The really nice thing about the Lightspeed Tango is the fact that it doesn’t need AA batteries anymore. Lightspeed put rechargeable lithium ion batteries in both the Panel Interface and the headset.  You get 12 hours of battery life out of both, far surpassing any length of time you would want to be in an airplane.  If the battery dies, there is a handy aux cable that can connect the Panel Interface directly to the headset (the ion batteries recharge with the included wall charger and USB cables in 2 hours).

    Though the Lightspeed Tango is slightly heavier than the Zulu 2 due to the Link hardware and the lithium ion battery, it is still extremely comfortable.  The ear cups actually fit better over my ears and give me a better seal with glasses on then the Zulu 2 did.  As with all Lightspeed products, there is no squeezing of my head and the cushions on top of the headset sit very comfortably on top of my head.

    The Bluetooth is much simpler to use than the Zulu 2 and definitely simpler than the Bose A20.  Sound quality is very good for phone calls and music.  The volume control on the headset itself is set to make smaller adjustments so you don’t have to deal with wide swings in volume.

    Overall, I’m a big fan of the Lightspeed Tango.  I am recommending them to all the pilots I talk to.  Rolling in at $400 cheaper than the Bose, you can’t go wrong.

    Lightspeed Tango 3

  • Reading Weather Prog Charts

    There are a multitude of weather products out there today to assist pilots in preparing for a flight.  Aviationweather.gov is the best source for getting all the information a pilot needs for planning a flight.  Aviationweather.gov is the National Weather Service’s source for all aviation related weather products.  When I teach about weather and weather briefings, I recommend to my students to utilize Aviationweather.gov in the planning stages, but still call the Flight Service Station to get a full fledged weather briefing before takeoff.

    When preflight weather planning, one of the best ways to get a picture of what is happening over a broad area is utilizing the Low Level Significant Weather Prog charts.  The Prog chart gives a forecasted 12 and 24 hour picture of what type of weather to expect over the US.  The Prog chart gives the expected flight rules, areas of turbulence, and where the freezing level is located.  If you’re looking at the 4 panel view, the Surface Prog chart shows fronts, pressure areas, and areas of expected precipitation.  That covers just about everything, doesn’t it?

    I believe the Prog charts are underutilized in planning.  Foreflight and Garmin Pilot have given easy access to radar pictures, satellite pictures, METARs, TAFs, and several other sources of weather information.  But, a lot of the easy access data you can get from those apps is current data (with the exception of the TAF) while a lot of the forecast data takes some hunting around.  So, products like Prog charts aren’t often utilized.

    The other problem arises when pilots know about Prog charts, but don’t know how to read them, then don’t know how to find the legend to decipher the chart, the chart is often set aside and quickly forgotten about just because of a lack of knowledge.  Have no fear, though, as now we will use an example 4 panel Prog chart to decipher the lines and colorations.

    Low Level Sig WX Prog

    Just looking at the Low Level Significant Weather Prog Chart above, it can be a little confusing.  That’s why they make a legend!

    Low Level Legend

    Coupling the legend with the chart above, we can determine some things.  First, California, parts of the Pacific Northwest, a small part of southern Arizona, and a good portion of the Midwest and East coast are going to have marginal VFR conditions in the next 12 hours.  Wisconsin, Illinois, a good portion of the Northeast, and a small portion of the Pacific Northwest will suffer IFR from IFR conditions.  There are going to be a good amount of low level turbulence in the northern and eastern parts of the country.  Finally, the freezing level starts at the surface running in a jagged line across the midwest states and curling up into the Northeast.

    That’s a good bit of information, isn’t it?  If a pilot is planning a VFR flight into the Northeast tonight, it would probably be best to wait for another day, according to this chart.

    Now, to see what is causing the conditions above, we need to look at the Surface Prog Chart.

    Surface Prog

    The green circular areas above show that some form of precipitation is in that area.  The circular dots with the triangle located in Mexico and Baja California are depicting moderate rain showers.  If the triangle was gone, it would just be moderate rain.  In the northeast, all those symbols are showing moderate to heavy snow showers.  Across the plains, we see a lot of high pressure, meaning visibility and nice flying weather.

    These charts are invaluable when it comes to flight planning, especially over long distances when the weather could be changing a lot over the period of your flight.  Put them to use the next time you are planning a trip and you’ll learn you have a much better picture of what the weather is doing.

  • Cirrus Simulator Training

    Let’s face it: airplanes are not the best classrooms. The propeller is running, the engine is making lots of noise, the pilot is attempting to multi-task and the instructor is barking orders. That’s almost as much overstimulation as being a parent to 4 kids under 10 (I have experience in that arena!). That’s even before takeoff!

    At Texas Top Aviation, we have observed many situations where a simulator would be an excellent way to introduce different concepts and supplement training. Now, in our Austin Executive (KEDC) office, we finally have a really good simulator.

    Meet the Noble Flight Simulator, the next best thing to a Cirrus cockpit. With the Noble Flight Simulator, we can duplicate 6 different types of Cirrus aircraft (G3 SR22, G3 SR22T, G5 SR22, G5 SR22T, G6 SR22, and G6 SR22T). The Garmin Perspective panel easily swaps between the G3 and G5 configuration to the G6 configuration, so the buttons are all in the proper places.

    Having button pushing problems? The simulator is the place to practice.

    Want to experience actual emergencies? An engine failure is a lot less stressful in a simulator.

    Want to pull CAPS (Cirrus Airframe Parachute System)? The Noble Flight Simulator has a realistic CAPS handle with the same amount of pull pressure that the CAPS handle in the airplane has.

    Need an IPC or want to practice approaches? All approaches done on a Noble Flight Simulator are luggable, plus a full IPC can be accomplished.

    Want to save fuel? The Noble Flight Simulator is for you!

    To top it all off, the Noble Flight Simulator that Texas Top Aviation has is classified as an Advanced Aircraft Training Device. It is certified to the highest standards of non-motion simulators, allowing pilots working toward their private and instrument ratings to log a significant amount of time toward that certificate or rating. Up to 20 hours of IFR training is allowed to be logged in an AATD toward an instrument rating. That’s huge!

    Texas Top Aviation is also developing a CAPS specific course to expose Cirrus pilots to the many different scenarios where pulling CAPS would be necessary. This teaches Aeronautical Decision Making to Cirrus pilots who struggle with the decision of whether or not to pull CAPS. Look for CAPS course information under our Aircraft Training page later this summer.

    Interested in checking the simulator out? Contact us today!

  • Building An Airplane

    Randy Vanstory, a long-time customer of Texas Top Aviation, decided in early 2017 to build his own airplane. Randy currently owns a Mooney M20J and has been active in aviation for a number of years.  He took on the Vans RV 10, starting in February 2017.  He’s about halfway through right now, with an estimated completion of mid-2020.

    A completed Vans RV 10

    I asked Randy what gave him the desire to build his own plane.  “I love building things, learning new things, and working on things” he said.  “This satisfies those desires all in one project.”  Randy had a desire to work with his hands, to create something of his own, and building an airplane put several of his passions together in one project.

    Lots of pilots out there dream of building their own airplane in their garage.  There is a certain cool factor to putting together an RV or a Lancair in a garage, then trucking it out to an airport, attaching the wings, then flying a personal creation for the first time.  An airplane unique to you, since there isn’t one quite like it any where else.

    That’s the beauty of a homebuilt.

    Here is a link to Randy’s build video done by Kobalt Tools.

Leave a Reply

Your email address will not be published. Required fields are marked *