|

Removing a Hold on Foreflight Approach

I’m a big fan of having my Foreflight map always match up exactly with the way I am flying. Having a Flight Stream in the airplane helps a lot with that as it always prompts me to load the new flight plan from the GPS into my Foreflight map. When I load an approach in the GPS flight plan, Foreflight will put it into my Foreflight flight plan via the Flight Stream.

The problem I run into on Foreflight is when there is a published hold at the Initial Approach Fix (IAF), but ATC has told me to fly the straight in approach and skip the hold. Up until recently, I didn’t think there was a way to set up a straight in approach on Foreflight, so I just settled for the hold staying on there.

Not anymore! There is a simple trick that I discovered that allows you to remove the hold from the Foreflight flight plan. Here’s how to do it.

Load the Approach

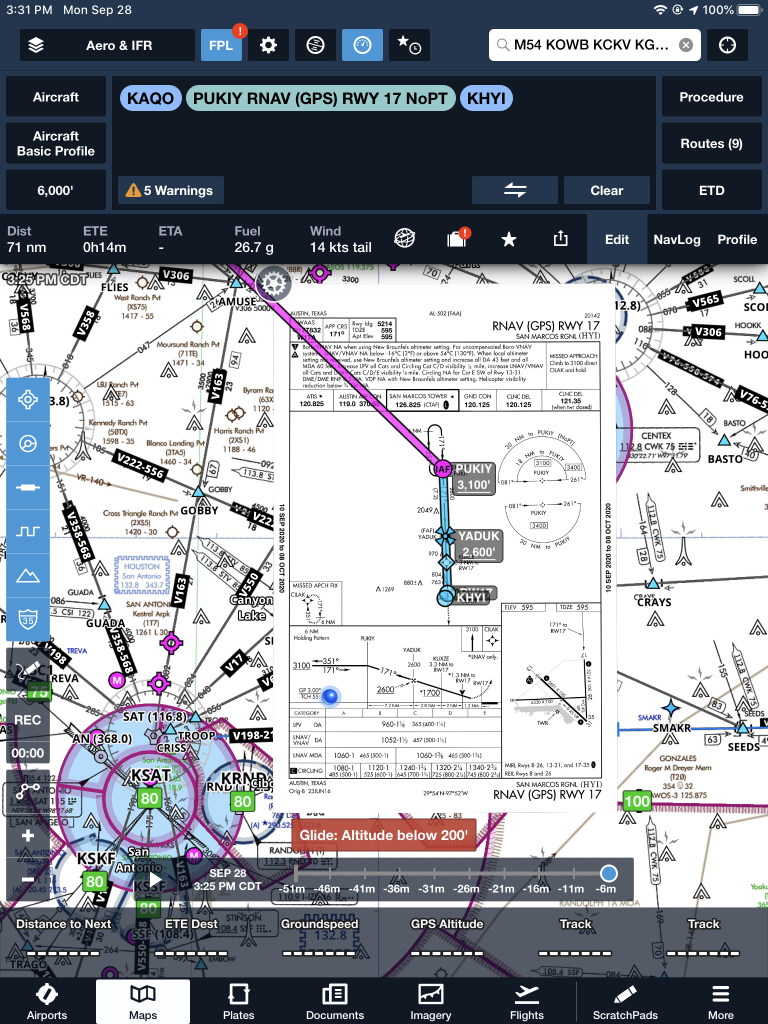
The first step is still to load the approach into your Foreflight flight plan on the Map page. In this scenario, we are flying from KAQO, the Llano Airport, to KHYI, the San Marcos Airport. Austin Approach has told us to expect the straight in RNAV 17 KHYI via PUKIY. So, on Foreflight, we have KAQO and KHYI in our flight plan. Then, I tap the Procedures button on the upper right hand corner of the screen. I then tap Approach, then RNAV 17 KHYI. Then I select my transition.

The options given are either PUKIY with the hold, seen below;
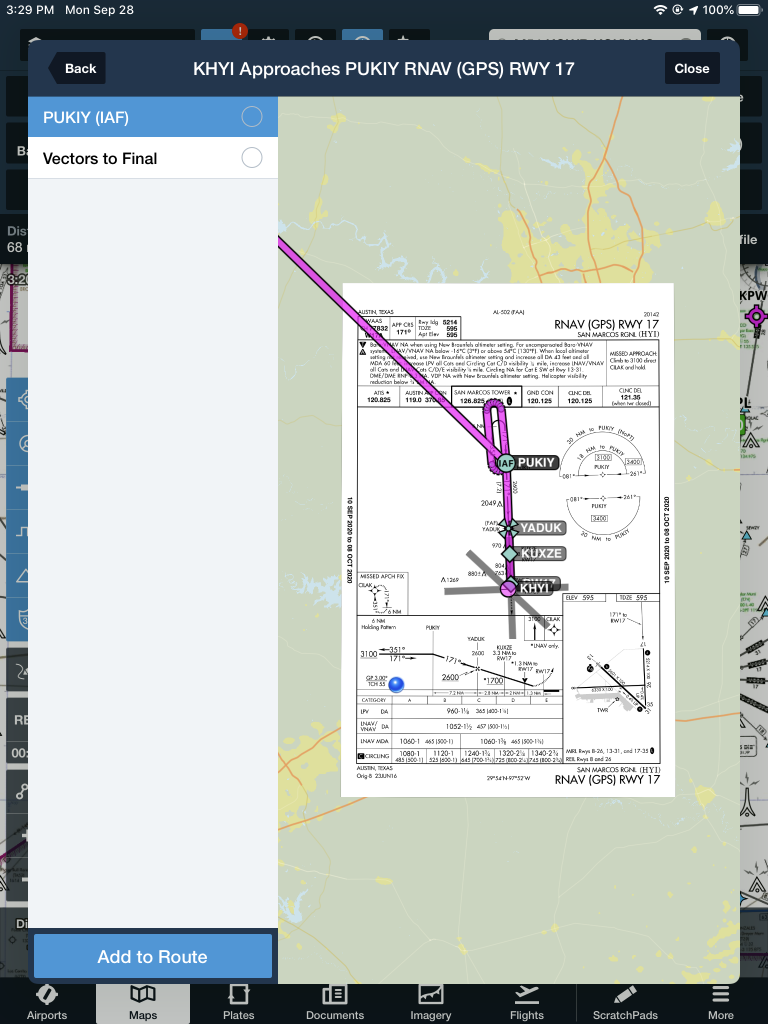
Or Vectors to Final, which lines me up inside of PUKIY. Neither of these are what I want.
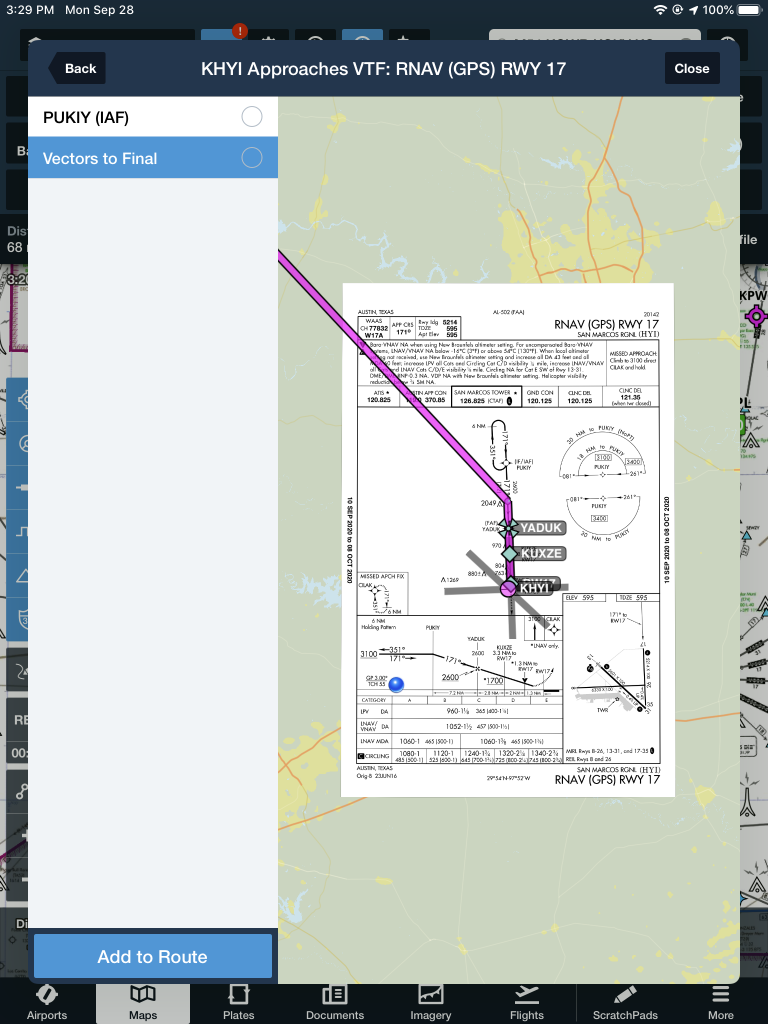
But, to get this to work, I select PUKIY, then tap add to route. Now we have our approach loaded into our flight plan.
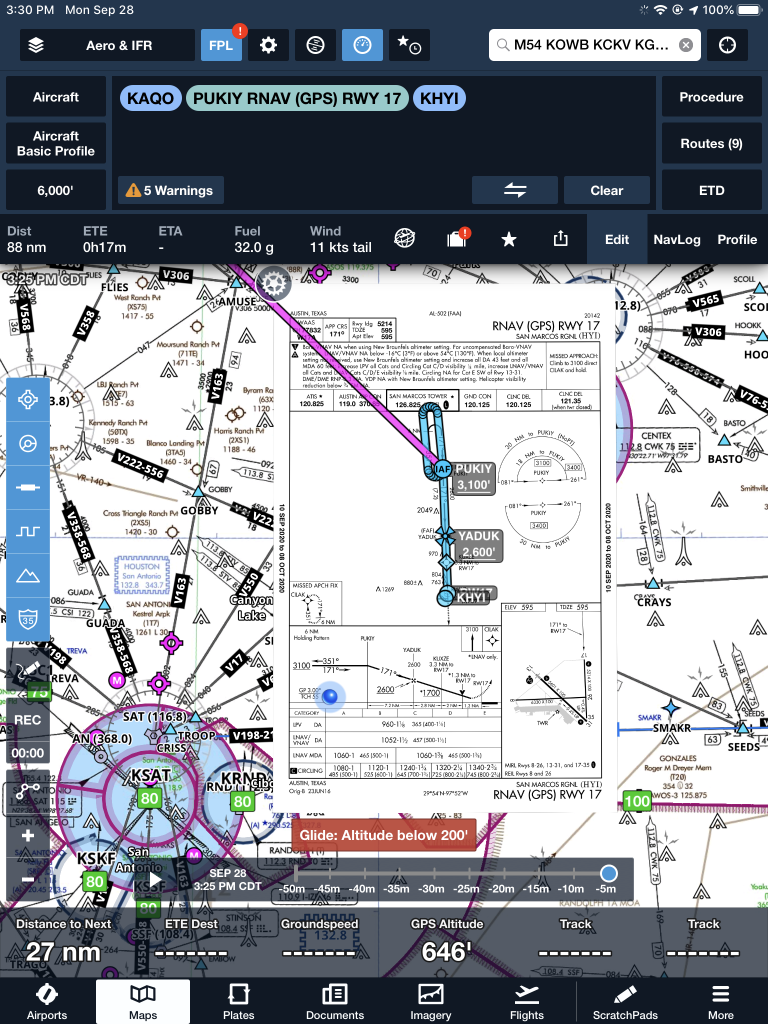
Removing the Hold

The RNAV 17 is now in the Foreflight flight plan, but the hold is displayed at PUKIY. To remove the hold, the first step is to tap the approach in green and a menu pops up.
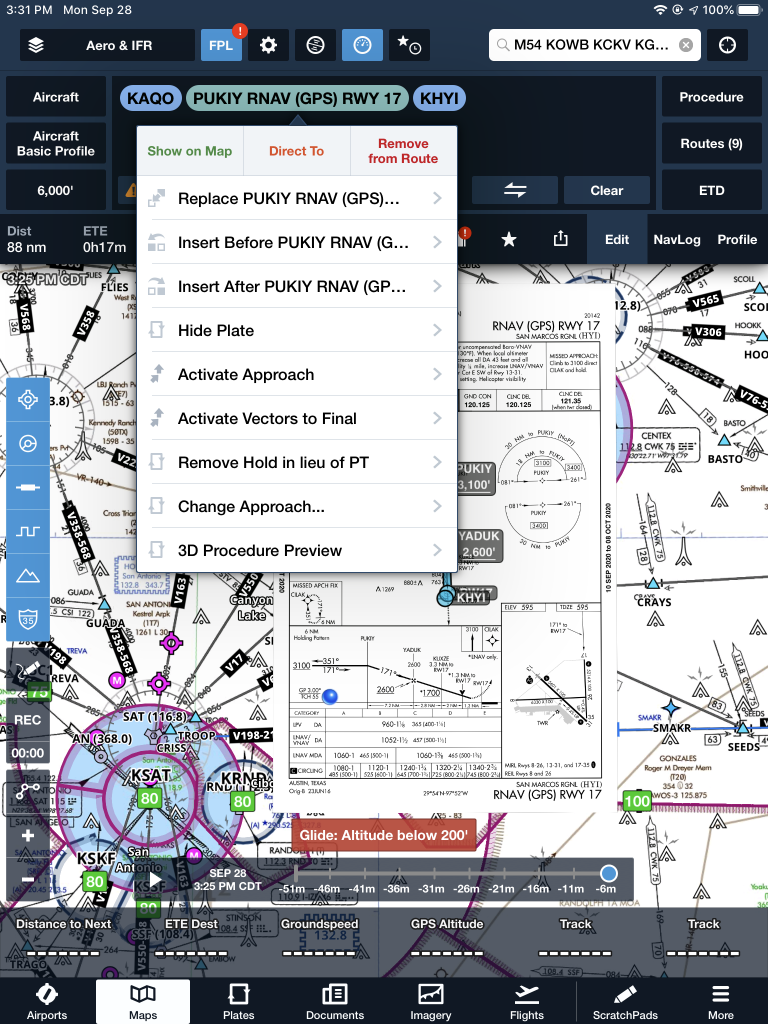
The 7th option down is “Remove Hold in lieu of PT.” Eureka! Tap that, then the approach is displayed without the hold. Houston, we have success! It even says “NoPT” in the flight plan.
Similar Posts

  • AOPA Air Safety Institute: More Difficult Decisions

    The AOPA Air Safety Institute is making it’s annual loop through Texas this January. The topic for this Safety Seminar is “More Difficult Decisions: Choices & Consequences.”

    The seminar is geared our the decision making process that we as pilots face on each flight. Some decisions are easy (what altitude should I pick?) while some have much greater consequences and should be taken very seriously.

    This event will be interactive for the participants as several scenarios will be presented. The goal is to help pilots learn to think through each decision, weighing the consequences along the weigh to arrive at the safest outcome of the flight.

    The first area seminar will be held on Tuesday, January 21st at the Stinson Field Airport (KSSF, 8535 Mission Road, San Antonio, TX 78214). The second area seminar will be held on Wednesday, January 22nd at the TXDOT office in Austin (200 E. Riverside Dr., Austin, TX 78704). WINGs credit is available for all attendees.

    Learn more here.

  • MMOPA Master Aviator Program

    Last fall, the Malibu & M-Class Owner’s and Pilot’s Association (MMOPA) announced a new program to encourage and enhance safety, the Master Aviator Program.

    The MMOPA Master Aviator Program was designed as a system to recognize those in the Piper PA46 community who strive to become the best pilots they can be. Each year, those who have achieved each of the levels in the program will be honored at the MMOPA Convention (the 2020 MMOPA Convention will be in Tucson in the spring of 2020) by getting Wings pinned on.

    What is the heart behind the MMOPA Master Aviator Program, you ask? Here’s a quote from the MMOPA Website:

    This program is the result of MMOPA having identified areas of flight operation that need improvement to increase safety. It provides a path forward for training for the PA46 pilot, honors those pilots that elect to participate in the MMOPA Master Aviator Program, and rewards those pilots that progress upwards to ultimately reach the highest level (MMOPA Master Aviator).

    The main focus areas of the MMOPA Master Aviator Program are pilot flight experience (flying more during a year increases skills), stall/spin awareness, and operations in the runway environment (improper aircraft handling during takeoff, landing, and go around, with a particular emphasis on rudder control).

    The MMOPA Master Aviator Program tackles these three areas in each of the different levels of achievement: Aviator, Senior Aviator, and Master Aviator.

    To achieve the Aviator Wings, a PA46 pilot must do the following:

    • Complete Initial Training with an Approved Training Provider
    • Fly 100 total hours in a PA46
    • Attend an Approved Mid-Year Training Event (M-Class, MMSTF, MMOPA Safety Standown, MMOPA Maintenance Standown, to name a few)
    • Attend the MMOPA Convention once in the last 3 years
    • No accidents/incidents in a PA46 in the last 3 years

    To achieve the Senior Aviator Wings, a PA46 pilot must have received their Aviator Wings and do the following:

    • Completed at least one yearly Recurrent Training Event
    • Fly 200 total hours in a PA46
    • Go through an approved Upset/Recovery Training course provided by an approved training provider
    • Attend the MMOPA convention once in the last 3 years
    • No accidents/incidents in a PA46 in the last 3 years

    To achieve the Master Aviator Wings, a PA46 pilot must have received their Senior Aviator Wings and do the following:

    • Completed at least two yearly Recurrent Training Events
    • Fly 300 total hours in a PA46
    • Receive a tailwheel endorsement
    • Attended the MMOPA convention once in the last 3 years
    • No accidents/incidents in a PA46 in the last 3 years

    To incentive PA46 pilots, MMOPA offers a $400 voucher to program participants to accomplish the Aviator Mid Year Training, the Senior Aviator Upset/Recovery Training, and the Master Aviator Tailwheel Training. A PA46 pilot is only eligible for one voucher per year.

    I received the Master Aviator Award at the MMOPA Convention this year. All told, there were close to 40 participants who received one of the three levels of achievement at the MMOPA Convention in Amelia Island, FL this year.

    Interested in applying to be a part of the MMOPA Master Aviator Program? You can find out more information on MMOPA’s website.

  • Beechcraft Flap Issues

    There has always been something that felt wrong to me about how the walkway on many models of Beechcraft extends onto the right hand flap. I have never felt right about stepping onto the flap as I make my way into and out of my dad’s E33A Bonanza and therefore I generally try to step over top of it and place my foot on the wing instead. But does this effort actually make any difference, or am I just making my self look silly for no reason?

    Nutplate Cracking 3

    Well, as it turns out, it wasn’t such a bad idea. In 2007, a pilot flying a Beech reported a split flap condition. Upon inspection, it was found that there was damage to the actuation rod attachment as well as the nose rib and nut plates. Six other aircraft were checked and found to have similar damage. These findings were submitted to Hawker Beechcraft and in 2008 and they issued a maintenance alert regarding the issue. In 2011 the FAA issued SAIB CE-11-21 (Special Airworthiness Information Bulletin) to alert owners, operators, and maintenance personnel about the problem; specifically warning of the potential for cracking in the nose flap rib (part number 35-165050-84). And while its true that this type of damage is not limited to the right hand flap, it is known to be much more common on that side. Stepping over the flap instead of on it is recommended by both the FAA and Beechcraft as a solution.

    Unfortunately, the flap cracking is known to span a wide variety of aircraft types. A 2011 “Safety Communique” issued by Hawker Beechcraft lists the affected models as:

    -Bonanza 33, 35, and 36
    -Baron 55, 56, 58, and 95
    -Duke 60

    Damage at the flap actuator point (Photo Courtesy of AOPA)
    Damage at the flap actuator point (Photo Courtesy of AOPA)


    According the the FAA, the cracking can been found most commonly on airframes which are between 4,000 and 6,500 hours, but has also been found on aircraft with as few as 2,000.

    So, what do we do about it?

    First off, although much of the damage is difficult to detect without dis-assembly, the paperwork from both the FAA and Beechcraft recommend taking a look at the flap yourself to see if there are any obvious signs of problems. They also suggest taking special care looking in this area during your preflight inspections.

    Next, if you have an airplane which may be susceptible to cracking, talk to who ever is doing your maintenance work and have them look carefully during your annual inspections. I talked to one of the IA’s at our shop who has dealt with this issue before and he told me that most shops will remove the flap and send it away to a repair station to have it fixed. It’s possible that if you purchased your airplane used it may have already had this issue taken care of; a quick look through the maintenance logbooks should clear up any questions.

    Repaired rib next to a damaged rib (Courtesty:  AOPA)
    Repaired rib next to a damaged rib (Courtesty: AOPA)


    Regardless of whether your airplane is known to suffer from this problem or not, do your best to avoid stepping on the flap when getting in and out of the cockpit. It is also a good idea to ask your passengers to do the same as this simple act could end up saving you big headaches and big money someday down the road.

    For more information regarding the flap issues discussed above, talk to your maintenance provider and visit these links:

    ABS Flight Controls, Flaps, and Trim System Inspection, Repair and Rigging Guide (See Page 17)

    ABS Information on SAIB CE-11-21

    Andrew Robinson is a 135 Charter Pilot and flight instructor in Pennsylvania.  He flies Pilatus PC-12s and instructs in Beechcraft Bonanzas.

  • Flying the RDD LX7

    I get to fly a lot of different airplanes in my chosen career. There aren’t many airplanes that I take off in, then say “Wow,” and have a big smile on my face. The RDD LX7 was definitely one of those.

    I wrote about the RDD LX7 in the past, bragging about everything I read about it. The blogs all advertised 250 KTAS and 17 GPH and FL250, all of which are eye popping numbers.

    Lo and behold, those numbers are true.

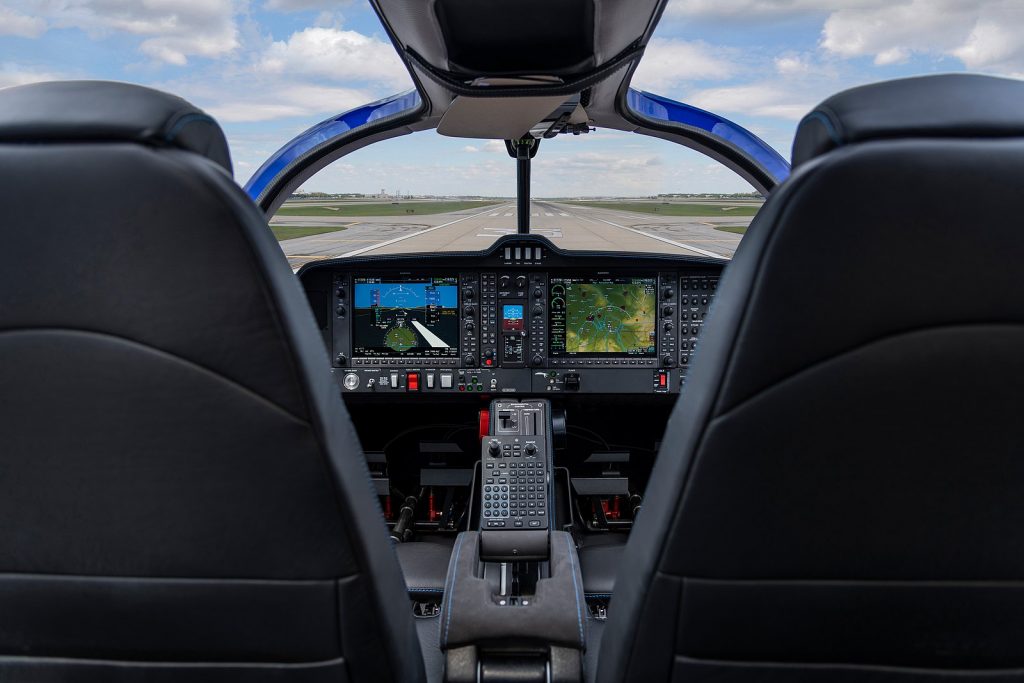
    I got to go up to RDD’s Redmond, Oregon facility in April 2021 to get my initial training in the RDD LX7 and I couldn’t wipe the smile off my face. The 3 screen G3X Touch layout is very impressive and not crowded like I thought it would be. Being familiar with the G500TXi, there are some G3X specifics that take a little getting used to, but overall, it’s a good system. The main GPS and number 1 radio is a GTN 750Xi.

    We took off from RDM and proceeded to climb at 140 KIAS, which equated to 2,000 FPM. We only had half tanks (which is still 90 gallons of fuel!), but it climbed with no problem. It’s extremely responsive as I learned while doing the basic flight maneuvers. The stall speed of the airplane (the biggest problem with the Lancair 4P, the airframe that the RDD LX7 is derived from, was the terrible wing design and extremely high stall speed), was in the low 60s or high 50s, with the stall being extremely docile.

    The airplane handled very similarly to a Columbia 400, but seemed even more responsive. The glide ratio isn’t as good as some, but it’s still better than a Cirrus (plus it still has a BRS system to boot).

    The big test was the flight to San Antonio from Redmond to bring the plane home. The new owner and I departed RDM with the tanks full of Avgas (180 gallons), then got up to a cruise altitude of FL210. After setting power and leaning, the numbers came out true to spec: 252 KTAS, 17.5 GPH.

    The greatest part? We stopped in Santa Fe to stretch our legs and we didn’t need fuel. We still had 100 gallons left! That left us plenty to get to San Antonio with 40-50 gallons left over. Another RDD LX7 owner flew his piston direct from Redmond, OR to Jacksonville, FL, non-stop. It was over 9 hours. That’s impressive.

    You can’t beat the purchase price, either. A new Cirrus SR22T runs a little north of $1.2m. A piston engine LX7, that is pressurized, 70 KTAS faster with a much longer range, and still has a BRS, is between $850,000-$900,000. An LX7 starts to make a whole lot of sense when you weigh all that. There is also a PT6 option with several different sizes and horsepowers to choose from, which costs more, but you see 300 KTAS.

    To learn more about the RDD LX7, check out the company’s website: RDD LX7.

  • Mooney Enters the Training Market with the Mooney M10

    Earlier this week, Mooney announced they would be following competitors Piper (with their Archer DX) and Redbird (with their retrofitted 172 known as the Redhawk) into the training market with the Mooney M10 T and Mooney M10 J.  Mooney, which hasn’t manufactured a primary trainer since the Mooney M10 Cadet in 1970, is planning on putting Jet A burning Continental Engines in the new aircraft.  The mockup was unveiled at Airshow China.

    The Mooney M10 T is a 3 seat, fixed gear trainer sporting a Continental CD-135 engine.  At 135 HP, the initial design data claims the Mooney M10 T will be able to cruise at 140 KTAS at 75% power, allowing the Jet A engine to burn between 4-5 gallons per hour while holding 42 gallons of fuel.  As with other Jet A piston powered airplanes, the Mooney M10 T will have a Fully Automated Digital Engine Control (or FADEC) system.  This leaves just a single power lever in the cockpit, allowing the pilot to set a percent power and the FADEC computer will set the manifold pressure, prop speed, and mixture.

    The Mooney M10 J has a slightly bigger engine, the 155 HP Continental CD-155.  It also is equipped with retractable gear.  Initially, Mooney is predicting 160 KTAS at 75% power for the Mooney  M10 J.  The airplane will come as a two-seater, but will have a third seat as an option.  Mooney says that the Mooney M10 J will allow pilots to make an easy transition to the bigger and faster M20J that has been popular for many years amongst “Mooniacs.”

    Mooney M10 Interior

    In a new direction for Mooney, the Mooney M10 T Mooney M10 J will both be composite airplanes with side sticks, instead of the traditional sheet metal exterior with a yoke as Mooney aircraft have been in the past. Also venturing from the more powerful Mooney aircraft is the fact that the Mooney M10 T and Mooney M10 J will have two doors.  Remaining, though, is the swept tail that Mooney aircraft are known for.  Both airplanes will be equipped with Garmin G1000 panels, while the Mooney M10 J will also have the GFC 700 autopilot, marketing more toward aircraft owners rather than students.

    The only downside that I read about was the time between replacements for the engines.  For the CD-135 engine in the Mooney M10 T, time between replacement is 1,500 hours, whereas the CD-155 only has a 1,200 hour replacement time.

    Mooney expects certification and deliveries to begin for the Mooney M10 T and Mooney M10 J in 2017.

    Mooney M10T and M10J

    Information courtesy of AOPA and Mooney International.  Images courtesy of Mooney International.

  • A Flying Car in the Future?

    EAA Airventure at Osh Kosh always draws great innovators every year, leading the aviation consumer to discover something new and different.  Flying cars have always been a dream for the everyday pilot.  Why not fly to work?  Why not park the plane in the parking lot?  Why not drive from the runway onto the freeway?  All excellent questions!

    Samson Switchblade Driving

    Well, Samson Motorworks is trying to make those dreams a reality.  Samson’s Switchblade flying car is in the (hopefully) finally stages of development this summer.  The company expects to be able to conduct test flights early next year, then begin selling the experimental kit.

    The Samson Switchblade will be in the Experimental category, but Samson has a builder assist program that only adds $20,000 to the final cost of the kit.  The total price of the kit, which comes 49% completed and only takes 3 weeks to complete with the builder assist program, comes in at $140,000.  That includes the engine, avionics (it’s equipped with Dynon’s 7″ Skyview glass panel display, a Dynon radio and transponder, a Dynon intercom, a Dynon AOA, an iPad mini, and an ADS-B GPS), and the builder assist program.  Similar to a Cirrus, it is also equipped with a Ballistic Parachute Recovery system.

    The Samson Switchblade has several different engine options, including a supercharged, liquid cooled, V-4 similar to a Corvette engine that will produce 190 HP.  Max cruise in the air should be around 170 knots.  The Switchblade will hold 30 gallons of mogas, burn 9 GPH in the air, and get 35 mpg on the ground.  The gross weight will be 1,750 pounds.

    How does the car to plane transition happen?  Samson has developed a fly by wire system to retract the rudder down while the car is in drive mode.  The wings use a mechanical linkage to fold up into the belly.

    Samson Switchblade Flying

    There are several different packages for the Samson Switchblade:  the Snowbird, the Aurora, and the Trek options.  Details can be found on Samson’s website.

    I, for one, will be keeping an eye on the freeways next summer to keep an eye out for cars sprouting wings.  No more traffic jams!

2 Comments

Leave a Reply

Your email address will not be published. Required fields are marked *