Cirrus CAPS Pull in Arkansas

Cirrus CAPS pull #55 took place at the beginning of November over Fayatteville, AR.  From initial reports, it appears a clamp broke on the oil cooler, causing a loss of oil pressure.  It does not appear that the engine immediately quit, but an annunciator alerted the pilot that the engine was losing oil pressure.  At this point, it appears the pilot elected to do an emergency descent to an airport below him, but ended up not timing it right, missing the airport and pulling the parachute.

As an experienced Cirrus flight instructor, there appears to be some suspect decision making in handling this operation.  I teach in a Cirrus that if an oil light comes on, given that a pilot has some altitude to work with, it is a better option to physically shut the engine down, leaving control of the situation in the pilot’s hands.  This way, the pilot knows when the engine is stopping and is prepared for it, instead of the engine acting erratically and causing problems on the descent.

After checking the engine gauges and shutting the engine down, a pilot should establish best glide first, not nose down and descend at a high rate trying to make an airport.  Best glide gives the pilot many more options and a lot more altitude to work with, further allowing him/her to plan how to make an airport directly underneath the airplane.

To pontificate, it seems that if the pilot had adjusted the plane to best glide, instead of performing an emergency descent, there is the possibility that Drake Field would have been reachable, the chute would not have been needed, and the driver of the truck would not have had to visit the hospital.  Hindsight is 20-20, but this may be an overall training and decision making issue that may need further emphasis.

The initial NTSB report as well as a link to the CBS story is below.

http://www.cbsnews.com/live/video/pilot-forced-to-deploy-emergency-parachute-in-arkansas/

NTSB Identification: CEN16LA026
14 CFR Part 91: General Aviation
Accident occurred Tuesday, November 03, 2015 in Fayetteville, AR
Aircraft: CIRRUS DESIGN CORP SR22T, registration: N857SW
Injuries: 3 Minor, 1 Uninjured.
This is preliminary information, subject to change, and may contain errors. Any errors in this report will be corrected when the final report has been completed. NTSB investigators may not have traveled in support of this investigation and used data provided by various sources to prepare this aircraft accident report.
On November 3, 2015, at 0950 central standard time, a Cirrus SR22T airplane, N857SW, descended under the canopy of the cirrus airframe parachute system (CAPS) and landed on a road in Fayetteville, Arkansas. The pilot, pilot rated passenger and one person on the ground received minor injuries. One passenger in the back right seat was uninjured. The airplane was substantially damaged. The airplane was registered to WG Aviation LLC, Rogers, Arkansas, and operated by a private individual under the provisions of 14 Code of Federal Regulations Part 91 as a personal flight. Visual meteorological conditions prevailed at the time of the accident and an instrument flight rules (IFR) flight plan was filed. The flight departed from the Bentonville Municipal Airport (VBT), Bentonville, Arkansas, at 0934 and was en route to the Waco Regional Airport (ACT), Waco, Texas.

According to the pilot, after departure from ACT he leveled off around 10,000 ft mean sea level (MSL) and was in “VFR on top” conditions. The pilot noticed that the crew alerting system (CAS) flashed a yellow caution light for oil pressure; the engine was still producing power. The pilot notified air traffic control (ATC) of the issue and received vectors to the nearest airport, Drake Field Airport (FYV), Fayetteville, Arkansas. The pilot descended and maneuvered toward FYV as the CAS indicated a red warning light for oil pressure, which had dropped below 10 psi. The engine was producing inconsistent power as the airplane descended to 3,300 ft and FYV was still not in sight due to cloud coverage. The pilot was unable to maintain altitude and the airplane’s stall warning horned sounded. The pilot deployed the Cirrus airframe parachute system (CAPS) and descended to the ground. During the landing the airplane collided with a truck and then came to rest on a four lane road.

At 0953, the weather observation at FYV reported wind from 190 at 9 knots, gusting to 17 knots, 10 miles visibility, clear sky, temperature 61° F, dew point 57° F, and altimeter setting 30.11 inches of mercury.

An initial postaccident examination was conducted on November 4, 2015, in Fayetteville. Engine oil was observed on the underside of the fuselage. The oil cooler cross fitting was broken and oil was observed in the engine compartment.

The airplane’s recoverable data module and three data cards were removed and sent to the NTSB Vehicle Recorders Laboratory for download.

The airplane has been retained for further examination.

Similar Posts

  • The Go Around Button

    Back in the old days, when flying an approach in an early Cirrus SR22 (circa 2004; yes, in airplane technology, those were the old days), performing a missed approach procedure was a lot of work.  You were low to the ground and weren’t able to see the runway.  Then, you had to start climbing so you don’t hit the ground, then push a lot of buttons in order to get the GPS and autopilot set fly the missed approach procedure.  It was very easy to get distracted with button pushing, then forget to fly the airplane, putting yourself and passengers in very unsafe circumstances.  The go around button has changed all that.

    Going Missed the Old Fashioned Way

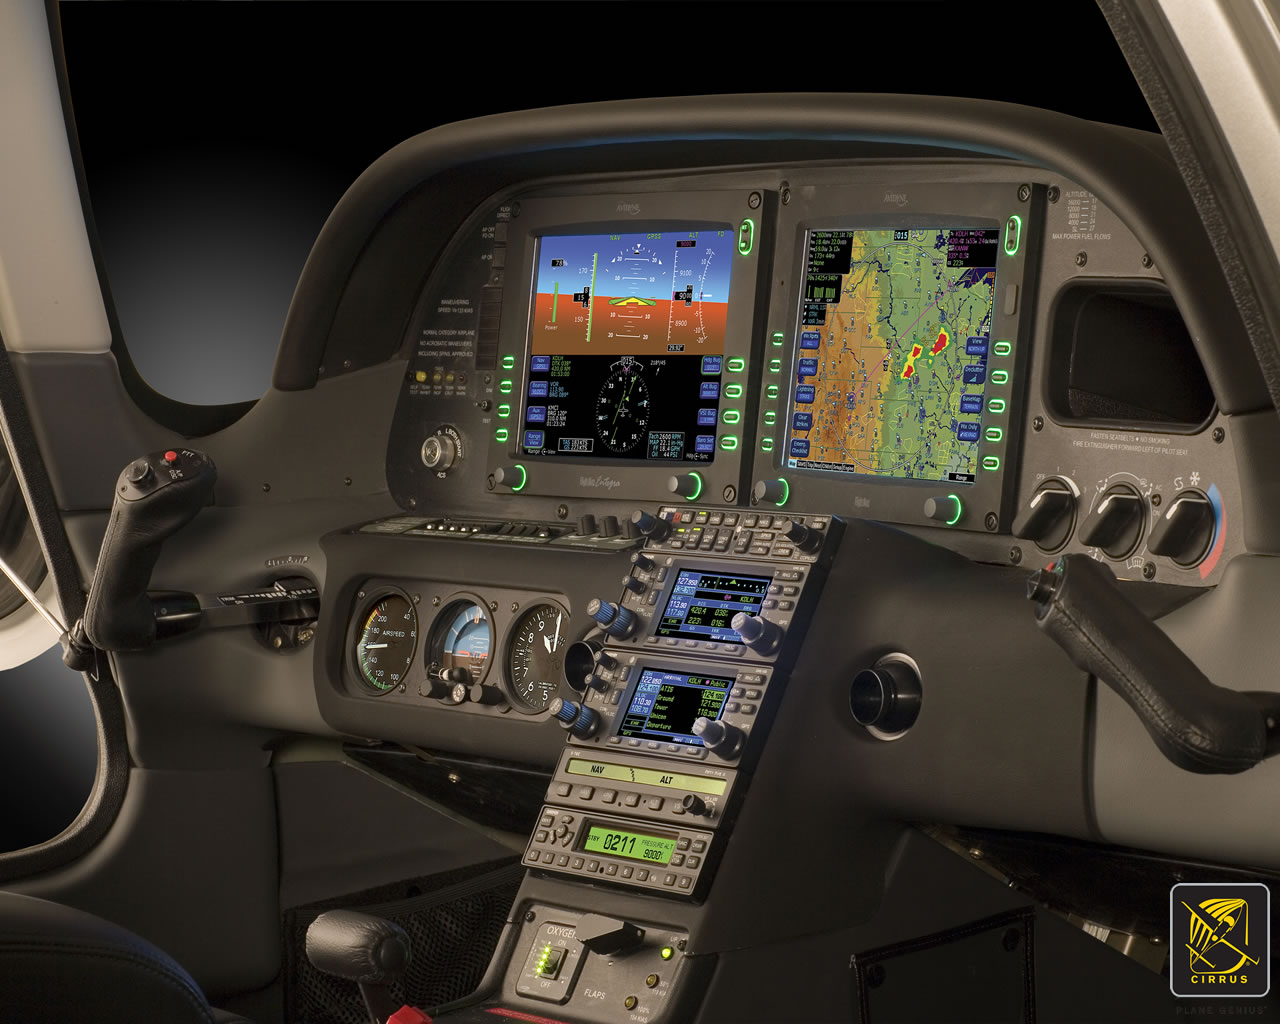
    Let’s stick with our example of the 2004 Cirrus.  The SR22 in 2004 was equipped with the Avidyne Entegra system, complete with dual Garmin 430 GPS units, and an STEC 55x Autopilot.  A very capable IFR flying machine (we could use the same example of a 2004 or 2005 Lancair Columbia 350 or 400 that was equipped the same way, except the screens were vertical instead of horizontal).

    Avidyne Cirrus Go Around Button

    We’ll use the ILS 15 at the Temple airport, KTPL, for our example.  You pass TPL, the outer marker at 1,683 with the glide slope already centered.  Everything is going well so far.  The number 1 Garmin 430 is set to VLOC and the autopilot is showing NAV and APR for the lateral guidance and GS on the vertical, tracking the glide slope.  The last weather report stated the clouds were Broken at 500 feet, so it appears like you’ll be able to get in on the approach.

    As you get closer to the Decision Altitude, the clouds aren’t letting up at all.  You hit 1,000 feet on your altimeter, 120 feet above the minimums, and you still can’t see a thing.  Another 100 feet lower doesn’t change anything, so you elect to proceed with the missed approach.  This means things are about to get busy.

    Here’s the process:

    • Fly the airplane first, meaning shut off the autopilot, pitch the nose up to about 7 degrees, TRIM, add full power, retract the flaps, and step on the right rudder
    • The Garmin 430 is now in SUSP mode, meaning the missed approach point is locked in as the active waypoint.  So, you have to press the OBS button to cause the GPS to cycle over to the missed approach procedure
    • You have to press the VLOC button on the Garmin 430 in order to change the CDI back to GPS
    • You have to re-engage the autopilot by pressing NAV twice (which engages GPS Steering mode)
    • You have to reset your altitude bug (if you hadn’t set it for the missed approach altitude previously)
    • You have to press VS and ALT on your autopilot to have the STEC continue the climb

    That’s a lot of work, isn’t it?  Plus, that’s an extensive amount of head down time in the cockpit, with your eyes looking elsewhere other than the instruments while hand flying.  All very low to the ground, I might add.  Can you see how this can be dangerous?  (Note:  The Avidyne IFD 550 has made this a little easier with automatically switching from VLOC to GPS and automatically engaging the missed approach procedure in the flight plan)

    The advent of the Go Around Button has streamlined the process, leading to safer operations where it matters most.  The functions of the Go Around Button vary based on the airplane, but here are three examples, the Garmin G1000 Cessna Corvalis TT, the Garmin G1000 Piper Mirage, and the Garmin Perspective Cirrus SR22.

    Cessna Corvalis TT

    We’ll take the above situation and swap out the airplanes.  Gone is the 2004 Cirrus SR22.  Insert a 2008 Cessna Corvalis TT, equipped with the Garmin G1000 suite and the GFC 700 autopilot.  The go around button is positioned directly above the twist in throttle.

    Cessna Corvalis G1000 Go Around Button

    When you push the Go Around Button, here’s what the system does:

    • Disconnects the Autopilot
    • Sets the Flight Director for 7.5 degrees pitch up (which is about your normal climb angle) and wings level
    • Switches the CDI back to GPS
    • Takes the GPS out of SUSP mode and cycles the flight plan to the first waypoint on the missed approach procedure

    Here’s what you have to do:

    • Follow the flight director by pitching the nose up and TRIM
    • Add full mixture, prop and throttle (prop & throttle should be full already)
    • Retract the flaps
    • Step on the right rudder
    • Re-engage the autopilot, then press NAV and VS (or FLC) and set your altitude bug if it isn’t already set

    Not too bad, eh?  Makes the whole situation streamlined and safer.

    Piper PA46-350P Mirage

    Same situation, different airplane.  You’ll notice the procedure for the Piper Mirage is almost exactly the same as the  Corvalis procedure.  The difference between the two airplanes is where the autopilot controller is.  In the Corvalis, the autopilot controller is positioned on the left side of the MFD, making it easy to scan back and forth while pushing buttons on the autopilot.

    The Piper Mirage autopilot controller is positioned below both screens and in front of the power quadrant. With this positioning, the pilot’s eyes have to go a lot further to see which autopilot button he is pushing. In this case, it becomes very important to get the airplane climbing and trimmed before going down to engage the autopilot.

    As in the Corvalis, here is what the Go Around button does:

    • Disconnects the Autopilot
    • Sets the Flight Director for 7.5 degrees pitch up (which is about your normal climb angle) and wings level
    • Switches the CDI back to GPS
    • Takes the GPS out of SUSP mode and cycles the flight plan to the first waypoint on the missed approach procedure

    And here’s what you have to do:

    • Follow the flight director by pitching the nose up, then TRIM
    • Add full mixture, prop and throttle (prop & throttle should be full already)
    • Retract the flaps
    • Step on the right rudder
    • Re-engage the autopilot, then press NAV and VS (or FLC) and set your altitude bug if it isn’t already set

    Cirrus SR22

    Cirrus Perspective Go Around Button

    This time, we’ll use the 2010 Cirrus SR22T with the Garmin Perspective and GFC 700 Autopilot. One thing I really like about how Cirrus configured their system is where the Go Around button is.  It’s actually on the throttle itself, making it much more intuitive.  This way, you can press the Go Around button while adding full throttle.

    There is one major difference between the Garmin Perspective in the Cirrus and the G1000 in the Corvalis. When you press the Go Around button in the Cirrus, the autopilot actually stays on.

    Here’s what happens when you press the Go Around button in the Cirrus:

    • Flight Director pitches to 7.5 degrees pitch up and wings level
    • AP Mode switches to Go Around mode, following the flight director
    • GPS comes out of SUSP mode
    • CDI switches back to GPS

    All the pilot really has to do is add power, take the flaps up, then press NAV on the GFC 700 to get the autopilot following the missed approach procedure.

    If you aren’t familiar with the Go Around button or haven’t used the one in your plane lately, it’s good to go up with a knowledgeable instructor and fly a couple of approaches where you perform the published missed approach afterward.  That way, he or she can assist you through the first missed approach, then give you pointers until  you get comfortable with the Go Around button.

  • Dallas Airspace Changes

    As was the case with the Class B Airspace around Houston several months ago, the Class B Dallas airspace has been overhauled as well.  These changes were implemented at the last database update on September 18th.  If you’ll be flying into any of the Dallas airspace airports IFR, make sure you have current charts and your GPS databases are updated.

    According to AOPA, 14 SIDs and STARs were deleted, a number of new procedures were added, and changes were made to most of the other remaining procedures.  The new procedures in the Dallas airspace consist mainly of RNAV procedures for turboprops and jets, so most GA aircraft won’t be affected by those.  The legacy procedures that remained in place over went changes, including new frequencies, so piston aircraft going into the Dallas airspace are still affected.

    From AOPA, departures from Dallas Love (KDAL) that file their flight plan with special equipment /G in their flight plan will automatically be given an RNAV departure procedure.  This does not appear to affect piston aircraft as all the new RNAV SIDs in the Dallas airspace are for turboprops or turbojets.

    The reason for the changes to the Dallas airspace?  Similar to the changes in Houston, these airspace changes are meant to streamline departures and arrivals in the Dallas airspace area, reduce controller workload, and give continuous descent angles for arriving high altitude traffic.

    Don’t be surprised the next time you are in the Dallas airspace area if you receive a clearance that states:  “Descend via the arrival.”  In that case, just check the chart and aim for the appropriate altitudes at the appropriate fixes.  As we move closer to the ADS-B requirement, I believe we will see more and more of these terminal procedure overhauls, so be prepared and keep those charts and databases up to date.

  • Setting Standards

    Type Clubs Lead By Example with Standard Operating Practices

    This article appeared in the May 2019 edition of EAA’s Sport Aviation Magazine. It is used with permission. For other articles by Charlie Precourt, please visit EAA.org and join for a full subscription.

    Imagine a year when there are no fatal accidents in general aviation. Does that seem impossible? The airlines achieved that many years ago, and so can we if we focus on the right things in our safety pro- grams. In fact, the overall trend in GA accident rates over the last few years is very encouraging. AOPA’s Air Safety Institute published its annual GA Accident Scorecard recently (see www.EAA.org/ extras), revealing fatal accidents from 2008 to 2017 are down more than 30 percent. Nevertheless, there were 185 fatal accidents in 2017, so we still have a long way to go. But, there are many developments in safety programs across GA that can keep the trend going.

    One such development that I’ve advocated through a couple of type clubs is establishing standard operating practices (SOP). When I flew for both the U.S. Air Force and NASA, we had what we called standard operating procedures. They were the law for our flying. That is, we had to follow them procedurally because the folks that paid our salaries said so. The objective was to ensure we all used the same playbook, minimizing the risk that one of us might develop a bad in-flight habit that increased risk to the organization.

    One way to think about SOPs is to recognize the difference between procedure and technique. For example, you have to follow the manufacturer’s pilot’s operating handbook (procedure)where it says to lower the landing gear before landing. If you don’t, you are in for a bad day. However, it does not tell you exactly when to lower the gear; that’s left to technique.

    In the middle, between procedure and technique, is a best practice. In this example, lowering the gear just before the final approach fix is a “standard practice.” It is the generally accepted “best” place to lower the gear. In GA, however, aircraft owners don’t generally answer to a boss, so I prefer the term practices instead of procedures.

    However, whether or not someone is paying us to fly, following best practices just makes sense. If you have a good set of practices, they enable you to do things the same way every time, leaving lots of brain cells to manage the unusual, the things that might go wrong. The safest approach to accomplishing a flight task is one that leverages consistency. On the other hand, if you are inconsistent, doing flight tasks differently each time, you’ll always be struggling to keep up. So, in my involvement with the safety committees for both the Malibu Mirage Owners and Pilots Association and the Citation Jet Pilots Association, there has been broad acceptance of recently developed standard operating practices.

    The good news in this development is that a culture of safety is growing broadly across most sectors of GA through these type club initiatives. Perhaps more importantly, there is much to learn from each other about the effectiveness of these various initiatives. EAA has seen a four-year drop of 47 percent in fatal accidents among homebuilts! So, there must be something right going on there — a major focus on appropriate transition training before flying a new homebuilt (as a standard operating practice) is paying off.

    So, what is covered in the SOPs these type clubs have developed? The following outlines the kinds of standard practices other type clubs have set up and represent SOPs you could establish for yourself regardless of the type of aircraft you fly. You just have to fill in the blanks for your particular type and commit to sticking to them in your flying. These are notional and are practices (not mandatory procedures). They don’t tell you how to fly your aircraft; they give you things to think about when you do. If you take a bit of time to set your own SOPs and then stick with them, you’ll be a far safer pilot. Here are some ideas:

    Duty Day

    Set the maximum number of hours of flight time during a calendar day and rest hours off between flying days. One example is a maximum of eight hours in the air and a minimum of 10 hours off until flying again.

    Cargo

    Establish best practices for what you will carry as cargo. One example is no lithium batteries in the baggage compartment.

    Flight Planning and Preparation

    What are your limitations for the types of flight you’ll take on? Consider SOPs such as designating a suitable alternate airport for all flights. Another might be for first flights after significant maintenance, such as no flight at night or in IMC until a day-VMC functional check flight has been done.

    Runway Field Length Guidelines

    Establish an appropriate minimum field length for your aircraft and commit to not going into shorter fields. Consider sea level operations and high-altitude airports as well.

    Surface Operations

    What should be your maximum wind conditions for taxi, takeoff, or landing? Maximum acceptable crosswinds on landing? Set them in your SOP and stick to them.

    En Route

    Consider establishing practices like no non-operationally necessary conversation below 10,000 feet MSL, during any segment of an approach procedure, or during the last 1,000 feet before leveloff during climb or descent. Also consider declaring “minimum fuel” when the fuel state becomes less than fuel to destination plus 45 minutes at current burn, even if flying day VFR.

    Approach and Landing

    Consider establishing personal minimums in your SOPs for things like visual approaches. Perhaps use a 1,500-foot ceiling and 3 miles’ visibility for day and 5 miles for night, even though these exceed the FAA’s requirements.

    Pilot Limitations, Training, & Currency

    FAR Part 91 rules allow us to fly with pretty marginal levels of currency. Consider setting your own SOP to something more appropriate for the kind of aircraft you fly and the kind of flying you do in it. For example, consider these ideas as SOPs:

    • If you have less than 100 hours of time-in-type or have not flown at least 15 hours as pilot in command in the last 90 days, use a minimum planned fuel reserve of one hour.
    • Also, if flying IFR in this situation, use a minimum visibility for takeoff of 1 mile.
    • On instrument approaches, increase the published minimums by one- half mile visibility and add 200 feet to the decision altitude or minimum descent altitude.
    • Perform landings at a weight that allows a full stop in 60 percent of available runway length.
    • Consider an SOP that establishes you will fly with a CFI on a refresher flight before flying as pilot in command if you have not logged at least an hour of flight time and one takeoff and landing in an aircraft of the same type within the preceding 45 days.

    Maneuver Standards

    Wherever there are “techniques” associated with things like takeoffs and climbs, cruise, use of autopilot, power settings, and approaches and landings, you can write down your preferred technique as your own SOP. Describe each maneuver in enough detail (speeds, altitudes, power settings, configurations, etc.) to define a routine you will use each time. This ensures you fly consistently each flight and leverage the power of the standard operating practice, that is, to give you the bandwidth you need should you encounter an unexpected event or an emergency.

    SOPs are among the exciting concepts underway to make safety programs work for us. Hats off to type clubs like MMOPA and CJP and many others that are taking the initiative. But even if you’re not in this kind of group, you can still set up your own SOPs. Let’s all look forward to our first year in GA without a fatal accident — and let’s make it soon!
    Fly safe!


    Charlie Precourt is a former NASA chief astronaut, space shuttle commander, and Air Force test pilot. He built a VariEze, owns a Piper JetPROP, and is a member of the EAA board of directors.

  • Cirrus SR20 Partnership Forming at KHYI

    Ever wanted to be a Cirrus owner, but the economics of being a single owner just don’t make sense for you? If you’re in the San Marcos/New Braunfels/Austin area, you now have a chance to join a Cirrus SR20 partnership at the San Marcos Municipal airport, KHYI.

    The Cirrus SR20 partnership group is looking for 2-4 more members to buy in to a 2006 or 2007 Cirrus SR20 GTS.  The plane will be kept at KHYI and the group already has a hangar for it.

    For more information, please contact Texas Top Aviation at info@txtopaviation.com.

    Cirrus SR20 Training


  • Cirrus Braking Systems: A Hot Topic

    You just bought your Cirrus SR22. You do some flying, and soon find yourself with a brake temp sticker that isn’t white anymore. You remember from your transition training that any color other than white is a no go. You now ponder…. I don’t remember getting on the brakes hard, or riding the brakes while taxiing, but sure enough they aren’t white anymore. You now start thinking that all the horrible rumors of Cirrus brakes are true. They overheat so fast!

    I would like to share some little-known facts about the Cirrus factory equipped braking system. Following the procedures below can help make the brakes last a little longer. There is also a very popular STC that allows upgraded brakes to be installed on all SR series aircraft. More to come on that.

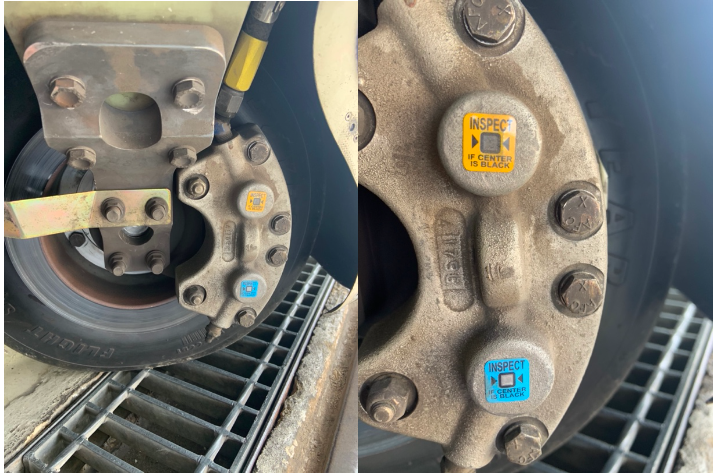
    Notice the Top Yellow sticker is far darker than the Bottom. The Yellow temperature indicator turns at 300 Degrees, while the bottom Blue indicator turns at 330 Degrees. This is an indication to the pilot that if the bottom sticker has turned colors, that the braking system has exceeded 330 degrees and is in need of servicing.

    Above is a photograph of an SR22 G1 braking system with turned brake temp stickers. The first things you may notice is that there are in fact two brake temperature stickers. We can only see the bottom blue sticker from the inspection port on the wheel pants. The other is higher on the caliper; in order to see it, the wheel pant must be removed. This isn’t common knowledge because there is no mention of this additional indicator in the POH.

    Now you may be asking yourself, what can I do to extend the service life of my factory equipped Cirrus brakes? Here are some tips. First, always taxi at 1000 RPM and use the rudder as much as you can while only tapping the brakes. This is not fool proof, since sometimes, depending on the grade, you will have no choice but to utilize brake tapping to keep the aircraft going straight. Taxiing is not typically where the brakes get overheated, though, but this is still a good practice to follow.

    What we tend to see is that the Cleveland brakes are generally overheated on landing. We always recommend to make sure your final approach speed is not excessive, land in the first 1/3 of the runway, and let the aircraft rollout to a smooth stop. What tends to happen is that the aircraft is too fast, and the pilot tries to exit at a certain taxi way, or brakes hard and continues to ride the brakes after landing during taxi. If you do your best to avoid these habits, it will serve you well.

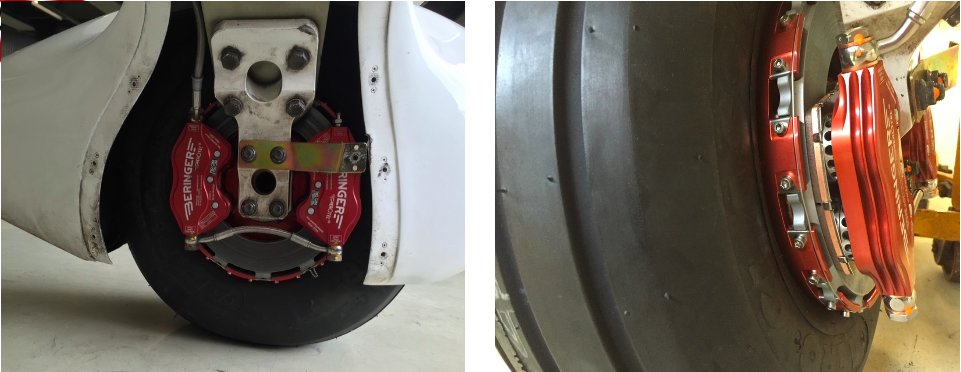
    This braking system remained unchanged all the way until the 2016 G5 Cirrus SR series. Starting in 2016, the factory equipped G5 and G6 Cirrus SR series all now come standard with a single piston hydraulic braking system from Beringer. The Cirrus Beringer brakes far exceed the braking power and durability of the old system. The new system is more robust, withstands heat better, and is is very well built. There is also an option for an upgraded dual caliper system to increase durability and stopping power. A braking system STC for the older Cirrus G1 through early G5 models was created to upgrade those airplanes to the better stopping power and cooling of the Cirrus Beringer brakes.

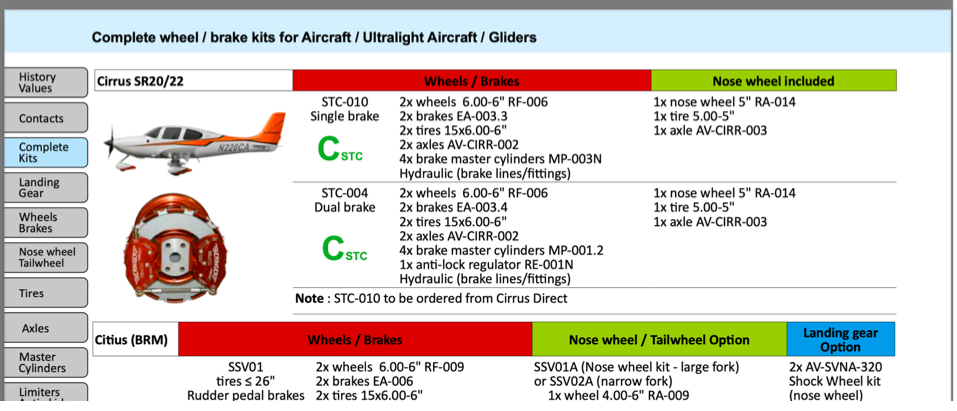
    Seen above is a page from a Beringer catalog highlighting the Cirrus SR series STC kits. Your local Cirrus service center will be able to quote prices for the kits. We have over 1000Hrs spent behind Beringer equipped Cirrus aircraft and the difference is quite apparent. The pilot has better control of the aircraft, no spongy pedal, and the confidence to get the plane stopped without possibly overheating the braking system. This, in our opinion, is one of the best upgrades you can do to your Cirrus.
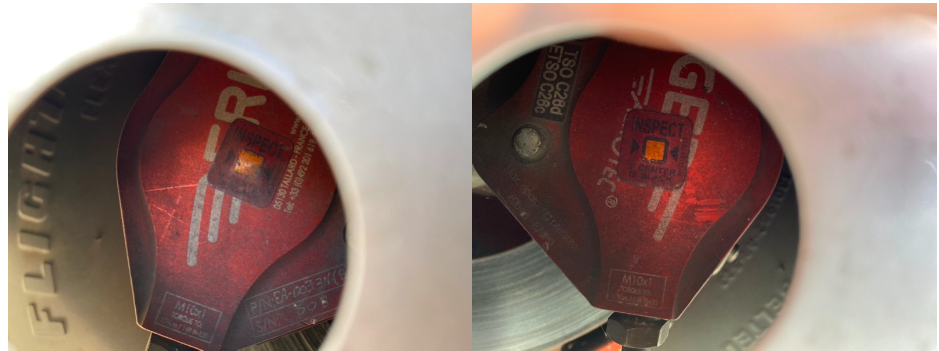
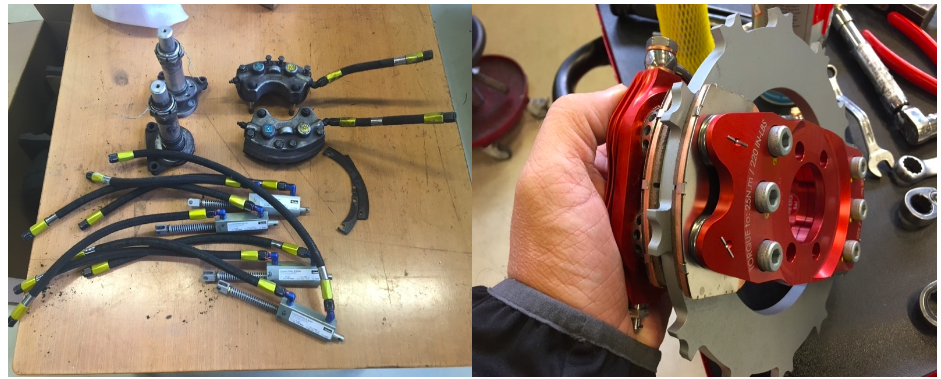
    Above is what an STC upgraded braking kit from Beringer looks like, as well as the new temperature indicator for the pre/post flight inspection. Notice the black spot on the left hand picture. These brakes have been overheated.

    One other difference for a pilot to note is that once upgraded to the Cirrus Beringer brakes, there is only one temperature indicator and it changes color at a whopping 450 Degrees Fahrenheit! Needless to say, it can handle some heat! The new temperature indicator is now Orange in color and turns grey/black when overheated.

    On the left are the original Cirrus factory brakes. On the right is the caliper to the new Beringer brakes for a Cirrus.
    Dual Caliper Cirrus Beringer Brakes

    The Cirrus Beringer brakes upgrade is quite a step up in the world of slowing down. However, this doesn’t mean that they are completely issue free. There is one little-known problem with Beringer brakes that is not that big of a deal and can be fixed with relative ease.

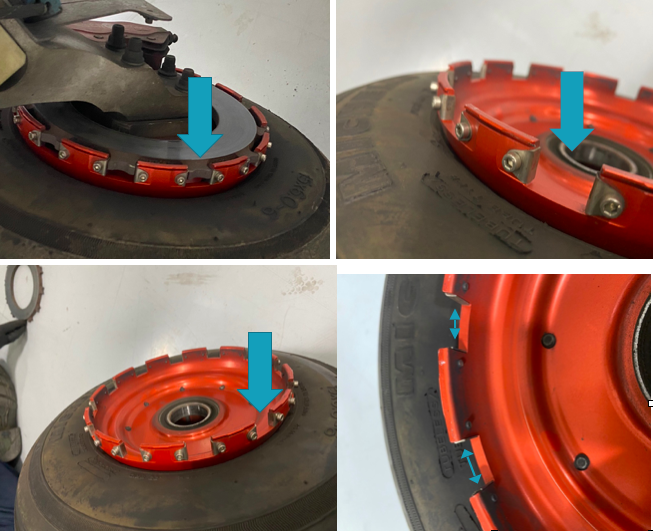
    The rotor on the Beringer braking systems is “free floating,” meaning it is not necessarily “fixed” in position when secured down to the spindle. It is “keyed” into the wheel rim with the male and female side interlocking.

    The brakes occasionally will get noisy, causing a “knocking” noise when brakes are applied. This noise is caused by the small metal tabs that tighten up the space between the wheel and the brake rotor. This is so the small tabs wear with use instead of the aluminum rim that they are fixed to. So, if your Beringers are making a knocking noise when brakes applied, this is most likely your culprit.

    These gaps above are the “keyed” position where the rotor finds home in the rim. Without these tabs that wear with use, we would be replacing the rim more often than the much cheaper replaceable tabs.

    It is highly recommended to upgrade your original Cirrus factory brakes to the new Beringer braking system. You will deal with less maintenance, less chance of a brake overheat, and less confusion on whether or not your brakes are airworthy. For more info, you can check out the Cirrus website for the single or dual caliper Beringer brakes.


    Zach Anderson is a Cirrus Standardized Instructor Pilot (CSIP) for Texas Top Aviation. Zach comes from a auto mechanic background and is very familiar with the ins and outs of maintenance. He started working for Texas Top Aviation in December 2020.

Leave a Reply

Your email address will not be published. Required fields are marked *