|

Dry Motoring a PT6

When it comes to turboprop engines, a hot start is a really bad thing. For you piston drivers out there thinking, “What’s the big deal, you are just starting a hot engine,” then here’s a little education for you.

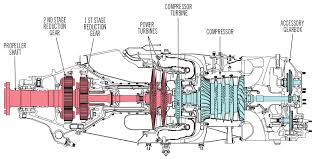
In a PT6 turboprop engine, there is a very important temperature gauge that a pilot monitors very closely during each and every start. It is called the Inter-Turbine Temperature gauge, or ITT. This temperature is a measurement of the exhaust gases between the compressor turbine and the power turbine (s). In the picture below, the probe is located where the blue and red colors meet.
In a turboprop engine, specifically the Pratt & Whitney PT-6 in all it’s different sizes and variations, there will always be a specific temperature that the pilot will want to keep the ITT below. This article will deal specifically with a Piper Meridian.

A Piper Meridian starts hotter than almost any other PT6 engine because of the way it’s air intake is designed. Unlike other turboprops, the Meridian has a permanently open inertial separator. This means that not all the intake air makes it to the engine during start because some of it goes out the inertial separator opening. So, coming to a Meridian from operating other turboprop engines can lead to a little bit of a surprise on the ITT temperature being higher than what a pilot is used to when starting.

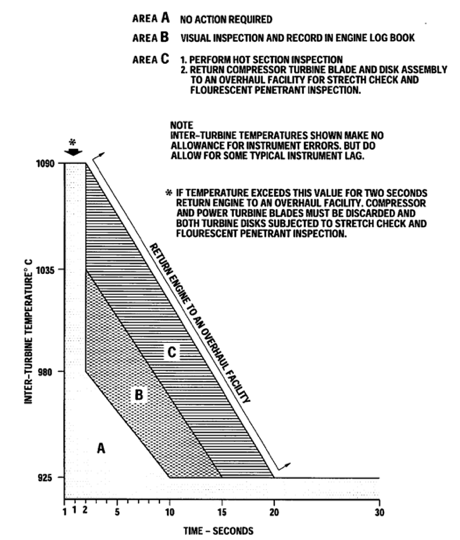
As a rule of thumb, when starting a Meridian, never let a start continue when the ITT hits 875 degrees. Based on the chart below, you are still in the safe zone at 875 and have about a 50 degree buffer before you have to start getting worried.
On cold starts with a good battery or a GPU, 875 is typically not an issue. Most starts when cold are going to be in the high 700s or low 800s. On a cold start, if you are seeing starts in the mid to upper 800s, try starting with a GPU and see if that lowers the start temperature. If it does, then that means your battery is weak and needs to be replaced. Another tell-tale sign of a weak batter is the Ng doesn’t spool up properly (meaning it settles around 12-13%) or takes a really long time to spool up. Also, never start on the battery with less than 24 volts.

When there are multiple flights in one day, the pilot has to take into consideration the warm engine prior to starting. If the ITT, prior to the start sequence, is above 150 degrees, it is time to do some motoring of the engine.

What is motoring? It is simply using the starter to turn the engine, which leads to air being sucked into the engine allowing the engine to cool off prior to start. The theory is, the cooler your engine prior to start, the cooler the ITT peaks at during start.

Here’s the steps on how to dry motor a Piper Meridian:

  • Battery on
  • Strobes on
  • Fuel Pumps and Ignition off
  • Throttle idle
  • Condition Lever feather/cutoff
  • Push the start button
  • Monitor the ITT temperature
  • Reaching 150 degrees, if less than 30 seconds have elapsed:
    • Fuel Pumps on
    • Ignition On
    • Condition Lever run
  • Reaching 150 degrees, if 30 seconds have elapsed:
    • Push Manual/Stop button to stop the start
    • Let starter rest for 30 seconds

The starter has a 30 second limit on the Meridian, followed by a 30 second rest period. You can do the sequence twice, then, after the 3rd start, there is a 30 minute rest period. Typically, if the ITT won’t cool down to 150 after the 3rd time, there is probably something wrong.

The most important thing a pilot can remember is never, ever push the condition lever forward if the ITT is above 150 degrees. You’ll be well on your way to avoiding hot starts that way.


Similar Posts

  • The Anatomy of a Hot Start

    Are you one of those pilots who hates fuel stops simply for the fact that the engine doesn’t have time to cool off?  You pump gas into the plane, hit the bathroom, get in the plane and the oil temperature is still up at 160-170 degrees, leading you to have to figure out how to get the plane going again with a hot engine.  For those without proper training, this usually means a lot of jockeying around with the throttle, mixture, and fuel pump to try and get the thing started without flooding it.  After coughing and wheezing several times, the engine finally comes to life, leaving you to only guess what worked and without the knowledge of how to duplicate it.

    Hot Start 2

    Let’s take a step back for a minute to see what is actually happening with a hot engine.  Once the engine is shut off, the fuel in the lines leading from the tank to the engine is vaporized, meaning there is more air in the fuel lines than liquid fuel.  In the engine block itself, there is still liquid fuel in the injectors, but only enough for the engine to cough then quit if started.

    When a normal priming and starting procedure is performed, too much fuel is forced into the cylinders and the engine becomes flooded.  A flooded engine just means that the stoichiometric ratio is way too rich, meaning there is too much fuel and not enough air.  The prime does the trick of getting the fuel vapor out of the fuel lines, but it shoves too much fuel into the cylinders.  Once the engine is flooded, it’s a waiting game to allow air into the engine to get the mixture right.  All Lycoming powered high performance and turbo charged engines are notoriously easy to flood when hot.

    So, what’s the solution?  By taking a step back to see what is actually happening, you can attack the problem from the source, which is the fuel lines.  You need to get the vapor out of the fuel lines and get some liquid fuel in there.  The procedure for this varies based on the make and model of engine, but I’m going to use the example of the Continental IO-550-N that is in a Cirrus SR22.  I found this procedure in the Continental Engine Manual and it works every time.

    (Pilots of other airplanes, keep reading.  I have sections below for PA46s, Columbias, and Bonanzas as well )

    • Mixture:  Full Lean (this allows fuel in the fuel lines, but prevents it from going past the mixture control into the engine, sending all fuel back to the fuel tank; a small amount of fuel leaks past the mixture control providing prime for the engine)
    • Throttle:  Idle
    • Low Boost Pump:  Run for 30-60 seconds (see note below)  (15 seconds in the Turbo Cirrus)
    • Mixture:  Full Rich
    • Throttle:  Open about 1/4 travel (not 1/4″, that won’t be enough)
    • Boost Pump:  Off, but have your finger on Low Boost
    • Starter:  Crank (engine will turn over a few more times before firing, this is normal)
    • At the first indication of start, turn the Low Boost on, increase the throttle to ensure the engine catches,  then adjust the throttle for 1,000 RPM
      • The engine will fire right about the time you start thinking it isn’t going to work

    A few notes regarding engine temperatures:

    • If the oil temperature is above 150 degrees, a hot start will be required.  If oil temp is close to 200 degrees, run low boost for 60 seconds in a non-turbo.  If oil temp is 175, run low boost for 45 seconds in a non-turbo.  If oil temp is 150, run low boost for 30 seconds in a non-turbo.  Use 15 seconds for all temps above 150 in a Cirrus Turbo.
    • If the oil temperature is between 125-150, skip the hot start procedure, don’t prime the engine, leave the boost pump off, and crank the engine, then boost pump on when it starts and slightly increase throttle to make sure the engine catches
    • If the oil temperature is between 100-125, skip the hot start, don’t prime the engine, and perform a normal start with the boost pump on
    • If the oil temperature is below 100, perform a normal prime and start

    Piper Malibu (PA46-310P with Continental Engine)

    • Mixture:  Full Lean (this allows fuel in the fuel lines, but prevents it from going past the mixture control into the engine, sending all fuel back to the fuel tank; a small amount of fuel leaks past the mixture control providing prime for the engine)
    • Throttle:  Idle
    • Low Boost Pump:  Run for 15-30 seconds depending on oil temperature…
      • Greater than 150 degrees: 30 seconds
      • Less than 125-150 degrees:  15 seconds
      • Less than 100-125 degrees, no need to run the Low Boost
      • Perform normal cold start below 100 degrees
    • Mixture:  Full Rich
    • Throttle:  Open about 1/4 travel (not 1/4″, that won’t be enough)
    • Boost Pump:  Off, but have your finger on the Primer Button
    • Magnetos:  On
    • Starter:  Crank (engine will turn over a few more times before firing, this is normal)
    • Engine should fire with the Low Boost Pump off, but…
      • If the engine starts to die, simultaneously increase the throttle a little bit and hit the primer button.
      • Only tap the primer button, don’t hold it as you’ll flood the engine if you hold it At the first indication of start, turn the Low Boost on, increase the throttle to ensure the engine catches,  then adjust the throttle for 1,000 RPM

    Piper Mirage & Matrix (PA46-350P and PA46-350T with Lycoming Engine)

    • Leave throttle and mixture idle
      • Before you turn the battery on, ensure the mixture is idle cutoff
      • If the mixture is forward and the battery is on, the low boost pump in the fuel tank will start pumping fuel to the engine and quickly flood it
    • Ensure Magneto switches are on
    • Open throttle 1/4 travel (not 1/4″ as this won’t be enough)
    • Crank
    • As soon as the engine begins coughing and wheezing (and this is what it will sound like), push the mixture 3/4 of the way forward
    • Once the engine has a good solid fire, smoothly and swiftly push the mixture all the way forward
    • Reduce throttle
    • Note:  The Emergency Boost Pump can be used as part of the hot start technique, but I usually leave it off.
      • Pro to the Emergency Boost Pump is it can help suck more fuel in and purge vapor during the start
      • Con is that if the engine doesn’t start on the first try, you are flooding your motor

    Columbia 400

    • Throttle and Mixture Idle Cutoff
    • Vapor Suppression:  Run for 30-60 seconds.  Reference above temperatures on the non-turbo Cirrus for run times
    • Mixture full forward
    • Throttle 1″ in
    • Prime for 3 seconds, then off
    • Crank
    • Once engine fires, primer might need to be pushed momentarily to purge excess vapor
      • On Columbia 350s, the throttle should be twisted (or pushed depending on if it’s an Avidyne or Garmin Columbia) in while cranking
      • Be prepared to reduce power once engine fires

    Beechcraft 36 Bonanza

    • Throttle and Mixture Idle Cutoff
    • Low Boost:  Run for 30-60 seconds.  Reference above temperatures on the non-turbo Cirrus for run times
    • Mixture full forward
    • Throttle open 1″
    • High Boost until fuel flow peaks, then off
    • Crank
    • Once engine fires, Low Boost might need to be engaged momentarily to purge excess vapor

    There are other “procedures” for hot starting out there, but most of them involve starting with full throttle, which can lead to the airplane shooting ahead on a ramp or taxi way if the brakes aren’t properly set.  This can lead to high repair costs, so always be cautious.  Figuring out what is happening when the engine is hot will give you a better chance of getting it started right away.

  • Hank Gibson Earns ABS Instructor Designation

    ABS Instructor

    Texas Top Aviation is proud to announce that Hank Gibson has completed the training to become an American Bonanza Society Instructor, or ABS Instructor.  He is now qualified to give instruction in Beech Aircraft.

    As an ABS Instructor, Hank brings over 2800 hours of flying experience in a variety of aircraft to the cockpit of Beechcraft. Along with his ABS Instructor Designation, Hank is also a Cirrus Standardized Instructor Pilot (CSIP) and a Cessna FITS Accepted Instructor in both Cessna high and low wing piston aircraft (CFAI+). Hank is proud to add the ABS Instructor designation to his list of qualifications.

    The process of becoming an ABS Instructor is quite comprehensive. The coursework consists of 20 powerpoint lessons covering anything and everything related to flying Debonairs, Bonanzas, Travel Airs, and Barons.  The ABS Instructor course is quite in depth and detailed, giving the graduate a full understanding of the Beechcraft piston line of aircraft.  To find out more about ABS Instructors, see the ABS website.

    Hank is now giving initial and recurrent training in Beech Debonairs and Bonanzas.  Please visit the Texas Top Aviation Bonanza Training page for more information on Bonanza and Debonair initial and recurrent training.  Interested in Bonanza or Debonair training with a qualified ABS Instructor?  Contact Texas Top Aviation today!


  • Redbird Skyport Fly-In Rescheduled

    The Bluebonnet Fly-In at Redbird Skyport has been rescheduled due to weather and the recent flooding in San Marcos.  The new date for the Bluebonnet Fly-In will be Saturday, June 6th from 10am-4pm.

    Hank Gibson of Texas Top Aviation will still be presenting on Garmin 430/530 Approaches this Saturday at 2pm in the large conference room at Redbird.

  • Night Flying

    Ah, fall is finally here.  In Texas, it arrived about a month late, but showed up with a vengeance.  A strong cold front caused a 40 degree temperature drop in 12 hours earlier this week, bringing rain, lower freezing levels, and lots of wind.

    Fall means cooler temps, but fall also means less light.  The sun begins to set sooner, plus the fall back time change in November cause darkness to spring upon an unaware pilot.

    Before getting in to too many night landings tips, just a friendly reminder, passengers can only be carried at night if the PIC has completed 3 takeoffs and landings to a full stop in the last 90 days during the time period of 1 hour after sunset to 1 hour before sunrise.

    Lots of us have been landing long before sunset for most of the past couple of months, so those night flying skills might be a little rusty.  The best way to remedy night flying rustiness?  Call an instructor and go get some practice.

    In the meantime, here are some tips as to what to expect for your next night flying experience.

    1. Your Eyes Are Very Important.  This may seem like an obvious statement, but night vision can be affected by many things.  Before you takeoff, you want to make sure you can see in the dark.  The FAA recommends no bright lights 30 minutes prior to takeoff.  They also recommend using oxygen at night as this greatly improves night vision, even at low altitudes.  Use off center viewing to help spot traffic or other objects in the air.  Finally, when preflighting, use a red flashlight as much as possible, but if you do have to use a white light, close one eye to keep one eye from being blinded.
    2. Utilize Approach Lights on Landing.  Night landings are very different then day landings.  It is very difficult to get the proper depth perception, not too mention see obstacles below you on your final approach to a runway.  PAPI’s, VASI’s, and instrument approach glide slope’s become very important.  If you are VFR only pilot, if your airport has a PAPI or a VASI, keep 2 white and 2 red (or 1 white and 1 red) lights.  If you see 3 red (or 2 red), climb.  If you see 4 red, definitely climb.  If you are an IFR pilot, I highly recommend always flying an approach at night.  What if your airport doesn’t have a PAPI, VASI, or approach with a glide slope?  You might not want to utilize it at night.  One side note on VFR flight: Clouds are nearly invisible at night.  If you do fly into a cloud (a clue is your strobe lights start reflecting back at you), don’t panic.  If you have an autopilot, turn it on and execute a 180 degree level turn.  If you don’t have an autopilot, start scanning your instruments, keep your attitude indicator blue side up, and make a shallow 180 degree while maintaining altitude.  Then call ATC, advise them what happened, and ask for help.  One more note:  I highly recommend that if a pilot finds that he/she will fly at night at lot, get an instrument rating and fly IFR at night.  It’s much safer.
    3. Practice Landings Before Carrying Passengers.  The tendency when landing at night is to level off too high before flaring, causing the airplane to bleed off speed and energy too high above the runway.  This can lead to a stall, a hard landing, and/or too high of a pitch attitude at touch down causing a tail strike. A good tip is start your level off when you can see the tire marks on the runway.  Make sure you practice night landings, preferably with an experienced instructor who is night current and proficient, before carrying any passengers on board, even if you are night current, but haven’t landed at night in a while.
    4. Night Emergencies.  For engine failures at night, you are very limited on options.  Unless you have a Cirrus equipped with a CAPS parachute system, you really have two options if an airport isn’t within gliding distance.  Find a wide, lighted road that appears to be lightly trafficked.  A word of caution, though:  be careful of light poles, fences, concrete medians, cars, and buildings.  The LA freeway would not be a good option (though there are exceptions to this rule as is evidenced by the picture below).  The second option is find a dark spot and pray it’s a field (or the Hudson River).  As you get closer, you can turn your landing light on to see what the ground looks like.  If it looks good, keep the light on and continue.  If you don’t like what you see, turn your landing light off and continue….

    Flying at night can be the best time of day to fly.  It’s usually smoother, cooler, and you get to see all the city lights.  It is a very different environment, however, so make sure to get some training before darkness settles in on your next trip.

  • Garmin GTN 750 Tips & Tricks

    The Garmin GTN 750 is an awesome piece of equipment.  Garmin tried to make the user interface with the touch screen as simple as possible (though there still is a bit of a learning curve when moving up from a Garmin 530W).  Garmin also integrated several key features that the 530W did not have that makes flying with a Garmin GTN 750 in IFR all that much better.

    The two features of the Garmin GTN 750 I want to focus on today are the “Load Airway” feature and the “Hold at Waypoint” feature.  If a pilot isn’t looking for these specifically, they can actually be a bit hard to find.  The “Load Airway” feature is especially handy when flying IFR long distances with several airways as part of the clearance.  Here’s how to utilize both.

    Load Airway

    1. On your flight plan page, insert the waypoint that you will be joining the airway, or, if your clearance was radar vectors to join an airway, then insert the waypoint on the airway that begins the leg you will be joining on.
    2. Tap the waypoint you just inserted.
    3. A menu will pop up.  Tap Load Airway.
    4. Select the Airway you want from the next menu that pops up.
    5. Then, a list of waypoints will display to exit the airway.  Select the waypoint where you will be exiting the airway.
      1. Note:  Garmin defaults to listing these waypoints alphabetically.  If you unselect the “Sort Alpha” option, it will sort the waypoints by direction and distance from the entry waypoint.  This is a little more practical, easier to work with, and how I recommend doing it.  This way you can either scroll up or down depending on the direction of travel on the airway and find your exit waypoint.
    6. Tap Load.
    7. The Airway and all the waypoints in between your entry and exit waypoints appear in your flight plan.
    8. If you are getting vectors to join the airway, you’ll need to use the Activate Leg function to activate the leg you will be joining the airway on.
      1. On the Flight Plan page, tap the waypoint that ends the leg you want to activate.
      2. On the menu that pops up, tap Activate Leg.

    Hold At Waypoint

    The Garmin GTN 750 allows pilots to place a holding pattern at any waypoint that is in the Nav Database (or any user created waypoint).  Here’s how to do it.

    1. On the Flight Plan page, tap the Waypoint that you want to hold at.
    2. On the menu that pops up, tap Hold At Waypoint
    3. On the next menu that pops up, input either the inbound or outbound course, right or left turns, leg time or distance, and the EFC time, then tap Load.
    4. You will see the hold now as a Waypoint in your flight plan.


    Once the hold is entered, the GPS will go into Suspend mode, suspending the Flight Plan Waypoint Sequencing.  Once you are ready to depart the hold, you will have to tap Unsuspend before crossing the holding point on the inbound leg, then the GPS will resume normal waypoint sequencing.

    These are 2 of the really cool, gee-wiz features of the Garmin GTN 750.  Following the above steps will make IFR flying much easier for the pilot, as well as much more enjoyable!

  • Angelina County Airfest

    The Angelina County Airport in Lufkin, TX (KLFK) will be hosting the Angelina County Airfest on Saturday, October 10th.  The airport will open up at 9am.

    Prepare for a day of food, fun, and some great performances.  There will be warbirds and many other classic airplanes on display, not too mention a number of aerobatic performances as the day goes on.

    To learn more about the Airfest, visit the Angelina County Airfest website.  Tickets start at $10 for adults.

    Angelina County Airfest

Leave a Reply

Your email address will not be published. Required fields are marked *