The Flight Director as a Backup

I’ve noticed that a lot of general aviation pilots tend to ignore the flight director on the attitude indicator.  A lot of pilots don’t even know what it’s there for or how to use it.  Talk to any airline pilot, though, and he or she will tell you how important the flight director actually is.

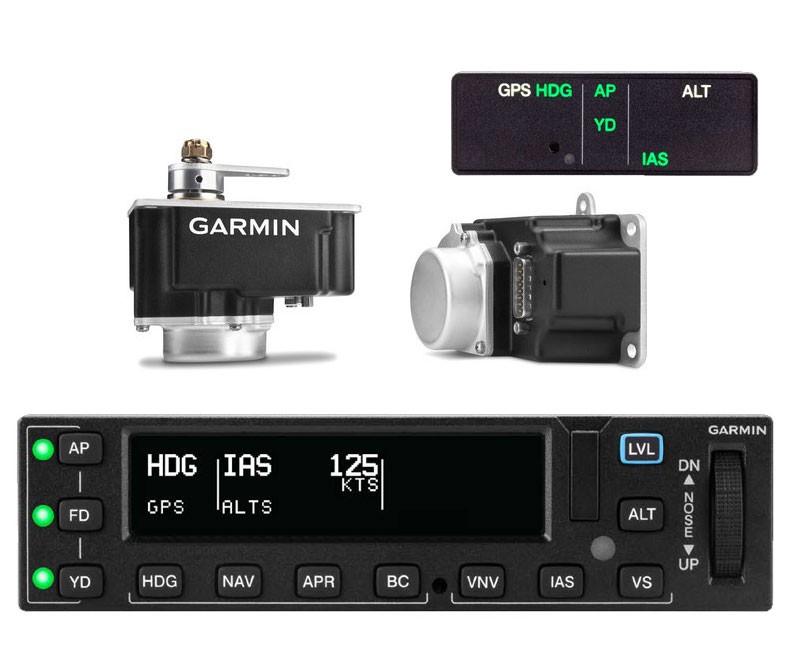
In most high performance airplanes, the flight director comes on when the autopilot comes on.  Essentially, the autopilot is following the flight director, which tells the autopilot where to go.  The flight director can also be used with the autopilot off, when hand flying an approach, for example.  By turning the flight director on, it will show you where you need to fly to stay on course and on glide slope.
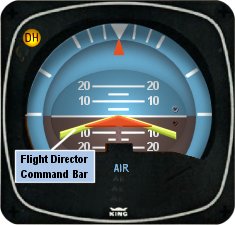
Flight Director

The flight director is most often controlled by the autopilot controller.  The same buttons you use to put the autopilot in heading mode also tells the flight director to follow the heading bug when the autopilot is off.  When you move the heading bug (or change course on the GPS, depending on which mode you have selected), the flight director will show you when you need to turn and when you need to stop turning.  It directs your flight attitude, hence the name.

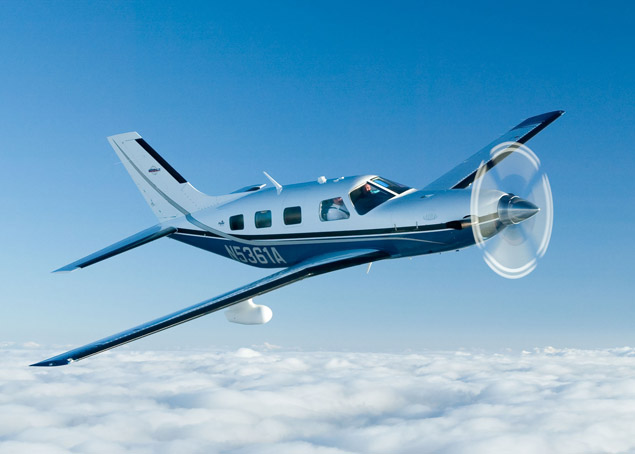
I recently discovered it’s a great backup when you have some instruments on the fritz.  I went on a long flight in a steam gauge Piper Malibu and the attitude indicator started reading erratically.  While flying straight and level, it would randomly indicate that I was in a 10 degree bank to the right, swing back and show wings level, then show a 3 degree turn left.  This went on for a while.  We were in VMC conditions, so legality wasn’t a problem, but it was kind of disorienting.

After a little while of this, the autopilot started acting up.  It would start oscillating the pitch up and down, making it seem like we were going through a moguls course in the air.  I ended up turning the autopilot off and hand flying the airplane.

This led to a conundrum, since my attitude indicator was unreliable.  I could definitely look outside, since it was VMC, seeing when I was level and when I wasn’t.  That would create a higher workload for me, which on a long flight like I was on, would lead to an increase in fatigue.  The solution?  The flight director!

I turned the autopilot off, but I left the flight director up.  It wasn’t referencing the bank angle that the attitude indicator was showing since the KFC 150 goes off of the turn coordinator.  So, if I just followed the attitude indicator, I could just keep scanning the instruments and relieve a little bit of my workload.

It actually worked really well.  By just following the flight director, I was able to stay on course and on altitude with only minor attitude adjustments whenever we hit turbulence.

So, if you’re attitude indicator and autopilot decide to stop working on you, then bring up the flight director, push the same buttons you would if you were using the autopilot, and it works as a great backup.

Similar Posts

  • MMOPA Master Aviator Program

    Last fall, the Malibu & M-Class Owner’s and Pilot’s Association (MMOPA) announced a new program to encourage and enhance safety, the Master Aviator Program.

    The MMOPA Master Aviator Program was designed as a system to recognize those in the Piper PA46 community who strive to become the best pilots they can be. Each year, those who have achieved each of the levels in the program will be honored at the MMOPA Convention (the 2020 MMOPA Convention will be in Tucson in the spring of 2020) by getting Wings pinned on.

    What is the heart behind the MMOPA Master Aviator Program, you ask? Here’s a quote from the MMOPA Website:

    This program is the result of MMOPA having identified areas of flight operation that need improvement to increase safety. It provides a path forward for training for the PA46 pilot, honors those pilots that elect to participate in the MMOPA Master Aviator Program, and rewards those pilots that progress upwards to ultimately reach the highest level (MMOPA Master Aviator).

    The main focus areas of the MMOPA Master Aviator Program are pilot flight experience (flying more during a year increases skills), stall/spin awareness, and operations in the runway environment (improper aircraft handling during takeoff, landing, and go around, with a particular emphasis on rudder control).

    The MMOPA Master Aviator Program tackles these three areas in each of the different levels of achievement: Aviator, Senior Aviator, and Master Aviator.

    To achieve the Aviator Wings, a PA46 pilot must do the following:

    • Complete Initial Training with an Approved Training Provider
    • Fly 100 total hours in a PA46
    • Attend an Approved Mid-Year Training Event (M-Class, MMSTF, MMOPA Safety Standown, MMOPA Maintenance Standown, to name a few)
    • Attend the MMOPA Convention once in the last 3 years
    • No accidents/incidents in a PA46 in the last 3 years

    To achieve the Senior Aviator Wings, a PA46 pilot must have received their Aviator Wings and do the following:

    • Completed at least one yearly Recurrent Training Event
    • Fly 200 total hours in a PA46
    • Go through an approved Upset/Recovery Training course provided by an approved training provider
    • Attend the MMOPA convention once in the last 3 years
    • No accidents/incidents in a PA46 in the last 3 years

    To achieve the Master Aviator Wings, a PA46 pilot must have received their Senior Aviator Wings and do the following:

    • Completed at least two yearly Recurrent Training Events
    • Fly 300 total hours in a PA46
    • Receive a tailwheel endorsement
    • Attended the MMOPA convention once in the last 3 years
    • No accidents/incidents in a PA46 in the last 3 years

    To incentive PA46 pilots, MMOPA offers a $400 voucher to program participants to accomplish the Aviator Mid Year Training, the Senior Aviator Upset/Recovery Training, and the Master Aviator Tailwheel Training. A PA46 pilot is only eligible for one voucher per year.

    I received the Master Aviator Award at the MMOPA Convention this year. All told, there were close to 40 participants who received one of the three levels of achievement at the MMOPA Convention in Amelia Island, FL this year.

    Interested in applying to be a part of the MMOPA Master Aviator Program? You can find out more information on MMOPA’s website.

  • A Tow Pilot’s Near Disaster

    by Lance Stick & Hank Gibson

    A couple of months ago, I had a life-threatening experience while flying. Thankfully, with my flight training, along with a lot of luck, I am here to talk about it.

    One of my many piloting jobs is as a glider tow pilot. For those not familiar with gliding, since a glider doesn’t have an engine, every time a glider pilot goes and flies, it’s a team effort. A powered airplane (anything from a Super Cub to a turbine powered Air Tractor) is attached to the glider via a tow rope, which is about 200 feet long. Once the glider pilot gives the go ahead over the airport’s CTAF, then the tow plane begins it’s takeoff roll, pulling the glider along behind it.

    The glider becomes airborne prior to the tow plane, then the tow plane will circle the airport environment till it get’s to the pre-determined altitude to release the glider. Some tows are pattern tows and some are higher (not usually above 3,000 AGL), depending on the request from the glider pilot. Once the altitude is reached, the glider pilot pulls a handle in the glider to release the tow rope, then begins his glide. The rope stays attached to the tail of the tow plane, which in turn descends back down to the runway and lands. The tow plane also has a tow rope release handle in case of emergency.

    On this particular tow, the plan was to tow the glider up to 3,000 AGL. Upon reaching 2,500 AGL, the glider pilot called me on the radio and stated that his rear canopy had opened up. I looked over my shoulder and sure enough, the rear canopy was fully opened while he was still in level flight behind me. I asked him if he wanted me to tow him closer to the field, but he didn’t reply.

    Now, as an experienced tow pilot, I know a glider canopy popping open should not be an emergency situation. It’s definitely abnormal, but would be similar to a door or window popping open in a powered airplane. Not a big deal. If too much force from the relative wind is applied to the canopy, it would snap off; however, a glider can easily land without a rear canopy.

    About 5 seconds after I radioed the pilot (and received no reply), I felt my tail instantaneously lift up into a completely vertical position, which caused my nose to go straight down. The next thing I knew, a whole lot of earth suddenly filled my windscreen and I was in what’s known as a graveyard spiral.

    A graveyard spiral (as defined from the Airplane Flying Handbook pg 4-23), “is a descending turn during which airspeed and G-load can increase rapidly….the airplane is flying very tight circles, in a nearly vertical attitude and will be accelerating since it isn’t stalled.” It’s also known as a spiral dive.

    Back to the story. At this point, I tried to reach for the glider release handle. Unfortunately, due to the shoulder straps holding me against the seat, plus the g’s, and also the quart of oil and tow bar that flew forward and hit me in the back of the head, I couldn’t reach it. I was semi-upside down at a certain point, which dislodged the oil and tow bar from the floor of the baggage compartment. They sailed over the seat and nearly gave me a concussion.

    At this point, 2,500 feet above the ground, I had a choice to either fight for my life at a very low altitude or to sit back and become part of a big explosion.

    I decided to fight for my life.

    As I was spiraling to the ground, I felt the tow rope snap. Up to this point, I had still been attached to the glider. The rope snapping was a good thing, as my airplane was now under my control, not attached to, and being affected by, a glider (more on that later). I now had a lifeline, no pun intended.

    After I felt the rope snap, my instincts and training kicked in. I initiated the spin recovery procedure using the PARE acronym. This task was difficult to do as I had a lot of debris flying from the rear of the plane to the front, blocking my view out of the windshield. There was also debris around my feet, hampering my ability to use the rudder pedals. The spiral finally stopped and I recovered approximately 500 feet above the tree tops. It took my heart a lot longer to stop spinning.

    After barely regaining my emotions, I tried to evaluate the condition of the plane. Were all the pieces of the plane still there, was the engine damaged, did my control surfaces still work?

    Once I advanced the throttle and saw an increase in my engine RPM, I started an immediate climb to give me altitude to get back to the airport. I had engine power but I wasn’t sure how long it would last if I had damage. Now, what they don’t teach you during spin training is that when this happens unexpectedly, you will become very disorientated. You have just been spiraling unexpectedly and your equilibrium will be out of whack. As I leveled out just over the tree tops, I was too low to visually see any landmarks, nor could I see the airport. Once I was able to climb, I was able to orient myself and figure out where the airport was.

    I had to be very careful getting back to the airport and landing without radio communication, since my radio was knocked out with all of the FOD from the baggage area. Thankfully, the landing was uneventful. After I landed, I saw the glider limp in over the trees. The rear canopy was totally gone, while the front canopy and other parts of the glider had suffered major damage. Miraculously, my airplane wasn’t damaged, except for the wire from the radio which came loose during the spiral.

    So, how did all this happen, you ask? Well, the glider pilot made 2 huge mistakes. First, in gliding, the moment the glider pilot loses visual sight of the tow plane, you are supposed to release the tow rope. He did not do that and almost killed both of us.

    Second, as pilots we are taught to always fly the airplane first. Everything else, no matter what it is, always comes after flying the airplane. As I stated previously, the loose canopy is not an emergency situation, but since the glider pilot did not aviate first and was distracted, it was almost a fatal day for 2 people and 2 airframes.

    So, what caused this chain of events? By getting distracted by the open canopy, the glider pilot inadvertently pulled back on the stick while trying to close the canopy. Then, by not releasing the glider from the tow plane, the glider pilot climbed rapidly with an excessive rate of climb while still being attached to me. The rapid climb is what pulled my tail up, causing my nose to drop and put me into the spiral. The tow rope snapping set into motion my recovery, since up till that point, I literally had no control. An extremely high lift wing was attached to my tail, pulling it up, and there was absolutely nothing I could do about it.

    We all spend time practicing and demonstrating emergency maneuvers during our flight training and during flight reviews. Many times you might think, I’ll never need to use this stuff. Thankfully, some of the procedures I learned in the past kicked in at a time of need, even though my heart was beating out of my chest.

    At some point in every pilot’s career, some type of spin training or Upset Recovery Training would be highly recommended. Then, when things go wrong, remember to always aviate first, then handle all the other things that need to be handled.


    Interested in spin training or Upset Recovery Training (UPRT)? Check out the list of Malibu & M-Class Owner’s and Pilot’s Association (MMOPA) approved UPRT vendors and schedule UPRT training today.

  • Texas Air Travelers Mandated to Self-Quarantine

    Texas Air Travelers From Designated Areas Only

    On March 30th, Texas Governor Greg Abbott issued an Executive Order mandating that all travelers (including Texas air travelers operating or traveling in private aircraft) from the following designated areas were to self-quarantine for 14 days (or the extent of their stay in Texas, whichever was shorter) upon entering the State:

    • California
    • Louisiana
    • Washington State
    • Atlanta, Georgia
    • Chicago, Illinois
    • Detroit, Michigan
    • Miami, Florida

    If you traveled to Texas by air from any of the above designated areas, you are required to fill out the Arrivals from Areas Designated for Mandatory Self-Quarantine Form. Failure to do so could lead to a $1,000 fine or 180 days in jail, or both. For private aircraft owners/operators, put your Tail Number in for Flight Number and “Private” for Airline.

    Aircraft owners, stay away from the designated areas listed above and you won’t have any worries. A lot of you reading this are from Texas, so make Louisiana a fly over state for now and don’t make any landings in Cajun country.

  • Icon A5 Thought to Have Crashed in California


    Most pilots have seen the Icon A5 light sport amphibious aircraft.  It’s a neat design that can land on water or on a runway.  The high wing design with a pusher prop has foldable wings that allow it to be put on a trailer and towed behind a vehicle, allowing it to be offloaded at boat ramps (it also begs the question can you wakeboard behind it?).

    Apparently, not all non-pilots know about the Icon A5.  Last week, one landed in the water near a beach in Southern California, but most of the beach goers and local authorities believed it had crash landed in the water.  Emergency crews were dispatched, but everyone was surprised when the two occupants crawled out on the wings, had a cup of coffee, and took back off.

    You can read the full article on the Flying Magazine’s website.

  • Avidyne Entegra Chart Updates

    Columbia 400 Avidyne Entegra

    There are a number of airplanes out there equipped with the Avidyne Entegra PFD and MFD system, most notably the Cirrus SR20 and SR22 models from the early 2000s and the Columbia 350 and 400 from the same era.  The Entegra is pretty simple and easy to learn, but doesn’t have the capability that it’s Garmin glass panel counterparts do (I have not, however, tried the R9, which could prove much more capable than it’s predecessor).  I have found that pilots master the Entegra a lot quicker because of the reduced functionality.

    One of the nice features of the Avidyne Entegra is the CMAX Chartview option.  With a yearly subscription, you can get all the Jeppesen approach plates and airport diagrams for the entire US on your MFD.  Just like your GPS, though, you have to update the charts monthly to keep them legal.  After a period of time when you don’t keep up with the updates (I believe it is 90 days), then the charts disappear.

    The update process is a little tricky if you don’t have someone to explain it to you.  Once you go through it a few times, you’ll have it down pat.  Here’s the process for the Avidyne Entegra Chart Updates.

    Jeppesen Subscription

    The first step in performing your Avidyne Entegra Chart Updates is to create an account with Jeppesen, who handles all the GPS NavData and MFD Chart updates for both Garmin and Avidyne.  If you already have a Jeppesen subscription, you can skip down to the next section.  To do that, simply go to jeppdirect.jeppesen.com, and then do the following:

    • Click on Avionics Data on the upper left hand side
    • Click “Purchase Avionics Subscription”
    • Then, click on “Create Account” in the new users section
    • Once you’ve created an account, login, then put in your aircraft information and select 1 update for the Avidyne Entegra EX500 EX 5000
    • Click Continue at the bottom and you can put in your payment information

    Software Needed

    There are two different programs depending on if you have a PC or a Mac.  If you have a PC, you need the Jeppesen Services Update Manager (JSUM).  If you have a Mac, you need the Jeppesen Distribution Manager (JDM).  Download whichever one you need, then login, and your updates will show up.

    Downloading the Avidyne Entegra Chart Updates

    First, we’ll go through the process of performing the Avidyne Entegra Chart Updates process for a Windows computer, using JSUM.    You’ll need two 2 GB USB drives formatted to FAT 16.  Here’s how to format to FAT 16.

    • Go to My Computer after inserting the USB drive
    • Right click on the drive
    • Click on Format, then select FAT and press OK

    Once the USB drive is formatted to FAT16, open up the JSUM program.  Login and your updates will be displayed on the screen

    • You’ll need to set the Avidyne CMAX Key Code
      • Right click the Avidyne Electronic Charts Service and click Set Avidyne Key
      • To get the key code, visit MyAvidyne.com and create an account using your JeppView subscription number and your serial number for your Avidyne MFD (found on the AUX page) and your PFD serial number (displayed on startup when the PFD is warming up)
      • Once you get the Key Code, copy and paste it in the window and click OK
    • Click on the service and click Start
    • The program should automatically detect the drive (if it doesn’t, click browse and select the drive)
    • Click Continue and the charts will start downloading and automatically programmed to the USB drive
    • If you are updating NavData on the MFD as well, follow the same steps as listed above in order to update the NavData

    Next, we’ll go through the Avidyne Entegra Chart Updates process on a Mac, using the JDM program.  You’ll need two 2 GB USB flash drives formatted to FAT 16 (the easiest way to format to FAT 16 is on a Windows computer, using the process above).

    • Open the JDM program and login
    • Insert the first USB drive
    • You’ll need to set your Avidyne CMAX Key Code
      • Click Service Details under the Electronic Charts Service
      • Click Set Avidyne CMAX Key Code
      • Program automatically detects the USB drive
    • Click and drag the Electronic Charts service over to the USB and release
    • The service is downloaded and copied to the USB drive automatically
    • Eject the USB drive
    • Insert the second USB drive (or plug the USB drive in to your MFD, do the update, then reformat the drive) and follow the same steps for the NavData

    Updated the MFD with the Avidyne Entegra Chart Updates

    Avidyne Cirrus

    Once everything is programmed the your USB drives, the rest of the process is simple.  Just go out to your airplane, plug in the first USB drive with the Electronic Charts on it, turn your battery on and the avionics master, and the system will upload the information automatically.  Once it’s finished, turn everything off, pull the USB drive out, then insert the second USB drive and do the same thing.

    Now, you’re all updated!

    If you’d like to see a video on the process, Jeppesen has some very good videos on the updating procedure.  The links are below.  If you have questions, please contact Texas Top Aviation and an expert will help you through the process.

    JSUM USB Programming Procedure

    JDM USB Programming Procedure

    Avidyne Entegra Chart Updates Upload

  • Shock Cooling in a PA46

    We’ve all heard it said…”reduce the throttle by no more than 1-inch every minutes to ensure you don’t shock-cool your engine”. Does this advice apply to a PA46 engine? Can a PA46 engine (Lycoming 540 or Continental 520/550) really be shock-cooled? How should the engine temperature be managed?

    Metals expand and contract with temperature, and the various metals in an air-cooled aviation engine expand and contract at a different rates. Shock-cooling supposedly occurs when the engine changes temperature quickly and the different metals in the engine cool (and therefore change shape) at different rates. When the change occurs dramatically supposed scoring, rubbing, and marking of the metal can occur, which can cause catastrophic results.

    So, let’s back to the original question…can a PA46 engine suffer shock-cooling and should a pilot operate the engine so as to avoid shock cooling? Simply put, I’ve never seen nor heard of any piston PA46 engine suffer shock-cooling. In 5000+ hours flying the piston PA46 and 16 years of flying/managing/training in the Malibu/Mirage/Matrix, it simply has not happened to me nor anyone I know. Does it mean that it cannot happen or has never happened? No. But, it is certainly not a prolific threat to our fleet.

    Should the owner/pilot operate the engine with a cautious eye cast toward the potential of shock cooling? Well, sort of…but, let’s flesh this out. My suggestion is that a pilot should operate the engine with conservatism in movement of temperature, but only because this is a good operating practice with any machine, and any flying machine is (by definition) not “overbuilt”. And, there are many ways to change the temperature of the engine…not just by reducing power. Here’s a partial list of ways to cool your PA46 engine:

    • Reduce power: Obvious…yes. When the engine produces less power, less heat is generated. Reducing power in a piston engine will almost always result in less temperature.
    • Lower the nose: By descending (and leaving power in a cruise setting) the airspeed will increase and cool the engine.
    • Enrichen the mixture: Fuel has a cooling effect on the engine, so the richer the mixture the cooler the engine.
    • Lower the landing gear: Yes…you read that right…engine cooling will occur when you lower the landing gear because more air will flow over the cylinders. Notice the landing gear doors on the PA46 have air louvers. Air flows into the engine nacelle on the front, passes down through the cylinders (along with the oil cooler, intercoolers, and other components) and then out the louvers of the closed gear doors. When the landing gear is lowered the “back door is opened” and a LOT more airflows over the cylinders.

    My suggestion is that a pilot only perform ONE of these actions at a time when beginning a descent. This suggestion was presented to me by Chad Menne (Owner, Malibu Aerospace) some time ago and I’ve operated engines this way ever since. If you are at a higher altitude and simultaneously reduced the power, lowered the landing gear, started a big descent, and enrichened the mixture in one flail swoop, I think there’s a chance that your engine would suffer some negative effects that could be called “shock cooling”. So, when you do start a descent, pick one “cooling action” to accomplish at a time. I’m sure you’ll not hurt your engine.

    Simply put, shock cooling is not a huge factor in the PA46 community, and a PA46 pilot does not need to be overly cautious. The “one inch per minute” rule may apply in some other airframes, but in the PA46 world it is not applicable.

    Joe Casey’s aviation story began in 1990 with his first flight near Nacogdoches, TX in a Cessna 172. From lift-off, Joe knew he would have a lifetime passion flying just about anything that will leave the ground…He was completely hooked.

    Along with being an FAA Designated Pilot Examiner (DPE), Joe is an ATP/CFI-AHMG and Commercial Rotorcraft/Glider Pilot in the civilian world and also a UH-60/AH-64 Pilot-in-Command/Instructor/Examiner Pilot in the US Army Reserves.  His passion for the last 19 years, however, has been the PA-46 Malibu/Mirage/Matrix/Jetprop/Meridian. Has has amassed over 6,500 hours in various PA-46 airframes and believe it to be one of the finest flying machines available for the serious cross-country pilot with an eye for efficiency.

    Now, Joe has flown more than 12,200 hours in just about every imaginable environment. Whether providing initial/recurrent training in the PA-46’s, TBM’s, instructing in NVG’s in a UH-60 Blackhawk, flying the King Air series of airplanes, giving tailwheel endorsements, or taking kids flying for the first time, he simply loves flying machines and the people who fly them.

Leave a Reply

Your email address will not be published. Required fields are marked *