Congratulations to Monte James who, on July 31, 2014, completed his first solo flight! Monte is the owner of N565TV, a 2007 Turbonormalized Cirrus SR22. N565TV is a G3 model with an Avidyne panel. Monte was very excited to complete his solo flight. He reported very good landings during the flight (he even said the last landing, which was probably his best yet, caused him to break into laughter!). Texas Top Aviation’s Hank Gibson, Monte’s instructor, took pictures and continued the tradition of cutting Monte’s shirt tail to commemorate the flight.
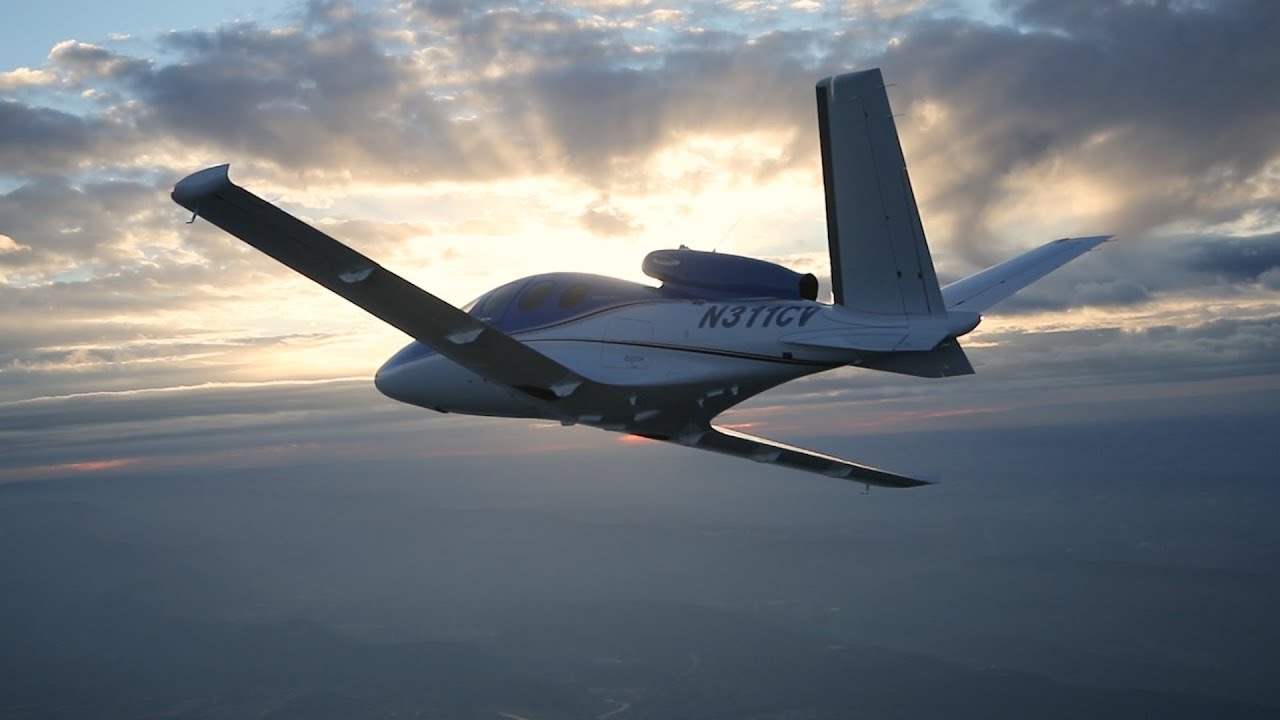
In January, Cirrus announced the Generation 2 SF50 Vision Jet. After getting the Generation 1 Vision Jet certified in late 2016, Cirrus didn’t waste any time in starting in on improvements.
The improvements are pretty sweet, making the G2 Vision Jet even easier to fly and step into for Cirrus’ target market, SR22 owners.
Here are the improvements on the G2 Vision Jet.
RVSM Approval
The G2 Vision Jet has received RVSM approval, allowing the airplane to fly at 31,000 feet. RVSM stands for Reduced Vertical Separation Minimums (read more about RVSM here). RVSM airspace starts at 28,000 feet, the G1 Vision Jet’s ceiling. Now that the G2 Vision Jet is RVSM certified, it can fly at 31,000 feet.
For piston pilots, you are left scratching your head as to the advantage of this. In a jet, the higher you go, the thinner the air, so the faster you go, and the less fuel you burn since the thin air needs less fuel to mix with. This caps out at a certain altitude and the speed begins dropping and you start losing efficiency (even though the fuel burn is quite low).
According to Cirrus, at 31,000 feet, the G2 Vision Jet cruises over 300 KTAS and gets a range boost to almost 1,200 nm.
Garmin Perspective Touch+
Cirrus & Garmin have taken the new NXi interface and paired it with the Garmin Perspective Touch to create the Touch+. You can read about the improvements on the NXi here, all of which are included in the Touch+ in the G2 Vision Jet.
The big improvement that is included in the Touch+ is Autothrottle capability. An Autothrottle is integrated with the autopilot. It automatically adjusts power settings and speeds based on the phase of flight without the pilot having to touch the throttle. Pretty cool.
New Cabin
The G2 Vision Jet has a redesigned cabin as well, making it an extremely passenger friendly airplane. The second row has been redesigned and equipped with a center console. There is also a drop down TV screen that allows passengers to connect their mobile devices to it to watch movies or videos while traveling (no internet on board, yet. That’ll probably be the G3 Vision Jet!).
Cirrus also put in more noise reduction in the cabin, creating a quieter ride for passengers. Cirrus also allows for multiple different seating configurations, depending on the needs of the owner.
As always, Cirrus is on the leading edge of airplane technology, creating airplanes that are easy as well as fun to fly. I’m excited to see how they continue to improve the design to both the SR22 and the Vision Jet.
Well, that was fast. In January, Cirrus announced the Generation 2 SF50 Vision Jet. After getting the Generation 1 Vision Jet certified in late 2016, Cirrus didn’t waste any time in starting in on improvements. The improvements are pretty sweet, making the G2 Vision Jet even easier to fly and step into for Cirrus’ target…
Mooney announced last week the redesign of their current Ovation and Acclaim models. The biggest change that Mooney pilots will love is the addition of a pilot’s door, allowing the pilot to enter on the left side instead of having to crawl over the passenger seat.
Other upgrades include a keypad for easier data entry on the G1000 and an all in one, digital standby instrument that includes attitude, airspeed, and altitude.
This raises the question, will Piper and Beechcraft follow suit?
Mooney announced last week the redesign of their current Ovation and Acclaim models. The biggest change that Mooney pilots will love is the addition of a pilot’s door, allowing the pilot to enter on the left side instead of having to crawl over the passenger seat. Other upgrades include a keypad for easier data entry…
Many people ask, which set of charts is better? Should I use the FAA Aeroservices charts on Foreflight or pay extra for the Jeppesen charts? Since you have to pay for Jeppesen, they are probably better, right?
I am not here to say which one is better as a chart preference is just that, a preference for one over the other or for certain features. After a while, muscle memory and routine take over and you probably wont even notice the difference.
History
In 1934, Elroy Jeppesen began making his own charts and sold them to other pilots. His little company grew into the giant Boeing chart company we know today. Jeppesen charts are used internationally and therefore include information that might otherwise seem common knowledge, like transition altitudes. The key is, you cannot get FAA Aeroservices charts for international destinations. Jeppesen is the only option for outside the US.
National Aerospace Charting Office (NACO), or the new(er) name “Aeroservices” or FAA chart, whatever you decide to call them, are United States government issued charts. In addition to civilian use, Aeroservices charts are used by the military so there will be some terminology that does not apply to civilians. The best part about FAA Aeroservices charts are… they’re free!
If you are in the middle of a transition or trying to decide which charts to use, you have come to the right place. Here are a few key differences.
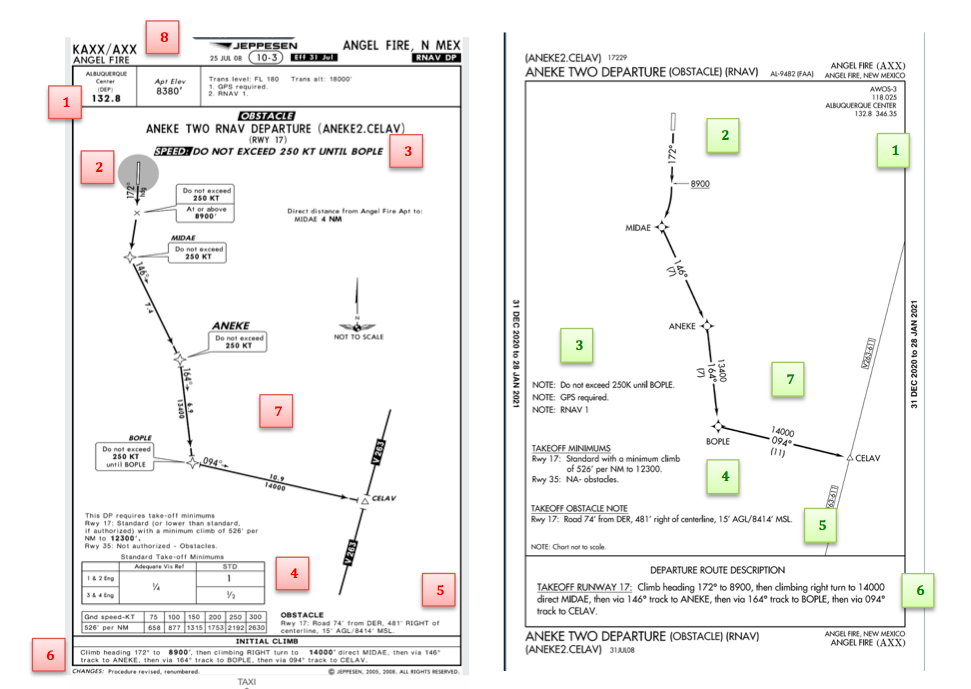
Obstacle Departure Procedure Chart KAXX (Angel Fire, New Mexico) ODP
Frequencies: FAA Chart provides the AWOS so you have all departure frequencies in once place.
Airport: Jeppesen highlight the airport, which is a nice feature so you can easily see the flow from the airport.
Notes and Remarks: Jeppesen bolds the speed restriction all over the chart so you won’t miss it. All other requirements are in the top right corner. Note the transition altitude 18,000′. Since Jeppesen is used internationally, it is published on the chart since other countries have different transition altitudes. It takes up a chunk of chart real estate, but it’s clear, easy to read, and always in the same place. The FAA charts post all the requirements and restrictions as notes off to the side. Since it’s in the same space as the chart graphic, it’s easy for the eyes to catch while studying the plate.
Take off Minimums: NOT APPLICABLE for PART 91 – however, it’s wise for all pilots to look and abide by them. Jeppesen displays the standard take off minimums table, as well as the rate of climb table, which is nice to have all in one place. The FAA chart gives the non standard information but you need to know/look up the rest in the Digital Terminal Procedures Supplemental document. (Hint: It’s in the Documents section of Foreflight)
Take Off Obstacles: About the same on both charts
Route Description: Similar on both charts, but larger font and clearer description on the FAA chart. When there are different routes from different runways, the FAA chart layout is really helpful.
Graphic Layout: Jeppesen and FAA use the same graphics for all their different charts and plates which makes it easy to read once you are familiar with the respective charts. FAA charts are easy to read and distractions are kept to a minimum. Jeppesen charts make things bold and enlarge pertinent information so you won’t miss it.
Airport altitude: This is only on the Jeppesen chart (the FAA chart doesn’t include it), but it is very helpful for situational awareness. As you brief the arrival altitudes, I think it’s important to have an idea what AGL you are at.
Approach Charts
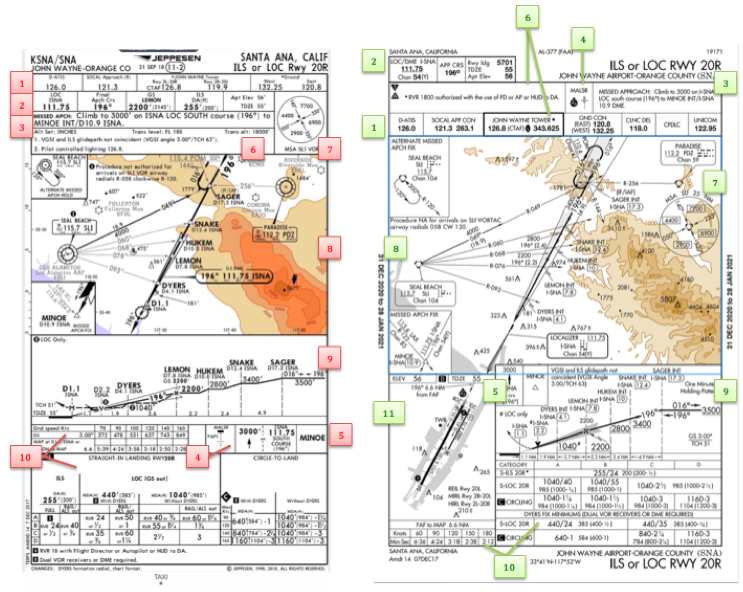
One thing pilots love about Jeppesen approach charts is the clear set up for an approach brief. The top section is created as a “briefing strip” starting with the frequencies, then navigation frequencies, minimums, airport elevation and the missed approach. It’s very natural and user friendly.
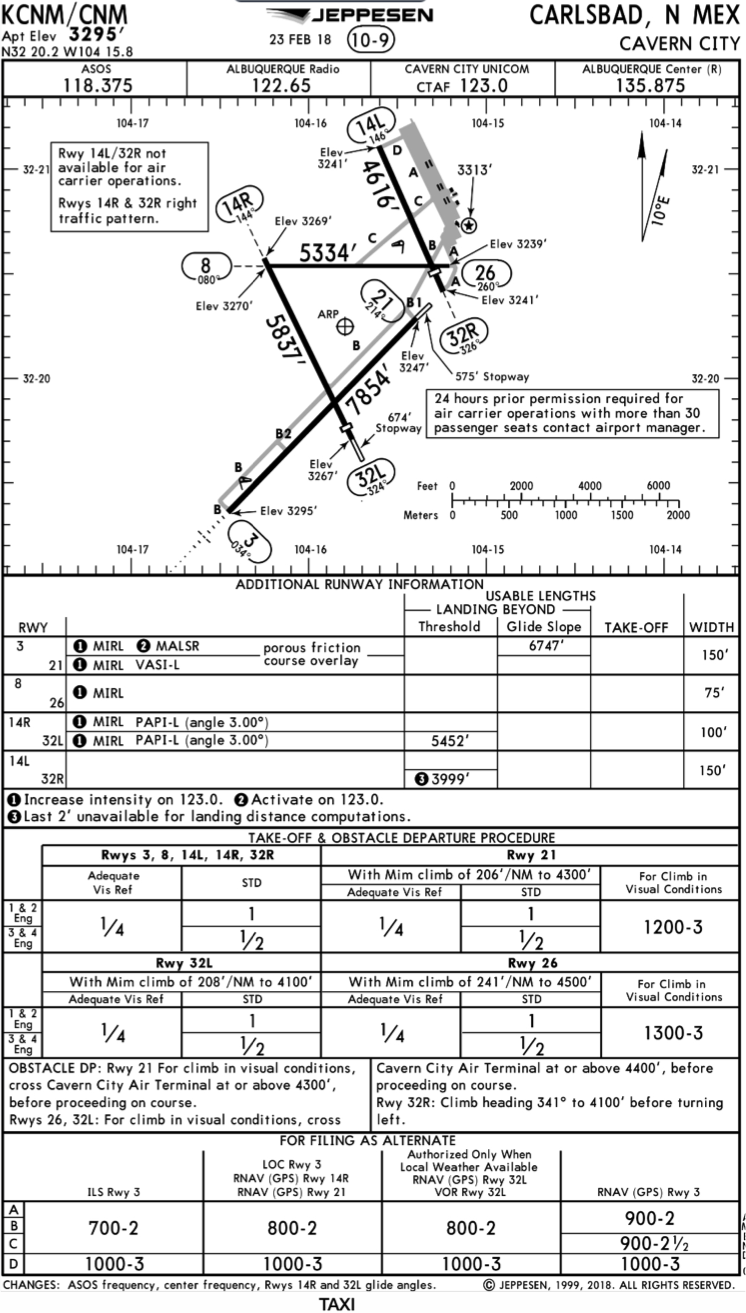
FAA charts have a slightly bigger picture of the approach planview, but the profile view and minimums section can get a bit cluttered. It can feel a little discontinuous when briefing the approach to bounce all over the page. However, some pilots really like the small airport diagram in the corner, which I find really helpful for situational awareness (particularly for students learning circle approaches). Non- standard alternate and takeoff minimums are also clearly noted, but unfortunately we must hunt elsewhere to find them. The Jeppesen alternate minimums and takeoff minimums will both be on the airport diagram
Frequencies: Getting weather and tuning radios is easy on the Jeppesen charts – just follow the briefing strip. The frequency section on the FAA charts is still easy to read, but closer to the center of the page. It’s split up from the nav frequencies and other important briefing information. a. FAA charts are created by the government and have military specific information, which are the odd looking frequencies and channels on the chart.
Approach Navigation: On a Jeppesen chart, you will continue to the next line to verify your frequency, course and set minimums (assuming you are straight in on the ILS). On the FAA chart, you will then have to skip to the top of the chart to get the frequency and course, and then scan to the bottom of the page to input your minimums. However, since you could be flying a localizer approach or a circle to land, it’s a good reminder that not everyone using this approach chart will be using the same Decision Altitude (DA). The FAA chart also includes runway distance information so pilots can make determinations of approach speeds and stopping distance if the runway is wet or icy.
Missed Approach – Textual
Approach Lighting
Missed Approach- Graphical: The missed approach information is the same on both charts. The lighting information is key for determining a missed approach and is next to the missed approach text on the FAA chart. It’s found next to the missed approach graphic on the Jeppesen chart. Personally, I find it easier to find and read the lighting information on the Jeppesen chart. Remember, on both charts, the placement of the PAPI on the chart indicates the physical location of the lights (left or right of the runway).
Notes: Both charts have a notes box, but they use them a little differently. Once again, remember that Jeppesen charts are used internationally and include the transition altitudes and altimeter setting info. On both charts, the notes section will be where other critical information will be shared which isn’t really applicable for this airport. On the FAA chart, the tower frequency is starred to note that there are operating hours (you’ll have to check the chart supplement AF/D to find out what those hours are). There is also an L next to the frequency to indicate it is the pilot controlled lighting frequency. You will also find the note about the VGSI and the Approach Glide path next to the profile view on the FAA chart, whereas the Jeppesen chart has that note in the notes section at the top. The FAA chart also has the T and an A in black triangles to note that this airport has non- standard alternate and take off minimums. Again, those are found in separate documents when using FAA charts and on the Airport Diagram when using Jeppesen charts.
Minimum Sector Altitude: Similar on both charts, but in different locations (reminder: ATC vector altitudes may be lower. It is the pilot’s responsibility for safety of flight to maintain safe obstacle clearance, so if you are ever concerned about going below the MSA – just ask ATC).
Planview: Other then differences in size, visuals, and text, the information displayed on both is very similar.
Profile View: Again, the displays look different and pilots will have their preference, but the information is the same.
Minimums: Jeppesen charts not only note the category for each approach with its designated letter, but also displays it in knots. It is recommended that if you increase your approach speed (based on flaps or gusty winds or perhaps a faster speed for a circle to land approach) that you should use the higher category minimums. The reference guide makes that easy to look up. The other benefit of the Jeppesen charts is right the table that contains the time from the final approach fix to the missed approach point for a localizer approach, it also shows the rate of descent with the associated ground speed to maintain a 3 degree glideslope. Now there is no excuse not to set pitch and power! The minimums posted in parenthesis are for the military, but RVR in statute miles is also included.
Airport diagram: Only on the FAA charts, this particular feature is particularly useful for situational awareness. The arrow pointing to the runway shows the direction the approach is arriving from so planning a circle to land is a cinch. There is also a lot of other information that can be gathered from the airport diagram for quick reference or to help a disoriented pilot: lighting, displaced thresholds, closed taxiways, and runway placement and lengths. This is easily one of the best perks of an FAA chart.
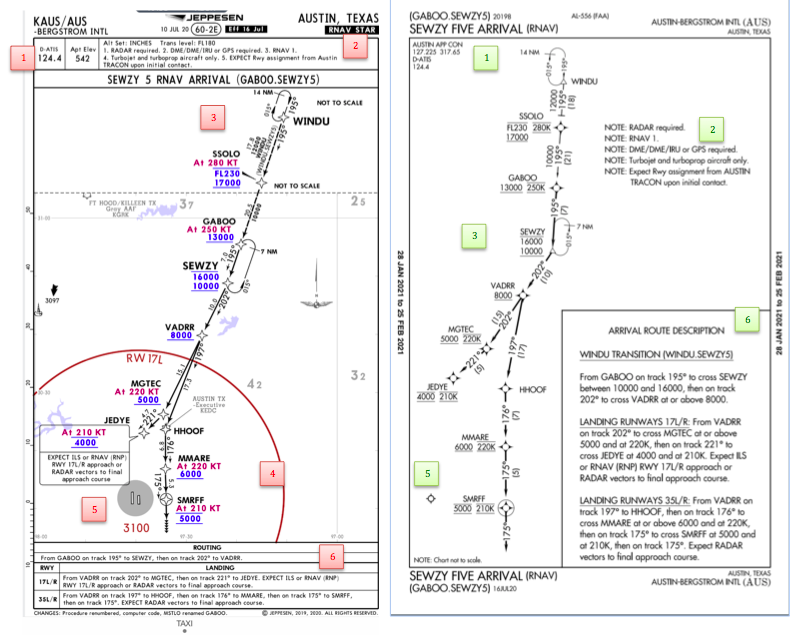
Arrival/ Departure Charts: Sewzy 5 Arrival KAUS
The Jeppesen lay out is very attractive and draws the pilots eye in a clear way to all the important information. The colors pop out, so the required altitudes and speeds are easy to read and remember. The chart, which is the proper scale, shows MORAs , easy to find airports (and runway layouts) and is over all easy to follow. However, the texts, while very clearly laid out, are small and difficult to read and pushed to the very edges of the chart. FAA charts are simple and fairly easy to read, but the airports are not as obvious and the flow to the airport requires a good look. The table on the Jeppesen chart is a really nice format, but the text and Notes for arrivals on the FAA chart are easy to find and much easier to read quickly.
Frequency: FAA charts include the approach frequency on the arrival, which is helpful for having radios tuned. During a busy time when the controller changes your frequency, all you have to do is verify the frequency you already set, rather then totally stop what you’re doing to switch it. The Jeppesen charts add the airport elevation next to the ATIS, which really aids situational awareness.
Notes: Jeppesen notes are clearly numbered and tucked away nicely in a box, but the FAA chart notes pop out in the middle of the page and are easy to skim for pertinent information.
Planview: I think Jeppesen is the clear winner here- it is so easy to read, it only takes one glance to know where the primary airport is and how the arrival flows. The chart being at the proper scale offers the pilot important geographical information and over all is a clean look. Notice the small series of arrows after SMRFF on the the Jeppesen chart; those indicate the pilot should expect radar vectors. The FAA charts include those instructions in the text, but I find the visual reference on the chart helpful. The FAA charts are equally clean, with altitude and speed restrictions easy to read even if they don’t jump out. When there are multiple airports that the arrival serves, the airports are clearly marked, though, I think it would be nice to have a little more information surrounding the primary airport for better situational awareness.
MSA: only on the Jeppesen chart
Primary airport: The runway alignment and grey highlight on the Jeppesen chart stands out very clearly, while the FAA airports are a little more obscure.
Arrival route description: The table on the Jeppesen chart is easy to follow but the text is very small and pushed to the bottom. The route description is much easier to find and read on the FAA chart.
Airport Diagram
The Jeppesen Airport Diagram page has it all: frequencies, airport diagram, runway info, take-off minimums, departure procedures and alternate minimums. It’s a one-stop shop. It makes preflight planning easy when its all at your fingertips.
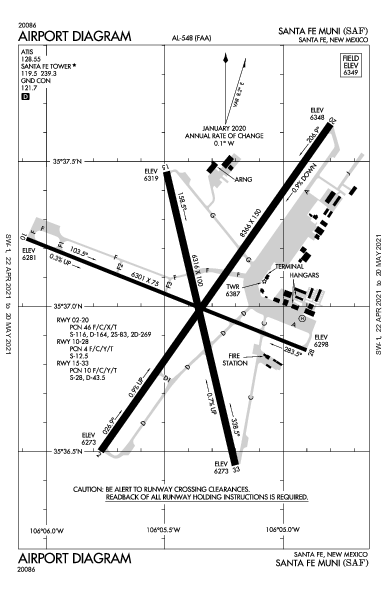
The FAA charts usually require a little more searching for different pieces of airport information. The Airport Diagram itself is just the airport layout. Above, you will see a simple FAA Airport diagram. It’s clean and simple, perfect for a knee board print out.
In the flight planning process, as you look at what approaches you will be using for the airport, you might see an A or T inside a triangle. Those indicate that you will need to look in the Alternate Minimum or Take off minimum documents for more information. The Takeoff Minimums document (see below) is also where you will find any obstacle departure procedures for that airport. Apps like Foreflight help you out by posting the take off minimums under the departure tab. Even though it’s a little more difficult to read, I didn’t crop out the airport information so you can see what it looks like in context.
FAA Alternate Minimums on the Left and Takeoff Minimums and Obstacle Departure Procedures on the Right
Many people ask, which set of charts is better? Should I use the FAA Aeroservices charts on Foreflight or pay extra for the Jeppesen charts? Since you have to pay for Jeppesen, they are probably better, right? I am not here to say which one is better as a chart preference is just that, a…
The safest pilots are the ones who attempt to gain as much knowledge and learning about their airplane and environment as possible. These pilots are the ones who enjoy learning, going to seminars and conventions, and soak up all the MMOPA magazine articles in each issue. These pilots are the ones who get as much training as they can, above and beyond what the minimum requirements are.
If you are one of these pilots and you own a Piper PA46, then this blog is for you.
Casey Aviation, one of the best Piper PA46 training companies out there, recently released all of their Malibu, Mirage, Matrix, Meridian, and JetProp systems training videos for free. These are some fantastic videos that Casey Aviation created which go much more in depth than any power point presentation could.
The great thing about the videos is they give the viewer an all access “inside look” to the specific airplane. Joe Casey, owner of Casey Aviation, takes off cowlings, crawls under the nose gear compartment, and even shows an airplane with the interior out so all the flap cables and environmental systems can be seen.
I have started referring all of my PA46 customers to the Casey Aviation videos as part of the prep work for our training sessions.
To access the videos, check out the Casey Aviation website.
The safest pilots are the ones who attempt to gain as much knowledge and learning about their airplane and environment as possible. These pilots are the ones who enjoy learning, going to seminars and conventions, and soak up all the MMOPA magazine articles in each issue. These pilots are the ones who get as much…
Recently, I was training a customer who had a brand new instrument panel installed in his TBM 700. The avionics shop that did the work (Abilene Aero, who I highly recommend for any panel installs, located at KABI) told us when we picked the plane up that the new Garmin GTN 750Xi had the most recent software update, which included the Garmin Smart Glide.
I had never used the Garmin Smart Glide before, so I was eager to check it out during our training. When we got to engine failures, we pushed the Emergency button on the Home page of the GTN 750Xi, and then the magic happened.
The plane was also equipped with a Garmin G600TXi PFD and the Garmin GFC 600 Autopilot. In order for Smart Glide to work, there has to be either a GTN 750Xi or GTN 650Xi installed, along with a G500TXi or G600TXi and a Garmin Autopilot. Garmin is working on getting the legacy G500 as well as the GI 275 and G5 to work with the above GPS units for Smart Glide as well.
Here’s what happens. The plane loses it’s engine. The pilot’s workload and stress level suddenly goes way up. Trim the airplane for best glide, find the nearest airport, attempt restart. Do it quickly so you have time to focus on the glide. Oh yeah, squawk 7700 and declare your emergency. All the while plummeting toward the ground in a somewhat controlled crash. Yikes.
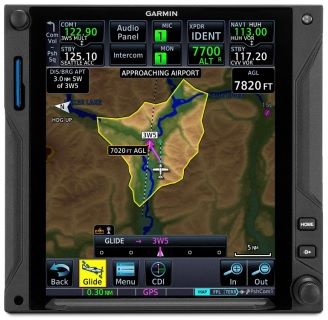
Garmin Smart Glide takes over the flying part, allowing the pilot to handle the restart, while making it much easier to squawk, talk and plan the engine out landing. On the home page of the GTN 750Xi/650Xi, the pilot simply taps the Emergency icon on the bottom of the screen. The Autopilot comes on and goes into IAS mode and maintains best glide while descending. The GPS immediately analyzes the Glide Advisor, and turns to the nearest airport in the glide ring (if there is no airport within gliding distance, the GTN 750Xi advises the pilot). Then, the Autopilot flies directly to the Nearest airport, allowing the pilot the ability to take attempt a restart.
Once it is determined that the engine won’t start, the Garmin Smart Glide has excellent situation awareness tools. On all screens, the pilot is constantly being advised of how high AGL the plane is currently, while advising also of how high AGL the plane will be over the airport that the glide is set up for. There is also a short cut on the screen to tap to squawk 7700 as well as runway length information at the airport.
The Garmin Smart Glide Button wasn’t installed yet in the TBM, but that will make things even easier when it is (it will be certified in January). This is amazing technology that all Garmin GTN 750Xi pilots should have their software updated to. Remember, you have to have a Garmin Autopilot and a Garmin PFD for it all to work.
Recently, I was training a customer who had a brand new instrument panel installed in his TBM 700. The avionics shop that did the work (Abilene Aero, who I highly recommend for any panel installs, located at KABI) told us when we picked the plane up that the new Garmin GTN 750Xi had the most…
Looking for some good $100 Hamburger options in the state of Texas? Here are some other good fly-in eateries around Texas. These are ranked in no particular order because they are all just really good! Most of these are located on the airport property, but a few are in town and worth the drive!
Lockhart BBQ (50R): With 4 BBQ options in Lockhart (and City Market BBQ 10 minutes away in Luling), you can’t go wrong with a stop in Lockhart. Just grab the keys for the giant suburban, and away you go. Most folks who stop off in Lockhart will give it a legitimate claim over Hard 8 in Stephenville.
Angelina County Airport Restaurant (KLFK): This is pure East Texas eating here in Lufkin. With greasy, tasty burgers and sandwiches, breakfast, and ladies who call you “Sugar” when taking your order, this is down home if I ever tasted it. Lufkin and Brenham are currently neck and neck for the best Texas burger.
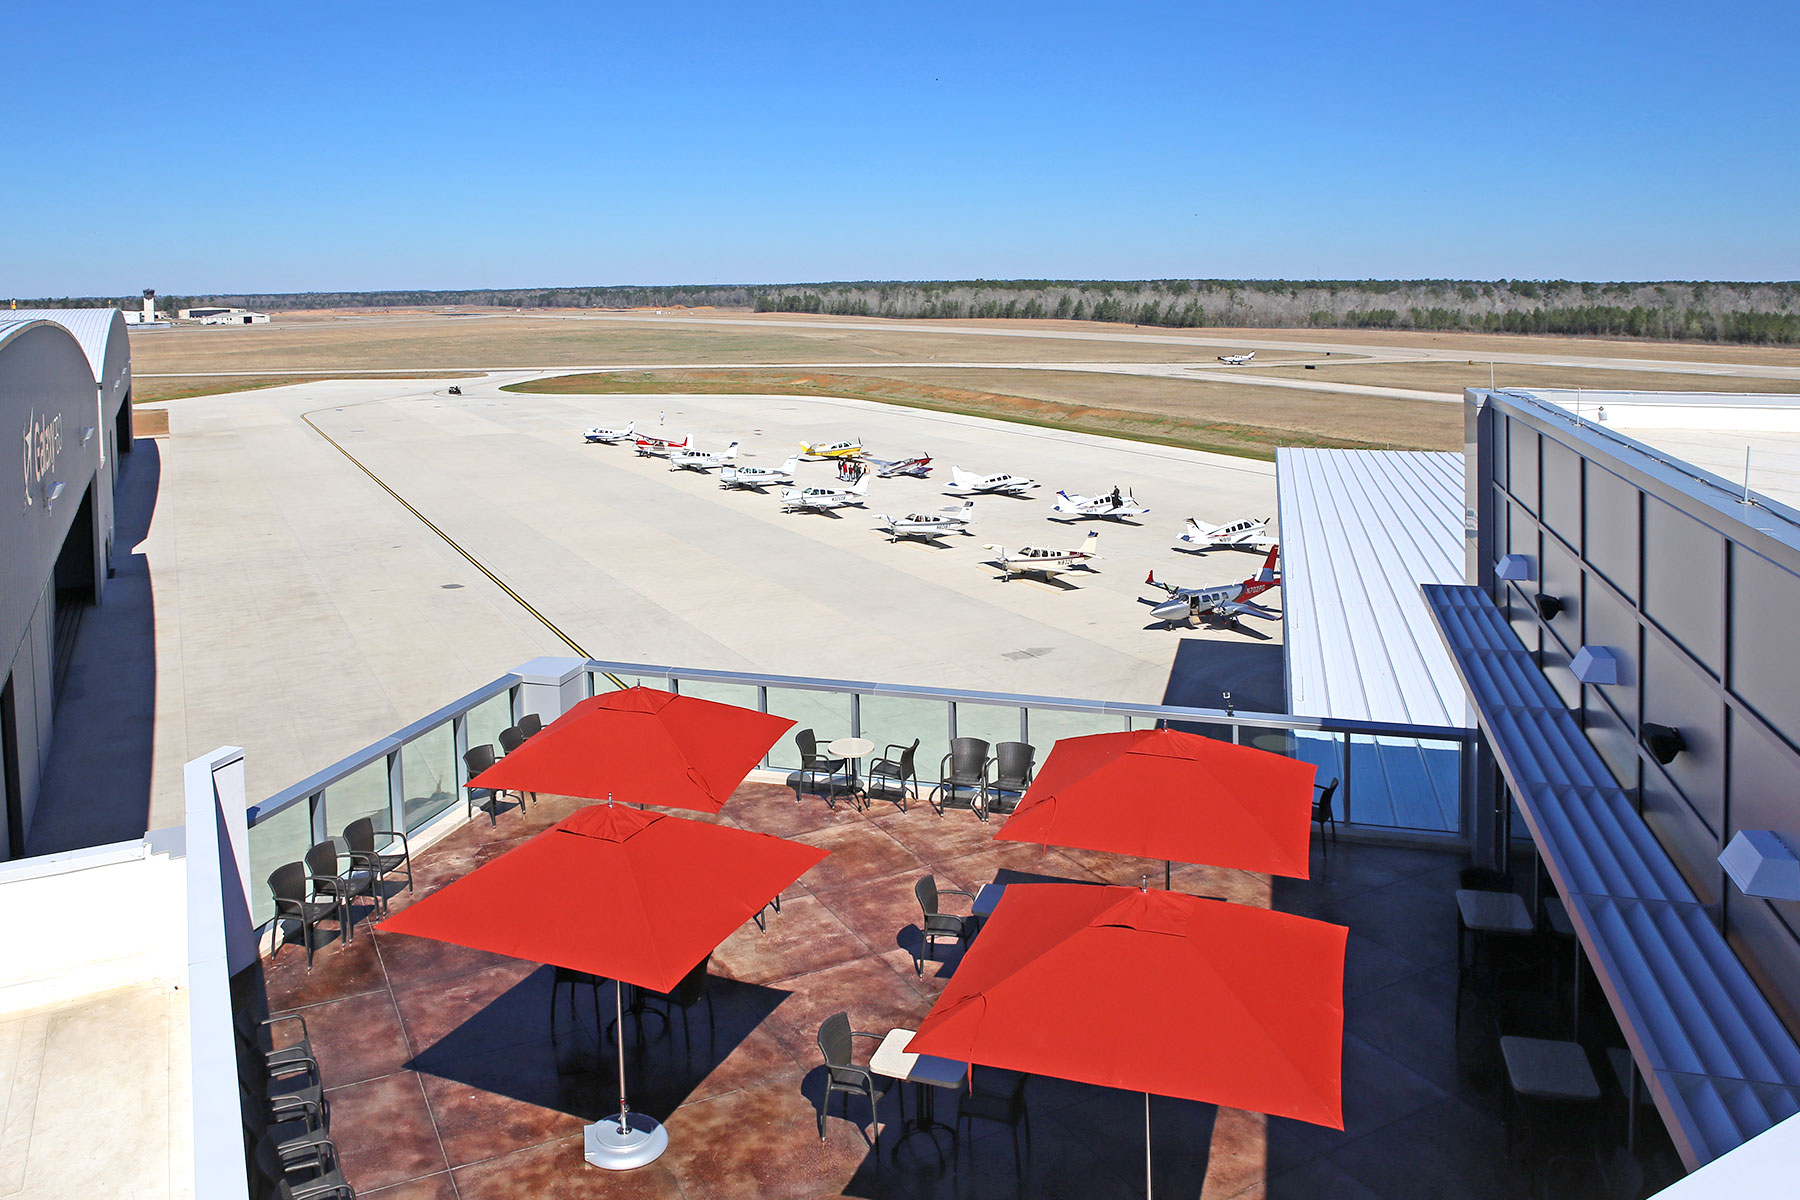
Black Walnut Cafe (KCXO): This airport diner, located at the Galaxy FBO in Conroe on the north side of Houston, is top notch. The food is excellent (I have eaten several different sandwiches and have not been disappointed) and you can’t beat the 3rd floor runway view from the patio. Not a bad place to spend the lunch hour, though make sure you get there before the lunch hour. It fills up quick.
Airport Diner (T82): Right next to the Hangar Hotel, the Airport Diner in Fredericksburg brings back memories of the old soda fountains of the ’40s and ’50s. With plates like the Warthog (their sausage sandwich with Fredericksburg made sausage) and the Whirly Bird (their chicken tenders wrap), the Airport Diner fully embraces the airport theme. Better to stop for lunch on a weekday rather than a weekend as their isn’t a whole ton of seating. Check your NOTAMs as the restaurant is closed on Mondays and Tuesdays.
Radial Engine Cafe (KGPM): A good little stop in the Dallas area for a simple burger, fries, and a Coke. Don’t get the smaller 17/35 runway at GPM confused with the much larger 16/34 runway at GKY just to the west. Approaching from the south, this can be easily done.
Clear Springs Restaurant (KBAZ): Come for the onion rings, stay for the fish. Clear Springs is just a 5 minute drive from the airport and there are always plenty of crew cars available. You could probably make a whole meal out of the onion rings themselves, but the fish is top notch too.
Gate 12 (KCLL): The College Station Airport now has the 12th Man! Aggie Fans will appreciate the Gate 12 experience with all the Texas A&M decorations scattered throughout the restaurant. Bring an appetite if you want to tackle the burgers. They are huge! Parking is only at the FBO. Only military planes get to park in front of the restaurant.
Cooper’s BBQ (KAQO): Llano, TX is known for BBQ. Just fly in to the airport, get a car, and after a 10 minute drive, you can take your pick of any kind of BBQ under the sun. Careful, as it’s easy to over order!
Hangar 6 Restaurant (KUVA): The newest restaurant on the list, located on the ramp at the Uvalde Airport, Hangar 6 tips it’s hat to the military history of the Uvalde airport while serving really good food. Taxi in and walk up to the quaint little joint. They even have a playground for the kids!
Sky Restaurant (KVCT): Not quite within walking distance, but just a short drive from the FBO, Sky Restaurant specializes on the seafood, but they also have good burgers and steaks. VCT is popular amongst the Air Force and Navy trainers in the area, especially around lunch!
Runway Cafe (KLBX): The best place I have found for seafood along the Texas Gulf Coast. With a huge runway to land on and a beautiful FBO next door, this is my go to for Fried Shrimp when I’m in the Houston area.
Delta Charlie’s (KRBD): With quite an extensive menu (and a full bar for those overnight trips), I will definitely make RBD one of my routine stops. Dallas Jet Center recently opened in the terminal, so fueling your stomach and your plane can all be done in one spot.
The Red Baron Restaurant (KDHT): The Panhandle of Texas hides many surprises and the Red Baron restaurant in Dalhart, TX is no exception. For those early morning flights, The Red Baron makes a solid breakfast and a mean cup of coffee. Lunch satisfies even the hungriest pilot. Dalhart has a very spiffy modern FBO to sleep away that burger and fries until your passengers show back up too.
Hogg’s BBQ (KDUX): I came hungry and I left very happy. Hogg’s makes some good West Texas BBQ. Huge helpings and an aviation themed dining room makes for a good choice. Restaurant is located just behind the terminal building. I was there for dinner and it wasn’t too crowded, but I bet lunch is hoppin’!
Aviator’s Grill (KDWH): Located in the Gill Aviation, FBO, Aviator’s Grill has a great selection of creative sandwiches. Hooks can be a little tricky to navigate while taxiing, but just tell ground you are going to Gill, and they will direct you to lunch.
Bill’s Burgers (KBMQ): A short drive from the airport in the Burnet FBO’s new courtesy van deposits you at Bill’s Burgers, the largest burger this side of the Mississippi. Always a popular lunch spot, especially on weekends, hitting lunch early or late is a good plan. Don’t get a full order of fries unless you want to share. It’s huge! Closed on Mondays.
In my book, these are the other great places to stop on a flight in Texas. Always make sure to come hungry! I probably missed a few along the way, so please feel free to add others to the list!
Note: Some of the above restaurants are either closed for COVID, or are only doing takeout. Make sure you call before hand. Google doesn’t always have updated information.
Looking for some good $100 Hamburger options in the state of Texas? Here are some other good fly-in eateries around Texas. These are ranked in no particular order because they are all just really good! Most of these are located on the airport property, but a few are in town and worth the drive! Lockhart…