Garmin GTN 750 Tips & Tricks

The Garmin GTN 750 is an awesome piece of equipment.  Garmin tried to make the user interface with the touch screen as simple as possible (though there still is a bit of a learning curve when moving up from a Garmin 530W).  Garmin also integrated several key features that the 530W did not have that makes flying with a Garmin GTN 750 in IFR all that much better.

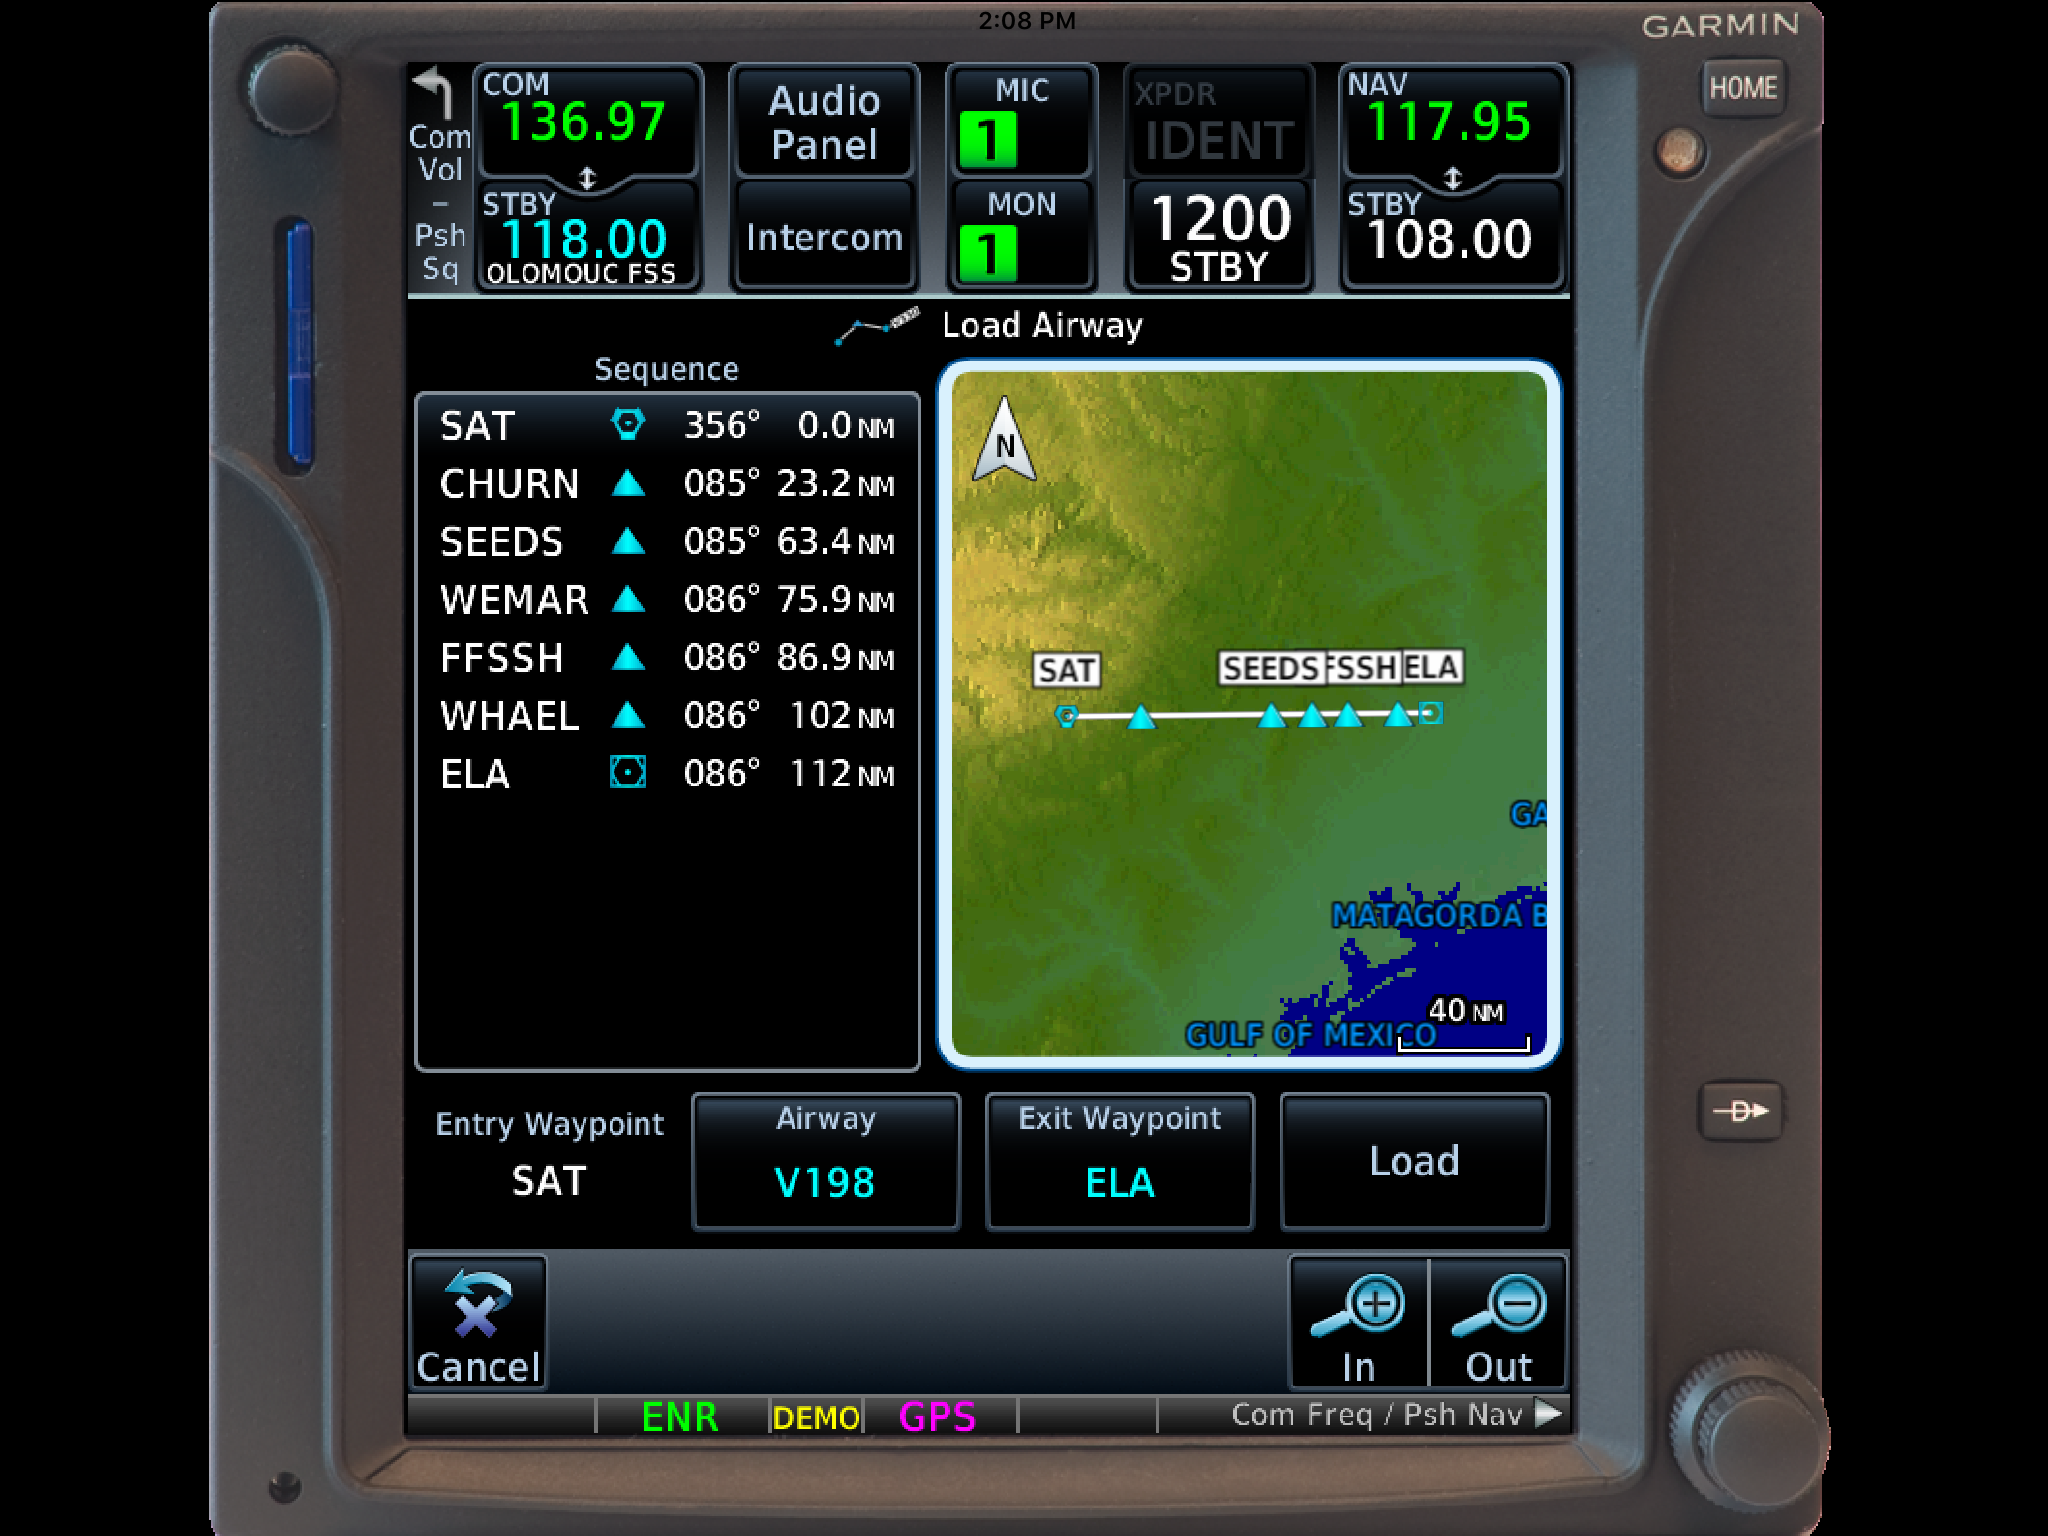
The two features of the Garmin GTN 750 I want to focus on today are the “Load Airway” feature and the “Hold at Waypoint” feature.  If a pilot isn’t looking for these specifically, they can actually be a bit hard to find.  The “Load Airway” feature is especially handy when flying IFR long distances with several airways as part of the clearance.  Here’s how to utilize both.

Load Airway

  1. On your flight plan page, insert the waypoint that you will be joining the airway, or, if your clearance was radar vectors to join an airway, then insert the waypoint on the airway that begins the leg you will be joining on.
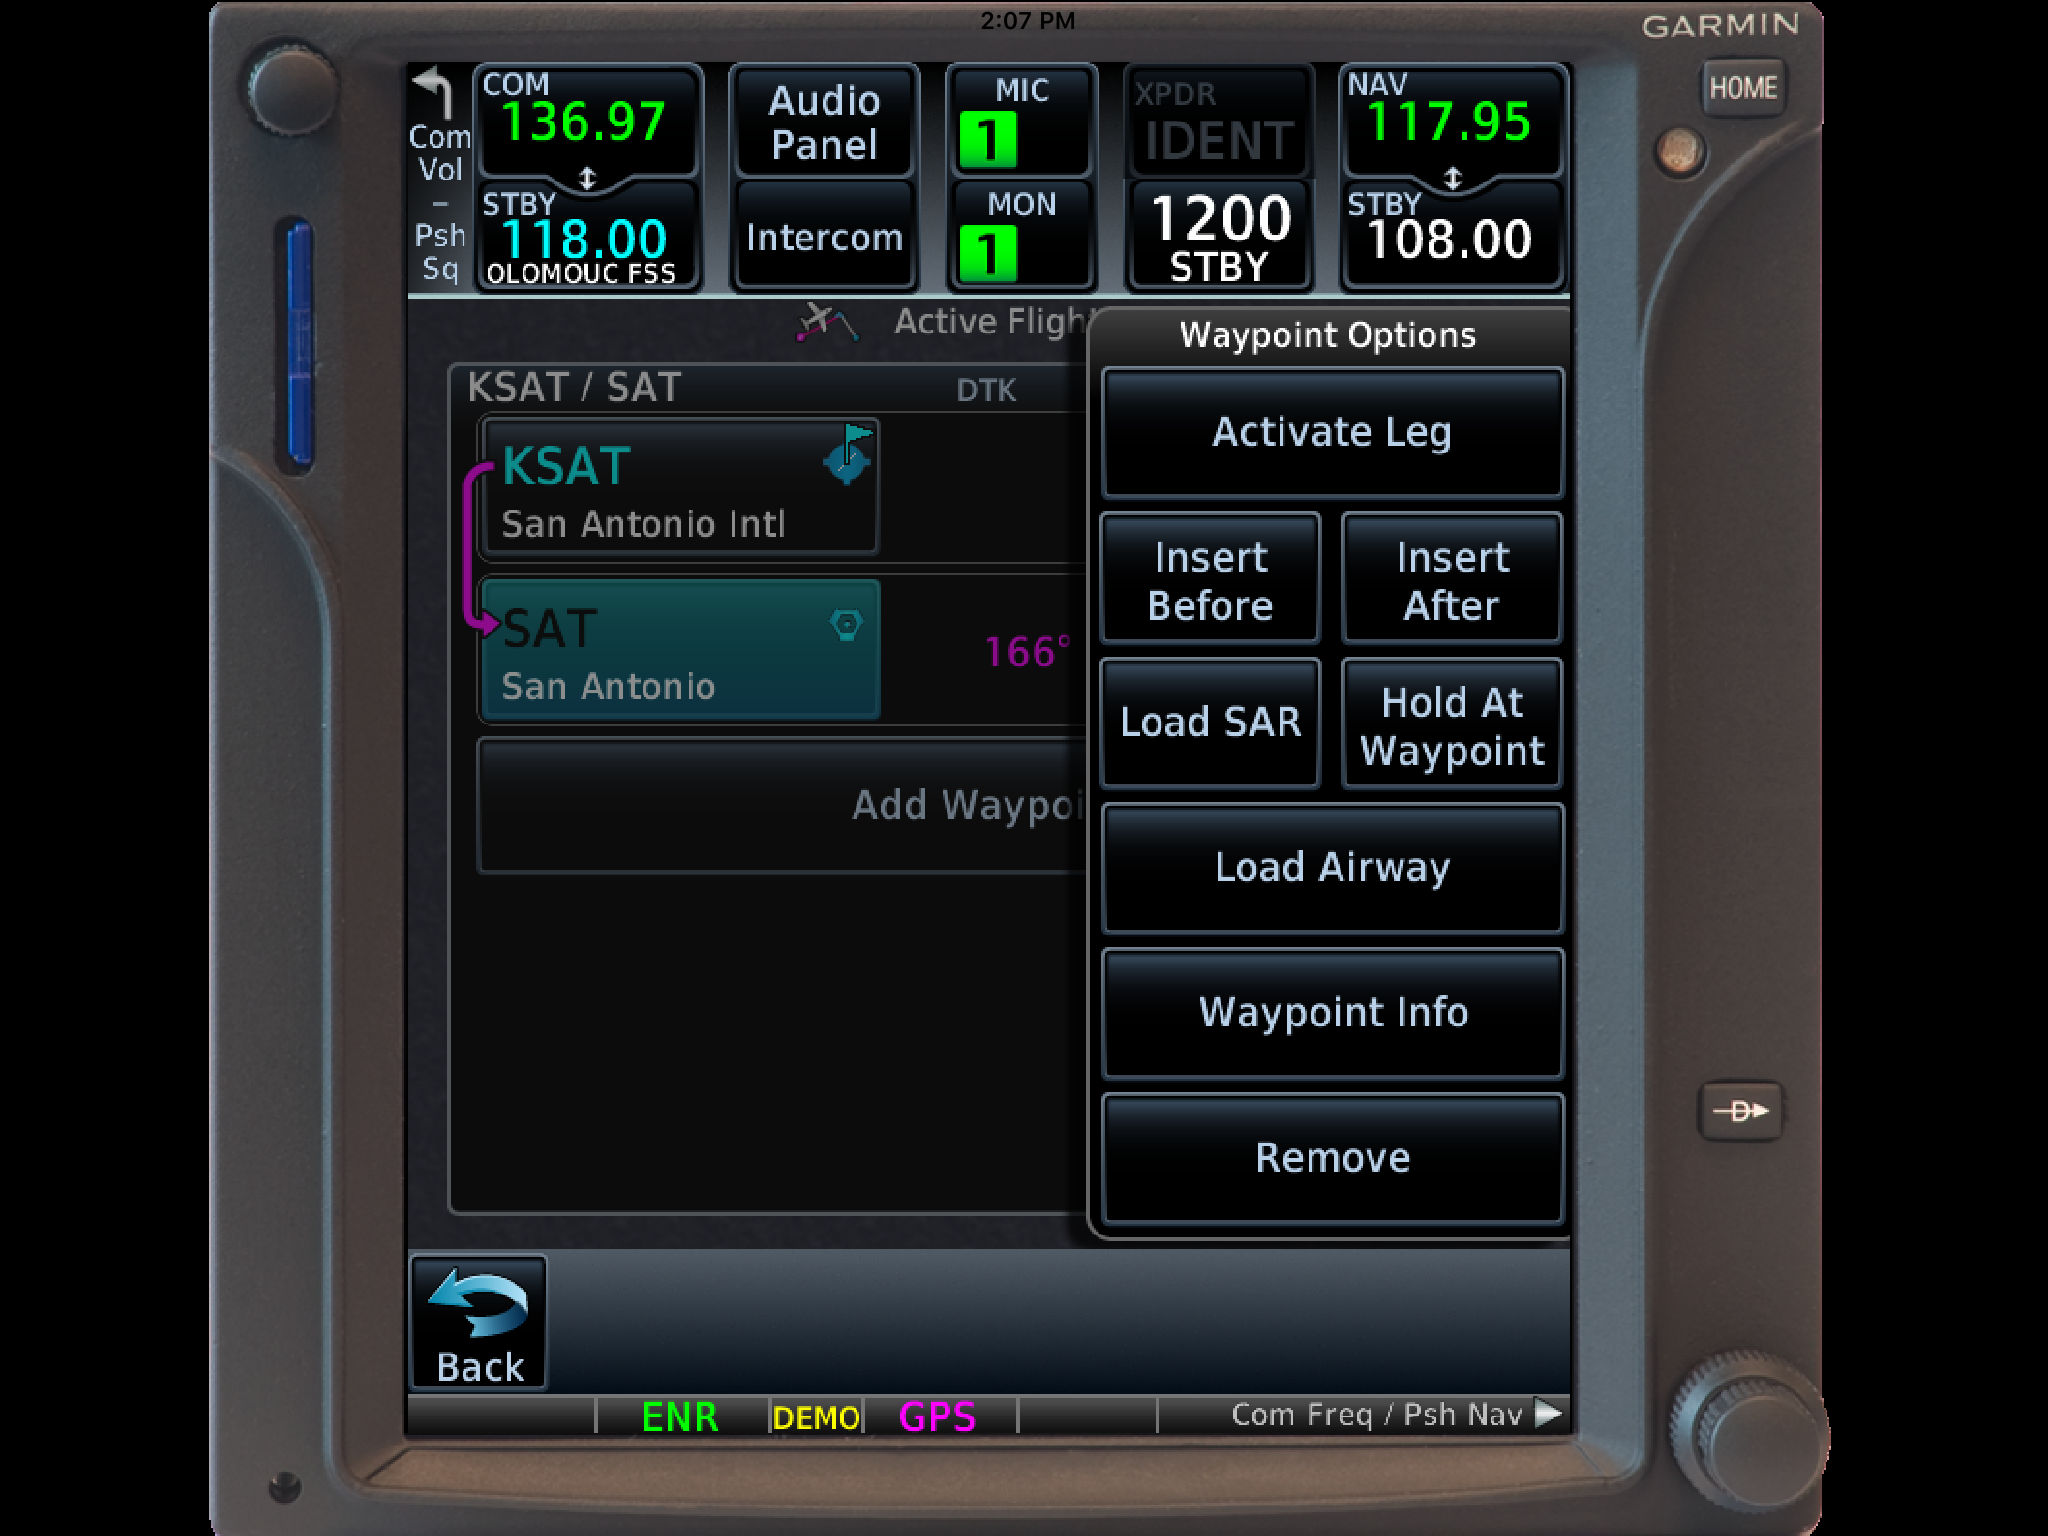
  2. Tap the waypoint you just inserted.
  3. A menu will pop up.  Tap Load Airway.
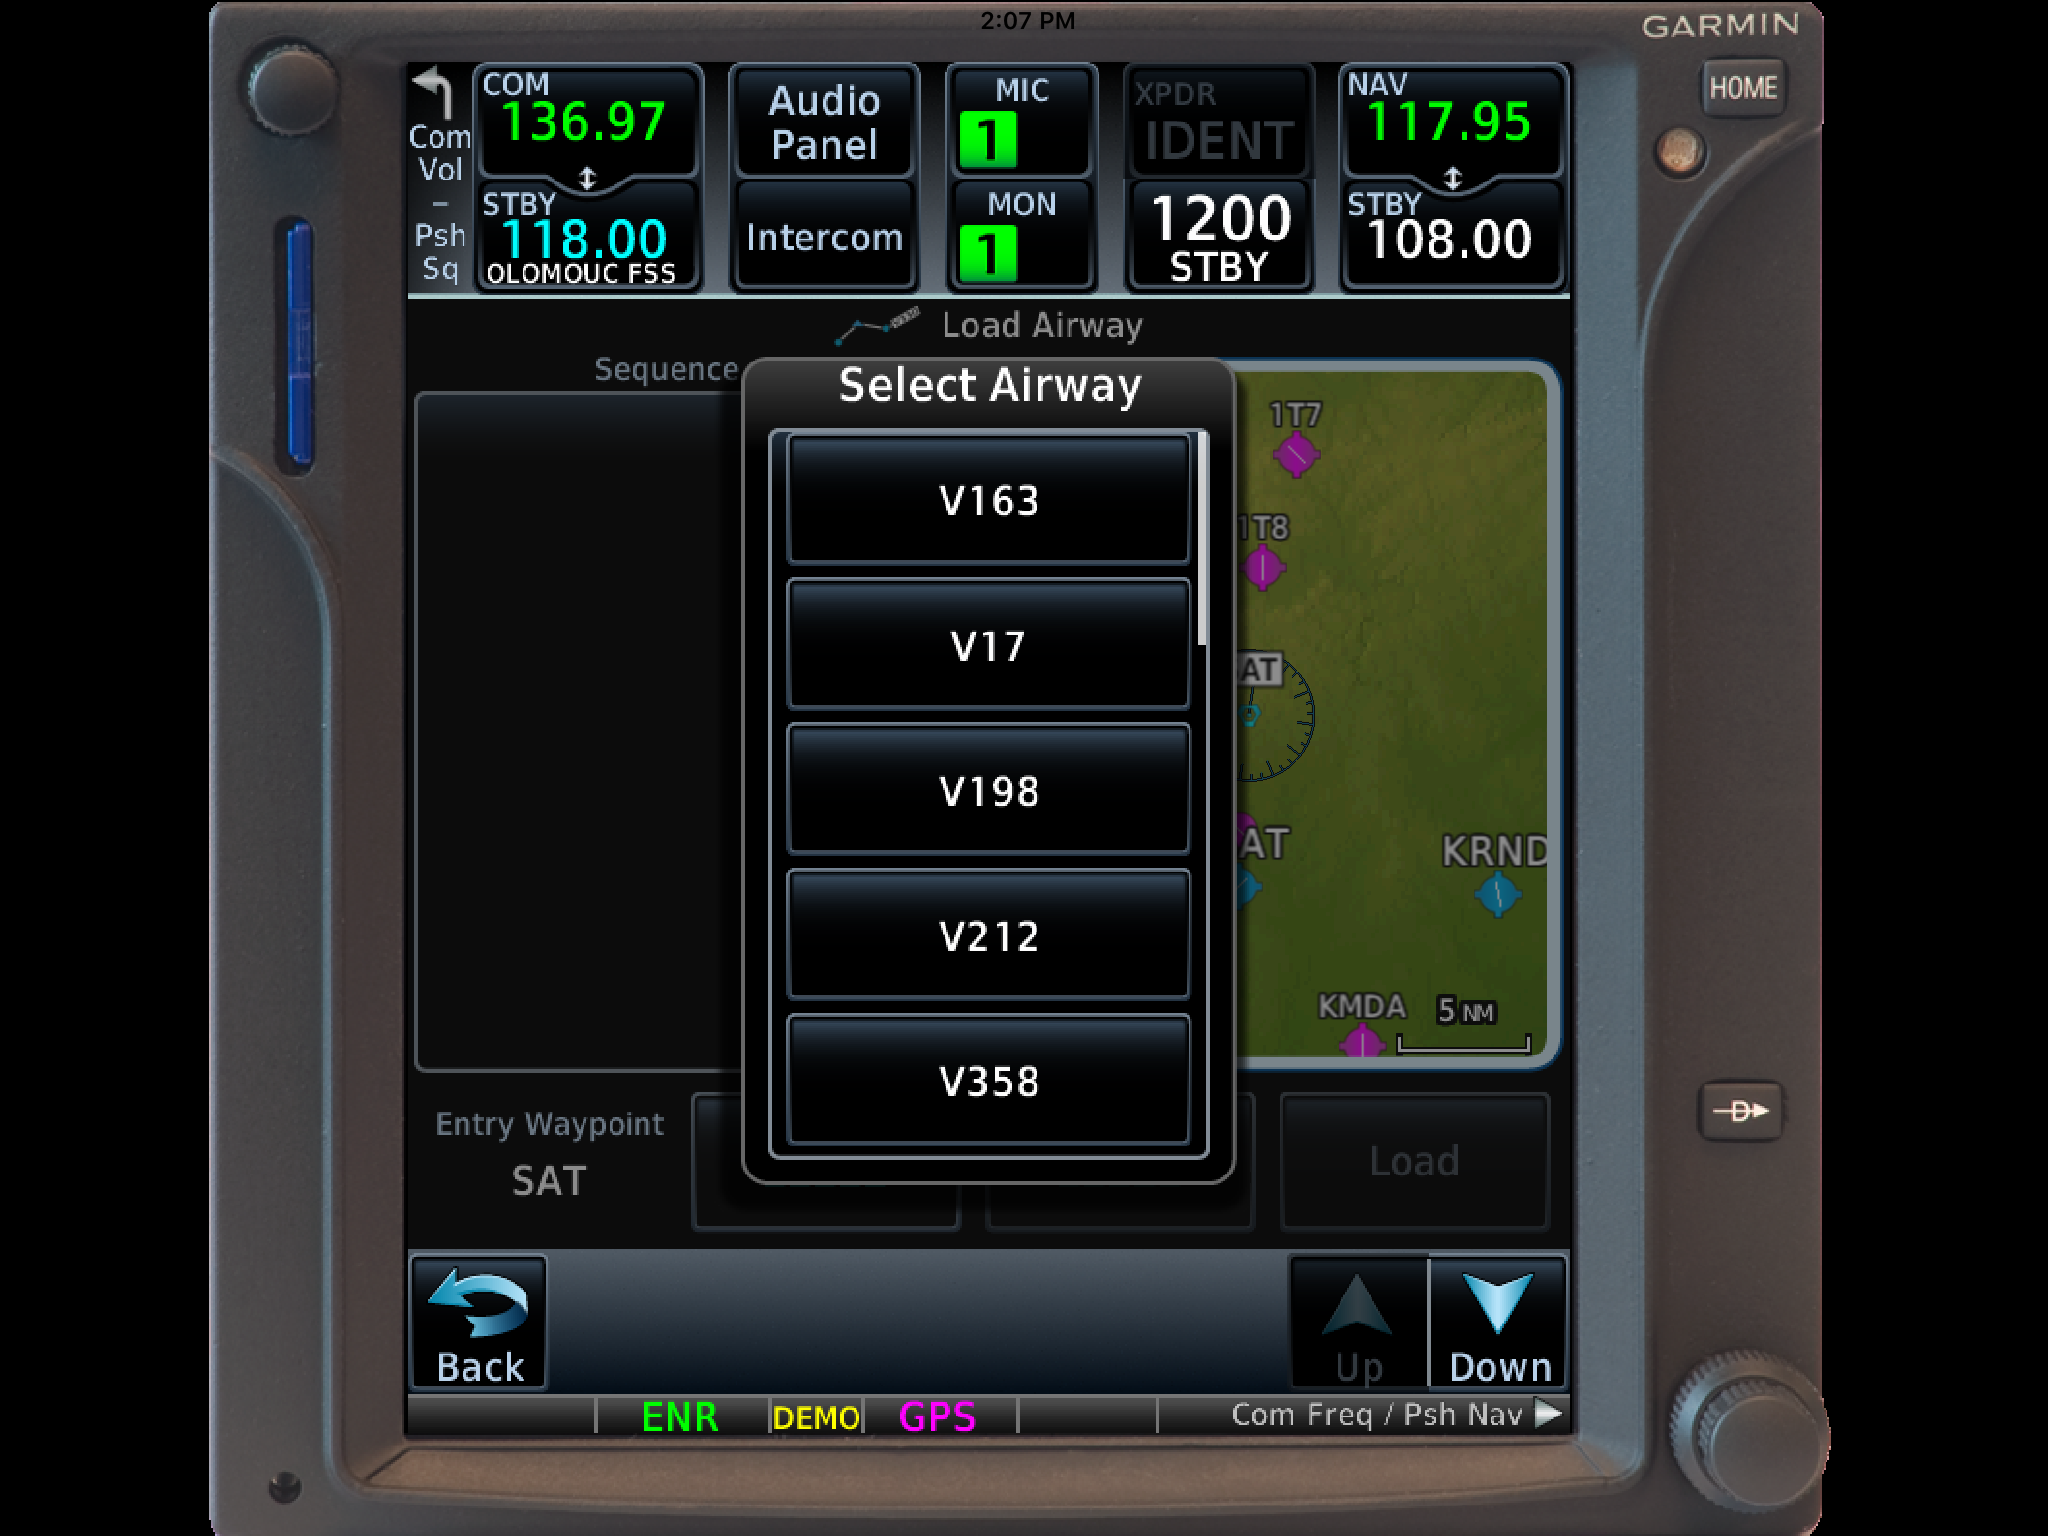
  4. Select the Airway you want from the next menu that pops up.
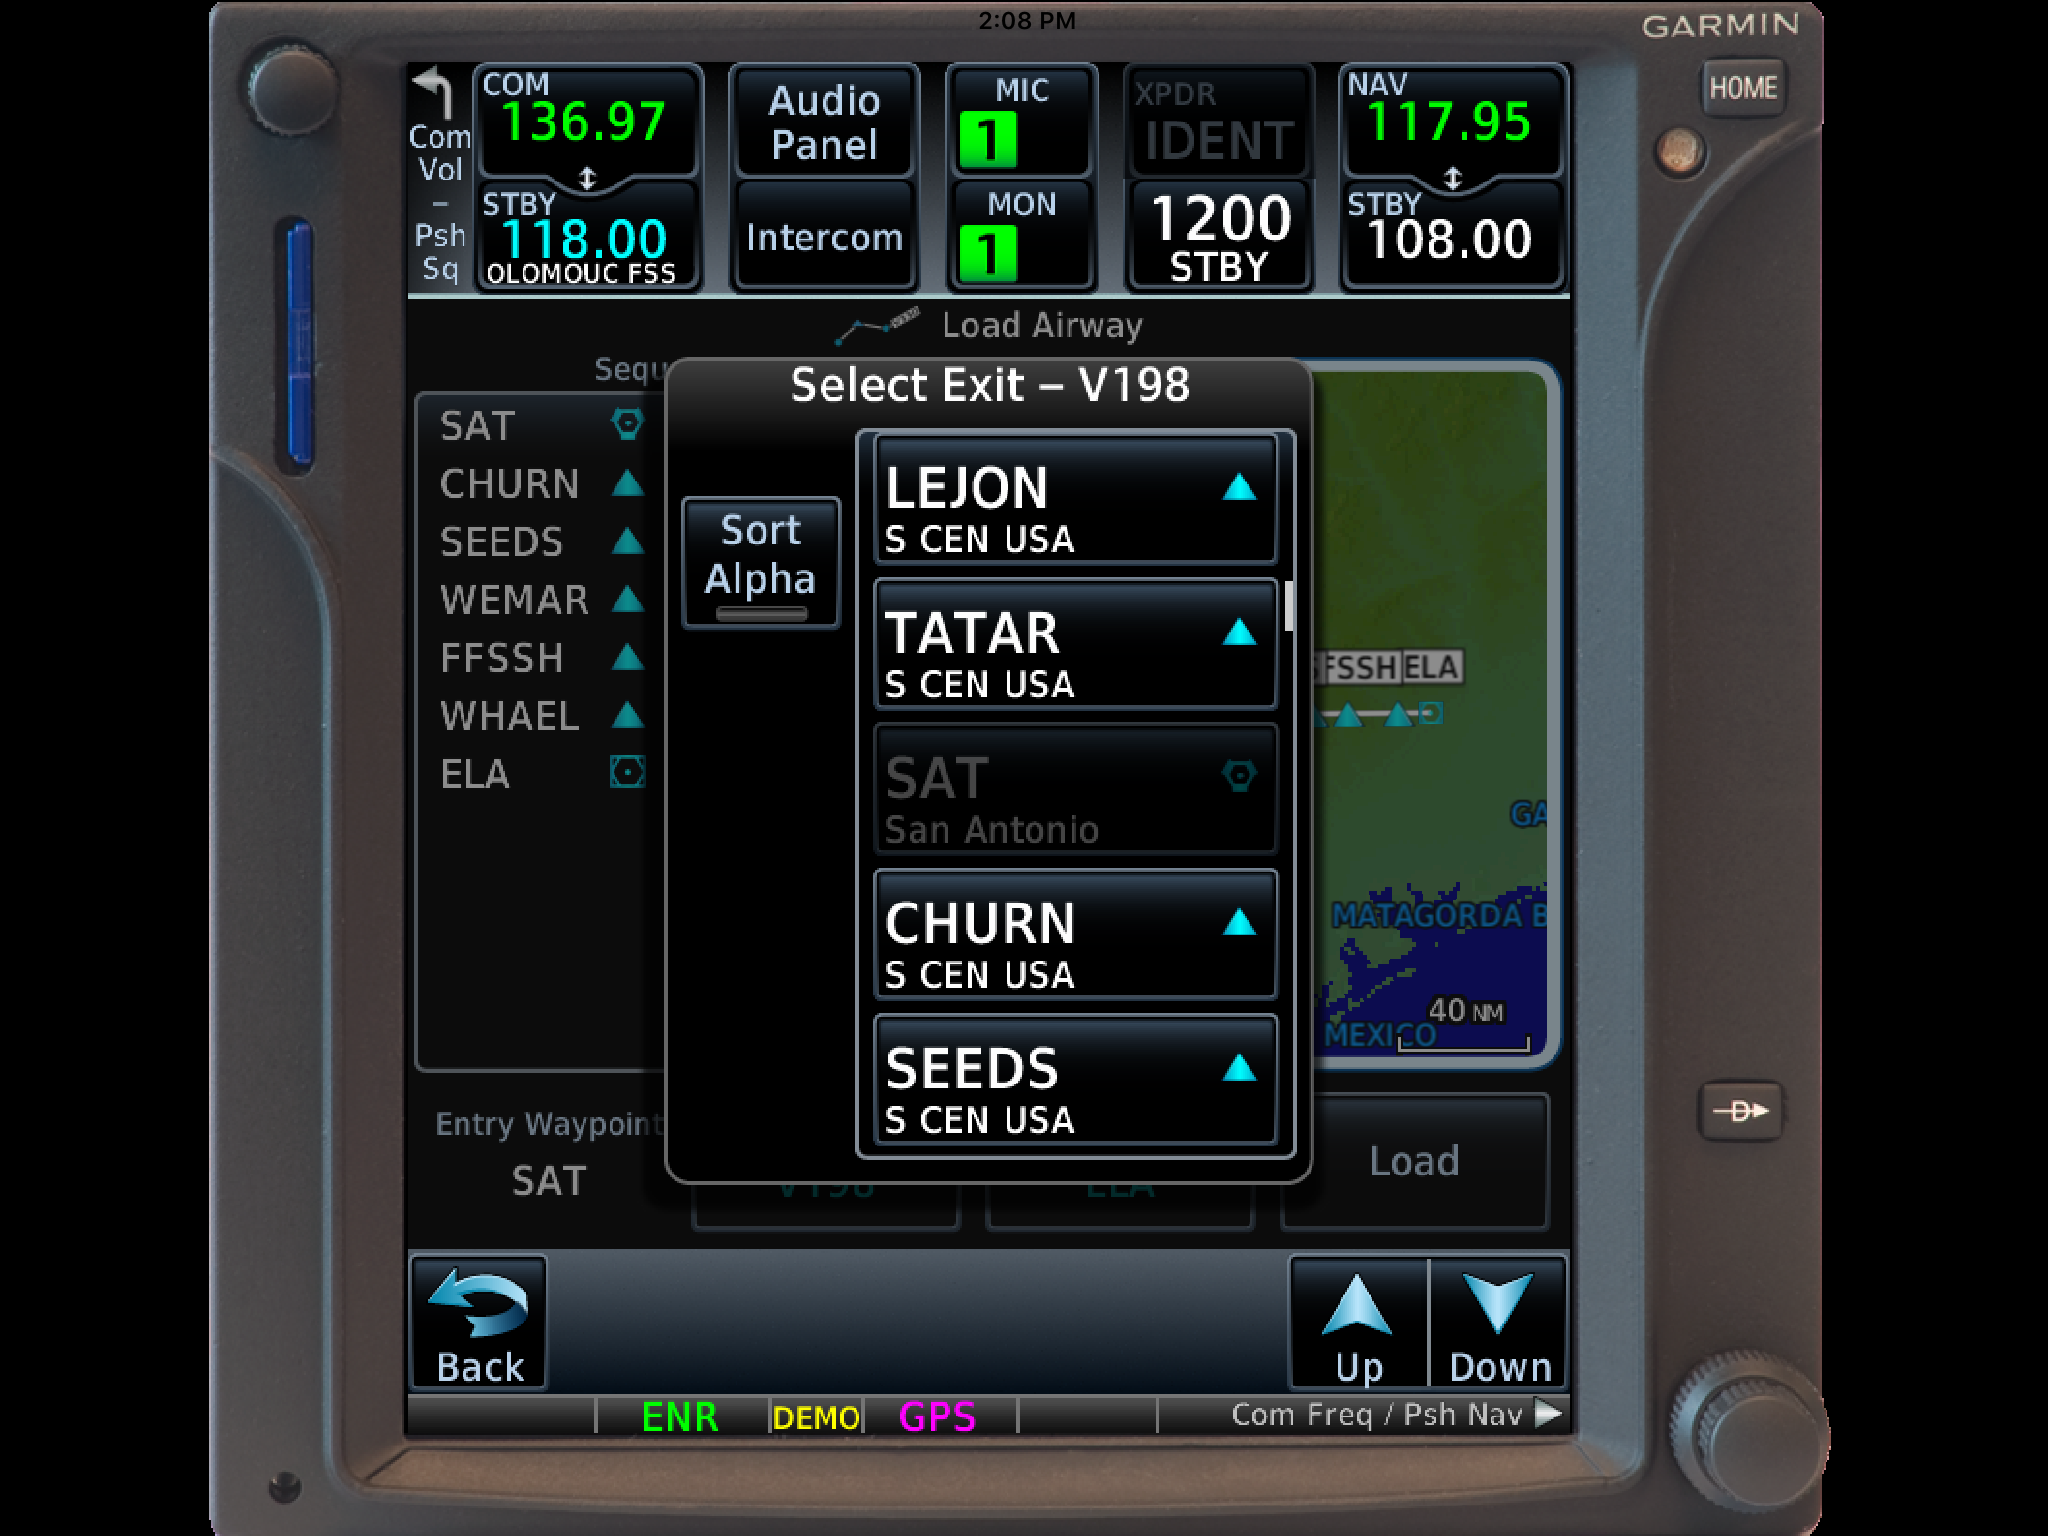
  5. Then, a list of waypoints will display to exit the airway.  Select the waypoint where you will be exiting the airway.
    1. Note:  Garmin defaults to listing these waypoints alphabetically.  If you unselect the “Sort Alpha” option, it will sort the waypoints by direction and distance from the entry waypoint.  This is a little more practical, easier to work with, and how I recommend doing it.  This way you can either scroll up or down depending on the direction of travel on the airway and find your exit waypoint.
  6. Tap Load.
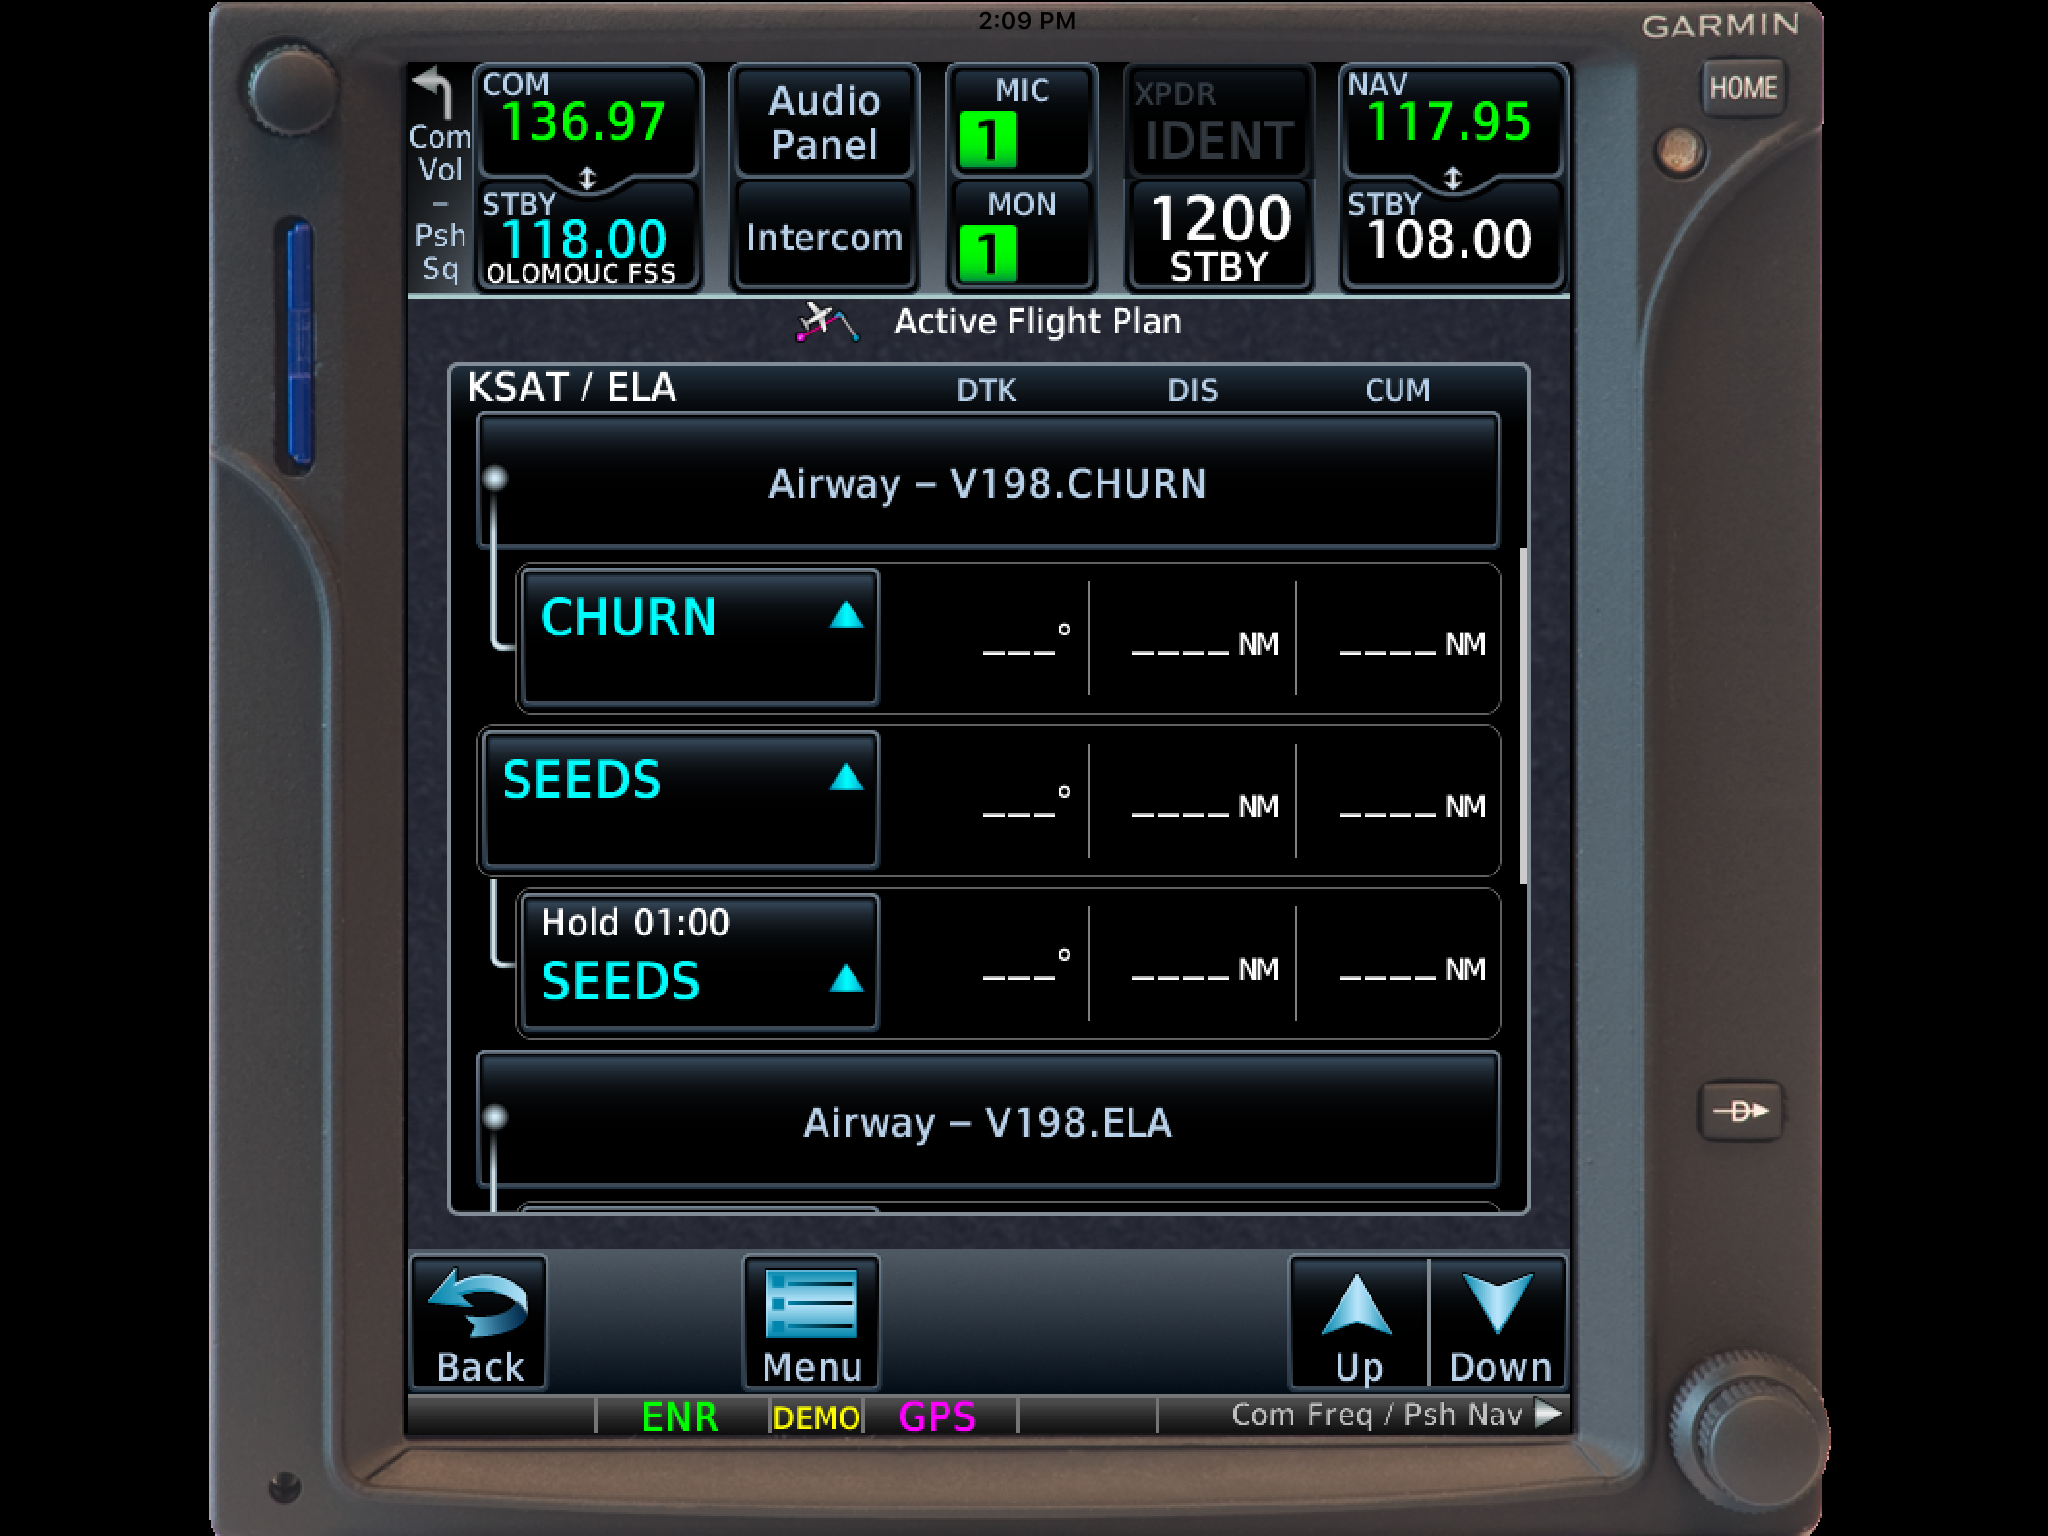
  7. The Airway and all the waypoints in between your entry and exit waypoints appear in your flight plan.
  8. If you are getting vectors to join the airway, you’ll need to use the Activate Leg function to activate the leg you will be joining the airway on.
    1. On the Flight Plan page, tap the waypoint that ends the leg you want to activate.
    2. On the menu that pops up, tap Activate Leg.

Hold At Waypoint

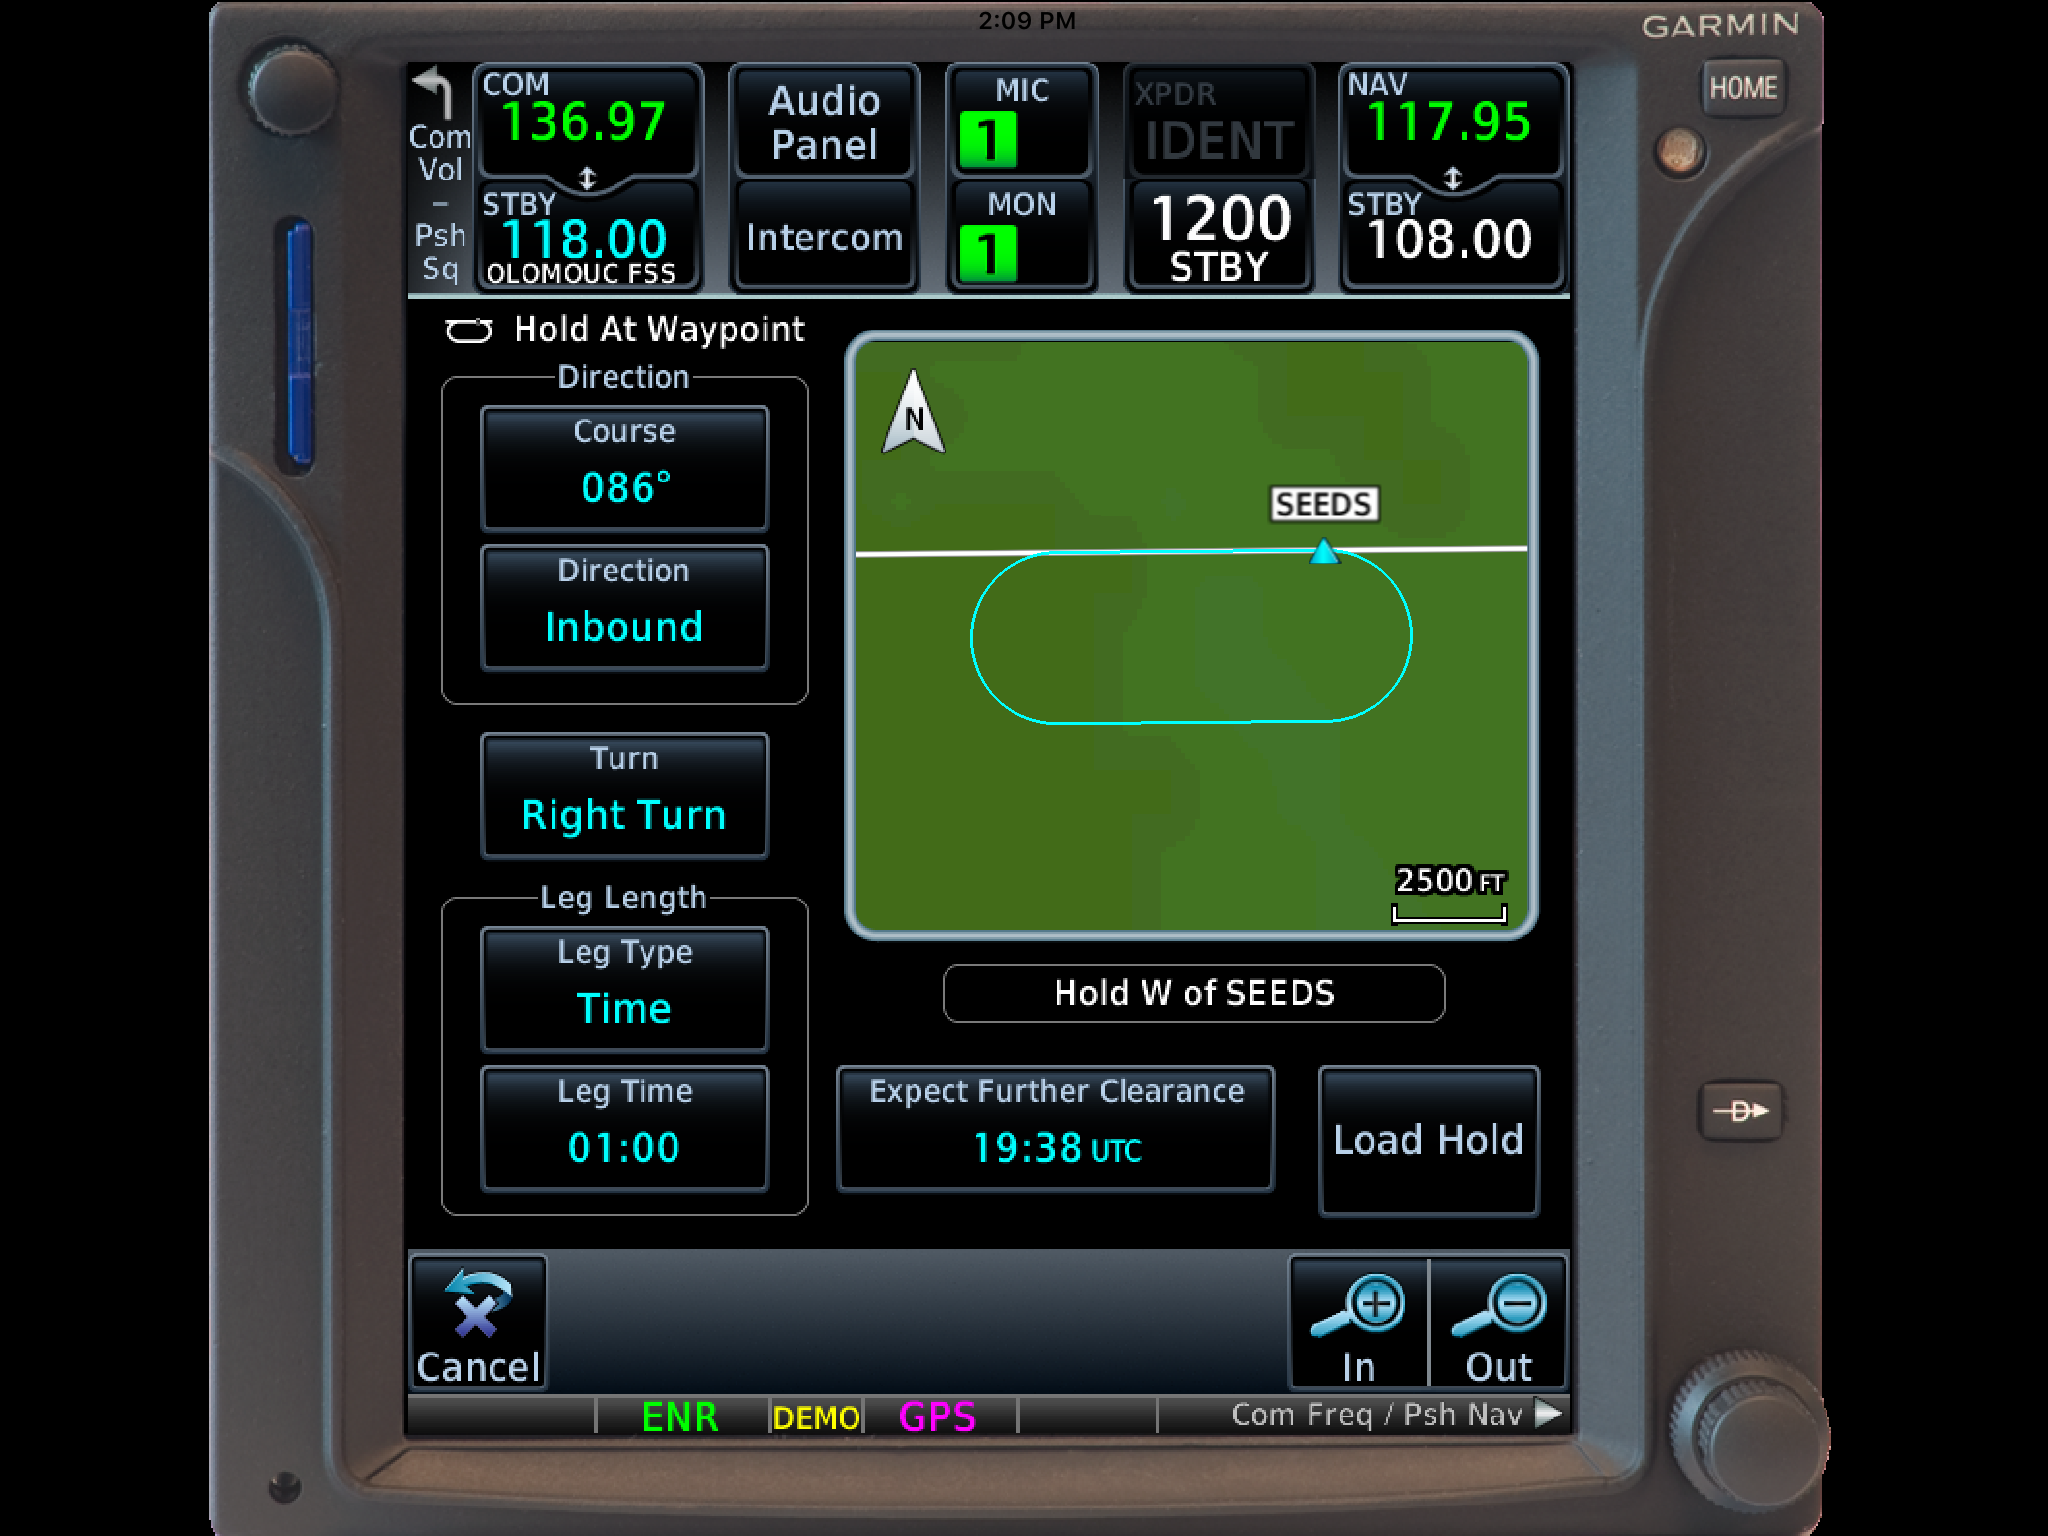
The Garmin GTN 750 allows pilots to place a holding pattern at any waypoint that is in the Nav Database (or any user created waypoint).  Here’s how to do it.

  1. On the Flight Plan page, tap the Waypoint that you want to hold at.
  2. On the menu that pops up, tap Hold At Waypoint
  3. On the next menu that pops up, input either the inbound or outbound course, right or left turns, leg time or distance, and the EFC time, then tap Load.
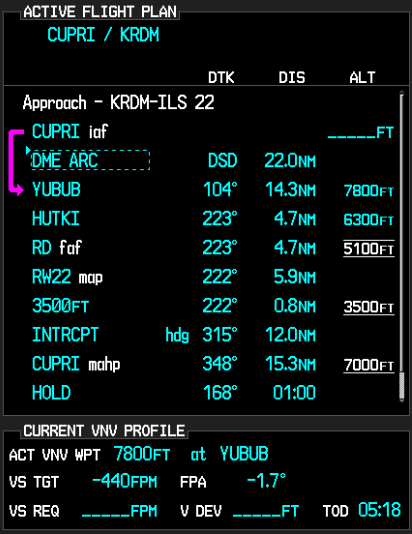
  4. You will see the hold now as a Waypoint in your flight plan.


Once the hold is entered, the GPS will go into Suspend mode, suspending the Flight Plan Waypoint Sequencing.  Once you are ready to depart the hold, you will have to tap Unsuspend before crossing the holding point on the inbound leg, then the GPS will resume normal waypoint sequencing.

These are 2 of the really cool, gee-wiz features of the Garmin GTN 750.  Following the above steps will make IFR flying much easier for the pilot, as well as much more enjoyable!

Similar Posts

  • Avidyne Entegra Chart Updates

    Columbia 400 Avidyne Entegra

    There are a number of airplanes out there equipped with the Avidyne Entegra PFD and MFD system, most notably the Cirrus SR20 and SR22 models from the early 2000s and the Columbia 350 and 400 from the same era.  The Entegra is pretty simple and easy to learn, but doesn’t have the capability that it’s Garmin glass panel counterparts do (I have not, however, tried the R9, which could prove much more capable than it’s predecessor).  I have found that pilots master the Entegra a lot quicker because of the reduced functionality.

    One of the nice features of the Avidyne Entegra is the CMAX Chartview option.  With a yearly subscription, you can get all the Jeppesen approach plates and airport diagrams for the entire US on your MFD.  Just like your GPS, though, you have to update the charts monthly to keep them legal.  After a period of time when you don’t keep up with the updates (I believe it is 90 days), then the charts disappear.

    The update process is a little tricky if you don’t have someone to explain it to you.  Once you go through it a few times, you’ll have it down pat.  Here’s the process for the Avidyne Entegra Chart Updates.

    Jeppesen Subscription

    The first step in performing your Avidyne Entegra Chart Updates is to create an account with Jeppesen, who handles all the GPS NavData and MFD Chart updates for both Garmin and Avidyne.  If you already have a Jeppesen subscription, you can skip down to the next section.  To do that, simply go to jeppdirect.jeppesen.com, and then do the following:

    • Click on Avionics Data on the upper left hand side
    • Click “Purchase Avionics Subscription”
    • Then, click on “Create Account” in the new users section
    • Once you’ve created an account, login, then put in your aircraft information and select 1 update for the Avidyne Entegra EX500 EX 5000
    • Click Continue at the bottom and you can put in your payment information

    Software Needed

    There are two different programs depending on if you have a PC or a Mac.  If you have a PC, you need the Jeppesen Services Update Manager (JSUM).  If you have a Mac, you need the Jeppesen Distribution Manager (JDM).  Download whichever one you need, then login, and your updates will show up.

    Downloading the Avidyne Entegra Chart Updates

    First, we’ll go through the process of performing the Avidyne Entegra Chart Updates process for a Windows computer, using JSUM.    You’ll need two 2 GB USB drives formatted to FAT 16.  Here’s how to format to FAT 16.

    • Go to My Computer after inserting the USB drive
    • Right click on the drive
    • Click on Format, then select FAT and press OK

    Once the USB drive is formatted to FAT16, open up the JSUM program.  Login and your updates will be displayed on the screen

    • You’ll need to set the Avidyne CMAX Key Code
      • Right click the Avidyne Electronic Charts Service and click Set Avidyne Key
      • To get the key code, visit MyAvidyne.com and create an account using your JeppView subscription number and your serial number for your Avidyne MFD (found on the AUX page) and your PFD serial number (displayed on startup when the PFD is warming up)
      • Once you get the Key Code, copy and paste it in the window and click OK
    • Click on the service and click Start
    • The program should automatically detect the drive (if it doesn’t, click browse and select the drive)
    • Click Continue and the charts will start downloading and automatically programmed to the USB drive
    • If you are updating NavData on the MFD as well, follow the same steps as listed above in order to update the NavData

    Next, we’ll go through the Avidyne Entegra Chart Updates process on a Mac, using the JDM program.  You’ll need two 2 GB USB flash drives formatted to FAT 16 (the easiest way to format to FAT 16 is on a Windows computer, using the process above).

    • Open the JDM program and login
    • Insert the first USB drive
    • You’ll need to set your Avidyne CMAX Key Code
      • Click Service Details under the Electronic Charts Service
      • Click Set Avidyne CMAX Key Code
      • Program automatically detects the USB drive
    • Click and drag the Electronic Charts service over to the USB and release
    • The service is downloaded and copied to the USB drive automatically
    • Eject the USB drive
    • Insert the second USB drive (or plug the USB drive in to your MFD, do the update, then reformat the drive) and follow the same steps for the NavData

    Updated the MFD with the Avidyne Entegra Chart Updates

    Avidyne Cirrus

    Once everything is programmed the your USB drives, the rest of the process is simple.  Just go out to your airplane, plug in the first USB drive with the Electronic Charts on it, turn your battery on and the avionics master, and the system will upload the information automatically.  Once it’s finished, turn everything off, pull the USB drive out, then insert the second USB drive and do the same thing.

    Now, you’re all updated!

    If you’d like to see a video on the process, Jeppesen has some very good videos on the updating procedure.  The links are below.  If you have questions, please contact Texas Top Aviation and an expert will help you through the process.

    JSUM USB Programming Procedure

    JDM USB Programming Procedure

    Avidyne Entegra Chart Updates Upload

  • Night Flying

    Ah, fall is finally here.  In Texas, it arrived about a month late, but showed up with a vengeance.  A strong cold front caused a 40 degree temperature drop in 12 hours earlier this week, bringing rain, lower freezing levels, and lots of wind.

    Fall means cooler temps, but fall also means less light.  The sun begins to set sooner, plus the fall back time change in November cause darkness to spring upon an unaware pilot.

    Before getting in to too many night landings tips, just a friendly reminder, passengers can only be carried at night if the PIC has completed 3 takeoffs and landings to a full stop in the last 90 days during the time period of 1 hour after sunset to 1 hour before sunrise.

    Lots of us have been landing long before sunset for most of the past couple of months, so those night flying skills might be a little rusty.  The best way to remedy night flying rustiness?  Call an instructor and go get some practice.

    In the meantime, here are some tips as to what to expect for your next night flying experience.

    1. Your Eyes Are Very Important.  This may seem like an obvious statement, but night vision can be affected by many things.  Before you takeoff, you want to make sure you can see in the dark.  The FAA recommends no bright lights 30 minutes prior to takeoff.  They also recommend using oxygen at night as this greatly improves night vision, even at low altitudes.  Use off center viewing to help spot traffic or other objects in the air.  Finally, when preflighting, use a red flashlight as much as possible, but if you do have to use a white light, close one eye to keep one eye from being blinded.
    2. Utilize Approach Lights on Landing.  Night landings are very different then day landings.  It is very difficult to get the proper depth perception, not too mention see obstacles below you on your final approach to a runway.  PAPI’s, VASI’s, and instrument approach glide slope’s become very important.  If you are VFR only pilot, if your airport has a PAPI or a VASI, keep 2 white and 2 red (or 1 white and 1 red) lights.  If you see 3 red (or 2 red), climb.  If you see 4 red, definitely climb.  If you are an IFR pilot, I highly recommend always flying an approach at night.  What if your airport doesn’t have a PAPI, VASI, or approach with a glide slope?  You might not want to utilize it at night.  One side note on VFR flight: Clouds are nearly invisible at night.  If you do fly into a cloud (a clue is your strobe lights start reflecting back at you), don’t panic.  If you have an autopilot, turn it on and execute a 180 degree level turn.  If you don’t have an autopilot, start scanning your instruments, keep your attitude indicator blue side up, and make a shallow 180 degree while maintaining altitude.  Then call ATC, advise them what happened, and ask for help.  One more note:  I highly recommend that if a pilot finds that he/she will fly at night at lot, get an instrument rating and fly IFR at night.  It’s much safer.
    3. Practice Landings Before Carrying Passengers.  The tendency when landing at night is to level off too high before flaring, causing the airplane to bleed off speed and energy too high above the runway.  This can lead to a stall, a hard landing, and/or too high of a pitch attitude at touch down causing a tail strike. A good tip is start your level off when you can see the tire marks on the runway.  Make sure you practice night landings, preferably with an experienced instructor who is night current and proficient, before carrying any passengers on board, even if you are night current, but haven’t landed at night in a while.
    4. Night Emergencies.  For engine failures at night, you are very limited on options.  Unless you have a Cirrus equipped with a CAPS parachute system, you really have two options if an airport isn’t within gliding distance.  Find a wide, lighted road that appears to be lightly trafficked.  A word of caution, though:  be careful of light poles, fences, concrete medians, cars, and buildings.  The LA freeway would not be a good option (though there are exceptions to this rule as is evidenced by the picture below).  The second option is find a dark spot and pray it’s a field (or the Hudson River).  As you get closer, you can turn your landing light on to see what the ground looks like.  If it looks good, keep the light on and continue.  If you don’t like what you see, turn your landing light off and continue….

    Flying at night can be the best time of day to fly.  It’s usually smoother, cooler, and you get to see all the city lights.  It is a very different environment, however, so make sure to get some training before darkness settles in on your next trip.

  • Beware of the Lunch Monster

    He prowls around, preying on innocent pilots.

    He’s very sneaky, creeping unexpectedly and attacking after the propeller begins to turn.

    He’s very cunning, veiling his intentions until, BOOM, he attacks.

    Beware of the Lunch Monster!

    Whenever I am doing a full day of training (which is usually how transition training courses are planned out, in full day sessions), I always plan a lunch stop.  My metabolism has the speed of a rocket ship, so I get hungry and need some sustenance in the middle of the day.  I have a running list of airports to stop at that have good lunch spots at them or nearby, so my customers and I usually end up at one of those airports.

    Almost without fail, if a customer is having an excellent flying morning, nailing all the procedures, picking up all the techniques, and overall, flying pretty well, then eats lunch, the afternoon doesn’t go quite as well.  Doing some of the same things we did that morning, but the customer’s performance isn’t quite as good.  Most of the time, it’s just a brain lockup or landings aren’t quite as squeaky as they were in the morning.

    Part of it is fatigue after flying for 2-3 hours in the morning.  The other part is what I call the Lunch Monster.  Eating a big lunch can sap away brain power and cause a person to lose energy around 2-3pm, leading to an afternoon lull (or the Lunch Monster attacking!).

    According to Forbes.com:

    Diet contributes to energy levels too. “Eating a lunch that is too big is the most common reason for feeling sleepy in the afternoon,” says Rebecca Solomon a nutritionist at Mount Sinai Hospital in Manhattan. “All your energy goes into digesting the enormous meal.”

    The goal is to keep the body’s Cortical and Cortisone levels even since they’re the hormones released by the body in reaction to stress–they produce the fight or flight response. Their levels are elevated when you have sugar, caffeine and processed food, so you feel awake and energetic. But a few hours later, when those levels drop, you’re sluggish.

    Solomon recommends eating a meal that’s balanced with healthy fats (from olive oil or avocados, for instance) with protein and healthy carbohydrates (whole wheat bread or pasta). The portion will vary for people of different sizes, but a general rule is you should be hungry about four hours after the meal.

    Another healthy eating habit: Consume small portions of foods throughout the day, including almonds, carrots and hummus and fruit. Enjoy lunch around 1:30 or 2 p.m., just before the time you normally feel fatigued.

    Now, most of the stops on my list of restaurants don’t fit the bill of healthy fats and healthy carbohydrates (plenty of protein, though, especially the BBQ joints).  For those days, bringing along a snack like almonds or dried fruit is a great idea to munch on mid-afternoon.  Trimming down the amount eaten at lunch helps a lot too.

    So, the next time you have a long day of flying or training, beware the lunch monster and prep some good snacks when your flight instructor says you’re stopping for BBQ!

  • The Importance of Slowing Down

    Technology has made our job as pilots simpler, streamlined, and safer.  With all the new GPS & autopilot technology that seems to come out every month, flying an airplane is getting easier every day (and when I say flying, I mean programming!).  I can’t tell you the last time I actually used a VOR for navigation, other than a practice approach.  The AIM even has guidance in it now allowing pilots to use the GPS overlay on a VOR or LOC approach instead of switching to the actual NavAid on the course needle (you have to WAAS in order to legally do this).

    I hear the argument already.  I am young (31) and used to all the different touchscreens because I have grown up with them.  Tech is nothing new to me.  It’s not that easy for everyone, I do understand.  There is also the argument that all the tech causes pilots to not know how to fly the airplane, which is also valid. This is why I put an emphasis on hand flying in any kind of training I do.

    For the sake of argument in this article, yes, I am young and I adapt to technology pretty easily.  I’m not afraid to press buttons to figure out what they do, but I usually do it while sitting on the ground with a GPU hooked up (or I go look in the manual).  And yes, all the autopilot ability has caused a decrease in base pilot skills.  I actually encourage every customer I have to go get a tailwheel rating so that they can actually learn how to fly better.  You don’t use a rudder much in a Cirrus compared to a Super Cub or a Citabria.

    What I want to focus on for a few minutes is how to alleviate the frustration that comes with getting so wrapped up in the technology when it doesn’t do something that you want it to, or the wrong button gets pressed, then you end up somewhere you had no intention of being.

    The biggest thing a pilot can do when it comes to technology is NEVER to get in a hurry.  Good training is first and foremost, but, after that when flying without an instructor or even in recurrent training, SLOW DOWN and think through what you are doing and what you want the system to do.  This will alleviate a ton of frustration.

    It can be very easy in hot, turbulent weather to get tuned in to the GPS programming, trying to do five or six different things in the span of five or six seconds, before looking up and realizing that plane is 500 feet off altitude (without an autopilot) or you blew through the course you were supposed to be intercepting (with an autopilot).

    What I teach is to slow down, whether or not you have an autopilot, and do one thing at a time.  Once that item is done, look up at the instruments or the horizon, check on things, make sure the airplane is still flying properly, then do the next thing.  Don’t try and do a bunch of things all at once or in a hurry.  It will usually get you off course and off altitude, plus it distracts the pilot from his main job:  Flying the airplane.

    So, next time you want to do something on your GPS, pause, take a breath, think through what you want to do, then do one item at a time.  The outcome will be less frustrating and you’ll keep flying where you want to go.

  • After Market Ice Protection

    It’s winter time, so that means winter weather for the aviation community.  For single engine piston pilots, that means dealing with icing conditions.  For us Texan flyers, ice only presents an issue for maybe a week out of the year (the exception being for those Panhandle residents!), but it’s nice to have some protection.

    Most single engine pistons do not come with ice protection from the factory and, of those that do, most are not Flight Into Known Icing (FIKI) approved.  The systems are “get out of jail” systems that can reduce the amount of ice you pick up if you accidentally get into icing conditions and you are on your way out.  The Cirrus SR22 line of aircraft has had the TKS system option since 2006, with the new FIKI system being available since 2010.  The Cessna TTx has a FIKI option that was debuted in 2014.

    The above mentioned airplanes use TKS systems.  There are a handful of single engine pistons that use boots that are FIKI certified:  the Piper PA46 line (Malibu, Mirage, and Matrix) and the Cessna P210 and T210 line (though not all are equipped with boots).

    If you find yourself flying into wintry conditions often and want some protection for your clean wing airplane, there are some aftermarket options for a lot of airplanes now.  Do note that all these systems do come with a pretty hefty price tag, but can be worth it if you fly into icing a good bit.

    CAV Ice Protection TKS Systems

    CAV Ice Protection is a TKS system outfitter.  What is TKS fluid?  According to Flying Magazine:

    “TKS systems dispense an ethylene glycol-based fluid with a freezing point below minus 70 degrees F through porous titanium panels attached to the leading edge of the wing and empennage. The fluid is released through thousands of the panels’ laser-drilled holes, which are not much larger than the size of a human hair. As air flows over the wing and empennage, it disperses the fluid, coating the surfaces, and preventing the formation and adherence of ice.”

    The advantages of a TKS system are the whole entire wing gets coated to get rid of any extra ice that adheres to the top or bottom of the wing surface.  The disadvantage is there is only a finite amount of fluid, so when it runs out, you don’t have any more protection.  The fluid also adds extra weight agains the useful load of the airplane.

    CAV Offers a Basic TKS system for the following single engine piston aircraft:

    • Beech Bonanza
    • Cessna 182, 206, 210, 350, & 400
    • Columbia 350 & 400
    • Piper PA32
    • Mooney M20

    CAV Offers a full FIKI System for the following single engine piston aircraft:

    • Beech A36 & G36 Bonanza, and Baron
    • Cessna 210 & TTx
    • Commander 114
    • Mooney M20

    For more information, check out CAV Ice Protection’s Website.

    Ice Shield De-Icing Boots

    Ice Shield is another after market de-ice option.  Ice Shield makes boots for wing leading edges.  The advantage of boots is they activate instantaneously, getting rid of ice where it builds up first, on the wing leading edge.  No running out of fluid and only the added weight of the system.  Ice Shield also offers heated windscreens for several the Piper Saratoga line and the A36, B36, and G36 Bonanza line.

    Ice Shield has boots for the following single engine piston aircraft:

    • Beech Bonanza F33A and -36 line
    • Cessna 210 line
    • Piper Pa46 line

    For more information, check out Ice Shield’s Website.

    One other company, Kelly Aerospace, makes an electric leading edge de-icer called the ThermaWing for the Cessna/Columbia 350/400 line.  You can read a review of the ThermaWing here, or check out Kelly Aerospace’s website.
  • Texas STOL Roundup

    Looking for a fly in this fall?  Check out the Texas STOL Roundup at the end of September in Hondo, KHDO.  Interested in entering?  All are welcome!  There are several different categories including LSA, Experimental, and others.  Come in for a fun weekend and see how short an airplane can be landed!

    There will be bands, a STOL seminar, and even a hangar dance.

    Fly in or drive in.  Camping will be available on the airport.

    For more information, you can visit the event website.

Leave a Reply

Your email address will not be published. Required fields are marked *