The PIC Isn’t Always the Pilot Who Took Off

You are at cruising altitude and your flight is going just as planned. All of that can change, sometimes without much warning, and you, the non-pilot, are now in charge. Would you know what to do?

This was a scary thought for me until I attended a seminar developed for the non-flyer at a Cirrus Owners Pilot Association (COPA) fly-in. Cirrus is the only small plane with a parachute as standard, so I thought all I had to do in an emergency was pull the chute. It’s a little more complicated than that!
I learned the vast majority of pilot incapacitation happens when the plane is at cruising altitude, so there is time to find a solution.
anne-pargeter-picture

I was taught ten basic steps to follow to bring the plane safely to the ground.

  • First attempt to revive the pilot. If he is choking, it is possible to do a Heimlich maneuver from the side. This may dislodge whatever is blocking his airway and solve the problem. If he is experiencing hypoxia, turn off the heat, open all vents, and, if you have on board oxygen, use it. Also, if you can, get instructions on how to descend to a lower altitude. If the pilot is unconscious due to a heart attack or other medical emergency, there are still things you can do from the right seat.
  • Engage the autopilot if it isn’t already on and move the pilot off the controls. *
  • Ensure you are connected to the radio. If you hear ATC or other pilots, you are.
  • Send an electronic trouble message. Set the transponder to 7-7-0-0 to identify your plane to ATC. This will cause your plane to be highlighted on ATC radar screens.
  • ATC will most likely contact you asking what is your emergency. If this does not happen, you will need to transmit a Mayday call. All non-pilot passengers should know how to use the radio to get help, if they know nothing else.
  • With help from ATC, decide where you want to go.
  • Use the autopilot to fly in the direction suggested by ATC. I was taught that ultimately the choice of where to deploy the parachute is up to me because I am now the PIC, pilot in command.
  • Ensure that seat belts are secure and the emergency hammer is between your legs (so you have it to break a window to escape if needed).
  • Pull the parachute handle.
  • On the way down, shut down the engine and brace for impact.
  • After landing, move away from the plane, into the wind. Stay nearby and wait for help.

The seminar covered specific procedures to accomplish these basic steps, what to do if you don’t get a response from ATC, what to say in a Mayday transmission, how to fly a heading, how to check fuel levels, shut down the engine, etc. After the seminar, I felt much more comfortable about what to do if my pilot suddenly lost consciousness.

I was also told to practice what I had learned to avoid panicking in an emergency situation. There are so many things the person in the right seat can do under normal circumstances to practice. Learn how to set heading bugs, learn where the plane’s Electronic Locator Transmitter (ELT) is located and how to activate it. This will help rescuers locate the airplane. Learn how to assess your fuel levels. Practice making routine radio transmissions. Observe what your pilot does and ask questions if you don’t understand something.

Knowing what to do in an emergency situation will give you a sense of control over what will happen to you, your pilot, and any passengers on board your plane. If you have never considered taking a lesson or two for the non-pilot, find yourself an instructor, and learn what you need to know for your plane. Hopefully you will never have to use it, but if you do, you will be ready to be the PIC who lands the plane.

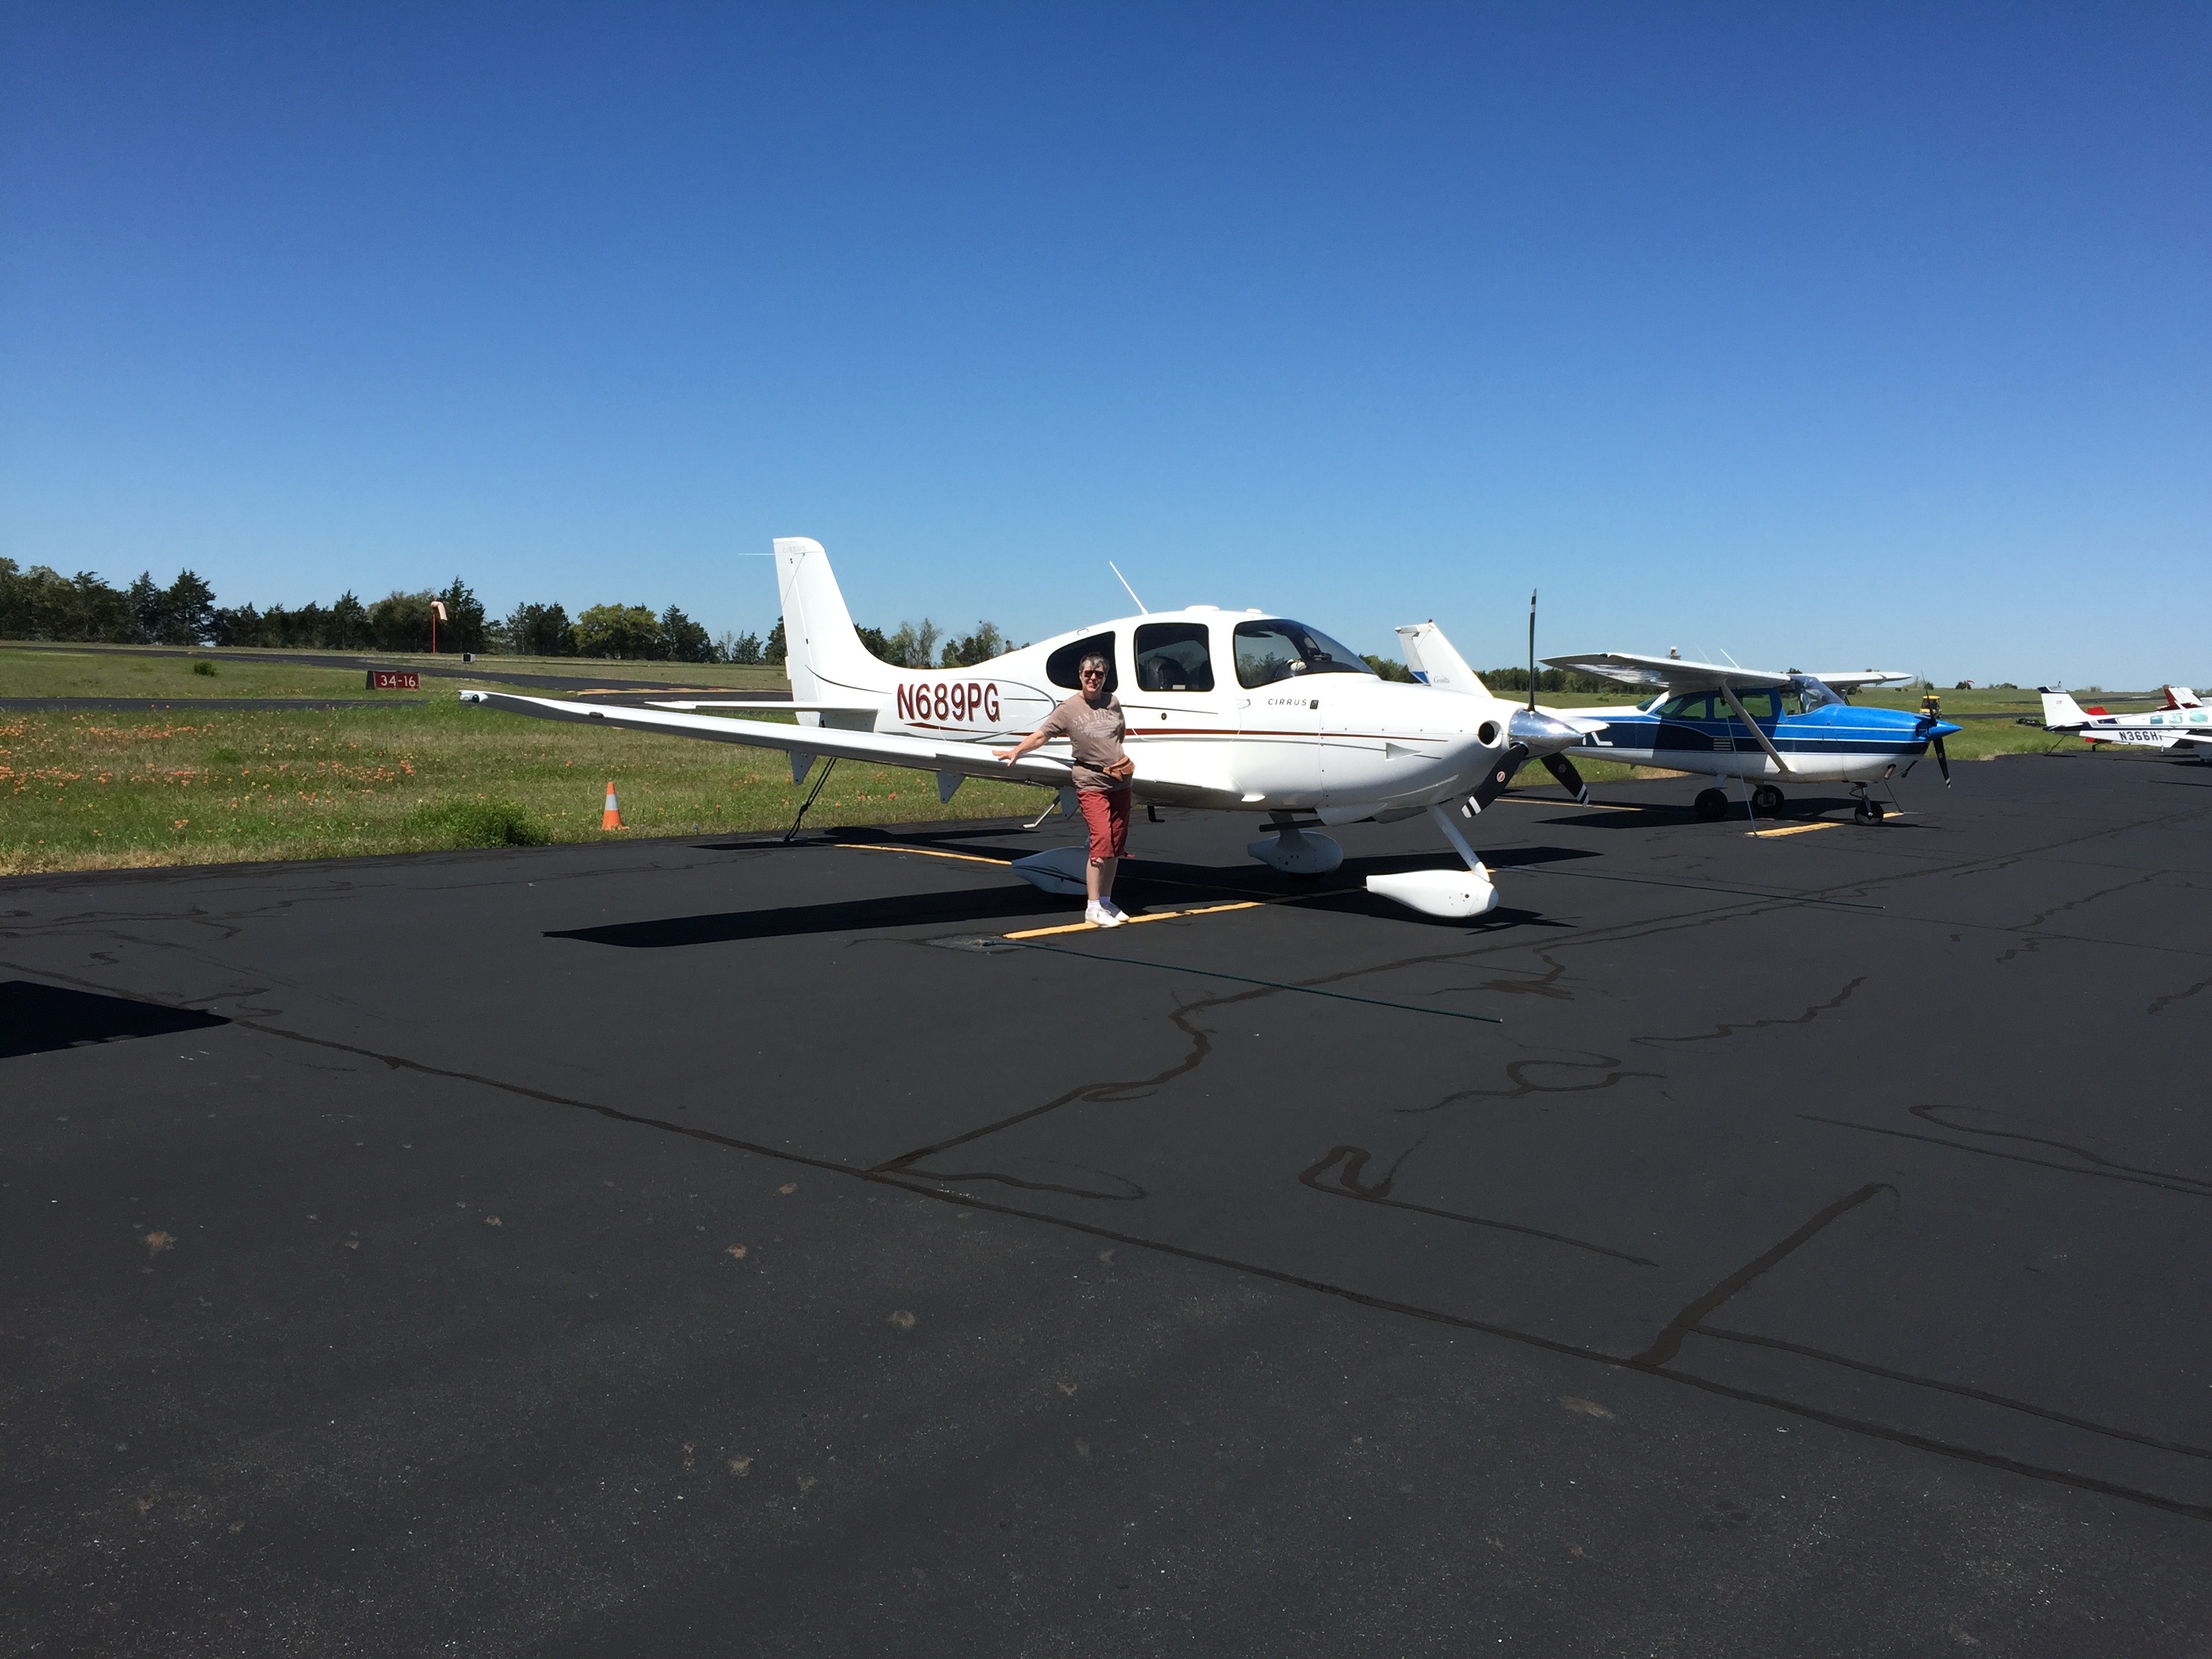
Anne and her husband Stephen are the proud owners of a Cirrus SR20. They plan to put the airplane to better use once Stephen retires. Anne has a background in desktop publishing and writing.

Similar Posts

  • Cirrus Approach

    Earlier this year, Cirrus debuted it’s new Learning Management System (LMS), Cirrus Approach. For several years, Cirrus has led the way in online systems training while using several different platforms for it’s LMS. Cirrus Approach is the culmination of lots of sampling and tinkering, and boy, did Cirrus knock it out of the park.

    For those of you unfamiliar with the Cirrus training program, here is the quick rundown. When a pilot who has no Cirrus time buys a Cirrus aircraft, initial transition training is required to familiarize the pilot with the aircraft systems, speeds to fly, power settings, etc. The Cirrus Transition Course is a 3 day that gets a VFR pilot up to speed in the airplane. Under the Cirrus Embark program, those 3 days of training are covered by Cirrus and free to the new owner.

    If the pilot is an IFR pilot, then the 5 day Cirrus Advanced Transition Training Course is required. If the pilot has Cirrus experience, but with a different engine or avionics configuration, there are courses for that too. The Cirrus Embark program covers 3 days of training for most courses for a new Cirrus owner.

    As part of the aforementioned courses, there are systems to learn about and procedures to understand. This is where the Cirrus Approach LMS excels. Cirrus has done a great job of putting together lots of good videos (that are actually interesting but not annoying) on the airplane, systems, how to fly it, etc. for each course. It cuts down greatly on the time that the training instructor has to spend on the ground with the pilot since the pilot has already compiled knowledge through Cirrus Approach.

    Cirrus Approach is accessible online at learning.cirrusapproach.com. To get access to the courses, create an account, then select the Learning Catalog. The courses are categorized based on the type of training (Transition, Advanced Transition, Avionics Differences, Airframe & Powerplant Differences, Recurrent, and Specialty), then further broken down into the type of airplane, engine and avionics (eg. SR22T G6 Perspective+). Make sure the correct engine and avionics configuration is selected! Notice, there is a difference between the SR22T and SR22 (Turbo & Non-Turbo).

    Anyone can do the specialty courses. I would highly recommend for everyone to take the Engine Management course as well as the Icing Awareness Course for you TKS and FIKI operators. The Takeoff & Landing course is a good refresher course for a pilot who hasn’t done any training in a while.

    The Recurrent Training courses are encouraged for all Cirrus pilots. There is an IFR Refresher, a VFR Refresher, and a Skills Refresher. These are recommended to rotate through with a CSIP (Cirrus Standardized Instructor Pilot) on a yearly basis. With a little extra ground, a Flight Review and an IPC can be accomplished yearly using these courses.


    Interested in Initial or Recurrent training in your Cirrus using Cirrus Approach? Contact Texas Top Aviation today!

  • Contact Approaches

    Almost all IFR pilots are familiar with visual approaches and what the requirements are in order to fly a visual approach. As a refresher, the Instrument Procedures Handbook defines a Visual Approach as “an ATC authorization for an aircraft on an IFR flight plan to proceed visually to the airport of intended landing; it is not an [Instrument Approach Procedure]” (page 4-56).

    For ATC to issue a Visual Approach, the pilot must have the airport or the traffic to follow in sight. Once the pilot reports the airport or the traffic in sight, ATC can clear the aircraft for a visual approach.

    A limiting factor for a visual approach is ATC’s Minimum Vectoring Altitude. “This altitude, based on terrain and obstruction clearance, provides controllers with minimum altitudes to vector aircraft in and around a particular location” (Instrument Procedures Handbook page 1-42). ATC has to restrict aircraft to these MVAs, which can sometimes be quite high due to terrain or obstacles in the vicinity of the airport.

    Every pilot has been in a situation with a high MVA that ATC can’t get them below, but it’s solidly MVFR or VFR at the destination airport. The MVA keeps the pilot in the clouds, so a visual approach isn’t possible since the pilot can’t see the airport or the traffic to follow. This can lead to extra time to go out and fly an approach.

    Enter a Contact Approach. A Contact Approach is different then a Visual Approach. “The main differences between a visual approach and a contact approach are: a pilot must request a contact approach, while a visual approach may be assigned by ATC or requested by the pilot; and a contact approach may be approved with 1sm visibility if the flight can remain clear of clouds, while a visual approach requires the pilot to have the airport in sight, or a preceding aircraft to be followed, and the ceiling must be at least 1,000 feet AGL with at least 3sm visibility” [Instrument Procedures Handbook page 4-57].

    Here’s the simplified explanation: A pilot does not have to have the airport in sight to request a contact approach. All that is required is for the airport to be reporting at least 1sm visibility and for the pilot to remain clear of clouds.

    When would this be helpful for an IFR pilot? Good question. Here’s a scenario.

    Pilot Smalls is about 20 minutes from his destination, which is an uncontrolled airport with only one approach to runway 17. He is approaching from the south and the initial approach fix for the approach to 17 is about 15 miles north of the airport. The airport is under Center control. When he has arrived at this destination in the past, Center usually could only vector him down to 4,000 AGL. He is very familiar with this airport and the surrounding area as he comes to this destination at least 2-3 times a month for business.

    Pilot Smalls listens to the AWOS, which is reporting a 2500 foot scattered layer and 10 miles visibility. He knows it is right traffic for 17 since there is a 2,000 foot antenna on the east side of the field. There is some hilly terrain around, but all the terrain is well below pattern altitude and doesn’t cause a safety issue.

    Looking out at the clouds, Pilot Smalls observes that the cloud layer is scattered to broken, but more scattered on the west side of the airport, with several large openings that he can see the ground through. Center asks for his approach request and Pilot Smalls requests a visual approach. Center gives him a descent to 4,000 AGL, their MVA for the area. They tell him to report the airport in sight for the visual approach.

    At 4,000 AGL, Pilot Smalls is going through the scattered layer of clouds, but can see the ground in between the clouds and deems he has room to maneuver safely between the clouds and stay clear of them. He can’t see the airport, so a visual approach seems unlikely. He can’t cancel IFR because then he would have to keep the VFR cloud clearance and visibility requirements in Class E airspace (1,000 feet above, 500 below and 2sm horizontally), which isn’t possible in this case.

    5 miles from the airport, ATC states, “N12345, I’m going to have to send you out for the approach since you don’t have the airport in sight.” Pilot Smalls then requests a Contact Approach. ATC clears him for the Contact Approach to his destination, so Pilot Smalls descends through a break in the clouds, remaining clear of clouds, until he gets below the base of the ceiling. He maneuvers onto the right downwind, lands and cancels IFR.

    Contact approaches can be useful at controlled and uncontrolled airports. The first time you request one, do so with a higher ceiling and some room to maneuver to keep your safety margins. After you’ve done a few, you can determine what your personal minimums are for a Contact Approach.

    I would not recommend doing a Contact Approach at an airport you are unfamiliar with. It’s vital to know what obstacles are around since on a Contact Approach, the pilot is now responsible for traffic avoidance and terrain avoidance, whereas on a visual approach, ATC resumes that responsibility.

    For more reading on Contact Approaches and another good scenario, check out Bold Method’s article on Contact Approaches.

  • Maintaining TKS Panels

    Columbia TKS Panels

    When cleaning airplanes, the majority of people don’t know how to properly maintain their TKS panels.  TKS panels provide wing leading edge, horizontal stabilizer leading edge, and, in the case of FIKI airplanes, vertical stabilizer leading edge de-icing protection.  For those not familiar with them, they are metal strips that have thousands of holes drilled into them where the TKS fluid seeps out. They have become quite prevalent on Cirrus aircraft, the Cessna TTx, and Mooney aircraft manufactured in the last decade or so.  The system is also known as a weeping wing system.

    Being on the leading edges, these panels pick up bugs very easily.  For the uninitiated, it would make sense to just use normal airplane cleaner to spray the panels and scrub the bugs.  Don’t!

    Using anything that contains Methyl Ethyl Ketone (MEK) as that can harm the TKS bladders behind the panels.  Any aircraft cleaner containing wax could cause the pores to clog, preventing the TKS fluid from properly seeping onto the wing.

    What’s the best thing to do?  Soap and water with a soft cloth is a good start (again, make sure it doesn’t have wax in it.  Dish soap would be suitable).  No hose available?  Just simply turn the TKS system on, let it run till you start to see fluid drip off the wings onto the ground, and use the fluid to clean the panels.

    A soft cloth would work fine, but, if the panels are really buggy, take a green scouring pad to do some scrubbing.  Just make sure the scrubbing motion is up and down with the grain, not side to side.  You can find the green scouring sponges on the dishwashing aisle in the grocery store.  Just leave one in the hangar for when you need it.

  • Garmin Smart Glide

    Recently, I was training a customer who had a brand new instrument panel installed in his TBM 700. The avionics shop that did the work (Abilene Aero, who I highly recommend for any panel installs, located at KABI) told us when we picked the plane up that the new Garmin GTN 750Xi had the most recent software update, which included the Garmin Smart Glide.

    I had never used the Garmin Smart Glide before, so I was eager to check it out during our training. When we got to engine failures, we pushed the Emergency button on the Home page of the GTN 750Xi, and then the magic happened.

    The plane was also equipped with a Garmin G600TXi PFD and the Garmin GFC 600 Autopilot. In order for Smart Glide to work, there has to be either a GTN 750Xi or GTN 650Xi installed, along with a G500TXi or G600TXi and a Garmin Autopilot. Garmin is working on getting the legacy G500 as well as the GI 275 and G5 to work with the above GPS units for Smart Glide as well.

    Here’s what happens. The plane loses it’s engine. The pilot’s workload and stress level suddenly goes way up. Trim the airplane for best glide, find the nearest airport, attempt restart. Do it quickly so you have time to focus on the glide. Oh yeah, squawk 7700 and declare your emergency. All the while plummeting toward the ground in a somewhat controlled crash. Yikes.

    Garmin Smart Glide takes over the flying part, allowing the pilot to handle the restart, while making it much easier to squawk, talk and plan the engine out landing. On the home page of the GTN 750Xi/650Xi, the pilot simply taps the Emergency icon on the bottom of the screen. The Autopilot comes on and goes into IAS mode and maintains best glide while descending. The GPS immediately analyzes the Glide Advisor, and turns to the nearest airport in the glide ring (if there is no airport within gliding distance, the GTN 750Xi advises the pilot). Then, the Autopilot flies directly to the Nearest airport, allowing the pilot the ability to take attempt a restart.

    Once it is determined that the engine won’t start, the Garmin Smart Glide has excellent situation awareness tools. On all screens, the pilot is constantly being advised of how high AGL the plane is currently, while advising also of how high AGL the plane will be over the airport that the glide is set up for. There is also a short cut on the screen to tap to squawk 7700 as well as runway length information at the airport.

    The Garmin Smart Glide Button wasn’t installed yet in the TBM, but that will make things even easier when it is (it will be certified in January). This is amazing technology that all Garmin GTN 750Xi pilots should have their software updated to. Remember, you have to have a Garmin Autopilot and a Garmin PFD for it all to work.

  • Dry Motoring a PT6

    When it comes to turboprop engines, a hot start is a really bad thing. For you piston drivers out there thinking, “What’s the big deal, you are just starting a hot engine,” then here’s a little education for you.

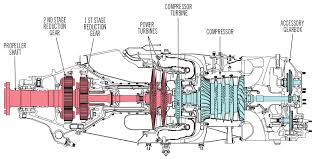
    In a PT6 turboprop engine, there is a very important temperature gauge that a pilot monitors very closely during each and every start. It is called the Inter-Turbine Temperature gauge, or ITT. This temperature is a measurement of the exhaust gases between the compressor turbine and the power turbine (s). In the picture below, the probe is located where the blue and red colors meet.

    In a turboprop engine, specifically the Pratt & Whitney PT-6 in all it’s different sizes and variations, there will always be a specific temperature that the pilot will want to keep the ITT below. This article will deal specifically with a Piper Meridian.

    A Piper Meridian starts hotter than almost any other PT6 engine because of the way it’s air intake is designed. Unlike other turboprops, the Meridian has a permanently open inertial separator. This means that not all the intake air makes it to the engine during start because some of it goes out the inertial separator opening. So, coming to a Meridian from operating other turboprop engines can lead to a little bit of a surprise on the ITT temperature being higher than what a pilot is used to when starting.

    As a rule of thumb, when starting a Meridian, never let a start continue when the ITT hits 875 degrees. Based on the chart below, you are still in the safe zone at 875 and have about a 50 degree buffer before you have to start getting worried.

    On cold starts with a good battery or a GPU, 875 is typically not an issue. Most starts when cold are going to be in the high 700s or low 800s. On a cold start, if you are seeing starts in the mid to upper 800s, try starting with a GPU and see if that lowers the start temperature. If it does, then that means your battery is weak and needs to be replaced. Another tell-tale sign of a weak batter is the Ng doesn’t spool up properly (meaning it settles around 12-13%) or takes a really long time to spool up. Also, never start on the battery with less than 24 volts.

    When there are multiple flights in one day, the pilot has to take into consideration the warm engine prior to starting. If the ITT, prior to the start sequence, is above 150 degrees, it is time to do some motoring of the engine.

    What is motoring? It is simply using the starter to turn the engine, which leads to air being sucked into the engine allowing the engine to cool off prior to start. The theory is, the cooler your engine prior to start, the cooler the ITT peaks at during start.

    Here’s the steps on how to dry motor a Piper Meridian:

    • Battery on
    • Strobes on
    • Fuel Pumps and Ignition off
    • Throttle idle
    • Condition Lever feather/cutoff
    • Push the start button
    • Monitor the ITT temperature
    • Reaching 150 degrees, if less than 30 seconds have elapsed:
      • Fuel Pumps on
      • Ignition On
      • Condition Lever run
    • Reaching 150 degrees, if 30 seconds have elapsed:
      • Push Manual/Stop button to stop the start
      • Let starter rest for 30 seconds

    The starter has a 30 second limit on the Meridian, followed by a 30 second rest period. You can do the sequence twice, then, after the 3rd start, there is a 30 minute rest period. Typically, if the ITT won’t cool down to 150 after the 3rd time, there is probably something wrong.

    The most important thing a pilot can remember is never, ever push the condition lever forward if the ITT is above 150 degrees. You’ll be well on your way to avoiding hot starts that way.

  • Synthetic Vision Technology

    Let’s say you’re flying in the mountains of Colorado on a cloudy day.  There’s a solid layer from the surface all the way up to 14,000 feet.  You’re inbound to Eagle (KEGE) on the RNAV (GPS) D approach.  There are mountains next to you and below you, but you aren’t concerned since you can see them all.  The base of the last reported overcast layer was 3,000 feet, so you know you’ll break out before the MDA and land no problem.

    At 11,100 over AWACC, you clearly see the top of the mountain below you.  You are comfortably above it. You already have the runway in sight as well.  You pop out of the clouds on the approach at 9,700 feet, spot the airport and follow the tower’s instructions to circle north of the runway for a left base for runway 7.

    How could you see the mountains inside the clouds?  You have Synthetic Vision installed on your glass panel, that’s how.

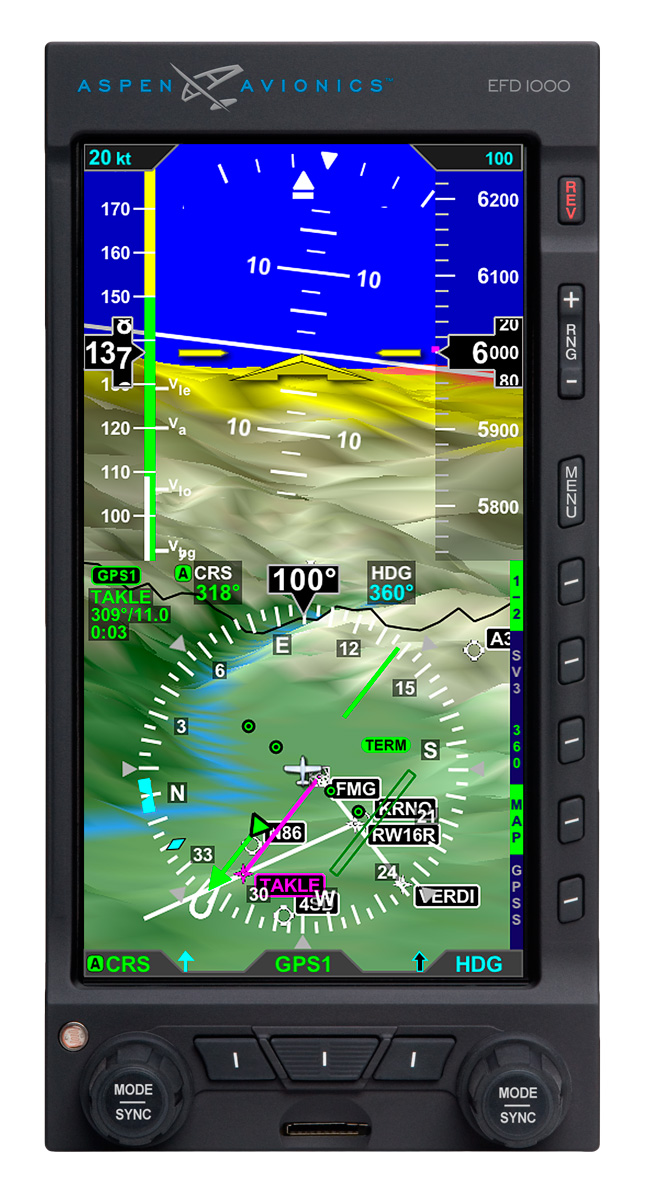
    Aspen Synthetic Vision
    Aspen Synthetic Vision

    Synthetic Vision, which has actually been around since the ’70s when NASA and the US Military first developed it, was first FAA certified for the Gulfstream PlaneView flight deck in 2009.  Garmin, Avidyne, and Aspen are the main general aviation manufacturers of synthetic vision these days.  All Garmin PFDs are now equipped with Synthetic Vision while Aspen gives you the option to upgrade to Synthetic Vision when you get one of their PFDs installed.  Avidyne gives you Synthetic Vision in their R9 upgrade for the Cirrus.

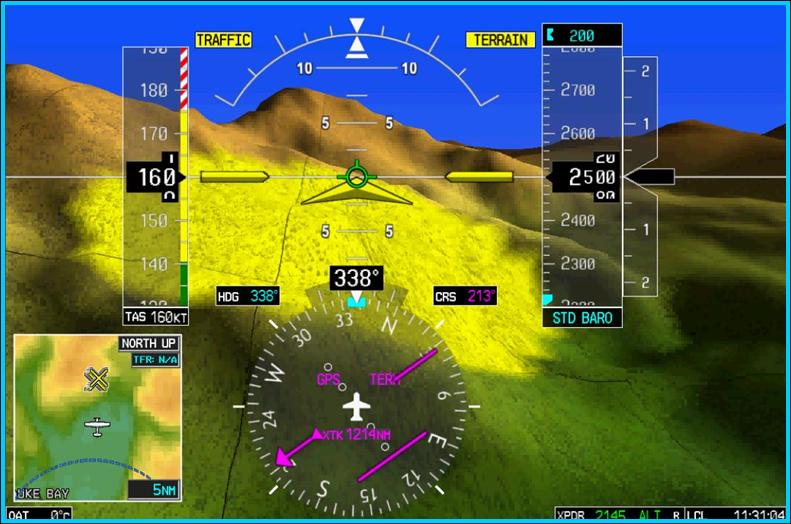
    What is Synthetic Vision?  Basically, it’s a 3-D picture on the primary flight display showing terrain, obstacles, traffic, and runways.  It greatly enhances situation awareness in areas of terrain or high obstacles during IFR conditions or at night.

    The goal behind the development of Synthetic Vision was to decrease the amount of controlled flight into terrain (CFIT) accidents.  A CFIT accident consists of a perfectly airworthy airplane flown by a pilot (or autopilot) unintentionally into terrain. These accidents can happen in low visibility conditions or at night, but the reason is mainly due to the pilot losing track of his position in relation to obstacles or terrain (or water as was the case with JFK Jr.).

    With Synthetic Vision, the goal is to enhance pilot knowledge of what is around the airplane at all times. When you’re at altitude, the terrain below you looks flat.  When you start descending down amongst the rocks, the hills or mountains start to rise up on your screen.  For those used to the coloration with the 2-D terrain feature on a GPS unit, it translates very easily to the terrain coloration on a Synthetic Vision equipped PFD. Terrain that is between 100 and 500 feet below the aircraft is shown as yellow, while terrain closer than 100 feet is depicted as red.

    Garmin Synthetic Vision
    Garmin Synthetic Vision


    One neat feature on Garmin units is the Highway in the Sky.  When a pilot puts a course or a flight plan in the GPS, the PFD displays magenta boxes at the altitude selected displaying the route.  It’s handy when hand flying to just “fly through the boxes.”  They also display descent angles on approaches.

    Synthetic Vision is still optional on Garmin and Aspen units, but I highly recommend springing for it.  It will give you a higher level of safety and keep you out of the rocks.

Leave a Reply

Your email address will not be published. Required fields are marked *