The first task I give my new instrument students before we start training is to find a view limiting device that they like. There’s the hood that everyone hates (which has been used since the beginning of instrument training,though it isn’t that uncomfortable) or foggles, which usually end up becoming very uncomfortable very quickly. The headset ends up pressing the sides of the foggles into the side of your head, leaving lumps and scars that hurt for days.
Well, there is finally another solution that combines the hood and foggles. Meet the ViBAN.
ViBAN brags that it is the most comfortable IFR view limiting device out there. I have a customer who has one and he loves it. It’s easy to put reading glasses on underneath while still blocking the view of the exterior of the plane. It doesn’t leave bruises against the side of your head, either.
If you’re looking for something different for your IFR training, give ViBAN a try.
We’ve all been there. You’re flying into an unfamiliar airport at night, you’re having difficulty seeing the field, and trouble identifying the runway. Airports can be hard to identify for a variety of reasons, but approaching in darkness only makes it more difficult. Perhaps the airport is located in a densely populated area and the airport lights bleed into the city lights. Maybe the airport that you’re approaching is located amid terrain that obstructs your view.
Situations like these are not uncommon for charter pilots. Just a few evenings ago I was descending IFR into Asheville, NC (KAVL) on a dark night with high overcast and scattered showers. Although the airport was VFR, the surrounding hills made me doubtful that I would be able to see the field in time to safely and comfortably descend for the visual approach that I was expecting.
Fortunately, there are some things we can do to help find our destination and set us up for the approach. Here are a few tricks that I use regularly when I find myself in this position:
When flying into an untowered/closed tower airport: Make sure that you have the right lighting frequency. Some airports have pilot-controlled lighting that is operated on a different frequency than the CTAF. If the lights don’t seem to be working, consult your AFD. If the AFD advises that your frequency is correct, double check the NOTAMs to make sure that the lights haven’t been taken out of service.
For towered airports: Ask the tower controller to turn up the intensity of the runway lights. This has helped me find the runway countless times. This request can be especially useful at airports that are located in a highly lit area. Controllers are happy to honor this request and will often leave the lights at the bright setting until you advise them that you are ready for them to be turned back to normal intensity.
Load an approach: If you are an instrument rated pilot, loading an instrument approach is a great way to get oriented with a runway when you need a little help. You may need to coordinate with the tower or controlling agency if you want to fly the approach, but this has the added bonus of giving the pilot altitudes for terrain/obstacle clearance should there be any hazards present.
Use OBS mode: If you are flying an airplane that has equipment capable of doing so, you can use the Omni Bearing Selector (OBS) button to help align you with the runway. If using this strategy, just remember: THIS IS NOT AN INSTRUMENT APPROACH. It will not provide you with obstacle clearance, nor will it line you up directly with the runway.
The pictures below should help clarify how to use the OBS to assist in airport orientation.
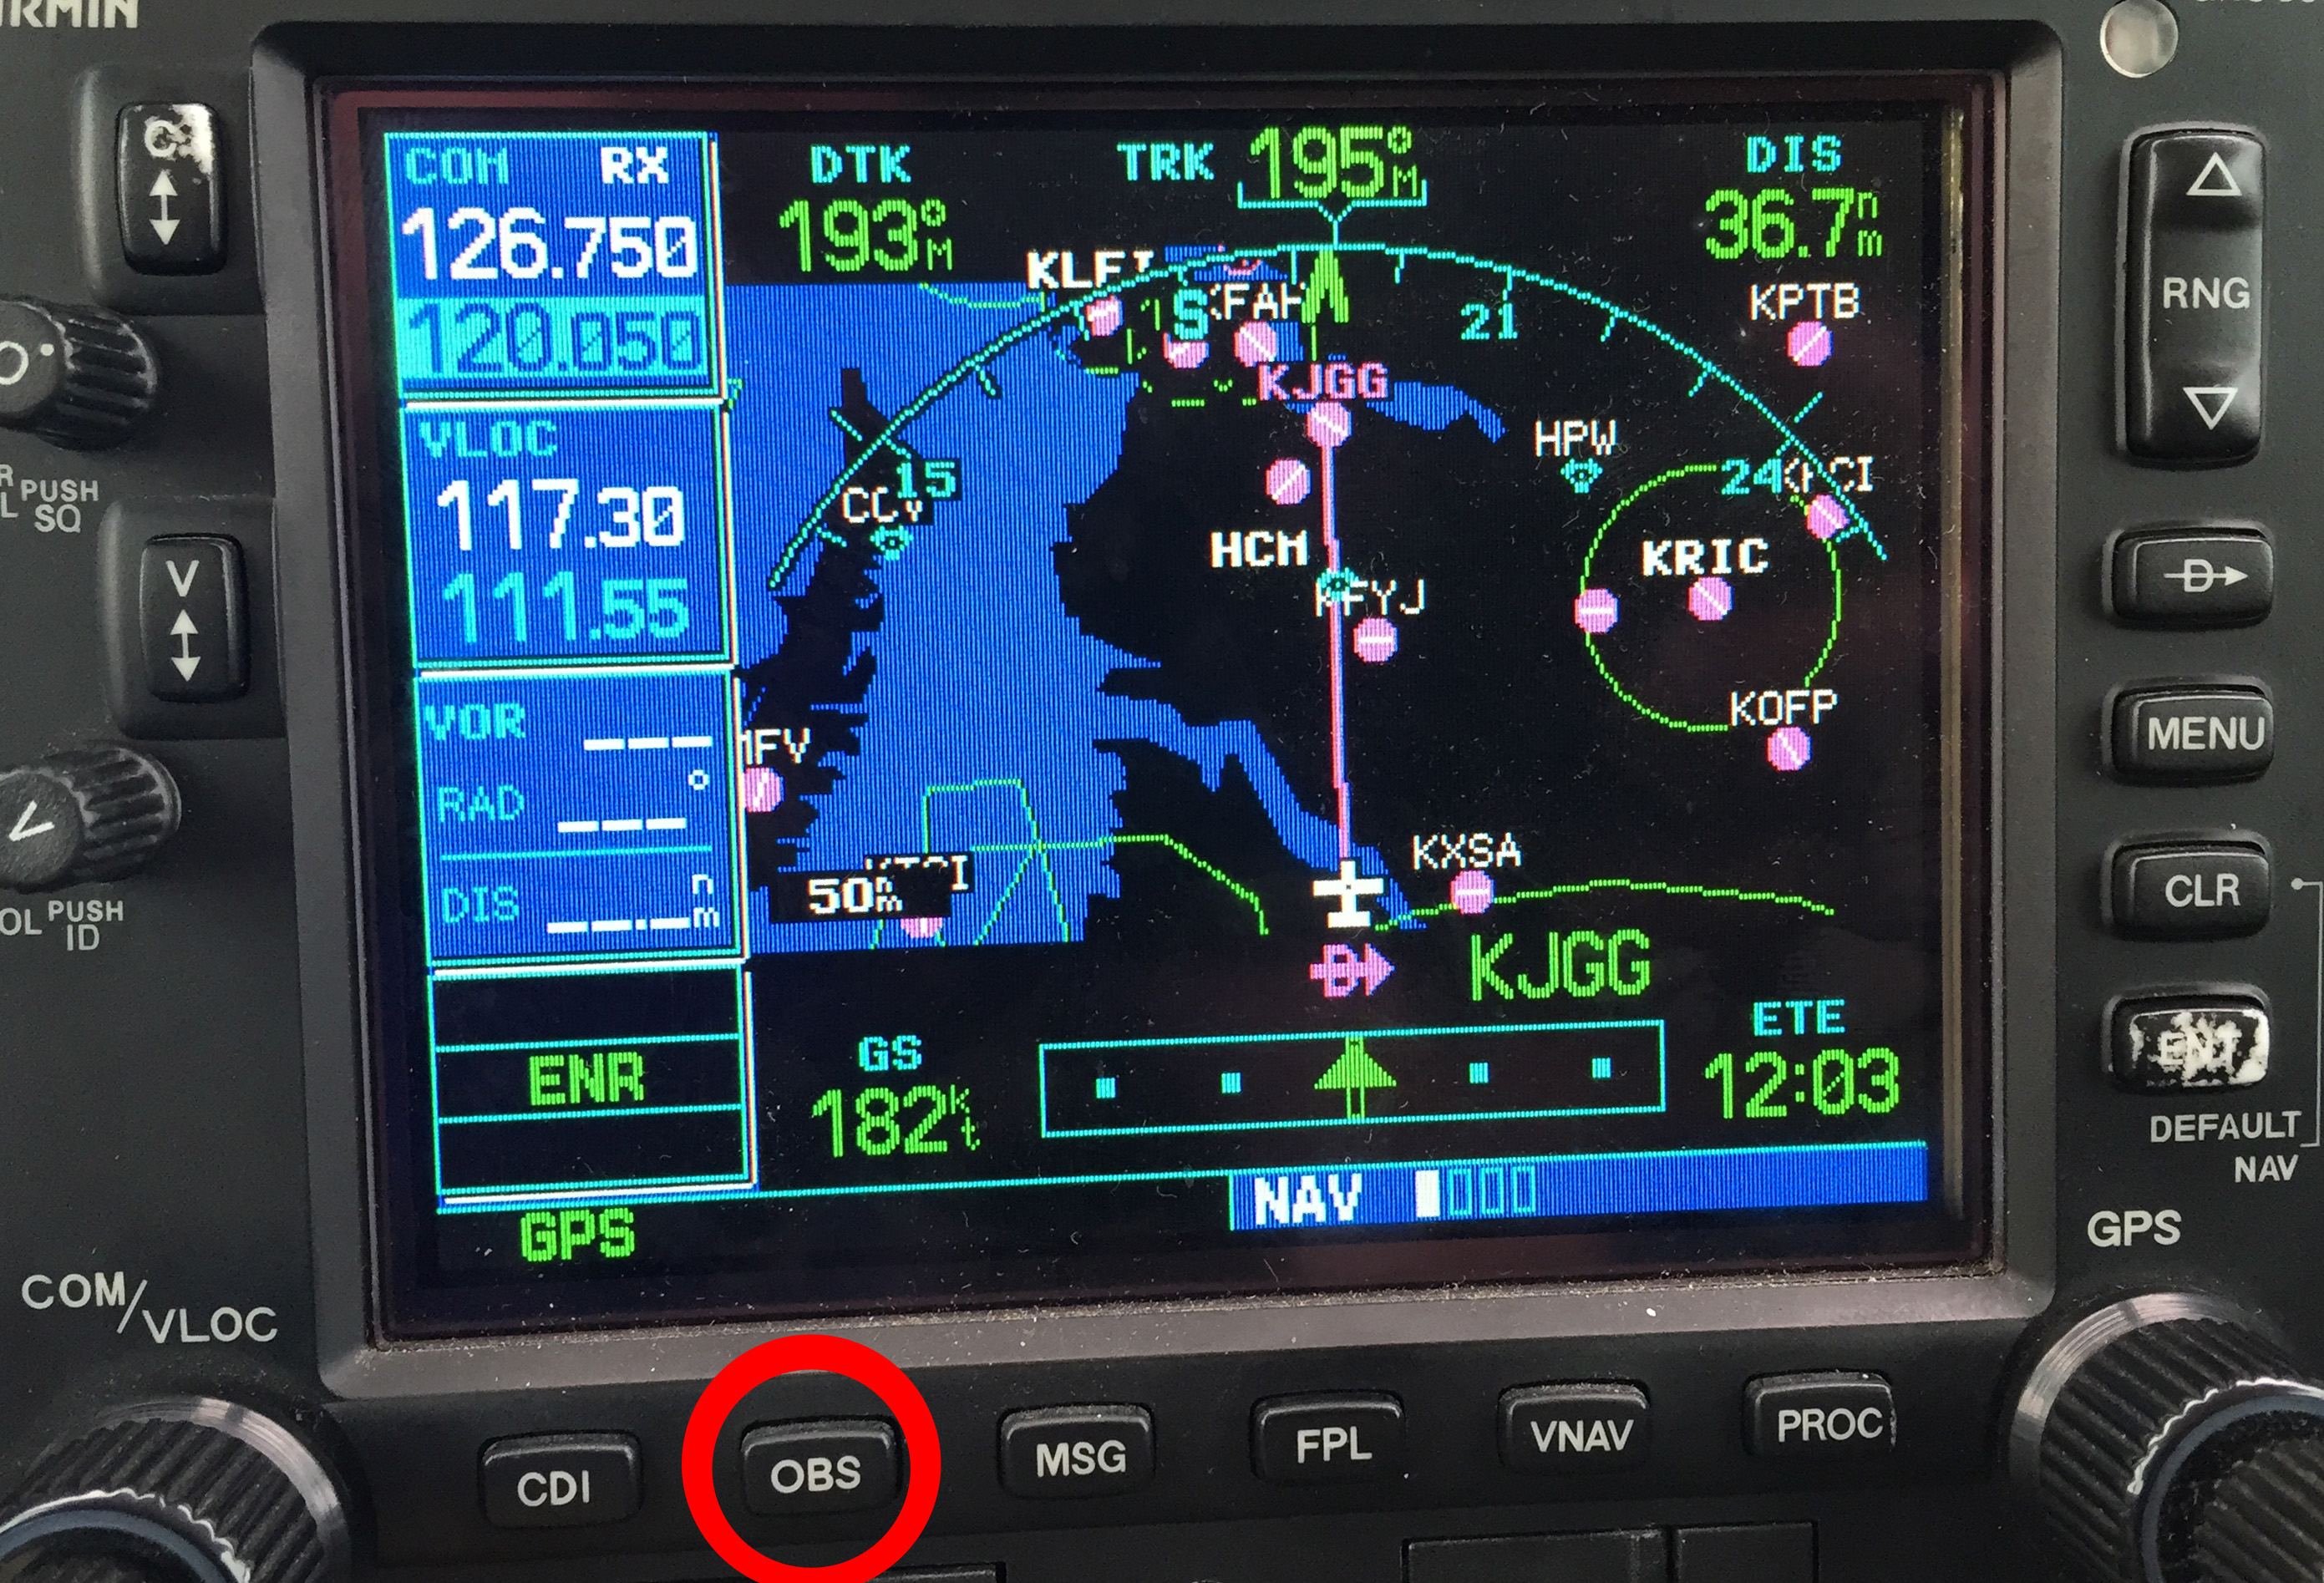
Step 1- Have the destination set as the next way point in your flight plan. In the picture below, The GPS is set to navigate direct to KJGG. Press the OBS button (circled in red) to engage the OBS mode.
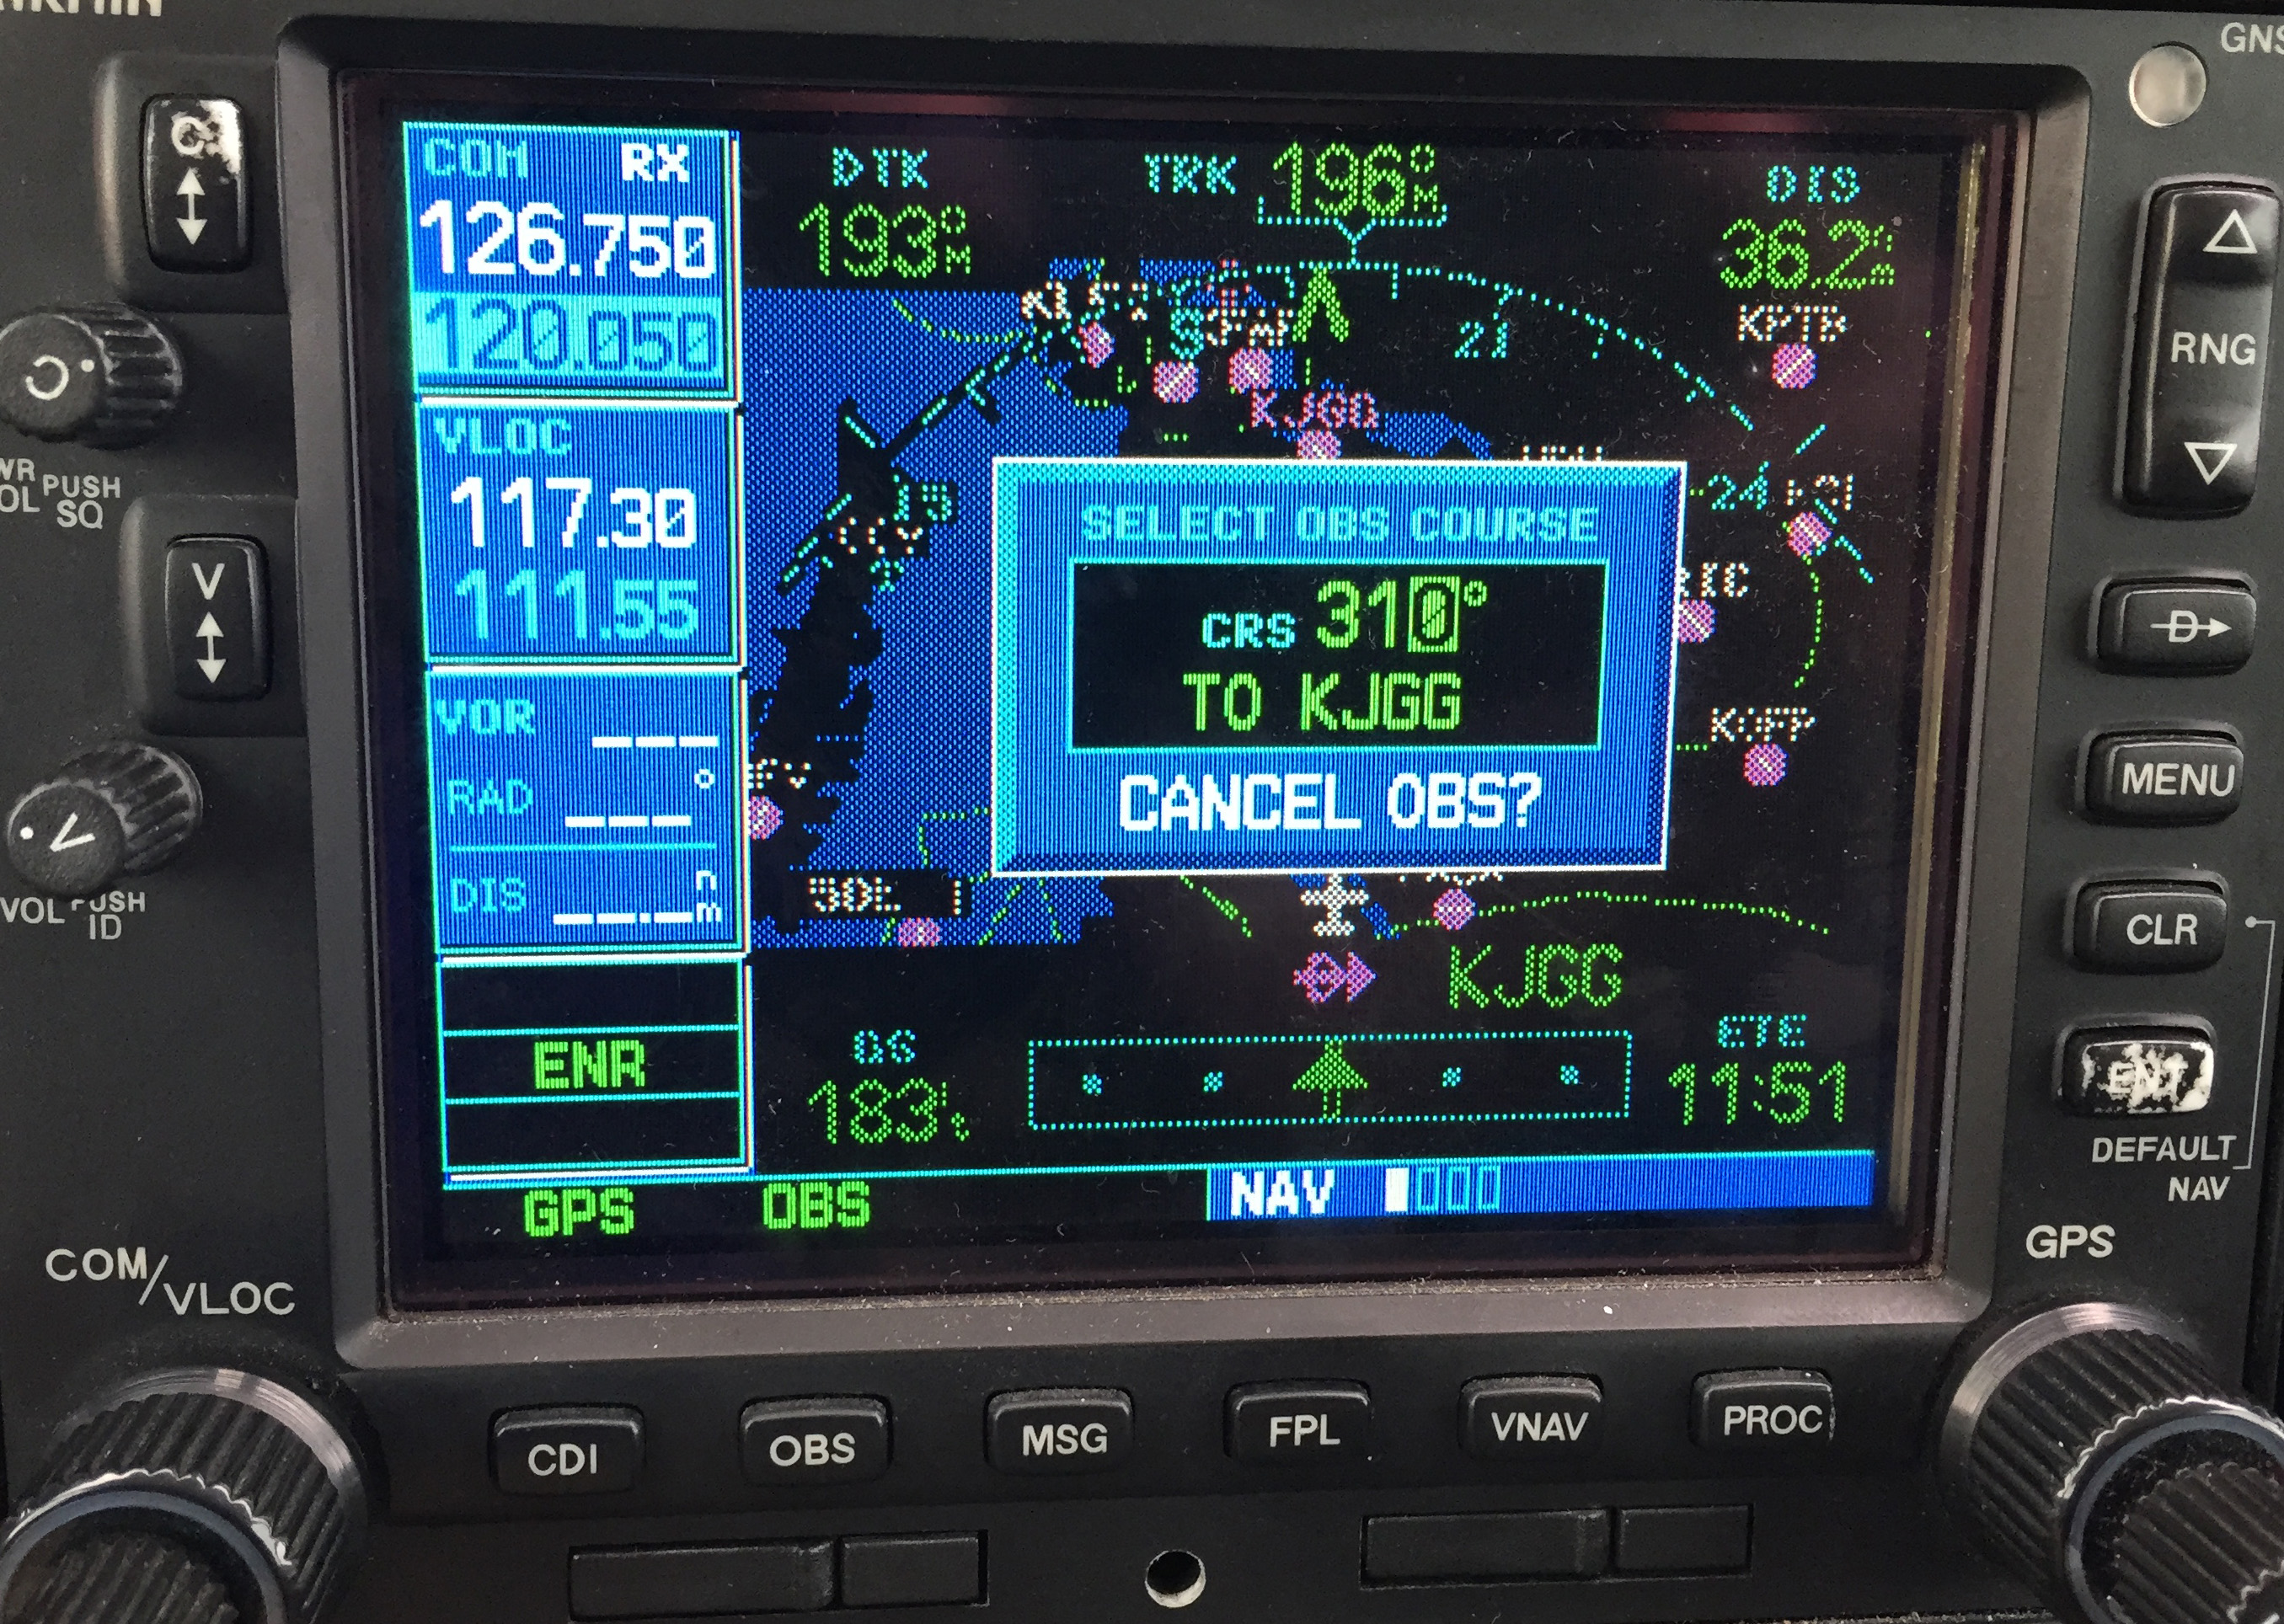
Step 2- Once OBS is selected, use either the window on the screen (which should come up automatically when you press the button in step 1) or the OBS selec tor on your navigation head to select the inbound radial. In this example, I have selected 310 degrees, the landing runway at KJGG.
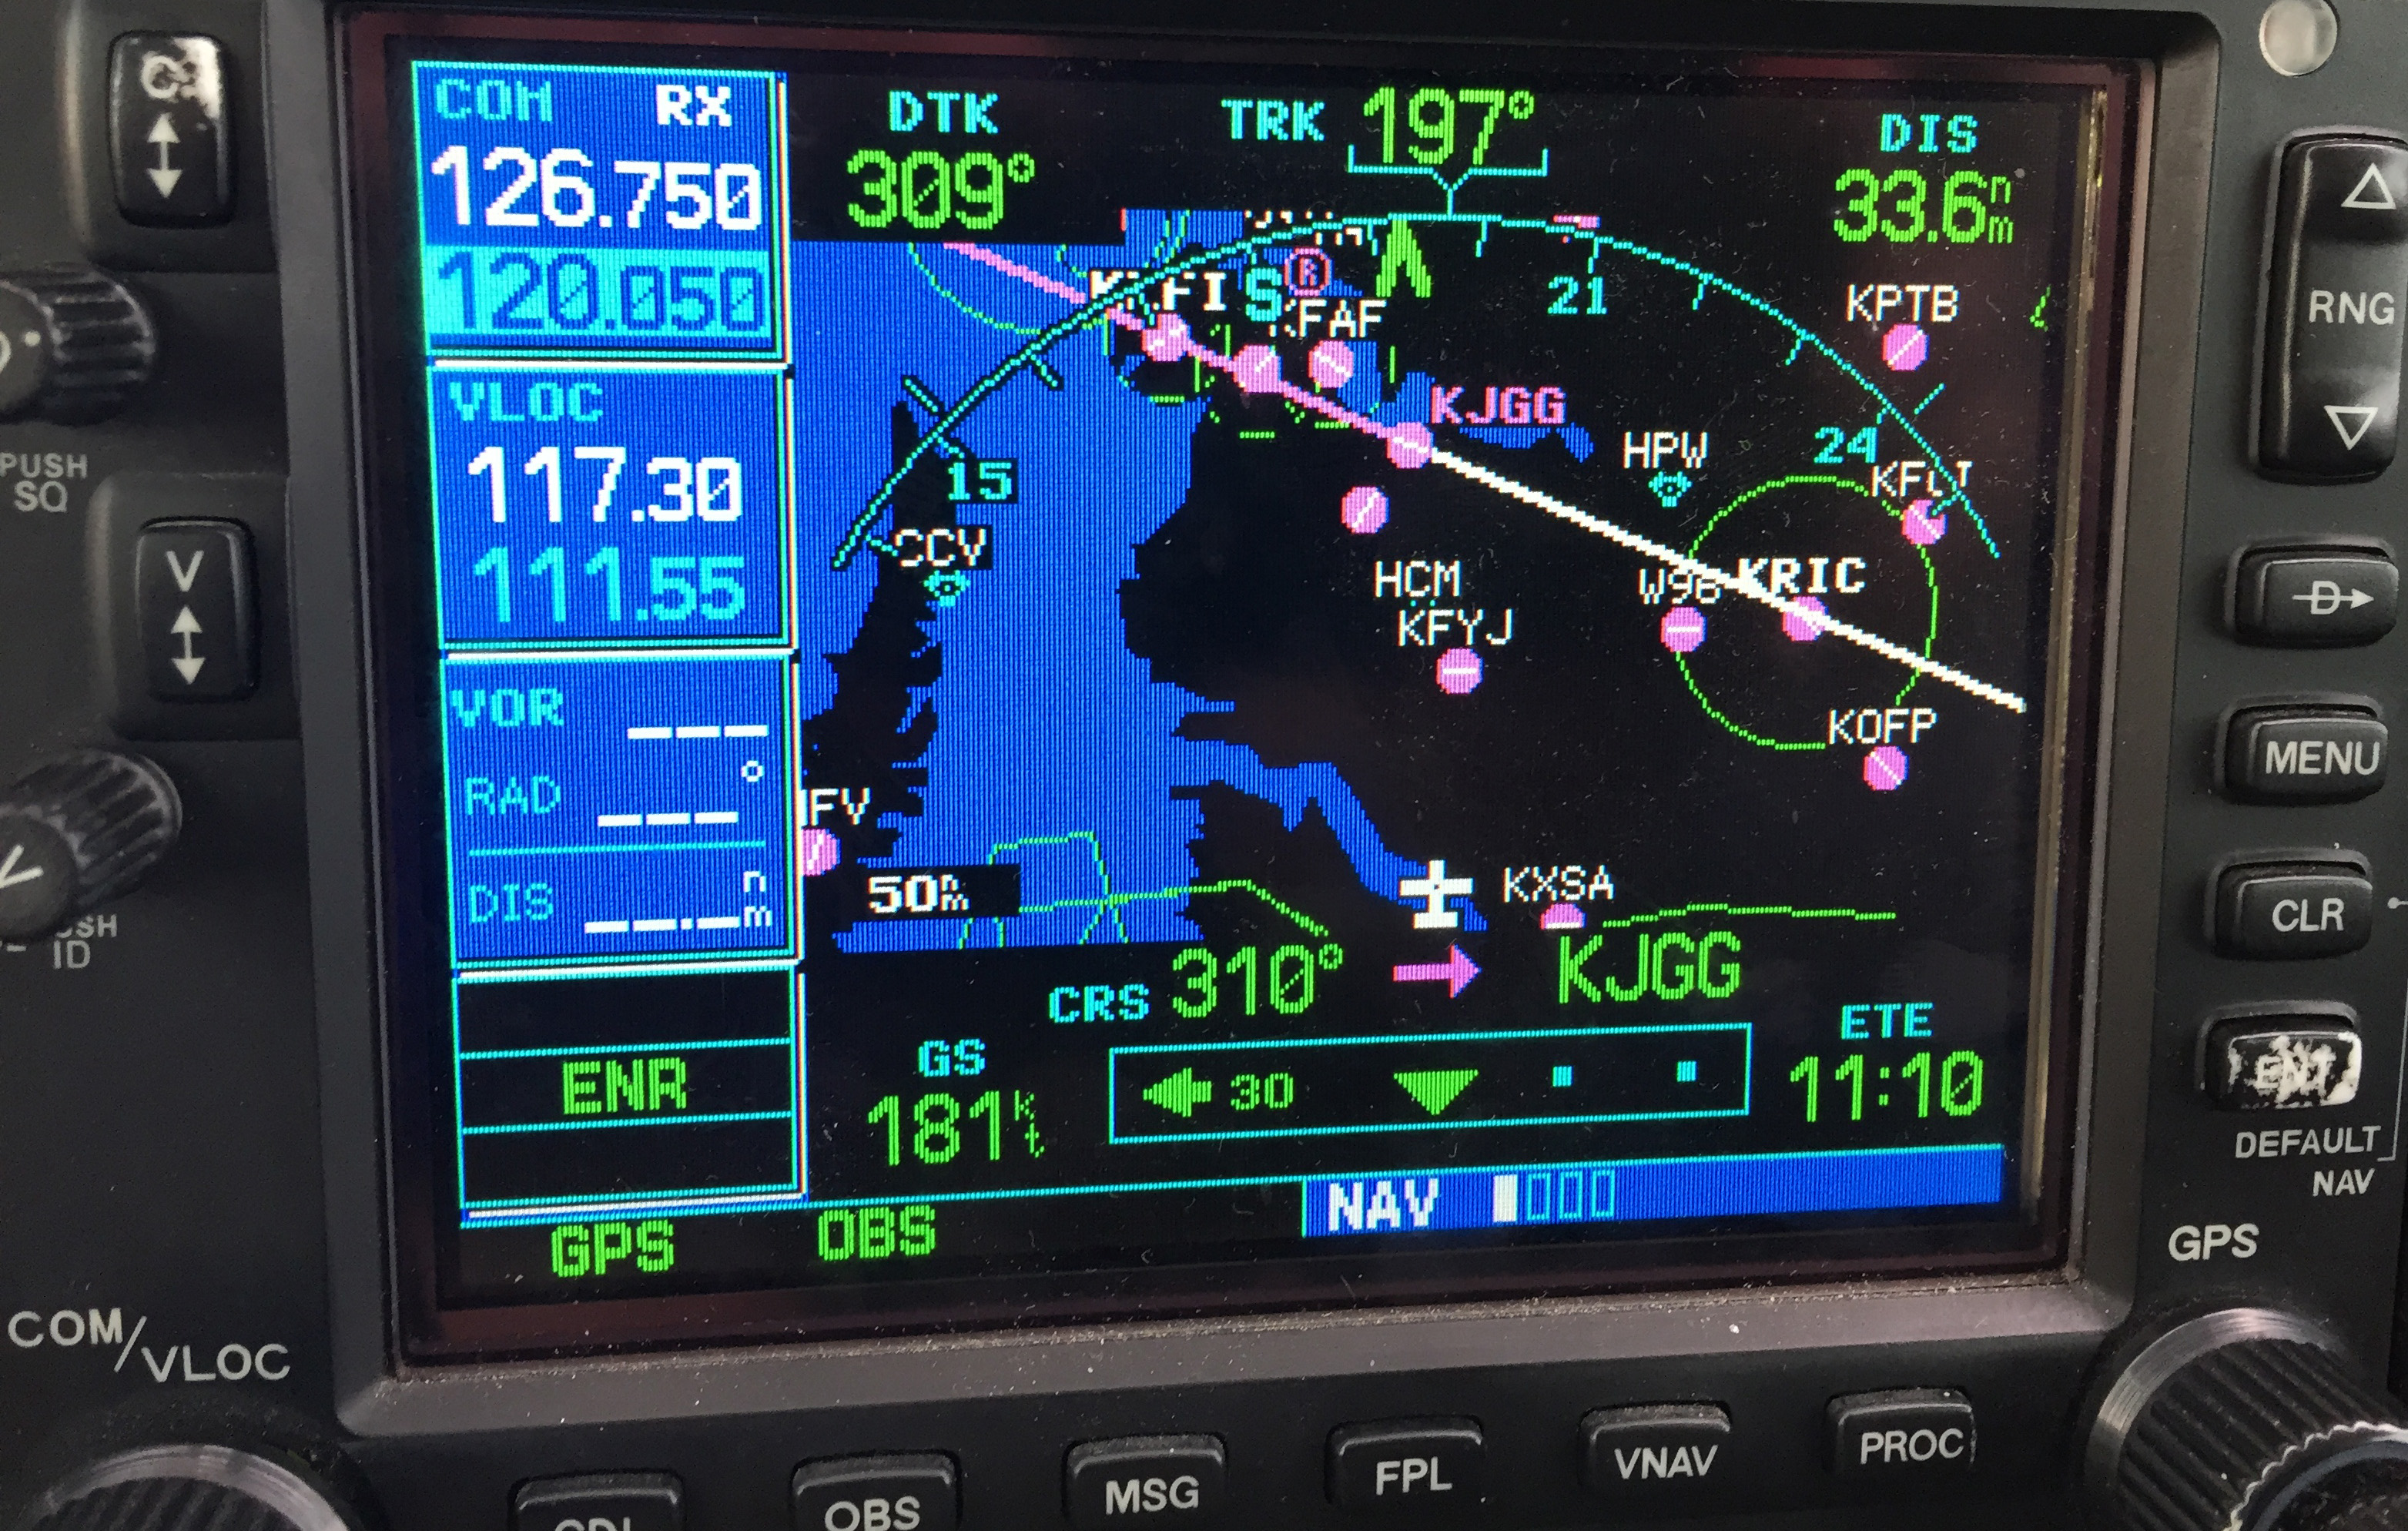
Step 3- The GPS now shows an inbound course to the airport of 310 degrees. It appears as a magenta line. The line serves as an excellent aid in airport/ runway orientation. Remember that this will not line you up perfectly with the runway, but it can still be extremely useful in planning a pattern entry or for getting your bearings.
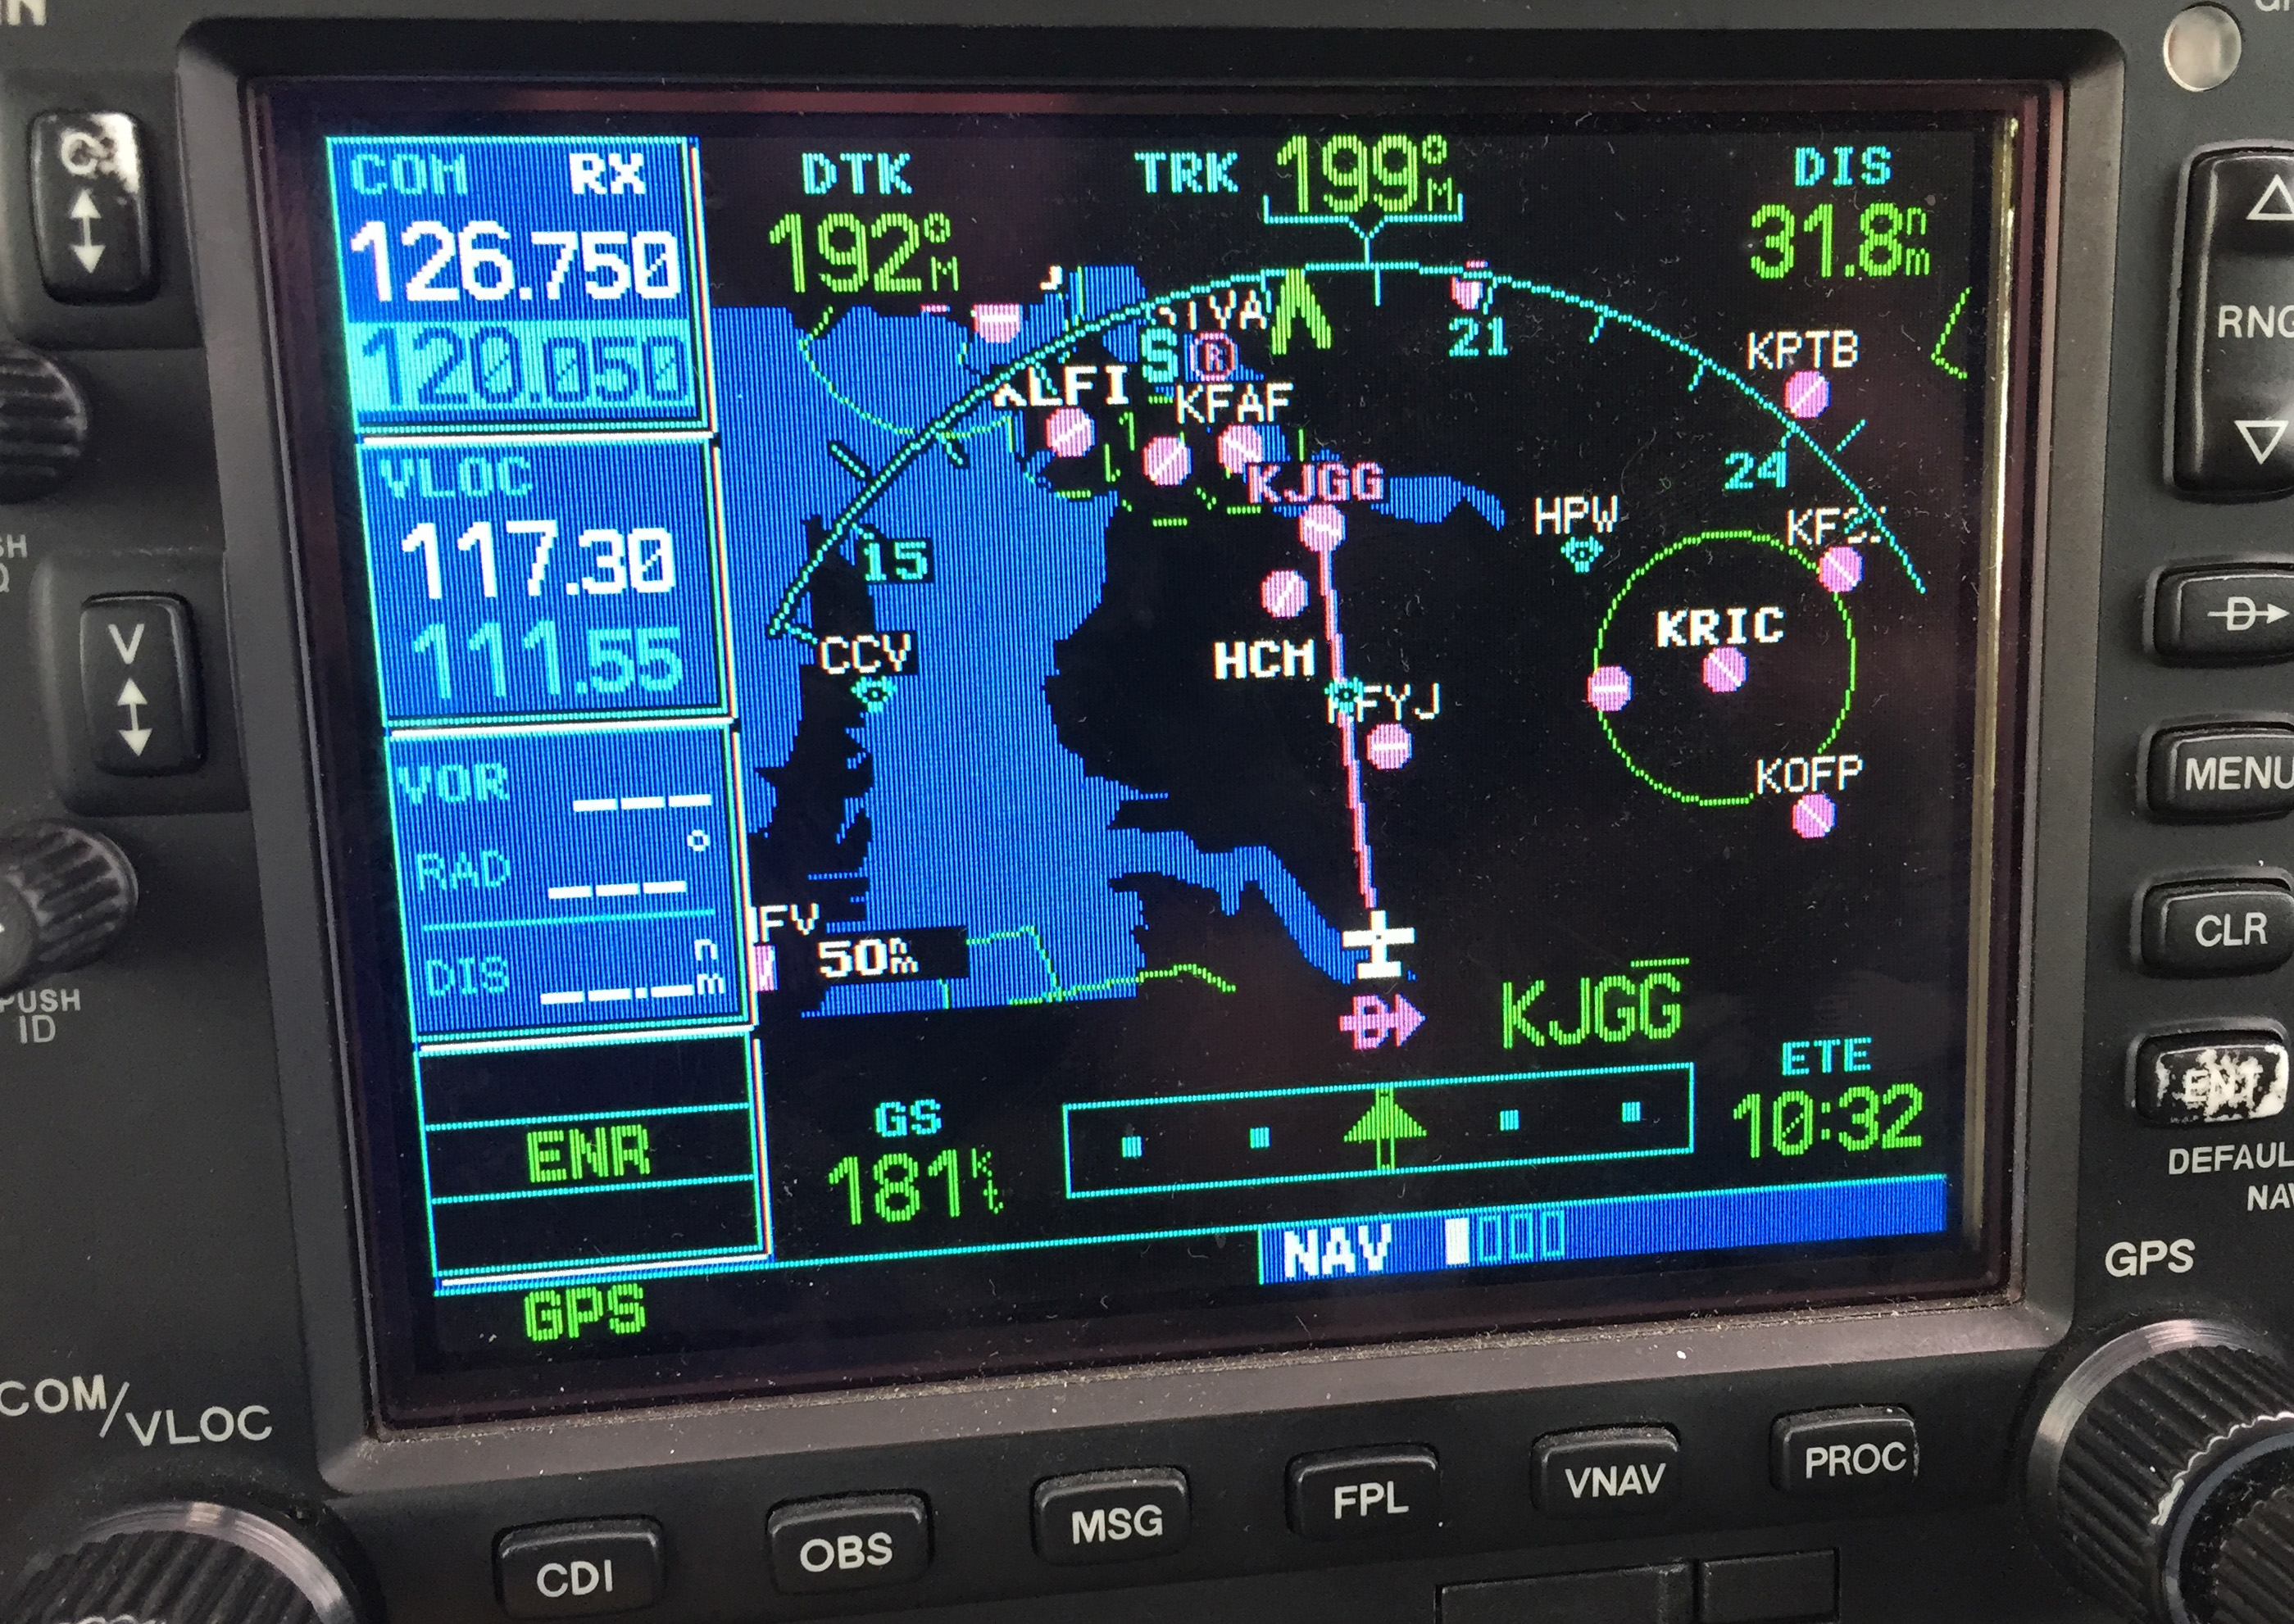
Note: As shown below, If you press the OBS button again, the GPS will return to the navigation as previously set.
1. Ask for vectors to the airport/ runway: If you have VFR flight following or are talking to a tower equipped to provide vectors, asking for them can be a good choice. Although the controllers may not always be able to accommodate your request due to workload or equipment limitations, most will be happy to comply if they are able. Some pilots may feel silly asking for help, but my policy has always been that I’d rather feel silly for asking than look silly for being lost.
In the case of the Asheville flight mentioned in the opening of this article, my solution was to ask the controller fo r direct to the final approach fix of the assigned runway. Upon arriving there, I had no trouble seeing the VASI and was in good position to fly the visual approach. If I had wanted to be positioned a little further out, I could have asked to fly to a different fix or simply asked to be cleared for the approach in lieu of the visual. Just remember to keep your intentions clear when communicating them to the controller.
The best way to approach an airport day or night, familiar or unfamiliar, is with careful preparation. Having lighted landmarks picked out as well as being acquainted with the airport layout will pay off when it comes time to plan your pattern entry or find the airport on a dark night. Use the resources available to you to get you safely to your destination.
Andrew Robinson is a 135 Charter Pilot and flight instructor in Pennsylvania. He flies Pilatus PC-12s and instructs in Beechcraft Bonanzas.
Skyvector has changed it’s look. The aeronautical chart website is now offering flight plan filing capability. In order to gain the ability to file flight plans, the user has to form an account first.
Personally, I really liked how Skyvector had a simple interface before they changed. As an instructor, a lot of times, I go to multiple airports on one flight. It was really nice to just plug in airport IDs to check distances and heading information on Skyvector. The new format is a little clunky as the website has made it a little more difficult to do what it did best before.
Did the aviation community need another venue to file flight plans? Not with Foreflight, Garmin Pilot, and WingXPro leading the way in the app market. Skyvector was smart in not trying to develop another app to compete with the big boys.
Will the new Skyvector last? We’ll see. I’m hoping they’ll go back to the way they used to be, but we’ll see. I may use it enough to come around to liking it.
The Angelina County Airport in Lufkin, TX (KLFK) will be hosting the Angelina County Airfest on Saturday, October 10th. The airport will open up at 9am.
Prepare for a day of food, fun, and some great performances. There will be warbirds and many other classic airplanes on display, not too mention a number of aerobatic performances as the day goes on.
In the fall of 2021, Garmin announced the long awaited confirmation that the Garmin GFC 600 autopilot is now certified for the Piper Meridian. The Garmin GFC 600 autopilot has been certified for all other types of the Piper PA46 line of aircraft, but the Meridian was last in line. The airplane has to have been manufactured prior to 2009 and have Avidyne avionics, Meggitt, or have been retrofitted with a Garmin G500 (no G1000 aircraft since those already have the GFC 700 autopilot).
The Garmin GFC 600 autopilot is the ultimate digital autopilot. The integration with the Garmin G500, GTN 750 and GTN 650 units is a beautiful thing. The autopilot communicates with all the heading and altitude bugs, flies approaches smoothly, and even has a level button.
In the latest technological marvel from Garmin, Garmin Safe Glide, the GFC 600 autopilot is critical in reducing pilot workload in an engine failure situation. It flies the airplane for you and takes you to the nearest airport, reducing the stress and allowing the pilot to troubleshoot the situation.
Texas Top Aviation recommends Abilene Aero in Abilene, Texas for any and all avionics installs. They have worked with several of our customers in the last year, are extremely knowledgable and do excellent work. Call them for a quote on a new Garmin GFC 600 autopilot in your Piper Meridian.
Austin Executive Airport opened a control tower on Friday, February 23rd 2018. The airport is now officially Class D airspace. The charts and A/FD are not updated yet to reflect the tower, but there is a NOTAM with the tower and ground frequency information. The tower hours are from 6am to 10pm. The weather frequency remains the same.
Make sure you check those NOTAMs if you are headed to KEDC anytime soon!
For a long time, I was happy if an FBO had a radio where I could tune the ATIS or automated weather before getting into the plane. This would allow me to skip listening to the weather in the airplane with the engine running, giving me a quicker exit from the ramp while burning a little less fuel. I would also be able to brief my taxi route from the ramp since I would know which runway was in use before getting in the plane.
As we progress forward in technology, I’m constantly amazed at how much more planning I can do from the palm of my hand. Now, I can call a phone number and get the ATIS, AWOS, or ASOS, depending on the size of the airport; if you prefer reading a text version…well, there’s an app for that.
With this technology, it’s very important for pilots to be aware of what service they are utilizing when calling these numbers. Usually only a Class B or larger Class C airport will have a phone number specifically for ATIS as well as one for AWOS/ASOS. These are listed in the Airport/Facility Directory (AFD), as well as all flight planning apps (Foreflight, Garmin Pilot, Stratus Insight). More then one pilot has called the AWOS/ASOS number for an airport thinking they would receive the ATIS (because towered airports that have ATIS phone numbers often also have AWOS/ASOS phone numbers that are different). Since the pilot didn’t hear a code on the phone, that led to the false thinking that either the tower was closed or the pilot did not have the code (ie. Information Bravo) to give to ground control when calling for taxi instructions. The minute weather can be very useful for flight planning, but the ATIS must be received before contacting ATC at a towered airport.
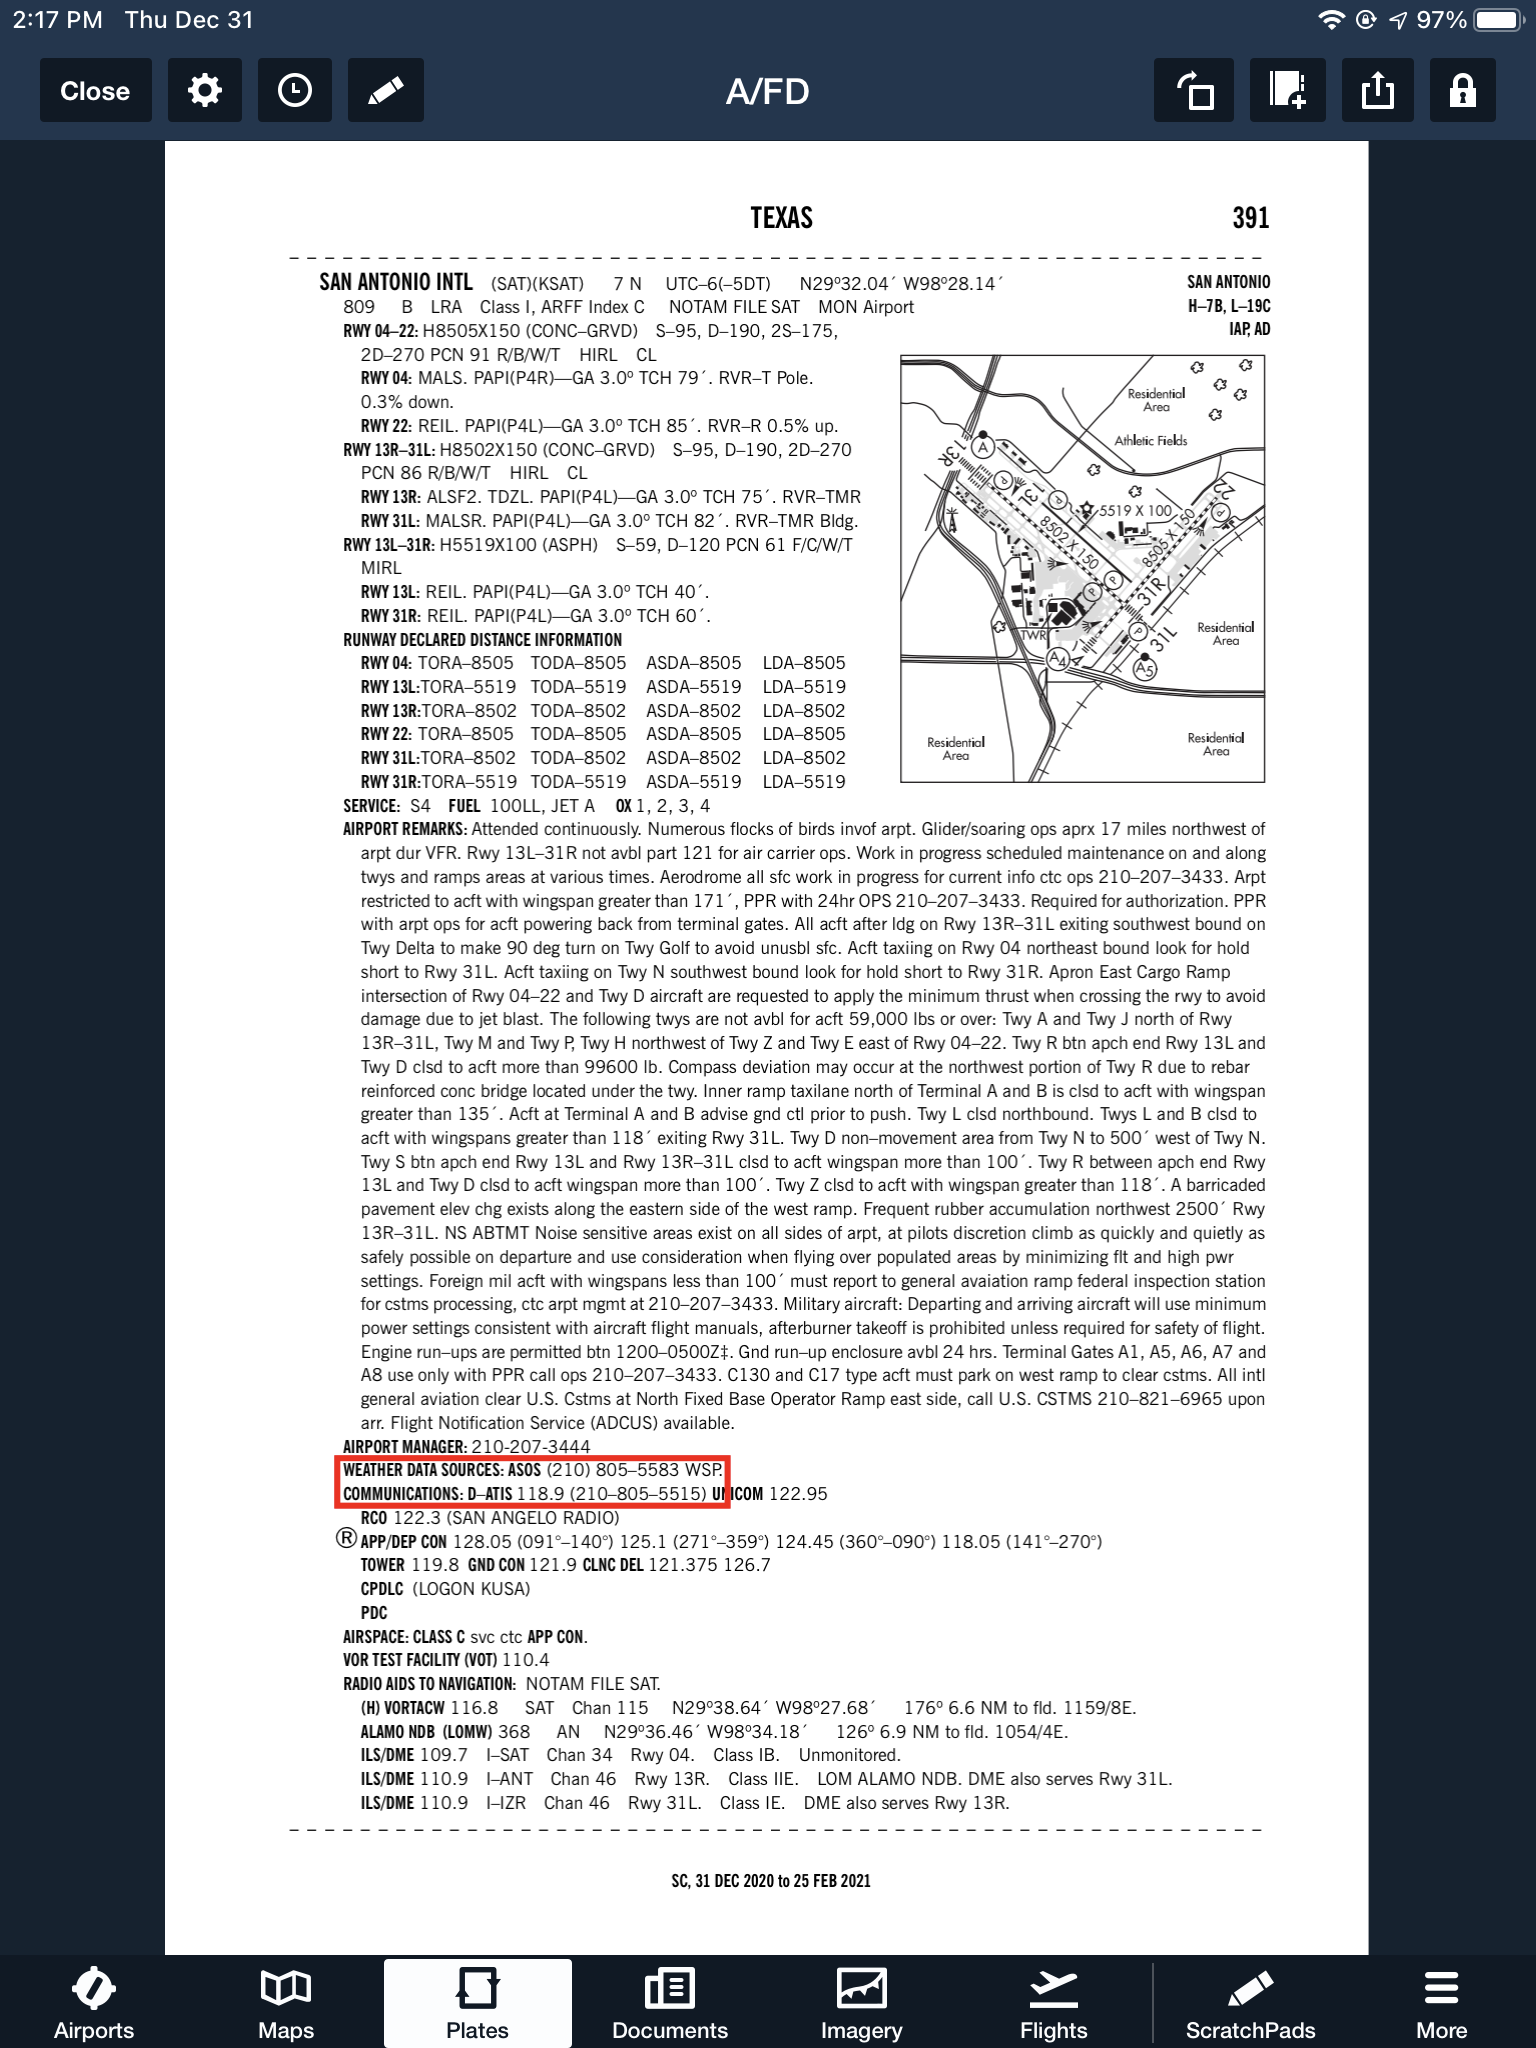
Notice the red box just past halfway down the page. There is a phone number for the ASOS at KSAT and a separate phone number for the ATIS next to the frequency.
Sometimes, you may get a busy tone if someone else is on the line. Usually, waiting a few minutes and trying again will lead to success. Just like old school phone lines, only one call can go through at at time! If it’s a particularly stormy day, you may be fighting a number of pilots to get on the line. In this case, an app where you can read the ATIS may be particularly helpful (Yes, there actually is a dedicated ATIS App!).
The ATIS app allows us lowly pilots without an Aircraft Communicating and Reporting System (ACARS) to access the Digital ATIS (D-ATIS ) at airports where ATIS is available. Only 76 airports in the US have D-ATIS, most of which are either Class B or busier Class C airports. Foreflight also provides D-ATIS textually at the same 76 airports, though it is only accessible depending on which subscription level you have with Foreflight (since I’m not a Garmin Pilot or Stratus Insight user, I’m not sure if either of them give D-ATIS reports).
ATIS App Symbol
With Foreflight’s D-ATIS, it does not get updated over ADS-B, only when your iPad or phone have an internet signal. When inbound to an airport with D-ATIS, the pilot has to listen to the radio frequency to get the current ATIS. Foreflight will display the last D-ATIS it received, but typically, it’s old. Check the time in the upper right hand corner.
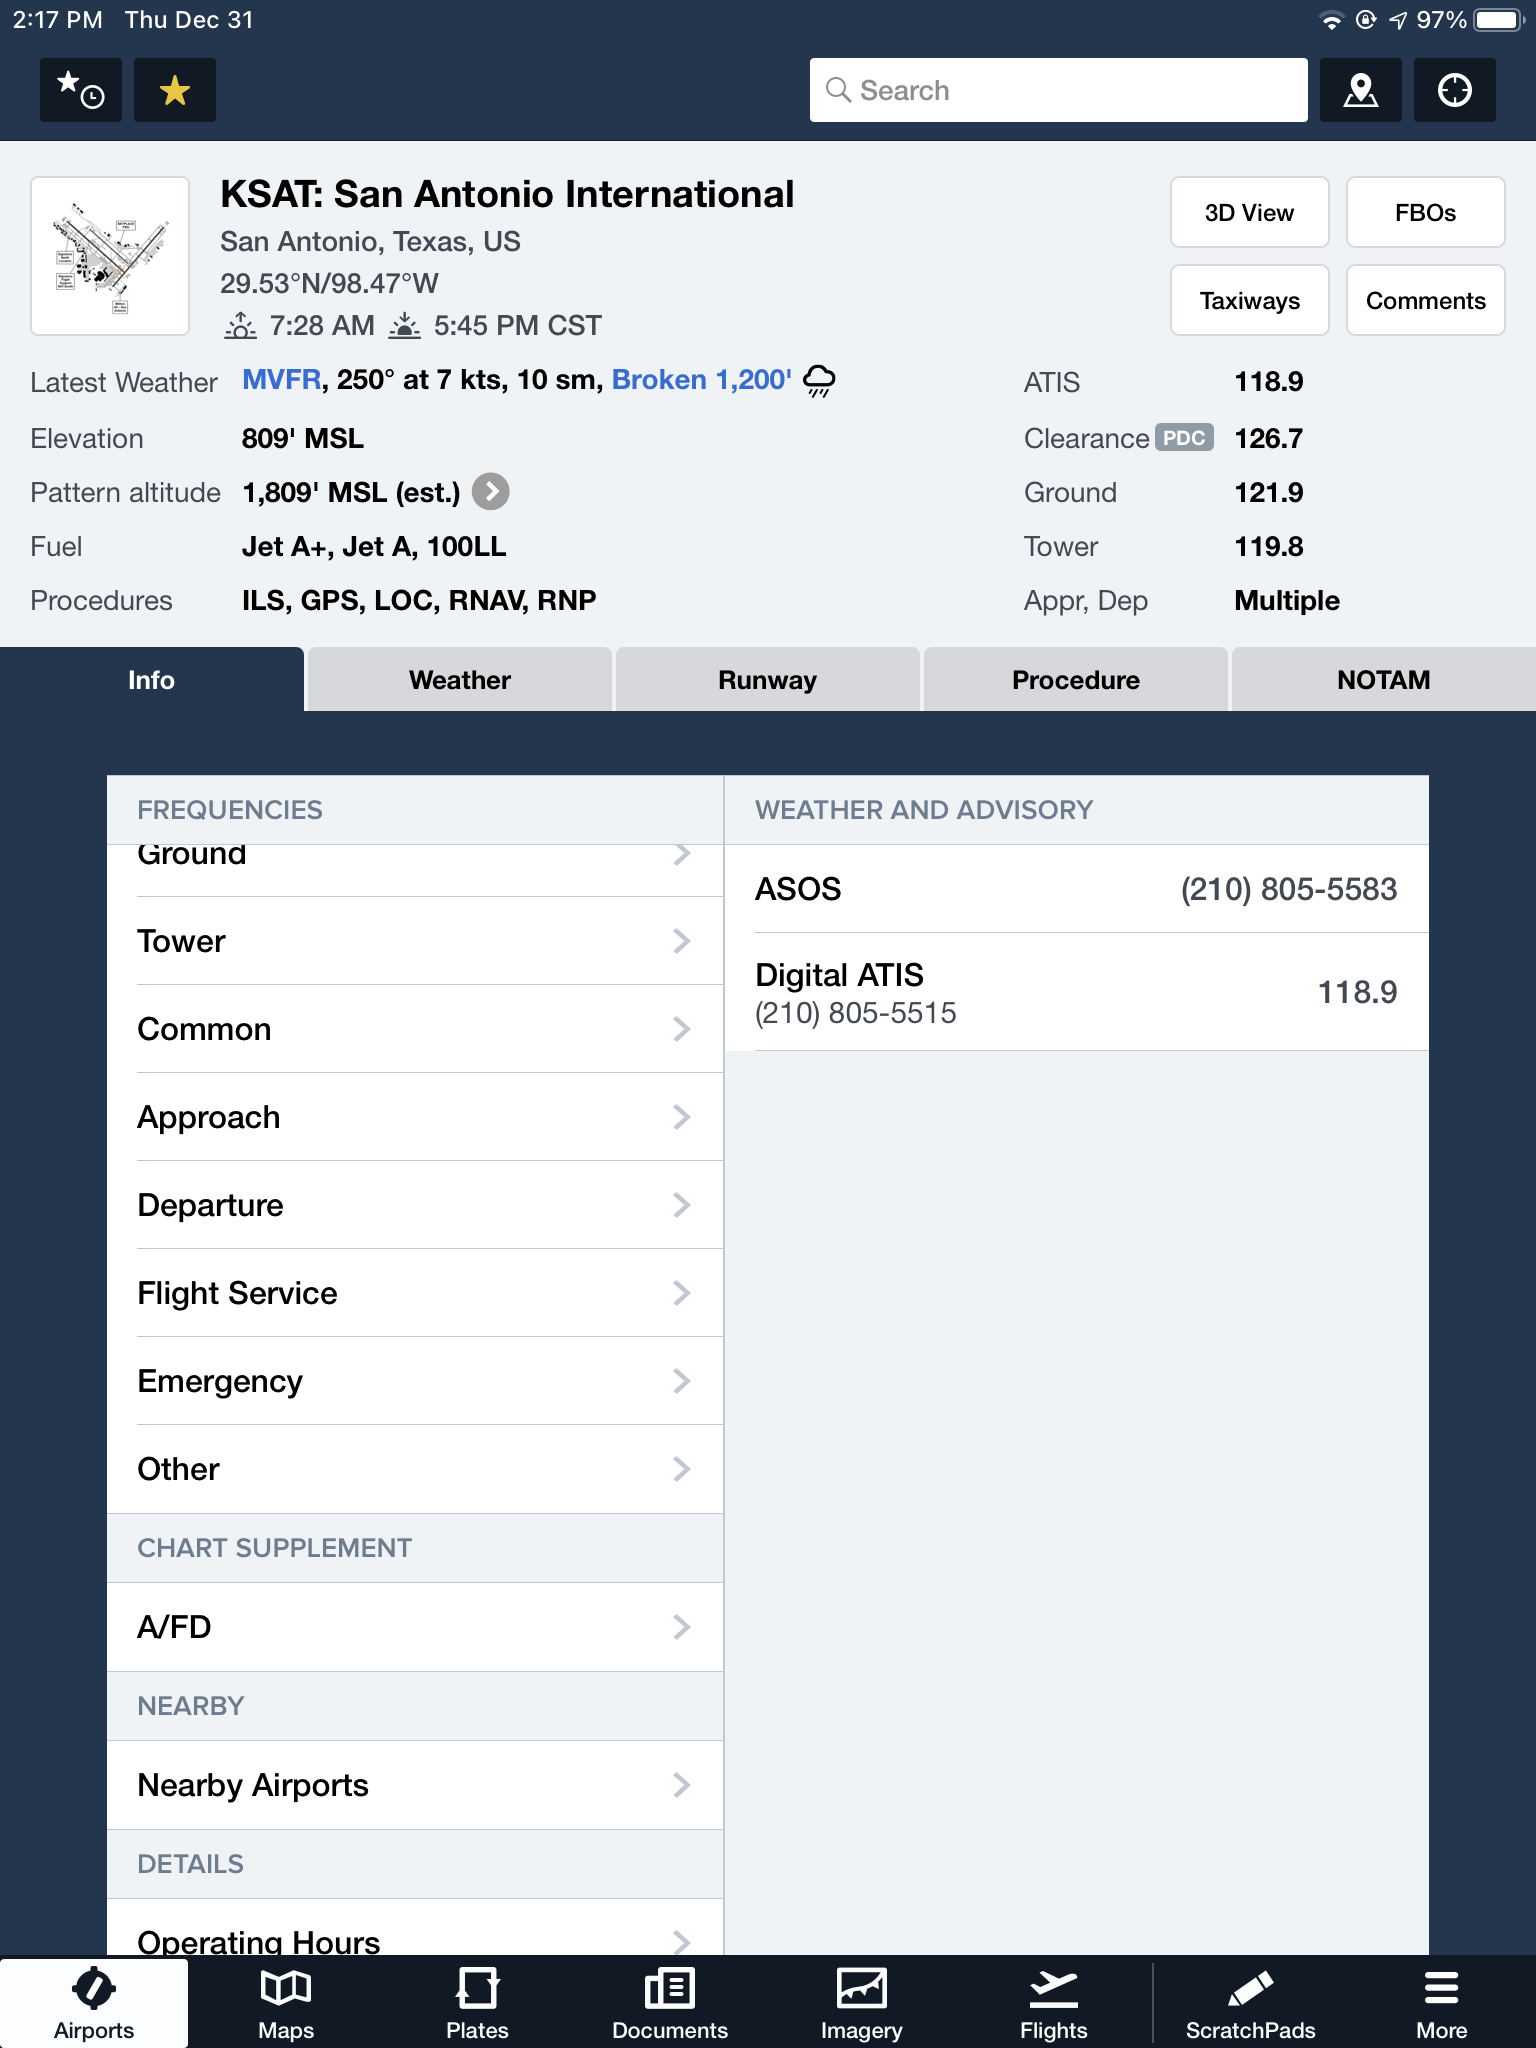
On the Airports page on Foreflight, tap Info, then tap Weather & Advisory and the phone numbers will display along with the ATIS frequency
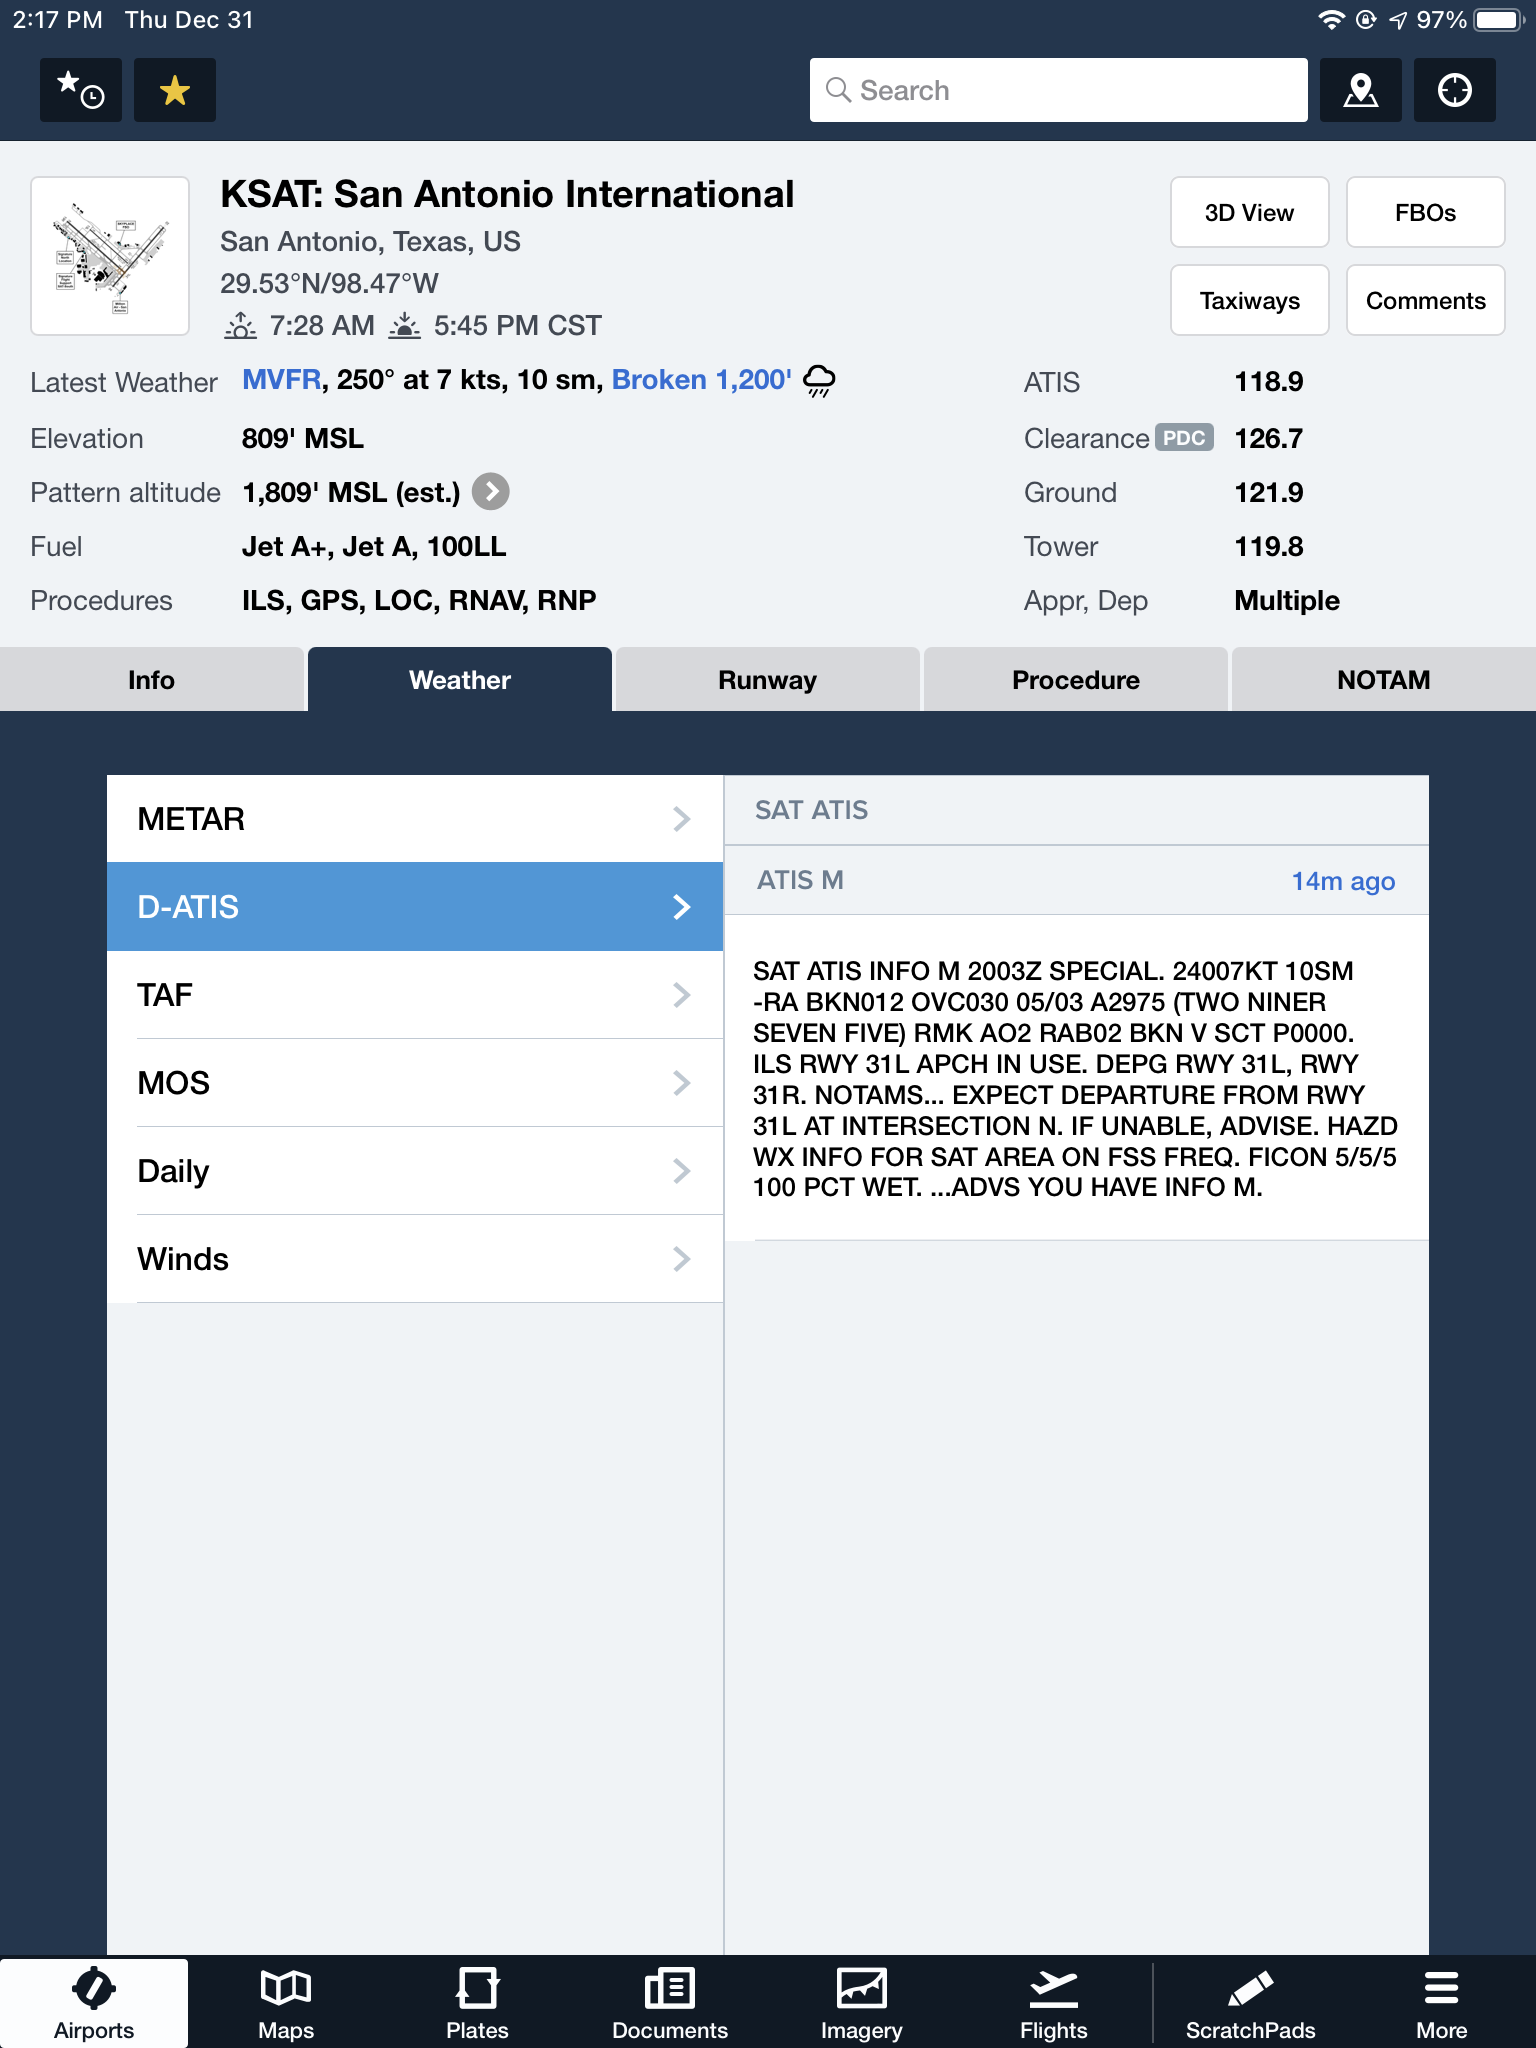
On the Airports page, tab Weather, then tap D-ATIS, and the last received D-ATIS will display. Note the age of the D-ATIS in the upper right hand corner
Foreflight now offers Pre-Departure Clearance (PDC) at those same 76 airports. With either a pre-registered tail number or a Foreflight call sign (starting in FFL), once a pilot files an IFR flight plan, the D-ATIS and the IFR clearance in it’s entirety are texted to the phone number the pilot filed with. All that is left to do is call ground, state “I have information Romeo and my clearance, ready to taxi,” then away you go. Skipping listening to the ATIS and talking to Clearance Delivery saves a good 5-10 minutes at times, depending on how busy the airport is.
These days, there are many different avenues to get the current weather (and IFR clearances!). When calling on the phone, the key is to be aware, know which number you are calling and, if you are expecting to hear an ATIS message but instead hear the AWOS/ASOS, verify the Chart Supplement Guide and Notices to Airmen (NOTAMS) to check tower hours of operation before flying into the airspace.








One Comment