Garmin GTN 750 Tips & Tricks

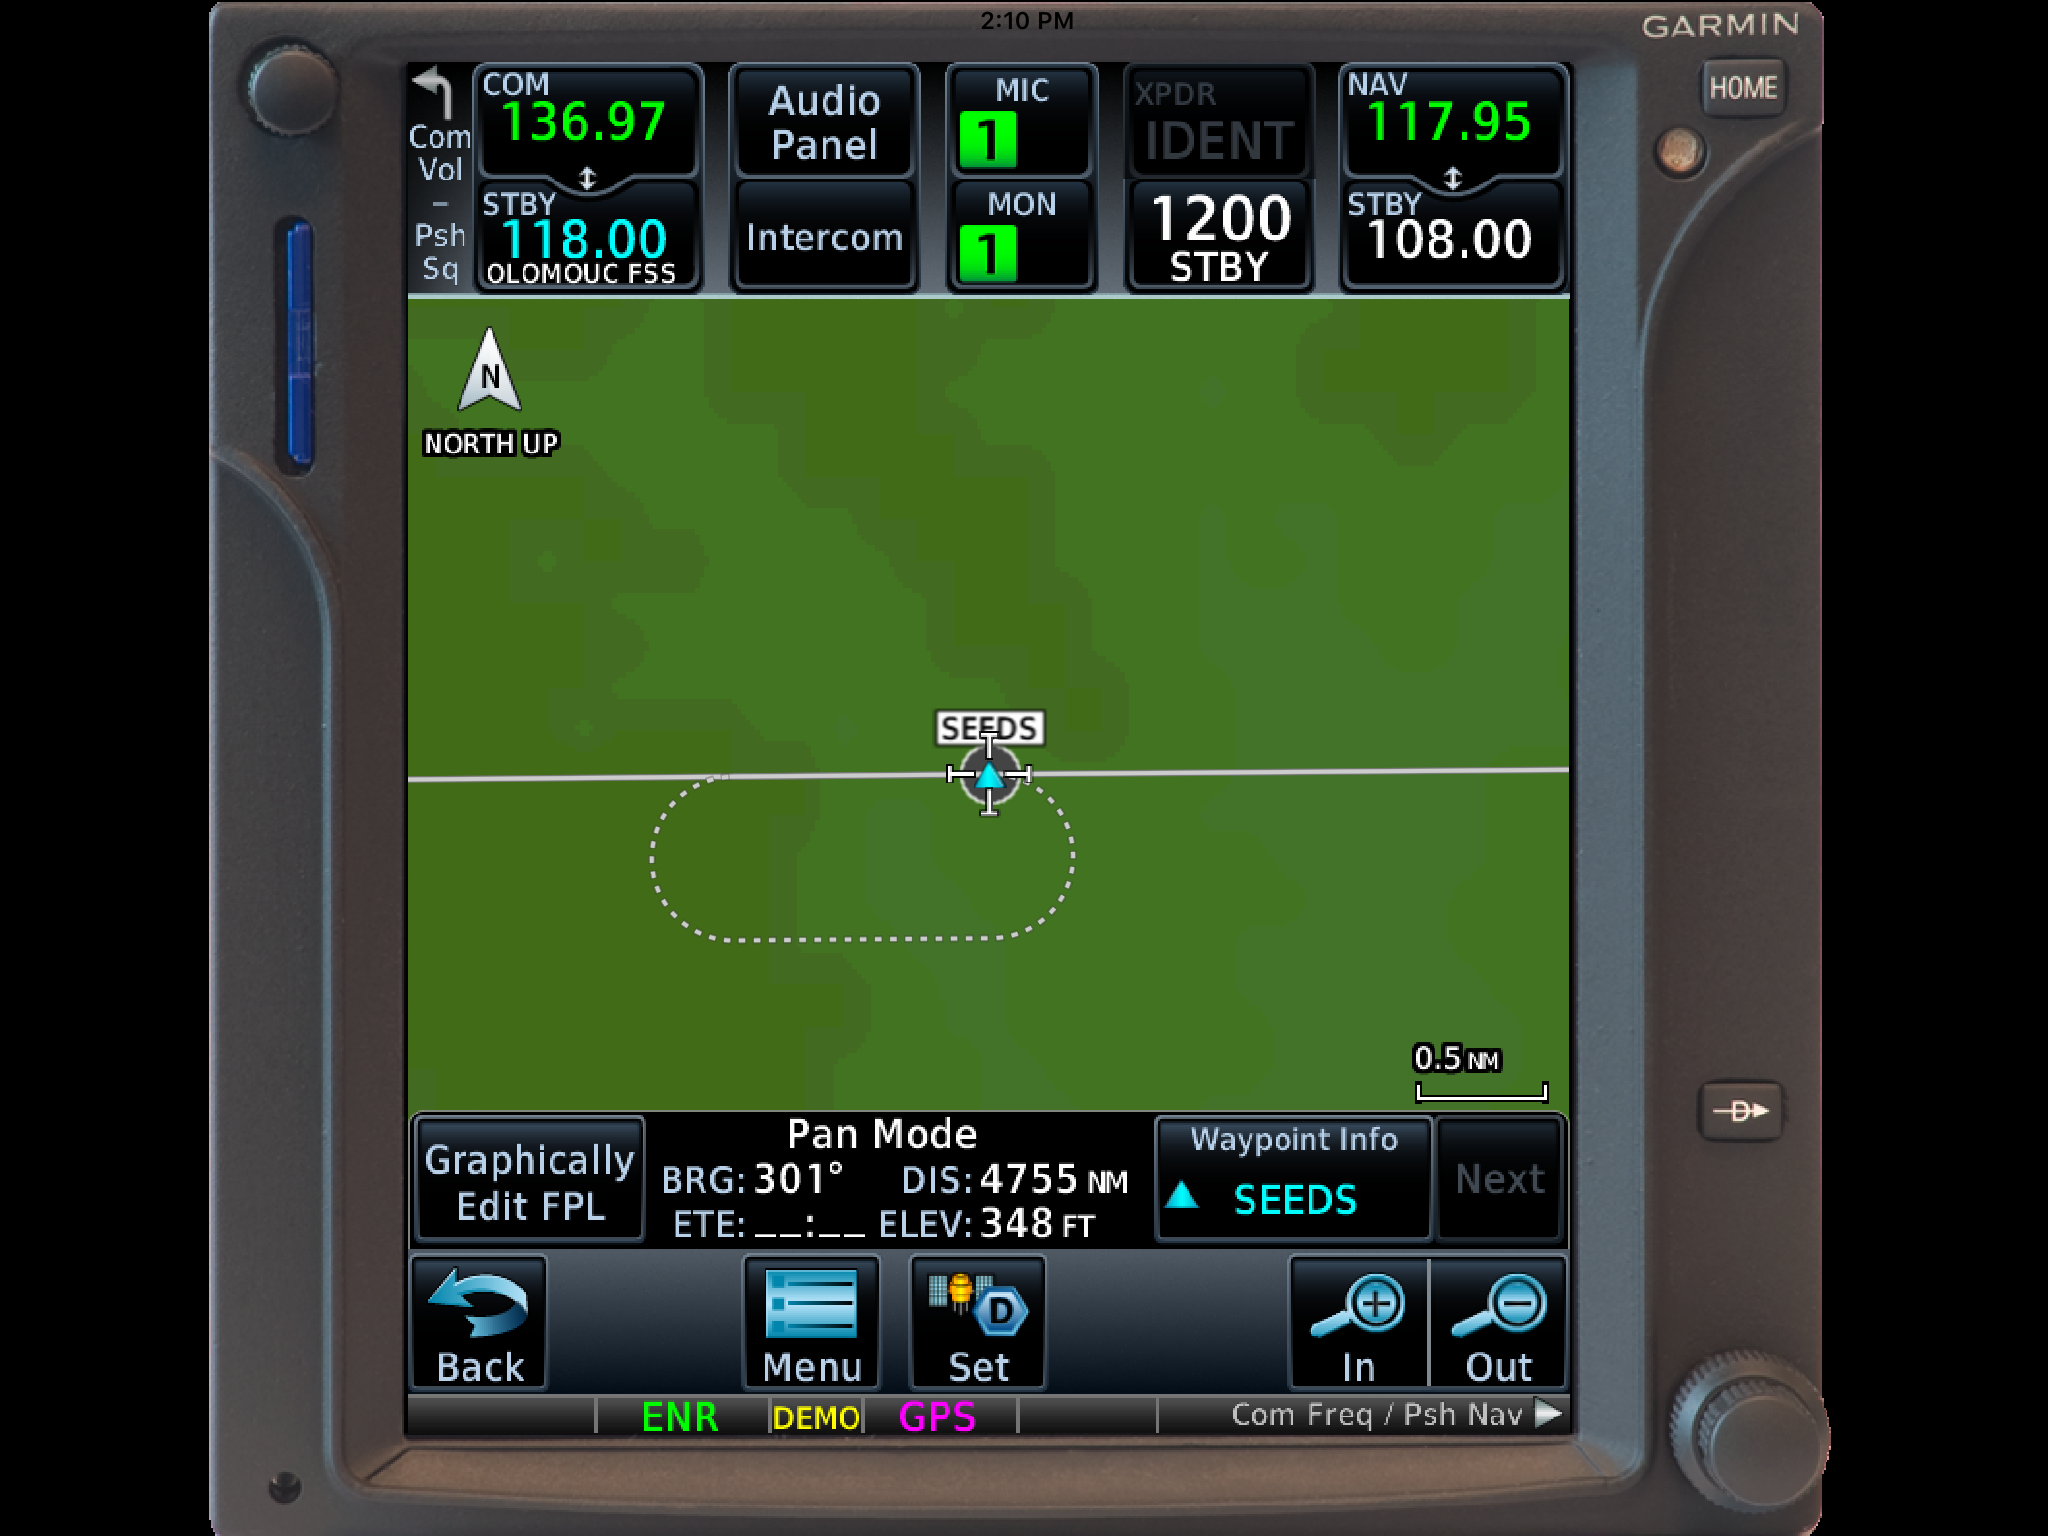
The Garmin GTN 750 is an awesome piece of equipment.  Garmin tried to make the user interface with the touch screen as simple as possible (though there still is a bit of a learning curve when moving up from a Garmin 530W).  Garmin also integrated several key features that the 530W did not have that makes flying with a Garmin GTN 750 in IFR all that much better.

The two features of the Garmin GTN 750 I want to focus on today are the “Load Airway” feature and the “Hold at Waypoint” feature.  If a pilot isn’t looking for these specifically, they can actually be a bit hard to find.  The “Load Airway” feature is especially handy when flying IFR long distances with several airways as part of the clearance.  Here’s how to utilize both.

Load Airway

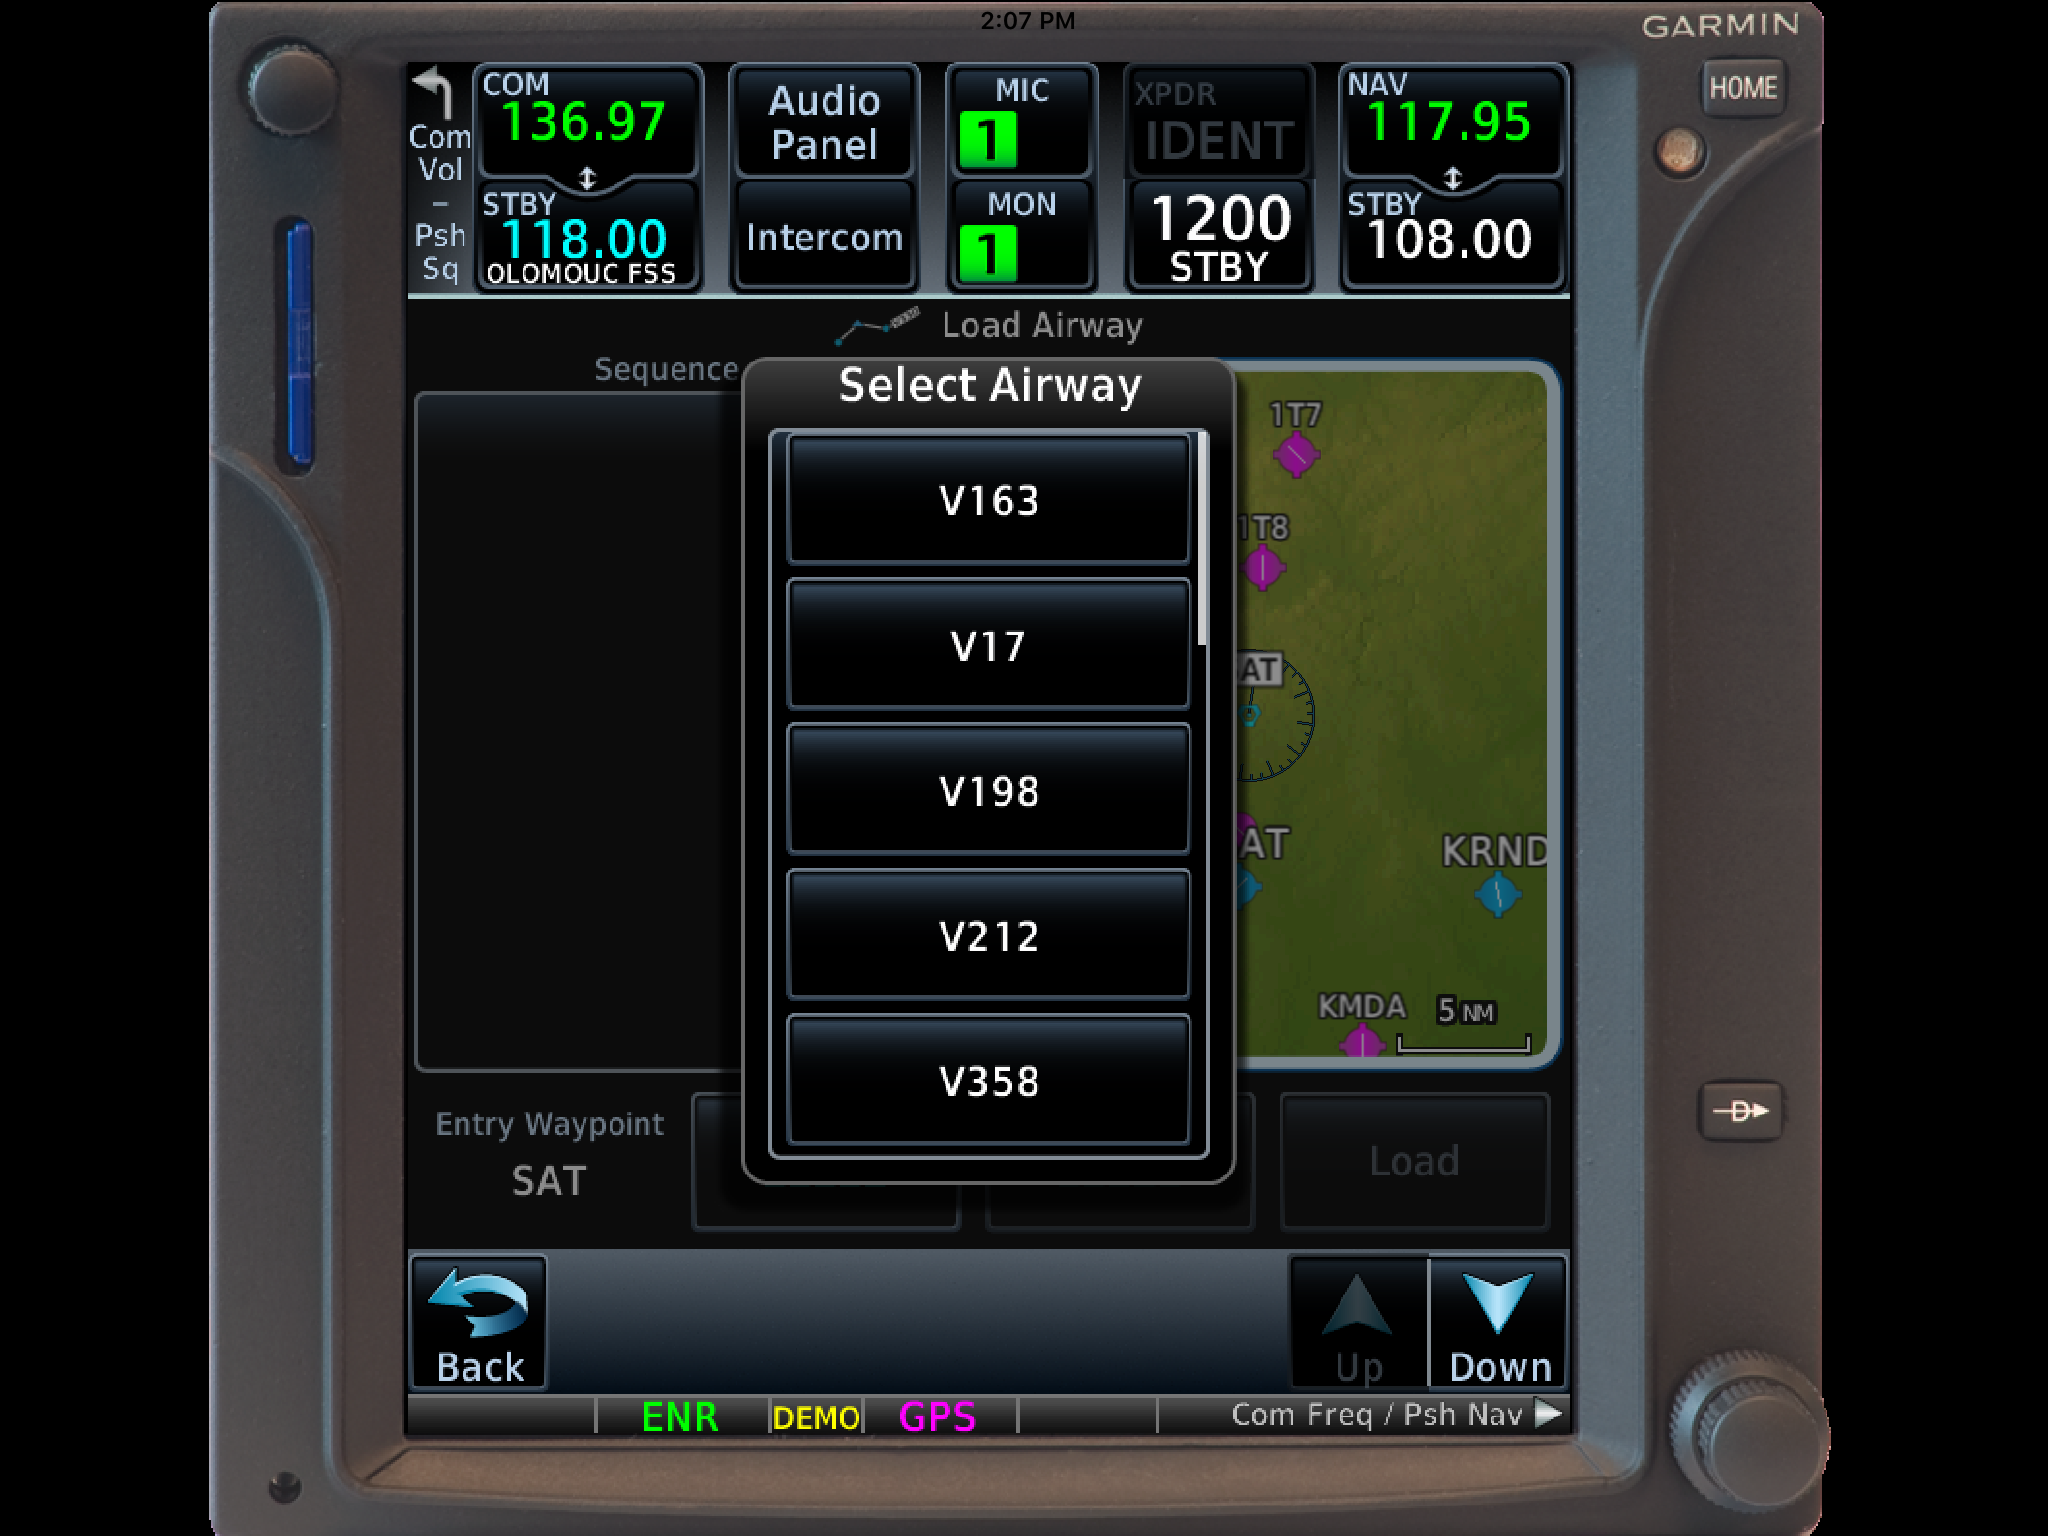
  1. On your flight plan page, insert the waypoint that you will be joining the airway, or, if your clearance was radar vectors to join an airway, then insert the waypoint on the airway that begins the leg you will be joining on.
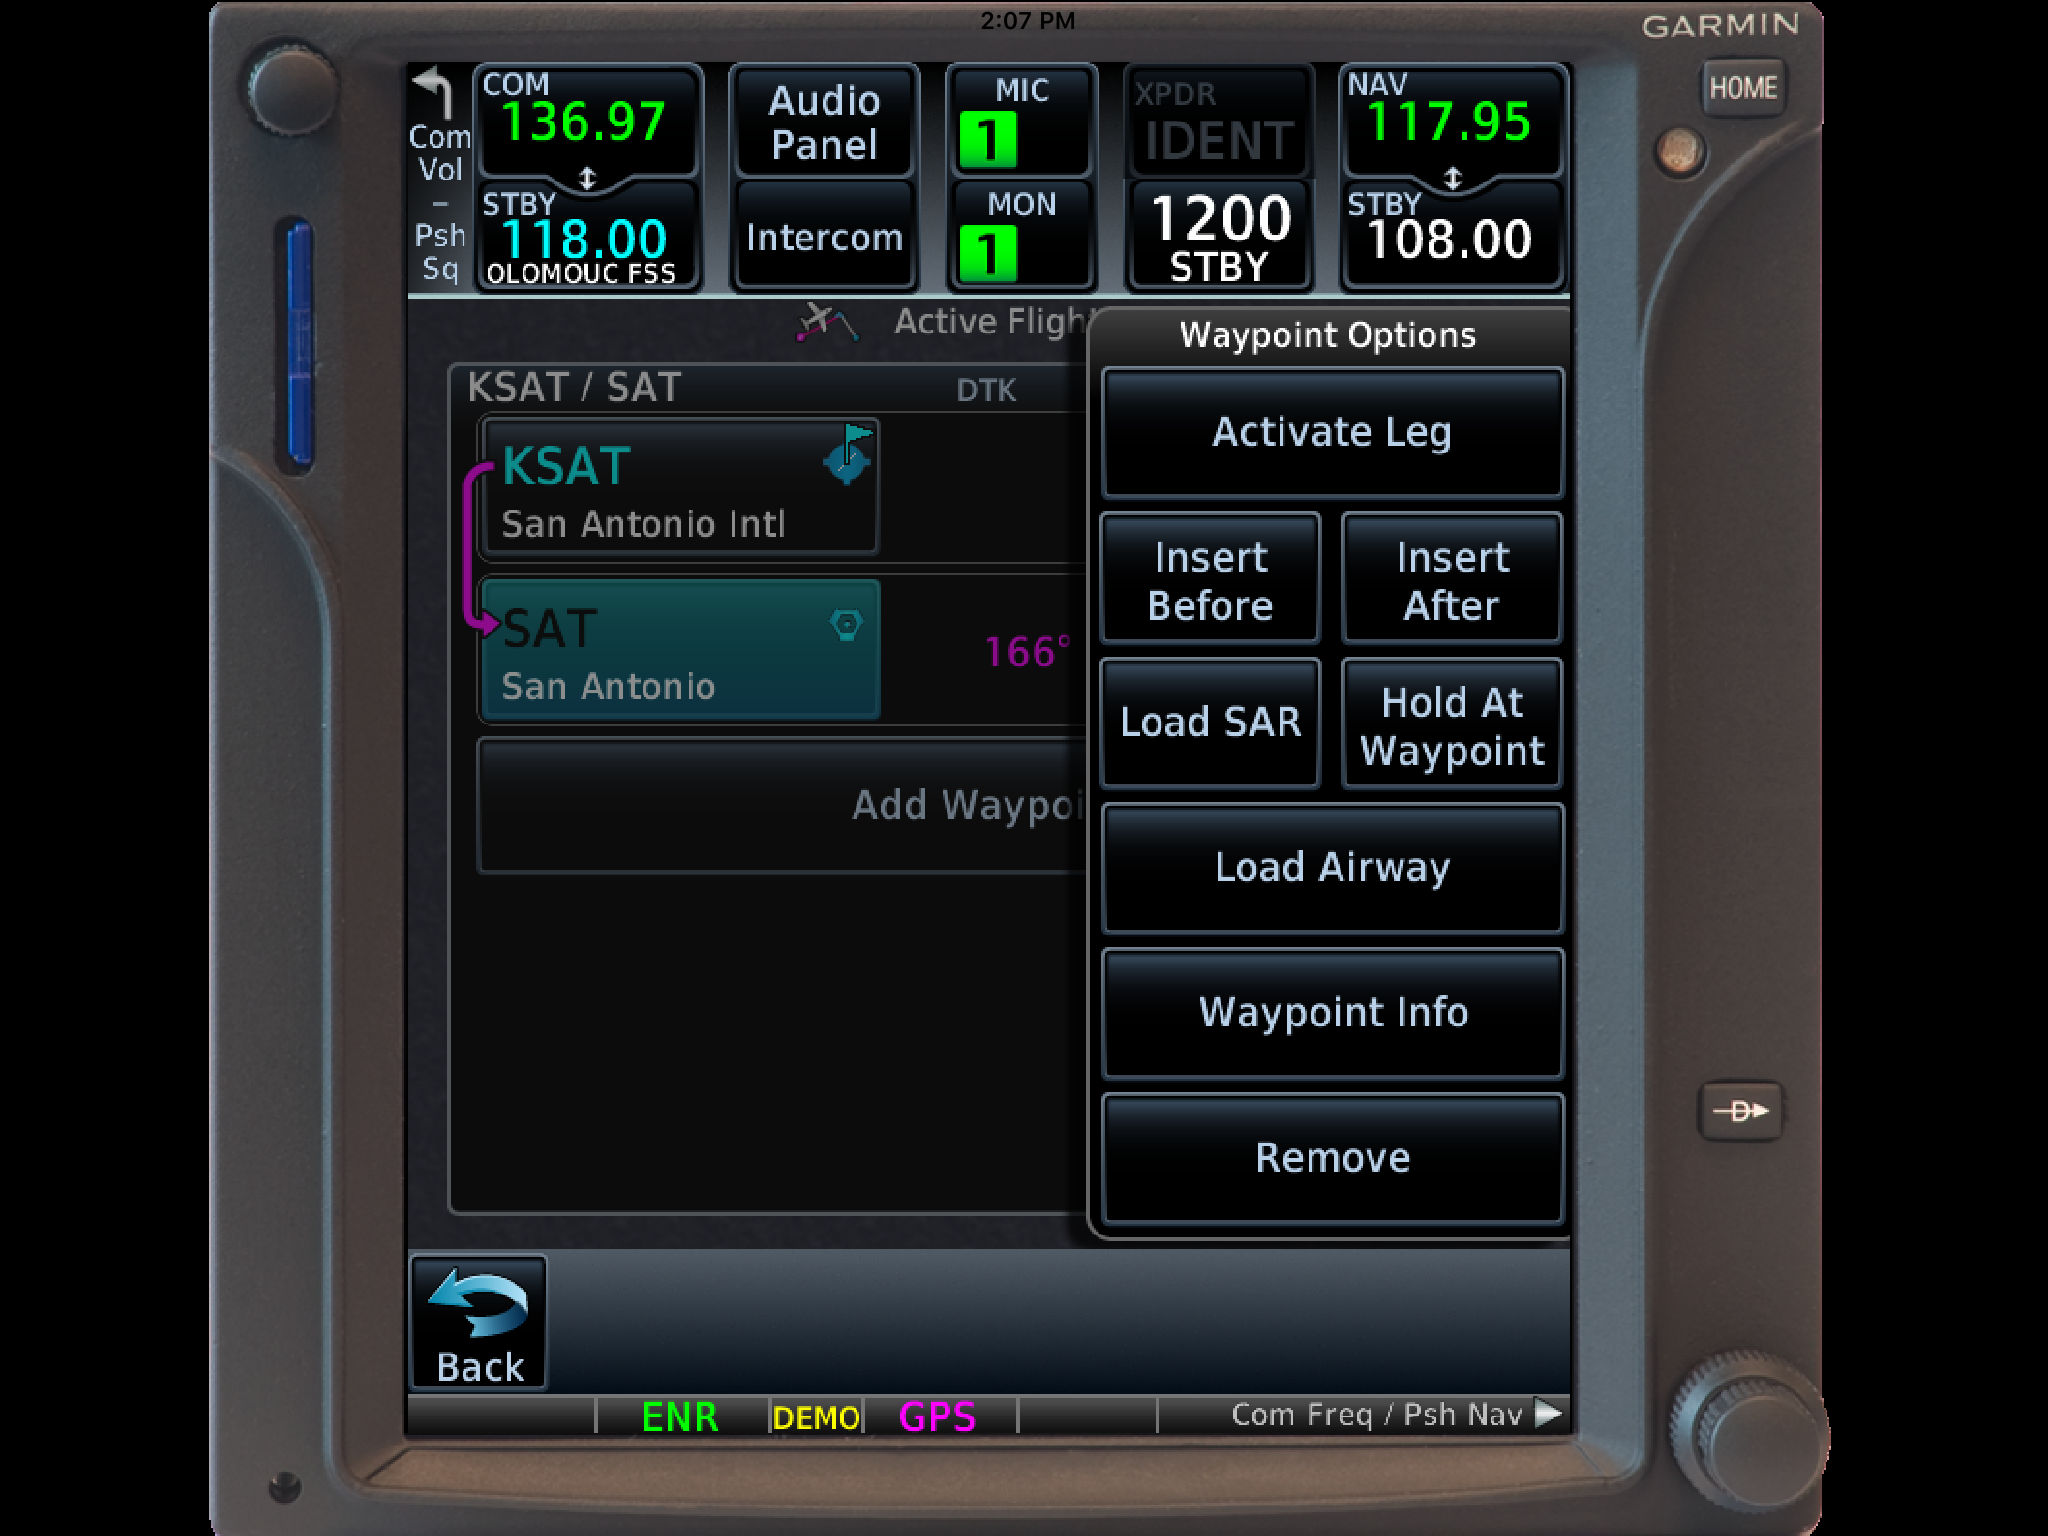
  2. Tap the waypoint you just inserted.
  3. A menu will pop up.  Tap Load Airway.
  4. Select the Airway you want from the next menu that pops up.
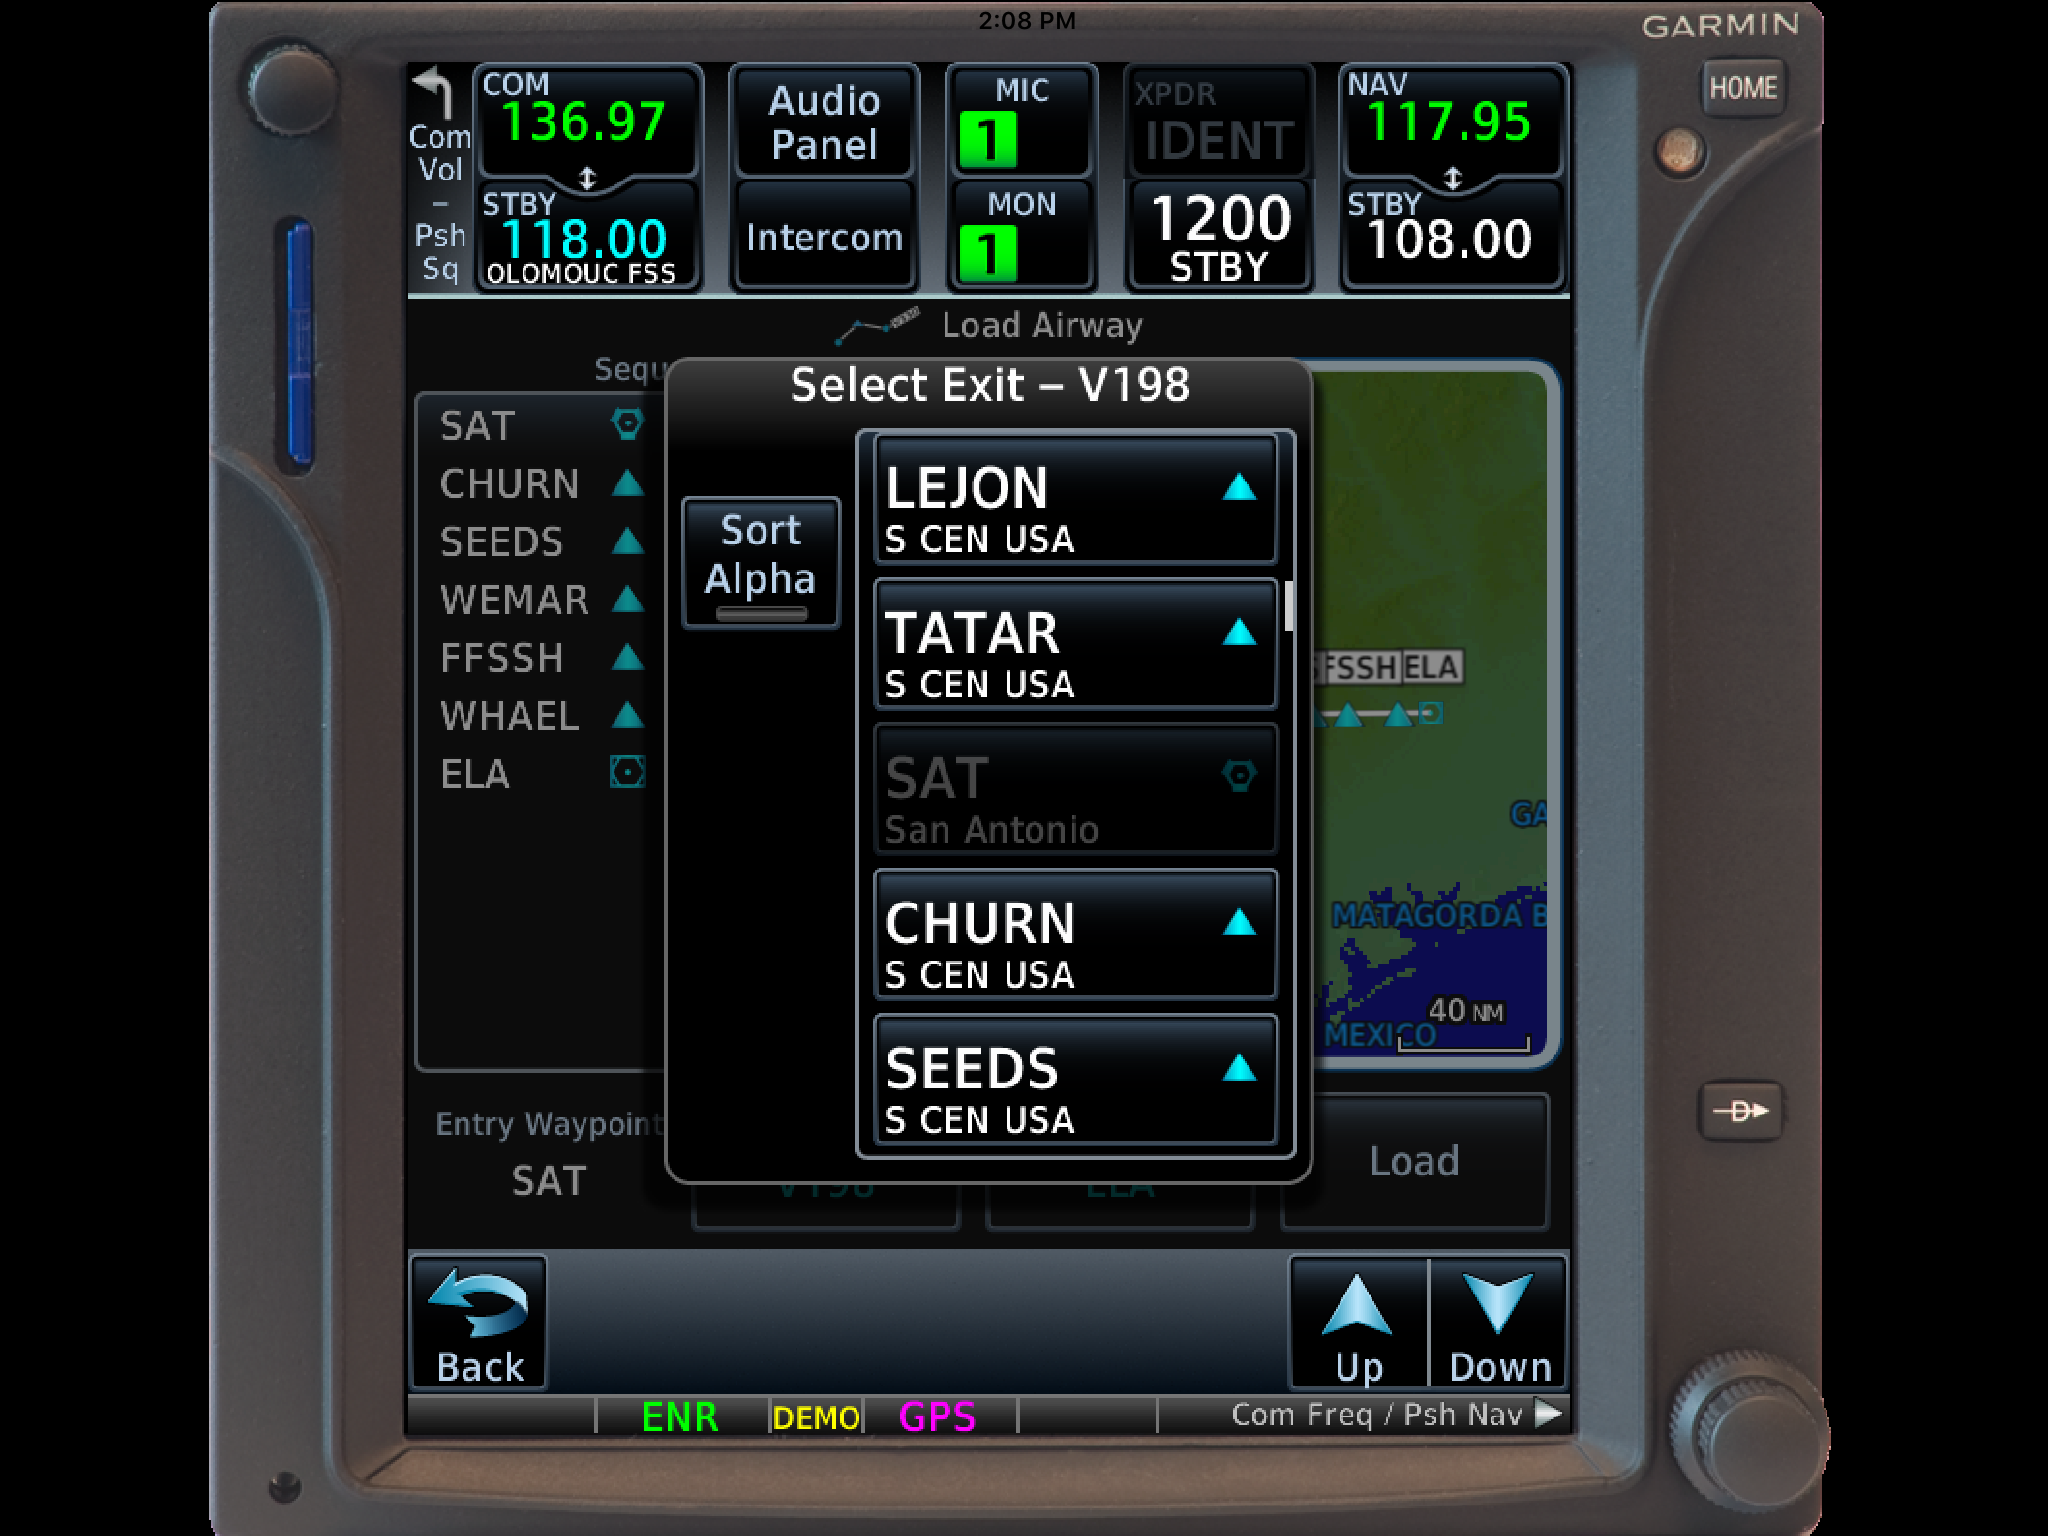
  5. Then, a list of waypoints will display to exit the airway.  Select the waypoint where you will be exiting the airway.
    1. Note:  Garmin defaults to listing these waypoints alphabetically.  If you unselect the “Sort Alpha” option, it will sort the waypoints by direction and distance from the entry waypoint.  This is a little more practical, easier to work with, and how I recommend doing it.  This way you can either scroll up or down depending on the direction of travel on the airway and find your exit waypoint.
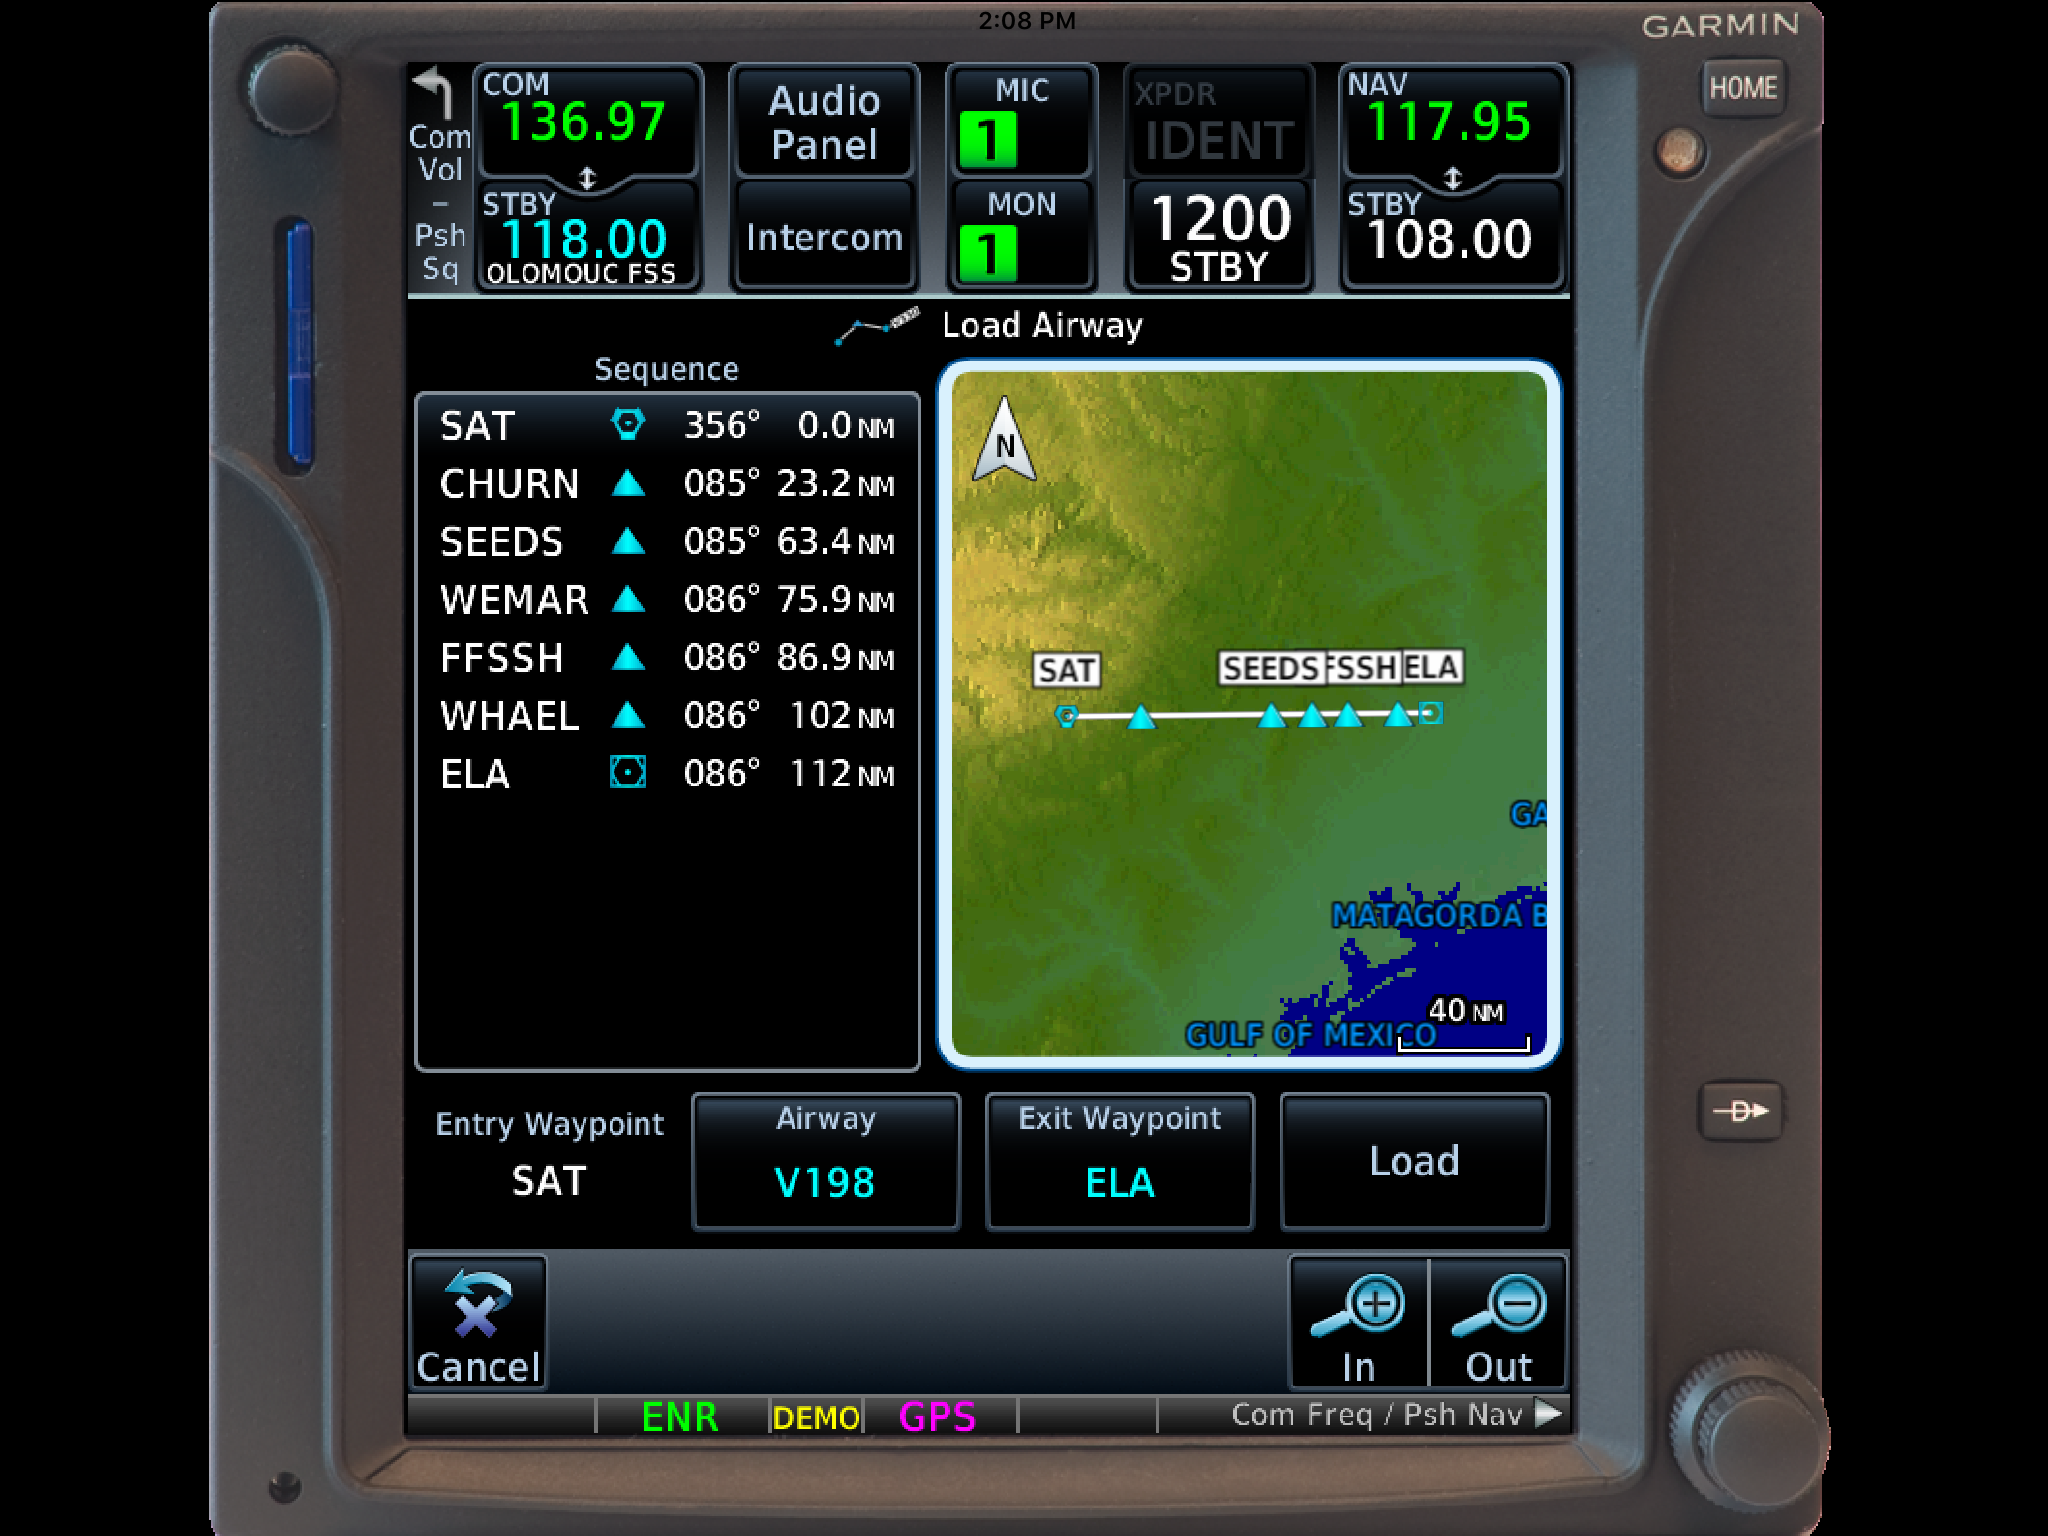
  6. Tap Load.
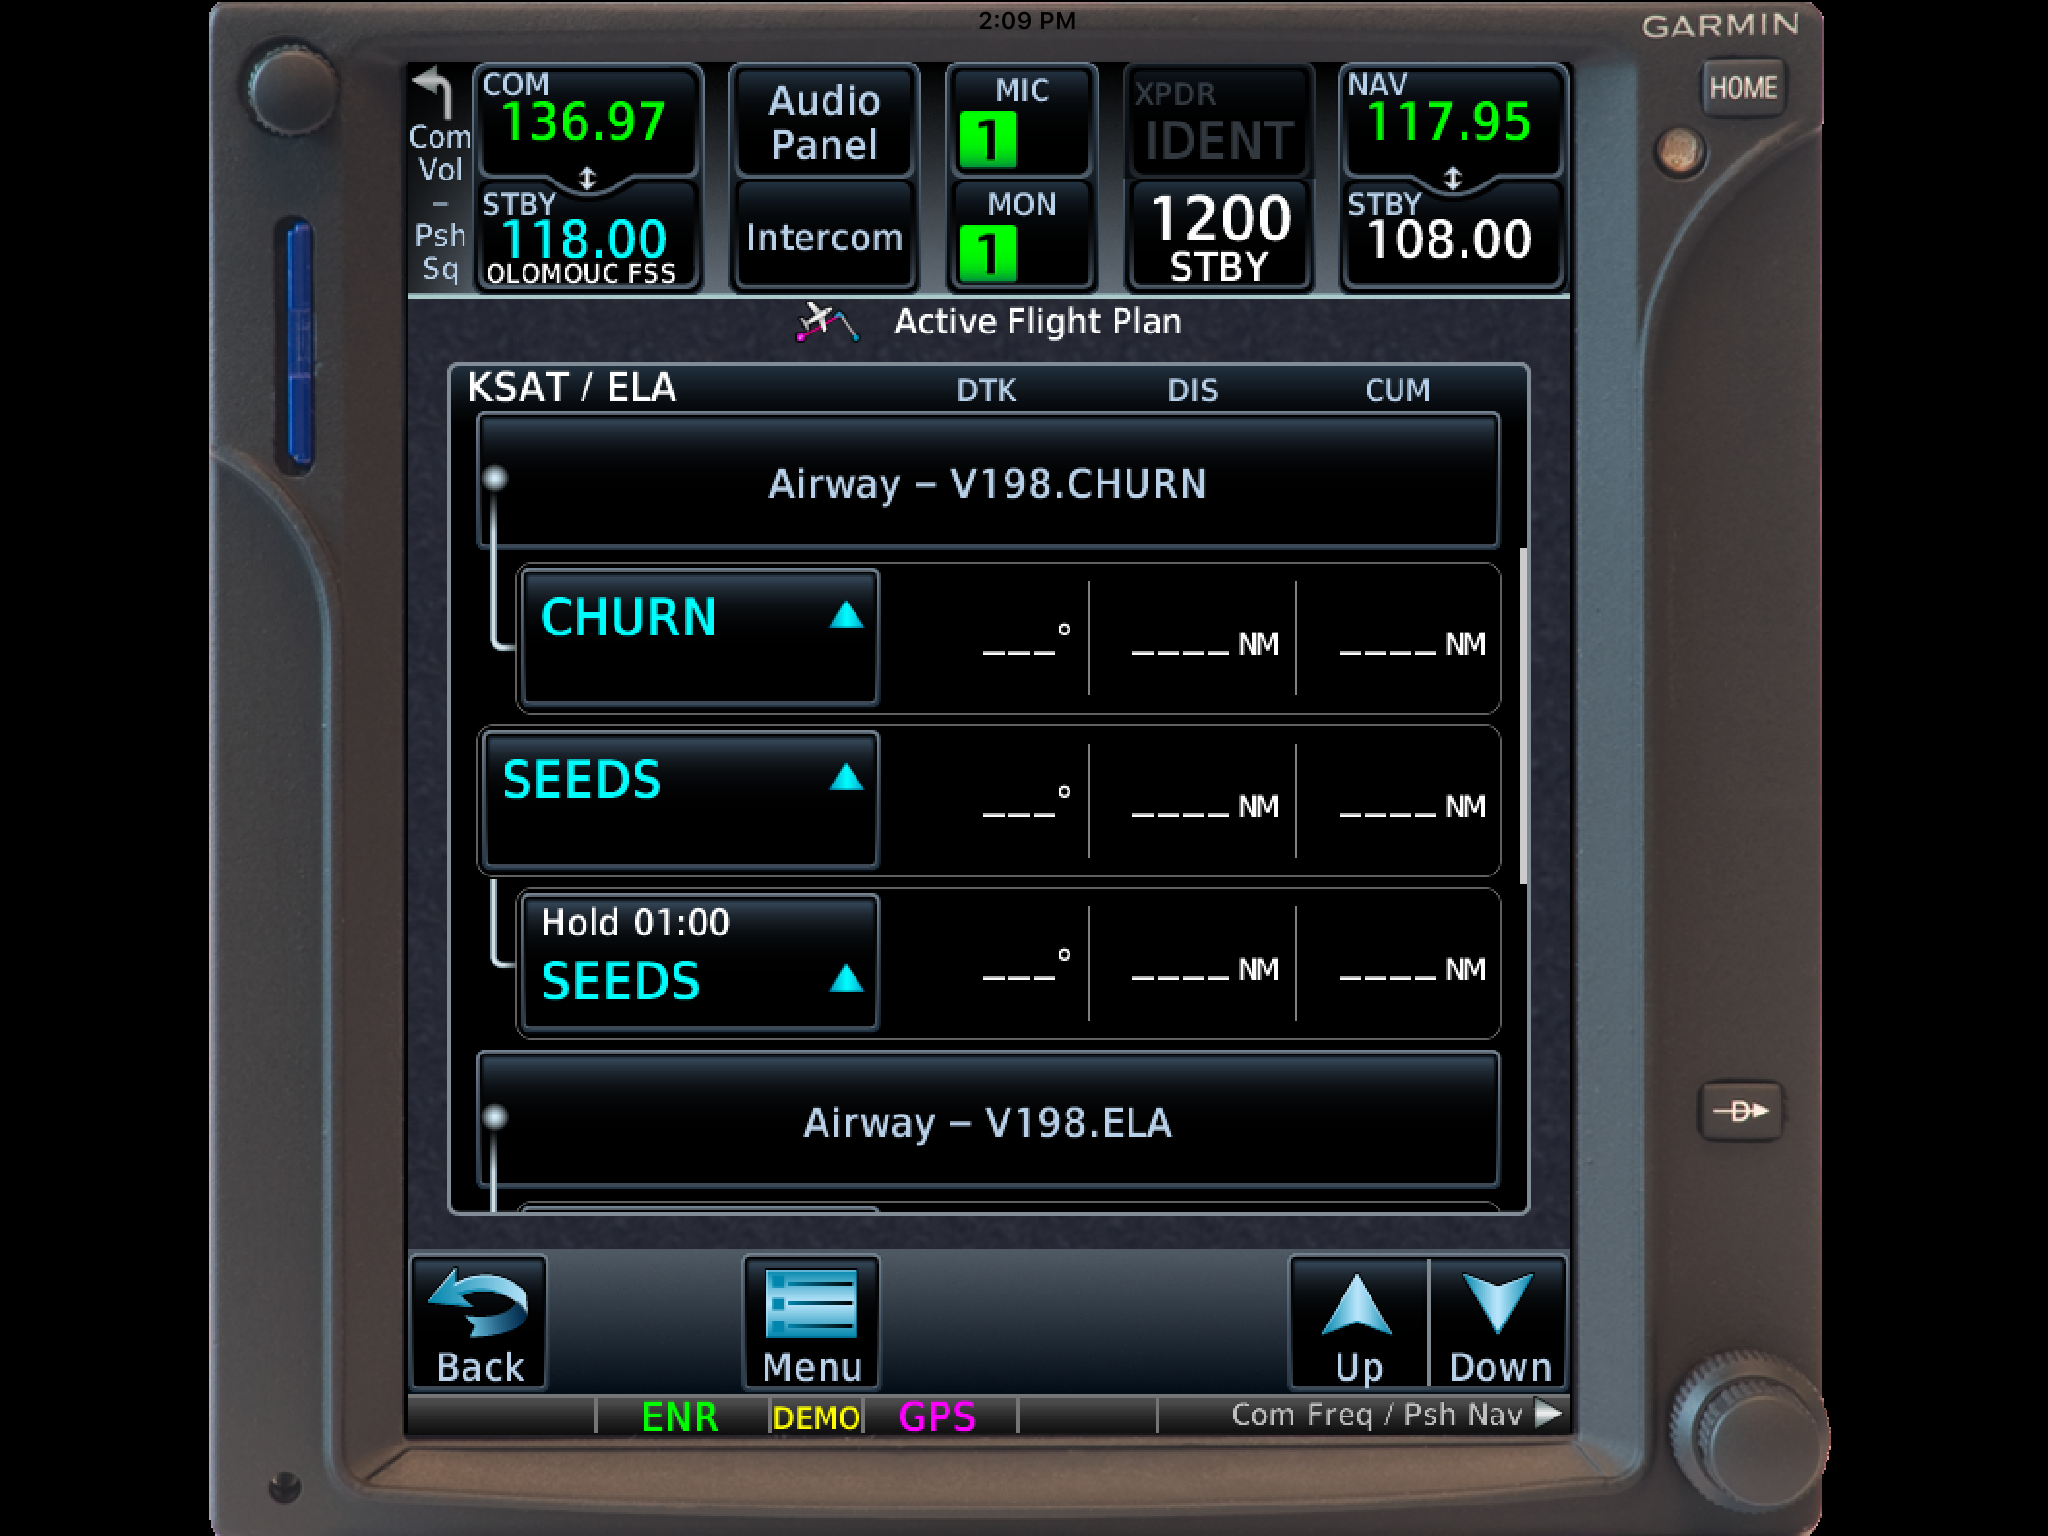
  7. The Airway and all the waypoints in between your entry and exit waypoints appear in your flight plan.
  8. If you are getting vectors to join the airway, you’ll need to use the Activate Leg function to activate the leg you will be joining the airway on.
    1. On the Flight Plan page, tap the waypoint that ends the leg you want to activate.
    2. On the menu that pops up, tap Activate Leg.
Hold At Waypoint

The Garmin GTN 750 allows pilots to place a holding pattern at any waypoint that is in the Nav Database (or any user created waypoint).  Here’s how to do it.

  1. On the Flight Plan page, tap the Waypoint that you want to hold at.
  2. On the menu that pops up, tap Hold At Waypoint
  3. On the next menu that pops up, input either the inbound or outbound course, right or left turns, leg time or distance, and the EFC time, then tap Load.
  4. You will see the hold now as a Waypoint in your flight plan.
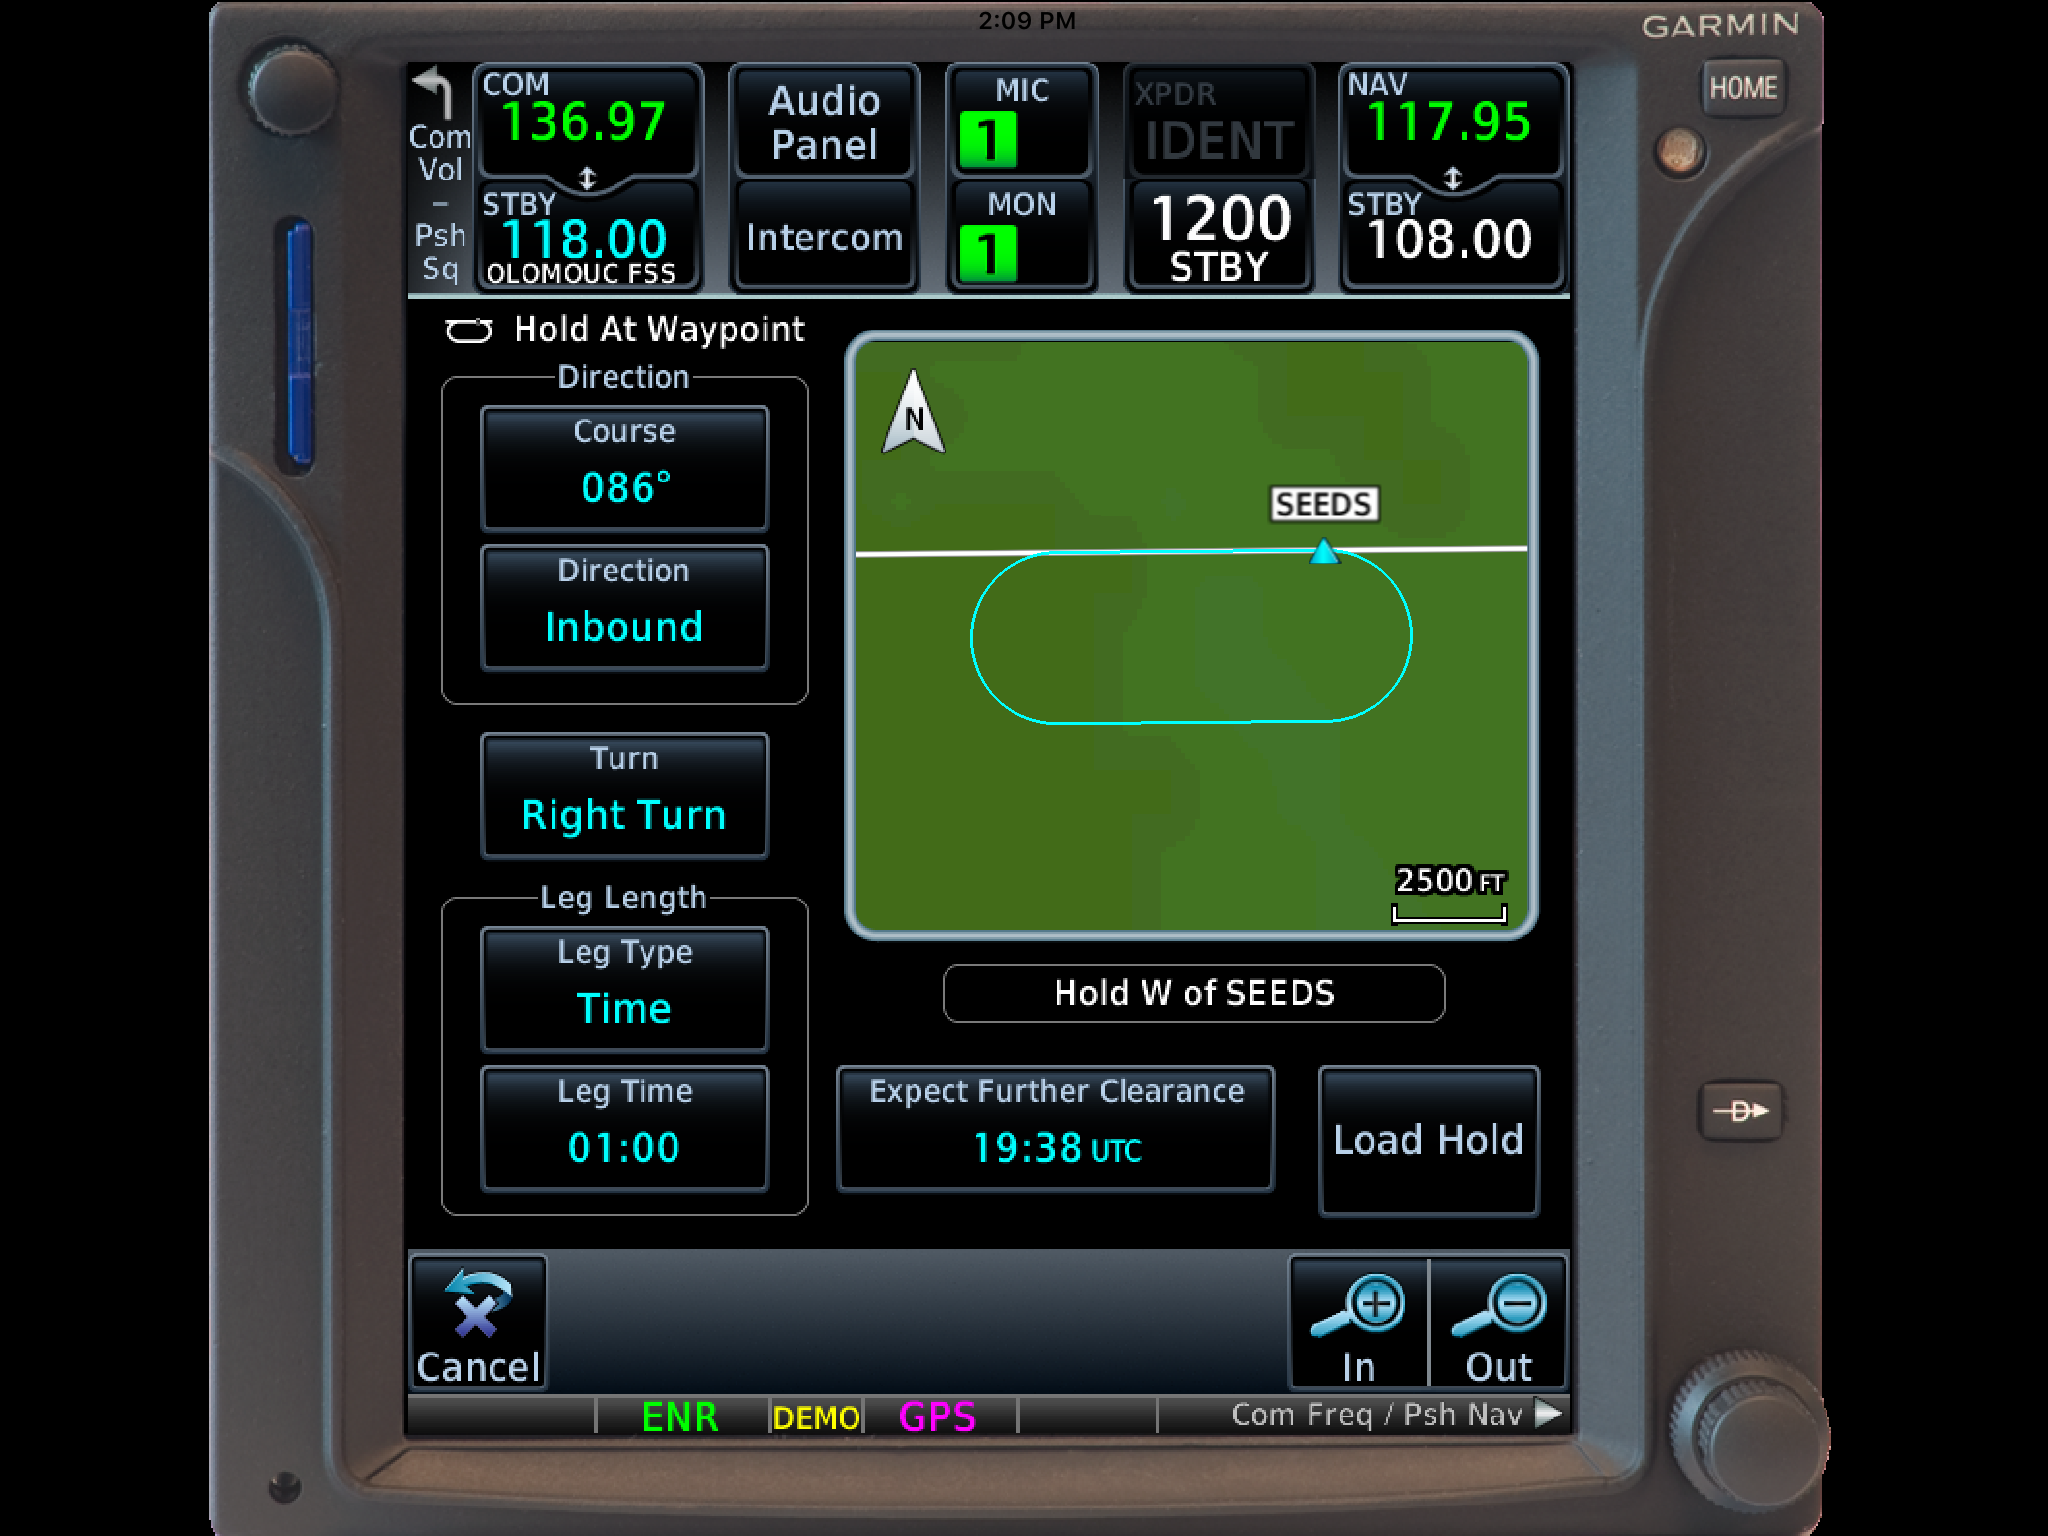
 

Once the hold is entered, the GPS will go into Suspend mode, suspending the Flight Plan Waypoint Sequencing.  Once you are ready to depart the hold, you will have to tap Unsuspend before crossing the holding point on the inbound leg, then the GPS will resume normal waypoint sequencing.

These are 2 of the really cool, gee-wiz features of the Garmin GTN 750.  Following the above steps will make IFR flying much easier for the pilot, as well as much more enjoyable!


Similar Posts

  • Flying To Mexico

    I took a Piper Malibu to Cabo San Lucas a few weeks back.  This was my second trip flying to Mexico, but the first where I arranged everything.  Cabo is a beautiful place and the MMSL airport is a fabulous facility. For those who haven’t been fying to Mexico before, MMSL is the place to go.  The folks there are extremely helpful and do most of the paperwork for you.  You just have to pass along your information to them.

    Mexico Flying

    Flying to Mexico and back out is different than flying in the US.  First of all, don’t forget your passport. The authorities on both sides frown upon that.  You’ll probably get sent back to the US (or sent back to Mexico if you are on your return trip).  Your aircraft also needs, Mexican insurance (talk to your US insurance agent) a radio license, and a customs decal.

    Second, you’ll have to file an ICAO specific flight plan for flying to Mexico.  This is available on Foreflight now, but I really like Fltplan.com’s way of doing it.  I don’t fly internationally enough to remember what everything means, but Fltplan.com does a great job of walking pilots through the the different classifications.  It’s almost impossible to get confused.

    Third, you have to fill out an eAPIS form.  This has to be done at least 24 hours prior to departure from the US, but it can be done as far in advance as you’d like.  If your departure time changes or your passengers change, you can edit the eAPIS form to bring it current.

    Flying to Mexico IFR is a lot simpler than flying VFR.  I have only flown IFR and it is very easy.  I’m already on a flight plan, already squawking a discreet code, and already on radar, so there really isn’t any way I can mess up the ADIZ penetration.  I really recommend going in and out of Mexico IFR instead of VFR.

    Once you land in Mexico, you have to close your IFR flight plan.  The tower doesn’t do this for you.  After clearing customs, you’ll have to pay a landing fee and sign your flight plan confirming you have arrived and closing it out.

    When departing, you have to file another eAPIS 24 hours in advance.  Wherever you plan on clearing Customs in the US, you’ll need to call the Customs office no less than 1 hour, but not more than 23 hours before arrival.  It’s called an Advanced Notice of Arrival.

    You’ll need to fill out a paper flight plan before departing, clear customs again to leave, then away you go.

    There are a lot of really fun getaways in Mexico and flying there doesn’t have to be difficult.  When you have the right information, flying to Mexico can be a breeze!

  • 2024 Texas Top Aviation Shangri-La Fly In

    It’s that time of year again! Yes, it’s the New Year, but it’s also time to register for the 2024 Texas Top Aviation Fly In. The Aviator’s Academy’s sister company, Texas Top Aviation, is hosting it’s 4th annual fly in event on March 19th-22nd, 2024 at the Shangri-La Resort in Grand Lake, OK.

    For those not familiar with the annual Texas Top Aviation Fly In, we’ve been hosting this event since 2019 and it is always well attended and fills up fast. Geared around aviation education, golf, community, and a whole lot of fun, the fly in is always very popular.

    This year, we are adding a Par 3 Shootout for early arrivals on Tuesday, March 19th at the Shangri-La’s Battlefield Par 3 Course. The 4th Annual 2 Round Golf Tournament begins on the afternoon of Wednesday, March 20th and finishes up on the afternoon of Thursday, March 21st.

    The biggest hit of the week is always the safety seminars on Thursday morning. This year, Texas Top Aviation has secured the talents of Paul New, expert Cirrus, Columbia, and Cessna mechanic, and owner of Tennessee Aircraft services. If you listen to Mike Busch’s podcast, Paul is a regular. Scott Williams, owner of The General Aviation Law Firm, will be presenting on LLC’s and Illegal Charters, while Hank Gibson, owner of Texas Top Aviation and The Aviator’s Academy, will present a study on several different accidents and what can be learned from other’s mistakes.

    It’s guaranteed to be a fun week. The Grove Regional Airport in Grove, OK will be our host airport (KGMJ) this year. Sign up soon as space is limited. Registration is only open till February 23rd, 2024. For more information and to register, simply Click Here. We hope to see you there!

  • That Pesky Rudder

    Whenever I get in an airplane with a pilot for recurrent training, I can assure myself that I will mention rudder usage more than once during the flight.  If it is in a tailwheel (or if the pilot is doing tailwheel training), I’m going to mention the rudder a lot.  How do I know this?  Because basic rudder skills are actually one of the most difficult things to master in flying.

    Let’s start simple.  What does the rudder do?  The dictionary definition is it controls the movement about the vertical axis of the airplane.  If you stick a pole down through the CG of the airplane and rotate the airplane around that pole, this is the vertical axis.  Looking at it another way, the rudder moves the airplane’s nose left and right.  Keep this in mind as we move on.

    Rudder

    Every pilot thinks about the rudder during the takeoff roll.  Because of the torque effect, the pilot must add right rudder during the takeoff roll to stay on the runway centerline.  Depending on the airplane’s horsepower, more rudder pressure is needed in higher powered airplanes.  The problem usually shows up once the airplane gets in the air.

    In the worst situation, after takeoff, the pilot will set both feet on the floor and completely disregard the rudder.  Torque effect and now P-factor are continuing to cause the airplane to yaw left, causing the need for right rudder.  With his feet on the floor, though, the pilot is allowing the airplane to yaw.  It’s not terribly noticeable for him in the front seat, but the back seat passengers (especially in a six seat or larger airplane) are certainly feeling it.

    One particular problem spot on the climb is the climbing left turn.  In a climbing left turn, training says to add left rudder since it is a left turn (see below for the reasoning).  But, since the airplane is climbing and therefore experiencing left yawing tendencies due to the aforementioned effects, the pilot needs to continue pressing the right rudder, though the pressure won’t be as much as in a straight climb.  Watch the ball the next time you make a climbing left hand turn and it’ll make a believer out of you.

    I find only a handful of pilots are this egregious.  Most pilots have rudder problems in turns and in turbulence.  We’ll tackle turns first.  As we all learned when we first started flying, due to adverse yaw, a pilot must add rudder in the turn’s direction.  Again, this isn’t usually where the problem shows up.  During the rollout is the problem area.

    Let’s take a turn to the left.  The pilot rolls in, adding left rudder, arrives at his heading, then begins to roll out with the ailerons.  Left adverse yaw is now being experienced and right rudder is needed to smoothly transition back to level flight.  Need some visual assistance?  Watch the nose the next time you make a turn. If you are working the rudder properly, the nose will pivot on one point in the horizon.  If you aren’t using the rudder properly, the nose will draw a U shape on the horizon.  Try making some turns without rudder, see what it looks like, then use the rudder properly.  You’ll notice a big difference.

    Finally, let’s talk turbulence.  As we all know, turbulence in the hot summer afternoon is quite pronounced. When the airplane experiences a bump, it usually doesn’t bounce straight up in the air.  There is usually some kind of rolling motion involved.  As the pilot corrects this rolling motion by moving the ailerons, adverse yaw is experienced (just like rolling into and out of a turn that we talked about above), so rudder is needed.  There isn’t a need to stomp on the rudder or you’ll cause the airplane to severely yaw in the other direction, but rudder pressure is needed.

    Final approach is where this gets most pilots.  By controlling the nose and not allowing it to move around on final by using the rudder, this will make your approaches a little more stabilized leading to a more successful landing.

    Feeling lost when it comes to the rudder?  Ask your instructor the next time you go fly to do some rudder exercises.  Most instructors don’t emphasize these basic stick and rudder skills which leaves pilots lacking as they move on in their aviation lives.  So make it a point to do some basic rudder work the next time you fly with your instructor.

  • Chuck’s Aircraft 10 Year Anniversary Fly In

    Chuck’s Aircraft, the Austin Cirrus Service Center located at the Austin Executive Airport (KEDC), is celebrating it’s 10 year anniversary this month. What better what to celebrate than to fly in for Texas BBQ? That’s what they thought too!

    Chuck’s Aircraft will be hosting its 10 Year Anniversary Fly In on Friday, June 25th from 1pm to 5pm on their ramp at EDC (see airport diagram below). Chuck’s Aircraft always provides quality maintenance for Cirrus and other aircraft, so come show your appreciation for them.

    Please RSVP to erin@chucksaircraftllc.com. Hope to see you there!!!

    Chuck’s Aircraft is the hangar circled in green
  • Lightspeed Zulu 2 vs. The Bose A20

    The debate about which headset is the better product will never cease.  We do know this for sure, though, Lightspeed and Bose make the best noise canceling headsets out there.  David Clark’s offering doesn’t match up with these two.  Newcomer AKG has a light (weight-wise that is, as the headset is equipped with a pair of LED lights as well) ANR headset that the jury is still out on.  For now, Lightspeed and Bose sit atop the ANR kingdom.

    The comparison for this article will be between the Lightspeed Zulu 2 and the Bose A20 headsets, both of which I have used quite extensively in my flying career.  I am officially in the Lighspeed camp at this point and after reading my comparison below, you’ll see why.

    ANR Functionality

    Bose A20

    Between the two, the Bose A20 cancels out more noise, no argument there.  This isn’t to say that the Lightspeed Zulu 2 doesn’t.  Quite the opposite, actually.  The Lightspeed Zulu 2 does a great job of canceling the noise.  But with the A20 on in a C172, you can barely hear the engine running.  The difference before you press the power button and after is extremely noticeable.  I had one client turn to me after turning on the noise canceling function of his new A20 headset and state, “These things are awesome!”

    The other advantage Bose has is a continuation of the noise canceling.  About the only thing I don’t like about the Lightspeed is if you don’t have the headset sized just right on your head, each time you turn your head to look at something, then the suction gets broken around the ear cup and you get some ambient noise.  My glasses probably don’t help with this.  It’s not that big of a deal, you just have to readjust the size of the headset, but, since I’m a little OCD, it bugs me.  Once I get the set sized right, it’s smooth sailing.

    Comfort

    Lightspeed Zulu 2

    Far and away, the Lightspeed Zulu 2 is much more comfortable than the Bose A20.   I flew for 5 hours in the right seat with my Lightspeed set on the other day.  I switched to the left seat for the last leg and used the owner’s A20 headset since it was plugged in on that side already and I noticed quite a bit of difference.  The ear cups seemed to press against my head more.  The pad on top of my head didn’t seem to be as cushiony.  It just wasn’t overall as comfortable as the Lightspeed Zulu 2.

    Bose has made a lot of progress from their original noise canceling headsets.  Those didn’t have much of a cushion on top at all.  After about 2.5 hours, the slim ear cushions began to dig in to the side of your head.  So, the A20 has made some progress, but the Lightspeed Zulu 2 takes the cake in comfort.

    Weight Distribution

    “Wait!”  You Bose boys scream (no pun intended).  “The A20 is lighter than the Zulu 2!”  While this is true (the Zulu 2 weighs in at 15.7 oz while the A20 is only 12 oz), the way that weight is distributed makes a massive amount of difference.  The Lightspeed Zulu 2 feels lighter on top of your noggin than the A20 because the weight of the A20 is firmly planted on the top of your head in a single point.  With the Zulu 2, the weight is distributed evenly across the top of your scalp, so even though the set is heavier, it feels lighter on your head because the weight is not all concentrated on one point.

    All this adds up to why I like the Lightspeed Zulu 2 more than the Bose A20.  As for a practical example, I wore my Lightspeed Zulu 2 set for 9.1 hours one day two weeks ago.  Needless to say, it was a long day.  But, once I climbed out of the airplane, I had no pain on the top of my head and only a very little where my glasses ran along the side of my head.  Now I call that a winner.

  • MMOPA Master Aviator Program

    Last fall, the Malibu & M-Class Owner’s and Pilot’s Association (MMOPA) announced a new program to encourage and enhance safety, the Master Aviator Program.

    The MMOPA Master Aviator Program was designed as a system to recognize those in the Piper PA46 community who strive to become the best pilots they can be. Each year, those who have achieved each of the levels in the program will be honored at the MMOPA Convention (the 2020 MMOPA Convention will be in Tucson in the spring of 2020) by getting Wings pinned on.

    What is the heart behind the MMOPA Master Aviator Program, you ask? Here’s a quote from the MMOPA Website:

    This program is the result of MMOPA having identified areas of flight operation that need improvement to increase safety. It provides a path forward for training for the PA46 pilot, honors those pilots that elect to participate in the MMOPA Master Aviator Program, and rewards those pilots that progress upwards to ultimately reach the highest level (MMOPA Master Aviator).

    The main focus areas of the MMOPA Master Aviator Program are pilot flight experience (flying more during a year increases skills), stall/spin awareness, and operations in the runway environment (improper aircraft handling during takeoff, landing, and go around, with a particular emphasis on rudder control).

    The MMOPA Master Aviator Program tackles these three areas in each of the different levels of achievement: Aviator, Senior Aviator, and Master Aviator.

    To achieve the Aviator Wings, a PA46 pilot must do the following:

    • Complete Initial Training with an Approved Training Provider
    • Fly 100 total hours in a PA46
    • Attend an Approved Mid-Year Training Event (M-Class, MMSTF, MMOPA Safety Standown, MMOPA Maintenance Standown, to name a few)
    • Attend the MMOPA Convention once in the last 3 years
    • No accidents/incidents in a PA46 in the last 3 years

    To achieve the Senior Aviator Wings, a PA46 pilot must have received their Aviator Wings and do the following:

    • Completed at least one yearly Recurrent Training Event
    • Fly 200 total hours in a PA46
    • Go through an approved Upset/Recovery Training course provided by an approved training provider
    • Attend the MMOPA convention once in the last 3 years
    • No accidents/incidents in a PA46 in the last 3 years

    To achieve the Master Aviator Wings, a PA46 pilot must have received their Senior Aviator Wings and do the following:

    • Completed at least two yearly Recurrent Training Events
    • Fly 300 total hours in a PA46
    • Receive a tailwheel endorsement
    • Attended the MMOPA convention once in the last 3 years
    • No accidents/incidents in a PA46 in the last 3 years

    To incentive PA46 pilots, MMOPA offers a $400 voucher to program participants to accomplish the Aviator Mid Year Training, the Senior Aviator Upset/Recovery Training, and the Master Aviator Tailwheel Training. A PA46 pilot is only eligible for one voucher per year.

    I received the Master Aviator Award at the MMOPA Convention this year. All told, there were close to 40 participants who received one of the three levels of achievement at the MMOPA Convention in Amelia Island, FL this year.

    Interested in applying to be a part of the MMOPA Master Aviator Program? You can find out more information on MMOPA’s website.

Leave a Reply

Your email address will not be published. Required fields are marked *