|

Garmin Smart Glide

Recently, I was training a customer who had a brand new instrument panel installed in his TBM 700. The avionics shop that did the work (Abilene Aero, who I highly recommend for any panel installs, located at KABI) told us when we picked the plane up that the new Garmin GTN 750Xi had the most recent software update, which included the Garmin Smart Glide.

I had never used the Garmin Smart Glide before, so I was eager to check it out during our training. When we got to engine failures, we pushed the Emergency button on the Home page of the GTN 750Xi, and then the magic happened.

The plane was also equipped with a Garmin G600TXi PFD and the Garmin GFC 600 Autopilot. In order for Smart Glide to work, there has to be either a GTN 750Xi or GTN 650Xi installed, along with a G500TXi or G600TXi and a Garmin Autopilot. Garmin is working on getting the legacy G500 as well as the GI 275 and G5 to work with the above GPS units for Smart Glide as well.

Here’s what happens. The plane loses it’s engine. The pilot’s workload and stress level suddenly goes way up. Trim the airplane for best glide, find the nearest airport, attempt restart. Do it quickly so you have time to focus on the glide. Oh yeah, squawk 7700 and declare your emergency. All the while plummeting toward the ground in a somewhat controlled crash. Yikes.

Garmin Smart Glide takes over the flying part, allowing the pilot to handle the restart, while making it much easier to squawk, talk and plan the engine out landing. On the home page of the GTN 750Xi/650Xi, the pilot simply taps the Emergency icon on the bottom of the screen. The Autopilot comes on and goes into IAS mode and maintains best glide while descending. The GPS immediately analyzes the Glide Advisor, and turns to the nearest airport in the glide ring (if there is no airport within gliding distance, the GTN 750Xi advises the pilot). Then, the Autopilot flies directly to the Nearest airport, allowing the pilot the ability to take attempt a restart.
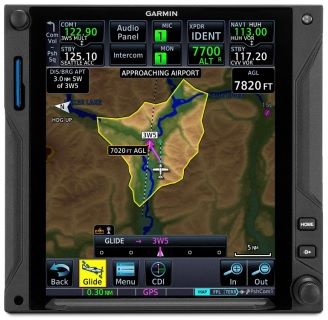
Once it is determined that the engine won’t start, the Garmin Smart Glide has excellent situation awareness tools. On all screens, the pilot is constantly being advised of how high AGL the plane is currently, while advising also of how high AGL the plane will be over the airport that the glide is set up for. There is also a short cut on the screen to tap to squawk 7700 as well as runway length information at the airport.

The Garmin Smart Glide Button wasn’t installed yet in the TBM, but that will make things even easier when it is (it will be certified in January). This is amazing technology that all Garmin GTN 750Xi pilots should have their software updated to. Remember, you have to have a Garmin Autopilot and a Garmin PFD for it all to work.


Similar Posts

  • The Avidyne Equipped Cirrus Upgrade

    A History Lesson

    11 years ago, in April of 2009, the Avidyne Corporation unveiled the much bally-hooed Release 9, or R9 as it is commonly known, as a hardware replacement for the Avidyne EX5000 Entegra system in Cirrus Aircraft. The Entegra system was way outdated by that point. Even though Avidyne was the first company to put together a glass PFD in a single engine piston airplane, the company had quickly fallen behind Garmin in keeping up with the ever changing technology landscape.

    Rewind to 2008. Cirrus had been going strong with the Avidyne Entegra since the SR20 and SR22 went to full glass in 2003 (a PFD and an MFD; prior to that, Cirrus aircraft only had an MFD with steam gauges and a Sandel Electronic HSI). Cessna, on the other hand, vaulted past the Avidyne Entegra and went straight to the Garmin G1000 in it’s aircraft, starting in 2004 with the 182 G1000 and 2005 with the 172 G1000. Beechcraft and Columbia went to the G1000 (Columbia started with the Avidyne as well) in 2005.

    Garmin’s technology in 2007 was so much better than Avidyne’s technology that Cirrus decided to switch. I’m sure there were many promises made by Avidyne to Cirrus about what Avidyne was working on (the R9), but the G1000 was out there, available, and being used in a lot of different airplanes with very good results.

    So, in 2008, Cirrus made the switch from the Avidyne Entegra to the Garmin G1000, dubbing it the Cirrus Perspective by Garmin avionics package. Avidyne finally got the R9 to market in 2009, but by that time, Piper was the only airplane manufacturer left putting factory Avidyne panels in their airplanes, and they switched to G1000 later that year.

    The R9 is a fabulous product. It’s fully integrated, has great graphics, has fully redundant displays, a QWERTY keypad (which, by the way, Garmin didn’t do for another 8 years), and a lot of other neat features. There’s a bit of a learning curve, but it’s a really good product for what it is.

    Avidyne, though, was late to the game with their technology. By the time it debuted in 2009, all the GA aircraft manufacturers had long since switched to the Garmin G1000 and weren’t looking back. That left Avidyne with the retrofit market for the many different Avidyne Entegra Cirrus aircraft out there. The only problem was, the retrofit was $80,000 ($95,000 if you wanted to throw in the DFC 100 Autopilot, which is a must have) and not many owners were up for paying that much money, then or now.

    To sum up our brief history lesson, Avidyne knew the Entegra needed to go, but couldn’t get the R9 out quickly enough to convince anyone to stick with Avidyne products. The retrofit market didn’t amount to many sales, so Avidyne doesn’t even make the R9 anymore.

    As a side note, I really, really like the Avidyne R9 and am sad that it didn’t make it into more airplanes.

    So, when the Avidyne Entegra starts to have issues, what’s an owner to do? Keep reading!

    There is Hope

    There are thousands of Cirrus aircraft out there flying with the Avidyne Entegra instrumentation, which is basically 20 year old technology (I’ve had a computer engineer tell me the programming in an Entegra is Windows 98 tech). These things are going to start having problems at some point (many already have), but what solution do owners have that is cost effective and get’s them new technology?

    Remember that little company named Garmin? Well, they have come through again. Announced this summer, the Garmin G500 TXi is now certified as a replacement in the Cirrus Avidyne Entegra equipped aircraft. This means pulling out both the PFD and MFD and replacing them with the G500 TXi on both sides. Engine data is also displayed on the G500TXi MFD, including the percent power and TIT indications, if equipped.

    Cirrus SR22 Equipped with Dual G500 TXi Screens and Dual Garmin GTN 650Xi GPS Units

    The cost for the panel? Two 10.6″ G500 TXi’s run about $16,000 apiece for the units, not including labor. $32,000 for a brand new panel isn’t terrible. Plus, the G500 TXi’s work with the DFC90 autopilot if the Cirrus is already equipped with it. If not, the Garmin GFC 500 autopilot is now approved for the Cirrus at a relatively low price of $7,000, including the servos.

    Still have the original Garmin 430s in your Cirrus? Upgraded to the Avidyne IFD 540/440 stack? Put in dual GTN 650Xi’s? Put in a GTN 750Xi? All are compatible with the G500 TXi panel.

    Want to upgrade everything? It does get kind of pricey at that point, but for just equipment, the cost for a complete panel conversion is somewhere in the area of $65,000 plus labor, still below what the R9 cost, but not cheap either. That would include 2 G500 TXi’s, 2 GTN 650Xi’s, a GFC 500 Autopilot, and all the engine monitoring equipment that the G500 TXi would need.

    Cirrus SR22 Equipped with Dual G500 TXi Screens, a GTN 750Xi, and a GTN 650Xi

    Thankfully, some new technology has finally come to the Generation 1-3 Cirrus. Oh, and by the way, your steam gauge Cirrus is fully upgradable as well.

    Want to read more? Check out Garmin’s website.

  • Breathing…It’s The Difference in Engine Performance

    The PT6 engine that’s found on the Jetprop and Meridian is designated a -21, -34,-35, or a -42A.  The Continental engine on a Malibu is either a TSIO 520 or a 550.  What’s the difference? Why should I care? Most pilots don’t understand the difference, but it’s pretty easy to understand…and it’s all about breathing.

    Whether a piston or a turbine, the engine has a ratio of fuel/air that works best.  For a piston model, we can make adjustments to this ratio by adjusting the mixture.  In climb we use a richer ratio to help cool the engine, and in cruise we lean the mixture to save fuel since we don’t need the extra fuel for cooling (due to higher speeds which cools the engine). In the turbine, the ratio is set and there’s nothing that can be done about it…except climb to a higher altitude.  But, more about that in a second..let’s go back to the piston discussion…

    Piston: A Continental 520 engine and the 550 engine are flown exactly the same.  On takeoff, both will develop 310HP (38″MP with the 520, 35.5″MP with the 550).  So, why would a pilot want a 550 in his airplane as opposed to a 520?  The answer is breathing.

    A 520 is named appropriately because the engine displaces 520 cubic inches of air with each complete cycle of all 6 cylinders.  To determine the displacement, just figure the bore (diameter of the cylinder) and the Stroke (how far the piston travels in the cylinder) and plug the numbers into this formula:

    CID = Bore X Bore X 0.8754 X Stroke X # of Cyl.

    Here’s the bore and stroke of the Continental 520 and 550 engine:

    TSIO 520:  Bore = 5.25″ and Stroke = 4″
    TSIO 550: Bore = 5.25″ and Stroke = 4.25″

    So, you can see the two engines are exactly the same except the 550 has a little longer stroke, and therefore displaces a little more air.  Said another way…it the sucks the air into the engine a little better.

    So, with this knowledge, the ability for the engine to breathe becomes a little more clear.  Both a 520 and a 550 will perform exactly the same until the point that a 520 simply cannot suck enough air and begins to develop less MP as a result.  For most 520 engines, this will happen somewhere around 18,000 ft.  But, it is dependent upon a myriad of factors including: health of the engine, altitude, temperature, and atmospheric pressure. When the 520 hits this point, the throttle can be full-forward, but the engine will not develop full MP, but some number that is less.  I’ve seen a max MP at FL250 in a 520 Malibu to be about 31″MP.  So, you can probably guess that the rate of climb will correspondingly suffer as the engine develops less MP.  How do we fix this problem?  Enter the 550…

    Since the 550 displaces more air, the engine will maintain max MP to a higher altitude.  When the 520 begins to develop less power at about FL180, the 550 engine will be able to continue to maintain 35″ at a higher altitude.  Make no mistake…the 550 will also hit an altitude where is cannot develop 35″MP, but this altitude will probably be nearly FL220.  So, the 550-powered Malibu will reach cruising altitude faster than the 520.

    But, at cruise both engines are pulled back to 30″MP.  So, either engine will deliver the same cruise speed because they are both able to develop 30″MP at any altitude.  Does it really matter if you’ve got a 520 or a 550 engine?  Answer: not much.  Both are excellent engines and both will deliver the airplane to the destination, but if the chosen altitude is above FL180, the 550-powered airframe will probably arrive a few minutes earlier.  Which would I want if I were purchasing an airplane?  It’s not a big enough deal, IMHO.  I’d select the best airframe/engine/prop combination and not put much weight into the 520 vs. the 550.

    Turbine world: So, how about the -21, -34/35, and -42A compare?  Here, there’s  big difference, but it’s still all about the breathing.  A -21, -34/35, and -42A are all derivatives of the famous PT6 family of engines, and all are designed to be 1000+SHP engines de-rated to fit the airframe.  For instance, the -42A engine is 750SHP when mounted on a King Air 200, but the same engine is derated to 500SHP when mounted on the Meridian.  Ditto with the -21 and -34/35 engines…all are de-rated.  So what’s the difference? Breathing…

    At the lower altitudes all will develop their maximum rated SHP, meaning they will all develop maximum torque.  And, down low there’s plenty of air to breathe so the engine has no problem developing that torque at a low ITT.  But, as altitude is gained, the engine must suck more air to develop the same torque, and the ITT goes up.  At some point in the climb (depending upon altitude, temperature, pressure, and IAS) the engine will not be able to produce max torque without exceeding Max ITT.  At this point, the engine cannot breathe any more (suck in anymore air), and the power (torque) developed falls off.  With the -21 engine, the power falls off quite dramatically because the engine simply cannot breathe well.  It is a smaller engine and more air cannot be forced into the compressor section.  For the rest of the climb the engine is “ITT limited” and the performance will suffer.

    The -34/35 engine is a little bigger and will develop maximum power (torque) to a higher altitude.  And, when the torque does drop off (as altitude is increased), the rate of decrease is less because it can breathe easier due to it’s larger size.  Guess what? The -42A will beat out the others and develop max torque to an even higher altitude.  With this decrease  in torque available also comes a welcome friend…less fuel burn.  Altitude is the friend of any turbine pilot, and he/she will climb to the highest altitude possible to save on fuel.

    The end result is the -21 powered Jetprop will cruise at 238 KTAS (in the summer) with a fuel burn of only 28gph.  The -34 will have higher torque than the -21 and will develop more SHP and will have a higher cruise (260 KTAS in the summer) with a correspondingly higher fuel burn (32gph).  The -42A will be breathing easily at higher altitudes, and will develop the most torque, but with a fuel flow of 39gph.  The Meridian (with the -42A) will not out-perform the -34/35 Jetprop in cruise purely because the Meridian is much heavier.

    Just remember…fuel flow in a turbine is always commensurate with its ability to breathe and a turbine’s ability to breathe is a function of the engine’s ability to breathe.

    With this knowledge…let’s check your understanding.  Answer this question: Will a Jetprop cruise faster in the summer or winter?  Remember, cold air is more dense than warm air, and an engine will develop power according to it’s ability to suck in air.  More air available, more power available.  Answer: Winter.

    A good analogy: I’m a Cross-fitter (meaning I do crossfit workouts a lot).  In the gym we have various workouts that test a person’s ability to perform.  Guess who usually does the best?  Right…the guy who can breathe the best.  A person is nothing more than an engine…we intake air and combine it fuel and burn it to develop energy.  In Crossfit, the person with the biggest engine (muscles that can develop power) that can sustain power (good aerobic capability) will win almost every time.  The only variables then are genetics (how well-made is the engine), flexibility (you’ve got to be able to get into the position), and skills (there are more efficient movements).  A good Crossfitter will work hard on mobility, skill, and try to increase the bodies ability to increase capacity through a tough workout.

    To get maximum performance, the pilot cannot change the engines skill or mobility (at  least not without an engine change!), but a thorough understanding of the how the engine breathes will help him/her use the power that is available to the fullest.

    Joe Casey’s aviation story began in 1990 with his first flight near Nacogdoches, TX in a Cessna 172. From lift-off, Joe knew he would have a lifetime passion flying just about anything that will leave the ground…He was completely hooked.

    Along with being an FAA Designated Pilot Examiner (DPE), Joe is an ATP/CFI-AHMG and Commercial Rotorcraft/Glider Pilot in the civilian world and also a UH-60/AH-64 Pilot-in-Command/Instructor/Examiner Pilot in the US Army Reserves.  His passion for the last 19 years, however, has been the PA-46 Malibu/Mirage/Matrix/Jetprop/Meridian. Has has amassed over 6,500 hours in various PA-46 airframes and believe it to be one of the finest flying machines available for the serious cross-country pilot with an eye for efficiency.

    Now, Joe has flown more than 12,200 hours in just about every imaginable environment. Whether providing initial/recurrent training in the PA-46’s, TBM’s, instructing in NVG’s in a UH-60 Blackhawk, flying the King Air series of airplanes, giving tailwheel endorsements, or taking kids flying for the first time, he simply loves flying machines and the people who fly them.

  • Determining Pattern Altitude

    Figuring out the pattern altitude at an airport should be pretty simple, right?  But, in this day of helpful technology, most pilots actually get it wrong.  How can you always get it right?  Well, it just takes about an extra 15 seconds.  Here’s how.

    Traffic Pattern
    John Wayne Airport Traffic Patterns

    As outlined in the Aeronautical Information Manual, section 4-3-3, “traffic pattern altitudes for propeller-driven aircraft generally extend from 600 feet to as high as 1,500 feet above the ground.”  Further, in the Pilot’s Handbook of Aeronautical Knowledge on page 13-10, it states:  “1,000 AGL is recommended pattern altitude unless established otherwise.”

    Okay, so for piston driver’s, we’ve got it narrowed down to 1,000 AGL (Above Ground Level for those who don’t like acronyms).  But wait!  There’s that very important phrase at the end of the last quote:  “unless established otherwise.”  That means not all airports have traffic pattern altitudes of 1,000 AGL, or else they wouldn’t put that line in there!

    How do you find out what the TPA (Traffic Pattern Altitude) is for a certain airport if it’s not 1,000 AGL?  Great question!  Your first guess is probably to look on Foreflight.  Though this is a good start, it is not the full answer.

    Let’s use an example.  Look up KAQO, the Llano Airport on Foreflight.  At the top of the page, the airport elevation is stated as 1,101′ MSL and the pattern altitude is stated as 1,902′ MSL.  From what we just learned, 1,902′ MSL is not 1,000 AGL, so is 1,902′ MSL otherwise established?

    On the Airports page with KAQO pulled up, tap the A/FD tab, second to last on the left.  Scroll down to Llano Muni.  Read the whole entry.  Does it state in the entry that pattern altitude is different than 1,000 AGL?  It sure doesn’t.  So, because it is not otherwise established, pattern altitude at KAQO is 2,102′ MSL not 1,902′ MSL.

    Where did Foreflight get that?  I have no idea.  Too often, though, pilots look at the Foreflight pattern altitude and don’t actually check the Airport Facilities Directory (A/FD).  Then, they get the pattern altitude wrong.

    What does it look like when pattern altitude is otherwise established?  Look up KSGR, Sugar Land Regional, on your Foreflight app.  Foreflight states the elevation as 82′ MSL and the Pattern Altitude as 1,000′ MSL.  Is this correct?  Well, tap that A/FD button again and let’s find out.

    On the second line of the A/FD entry, it says TPA-See Remarks.  Down in the remarks section, we find the following:

    TPA-1000 (918) single engine piston acft, TPA-1500 (1418) for twin and turbojet acft, TPA-500 (418) for helicopters within 2NM.

    Foreflight got it right this time for single engine pistons, but if you are in a twin, the pattern altitude is different.  What’s the lesson here?  Always check the A/FD and don’t always go by what Foreflight says.  The A/FD is always right and usually has a little more detail to help set you straight.

    One last thing.  Both the AIM and the Pilot’s Handbook of Aeronautical Knowledge, when talking about pattern altitude, state, “When operating at an airport, traffic pattern altitudes should be maintained unless otherwise required by the applicable distance from cloud criteria in…section 91.155.”  91.155 defines basic VFR weather minimums.  So, to fully interpret what the AIM is saying, we have to take into account the type of airspace we are in to determine if we can safely and legally operate at pattern altitude at a particular airport.

    For example, let’s say we are at KCVB, the Castroville Airport.  Pattern altitude there is 1,602 feet, which is 829 AGL.  CVB is Class G airspace up to 700 AGL, then Class E above that.  Let’s say there is a 700 AGL broken cloud layer.  Pattern altitude is 829 AGL, so you won’t be able to get up that high with a broken ceiling.  What altitude can you do pattern work at to stay legal?

    Class G VFR weather minimums during the day below 1,200 AGL is 1 SM visibility and clear of clouds.  So, legally, you could fly at 699 AGL (which at CVB would be 1,472 MSL) while in the pattern and be legal.  Safe?  Maybe, but probably not if you are skimming the base of the clouds.  Is 1300 MSL a safer pattern altitude in this example?  Well, that is 527 AGL, so probably not, since towers tend to stick up that high sometimes.

    Let’s go back to KSGR and put a 1,000 AGL overcast ceiling there.  SGR is Class D airspace and we already determined pattern altitude there was 1,000 MSL for piston singles.  VFR visibility and cloud clearance requirements in Class D airspace are 1,000 feet above clouds, 500 feet below clouds, and 2,000 feet horizontally from the clouds with 3 SM visibility.  In order to stay 500 feet below the clouds, you would be flying a 582 MSL pattern.  Safe?  Probably not, though it is legal.

    To summarize, don’t take Foreflight’s word for pattern altitude.  Cross reference the A/FD (it only takes 15 seconds at the most) to verify.  If it’s cloudy, it’s really best to stay on the ground, but if you want to find out your legal pattern altitude with a cloud deck, cross reference 91.155.  I don’t recommend flying below pattern altitude because it is there for a reason.

  • Garmin Perspective Missed Approaches

    Are you a Cirrus pilot with a Garmin Perspective?  Still can’t figure out the use of the go around button?  Read on!

    When it comes to flying an instrument approach, we as pilots are assuming we are going to land.  Most of the time, we won’t even take off if the ceilings or visibilities are below the minimums for an approach.  95% of the time, we do land.

    There is the other 5% of the time when something unexpected happens, whether we get a full scale deflection, or we don’t see the runway at the published minimums, and we have to perform a missed approach.

    When instructing, missed approach procedures are actually what I see the most deficiency in when instructing an instrument rated pilot.  It’s not necessarily configuring the airplane for a missed approach procedure, it’s the button pushing involved in setting up the GPS properly.  When a pilot isn’t proficient in the button pushing, that button pushing distracts the pilot from actually flying the airplane, which can lead to a dangerous situation.

    I am going to spend a few articles on flying a missed approach with different GPS and different autopilot configurations.  Today, I will be addressing the Garmin Perspective with a GFC 700 Autopilot, which is what all Cirrus Aircraft after 2009 are equipped with.

    The Garmin Perspective Missed Approach Procedure

    Once the decision to execute a missed approach has been made, here is the step by step procedure:

    • Full Mixture and Full Throttle
    • Simultaneously push the Go Around button on the underside of the throttle.  This does the following:
      • Sets the Garmin Perspective Flight Director to Go Around Mode (7.5 degrees pitch up and wings level)
      • Takes the Garmin Perspective GPS out of Suspend Mode
      • Switches the CDI back to GPS mode if it is in a different mode
      • Garmin Perspective with GFC 700 Autopilot stays on
    • Flaps up
    • Confirm airplane is climbing
    • Set altitude bug for missed approach altitude (assuming it isn’t there already)
    • Set NAV mode and IAS mode on the Garmin Perspective GFC 700 Autopilot

    Garmin perspective

    That’s it.  When Garmin and Cirrus got together to create the Garmin Perspective with the GFC 700 Autopilot, they tried to make as simple but robust system as possible.  Once you have the procedure down for the right buttons to press, then the procedure is relatively straight forward.

  • AOPA Rusty Pilot Seminar in San Marcos

    “AOPA Rusty Pilot presented by AOPA Ambassador Pat Brown at Tempus Training Solutions”
    Topic: A Rusty Pilots Seminar
    On Saturday, July 16, 2016 at 09:00 Central Daylight Time
    Location:
    Tempus Training Solutions
    2080 Airport Dr.

    San Marcos, TX 78666

    Select Number:
    EA2769634

    Description:

    Life may have gotten in the way, but the dream of flight can be yours again. Returning to the skies is not as difficult as most rusty pilot think. We’re inviting you back in the cockpit and will help you get there. Come and participate in a FREE Rusty Pilot program with fellow lapsed pilots. We will help you understand what’s changed in aviation since you’ve last took the controls and brush up on your aviation knowledge. The Rusty Pilot program is developed by AOPA in partnership with local flight training providers in order to create the best environment for getting you back in the air and a part of the general aviation community.

    It is easier than most people think:

    • No FAA checkride or test
    • Medical may not be required

    As a Bonus, by attending, you get two to three hours of free ground instruction towards your flight review!

    Register Now!

    https://ww2.eventrebels.com/er/Registration/StepRegInfo.jsp?ActivityID=16910&StepNumber=1

    To view further details and registration information for this seminar, click here.

  • Night Flying

    Ah, fall is finally here.  In Texas, it arrived about a month late, but showed up with a vengeance.  A strong cold front caused a 40 degree temperature drop in 12 hours earlier this week, bringing rain, lower freezing levels, and lots of wind.

    Fall means cooler temps, but fall also means less light.  The sun begins to set sooner, plus the fall back time change in November cause darkness to spring upon an unaware pilot.

    Before getting in to too many night landings tips, just a friendly reminder, passengers can only be carried at night if the PIC has completed 3 takeoffs and landings to a full stop in the last 90 days during the time period of 1 hour after sunset to 1 hour before sunrise.

    Lots of us have been landing long before sunset for most of the past couple of months, so those night flying skills might be a little rusty.  The best way to remedy night flying rustiness?  Call an instructor and go get some practice.

    In the meantime, here are some tips as to what to expect for your next night flying experience.

    1. Your Eyes Are Very Important.  This may seem like an obvious statement, but night vision can be affected by many things.  Before you takeoff, you want to make sure you can see in the dark.  The FAA recommends no bright lights 30 minutes prior to takeoff.  They also recommend using oxygen at night as this greatly improves night vision, even at low altitudes.  Use off center viewing to help spot traffic or other objects in the air.  Finally, when preflighting, use a red flashlight as much as possible, but if you do have to use a white light, close one eye to keep one eye from being blinded.
    2. Utilize Approach Lights on Landing.  Night landings are very different then day landings.  It is very difficult to get the proper depth perception, not too mention see obstacles below you on your final approach to a runway.  PAPI’s, VASI’s, and instrument approach glide slope’s become very important.  If you are VFR only pilot, if your airport has a PAPI or a VASI, keep 2 white and 2 red (or 1 white and 1 red) lights.  If you see 3 red (or 2 red), climb.  If you see 4 red, definitely climb.  If you are an IFR pilot, I highly recommend always flying an approach at night.  What if your airport doesn’t have a PAPI, VASI, or approach with a glide slope?  You might not want to utilize it at night.  One side note on VFR flight: Clouds are nearly invisible at night.  If you do fly into a cloud (a clue is your strobe lights start reflecting back at you), don’t panic.  If you have an autopilot, turn it on and execute a 180 degree level turn.  If you don’t have an autopilot, start scanning your instruments, keep your attitude indicator blue side up, and make a shallow 180 degree while maintaining altitude.  Then call ATC, advise them what happened, and ask for help.  One more note:  I highly recommend that if a pilot finds that he/she will fly at night at lot, get an instrument rating and fly IFR at night.  It’s much safer.
    3. Practice Landings Before Carrying Passengers.  The tendency when landing at night is to level off too high before flaring, causing the airplane to bleed off speed and energy too high above the runway.  This can lead to a stall, a hard landing, and/or too high of a pitch attitude at touch down causing a tail strike. A good tip is start your level off when you can see the tire marks on the runway.  Make sure you practice night landings, preferably with an experienced instructor who is night current and proficient, before carrying any passengers on board, even if you are night current, but haven’t landed at night in a while.
    4. Night Emergencies.  For engine failures at night, you are very limited on options.  Unless you have a Cirrus equipped with a CAPS parachute system, you really have two options if an airport isn’t within gliding distance.  Find a wide, lighted road that appears to be lightly trafficked.  A word of caution, though:  be careful of light poles, fences, concrete medians, cars, and buildings.  The LA freeway would not be a good option (though there are exceptions to this rule as is evidenced by the picture below).  The second option is find a dark spot and pray it’s a field (or the Hudson River).  As you get closer, you can turn your landing light on to see what the ground looks like.  If it looks good, keep the light on and continue.  If you don’t like what you see, turn your landing light off and continue….

    Flying at night can be the best time of day to fly.  It’s usually smoother, cooler, and you get to see all the city lights.  It is a very different environment, however, so make sure to get some training before darkness settles in on your next trip.

Leave a Reply

Your email address will not be published. Required fields are marked *