For those of you who frequent the Houston area, make sure to check your NOTAMs. The Houston Executive Airport (KTME) in Katy recently opened a control tower. The Houston Executive tower information won’t show up on the sectional chart till the new chart comes out in the spring. The only way to get the information about the tower and the airspace will be via NOTAMs or when the new Airport/Facilities Directory comes out on November 3rd. The tower opened October 1st.
According to AOPA, the airspace will remain Class G around the airport, even though there is a control tower in place. Since the Houston Executive tower is there, it will be mandatory to contact the tower when passing through the airspace. KTME’s airspace stretches up to 2,000 feet MSL and goes out to a 4 sm radius around the airport. It is a VFR Only tower, so the controllers do not have radar.
The tower is open from 6am-10pm, local time, 7 days a week.
Sometimes, it’s hard to find a good shop that does quality work and communicates well without charging a fortune. Luckily for the PA46 owner, there are lots of good options. Here are the Texas Top Aviation recommended Piper PA46 maintenance shops.
Lubbock Aero (KLBB)/Abilene Aero (KABI)-Texas
Lubbock Aero and Abilene Aero are owned by the same company. Both are Piper service centers. I have had some Piper PA46 maintenance interactions with Chad at Lubbock Aero over the last year and have been impressed.
The folks at Lubbock Aero are friendly, knowledgeable, and keep the customer abreast of what’s going on with their airplane. I haven’t been to Abilene Aero, but I suspect that the same quality of service exists there as well.
Chuck’s Aircraft (KEDC)-Austin, TX
Chuck’s Aircraft has been a Cirrus Service Center for a number of years. Recently, Chuck’s put several mechanics through Kevin Mead’s M-Class which educates mechanics on the ins and outs of Piper PA46 maintenance. Chuck’s is a great, convenient spot to get your PA46 worked on.
First Line Aero (KJSO)-Jacksonville, TX
Located on the same airport as Casey Aviation, First Line Aero specializes in Piper PA46 maintenance. Walking up to their hangar, it’s loaded with Malibus, Mirages, JetProps, and Meridians. Charles Crossman, the owner, has been turning wrenches for a lot of years. Anyone recommended by Joe Casey has a stamp of approval in my book.
Midwest Malibu (KHUT)-Hutchinson, KS
One of 2 nationally renowned PA46 shops, owners bring their PA46s from all over the country to Midwest Malibu. Owner Tony Beauchamp has personally assisted multiple of my customers when they have gotten in AOG situations with their PA46s.
Des Moines Flying Service (KDSM)-Des Moines, IA
I have not had any direct interaction with Des Moines Flying Service, but I have several customers who have. The reviews have all indicated knowledgeable mechanics, good work, and good communication.
Malibu Aerospace (KANE)-Blaine, MN
Malibu Aerospace (the second nationally renowned Piper PA46 maintenance shop) has done many great things for the PA46 line of aircraft. From the M1 Cooling Mod that alters the lower cowl and add baffles for cooling air getting to where it needs to go, to the M5 TSIO 550C upgrade for the original PA46-310P, the Malibu Aerospace guys know what they are doing with the PA46.
Hetrick Aviation (KTOP)-Topeka, KS
I recently learned about Hetrick Aviation in Topeka. I met a customer there to pick up his plane where it was having a pre-buy and annual done. Keith Hetrick, the owner, has worked on a lot of PA46 airplanes and was very knowledgeable in my discussions with him. He is also a pilot, so he flies each airplane after maintenance is done to make sure no bugs are present when an owner picks it up.
Those are the Texas Top Aviation recommended PA46 shops. Have another one to add? Post in the comments below and we’ll get it added to the list.
On the evening of November 3rd, 2015, I was returning to my home airport of Lancaster from Pittsburgh in my company’s Aerostar, after being out on charter all day. It was dark out as I entered the traffic pattern at Lancaster. After an uneventful approach, I was cleared to land behind a Mooney. The spacing looked good as I turned final, but, as I was nearing the threshold, I started to become concerned that the Mooney wouldn’t be clear of the runway in time for me to land. At that moment, over the radio I heard an uncomfortable transmission from the Mooney pilot: “Tower, Mooney ABC has landed gear up.”
It took the tower controller a minute to grasp what was going on, and I was on about a 1-2 mile final when I was instructed to go around. Thankfully, the Mooney came to a stop in such a position that I was able to use the other intersecting runway, and was on the ground only a few minutes later. I can assure you, however, that I’ve never checked my “3 green” so many times in one traffic pattern as after that incident. Thankfully, no one was hurt, but there sure was an impressive amount of emergency equipment on the runway as I taxied back to my hangar.
In aviation, there’s a saying that goes: “There are two types of pilots. Those who have landed with their gear up, and those that will.” I don’t like that saying. The potential of a gear up landing (as a result of pilot error) is something that has always been a risk that I have worked hard to avoid. Not only is a gear up landing embarrassing; but it’s also an extremely expensive black mark on any pilot’s career.
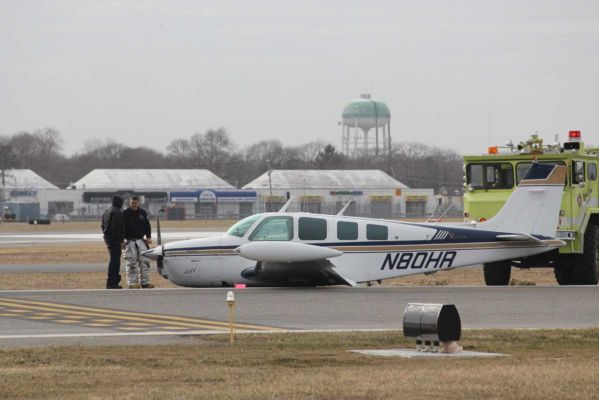
Not a good day. (Photo credit: http://www.newsday.com/long-island/suffolk/plane-lands-at-republic-with-no-wheels-1.2735131)
According to a July 2006, article in Aviation Consumer, the estimated cost of repairs following a gear up landing for an A-36 Bonanza would be about $27,000 and about 3 weeks of down time. 25 years ago, even my beloved E33 Bonanza was the victim of a gear up landing. While it was neither me nor my dad flying our airplane that day, the event stays in its history and reduces its value should the time ever come to sell it.
That incident in 1990 resulted in approximately $25,000-30,000 in repairs. The cause of the incident was classic: the pilot put the gear down at the normal time, but then had his downwind extended by tower. He brought the gear back up to fly the longer downwind, but forgot to put it back down later when he was cleared to land. Like many pilots, he had a set routine time when he normally put the gear down, and when his routine was changed, he didn’t remember to lower the gear once more.
Unfortunately, no matter what experience level one may be at, no pilot is immune to the possibility of such a mistake. The following are 5 tips that I have learned in my time flying that have helped myself and others minimize the chance of a gear-up landing occurring:
Know your aircraft systems: What are the operating perimeters on your airplane’s gear warning system? Most airplanes have a designated speed or power setting at which the gear warning horn will sound in the event that the gear isn’t down and locked. In the Aerostar that I was flying, the gear horn was supposed to come on at 15” of manifold pressure with the gear up, but in practice, it didn’t come on until much lower than that. It has since been adjusted, but at the time it was important for me to know that if I had left the gear up, the horn wouldn’t have sounded in a timely enough manner for me to go around, much less lower it prior to touchdown. Most likely it would have just added to the noise of metal on concrete as I pulled the power all the way back in the landing flare.
Don’t override gear-up warning systems: They were put there for a reason! Even if you’re out doing maneuvers and the horn is blasting in your ear for half an hour, resist the temptation to simply pull the circuit breaker or push the warning silencer to make it shut up. If a pilot disables the gear-up warning horn and then later forgets to put the gear down on landing, he or she will have a much worse headache on their hands than the one that the horn would have given them.
Use your checklists and memory items: It doesn’t matter how much a pilot knows about his or her airplane, or the procedures for it. Distractions happen. Mistakes Happen. Always consult the checklist for confirmation that you’ve accomplished all the essential tasks before landing. Additionally, if you haven’t already, work on developing call outs which you perform out loud regardless of whether you are alone in the airplane or not. Whenever I’m landing an airplane, I start with my flows, go through my GUMPS (Gas-Under carriage- mixture- props- seat belt) checks, then do the printed checklist, and finally when on short final I call out “short final, cleared to land, three green.” I’ve had several passengers tease me about doing the “three green” call out while I was flying aircraft that didn’t have retractable landing gear. But, I’d much rather be in the habit of checking every time regardless of what I’m flying than forgetting to check when it is necessary.
Use your available resources and develop healthy habits: If I have someone riding with me, I generally ask them to confirm that there are 3 green lights glowing on the instrument panel. Even if that person isn’t a pilot, they will probably enjoy the opportunity to be involved, and it’s a good way for me to stay in the habit of checking the gear lights to ensure that everything is properly down and locked. I’ve also found that intentionally leaving your hand on the gear lever until you have gear safe lights is a good idea. Forcing yourself to keep your hand on the handle until you have the all important lights obligates you to actually observe the indications instead of simply throwing the lever and moving onto something else. This way, if you only get an indication of 2 greens you’ll be aware of it right away and have more time to respond appropriately. It also helps you to learn the normal length of time it takes for the gear to extend or retract, which will be helpful to you to be aware of any abnormalities in the gear system.
Upgrade your aircraft’s gear-up warnings: There’s a variety of ways you can improve your aircraft’s ability to warn you of a potential gear-up landing. For student pilots or pilots new to complex aircraft, it could be something as simple as a red post-it note on the panel to remind you to verify the gear position prior to landing. Or, if you own an aircraft that doesn’t have an effective way to warn the pilot of a gear-up landing, consider investing in an aftermarket gear-up warning system – surely the extra price of such an upgrade is a small amount next to the cost of repairing the damage from a gear-up landing!
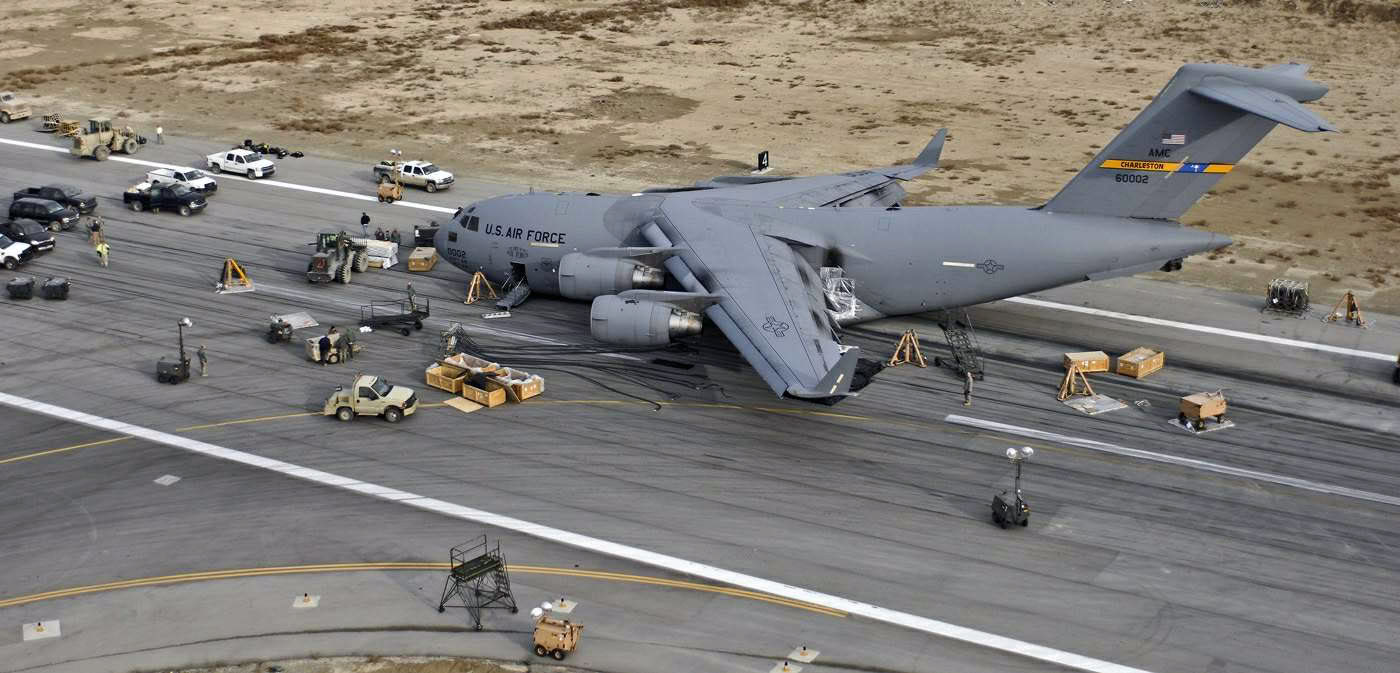
It can happen to anyone! The gear handle in this C-17 was in the “UP” position. (Photo Credit:https://theaviationist.com/2009/02/09/c-17-gear-up-landing-in-bagram-images/)
Always remember, regardless of experience, no pilot is immune to the possibility of a gear up landing. The best way to safeguard yourself is to discipline yourself in the use of flows, checklists, and call outs. Things like gear warning horns, visual reminders, and other systems are a useful back up, but they shouldn’t be relied upon to save your bacon if you don’t get the gear down at the proper time. Fortunately, in most gear up landings, the pilot and passengers are able to walk away uninjured – but that doesn’t lessen the embarrassment or financial burden of the event. So, keep your chin up, your gear down, and remember….THREE GREEN
The Garmin GTN 750 is an awesome piece of equipment. Garmin tried to make the user interface with the touch screen as simple as possible (though there still is a bit of a learning curve when moving up from a Garmin 530W). Garmin also integrated several key features that the 530W did not have that makes flying with a Garmin GTN 750 in IFR all that much better.
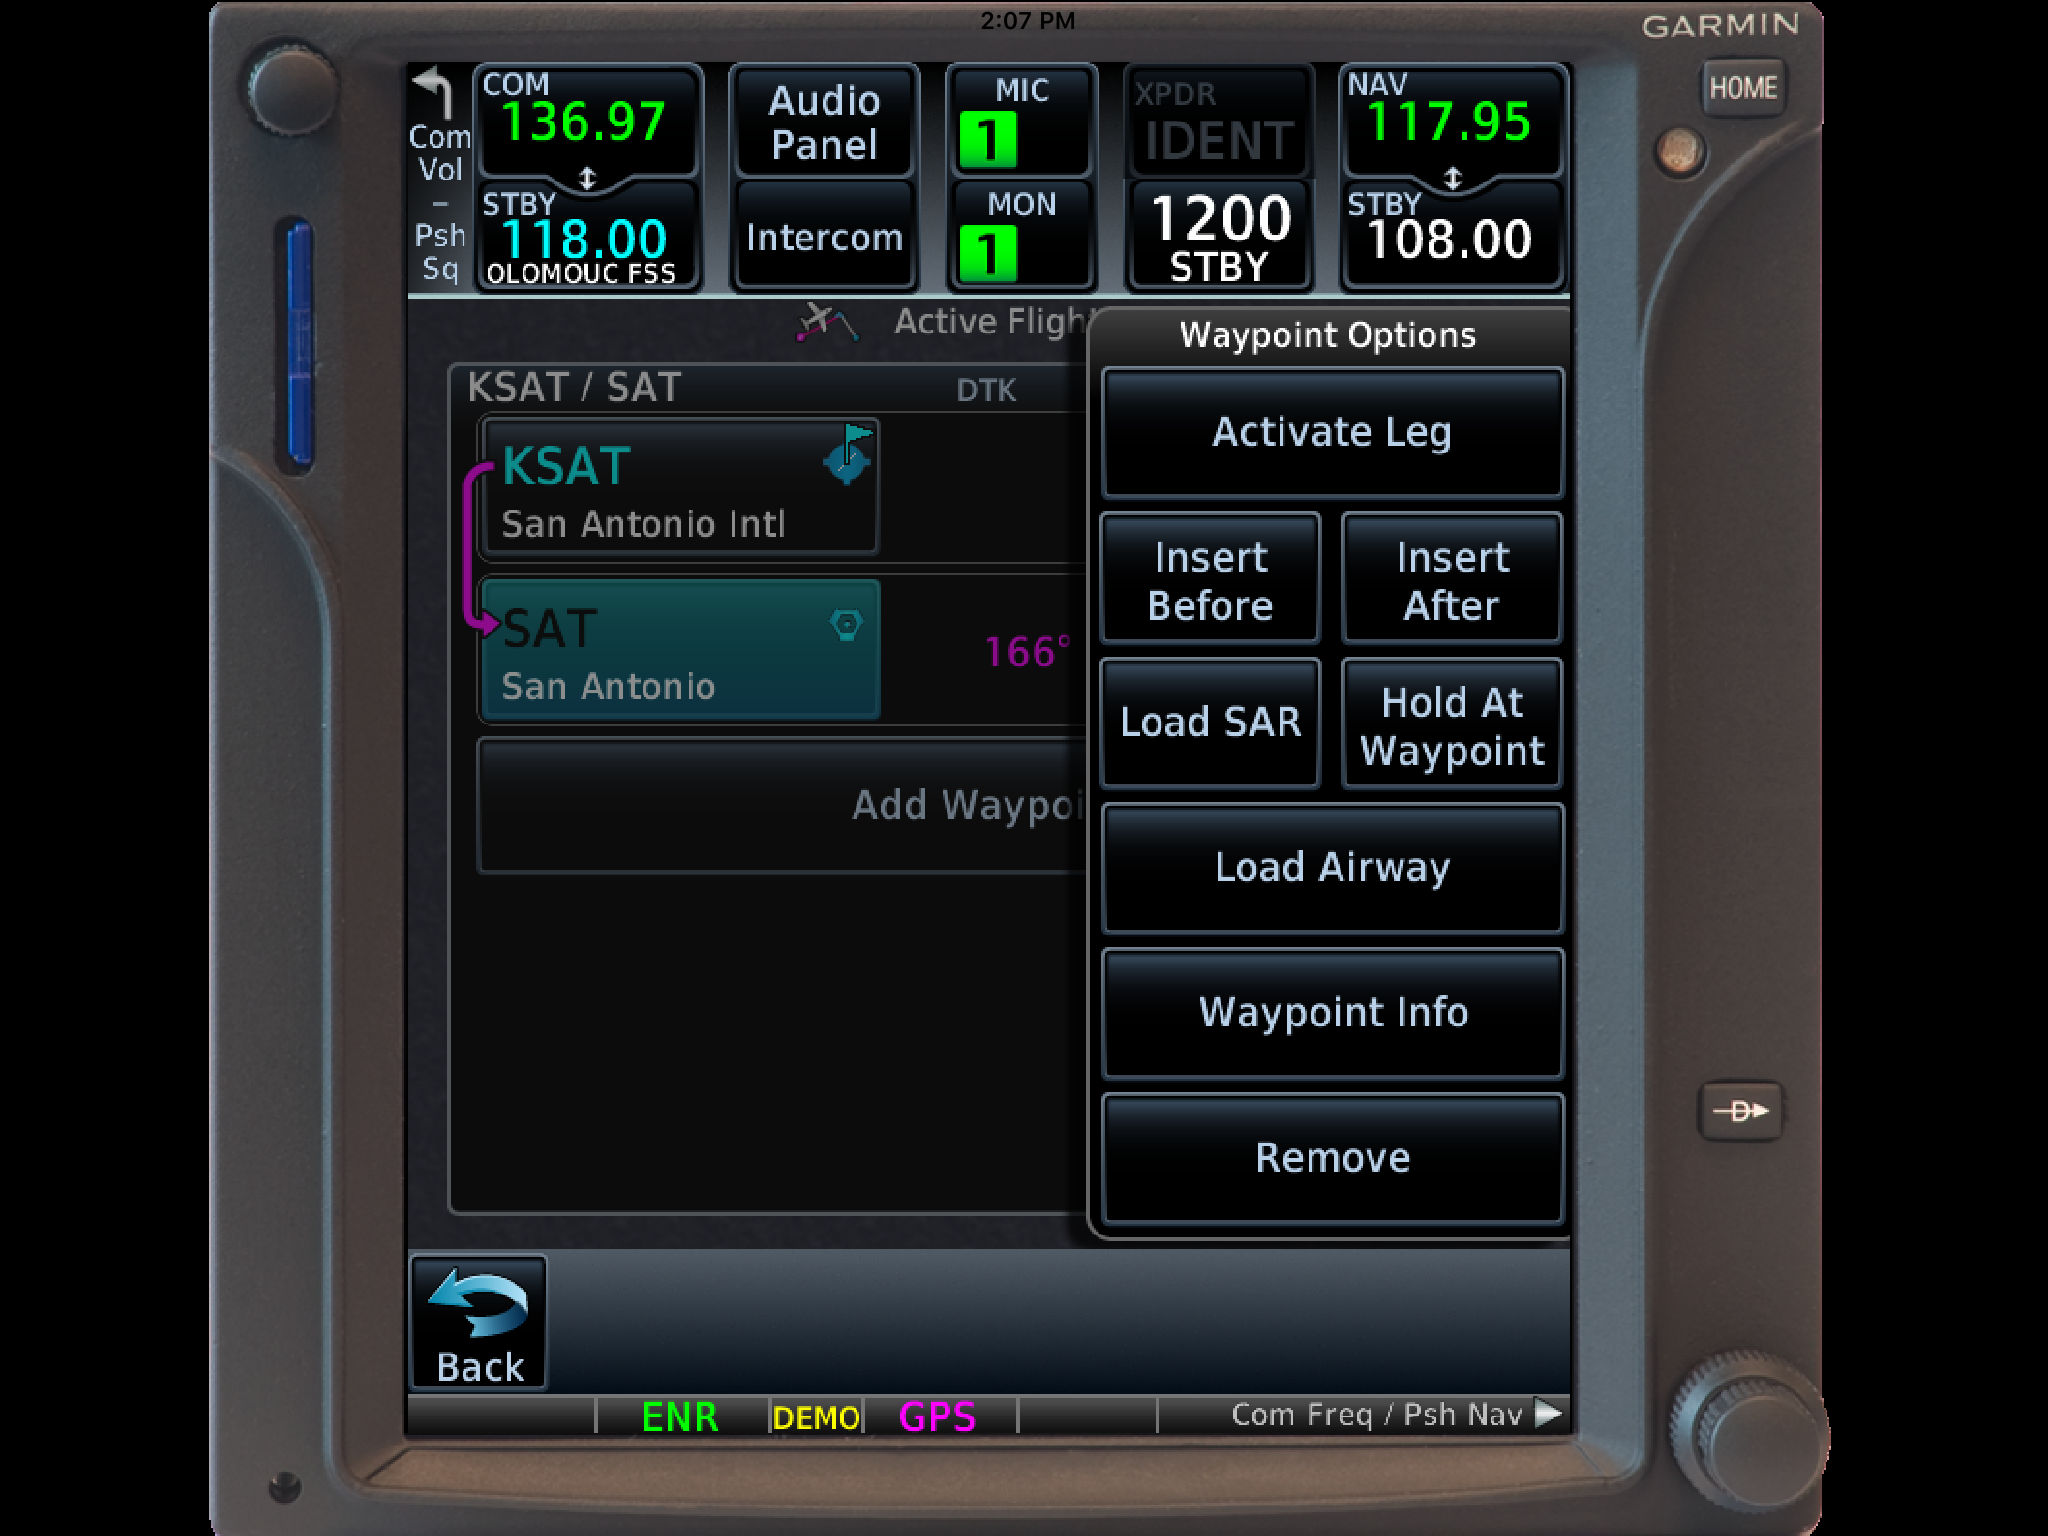
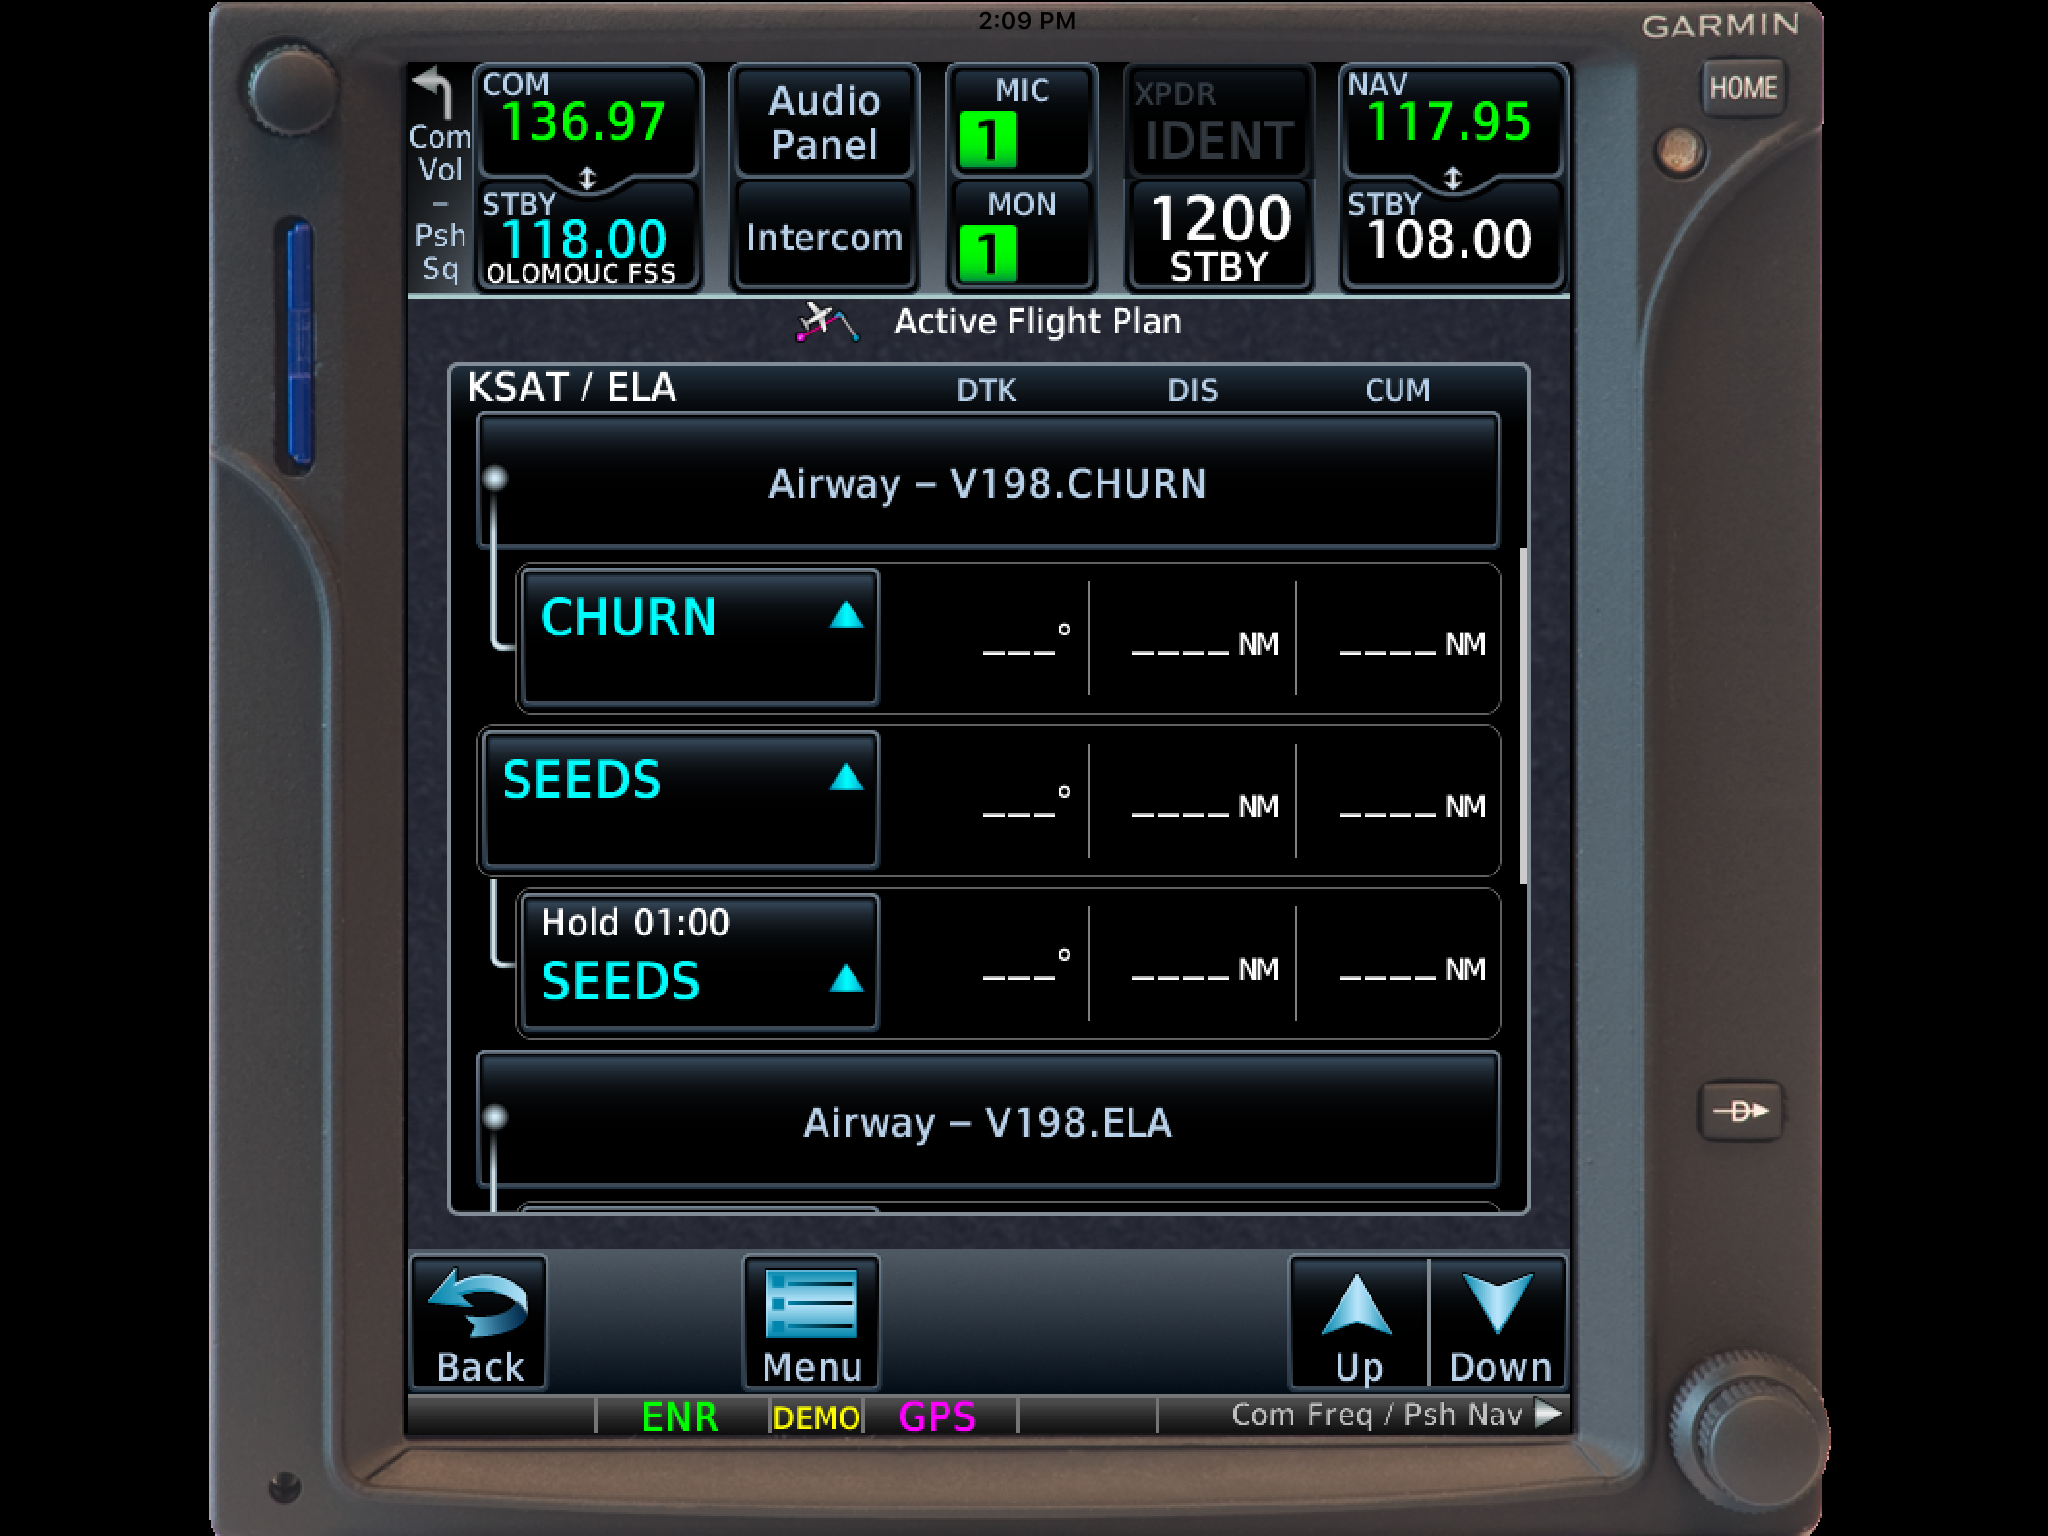
The two features of the Garmin GTN 750 I want to focus on today are the “Load Airway” feature and the “Hold at Waypoint” feature. If a pilot isn’t looking for these specifically, they can actually be a bit hard to find. The “Load Airway” feature is especially handy when flying IFR long distances with several airways as part of the clearance. Here’s how to utilize both.
Load Airway
On your flight plan page, insert the waypoint that you will be joining the airway, or, if your clearance was radar vectors to join an airway, then insert the waypoint on the airway that begins the leg you will be joining on.
Tap the waypoint you just inserted.
A menu will pop up. Tap Load Airway.
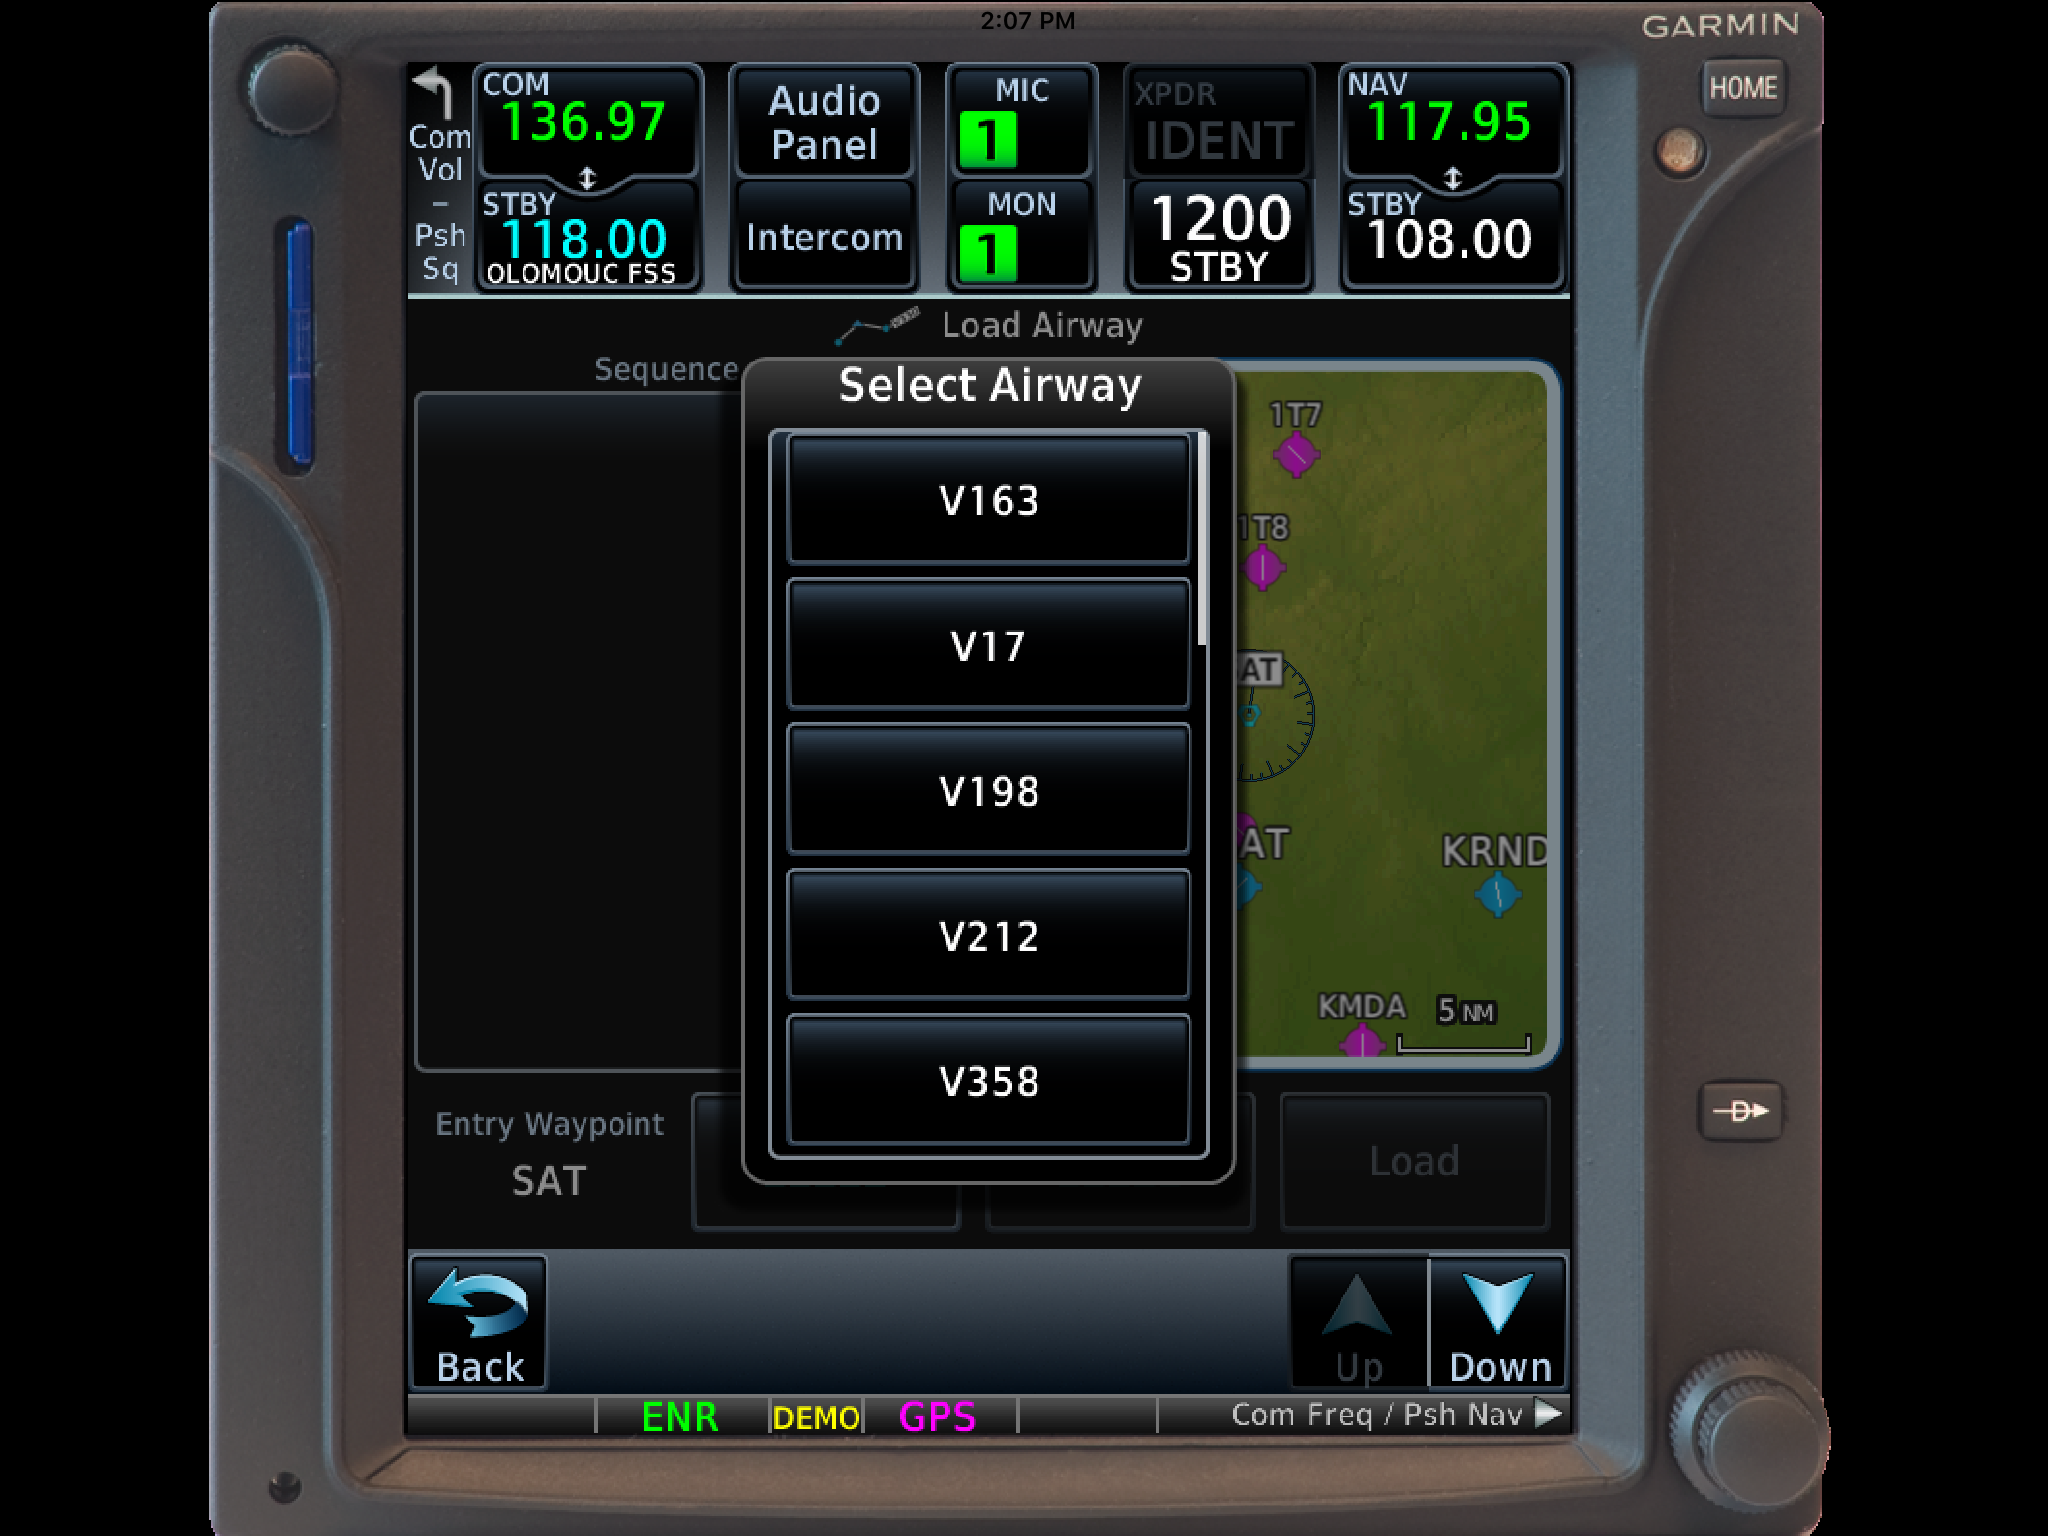
Select the Airway you want from the next menu that pops up.
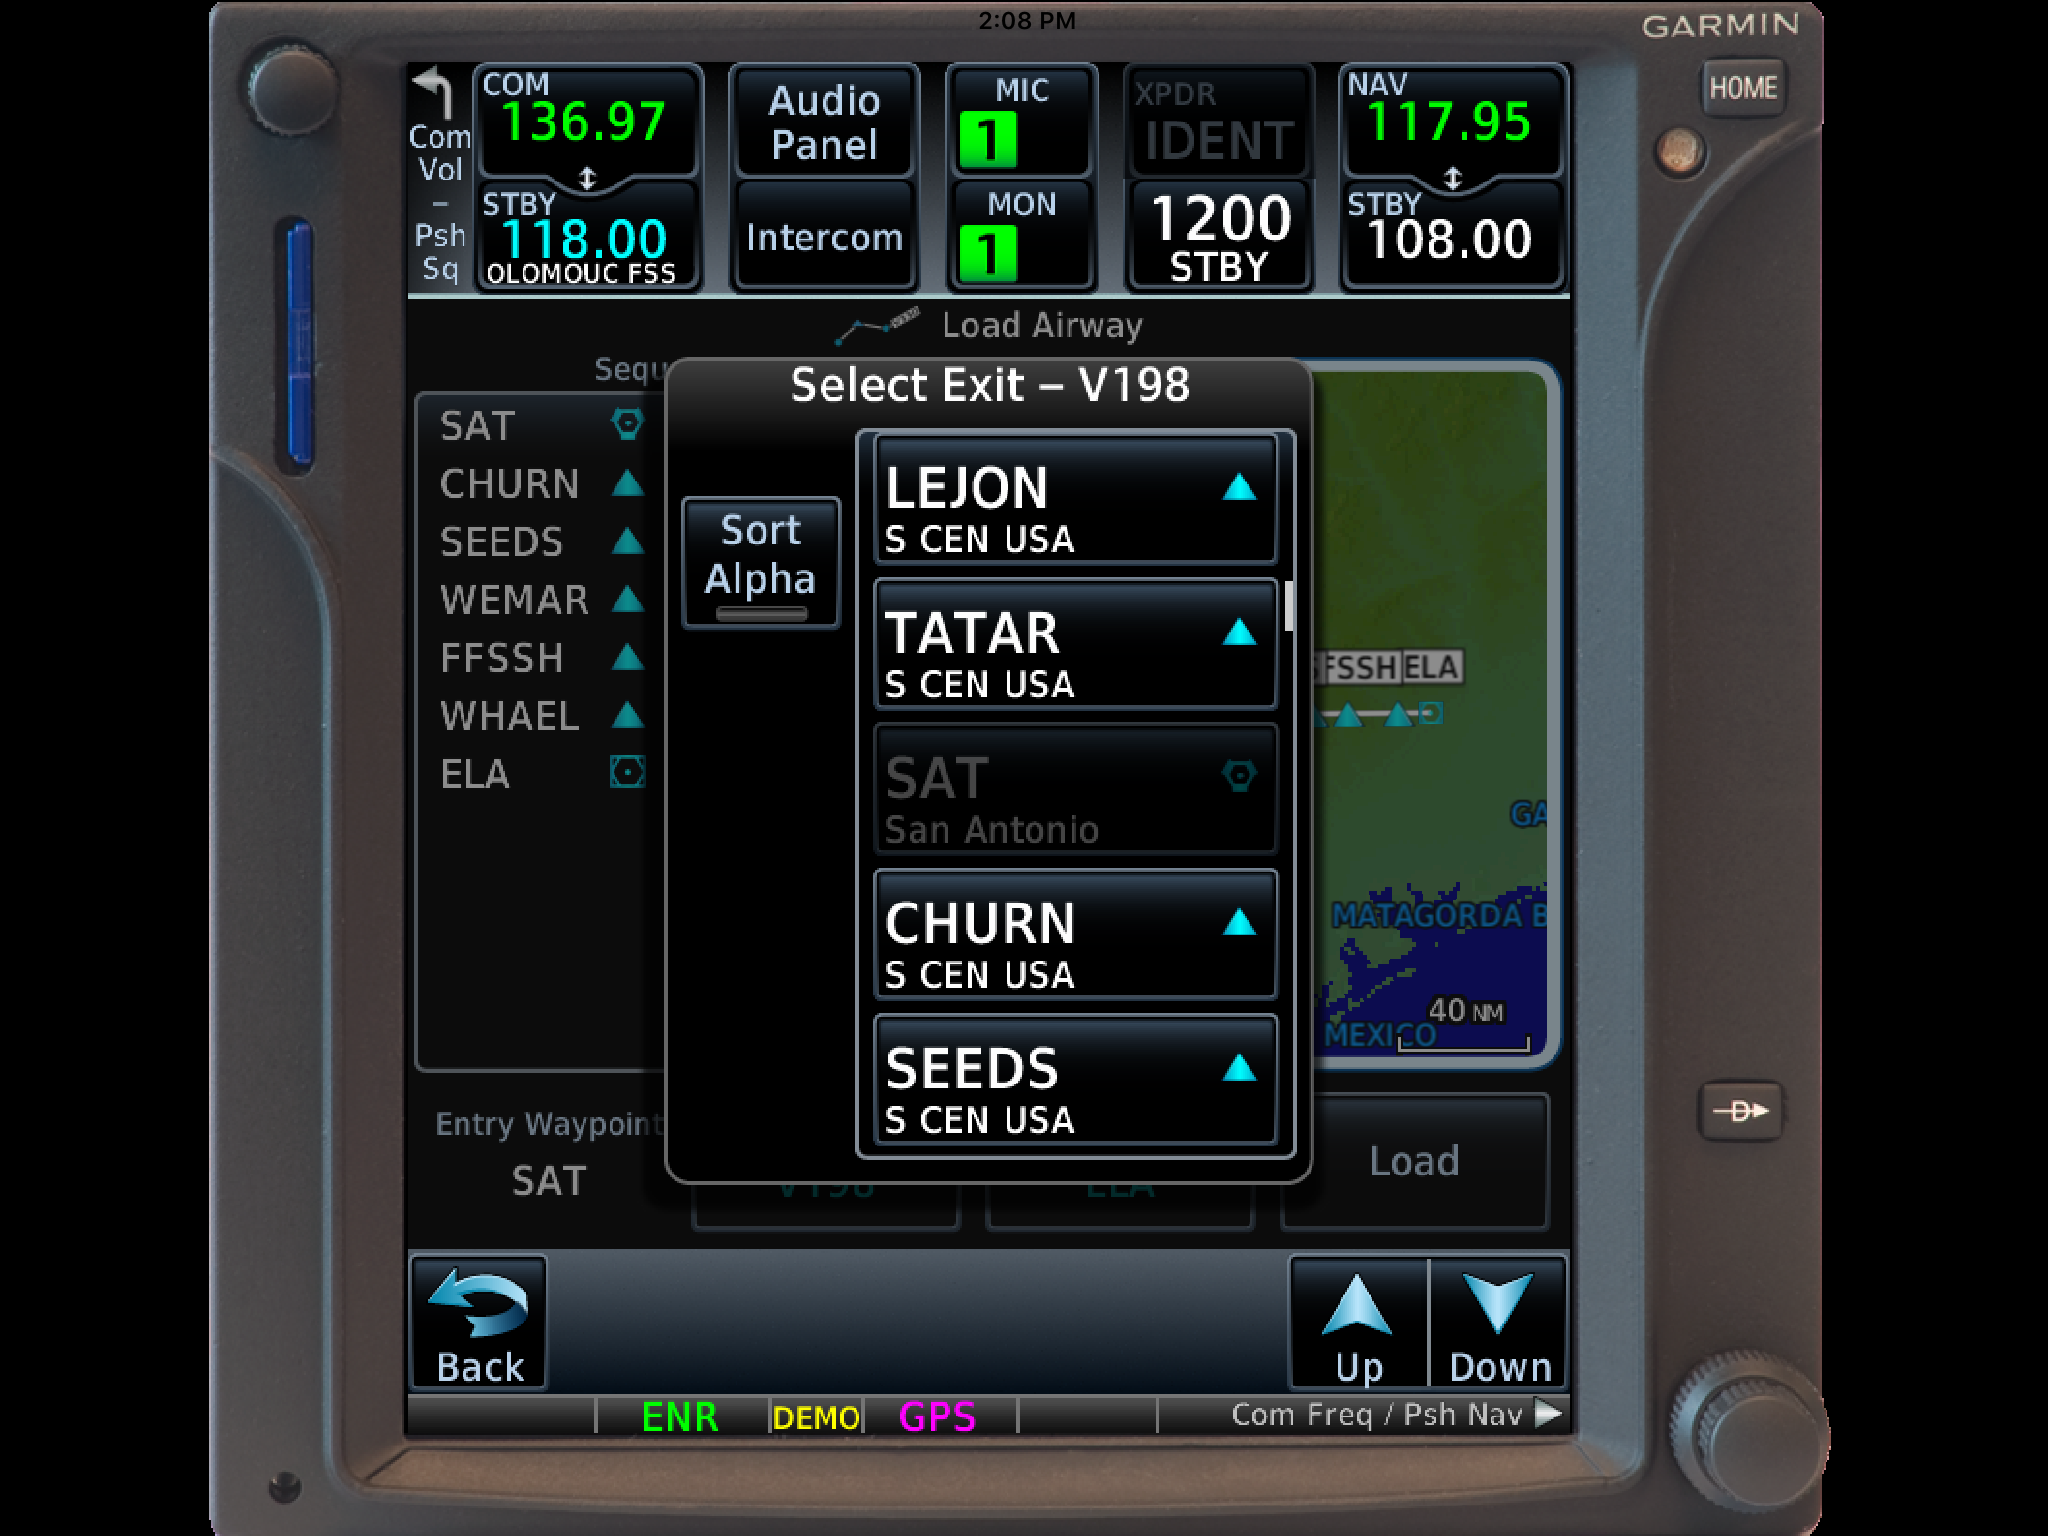
Then, a list of waypoints will display to exit the airway. Select the waypoint where you will be exiting the airway.
Note: Garmin defaults to listing these waypoints alphabetically. If you unselect the “Sort Alpha” option, it will sort the waypoints by direction and distance from the entry waypoint. This is a little more practical, easier to work with, and how I recommend doing it. This way you can either scroll up or down depending on the direction of travel on the airway and find your exit waypoint.
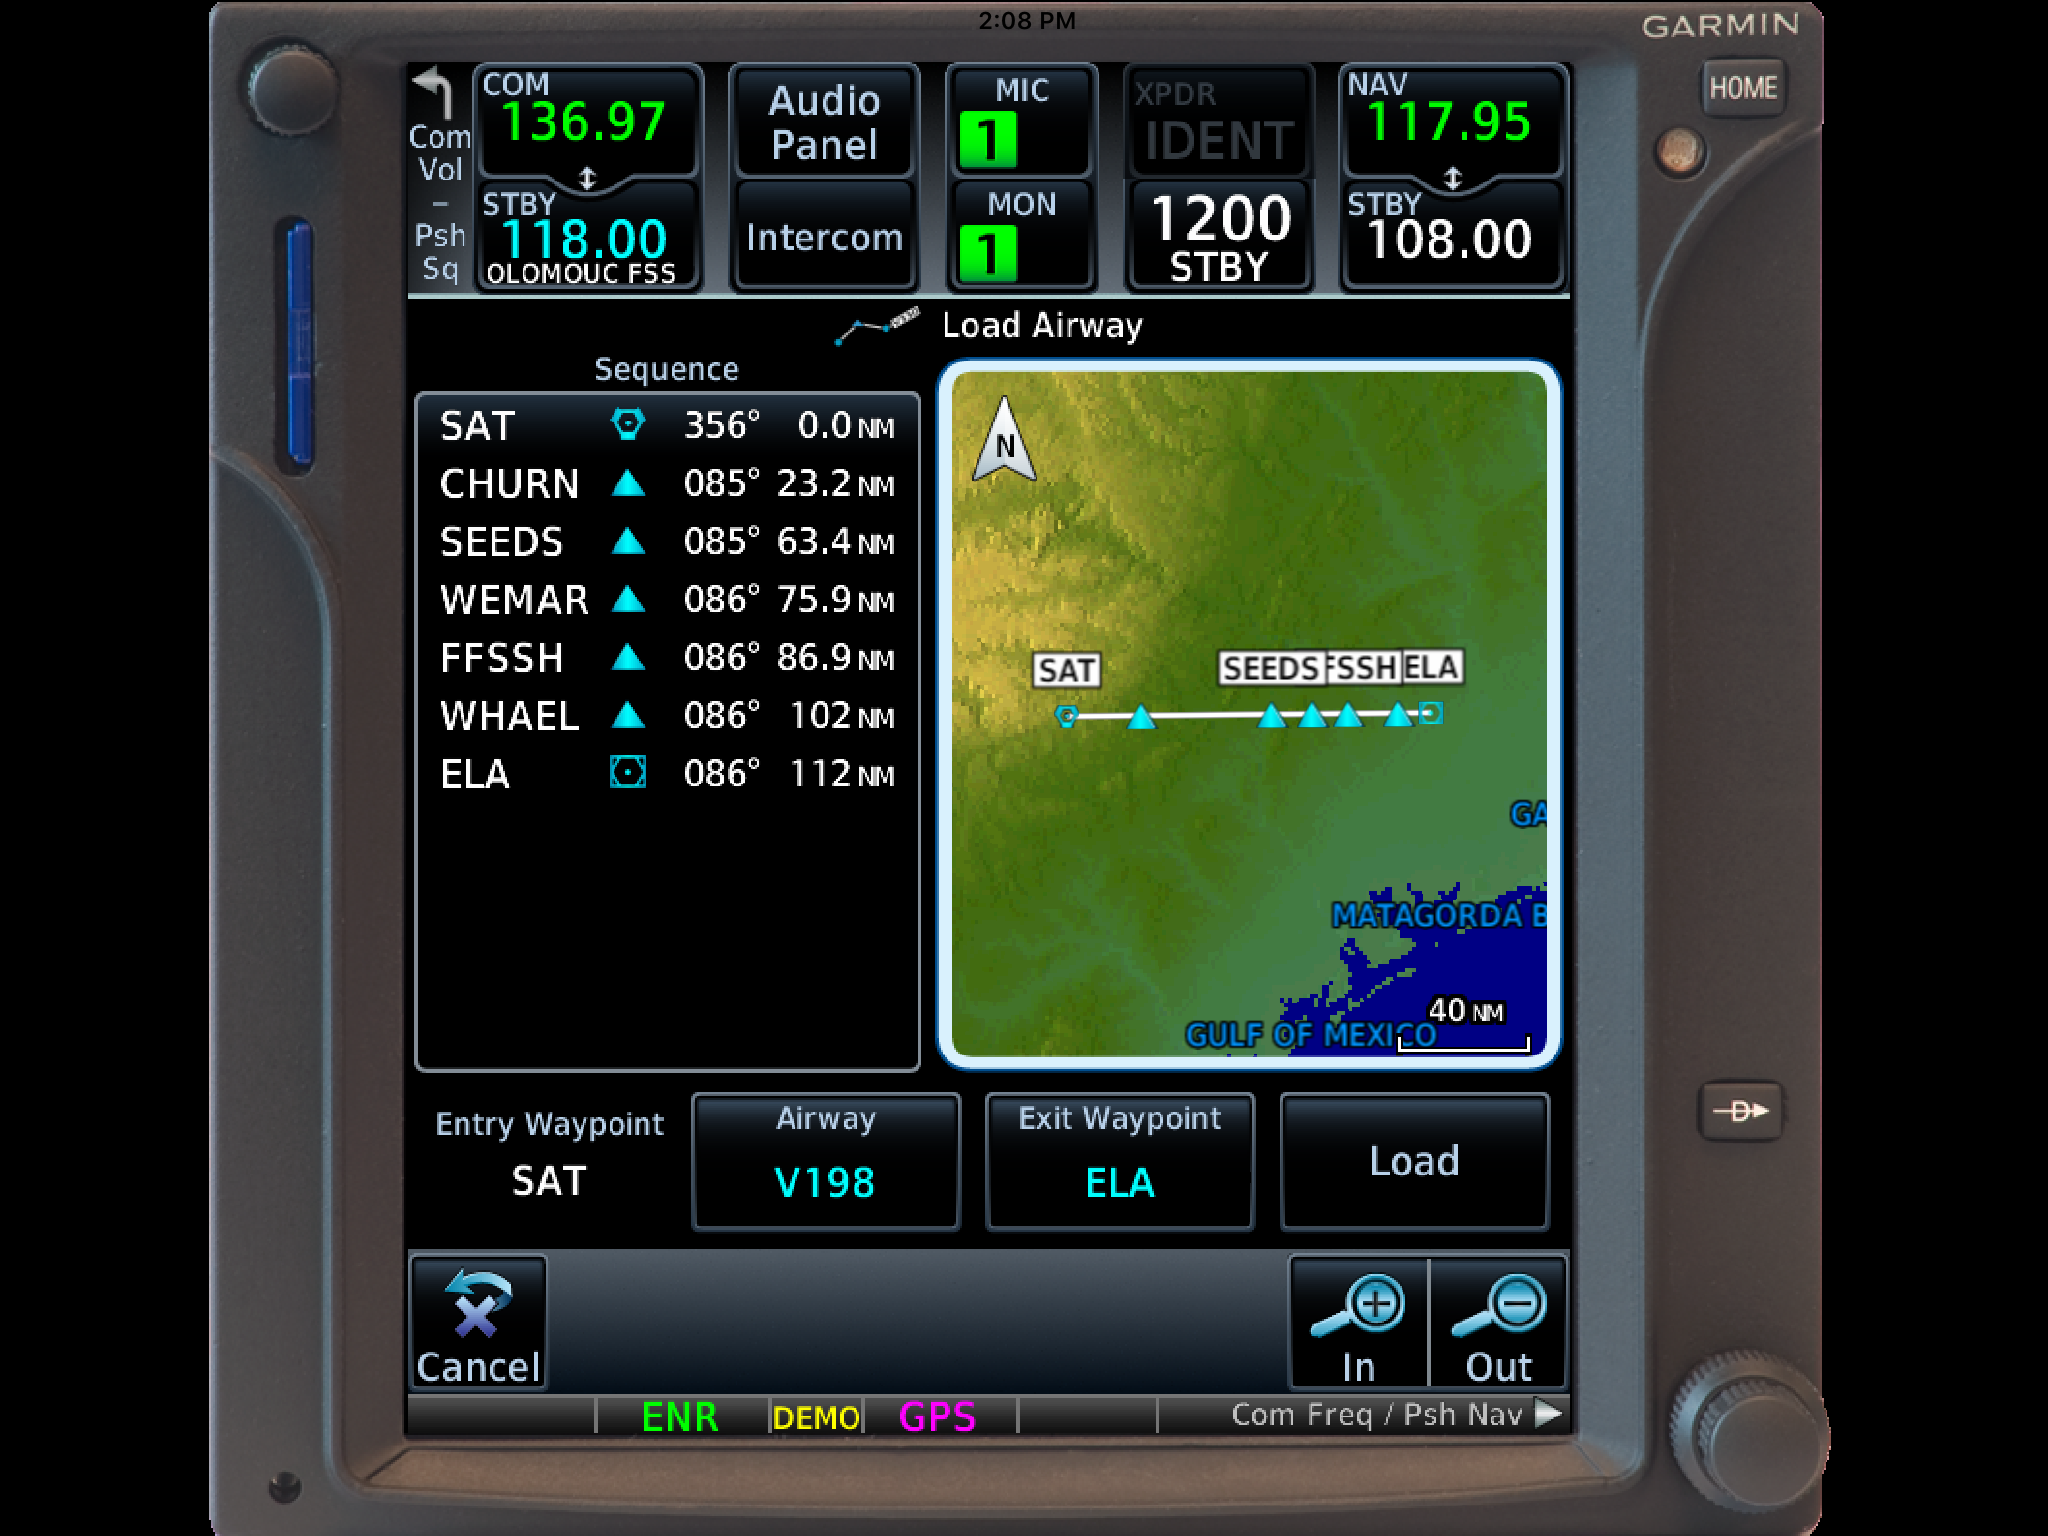
Tap Load.
The Airway and all the waypoints in between your entry and exit waypoints appear in your flight plan.
If you are getting vectors to join the airway, you’ll need to use the Activate Leg function to activate the leg you will be joining the airway on.
On the Flight Plan page, tap the waypoint that ends the leg you want to activate.
On the menu that pops up, tap Activate Leg.
Hold At Waypoint
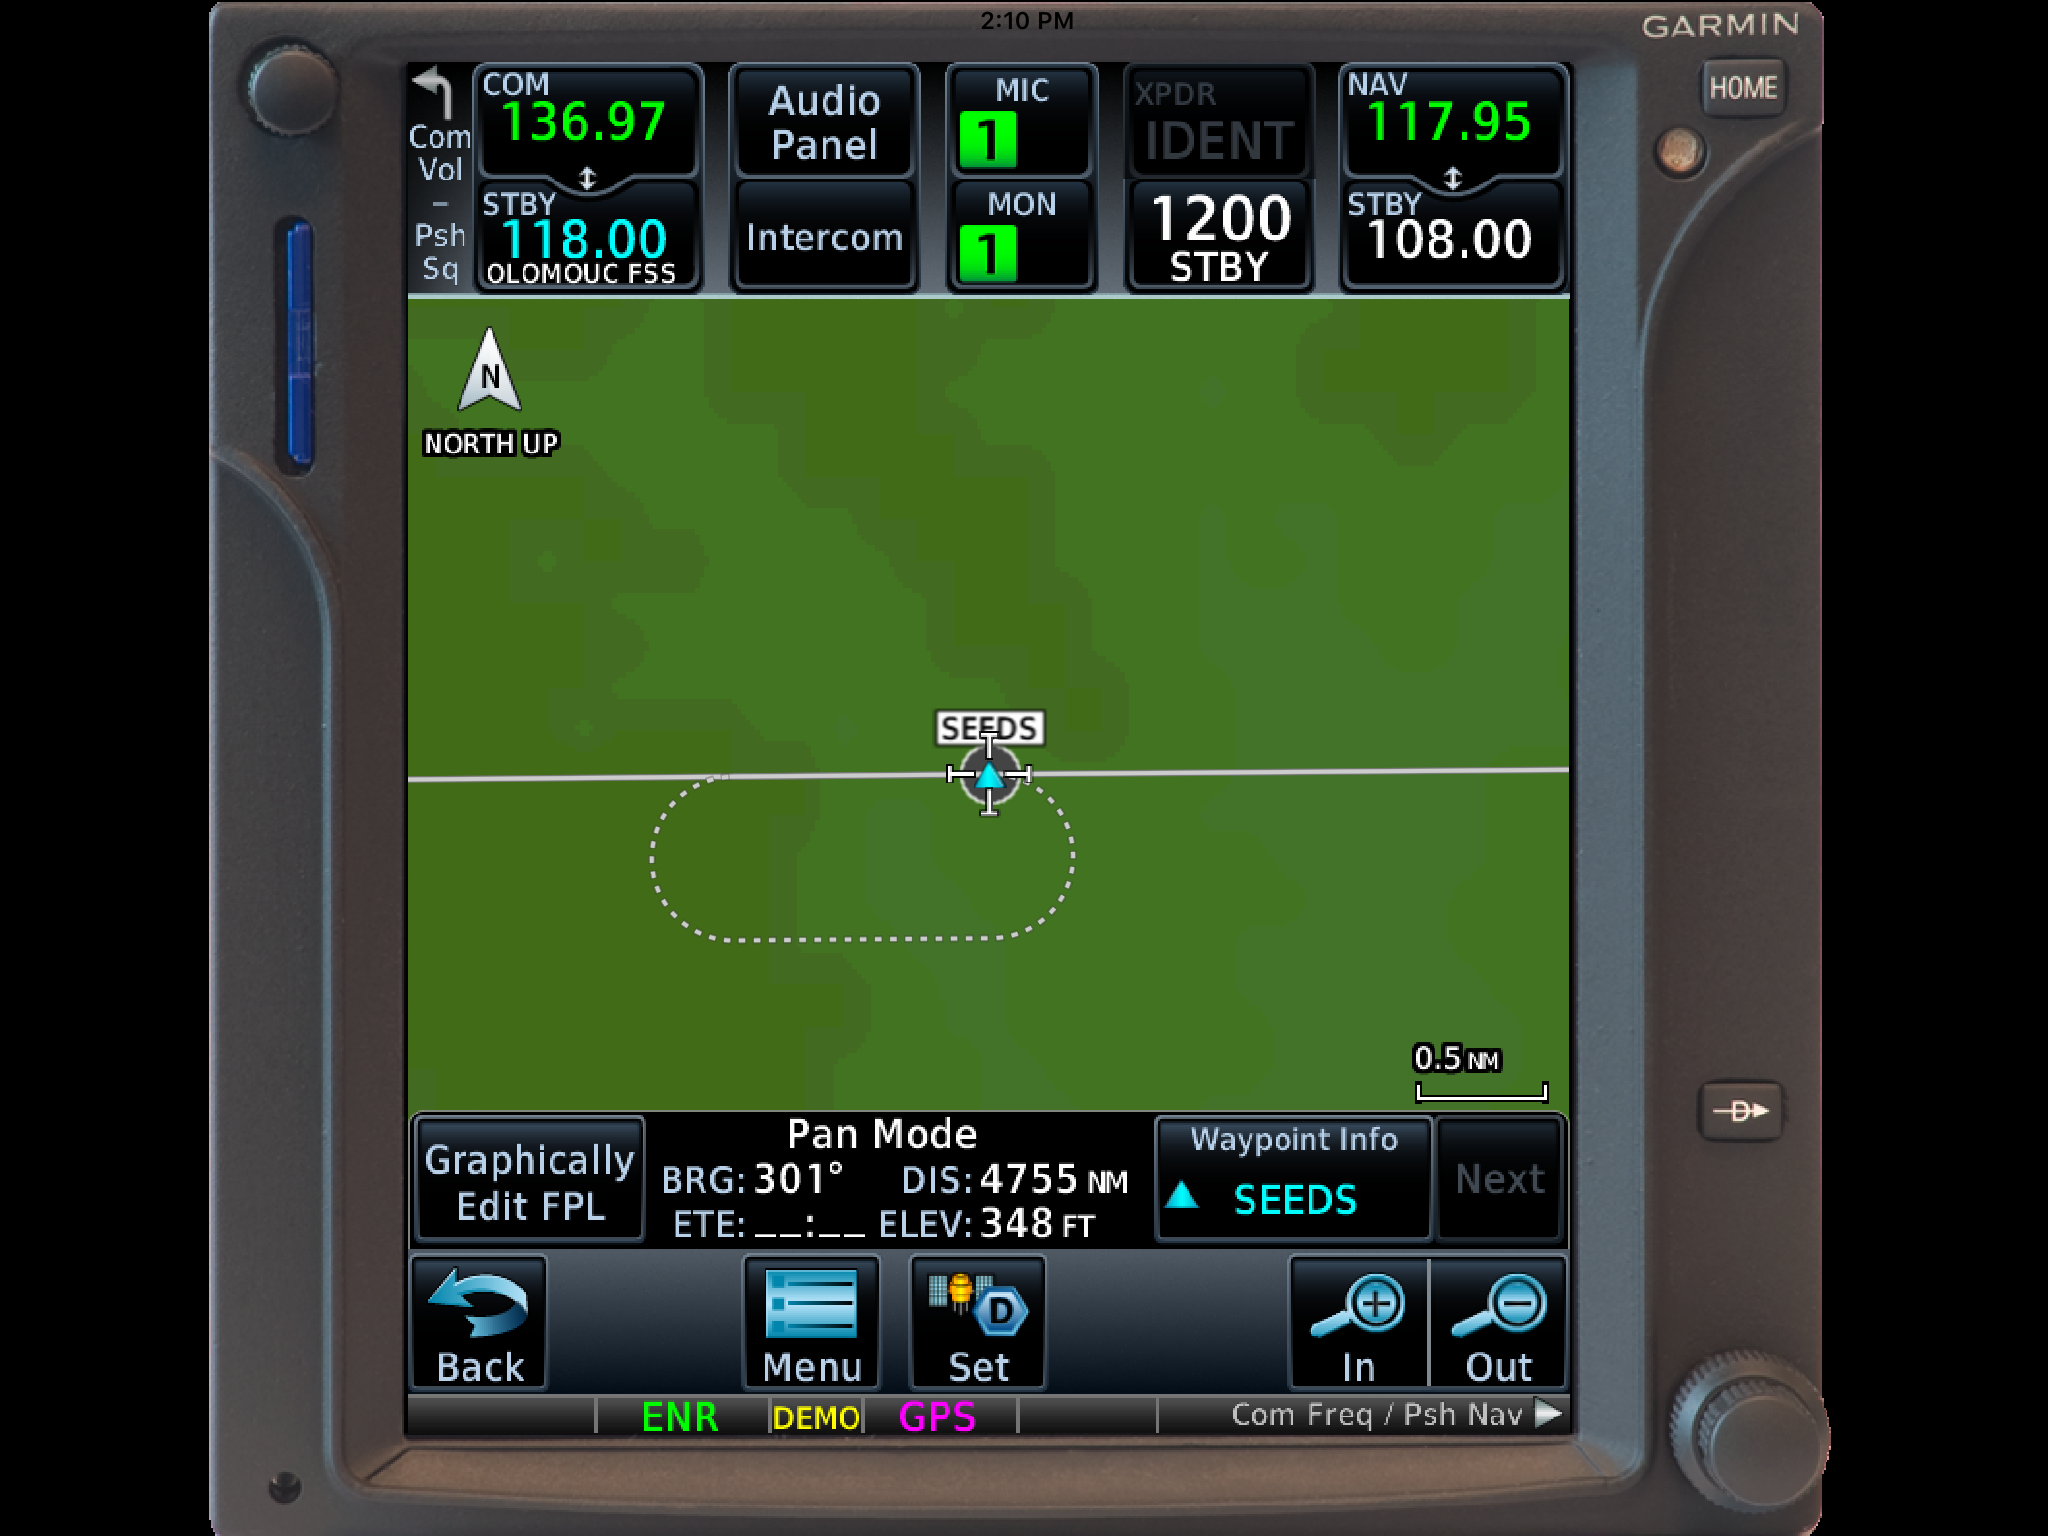
The Garmin GTN 750 allows pilots to place a holding pattern at any waypoint that is in the Nav Database (or any user created waypoint). Here’s how to do it.
On the Flight Plan page, tap the Waypoint that you want to hold at.
On the menu that pops up, tap Hold At Waypoint
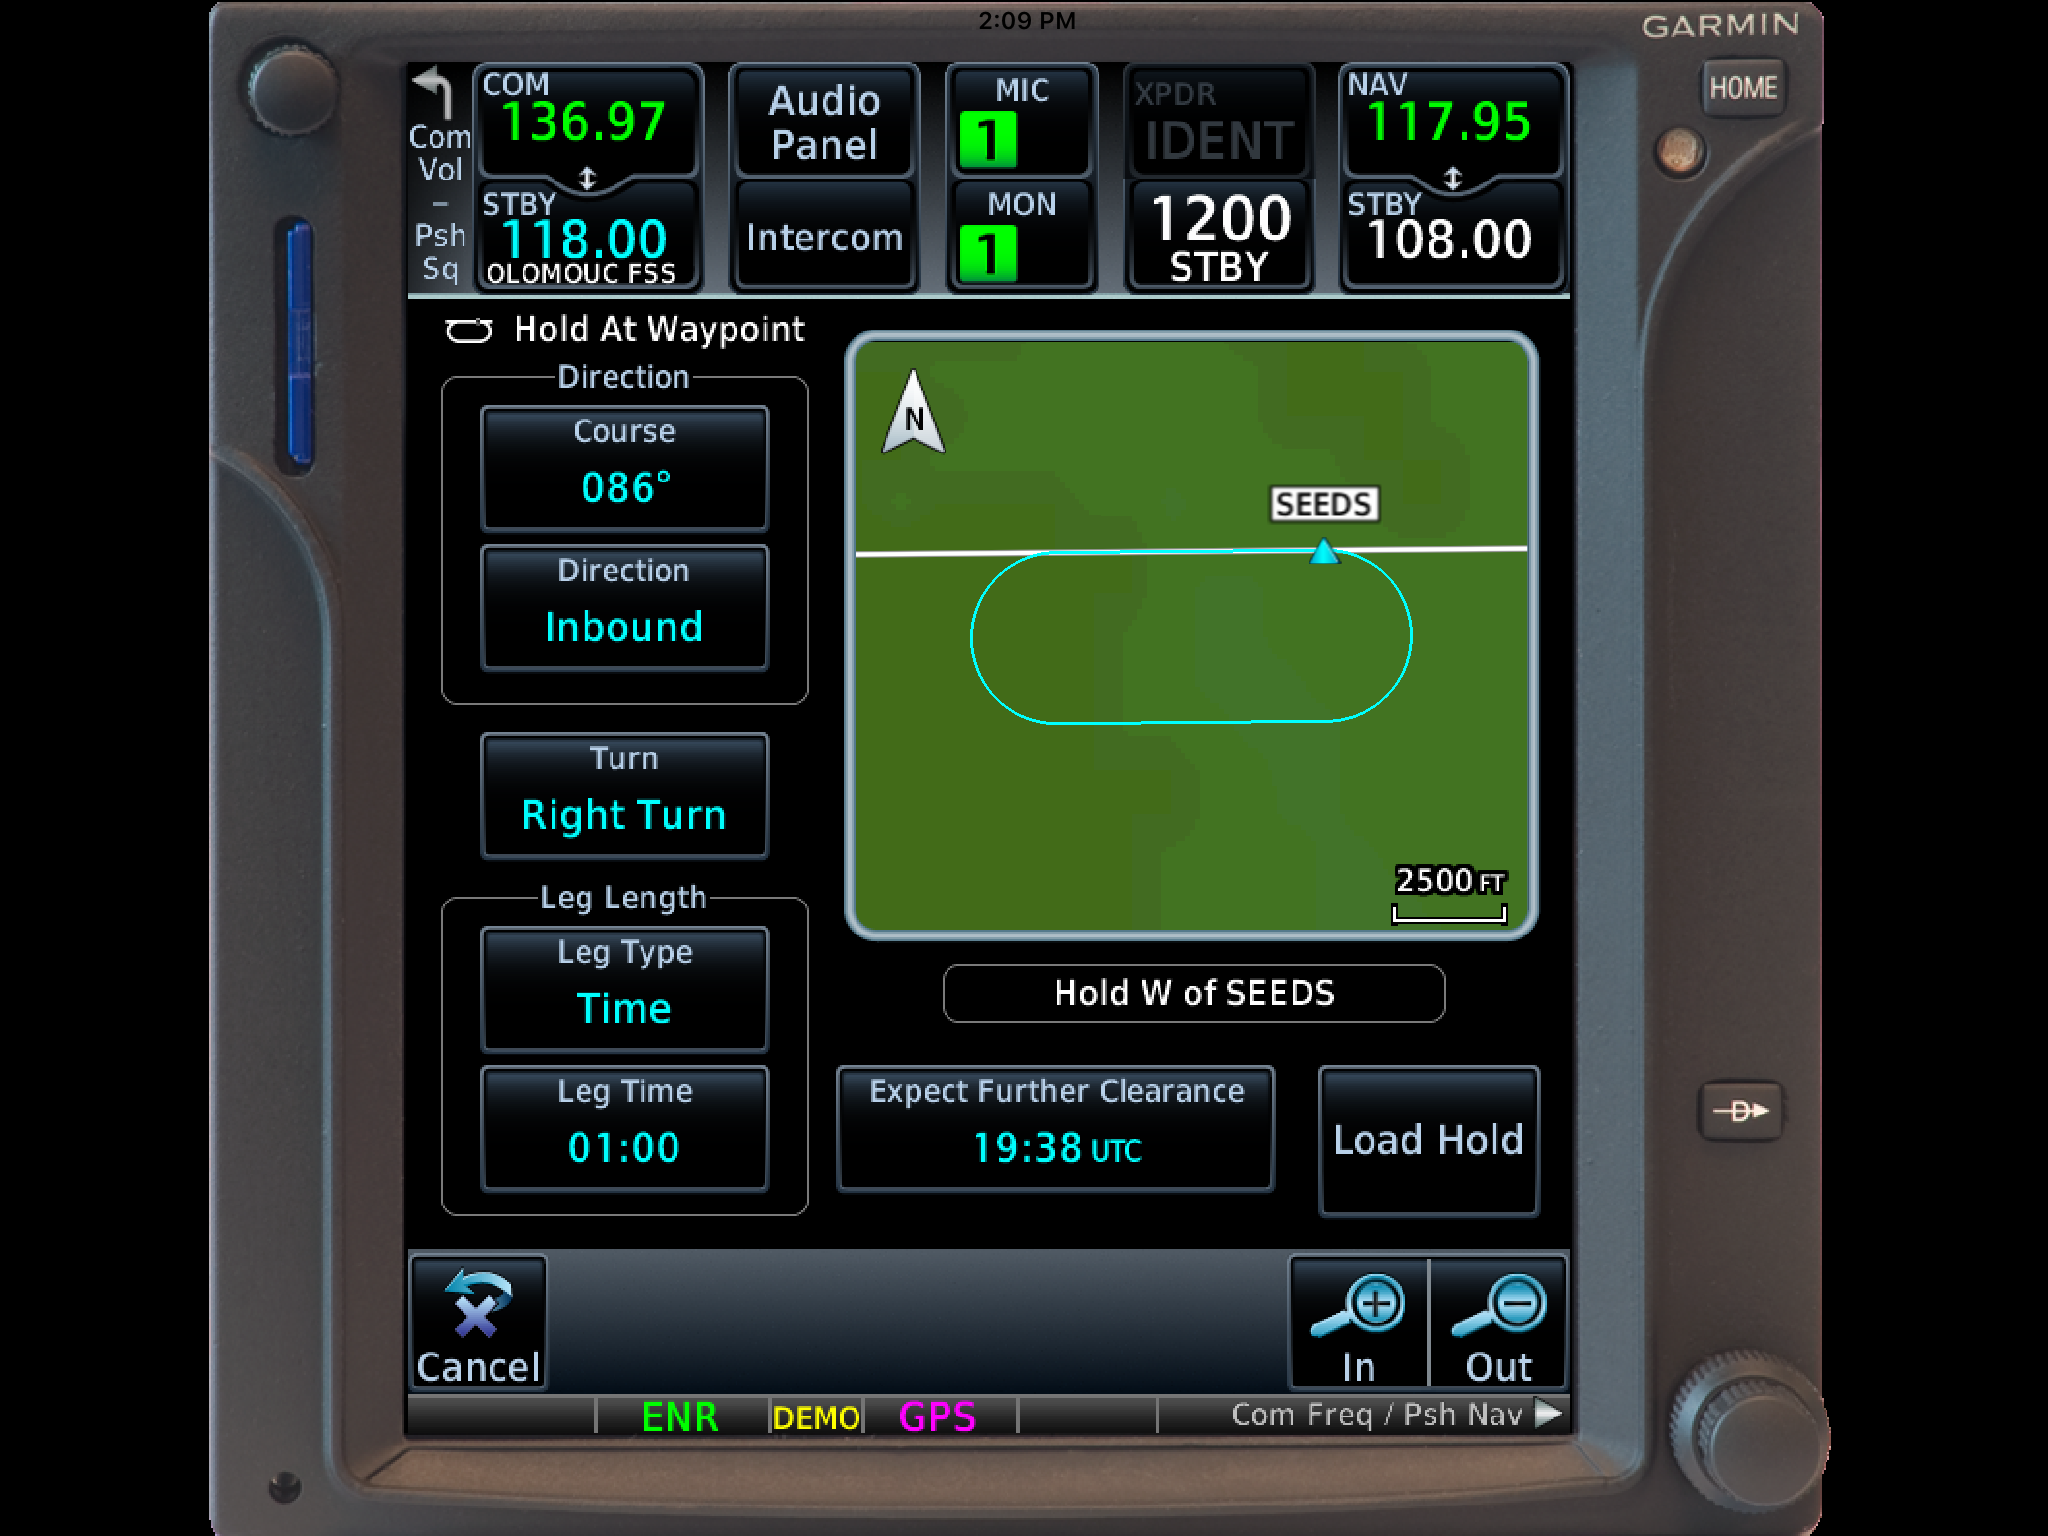
On the next menu that pops up, input either the inbound or outbound course, right or left turns, leg time or distance, and the EFC time, then tap Load.
You will see the hold now as a Waypoint in your flight plan.
Once the hold is entered, the GPS will go into Suspend mode, suspending the Flight Plan Waypoint Sequencing. Once you are ready to depart the hold, you will have to tap Unsuspend before crossing the holding point on the inbound leg, then the GPS will resume normal waypoint sequencing.
These are 2 of the really cool, gee-wiz features of the Garmin GTN 750. Following the above steps will make IFR flying much easier for the pilot, as well as much more enjoyable!
11 years ago, in April of 2009, the Avidyne Corporation unveiled the much bally-hooed Release 9, or R9 as it is commonly known, as a hardware replacement for the Avidyne EX5000 Entegra system in Cirrus Aircraft. The Entegra system was way outdated by that point. Even though Avidyne was the first company to put together a glass PFD in a single engine piston airplane, the company had quickly fallen behind Garmin in keeping up with the ever changing technology landscape.
Rewind to 2008. Cirrus had been going strong with the Avidyne Entegra since the SR20 and SR22 went to full glass in 2003 (a PFD and an MFD; prior to that, Cirrus aircraft only had an MFD with steam gauges and a Sandel Electronic HSI). Cessna, on the other hand, vaulted past the Avidyne Entegra and went straight to the Garmin G1000 in it’s aircraft, starting in 2004 with the 182 G1000 and 2005 with the 172 G1000. Beechcraft and Columbia went to the G1000 (Columbia started with the Avidyne as well) in 2005.
Garmin’s technology in 2007 was so much better than Avidyne’s technology that Cirrus decided to switch. I’m sure there were many promises made by Avidyne to Cirrus about what Avidyne was working on (the R9), but the G1000 was out there, available, and being used in a lot of different airplanes with very good results.
So, in 2008, Cirrus made the switch from the Avidyne Entegra to the Garmin G1000, dubbing it the Cirrus Perspective by Garmin avionics package. Avidyne finally got the R9 to market in 2009, but by that time, Piper was the only airplane manufacturer left putting factory Avidyne panels in their airplanes, and they switched to G1000 later that year.
The R9 is a fabulous product. It’s fully integrated, has great graphics, has fully redundant displays, a QWERTY keypad (which, by the way, Garmin didn’t do for another 8 years), and a lot of other neat features. There’s a bit of a learning curve, but it’s a really good product for what it is.
Avidyne, though, was late to the game with their technology. By the time it debuted in 2009, all the GA aircraft manufacturers had long since switched to the Garmin G1000 and weren’t looking back. That left Avidyne with the retrofit market for the many different Avidyne Entegra Cirrus aircraft out there. The only problem was, the retrofit was $80,000 ($95,000 if you wanted to throw in the DFC 100 Autopilot, which is a must have) and not many owners were up for paying that much money, then or now.
To sum up our brief history lesson, Avidyne knew the Entegra needed to go, but couldn’t get the R9 out quickly enough to convince anyone to stick with Avidyne products. The retrofit market didn’t amount to many sales, so Avidyne doesn’t even make the R9 anymore.
As a side note, I really, really like the Avidyne R9 and am sad that it didn’t make it into more airplanes.
So, when the Avidyne Entegra starts to have issues, what’s an owner to do? Keep reading!
There is Hope
There are thousands of Cirrus aircraft out there flying with the Avidyne Entegra instrumentation, which is basically 20 year old technology (I’ve had a computer engineer tell me the programming in an Entegra is Windows 98 tech). These things are going to start having problems at some point (many already have), but what solution do owners have that is cost effective and get’s them new technology?
Remember that little company named Garmin? Well, they have come through again. Announced this summer, the Garmin G500 TXi is now certified as a replacement in the Cirrus Avidyne Entegra equipped aircraft. This means pulling out both the PFD and MFD and replacing them with the G500 TXi on both sides. Engine data is also displayed on the G500TXi MFD, including the percent power and TIT indications, if equipped.
Cirrus SR22 Equipped with Dual G500 TXi Screens and Dual Garmin GTN 650Xi GPS Units
The cost for the panel? Two 10.6″ G500 TXi’s run about $16,000 apiece for the units, not including labor. $32,000 for a brand new panel isn’t terrible. Plus, the G500 TXi’s work with the DFC90 autopilot if the Cirrus is already equipped with it. If not, the Garmin GFC 500 autopilot is now approved for the Cirrus at a relatively low price of $7,000, including the servos.
Still have the original Garmin 430s in your Cirrus? Upgraded to the Avidyne IFD 540/440 stack? Put in dual GTN 650Xi’s? Put in a GTN 750Xi? All are compatible with the G500 TXi panel.
Want to upgrade everything? It does get kind of pricey at that point, but for just equipment, the cost for a complete panel conversion is somewhere in the area of $65,000 plus labor, still below what the R9 cost, but not cheap either. That would include 2 G500 TXi’s, 2 GTN 650Xi’s, a GFC 500 Autopilot, and all the engine monitoring equipment that the G500 TXi would need.
Cirrus SR22 Equipped with Dual G500 TXi Screens, a GTN 750Xi, and a GTN 650Xi
Thankfully, some new technology has finally come to the Generation 1-3 Cirrus. Oh, and by the way, your steam gauge Cirrus is fully upgradable as well.
Field Condition, or FICON, reports show up in NOTAMs both during the summer time and the winter time. In the southern states, FICON reports are seen more in the summertime during and after hard rains and thunderstorms (with the exception of winter 2021 & 2022, where Texans quickly got familiar with FICON reports after some very unusual winter weather). In cold winter climates, FICON reports are a staple during the winter season, showing up during and after snow & ice storms.
The question is, what do those codes mean in the FICON report? You could see 5/5/5, 3/3/3, 3/4/4 and any combination thereof. And why are there three numbers?
Let’s start with the second question first. The three different numbers in the FICON report indicate the 3 different sections of the runway: the touchdown third, midpoint third, and rollout third of the runway.
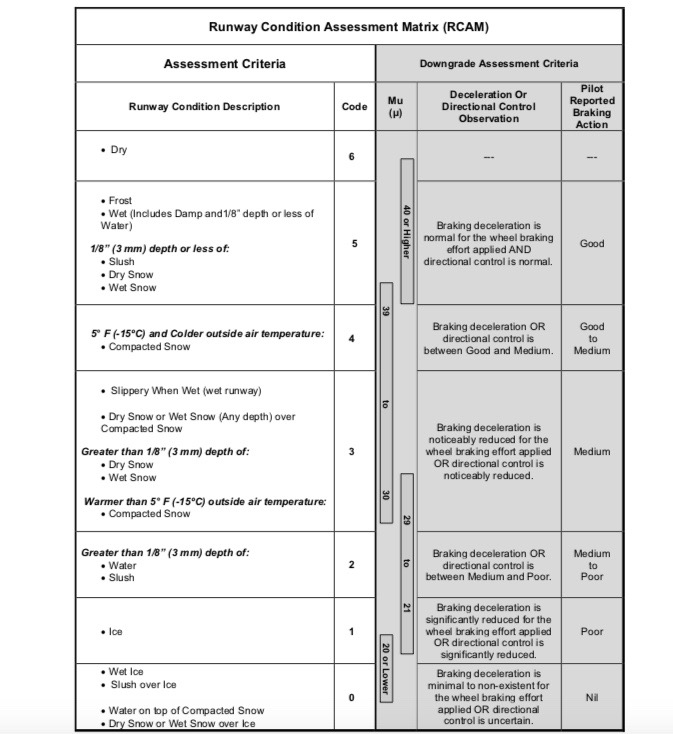
Now, what are those numbers describing? The three numbers are the indication of how slippery that portion of the runway is. This is referred to as a Runway Condition Code (or RCC). The lower the number, the more slippery the runway is. The higher the number, the dryer the runway. The scale is 0-6, with 6 being completely dry and zero being no traction at all.
Here is the FAA table for the RCCs.
Now, in order for those RCC codes to generate, at least 25% of the surface must be wet. If there are just spots of standing water, slush or snow, a FICON report will be issued to report the contaminants, but no codes will be generated.
The Runway Condition Codes are only part of a FICON report. In addition to the codes, a descriptor in the NOTAM will be published describing what percentage of the portion of the runway is affected and by what.
For example: RWY 28 FICON 3/3/3 100 PRCNT 2IN DRY SN OVER COMPACTED SN.
Deciphered, that is saying that all sections of Runway 28 have braking deceleration that is noticeably reduced or direction control is noticeably reduced and 100% of each section has 2 inches of dry snow over compacted snow. Sounds like a runway to avoid!
Braking action reports are separate from FICON reports, but also issued via NOTAM. Braking action reports are issued by the airport manager whereas the FICON reports are computer generated.
There are multiple ways to save money during the aircraft buying process. To start, since you are buying an airplane, you have some means of positive income in order to afford an airplane. Airplanes come in all different shapes and sizes and usually, an airplane can be found to fit almost any budget, whether is a $20,000 Texas Taildragger all the way up to a multi-million dollar jet.
One way is to stay within your budget. There will always be a shinier, newer, lower time airplane that is just above where you set your budget at. Don’t reach for it! There is a reason you set your budget where you did.
Another way is to shop around and get multiple insurance quotes. Your agent is in charge of engaging underwriters who are going to evaluate you and your airplane as risks, then price a policy accordingly. With most airplanes, you should get multiple quotes to see what fits you best. Beware though, because sometimes, you can get a lower rate, but it will require more training, so you end up shelling out more money in the long run. If you find a policy you like, but the training seems skewed or the liability isn’t high enough, you can always have your agent ask the underwriter to modify the quote. You are still in charge.
Finally, if you evaluate your mission and see that your budget can’t afford an airplane that carries enough or goes fast enough, look into taking on a partner or two to help with costs. Be thorough in vetting your potential partners as a good partnership is worth it’s weight in gold, but a bad one is downright unpleasant and often times hard to get out of. Find pilots who have the same mindset & personality you do and treat their stuff the same way you do. Try to take a ride in their car or go to their house, then you’ll see what kind of shape they will keep the airplane in.
The best way to cost yourself more money in the aircraft buying process?
Don’t do a pre-buy inspection.
A pre-buy inspection takes place after negotiations and once a Purchase Agreement is in place. You are pretty much set on the airplane, you just want a third party mechanic who is knowledgeable on that make and model of airplane (and this is a very important point) to go over it and make sure that it is sound from a mechanical standpoint. The buyer, you, want someone who has never had an association with the seller since the mechanic will be your representative in the process and you want him answering to you.
If you have used a broker or a buyer’s agent, that person should have already gone through the logbooks for you, so you’ll have a basic idea of the history of the airplane. However, knowledgeable mechanics find things all the time that turn out to be the responsibility of the seller to repair since it happened on their watch. Without a pre-buy, you would end up having to pay for that in the not to distant future.
Here is an example of where not doing a pre-buy can cost a lot of money.
An owner bought a late ’70s model Citation ISP, one of the very first Citations ever made. It had been based in Florida (salt & humidity + aircraft don’t mix well) for a while. The buyer didn’t use a broker, but thankfully had someone look through the maintenance history of the airplane. Since it was so old, the logbook reviewer didn’t have time to do anything but a basic overview, but he gave the thumbs up to the buyer.
The buyer decided he just wanted a boroscope inspection and the seller’s mechanics to look over the airplane. Remember what I said before about a third party mechanic? Well, these mechanics didn’t do a very thorough job. When the buyer took delivery of the plane, after about 10 hours of flying, he already had an $18,000-$25,000 maintenance bill.
You may say, well that’s a jet. Jet’s have specialized maintenance and need a more extensive pre-buy inspection.
On the contrary, in my 8 years in the training business, I have seen Cirrus, Piper PA46s, Bonanzas and several other piston engine airplanes that either didn’t have a pre-buy done or the pre-buy was done by someone who didn’t know that airframe. Lo and behold, things started breaking and adding up very quickly that would have been discovered on a good pre-buy inspection.
Don’t skip on the pre-buy inspection. They usually run a few thousand dollars, but save tons of money in the long run.