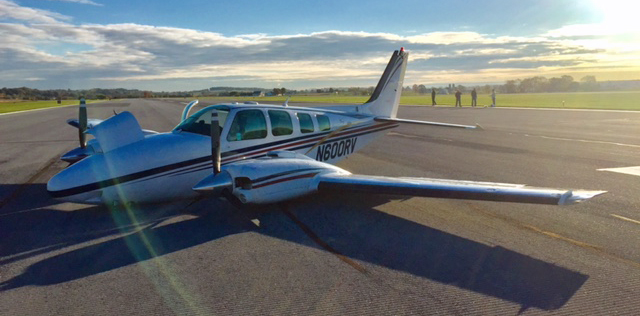
Night Flying Techniques

We’ve all been there. You’re flying into an unfamiliar airport at night, you’re having difficulty seeing the field, and trouble identifying the runway. Airports can be hard to identify for a variety of reasons, but approaching in darkness only makes it more difficult. Perhaps the airport is located in a densely populated area and the airport lights bleed into the city lights. Maybe the airport that you’re approaching is located amid terrain that obstructs your view.

Situations like these are not uncommon for charter pilots. Just a few evenings ago I was descending IFR into Asheville, NC (KAVL) on a dark night with high overcast and scattered showers. Although the airport was VFR, the surrounding hills made me doubtful that I would be able to see the field in time to safely and comfortably descend for the visual approach that I was expecting.

Fortunately, there are some things we can do to help find our destination and set us up for the approach. Here are a few tricks that I use regularly when I find myself in this position:

  • When flying into an untowered/closed tower airport: Make sure that you have the right lighting frequency. Some airports have pilot-controlled lighting that is operated on a different frequency than the CTAF. If the lights don’t seem to be working, consult your AFD. If the AFD advises that your frequency is correct, double check the NOTAMs to make sure that the lights haven’t been taken out of service.
    • For towered airports: Ask the tower controller to turn up the intensity of the runway lights. This has helped me find the runway countless times. This request can be especially useful at airports that are located in a highly lit area. Controllers are happy to honor this request and will often leave the lights at the bright setting until you advise them that you are ready for them to be turned back to normal intensity.
  • Load an approach: If you are an instrument rated pilot, loading an instrument approach is a great way to get oriented with a runway when you need a little help. You may need to coordinate with the tower or controlling agency if you want to fly the approach, but this has the added bonus of giving the pilot altitudes for terrain/obstacle clearance should there be any hazards present.
  • Use OBS mode: If you are flying an airplane that has equipment capable of doing so, you can use the Omni Bearing Selector (OBS) button to help align you with the runway. If using this strategy, just remember: THIS IS NOT AN INSTRUMENT APPROACH. It will not provide you with obstacle clearance, nor will it line you up directly with the runway.

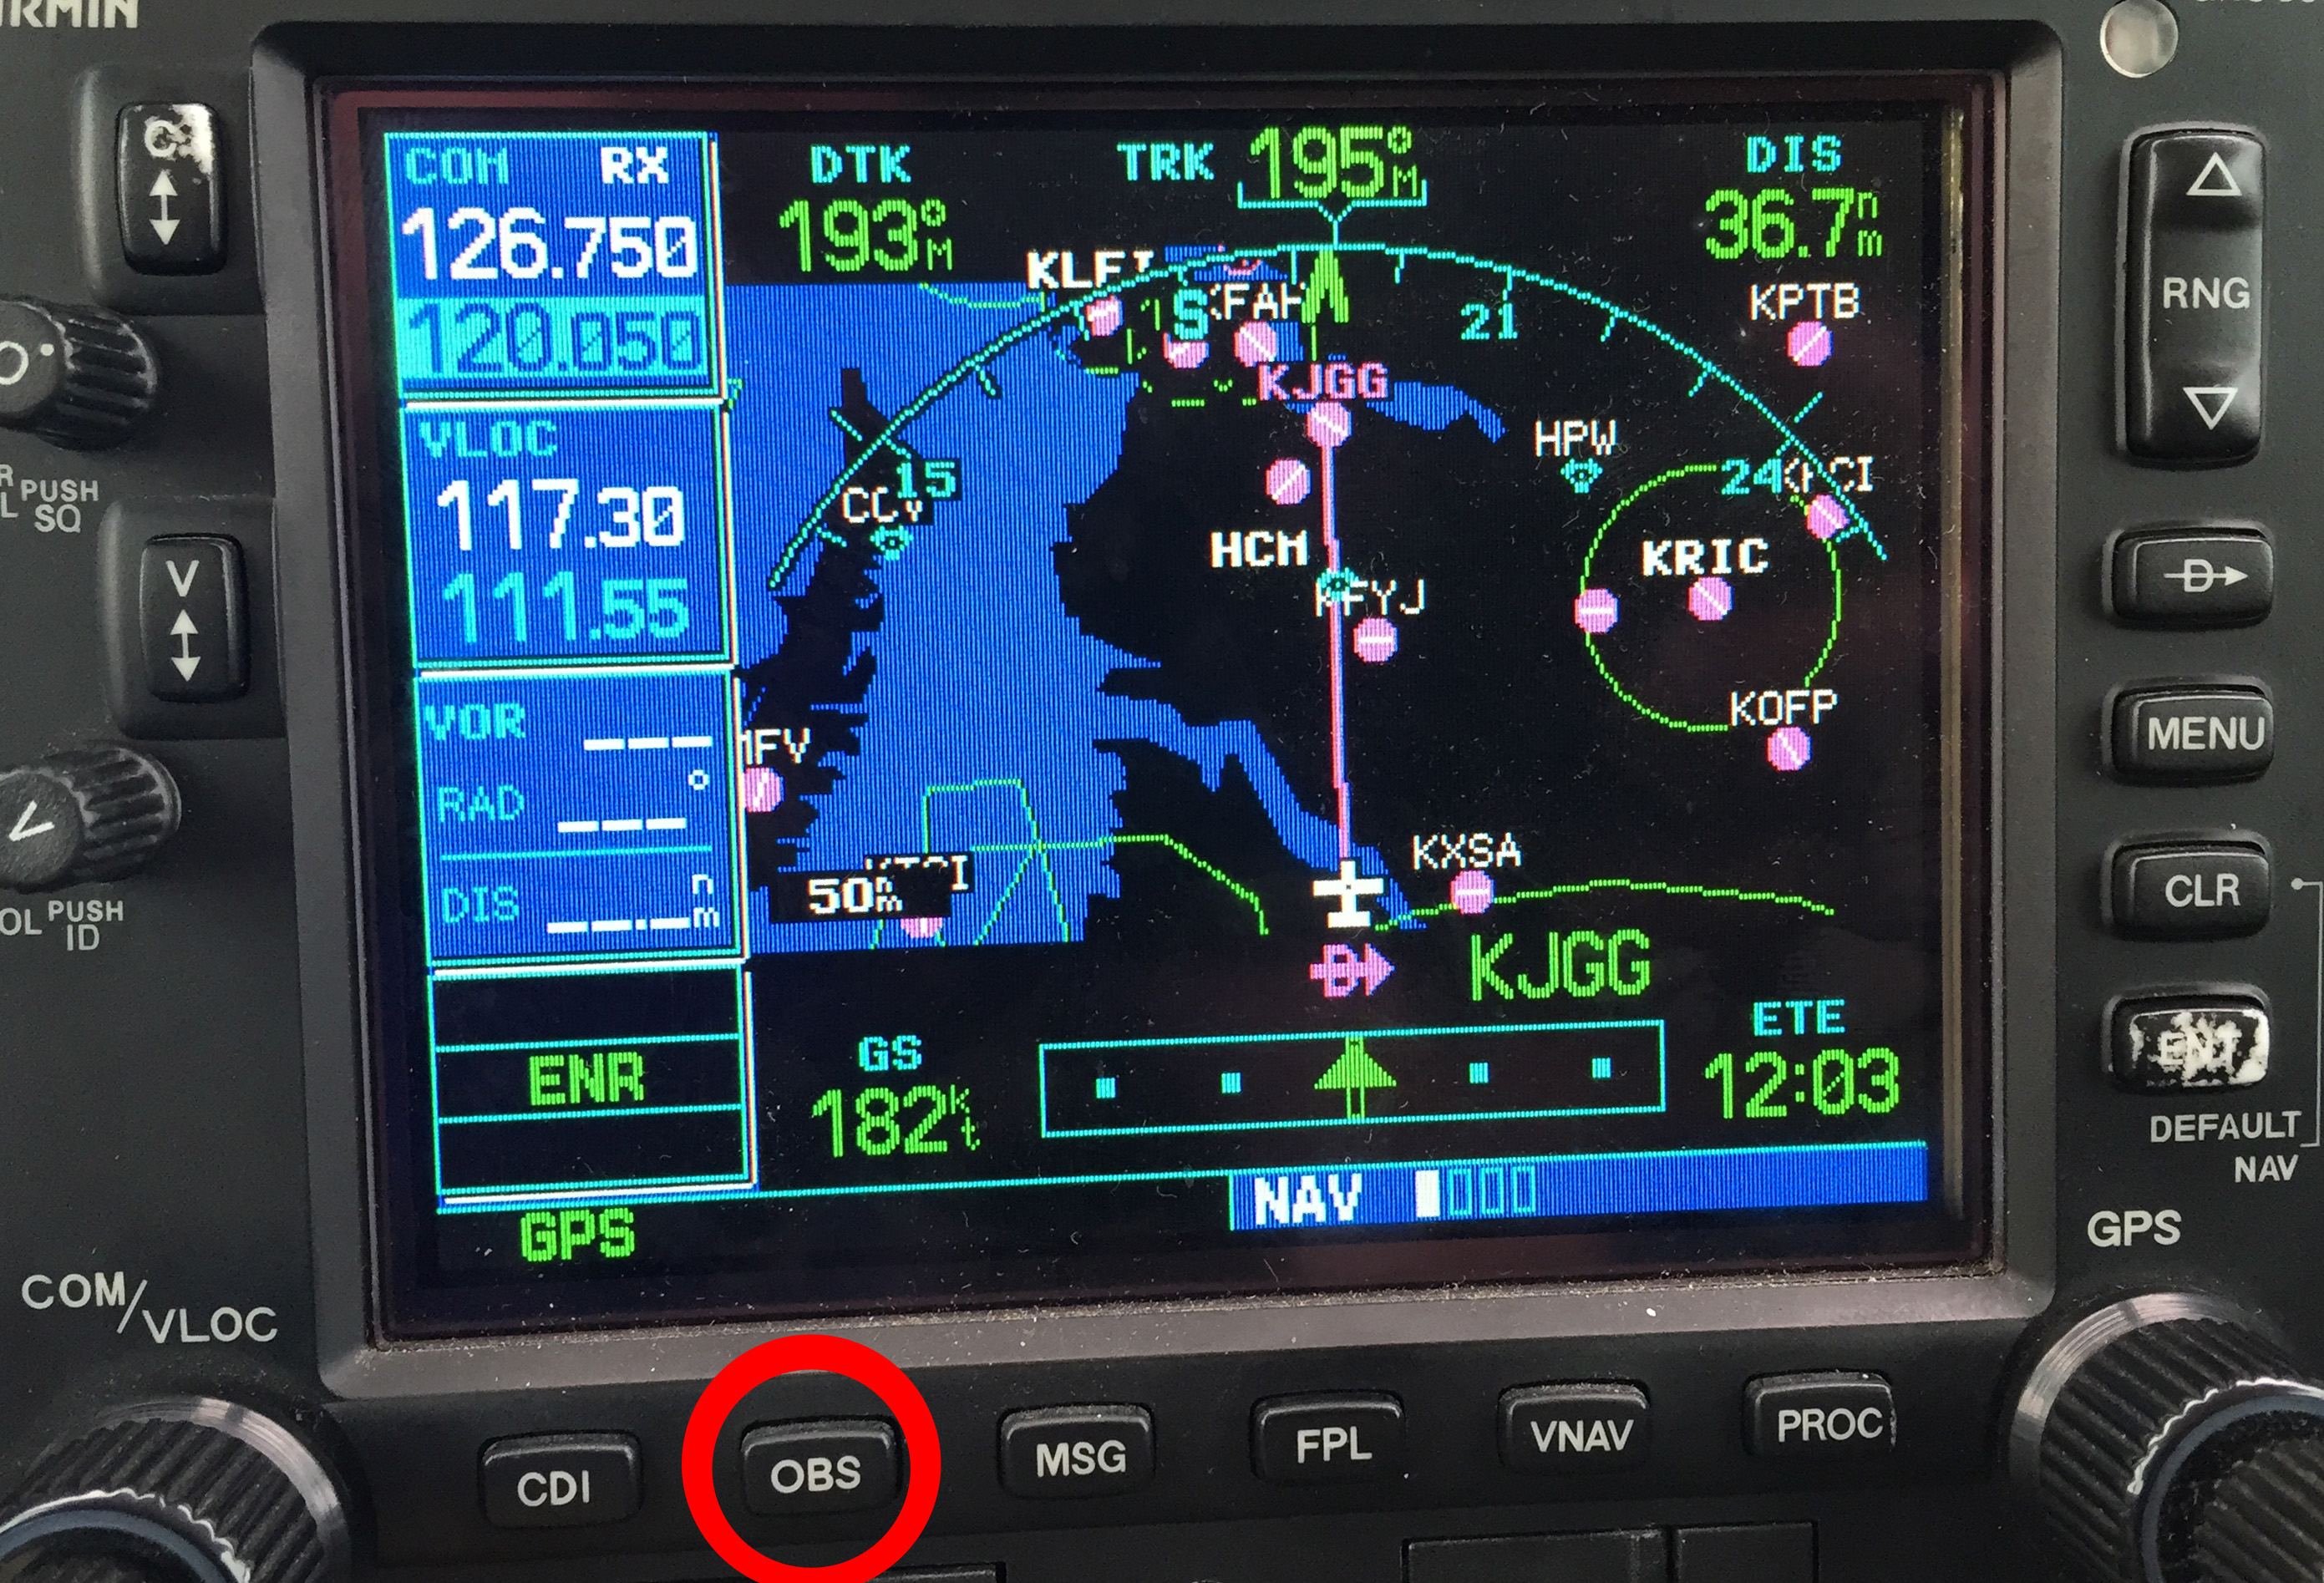
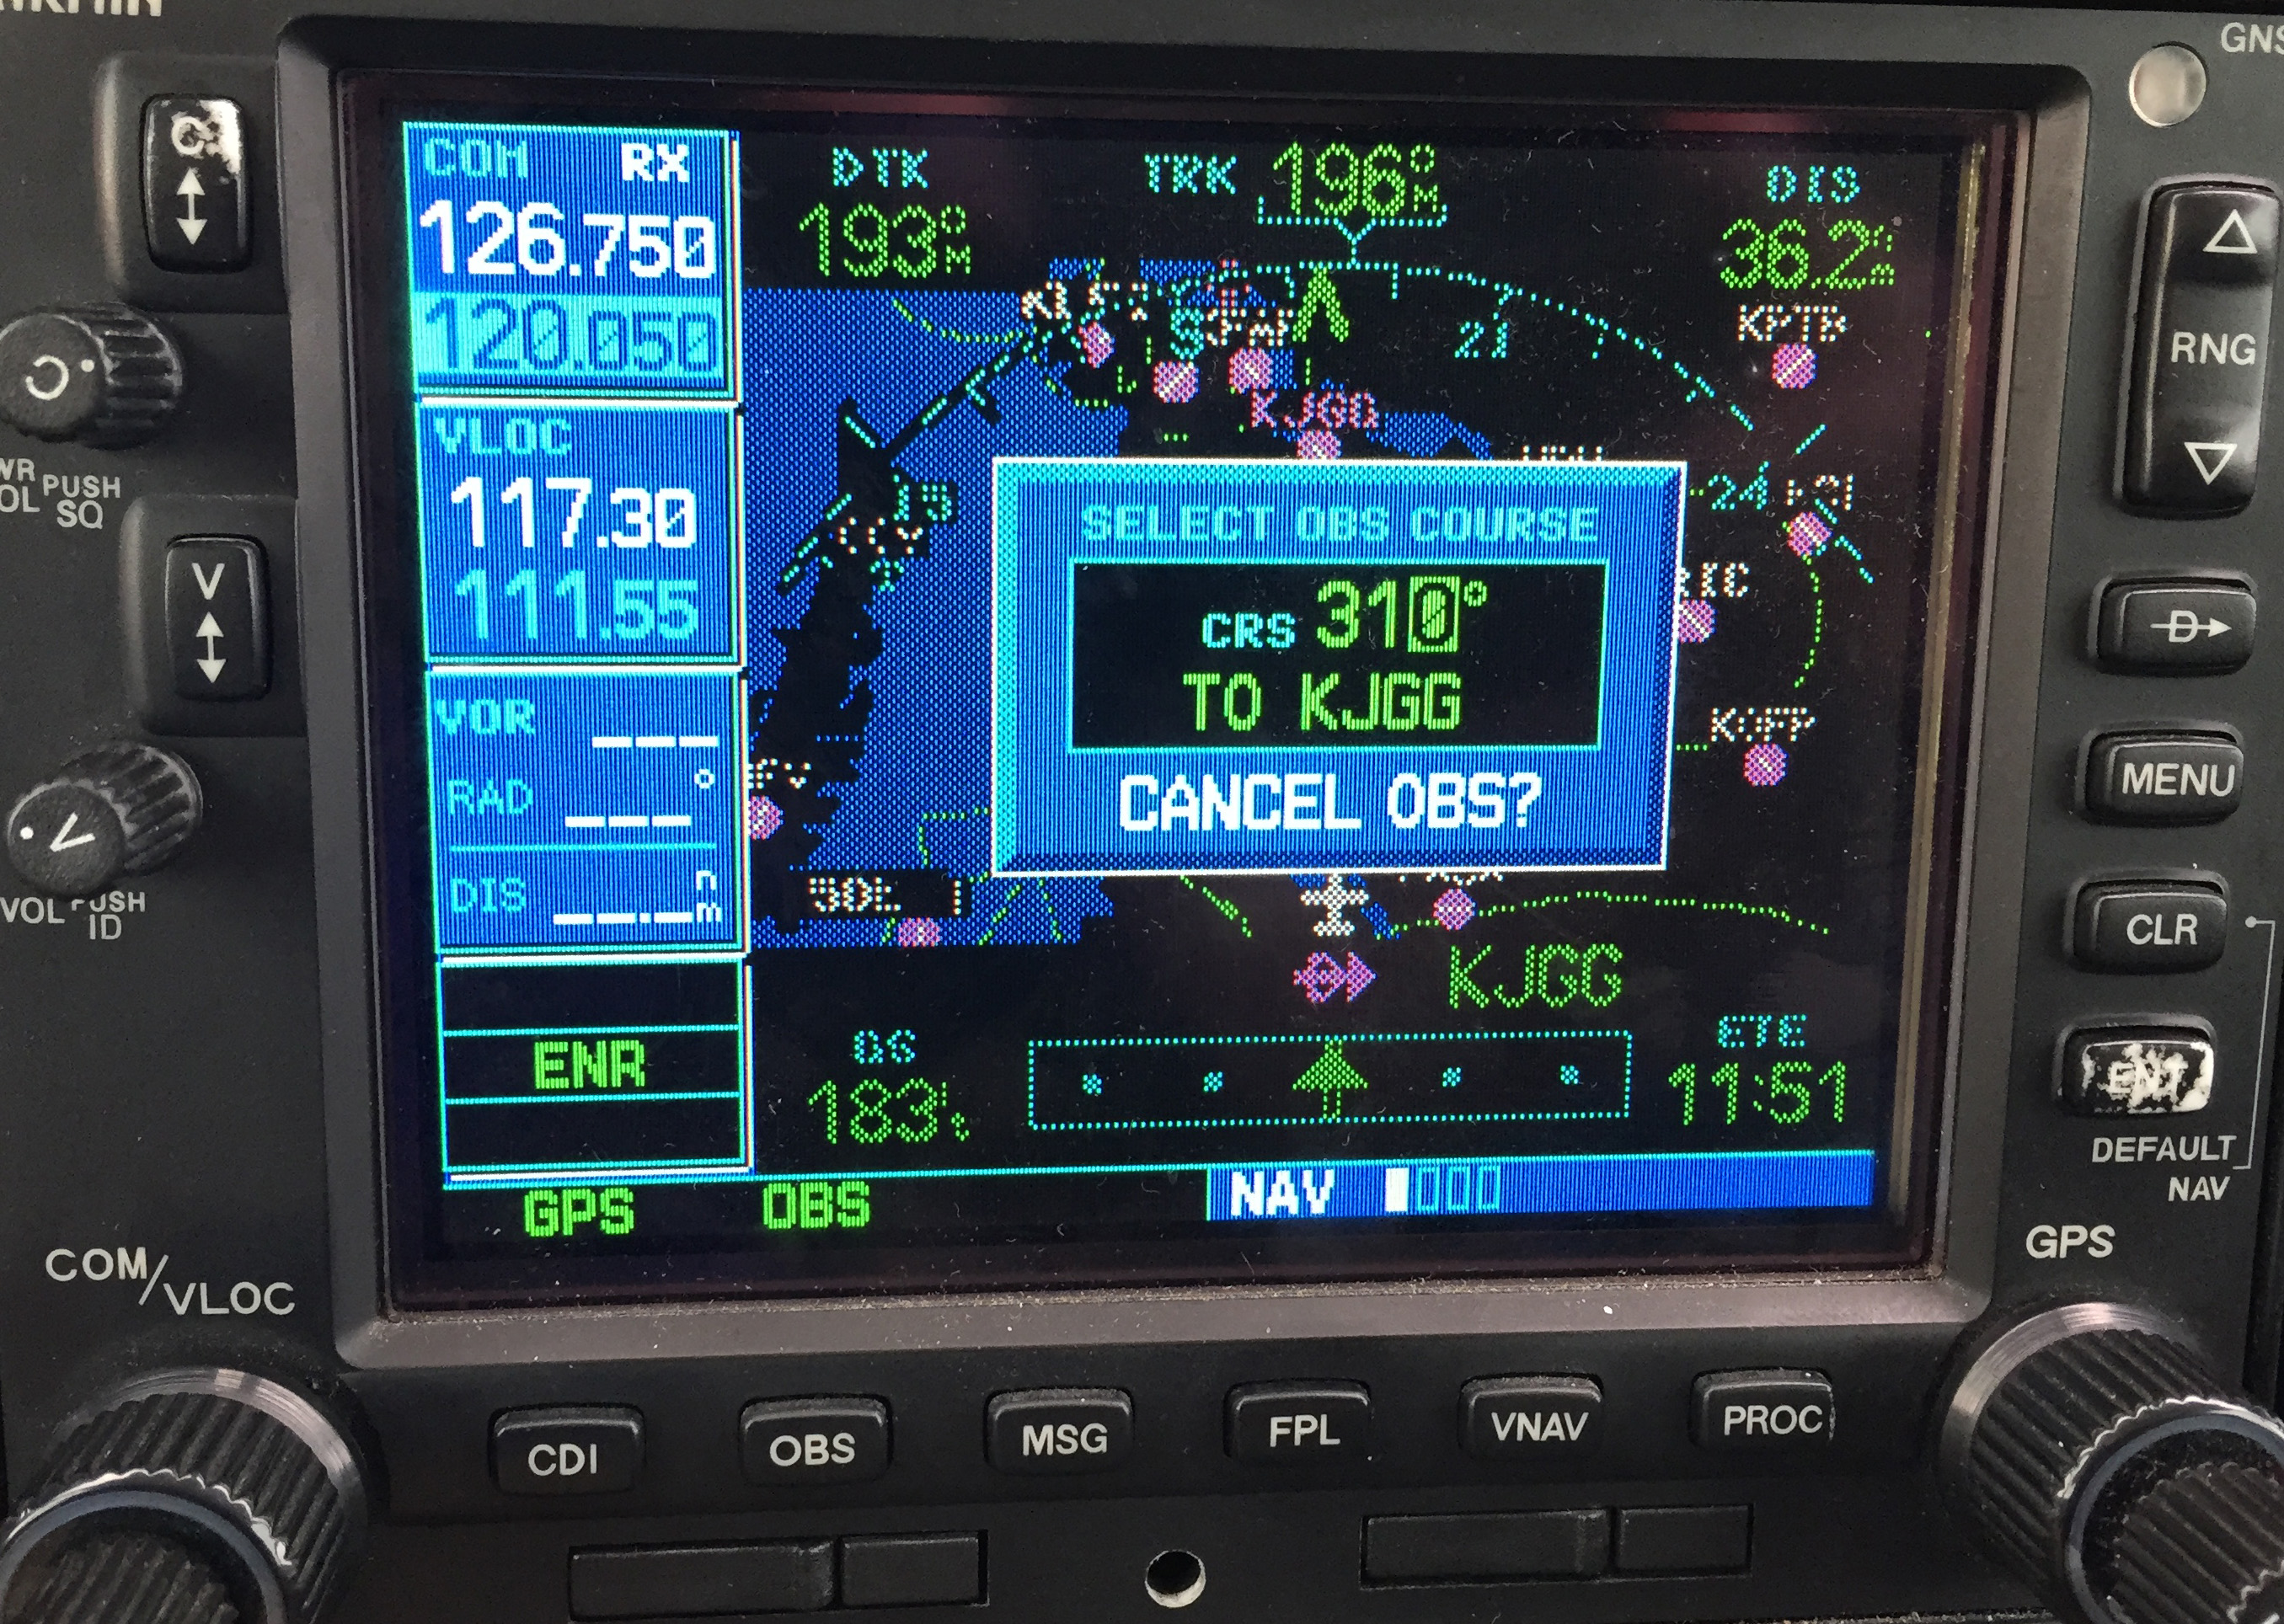
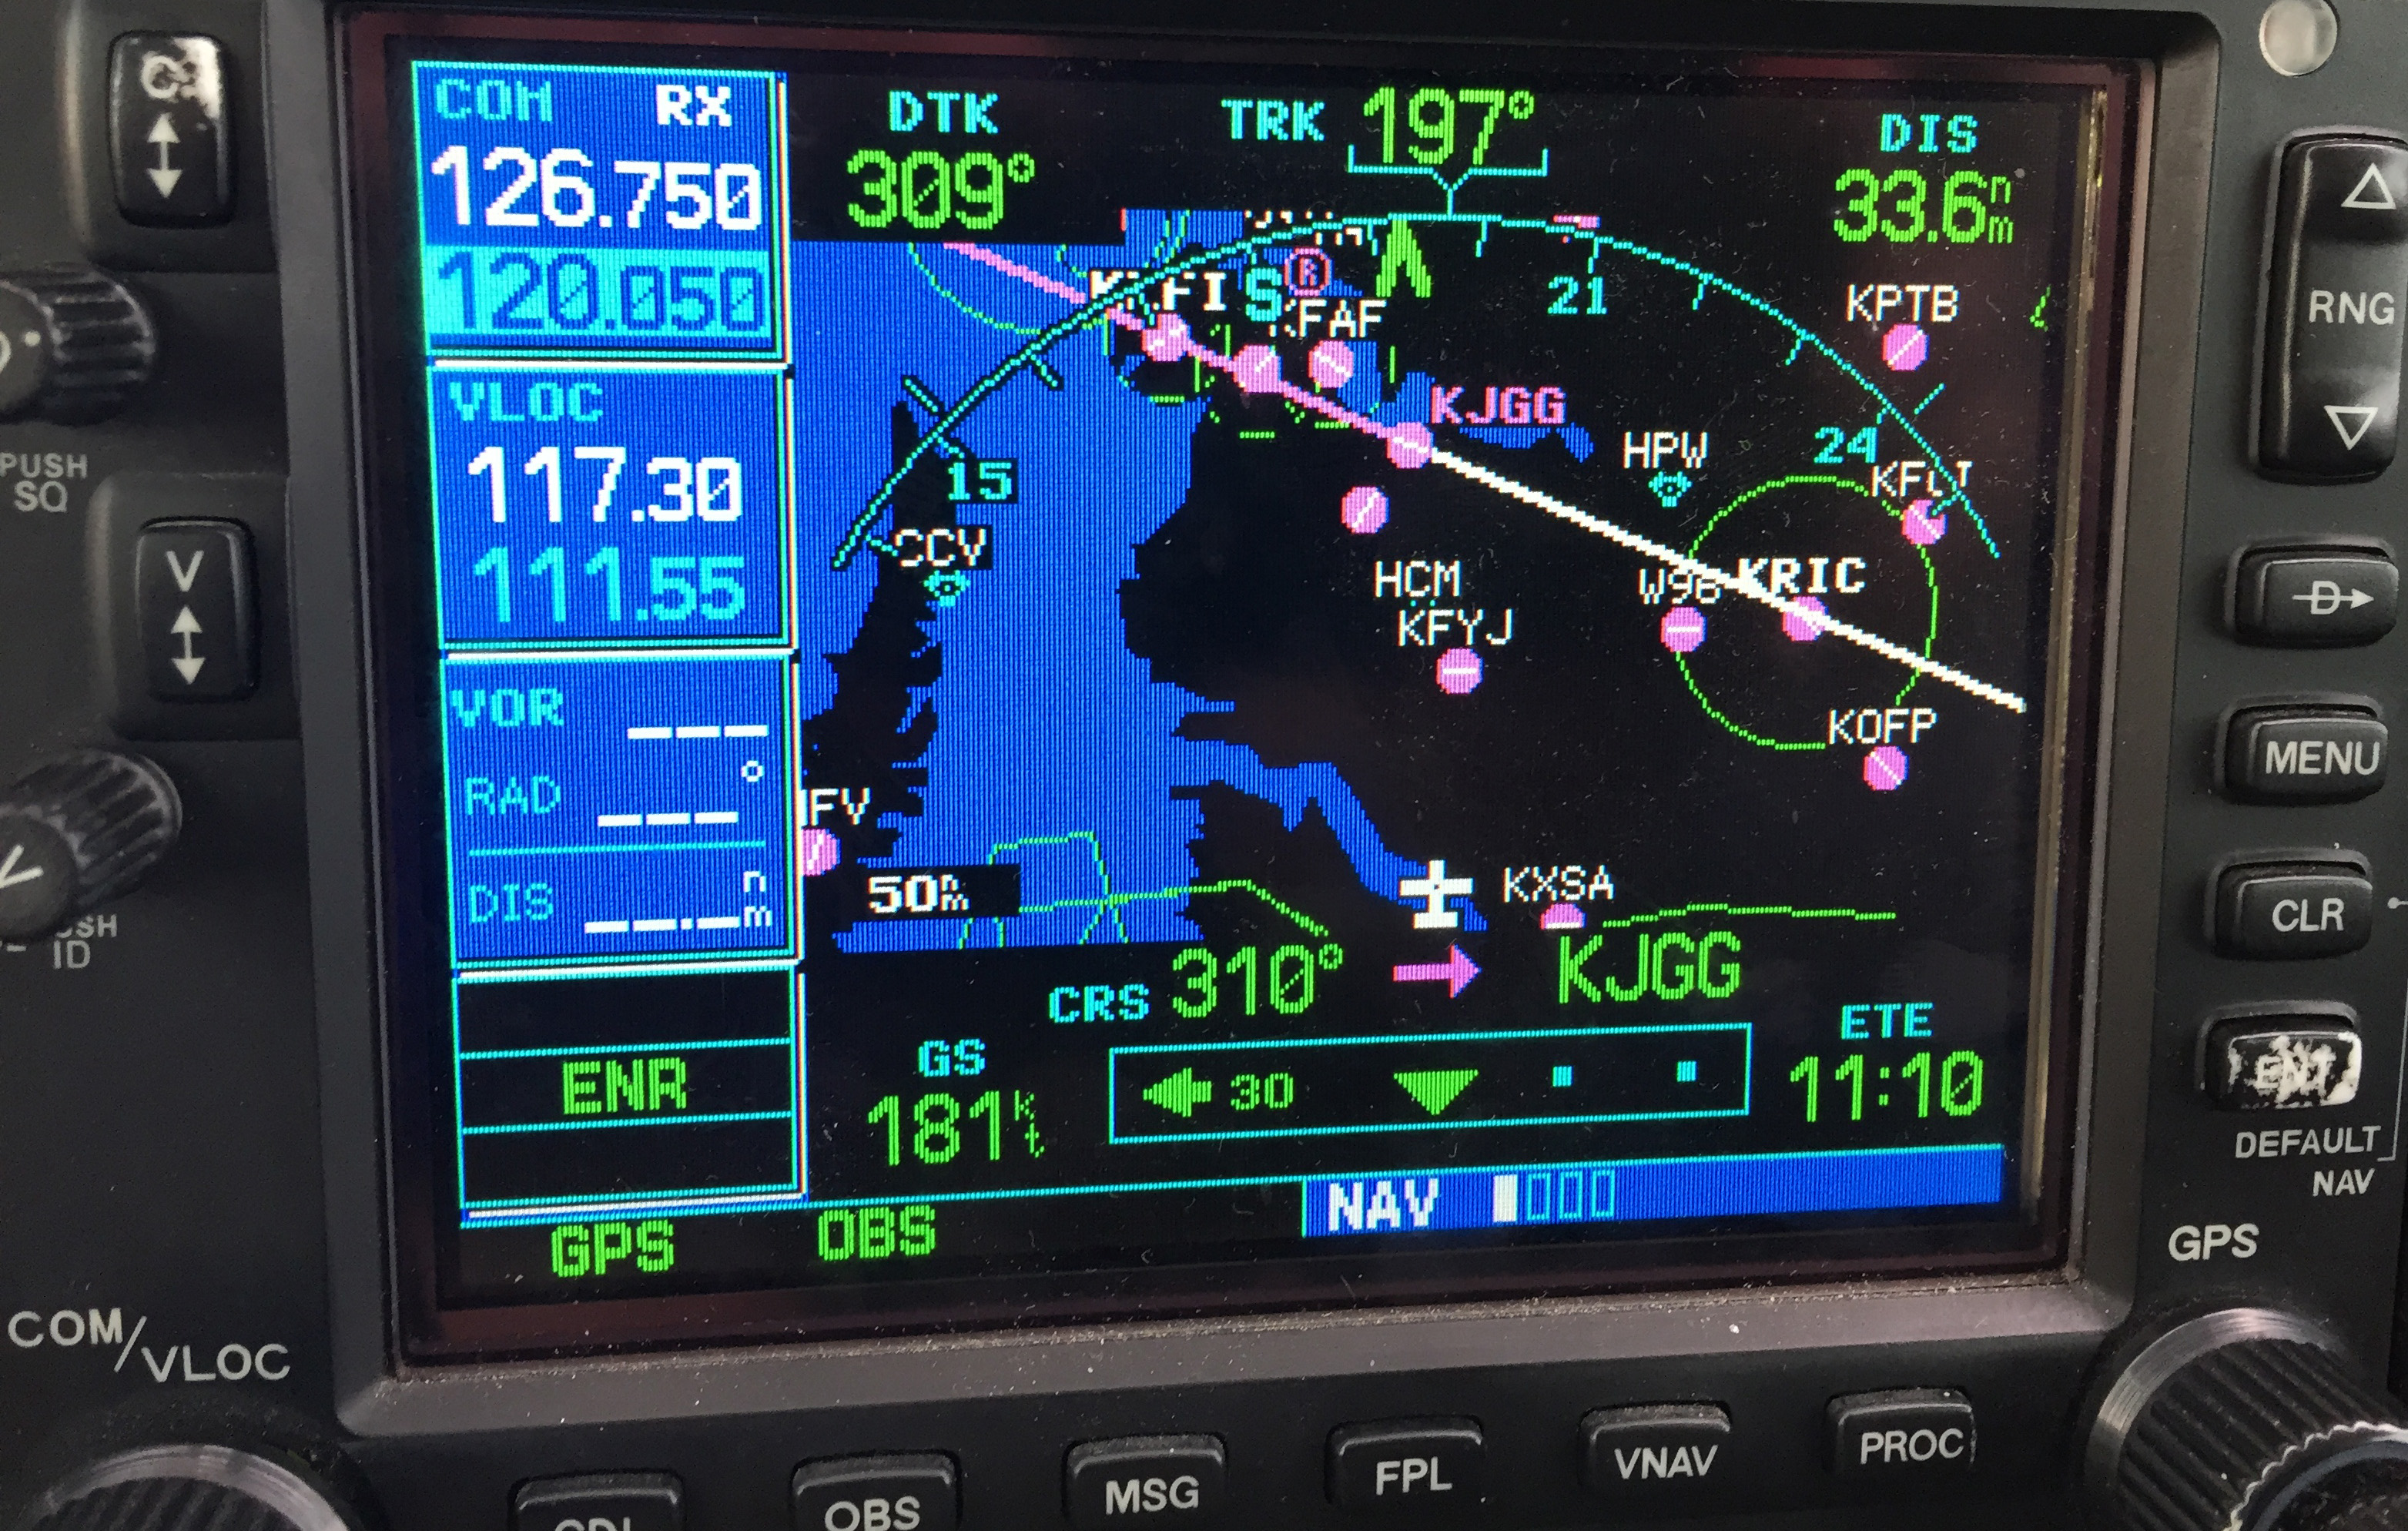
The pictures below should help clarify how to use the OBS to assist in airport orientation.

Step 1- Have the destination set as the next way point in your flight plan. In the picture below, The GPS is set to navigate direct to KJGG. Press the OBS button (circled in red) to engage the OBS mode.
OBS 1

Step 2- Once OBS is selected, use either the window on the screen (which should come up automatically when you press the button in step 1) or the OBS selec tor on your navigation head to select the inbound radial. In this example, I have selected 310 degrees, the landing runway at KJGG.
OBS 2

Step 3- The GPS now shows an inbound course to the airport of 310 degrees. It appears as a magenta line. The line serves as an excellent aid in airport/ runway orientation. Remember that this will not line you up perfectly with the runway, but it can still be extremely useful in planning a pattern entry or for getting your bearings.
OBS 3

Note: As shown below, If you press the OBS button again, the GPS will return to the navigation as previously set.
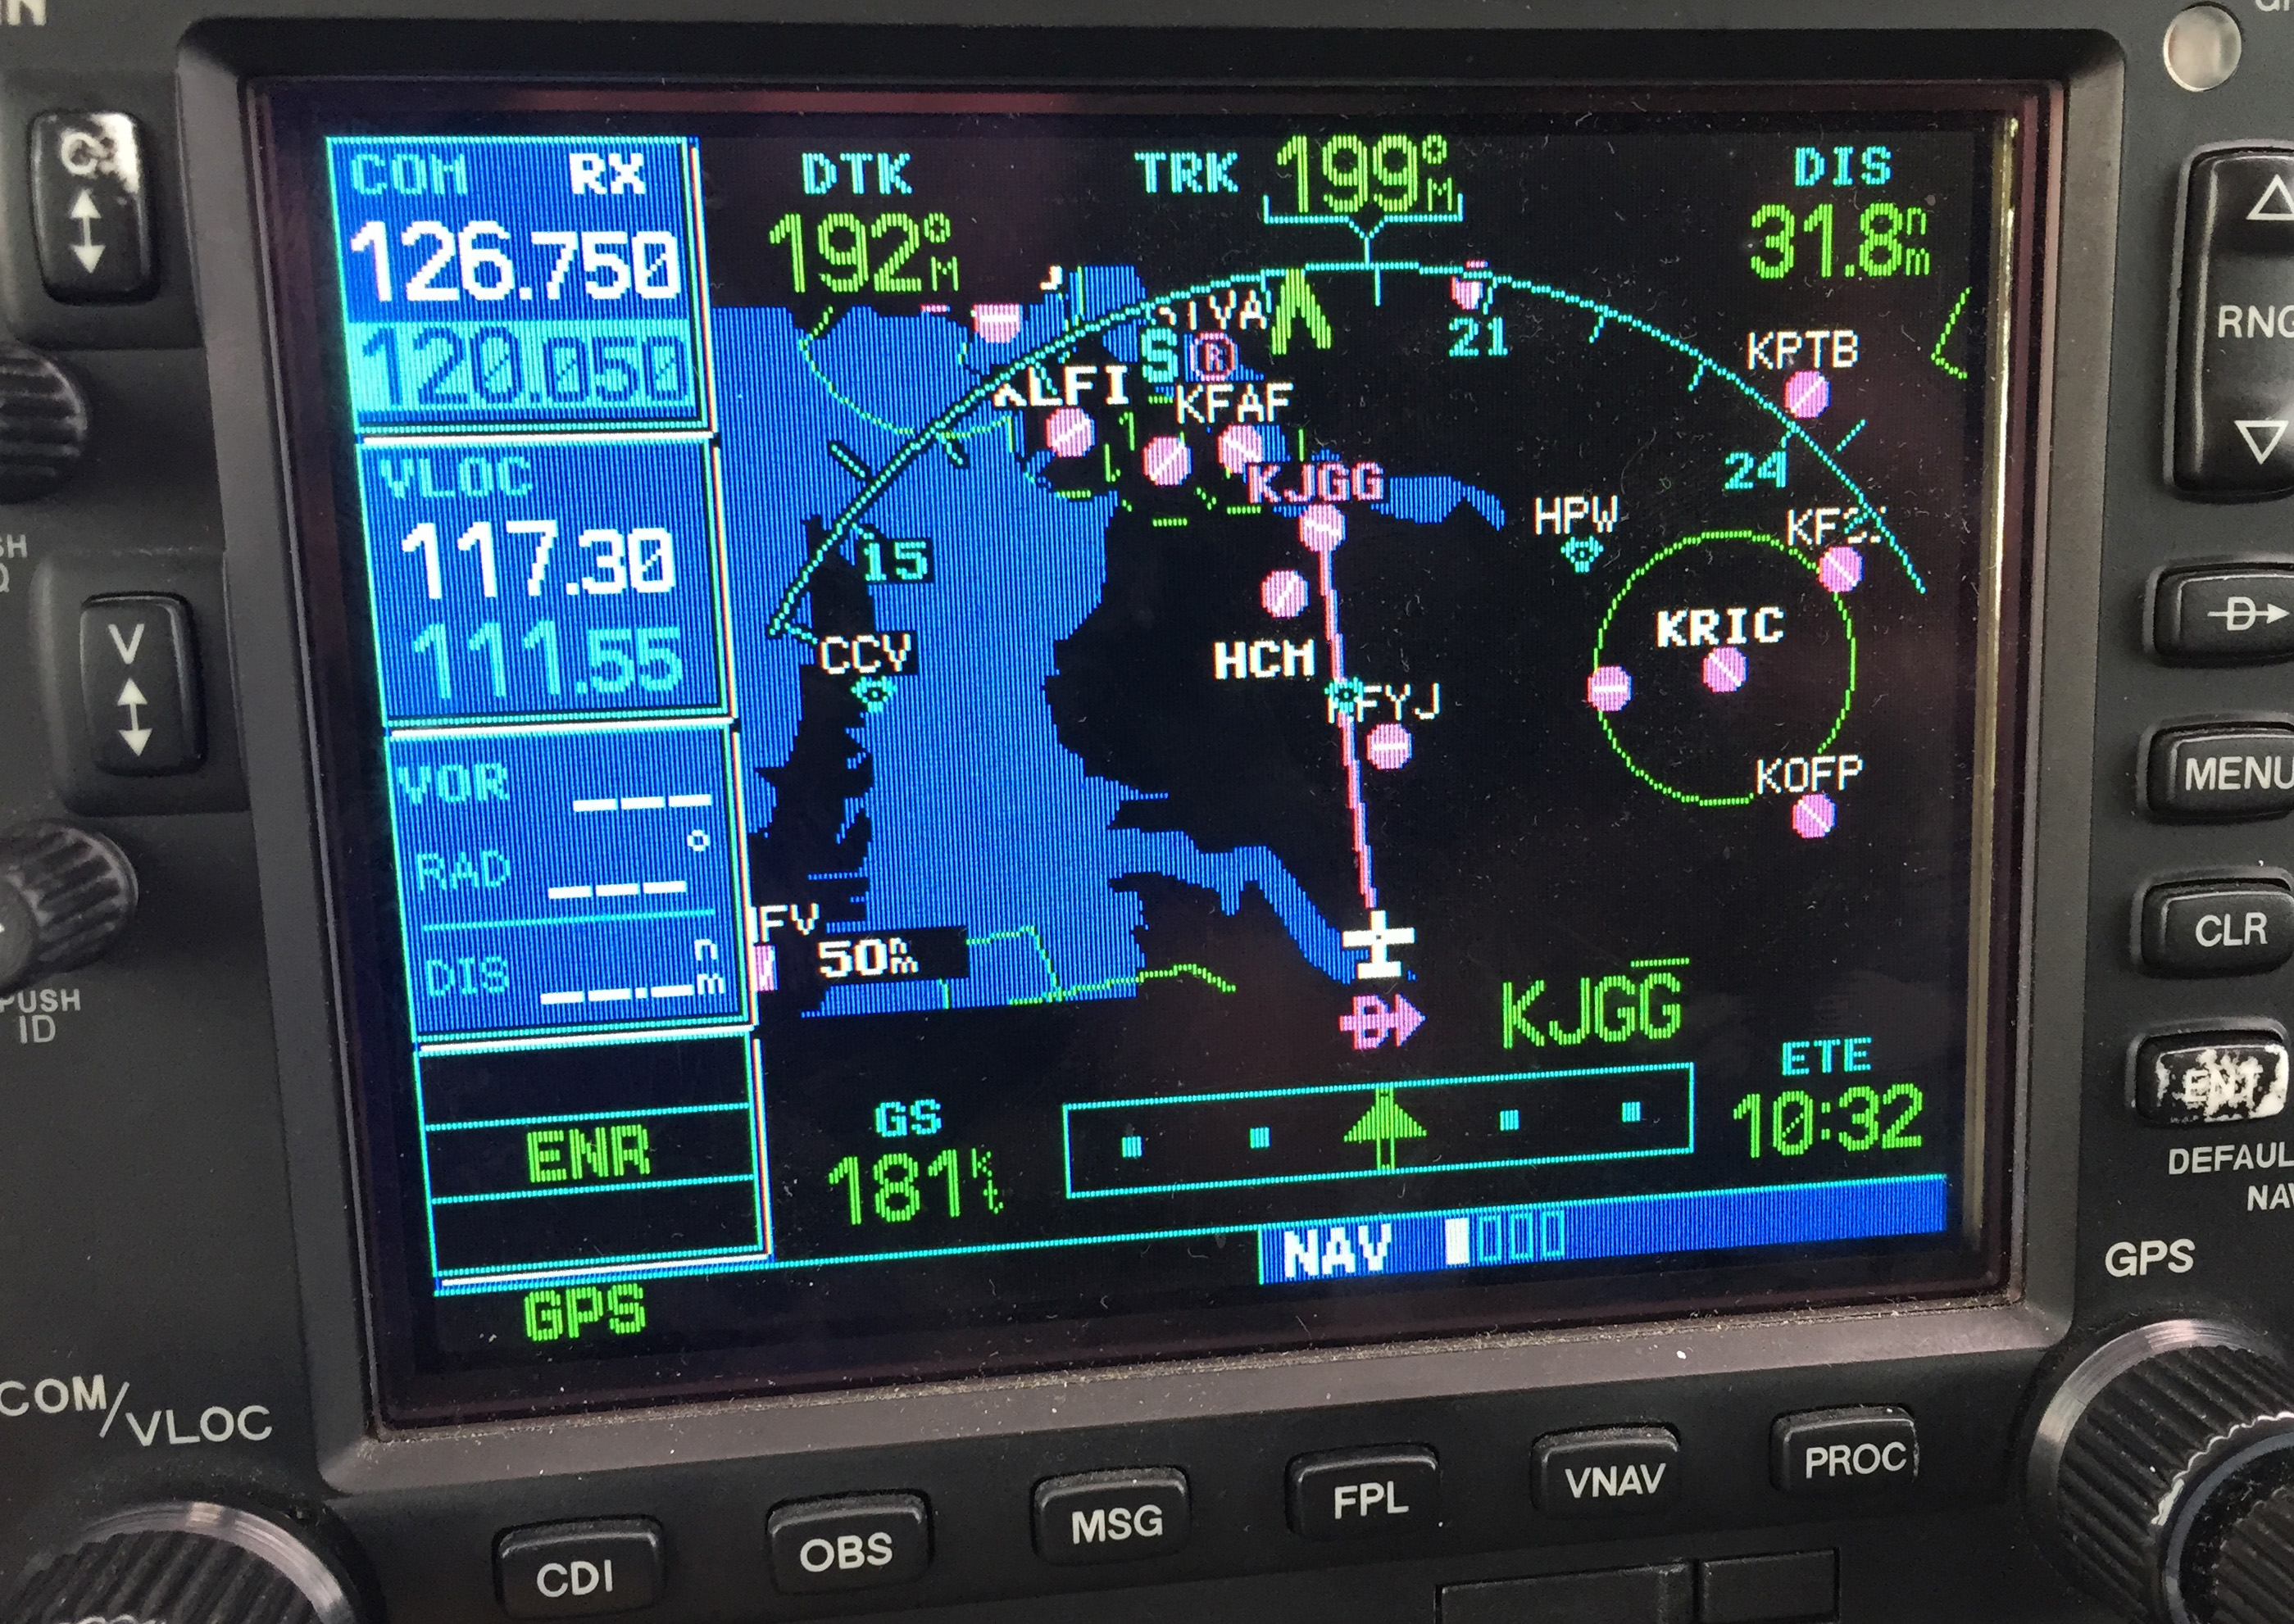
OBS 4
1. Ask for vectors to the airport/ runway: If you have VFR flight following or are talking to a tower equipped to provide vectors, asking for them can be a good choice. Although the controllers may not always be able to accommodate your request due to workload or equipment limitations, most will be happy to comply if they are able. Some pilots may feel silly asking for help, but my policy has always been that I’d rather feel silly for asking than look silly for being lost.

In the case of the Asheville flight mentioned in the opening of this article, my solution was to ask the controller fo r direct to the final approach fix of the assigned runway. Upon arriving there, I had no trouble seeing the VASI and was in good position to fly the visual approach. If I had wanted to be positioned a little further out, I could have asked to fly to a different fix or simply asked to be cleared for the approach in lieu of the visual. Just remember to keep your intentions clear when communicating them to the controller.

The best way to approach an airport day or night, familiar or unfamiliar, is with careful preparation. Having lighted landmarks picked out as well as being acquainted with the airport layout will pay off when it comes time to plan your pattern entry or find the airport on a dark night. Use the resources available to you to get you safely to your destination.

Andrew Robinson is a 135 Charter Pilot and flight instructor in Pennsylvania.  He flies Pilatus PC-12s and instructs in Beechcraft Bonanzas.

Similar Posts

  • AOPA Air Safety Foundation Survival Seminar

    The AOPA’s Air Safety Foundation will be returning to Texas this coming week with their After the Crash:  Surviving An Aircraft Accident seminar.  Though aircraft accidents are rare to most pilots, they still happen.  It is best to be prepared with the proper knowledge and supplies in case you are stranded in a remote area while awaiting help to arrive.

    The seminar will cover the following items:

    • How and what to pack in a survival kit
    • Ways to help search parties find you
    • What to do first immediately after the off airport landing
    • How to survive will awaiting rescue

    The seminar will be put on in Houston, San Antonio, and Austin on three consecutive nights, the 20th-22nd, so everyone will get a chance to attend.  The location and times are below.

    No signup is necessary, just show up and be ready to learn.  The seminar does count for WINGs credit and there will be a sign in sheet at each event.

    The AOPA Air Safety Foundation puts on numerous seminars throughout the country during the year covering a wide variety of topics relevant to general aviation pilots.  The content is always interesting and the presenter always knowledgeable and entertaining.  Hope to see you there!

    Tuesday, January 20th

    Wyndham Hotel, Houston West
    14703 Park Row Blvd.
    Houston, TX 77079
    7:00pm-9:00pm

    Wednesday, January 21st

    Doubletree Hotel, San Antonio Airport
    37 NE Loop 410
    San Antonio, TX 78216
    7:00pm-9:00pm

    Thursday, January 22nd

    Omni Hotel, Southpark
    4140 Governor’s Row
    Austin, TX 78744
    7:00pm-9:00pm

    For more information on the event and the locations, please click here.

  • Texas Top Aviation Now Offers Piper PA46 Training

    Texas Top Aviation is proud to announce that we now offer Piper PA46 Training in the Malibu and Mirage.  Our Piper PA46 training is provided with the same excellent & professional approach that has become our hallmark.

    The four-day format of this course allows time to answer all of your questions about your new airplane.  The Texas Top Aviation Piper PA46 training course leaves you with a confidence and understanding that will help you enjoy your Malibu or Mirage even more.

    New avionics have you scratching your head in confusion? No problem. Texas Top Aviation is well versed in the latest Garmin and glass panel instrumentation.

    If you are in need of recurrent training in your PA-46, Texas Top Aviation would be proud to help with that as well. Consider us your one stop shop for Piper PA-46 training.

    For more information, check out our Piper Malibu/Mirage Training page.

    Contact us today to schedule your Piper PA46 Training!

  • Cirrus SR20 vs. Diamond DA40

    Note:  For this article I am comparing a 2008 Cirrus SR20 G3 and a 2008 Diamond DA40 XLS.

    Aircraft shopping can be a tedious process.  First, a buyer needs to know what the mission is.  How far will flights typically be, how many people will be on board, and how fast does the airplane need to be.  Then, the buyer has to figure out what the budget is.  Finally, a prospective owner needs to figure out how much airplane he or she can handle.

    Two very good airplanes for newer pilots transitioning from a flight school 172 who need a faster airplane to build experience in, but also want to experience a glass panel, are the Cirrus SR20 G3 and the Diamond DA40 XLS.

    Cirrus SR20 G3

    The 2008 Cirrus SR20 G3 is a good airplane.  The G3 is equipped with the 6 cylinder, Continental IO-360-ES, 200 HP engine.  Performance-wise, an owner can expect 135-140 knots true at 9 GPH (Lean of Peak) or 145-150 knots true at 11.5-12 GPH (Rich of Peak).  The 3 blade propeller equipped models have better takeoff and climb performance than the 2 blade propeller equipped planes, especially in high density altitude conditions.

    Cirrus SR20 Comparison

    The airplane is equipped with the Avidyne Entegra EX 5000 glass panel system.  Most models out there will have Avidyne’s CMAX (Chart View) and all will have the Avidyne EMAX (Engine Monitoring).  All came from the factory with the STEC 55x autopilot (though a handful will have the STEC 55 SR, which doesn’t have glideslope functionality).  They also came from the factory with dual Garmin 430s. Most units have been upgraded to WAAS.

    Some owners have upgraded the autopilot to the Avidyne DFC 90, which is a nice upgrade.  The STEC 55x is a rate based autopilot which takes it’s commands from a hidden turn coordinator that is behind the instrument panel in front of the co-pilot’s seat.  The STEC has some crosswind limitations on approaches where the pilot can actually fly better than the autopilot.

    The DFC 90, however, is an attitude based autopilot that  takes it’s commands from the attitude indicator on the Primary Flight Display (PFD).  It also adds a Straight and Level button as well as an Indicated Airspeed hold button, adding safety and functionality.  It does much better in crosswinds on an instrument approach then the STEC.

    A select few SR20s have been upgraded to a single (or dual) Garmin GTN 650 touch screen GPS unit.  The GTN 650 is a very nice upgrade.  The Garmin 430 is a great unit, but the learning curve with the GTN 650 is much less.  The touch screen setup makes a little more sense to the new user.

    Values on the 2008 SR20 G3 with 1,000 hours or less run somewhere between $220,000-$260,000, depending on total time and equipment.

    Diamond DA40 XLS

    A handful of 2007 XLS DA40s were made, but not many.  Most XLS models you will see are 2008 and later. These are equipped with the Lycoming IO-360, 4 cylinder, 180 HP engine with the Powerflow Exhaust STC. Due to the Powerflow Exhaust, the performance is equal to the SR20.  At 6,000-8,000 feet, you will routinely see 140 knots true at 10-10.5 GPH.  Higher altitudes will give slightly better performance and lower fuel burn.  Like the SR20, the Diamond DA40 XLS comes with either a 2 blade or 3 blade prop.  Go with the 3 blade as the takeoff and climb performance is much better.

    Diamond DA40 Comparison

    Where the DA40 XLS has a leg up on the 2008 SR20 G3 Avidyne is in the avionics.  Diamond got on the Garmin G1000 train a little sooner than Cirrus did and the XLS is equipped with the G1000 and GFC 700 autopilot.  The Garmin GFC 700 autopilot is the best GA autopilot I have flown with.  It is an amazing piece of equipment.

    Most, if not all, DA40 XLS models will have both WAAS and Synthetic Vision.  Cirrus didn’t get Synthetic Vision till they put the Cirrus Perspective by Garmin in their aircraft in the middle of 2008.

    The DA40 has great visibility due to the massive amount of glass surrounding the pilot.  The big glider wings give it excellent pop off the runway, but quite a different climb pitch attitude than most other piston single engine airplanes.  The airplane does like to float on landing if the pilot doesn’t get the speed right.

    Values on the 2008 Diamond DA40 XLS equipped with the Garmin G1000 are around the low-mid $200,000 range.

    Comparison

    Performance wise, the airplanes are about equal.  Rich of peak, the Cirrus out performs the Diamond, but uses more fuel.  Both have about 5 hour ranges (though the Cirrus has bigger fuel tanks, 56 gallons usable compared to the Diamond long range tanks of 50 gallons usable).  Useful load is slightly better in the Diamond due to the fact that the Lycoming engine has 2 fewer cylinders than the Cirrus.  The Cirrus does have a roomier back seat, a larger baggage area, and a side stick instead of a center stick, but the DA40 has a back door.  The Cirrus also has the CAPS system, though an owner has to do a $15,000 repack every ten years.  Airplane values are about the same.

    I give a slight edge to the Diamond, though, and here’s why.  For about the same price, a purchaser can get the Garmin G1000 system complete with the GFC 700 autopilot in the DA40 XLS.  The Avidyne and STEC system is great, but the Garmin system is definitely above and beyond.  To get the Garmin G1000 in an SR20, you’d have to look at the Cirrus Perspective by Garmin, which came out in late 2008, and you’d be paying $300,000 or more for a single engine piston with 200 HP (though you do get Air Conditioning!).

    So for my money, I would go for the Diamond DA40 XLS.  I believe you get a little bit more bang for your buck and you don’t lose anything with the DA40 XLS.  Don’t get me wrong, I love the Cirrus, but comparing the two, I think the Diamond DA40 XLS rates a little higher.

  • Simplified Instrument Approach Briefing

    In instrument flying, I am all about keeping things simple.  There is a ton of detail that an instrument pilot can get bogged down in.  When an instrument pilot gets bogged down, he gets distracted from flying the airplane.  When he gets distracted from flying the airplane, dangerous circumstances can happen.

    I like to keep things simple.  When I first started instructing, I developed a very simple instrument approach briefing that captures everything that is necessary on an approach plate, but prevents getting bogged down in the details.

    I call it the BBC instrument approach briefing.  Here it is:

    Brief

    rnav-32-kssfFirst things first.  The first step of an instrument approach briefing is to brief the approach plate.  There are a bunch of acronyms out there that instructors tell their students to memorize that only cause confusion instead of helping get the plate briefed.  To keep it simple, just work your way across the plate and you’ll get all the information you need.

    Start in the top left hand corner of the plate, with the approach course, then work your way right and down, as follows:

    • Approach Course (or Nav frequency if flying a VOR/ILS/LOC)
    • Runway information
    • Notes (these are good to brief the night before as a lot are irrelevant to GA pilots
    • Missed approach
    • Frequencies
    • Planview and MSA
    • Profile View and Minimums

    Simple enough, right?

    Build

    Now that you know what you are planning on doing, you can now take the second step in the instrument approach briefing and build the approach in your GPS.  You know your approach type, you know your transition, and you know what your minimums are.  Taking all that information, you can now build it in to your system.

    Checklists

    Once everything else is done, don’t forget the checklists.  The descent and before landing checklists still need to be done as part of an approach.  The best time to do these is before joining the approach so that you don’t have to worry about flying the approach and looking at a checklist at the same time.  Even better, memorize the checklist and you don’t have to look at anything!

    Most importantly, you want to be configured properly for the approach by the final approach fix.  Gear, flaps set, power set, so all you have to worry about at that point is following the needles and trusting your instruments.

    ifr-cartoon

  • Cirrus SR22 Owner Completes First Solo


    Monte and N565TV

    Congratulations to Monte James who, on July 31, 2014, completed his first solo flight!  Monte is the owner of N565TV, a 2007 Turbonormalized Cirrus SR22.  N565TV is a G3 model with an Avidyne panel.  Monte was very excited to complete his solo flight.  He reported very good landings during the flight (he even said the last landing, which was probably his best yet, caused him to break into laughter!).  Texas Top Aviation’s Hank Gibson, Monte’s instructor, took pictures and continued the tradition of cutting Monte’s shirt tail to commemorate the flight.

    Congratulations to Monte!


  • Upgrading Avionics

    There are many different ways to upgrade an instrument panel.  Putting in a 696 here, a JPI engine monitoring system there, even an Electronic HSI.  But, if you want to swing for the fences and get a serious upgrade, you have to go for a complete glass instrument panel.  For good measure, you might as well throw in a touch screen GPS while you are at it.

    Which panel to go with?  There are two mainstream options (Garmin and Aspen) and a handful of other companies that make glass panel replacements (Avidyne being one, King for a short period of time at the end of the last decade being another with the KFD 840).  Around 2010, there were a lot of companies trying to get into the glass panel retrofit game, but many of the products didn’t gain a whole lot of popularity, leaving Garmin and Aspen at the top of the heap.

    What about the touch screen GPS market?  Garmin has this pretty much cornered as well, with Avidyne and King just getting into the game.  The gap between Garmin’s GTN series and Avidyne and King is pretty wide.

    Garmin GTN Series

    The answer is pretty easy when it comes to the GPS (go with Garmin!), but not so easy when it comes to the panel.  The G500 and the Aspen Evolution series are both excellent interfaces with strong reliability, so which one do you go with?  Feature-wise, both have a lot of the same features: traffic, weather, terrain, synthetic vision, to name a few.  The presentation for each feature is a little different between the two interfaces.  It just depends on what you like better.

    The nice thing about the Aspen system is you can go glass, but you have options on how much glass you want:  1 screen, 2 screens, or 3 screens?  With the single screen PFD, you have all your instrumentation, traffic, weather, and optional synthetic vision.  You don’t need the synthetic vision for the traffic and weather, as it shows up behind your HSI.  It is an honest to goodness glass panel retrofit.

    When you decide to upgrade to 2 screens, this is where Aspen has a leg up.  The second screen is a completely redundant PFD and, if you get the 2 hour emergency backup battery installed, acts as the backup instrumentation to the main PFD.  This means you can take out the old steam gauge standby instruments.  This helps clean the panel up.

    I personally don’t see the need for 3 screens, but maybe there is someone out there who needs it.

    One selling point that Aspen has over Garmin is the wide variety of autopilots and GPS units that Aspen units are compatible with.  The G500 is only compatible with King autopilots, it’s own GFC 700 autopilot (which would be a retrofit), some Collins autopilots, and the Century 21, 31, 41, and 2000.  This does cover a wide array of autopilots, but it keeps some on the outside.  Aspen, on the other hand, is compatible with most autopilots on the market.

    Finally, let’s talk price.  Going with an Aspen EFD 1000 PFD (this is the single screen Aspen) will run you somewhere in the area of $12,000.  The price will vary based on the shop and the airplane.  When you want to add a screen, it’s an additional $6,000.  This is for the base, so if you want to add weather or synthetic vision, it’ll run you a little more.

    The Garmin G500 comes in around $20,000, again depending on the shop and the airplane.  The screens are bigger on the G500, which is kind of nice, and you are buying a Garmin product, which has a fabulous track record in the aviation industry.

    Decisions, decisions.  There really is no wrong answer here.  Both are excellent products with very good track records.  Both have really nice features and don’t hardly fail.  Really, the choice comes down to what you want.

    Need training on your upgraded GPS or glass panel retrofit?  Contact Texas Top Aviation for thorough training on your new avionics today.

Leave a Reply

Your email address will not be published. Required fields are marked *