PopSocket iPad Yoke Mount

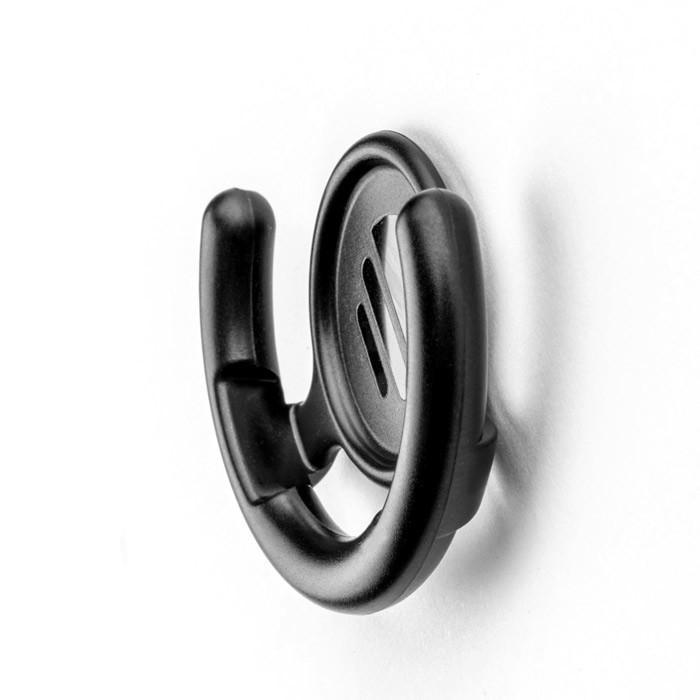
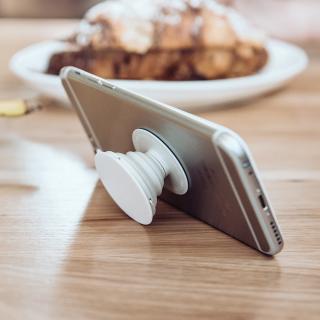
I was recently clued in to a really cool (and very cost efficient) iPad yoke mount.

It’s called a PopSocket and you won’t find it on any aviation website (I have to credit Joe Casey of Casey Aviation with this nifty find).

It’s very simple.  You take the mount (see right) and stick it to your yoke.  Then you pick one of a ton of designs from PopSocket and stick it to the back of your iPad (you can even create your own design!  B2 Bomber anyone?).

It’s low profile, doesn’t get in the way of anything, and is easily removable.  The PopSocket mounts are $10 apiece (depending on the size of your iPad, you may want to get 2).  The PopSocket is $10, so at the most, you’ll be in $40 plus tax and shipping.  Most mounts on Sporty’s are upwards of $50 and require a lot of installation, are big and bulky, and usually require lots of juggling to get the iPad in and out of the mount.

Give the PopSocket a try.

Similar Posts

  • Lightspeed Zulu 2 vs. The Bose A20

    The debate about which headset is the better product will never cease.  We do know this for sure, though, Lightspeed and Bose make the best noise canceling headsets out there.  David Clark’s offering doesn’t match up with these two.  Newcomer AKG has a light (weight-wise that is, as the headset is equipped with a pair of LED lights as well) ANR headset that the jury is still out on.  For now, Lightspeed and Bose sit atop the ANR kingdom.

    The comparison for this article will be between the Lightspeed Zulu 2 and the Bose A20 headsets, both of which I have used quite extensively in my flying career.  I am officially in the Lighspeed camp at this point and after reading my comparison below, you’ll see why.

    ANR Functionality

    Bose A20

    Between the two, the Bose A20 cancels out more noise, no argument there.  This isn’t to say that the Lightspeed Zulu 2 doesn’t.  Quite the opposite, actually.  The Lightspeed Zulu 2 does a great job of canceling the noise.  But with the A20 on in a C172, you can barely hear the engine running.  The difference before you press the power button and after is extremely noticeable.  I had one client turn to me after turning on the noise canceling function of his new A20 headset and state, “These things are awesome!”

    The other advantage Bose has is a continuation of the noise canceling.  About the only thing I don’t like about the Lightspeed is if you don’t have the headset sized just right on your head, each time you turn your head to look at something, then the suction gets broken around the ear cup and you get some ambient noise.  My glasses probably don’t help with this.  It’s not that big of a deal, you just have to readjust the size of the headset, but, since I’m a little OCD, it bugs me.  Once I get the set sized right, it’s smooth sailing.

    Comfort

    Lightspeed Zulu 2

    Far and away, the Lightspeed Zulu 2 is much more comfortable than the Bose A20.   I flew for 5 hours in the right seat with my Lightspeed set on the other day.  I switched to the left seat for the last leg and used the owner’s A20 headset since it was plugged in on that side already and I noticed quite a bit of difference.  The ear cups seemed to press against my head more.  The pad on top of my head didn’t seem to be as cushiony.  It just wasn’t overall as comfortable as the Lightspeed Zulu 2.

    Bose has made a lot of progress from their original noise canceling headsets.  Those didn’t have much of a cushion on top at all.  After about 2.5 hours, the slim ear cushions began to dig in to the side of your head.  So, the A20 has made some progress, but the Lightspeed Zulu 2 takes the cake in comfort.

    Weight Distribution

    “Wait!”  You Bose boys scream (no pun intended).  “The A20 is lighter than the Zulu 2!”  While this is true (the Zulu 2 weighs in at 15.7 oz while the A20 is only 12 oz), the way that weight is distributed makes a massive amount of difference.  The Lightspeed Zulu 2 feels lighter on top of your noggin than the A20 because the weight of the A20 is firmly planted on the top of your head in a single point.  With the Zulu 2, the weight is distributed evenly across the top of your scalp, so even though the set is heavier, it feels lighter on your head because the weight is not all concentrated on one point.

    All this adds up to why I like the Lightspeed Zulu 2 more than the Bose A20.  As for a practical example, I wore my Lightspeed Zulu 2 set for 9.1 hours one day two weeks ago.  Needless to say, it was a long day.  But, once I climbed out of the airplane, I had no pain on the top of my head and only a very little where my glasses ran along the side of my head.  Now I call that a winner.

  • Synthetic Vision Technology

    Let’s say you’re flying in the mountains of Colorado on a cloudy day.  There’s a solid layer from the surface all the way up to 14,000 feet.  You’re inbound to Eagle (KEGE) on the RNAV (GPS) D approach.  There are mountains next to you and below you, but you aren’t concerned since you can see them all.  The base of the last reported overcast layer was 3,000 feet, so you know you’ll break out before the MDA and land no problem.

    At 11,100 over AWACC, you clearly see the top of the mountain below you.  You are comfortably above it. You already have the runway in sight as well.  You pop out of the clouds on the approach at 9,700 feet, spot the airport and follow the tower’s instructions to circle north of the runway for a left base for runway 7.

    How could you see the mountains inside the clouds?  You have Synthetic Vision installed on your glass panel, that’s how.

    Aspen Synthetic Vision
    Aspen Synthetic Vision

    Synthetic Vision, which has actually been around since the ’70s when NASA and the US Military first developed it, was first FAA certified for the Gulfstream PlaneView flight deck in 2009.  Garmin, Avidyne, and Aspen are the main general aviation manufacturers of synthetic vision these days.  All Garmin PFDs are now equipped with Synthetic Vision while Aspen gives you the option to upgrade to Synthetic Vision when you get one of their PFDs installed.  Avidyne gives you Synthetic Vision in their R9 upgrade for the Cirrus.

    What is Synthetic Vision?  Basically, it’s a 3-D picture on the primary flight display showing terrain, obstacles, traffic, and runways.  It greatly enhances situation awareness in areas of terrain or high obstacles during IFR conditions or at night.

    The goal behind the development of Synthetic Vision was to decrease the amount of controlled flight into terrain (CFIT) accidents.  A CFIT accident consists of a perfectly airworthy airplane flown by a pilot (or autopilot) unintentionally into terrain. These accidents can happen in low visibility conditions or at night, but the reason is mainly due to the pilot losing track of his position in relation to obstacles or terrain (or water as was the case with JFK Jr.).

    With Synthetic Vision, the goal is to enhance pilot knowledge of what is around the airplane at all times. When you’re at altitude, the terrain below you looks flat.  When you start descending down amongst the rocks, the hills or mountains start to rise up on your screen.  For those used to the coloration with the 2-D terrain feature on a GPS unit, it translates very easily to the terrain coloration on a Synthetic Vision equipped PFD. Terrain that is between 100 and 500 feet below the aircraft is shown as yellow, while terrain closer than 100 feet is depicted as red.

    Garmin Synthetic Vision
    Garmin Synthetic Vision


    One neat feature on Garmin units is the Highway in the Sky.  When a pilot puts a course or a flight plan in the GPS, the PFD displays magenta boxes at the altitude selected displaying the route.  It’s handy when hand flying to just “fly through the boxes.”  They also display descent angles on approaches.

    Synthetic Vision is still optional on Garmin and Aspen units, but I highly recommend springing for it.  It will give you a higher level of safety and keep you out of the rocks.

  • A Flying Car in the Future?

    EAA Airventure at Osh Kosh always draws great innovators every year, leading the aviation consumer to discover something new and different.  Flying cars have always been a dream for the everyday pilot.  Why not fly to work?  Why not park the plane in the parking lot?  Why not drive from the runway onto the freeway?  All excellent questions!

    Samson Switchblade Driving

    Well, Samson Motorworks is trying to make those dreams a reality.  Samson’s Switchblade flying car is in the (hopefully) finally stages of development this summer.  The company expects to be able to conduct test flights early next year, then begin selling the experimental kit.

    The Samson Switchblade will be in the Experimental category, but Samson has a builder assist program that only adds $20,000 to the final cost of the kit.  The total price of the kit, which comes 49% completed and only takes 3 weeks to complete with the builder assist program, comes in at $140,000.  That includes the engine, avionics (it’s equipped with Dynon’s 7″ Skyview glass panel display, a Dynon radio and transponder, a Dynon intercom, a Dynon AOA, an iPad mini, and an ADS-B GPS), and the builder assist program.  Similar to a Cirrus, it is also equipped with a Ballistic Parachute Recovery system.

    The Samson Switchblade has several different engine options, including a supercharged, liquid cooled, V-4 similar to a Corvette engine that will produce 190 HP.  Max cruise in the air should be around 170 knots.  The Switchblade will hold 30 gallons of mogas, burn 9 GPH in the air, and get 35 mpg on the ground.  The gross weight will be 1,750 pounds.

    How does the car to plane transition happen?  Samson has developed a fly by wire system to retract the rudder down while the car is in drive mode.  The wings use a mechanical linkage to fold up into the belly.

    Samson Switchblade Flying

    There are several different packages for the Samson Switchblade:  the Snowbird, the Aurora, and the Trek options.  Details can be found on Samson’s website.

    I, for one, will be keeping an eye on the freeways next summer to keep an eye out for cars sprouting wings.  No more traffic jams!

  • Texas Top Aviation Now Offers Piper PA46 Training

    Texas Top Aviation is proud to announce that we now offer Piper PA46 Training in the Malibu and Mirage.  Our Piper PA46 training is provided with the same excellent & professional approach that has become our hallmark.

    The four-day format of this course allows time to answer all of your questions about your new airplane.  The Texas Top Aviation Piper PA46 training course leaves you with a confidence and understanding that will help you enjoy your Malibu or Mirage even more.

    New avionics have you scratching your head in confusion? No problem. Texas Top Aviation is well versed in the latest Garmin and glass panel instrumentation.

    If you are in need of recurrent training in your PA-46, Texas Top Aviation would be proud to help with that as well. Consider us your one stop shop for Piper PA-46 training.

    For more information, check out our Piper Malibu/Mirage Training page.

    Contact us today to schedule your Piper PA46 Training!

  • Introducing…The Aviator’s Academy

    Imagine this …

    You have plans to fly to an airport 218 miles north for a business meeting. Your window is tight; you have an early morning meeting at your office you can’t miss prior to leaving for the airport. The colleagues you are flying to meet must catch another flight within two hours of your target arrival time. 

    You’re comfortable flying in the current weather conditions, but a small southward-moving storm north of your destination might threaten your approach. Additionally, given the time of day, you can expect ATC delays due to vectors and know you’ll have to adjust on the fly.

    Are you confident you can make the meeting in time?

    If the answer isn’t immediately clear, you’re not alone. Good aeronautical decision making is of utmost importance in the air. External pressures, unexpected challenges, and your level of instrument proficiency are among the many factors to consider when considering an IFR flight. 

    While we can’t remove the external pressures or control the weather, we CAN help with instrument proficiency!

    Introducing … The Aviator’s Academy – advanced online pilot training. 

    During my time training hundreds of capable and competent pilots at Texas Top Aviation, my most common observation with seasoned and rookie pilots alike is that the pilot is often aware of knowledge gaps with the airplane’s avionics after initial flight training or after upgrading to a more advanced airplane, but aren’t sure where to get answers.  Simply put – expert glass panel flight training is hard to find.

    They know enough to have earned their license, but still feel uneasy anticipating unexpected challenges. This leaves them feeling at best, uncomfortable, or worse, on edge and unsafe. When you’re not as proficient as you could be, an easy flight can become stressful quickly in unexpected scenarios, and things spiral from there. It doesn’t have to be this way.

    That’s why The Aviator’s Academy offers online courses with real-life scenarios using glass panel avionics. You’ll gain more confidence in the air and be equipped with better aeronautical decision-making skills after learning from the best in the business.

    We understand the pressures you face in the air. We get it because we have been providing expert, personalized, owner/pilot instruction since 2014 at Texas Top Aviation. With over 8000 hours of instruction given in Technically Advanced Aircraft and over 13,000 hours in total flight time, The Aviator’s Academy instructors are qualified to fly and instruct most single-engine aircraft to a level that far exceeds what a flight school can provide. Nowhere else can you get expert glass panel online instruction for Technically Advanced Aircraft.

    If you’re in need of an instrument proficiency check and fly a technically advanced aircraft with glass panel instruments, this is the place to get your ground school training. Conveniently online. Expertly taught. 

    Mastering your glass panel avionics isn’t impossible. You just need a guide. Enroll in the course you need to take your skill to the next level. You’ll receive expert, specialized online training. Then you’ll fly with confidence.

    LAUNCHING AT OSHKOSH! Visit www.aviatorsacademy.com and leave us your email to be notified when our first course drops. Come visit us at booth 3004 at Osh Kosh, July 25th-July 31st, 2022.

  • The Importance of Density Altitude

    Density Altitude:  Pressure Altitude corrected for non-standard temperature.

    That’s the book definition of density altitude.  The problem is, that definition leaves a lot of general aviation pilots scratching their heads.  What really is density altitude?

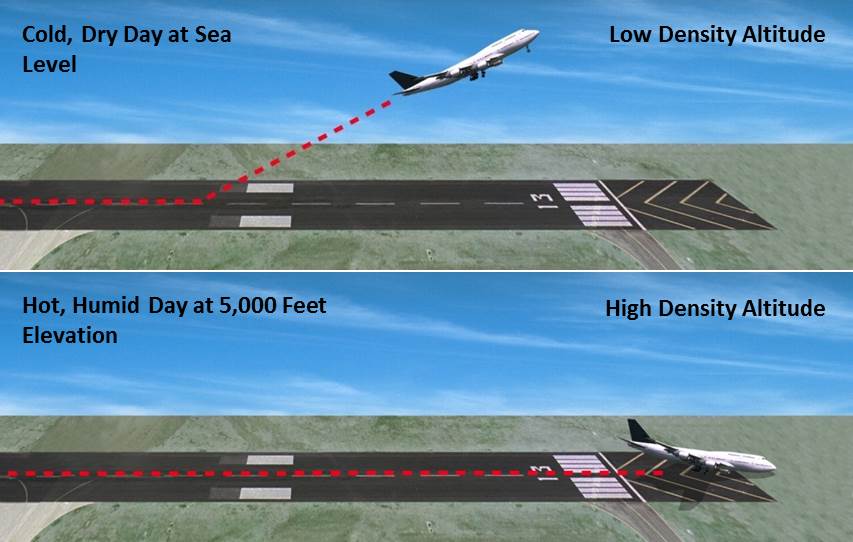
    All airplane engines rely on air and fuel mixing together, then that mixture is ignited to create combustion. Normally aspirated piston engine airplanes get their best performance at sea level, where the air is nice and thick, allowing plenty of air molecules to get sucked in the engine intake.  As a normally-aspirated airplane climbs, the ambient air pressure drops with an increase in altitude (the air gets thinner, less dense), thereby reducing airplane takeoff, climb, and landing performance.  There just isn’t as much air at higher altitudes, to put it simply.

    Turbo charged piston engines assist with this air density problem.  A turbo charger boosts the air coming into the engine and fools the engine into thinking it is at sea level pressure all the time.  The higher the altitude, the faster the turbo charger spins, spinning the compressor faster, which compresses more air to continue to give the engine sea level pressure air.  This gets faster cruise speeds the higher you go.

    Both normally aspirated & turbo charged engines do experience longer takeoff rolls and reduced climb rates at higher airport elevations & higher altitudes.

    How does this all relate to density altitude?

    When the outside air temperature rises, the air becomes thinner, less dense.  This means that when an airport elevation is 1,000 feet, but the density altitude is reported as 3,000 feet, the airplane engine thinks it is at 3,000 feet.  It won’t accelerate as fast.  The airplane’s climb rate will also be reduced.  That means that the normal climb pitch attitude a pilot is used to seeing won’t be accurate at higher density altitudes. It will lead to slower indicated airspeeds, slow enough to potentially lead to a stall if a pilot isn’t paying attention.

    Where does this get dangerous?  High elevation airports.  Whenever the OAT creeps above 85 or 90 at an airport that is higher elevation (I would classify higher elevation as 2,500 feet or higher), the corresponding density altitude sky rockets.  If a pilot isn’t paying attention to airspeed or angle of attack (if the airplane is equipped with an AOA), a stall can come very quickly on climb out.

    What to take home from this?  Monitor your climb speed and angle of attack, especially right after takeoff, when you hear density altitude on the ATIS or AWOS.

Leave a Reply

Your email address will not be published. Required fields are marked *