Recently, I did my TBM and Meridian recurrent training with Joe Casey of Casey Aviation. I always like being challenged my more seasoned instructors than me because I always get to learn something. When I learn something, it makes me a better instructor and allows me to give better instruction to my customers. Plus, there is still a bunch that I don’t know!
Joe has a podcast titled The Malibu Guru (because he really is the Malibu guru!). During our training, we did a podcast together and he interviewed me. I get to tell about Texas Top Aviation and some exciting things coming up this summer (hint: the biggest exciting thing is called The Aviator’s Academy). Before I give too much away, take a listen to the podcast.
It was a rainy Thursday afternoon and I was eating lunch with my family when my phone rang. My wife and I had just been discussing how miserable the weather was, so it was only natural that about 30 minutes later I was soaking wet and sitting in one of our Aerostars getting ready to take off for Ohio. I didn’t have much information about who I would be flying, or why, but I knew that I was going to pick someone up to fly them home; something about a missing airplane. So off I went into the muck. My biggest concern at that point being whether or not my clothes would ever dry out.
I arrived uneventfully and walked happily into the FBO, but found myself quickly in a very different atmosphere. It turned out I had two passengers to pick up, a husband and wife, and they had arrived at the FBO before me. As I walked in the door, the wife received a phone call. The person on the phone told her that search teams had found her father’s airplane crashed in the woods and that he was dead. I learned the rest of the details quickly and it was hard to stomach.
She was travelling home that day to be with family until they were able to locate her father. She was pregnant with her first baby and was in her third trimester. The baby was to be her dad’s first grandchild. He’d owned a Lake Amphibian for years and had stayed at home to work while his wife was out of town. He was last seen leaving work on Tuesday of that week and was reported missing on Thursday by his co-workers. Airport security footage showed him pulling the airplane out and taking off at 20:48 (after sunset) on Tuesday night.
After a few minutes we loaded the Aerostar and took off. It was the saddest flight I’ve ever done. Understandably, my passanger sobbed on and off from the time she got off the phone until we landed a couple of hours later. The weather seemed appropriate as we flew along through the rain and were greeted at our destination by a grief stricken family and a few reporters.
I said a sad goodbye and left, but I couldn’t help but think about their situation. It really hit close to home with me as it was easy to draw parallels between my family and theirs: she was very close in age to me and pregnant with her first child. My wife and I were new parents. Her dad had owned his airplane for about the same length of time that my dad has owned his Bonanza. Additionally, it isn’t uncommon for my parents to go a couple days without being able to reach each other because they both travel.
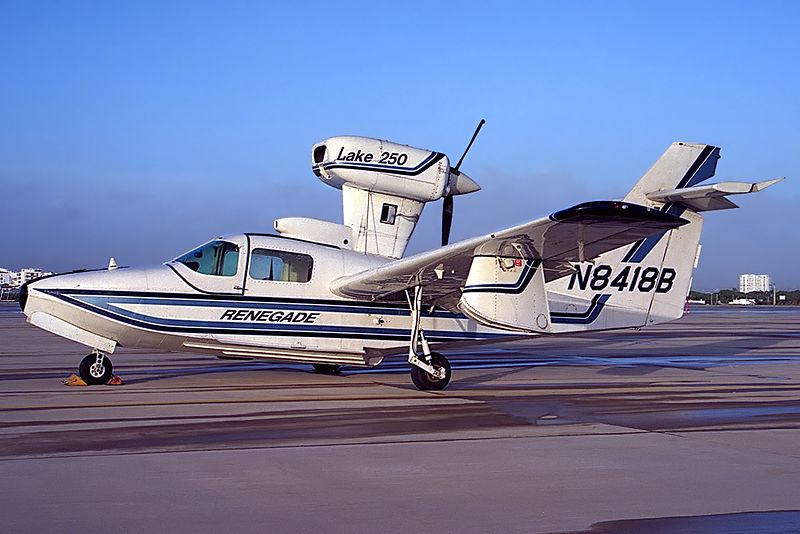
A Lake 250, the same type of aircraft involved in the accident.
But what happened..?
In the time since the accident, the NTSB has published their findings and unfortunately, it makes the situation sadder. It was completely avoidable.
Airport security cameras showed that after removing the airplane from the hangar, the pilot did not complete a preflight inspection or even a walkaround of any kind. He simply climbed in and left. The investigators were unable to find any traces or odor of fuel in the wreckage, nor any mechanical abnormalities with the airplane. In fact, according to the report, the engine was put on a test stand and ran perfectly. It would seem that the pilot simply never checked the fuel quantity and took off. The airport cameras captured the take off and a bright flash about 30 seconds after the aircraft departed.
Here is an excerpt from the report:
The National Transportation Safety Board determines the probable cause(s) of this accident as follows: The pilot’s attempted 180-degree return to the runway immediately after takeoff in dark night conditions, which resulted in collision with trees and terrain. Also causal was the pilot’s inadequate preflight inspection, which resulted in a takeoff with little-to-no fuel on board the airplane.
Interestingly, the report also details their ability to use logbook information and fuel receipts to show the airplane was taken on a long cross country on its last flight and likely not fueled again.
Another thing which stuck out in my mind upon learning the details of the crash was how important it is to let someone know when you’re going flying. Having another person know roughly when a flight is leaving, where it’s going and and when to expect it back could potentially save the lives of the people on board. In the case of this accident, the pilot didn’t alert anyone that he was going flying and therefore, no one realized he was missing for 2 days.
From reading the NTSB report I don’t get the impression that he survived the crash, but I can’t help thinking about the possibility that he, or others in similar circumstances, could survive a crash and then die from their injuries because no one knew to look for them. When I flew charter, we weren’t legally allowed to take off VFR without letting someone at the company know the details of the flight. I’ve adopted this as my personal policy as well. One text message could be the difference between being rescued or not.
Finally, every pilot should ensure that a proper walk around is completed! It’s easy to assume everything is okay with an airplane, especially one that no one else has access too. In addition to a thorough preflight, I like to walk all the way around the airplane and visual check fuel caps, doors, chocks, ropes, etc., immediately before getting in to ensure that everything is ready. I know a couple of pilots who have taken off with various panels and compartments open simply because they got distracted during their walk around and never closed them. (A good policy is to never walk away and leave something open). Perhaps even more mind boggling is that he apparently didn’t look at the fuel gauges after start up and before take off. I also have to wonder how much fuel he had remaining upon completion of the previous flight.
“Aviation in itself is not inherently dangerous. But to an even greater degree than the sea, it is terribly unforgiving of any carelessness, incapacity or neglect” is likely a familiar quote to just about every pilot. It is often written on a poster with a picture of an old timey bi-plane hanging out of a tree, but I think that it is absolutely on point. Carelessness in the preflight and neglecting basic pilot responsibilities (in this case fuel planning) cost this father his life and his opportunity to meet his first grandchild.
I know this article is a real downer, but it’s supposed to be. Its tragic that accidents take place which are completely avoidable. Obviously this case was beyond the normal realm of carelessness and neglect, but, we as pilots need to be extremely careful not to get so comfortable with an airplane that we stop doing the things which are so basic and important to safety. One of my professors in school used to say “aviation is fun, but it plays for keeps,” which is an effective way to remind myself how important it is to do it right.
*Out of respect to the family, I have not included any specific names, tail numbers or airports in this article.
It was a rainy Thursday afternoon and I was eating lunch with my family when my phone rang. My wife and I had just been discussing how miserable the weather was, so it was only natural that about 30 minutes later I was soaking wet and sitting in one of our Aerostars getting ready to…
I began flying a Piper Malibu earlier this year. For those of you not familiar with the original PA-46, a Malibu has a Continental TSIO-320 engine, with 310 HP. It’s pressurized and cruises at about 185-200 KTAS.
A few things are introduced to the equation when pilots start flying higher, faster, and farther. When you start flying over longer distances, weather becomes more of an issue. On a quick hop from, say, Austin to Dallas, you can be pretty sure of what the weather will be since it’s a short trip. When you fly from Austin to LA, leave in the morning, land once along the way, and arrive in the afternoon after spending six and a half hours in the air, weather can change a lot in that amount of time.
A must for any pilot flying high and over long distances is some kind of Nexrad system, whether it be a Garmin 696, or it shows up on your GPS or MFD. Having this situation awareness is very helpful when planning ahead as to what to do about weather. A stormscope is also a handy tool, since you can see where the lightning is with it.
Cold fronts can be pretty nasty, depending on how strong and how fast they are moving. A strong, fast moving cold front usually has a lot of convective activity associated with it. The tricky thing with storms associated with fronts is that storms form in lines, most of the time. If you’re trying to cross a front in the morning, you can usually get high enough over the clouds with a pressurized airplane since the temperature is still relatively low to get clear of the cumulonimbus clouds. The cloud tops will only be around ten or twelve thousand feet.
Crossing fronts in the afternoon when daytime heating is pushing the tops of the CBs up to the 20-40 thousand foot range, it’s best to land, have a meal, stretch your legs, and wait till the sun starts to go down before pushing on. Do not, under any circumstances, try and go through the cumulonimbus clouds associated with a cold front in a small airplane. Not only is it uncomfortable (the turbulence bounces you around pretty good), but you’ll get ice, scare the passengers, and, if you’re in the heart of a storm, the plane could come apart.
When crossing mountains, the weather is always highly unpredictable. If it’s a clear day, no matter your altitude, you’ll probably pick up some turbulence from all the rising air off the peaks. If there is moisture in the air, there are going to be isolated to scattered thunderstorms in the summer time. The advantage of flying high when there are isolated or scattered storms is you can utilize the see and avoid method.
See and avoid is simple. When the storms aren’t embedded in other clouds, it’s actually rather easy to spot the big, rising clouds and go around them. The same concept holds true when avoiding those pesky pop up thunderstorms in humid areas like Houston and Florida.
One thing that I learned this summer was this. Sometimes, with an area of closely grouped storms, the cloud base is actually quite high (some storms I went underneath in New Mexico had cloud bases of 15,000 MSL). The thing to do here is just stay below the bases of the clouds and go around the areas of rain. These will be visible and you’ll be able to navigate around them. With bases even as low 9-10 thousand feet, it’s a much better idea to stay below the clouds, sacrifice some speed, and dodge the rain shafts.
The most important concept to take away is don’t fly into a thunderstorm. If there are a bunch of really high clouds in front of you and you don’t see a safe way around them, descend down and land, wait it out, and then continue on your way.
I began flying a Piper Malibu earlier this year. For those of you not familiar with the original PA-46, a Malibu has a Continental TSIO-320 engine, with 310 HP. It’s pressurized and cruises at about 185-200 KTAS. A few things are introduced to the equation when pilots start flying higher, faster, and farther. When you…
A common practice when ATC is setting an aircraft up for a visual approach is giving a clearance direct to the Final Approach Fix (FAF) for the approach for that runway. The theory is, the pilot will fly to the FAF, then he’ll pick up the airport and fly visually in. It is a handy way of setting the pilot up for a 5 mile straight in visual approach.
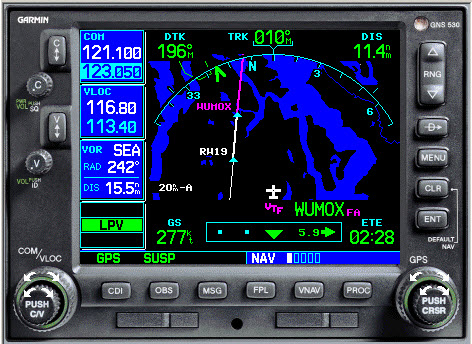
For anyone who flies with a Garmin GPS, whether is be a 430, a G1000, or a GTN 750, you have probably discovered a little nuance with going direct to the FAF. Once an approach is loaded into the flight plan, whether is is loaded via vectors or via an IAF, all the waypoints on the approach go into the flight plan. If the FAF is selected in the flight plan and the direct to command is given, the plane turns to the FAF and flies direct to it.
The fun starts once the plane gets to the FAF. The Garmin doesn’t sequence to the next waypoint. It just keeps the FAF as the active waypoint and the airplane just continues on the course it had to get to the FAF. This has probably caused some stress and frustration as the pilot is expecting the airplane to turn inbound (if the autopilot is engaged), but then it keeps flying, usually away from the runway.
How to fix this? If a Garmin GPS is closely inspected once the direct to the FAF command is selected, the pilot will notice that the GPS goes into Suspend mode. The Garmin programers thought this was a good idea to do.
How to get it to sequence properly? Well, once the FAF is the active waypoint and the airplane is flying direct to it, simply unsuspend the GPS, then the airplane will turn inbound on the final approach course and track inbound and the glide slope will pop up. On the 430 or 530, just press the OBS key. On the G1000, press SUSP. On the GTN 750, tap UNSUSP on the bottom of the unit.
Hopefully, this will lead to reduced frustration on what otherwise should be a simple approach to an airport.
A common practice when ATC is setting an aircraft up for a visual approach is giving a clearance direct to the Final Approach Fix (FAF) for the approach for that runway. The theory is, the pilot will fly to the FAF, then he’ll pick up the airport and fly visually in. It is a handy…
We’ve all been there. You’re flying into an unfamiliar airport at night, you’re having difficulty seeing the field, and trouble identifying the runway. Airports can be hard to identify for a variety of reasons, but approaching in darkness only makes it more difficult. Perhaps the airport is located in a densely populated area and the airport lights bleed into the city lights. Maybe the airport that you’re approaching is located amid terrain that obstructs your view.
Situations like these are not uncommon for charter pilots. Just a few evenings ago I was descending IFR into Asheville, NC (KAVL) on a dark night with high overcast and scattered showers. Although the airport was VFR, the surrounding hills made me doubtful that I would be able to see the field in time to safely and comfortably descend for the visual approach that I was expecting.
Fortunately, there are some things we can do to help find our destination and set us up for the approach. Here are a few tricks that I use regularly when I find myself in this position:
When flying into an untowered/closed tower airport: Make sure that you have the right lighting frequency. Some airports have pilot-controlled lighting that is operated on a different frequency than the CTAF. If the lights don’t seem to be working, consult your AFD. If the AFD advises that your frequency is correct, double check the NOTAMs to make sure that the lights haven’t been taken out of service.
For towered airports: Ask the tower controller to turn up the intensity of the runway lights. This has helped me find the runway countless times. This request can be especially useful at airports that are located in a highly lit area. Controllers are happy to honor this request and will often leave the lights at the bright setting until you advise them that you are ready for them to be turned back to normal intensity.
Load an approach: If you are an instrument rated pilot, loading an instrument approach is a great way to get oriented with a runway when you need a little help. You may need to coordinate with the tower or controlling agency if you want to fly the approach, but this has the added bonus of giving the pilot altitudes for terrain/obstacle clearance should there be any hazards present.
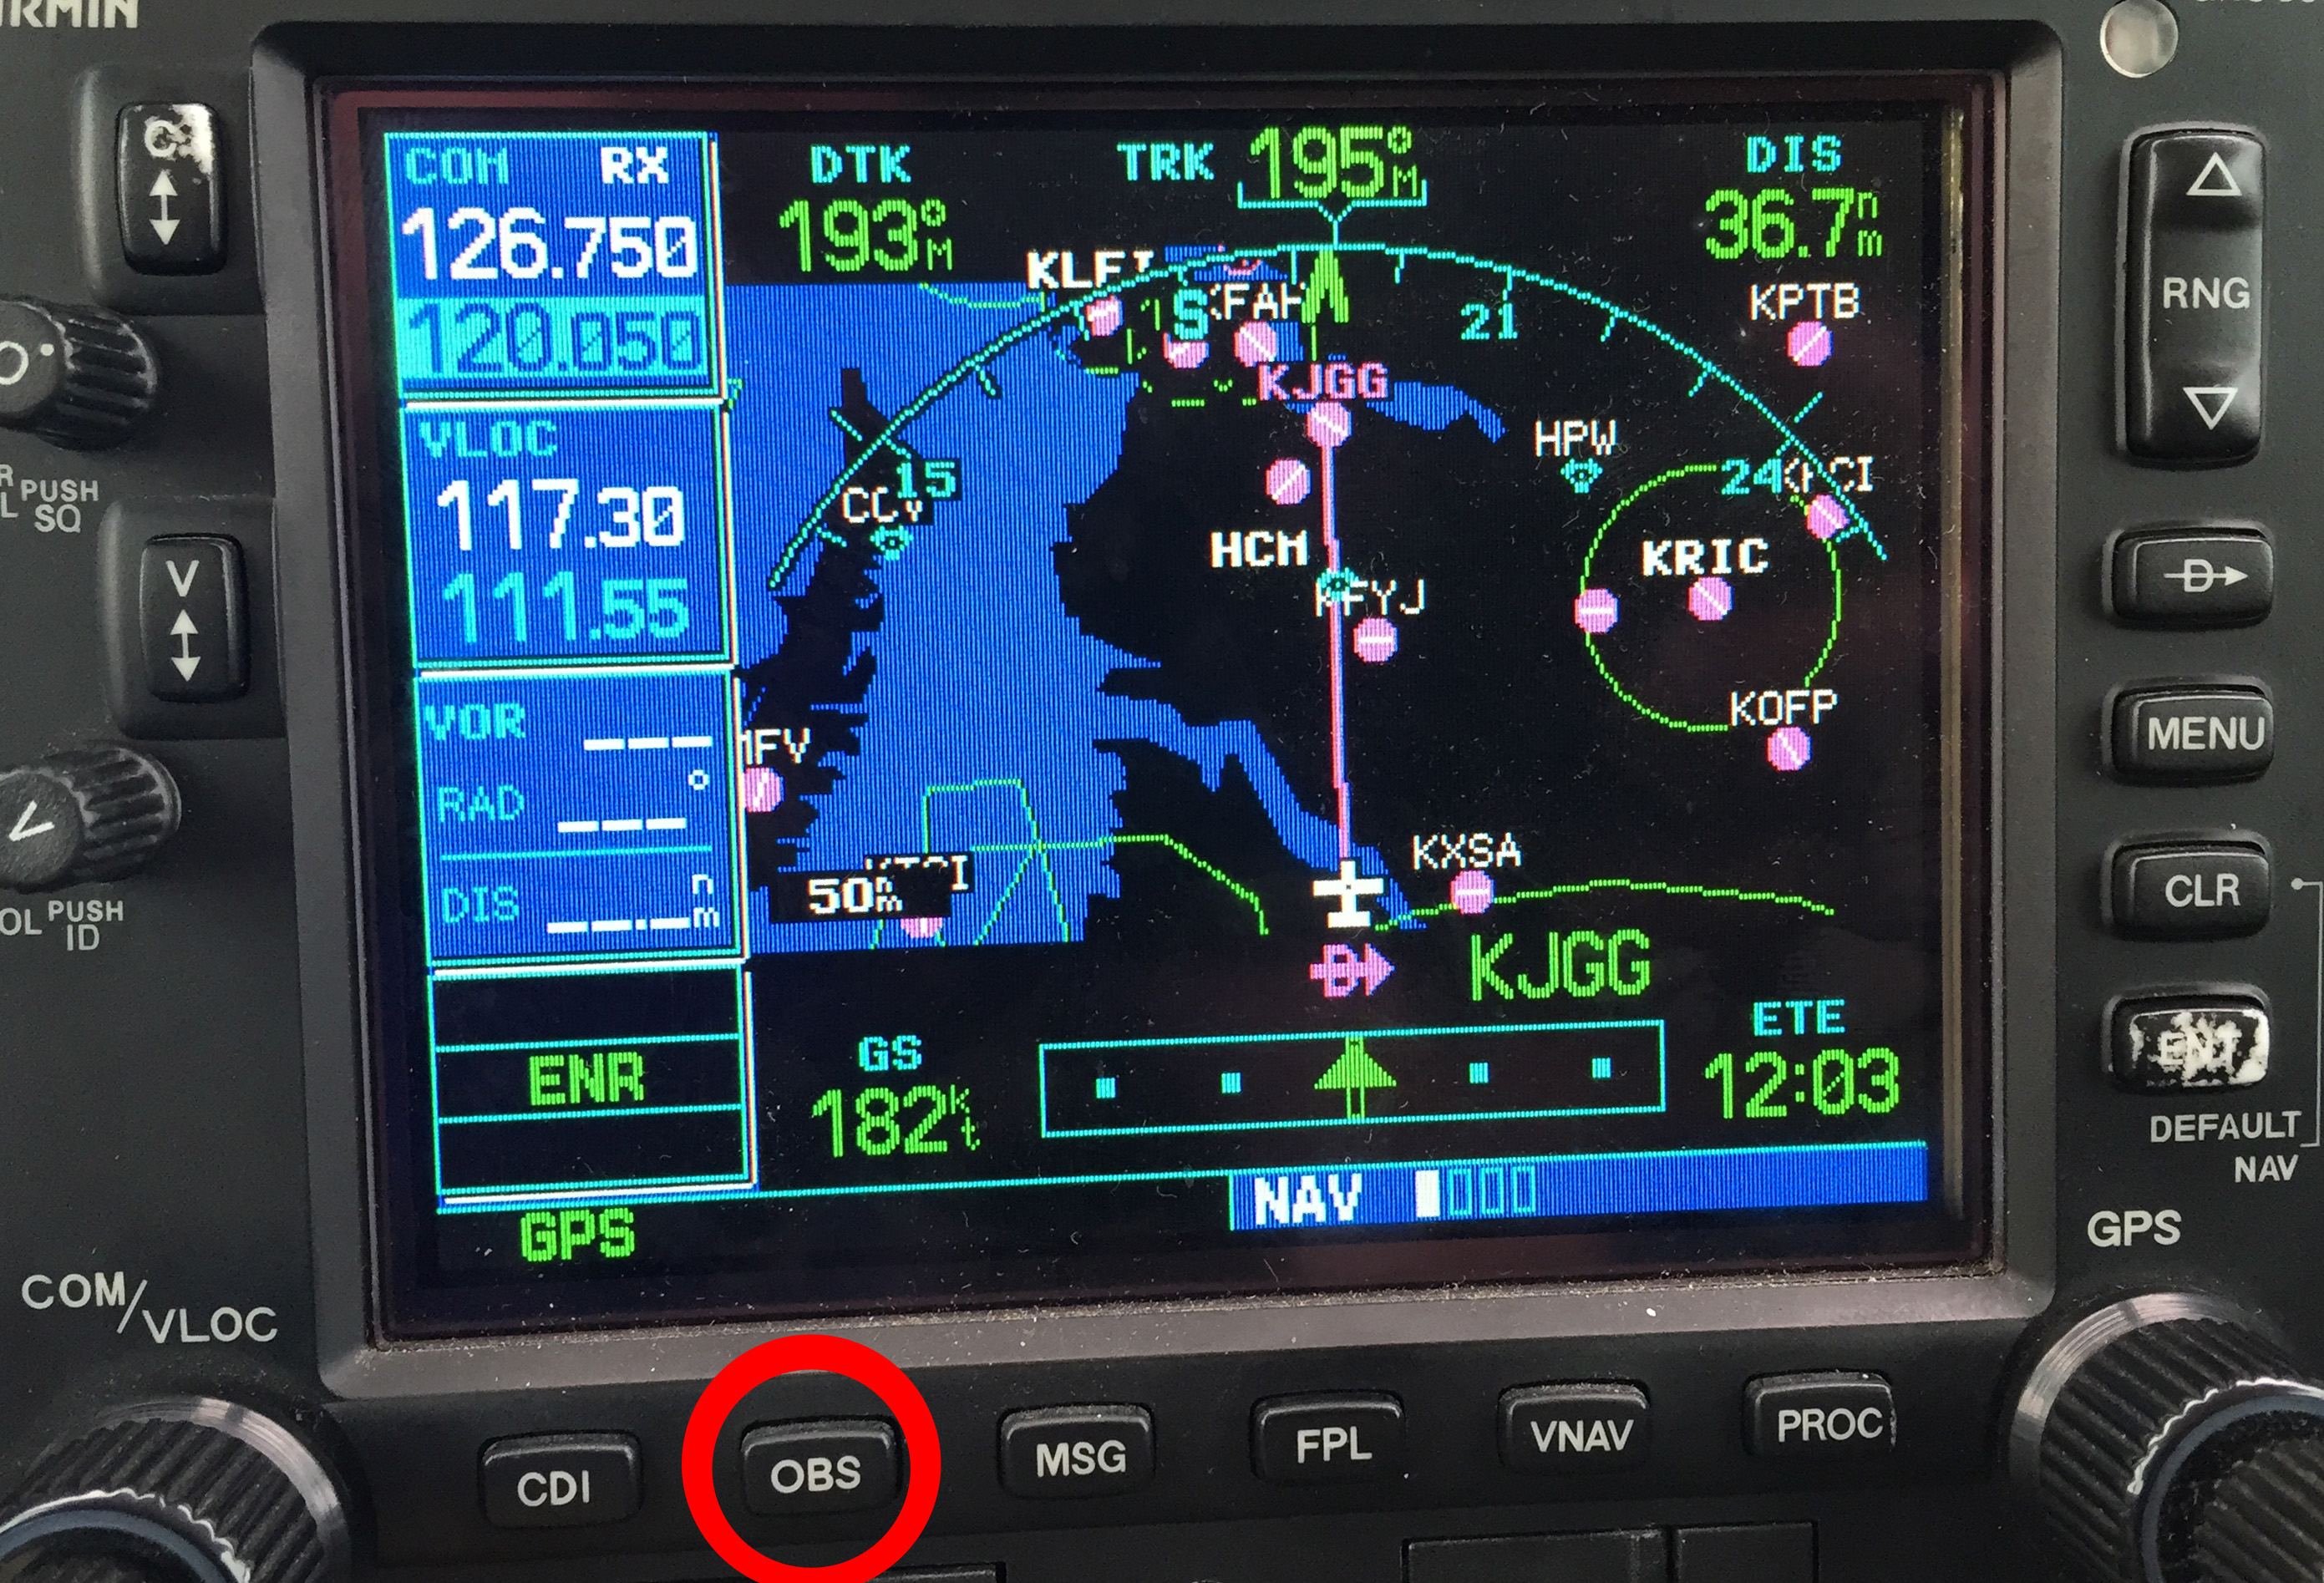
Use OBS mode: If you are flying an airplane that has equipment capable of doing so, you can use the Omni Bearing Selector (OBS) button to help align you with the runway. If using this strategy, just remember: THIS IS NOT AN INSTRUMENT APPROACH. It will not provide you with obstacle clearance, nor will it line you up directly with the runway.
The pictures below should help clarify how to use the OBS to assist in airport orientation.
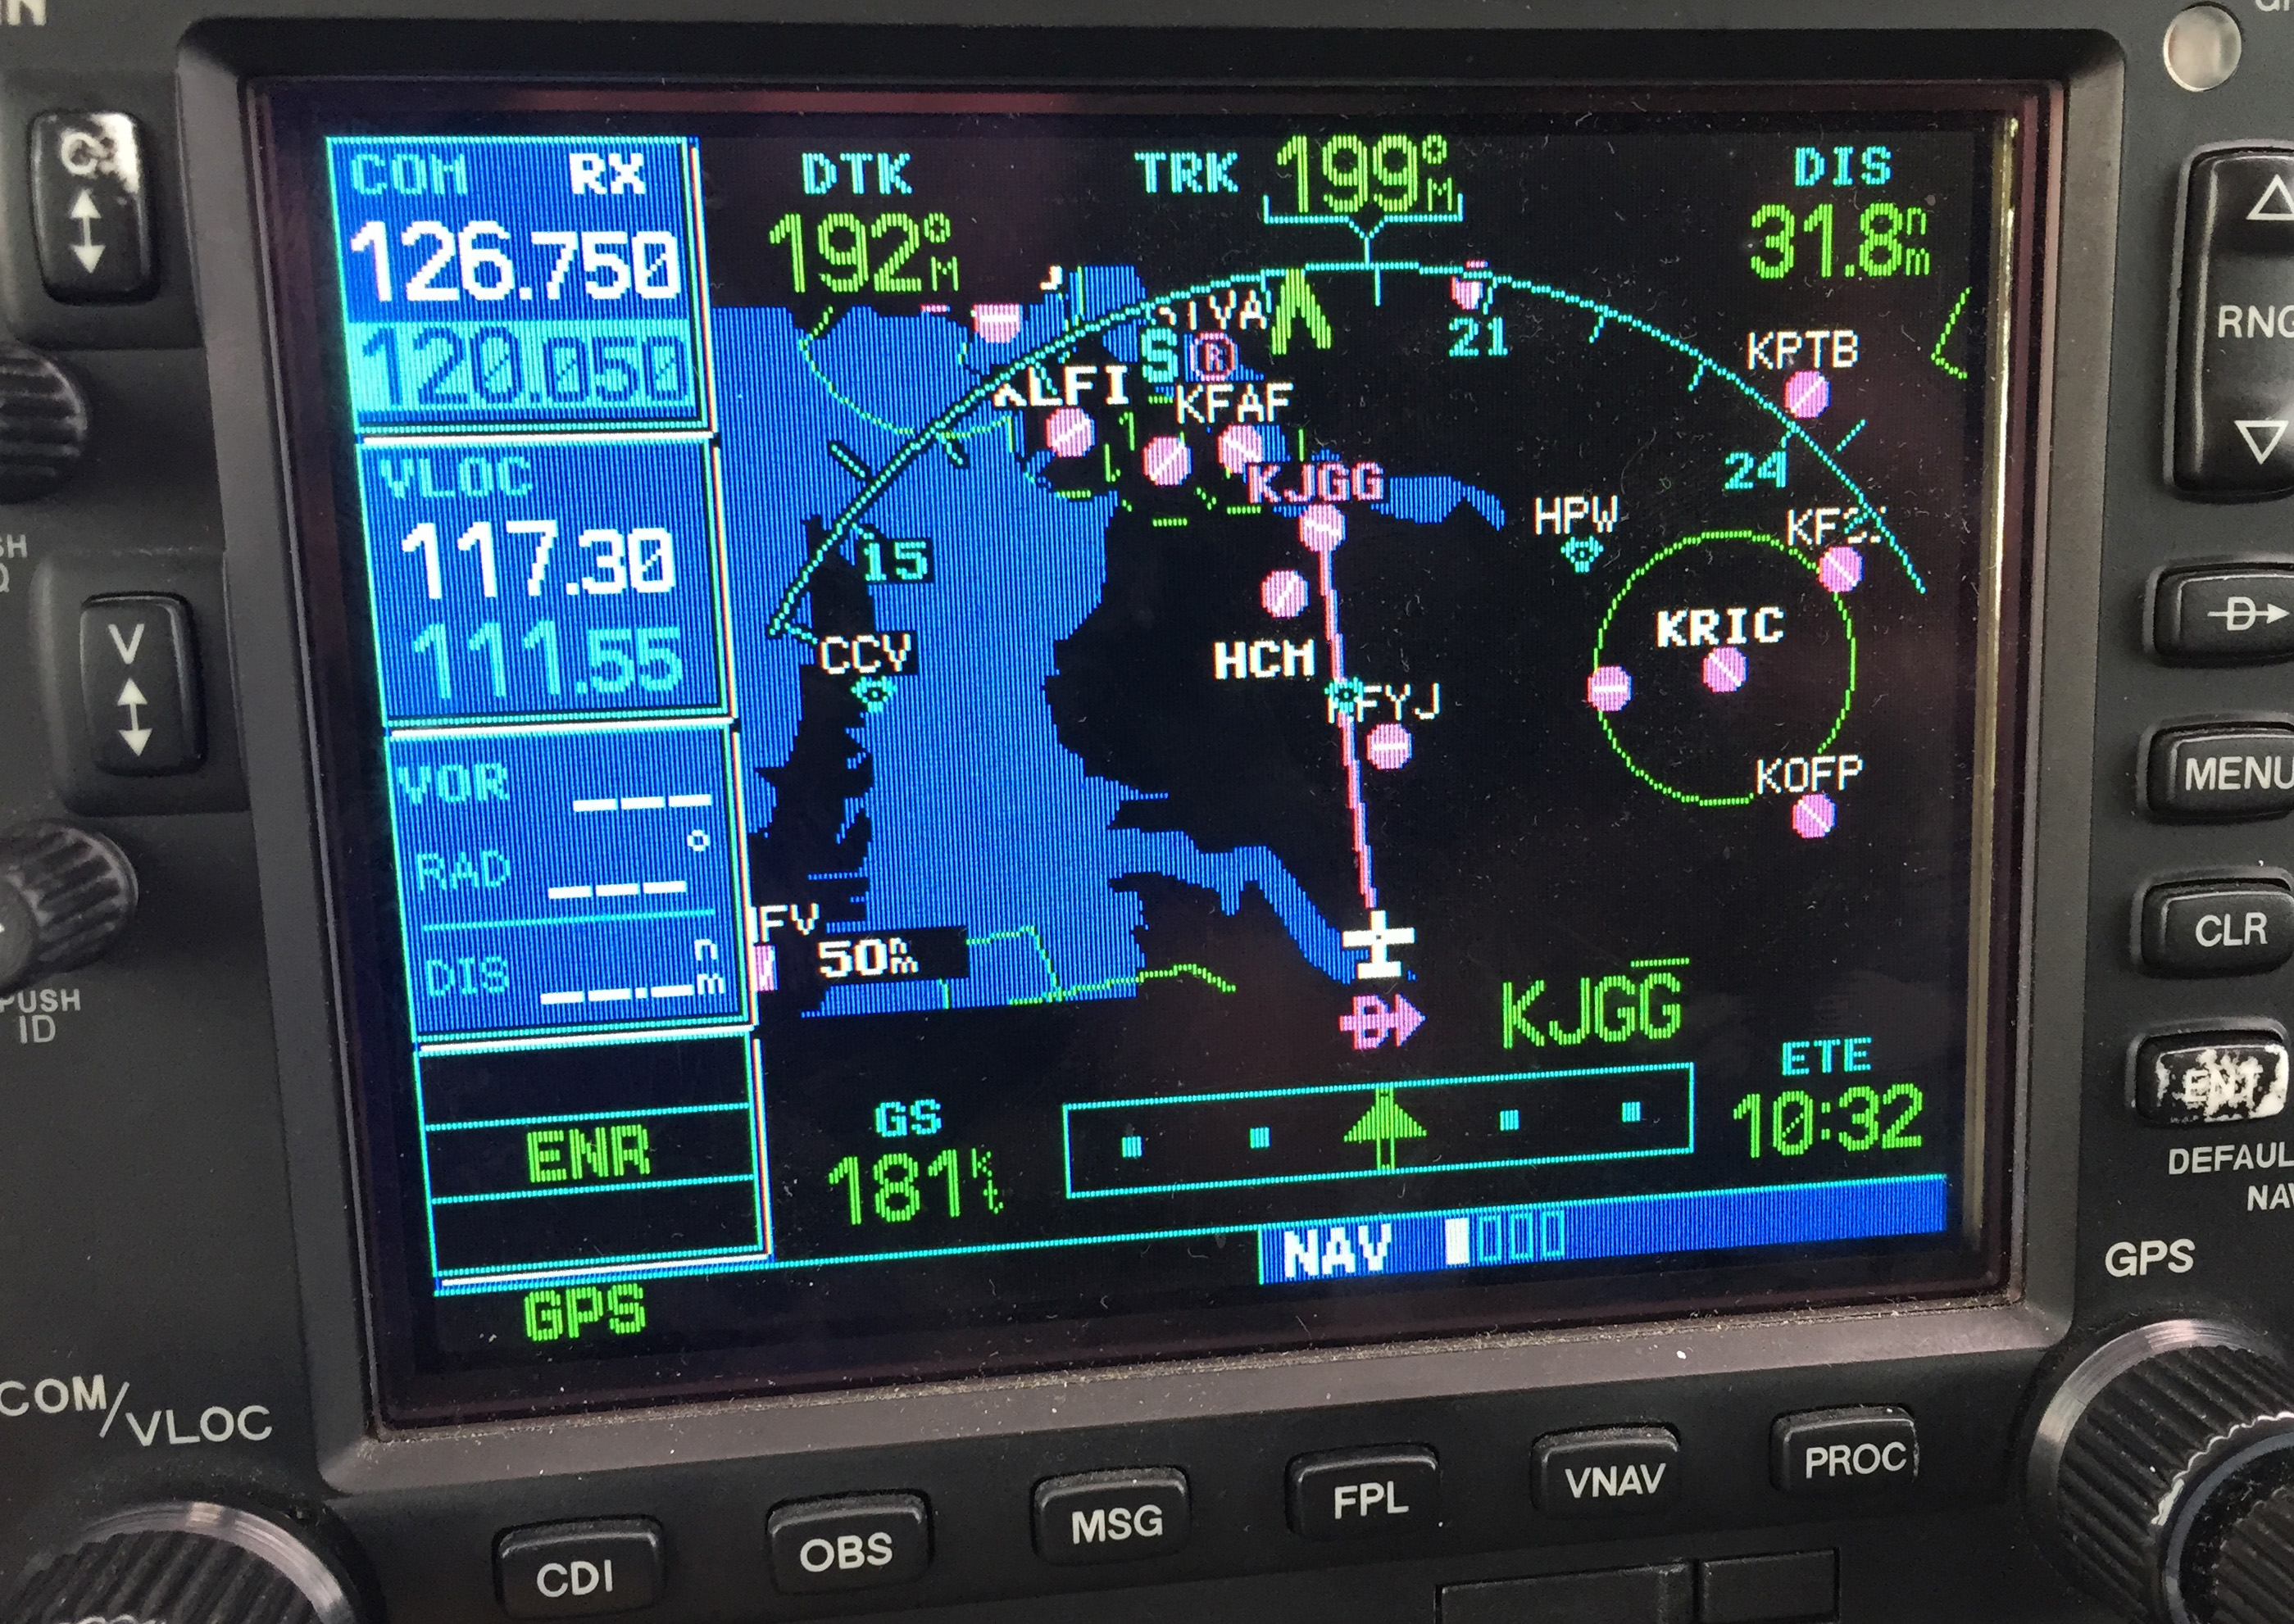
Step 1- Have the destination set as the next way point in your flight plan. In the picture below, The GPS is set to navigate direct to KJGG. Press the OBS button (circled in red) to engage the OBS mode.
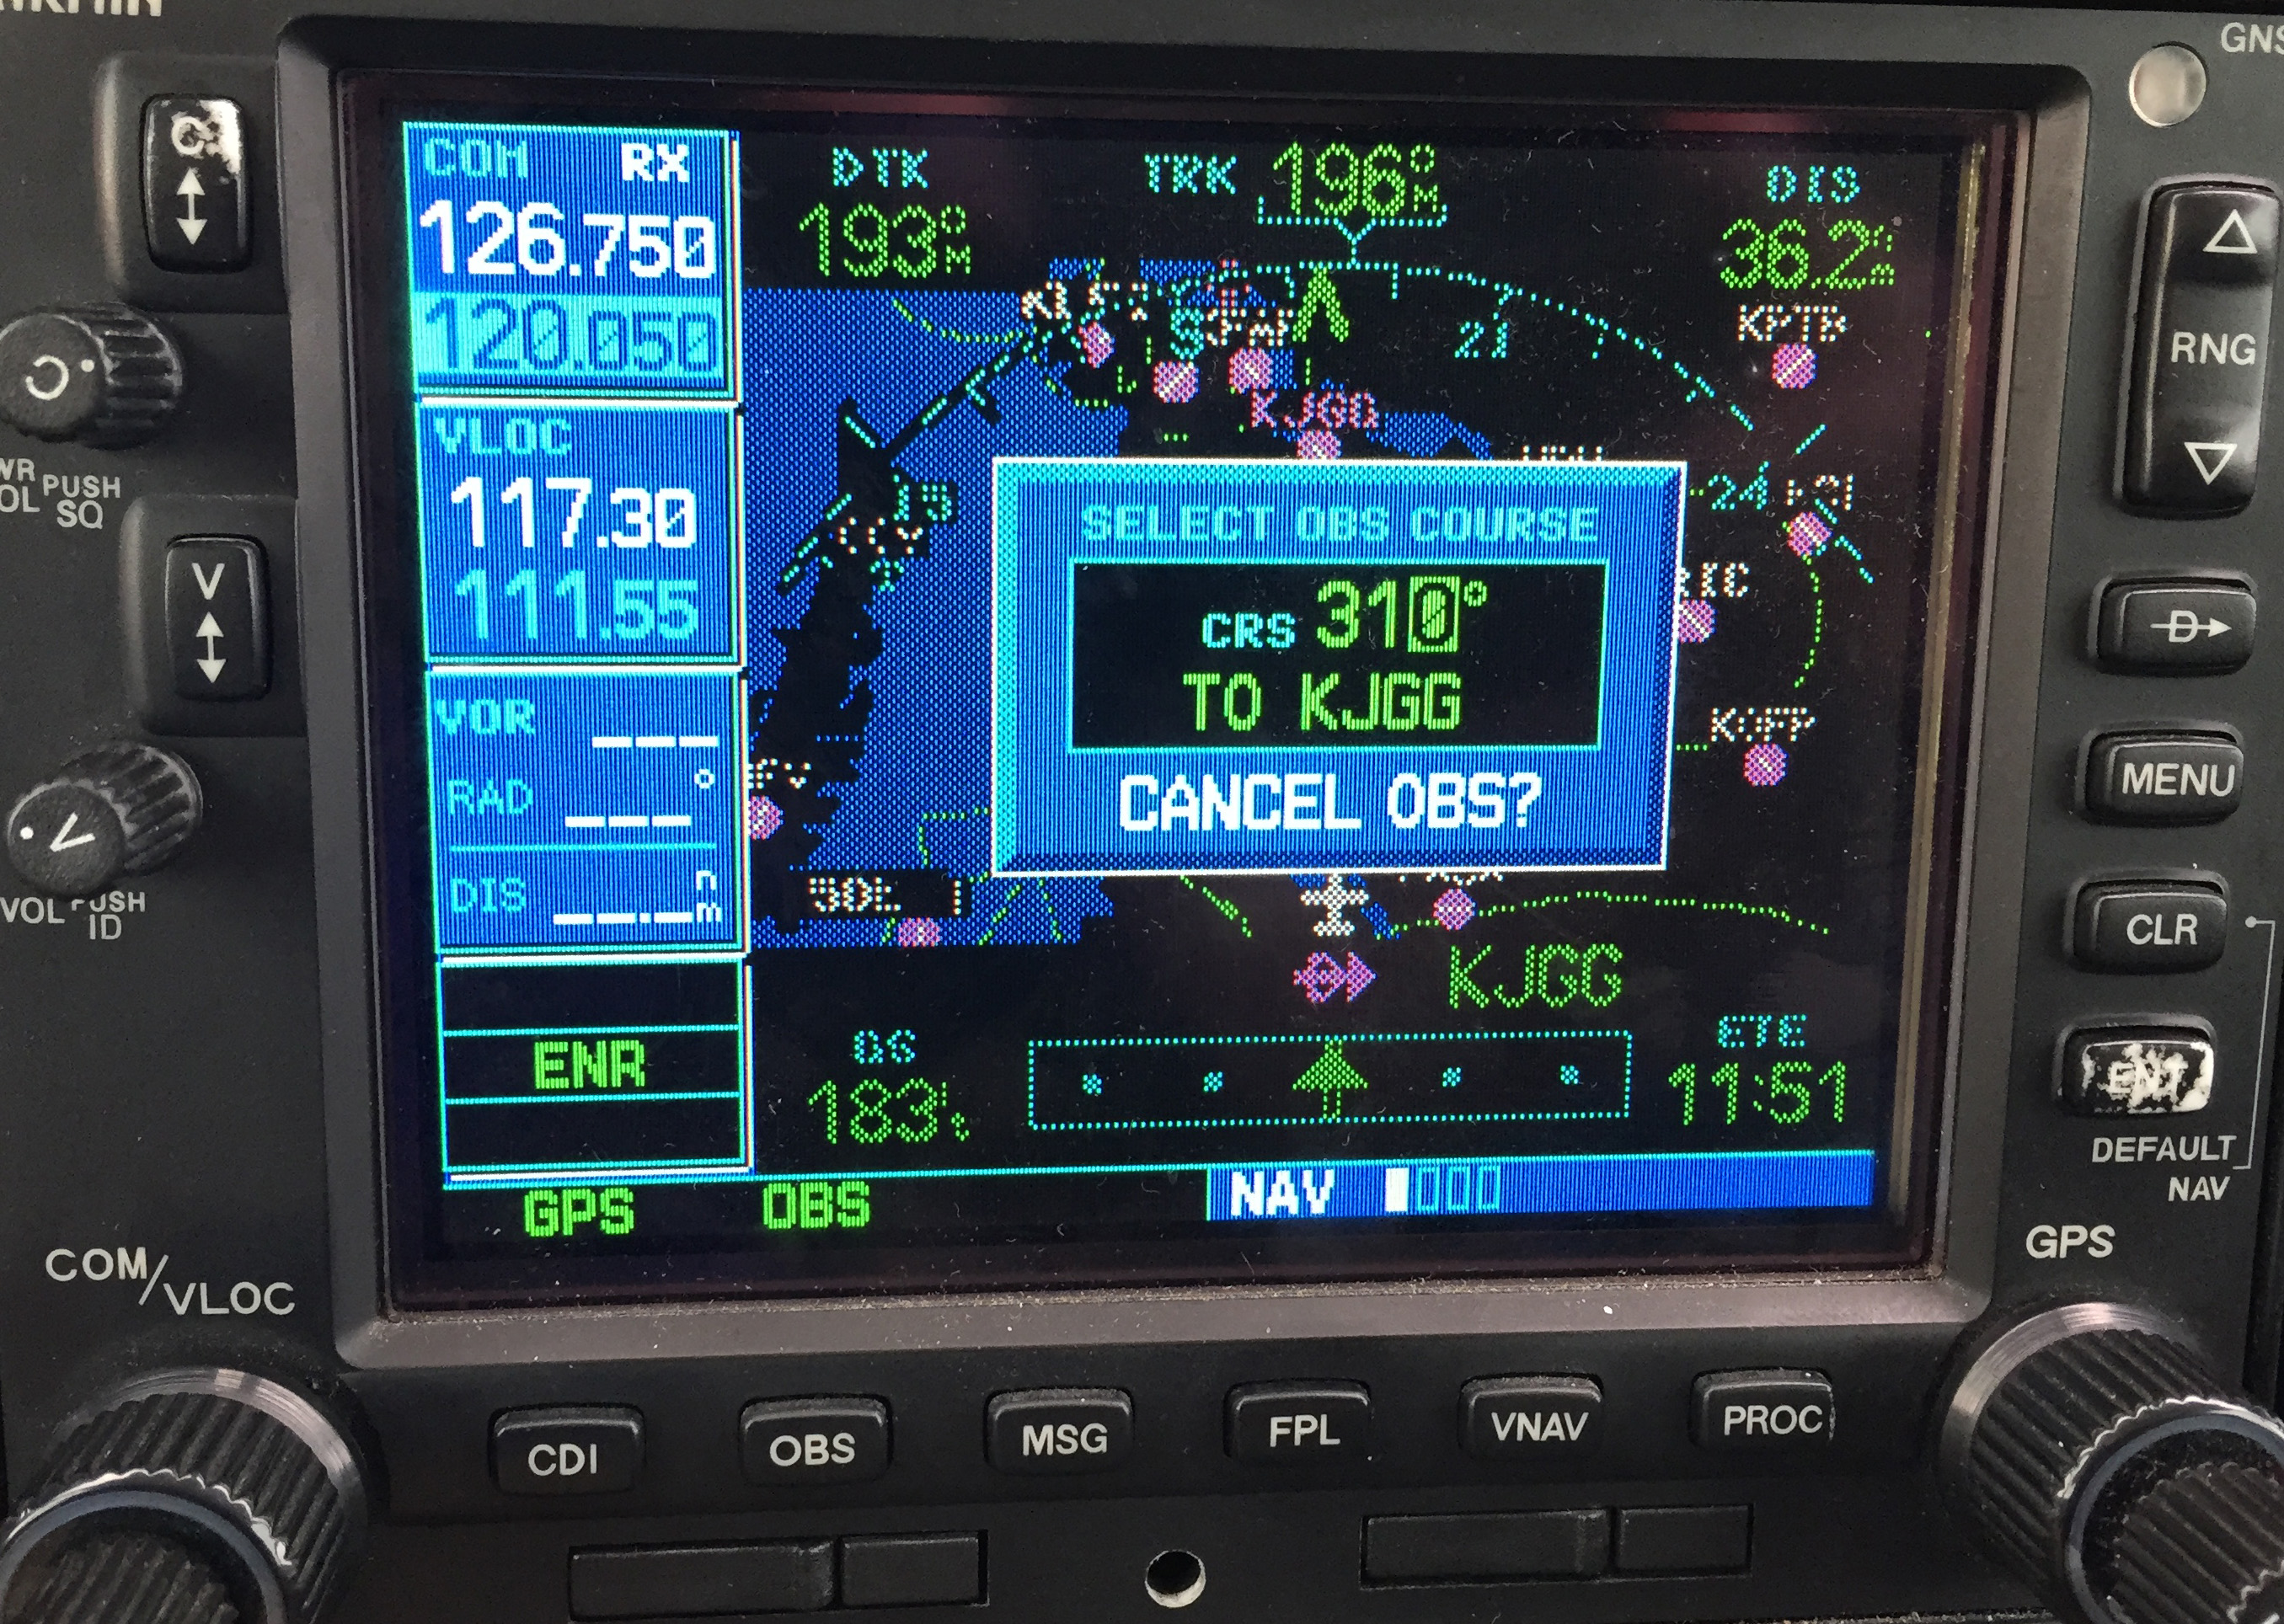
Step 2- Once OBS is selected, use either the window on the screen (which should come up automatically when you press the button in step 1) or the OBS selec tor on your navigation head to select the inbound radial. In this example, I have selected 310 degrees, the landing runway at KJGG.
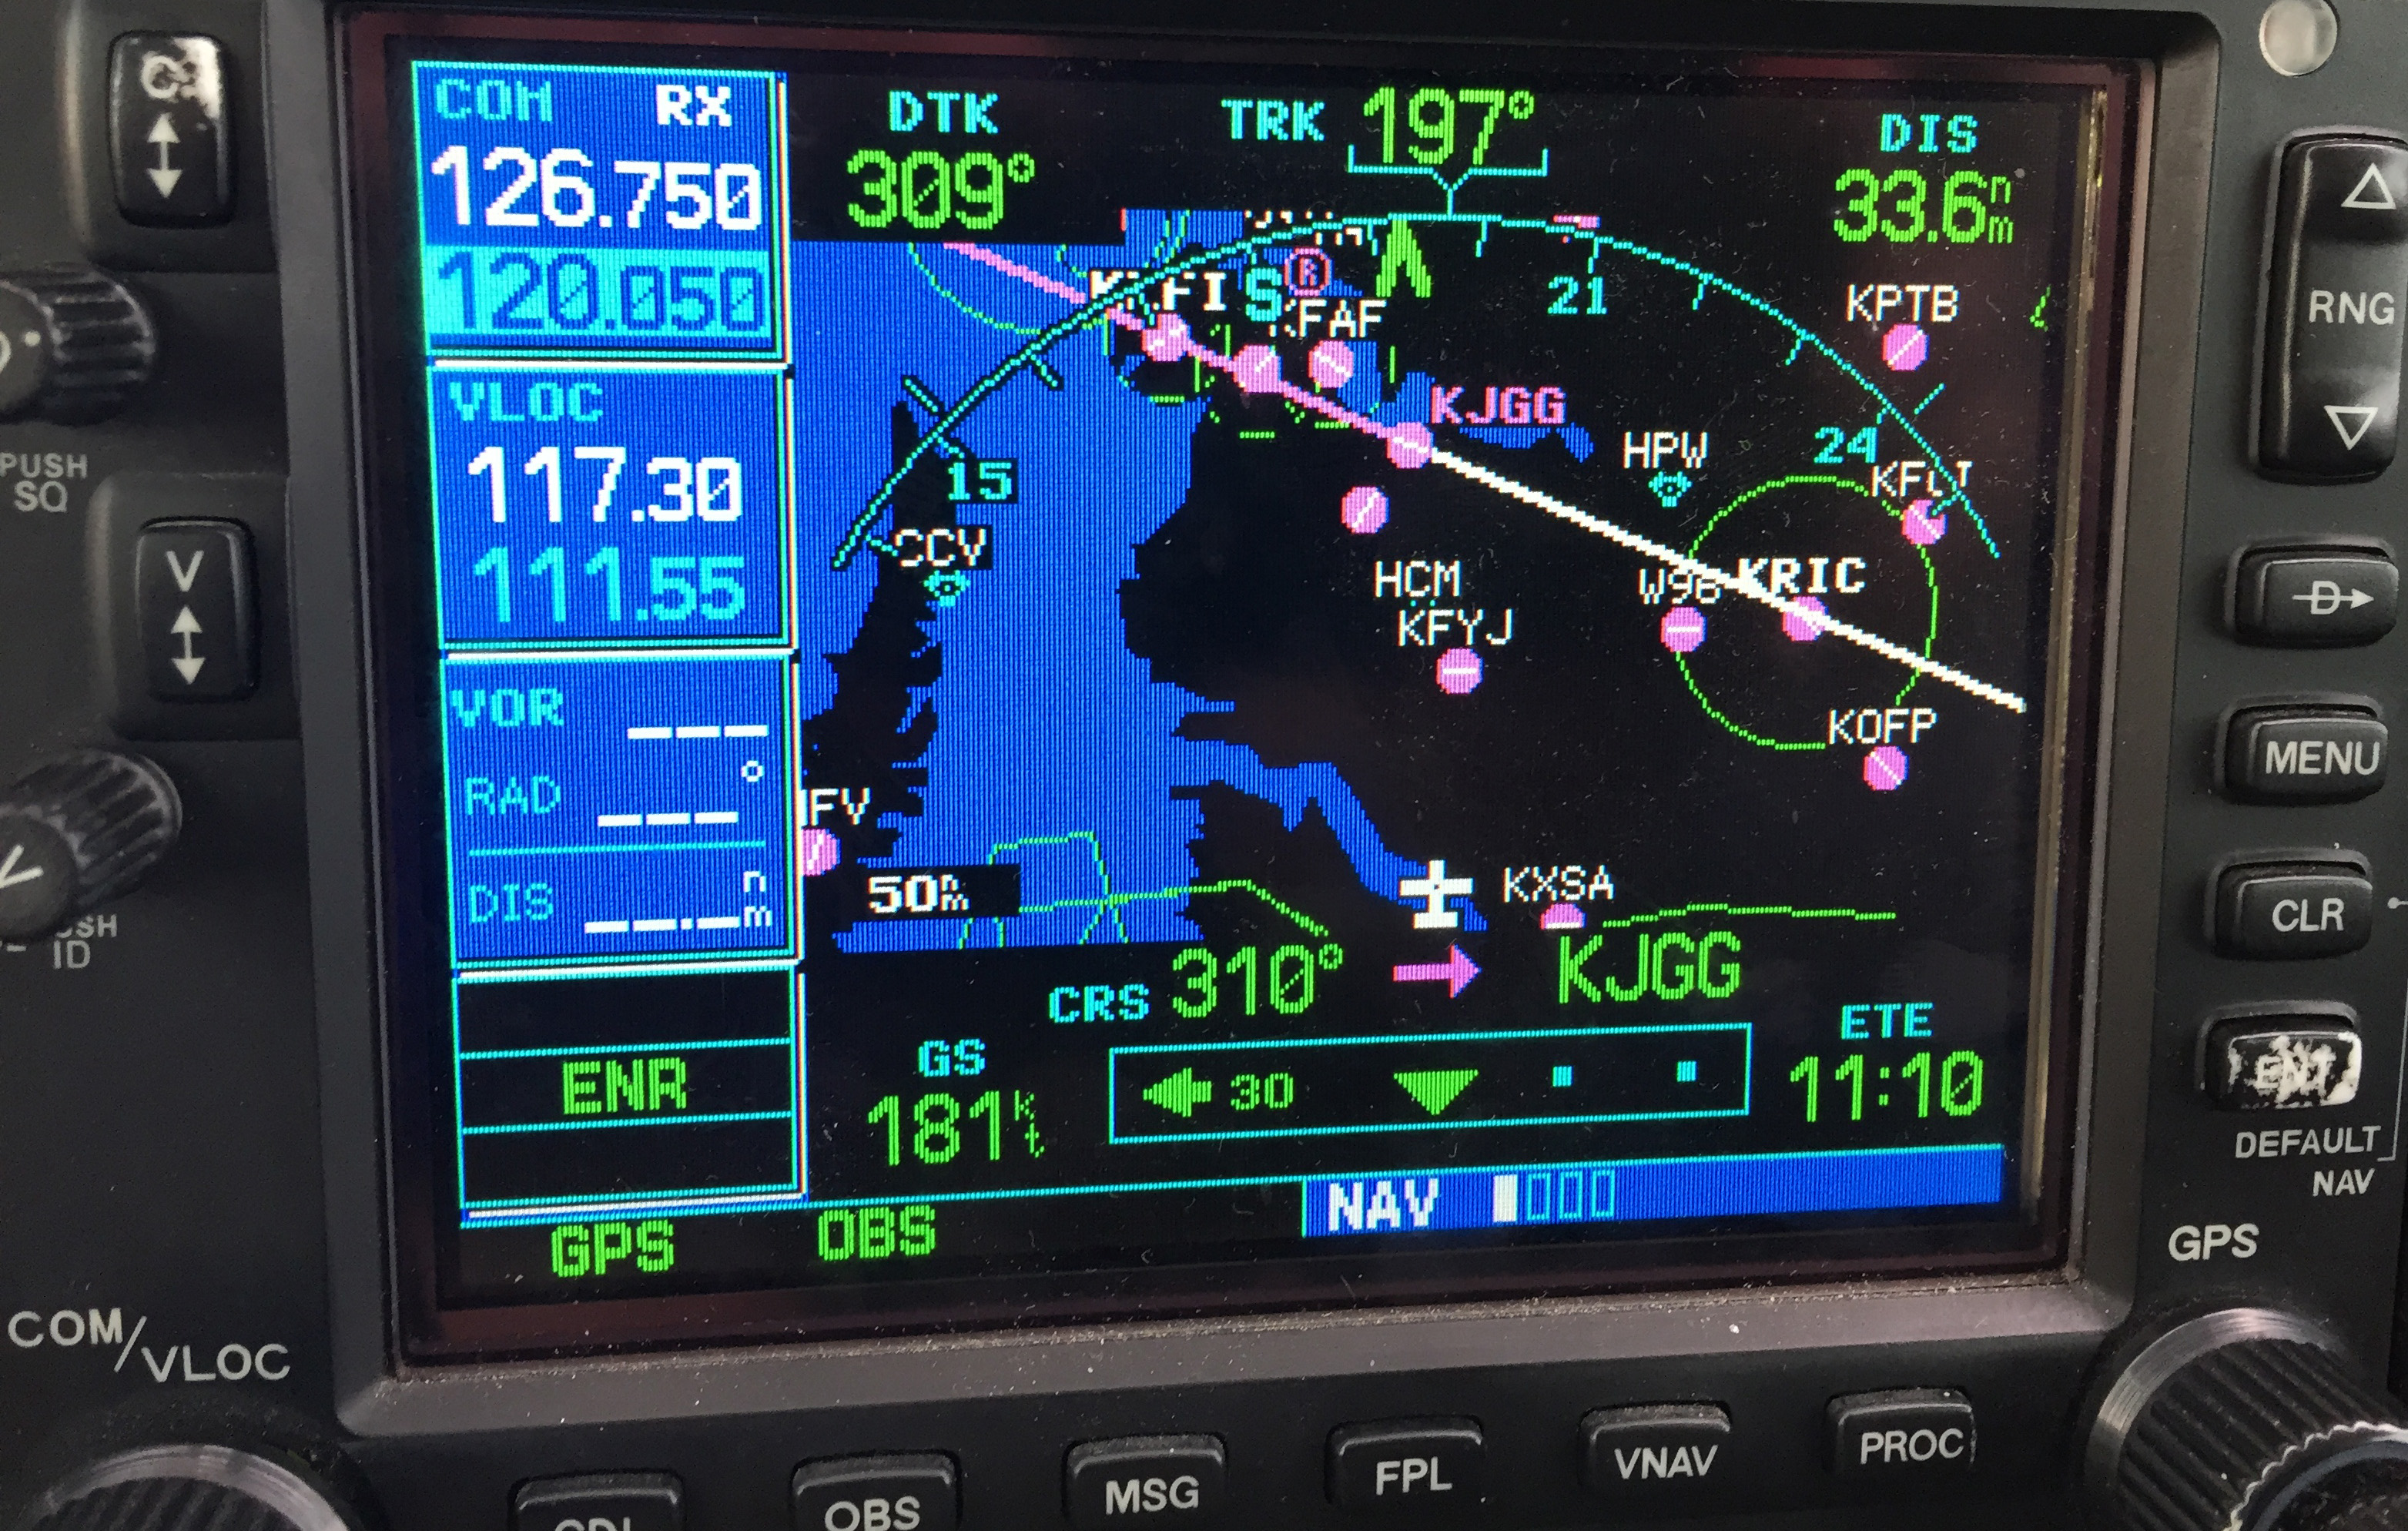
Step 3- The GPS now shows an inbound course to the airport of 310 degrees. It appears as a magenta line. The line serves as an excellent aid in airport/ runway orientation. Remember that this will not line you up perfectly with the runway, but it can still be extremely useful in planning a pattern entry or for getting your bearings.
Note: As shown below, If you press the OBS button again, the GPS will return to the navigation as previously set.
1. Ask for vectors to the airport/ runway: If you have VFR flight following or are talking to a tower equipped to provide vectors, asking for them can be a good choice. Although the controllers may not always be able to accommodate your request due to workload or equipment limitations, most will be happy to comply if they are able. Some pilots may feel silly asking for help, but my policy has always been that I’d rather feel silly for asking than look silly for being lost.
In the case of the Asheville flight mentioned in the opening of this article, my solution was to ask the controller fo r direct to the final approach fix of the assigned runway. Upon arriving there, I had no trouble seeing the VASI and was in good position to fly the visual approach. If I had wanted to be positioned a little further out, I could have asked to fly to a different fix or simply asked to be cleared for the approach in lieu of the visual. Just remember to keep your intentions clear when communicating them to the controller.
The best way to approach an airport day or night, familiar or unfamiliar, is with careful preparation. Having lighted landmarks picked out as well as being acquainted with the airport layout will pay off when it comes time to plan your pattern entry or find the airport on a dark night. Use the resources available to you to get you safely to your destination.
Andrew Robinson is a 135 Charter Pilot and flight instructor in Pennsylvania. He flies Pilatus PC-12s and instructs in Beechcraft Bonanzas.
We’ve all been there. You’re flying into an unfamiliar airport at night, you’re having difficulty seeing the field, and trouble identifying the runway. Airports can be hard to identify for a variety of reasons, but approaching in darkness only makes it more difficult. Perhaps the airport is located in a densely populated area and the…
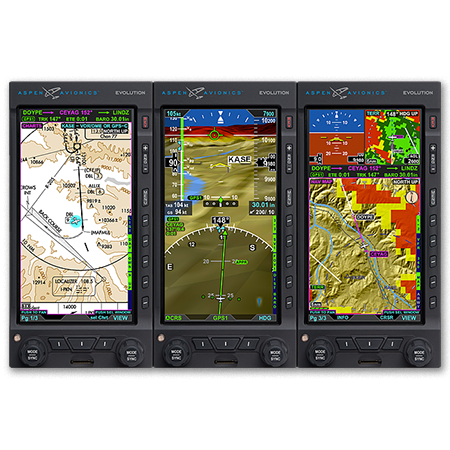
Have you looked longingly at the Aspen PFD or Garmin G500, imagining those beautiful glass panels set in your airplane? Think it’s too advanced for your flying skills? Well, think again! Hank Gibson of Texas Top Aviation will be hosting a seminar at the Redbird Skyport FBO at the San Marcos Airport (KHYI) on Thursday, September 25th at 7pm to enlighten everyone on all the different glass panel and modern GPS options out there.
No panel is too complex! No GPS is too complicated! Come hear about how you can upgrade your steam gauge airplane to a modern, glass panel cockpit that will be the envy of all your pilot buddies.
The seminar begins at 7pm in the large conference room at the Redbird Skyport. Come see this beautiful facility which hosted the AOPA Fly In this past April. There will be two drawings for free flight training in your airplane, so make sure you get your entry in once you arrive. WINGS credit will also be given.
Redbird welcomes pilots flying in for the event. If you are flying in, please show your support for Redbird by purchasing fuel!
Signup is required for the event. To sign up, please click here.
We hope to see you there!!!
Have you looked longingly at the Aspen PFD or Garmin G500, imagining those beautiful glass panels set in your airplane? Think it’s too advanced for your flying skills? Well, think again! Hank Gibson of Texas Top Aviation will be hosting a seminar at the Redbird Skyport FBO at the San Marcos Airport (KHYI) on Thursday,…
This is the second part in a series on drones and Unmammed Aerial Systems (UAS). To read Part 1, Drones: A Brief History, please click here.
I’m surprised how often I’ve been asked about drones by concerned passengers as they load up for a charter flight. Most commonly I’m asked how many drones I’ve seen while I’m flying, or how many drones I’ve hit/ almost hit. Sadly, the media has made this drone crisis into something that it isn’t. I’ve never seen a drone while I was operating a full scale aircraft, and I’ve certainly never been put into a situation where I felt that a drone was a threat to my safety or the safety of the flight. In fact, I only personally know one pilot who has reportedly seen one around an airport and that was an isolated incident (and a non-event).
The reality is that while Unmanned Aerial Vehicles can be a real danger to full scale aircraft, incidents aren’t actually all that common and detailed information is often lacking or missing altogether. It is likely that some of the reported drone incidents were actually a case of a pilot confusing a loose balloon or a bird for a drone. This, combined with the media’s sensationalizing of every “close” encounter nationwide has led the public to believe that the problem is much bigger than it actually is.
In actuality, when the AMA (Academy of Model Aeronautics, the USA’s governing body for model aircraft) analyzed the data from the FAA’s 764 recorded Drone sightings, only 27 of them (3.5%) were actually recorded as “near misses” or “near collisions.” Additionally, only 10 of the records (1.3%) indicate that pilot was required to take evasive action.
The records also include reports of drone sightings at altitudes which would be impossible for civilian models to attain (19,000-24,000′). Finally, some of the sightings took place in areas which are specifically set aside for model aircraft and drones to operate. In those cases, the person flying the drone when it was reported was actually doing so in a safe and legal manner in an area designated for that specific purpose. If you’re interested, the whole article is available here and has a lot of great information.
As pilots, it is important that we do our part in helping reduce the risk of drone strikes. The biggest thing that we can do to help is to report any activity that we see so that it can be investigated and hopefully the drone operator can be found and dealt with. Try to get as much detail as possible about the incident, such as the size, color, location, direction and altitude of any sighted UAVs and report it to the closest tower or controlling agency.
Recently, the people in Washington have come up with a bunch of new rules to regulate the operation of model aircraft. As of this year, every unmanned aerial vehicle between 0.5 and 55 lbs must be registered with the FAA and have an FAA issued registration number located on the model itself. The logic here is that if someone crashes a drone where it shouldn’t have been operated, the officials will be able to identify the owner of the model and take action.
Model manufacturers and vendors have also agreed to start providing information about a program called “Know Before You Fly” (KBYF) in the packaging of the drones. This program seeks to help educate new hobbyists to the rules and responsibilities associated with model aviation. For more information on KBYF, here is a link to their website.
In the end, the sad reality is that it’s a combination of many factors: new technology making models cheaper and easier to fly, GPS navigation and automation, the media blowing the incidents out of proportion, and inexperienced and foolish operators which have caused the growing concern and required the FAA’s action. I think that it is important to understand that thousands of people have been flying radio controlled models for many years responsibly and this has never been a problem. The AMA has rules (which are the same ones now adopted by the FAA) regarding flying location, altitudes, speeds, and more which have kept both the modelers on the ground and the pilots in the air safe until now. Its a classic case of a few foolish individuals who have caused all modelers to be cast in a bad light.
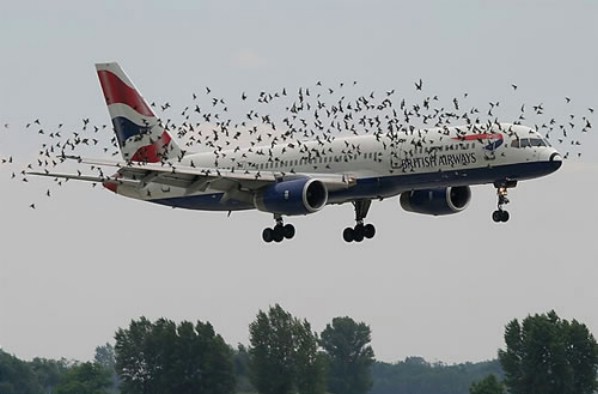
There is no reason to fly in fear, though. A pilot should always be watching for hazards as he or she is flying, regardless of the variety. In fact, according to the FAA’s website, there were 142,000 wild life STRIKES with civil aircraft in the USA between 1990 and 2013. That seems like a much bigger concern to me than the 764 reported drone SIGHTINGS. As with any new technology, drones are suffering from growing pains. As the rules fall into place and new operators become better experienced, hopefully we will hear about fewer incidents on the evening news. Anyway, I’ll stop “droning” on. Fly safe.
Andrew Robinson is a 135 Charter Pilot and flight instructor who lives with his wife and 2 daughters in Pennsylvania. He flies Pilatus PC-12s and instructs in Beechcraft Bonanzas.
I’m surprised how often I’ve been asked about drones by concerned passengers as they load up for a charter flight. Most commonly I’m asked how many drones I’ve seen while I’m flying, or how many drones I’ve hit/ almost hit. Sadly, the media has made this drone crisis into something that it isn’t. I’ve never…






 One thing that I learned this summer was this. Sometimes, with an area of closely grouped storms, the cloud base is actually quite high (some storms I went underneath in New Mexico had cloud bases of 15,000 MSL). The thing to do here is just stay below the bases of the clouds and go around the areas of rain. These will be visible and you’ll be able to navigate around them. With bases even as low 9-10 thousand feet, it’s a much better idea to stay below the clouds, sacrifice some speed, and dodge the rain shafts.