TBM Debuts the 960 at Sun N Fun

This is a Press Release from Daher’s website, the maker of the TBM 960.

Sun ‘n Fun Aerospace Expo, Lakeland, Florida, April 5, 2022 – Daher today unveiled the latest high-end version of its TBM pressurized single turboprop aircraft family – the TBM 960 – which incorporates Pratt & Whitney Canada’s advanced PT6E-66XT engine and a fully digital e-throttle, along with a digitally-controlled cabin that incorporates an all-new environmental control system, LED ambience lighting and electrically-dimmable windows.
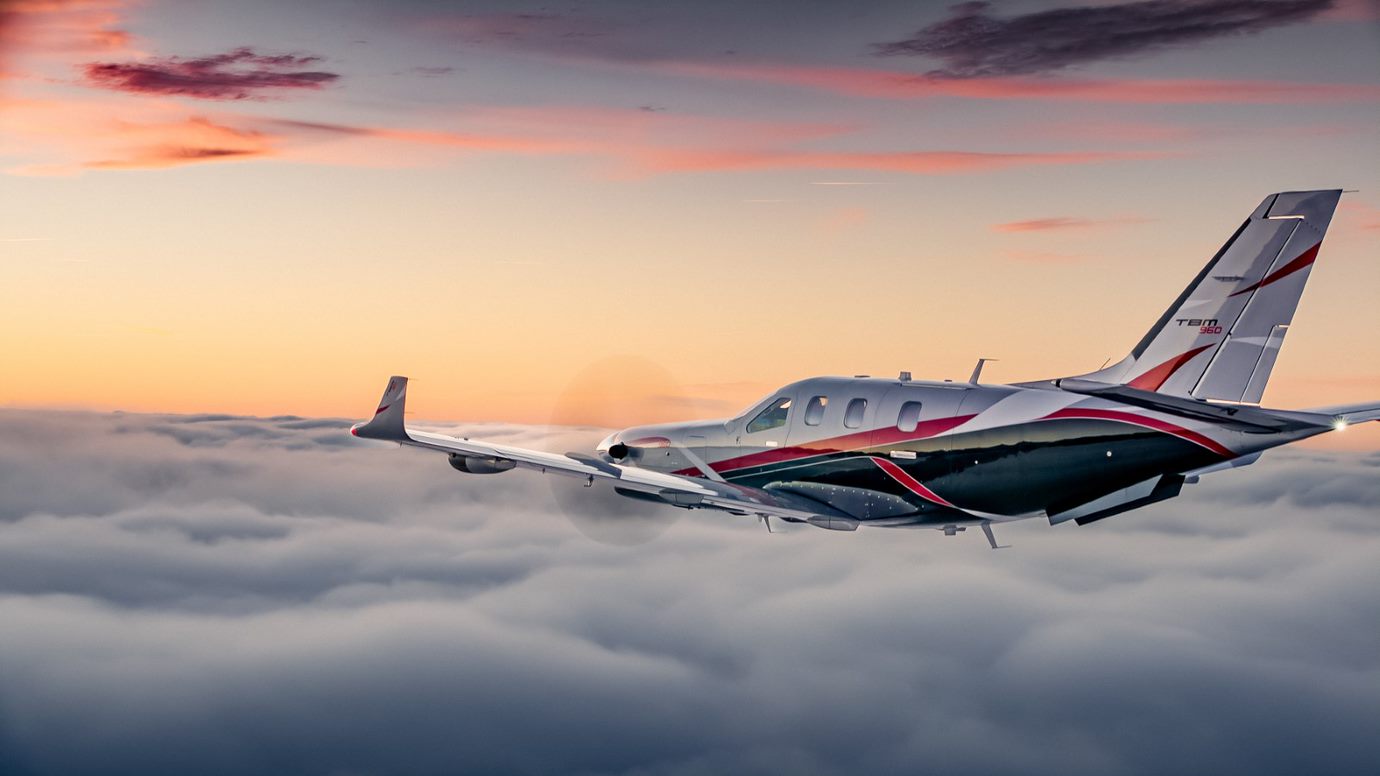
The TBM 960 was introduced at the Sun ‘n Fun Aerospace Expo in Lakeland, Florida, where Daher is exhibiting the first production airplane (exhibit stand #MD-22B).

“The TBM 960 is the quintessential TBM, representing the fifth evolution of our very fast turboprop aircraft family since the TBM 900-series’ introduction in 2014,” commented Nicolas Chabbert, the Senior Vice President of Daher’s Aircraft Division. “It takes the maximum advantage of today’s turboprop technology to provide digital control of the engine and the propeller.”

The TBM 960 retains the rapid speed of Daher’s TBM family while enabling lower fuel consumption. At Daher’s recommended cruise setting of 308 kts., the fuel consumption is only 57 U.S. gallons per hour, which is a 10% fuel economy compared to maximum cruise setting for more sustainability.

At the heart of this latest TBM version is the intelligent PT6E-66XT powerplant and Hartzell Propeller’s five-blade RaptorTM composite propeller, both of which are linked to the dual-channel digital Engine and Propeller Electronic Control System (EPECS).

With the EPECS, the PT6E-66XT’s startup is fully automated after a single-switch activation. The cockpit’s power lever is an e-throttle, using a single forward position from takeoff to landing – with the EPECS optimizing powerplant performance throughout the flight envelope while

Daher unveils the TBM 960 at Sun ‘n Fun Aerospace Expo

reducing pilot workload by integrating all functions and protecting the engine’s life. Analysis of engine parameters is driven by 100-plus smart data inputs.

The RaptorTM propeller is fully integrated into the propulsion system. It is specifically designed to reduce overall weight and improve the TBM 960’s takeoff distance, climb and cruise speed. Turning at 1,925 rpm during maximum power output, the Raptor contributes to limiting noise and vibration. Its sound level during takeoff is just 76.4 decibels, meeting the most stringent international noise standards.

With its G3000® integrated flight deck, the TBM 960 retains Daher’s e-copilot® concentration of technological innovation and safety systems in the TBM, which can be compared to an “electronic copilot.” This includes an icing protection system, flight envelope monitoring through the Electronic Stability and Protection (ESP) and the Under-speed Protection (USP) systems, the Emergency Descent Mode (EDM) function, as well as the game-changing HomeSafeTM emergency autoland system.

New to the TBM 960 is the Garmin GWXTM 8000 doppler weather radar with advanced surveillance features such as lightning and hail prediction, turbulence detection, zero blind range for close-in returns, and ground clutter suppression. The TBM 960 also is the first application of Garmin’s GDL® 60 next-generation data transmitter for automatic database upload and interconnection with mobile devices.

The TBM 960’s Prestige cabin extends Daher’s use of digital power inside the aircraft, featuring an all-new environmental control system, LED ambience strip lighting integrated into both sides of the overhead ceiling panel, and electronically-dimmable windows – all controlled by a PassengerComfortDisplay(PCD). Enhancementsinthecabin’sstyleandcomfortalsoinclude new ergonomically enhanced seats, USB-A and USB-C power plugs, individual cupholders and headset hangers for each occupant.

For the TBM 960, a fifth TBM paint scheme – called Sirocco, based on the creativity of French designer Alexandre Echasseriau – has been added to the aircraft’s style customization possibilities.

The TBM 960 has been certified by EASA (the European Union Aviation Safety Agency); with certification by the U.S. FAA (Federal Aviation Administration) currently underway. Deliveries will begin in the first half of 2022.

With the new aircraft’s launch, Daher’s TBM family is now offered in two versions: the TBM 960 and TBM 910.

About Daher – www.daher.com

Similar Posts

  • Garmin Perspective Tips & Tricks

    The Garmin Perspective and Perspective + are awesome pieces of equipment.  There is so much a pilot can do with this system that it can sometimes get overwhelming. There are two very important features of the Garmin Perspective that all IFR pilots need to know, but are tricky to do if the correct buttons aren’t pushed.

    The two features of the Garmin Perspective I want to focus on today are the “Load Airway” feature and the “Hold at Waypoint” feature.  The “Load Airway” feature is especially handy when flying IFR long distances with several airways as part of the clearance.  Here’s how to utilize both on the Garmin Perspective.

    Load Airway

    • On your flight plan page, insert the waypoint where you will be joining the airway, or, if your clearance was radar vectors to join an airway, then insert the waypoint on the airway that begins the leg you will be joining on
    • Press the Menu key on the keypad
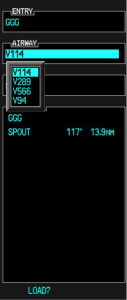
    • A menu will pop up. Scroll down to highlight Load Airway
    • Highlight the Airway you want from the next menu that pops up then press Enter
    • Then, a list of waypoints will display to exit the airway. Highlight the waypoint where you will be exiting the airway and Press Enter
    • The cursor will then move down to Load at the bottom of the menu. Press Enter to load the airway
    • The Airway and all the waypoints in between your entry and exit waypoints appear in your flight plan
    • If you are getting vectors to join the airway, you’ll need to use the Activate Leg function to activate the leg you will be joining the airway on
      • On the Flight Plan page, highlight the waypoint that ends the leg you want to activate
      • Look for the ACT LEG soft key on the lower right hand side of the MFD and press
      • This Activates the leg on the airway. Then, just simply fly the heading assigned by ATC until the CDI needle centers showing you are on the airway

    Hold At Waypoint

    The Garmin Perspective allows pilots to place a holding pattern at any waypoint that is in the Nav Database (or any user created waypoint).  Here’s how to do it.

    • On the Flight Plan page, highlight the Waypoint that you want to hold over and press Menu on the keypad
    • On the menu that pops up, highlight Hold At Waypoint and press Enter
    • On the next menu that pops up, input either the inbound or outbound course, right or left turns, leg time or distance, and the EFC time, then highlight Load and press Enter
    • You will see the hold now as a Waypoint in your flight plan
  • A Complex Clearance?

    I was flying in the Rio Grande Valley in south Texas a few weeks ago and heard an IFR clearance given to a King Air that pricked my ears up.  It was a clearance from CRP to LRD, but the routing was one you don’t hear too often anymore.  Because of active military airspace, the routing was via a radial and DME off the CRP VOR (so a point defined by the radial and DME) to another radial and DME point off the LRD VOR.

    It took me a second to think about how to do this the easiest (without setting up the VOR and watching the DME).  After a moment’s thought, it’s actually a snap with the G1000.  You create 2 user waypoints, one for each Radial/DME spot, then put those 2 user waypoints in your Flight Plan.

    Here’s how.

    Step 1

    Using the big knob, go to the Waypoint chapter.  Once there, scroll down to the User Waypoint page using the small knob.

    Step 2

    Press the New soft key.  If you want to name the waypoint something specific, you can do that at the top of the page.  If not, it will default to something like VOR 1 or VOR 2.

    Step 3

    Under Waypoint Type, use the small knob to select RAD/DIS (stands for Radial/Distance).

    Step 4

    Under Reference Waypoints, again using the small knob (or your keypad), type or dial in the VOR identifier, the radial from that VOR, and the DME distance.  Press enter and you are done.

    Once you have both User Waypoints created, then just put them in your flight plan (if you forget what you named them, you can just go back to the User Waypoint page), and off you go.

  • Fly Away Destination: Lajitas Golf Resort

    Talk about star treatment.  The Lajitas Golf Resort rolled out the red carpet for the 2019 Texas Top Aviation Lajitas Fly In.  I had been to Lajitas twice before; once in July when it was hot, miserable and bumpy.  The second time was the week before our Fly In.  Both times, everyone from the airport folks to the bus drivers to the front desk and restaurant staff were top notch.  It made for a very pleasurable experience.

    If you haven’t been out to Lajitas (or don’t even know where it is) and you’re a pilot (you don’t even have to play golf), you have missed a sure gem.  Lajitas is positioned on the southern tip of the Big Bend area of Texas, right on the Rio Grande river.  Lajitas has great lodging with several different room options from big to small, an excellent restaurant for 3 square a day (and even a bakery for sweets, coffee, and breakfast tacos in the mornings), and a 5 star golf course in Black Jack Crossing.

    Why is this all relevant to us aviators?  Lajitas has it’s own private airport, 89TE.  Complete with a 5,500 foot asphalt runway, VFR conditions most of the year, and reasonable fuel prices, Lajitas is the pilot’s gateway to the resort and the entire Big Bend area.  If you wait until the fall, a brand new, 7,000 foot concrete runway should be completed and an IFR approach should be available.  An AWOS is in the works too.

    The resort and airport are so far south, radar and radio coverage with Albuquerque Center is pretty poor below about 15,000 feet, and non-existent below 10,000 feet.  This isn’t a big concern as any airplanes in the area should be on 122.9 and the airport manager will make contact with you, give you a weather report, and assign a runway.

    Once you are on the ground, there will be a resort bus waiting to whisk you and all your friends to the resort for your getaway.

    The 2019 Texas Top Aviation Lajitas Fly In was a big hit.  We had 7 airplanes total:  5 Cirrus SR22s, 1 Piper Matrix, and 1 Citation M2.  There were 15 attendees total, including 13 golfers.  Everyone raved about the resort and the golf course.  The only hiccup in the weekend was the cold front that blasted through on Friday afternoon, kicking up a lot of dust.  Golfing on Saturday was windy too, but Sunday morning was absolutely perfect.

    Thanks again to the folks at Lajitas for the star treatment!

    Interested in participating in the next Texas Top Aviation Fly In?  Contact Us or Sign Up for Our Newsletter and we will make sure you find out about the next one so you don’t miss out!

  • The Piper Saratoga Turbo

    Piper SaratogaRecently, I assisted with the delivery of a 2007 Piper Saratoga Turbo from San Antonio to New York City.  It was a very nicely equipped airplane, complete with a Garmin G1000 panel, an STEC 55x autopilot, and air conditioning.  The owner joined me on the flight back to get trained in the airplane, getting him comfortable in it over our 2 day excursion back to NYC.  Total flight time was 12 hours, though that did include several stops along the way and landing practice at the airports we stopped at.

    The 6 seat Turbo Saratoga is a very comfortable, very capable flying machine.  It is made for hauling, with a gross weight of 3,600 pounds, but that’s not to say it isn’t lacking in comfort, either.  The rear cabin has 4 seats, 2 facing forward and 2 facing rear.  It would be a little tight for 4 full size adults in the back seat.  To avoid knee knocking, the plane is an excellent 4 person and bags aircraft (or 4 adults and 2 kids).

    The really nice part about the Piper Saratoga is the baggage door.  Unlike the Bonanza, the Piper Saratoga has a baggage door that opens to the baggage compartment, creating a much easier way to load and unload baggage.  The nose baggage compartment, which holds an additional 100 pounds, is a very nice feature, allowing the bag load to be spread out.

    Piper Saratoga Inside

    We typically saw cruise speeds of 155-165 KTAS depending on altitude.  The highest we went was only about 9,000 feet, so we didn’t get up real high to see what the single turbo could do.  Even though the Lycoming TIO-540 engine burns about 20 gallons an hour, with 102 gallons of gas on board, the fuel consistently outlasted our desire to continue flying.

    Being equipped with the G1000 was a very nice feature of this particular Piper Saratoga.  The screens are nice and big, larger than the displays on a high wing Cessna or a Corvalis.  That allows for easier viewing of approach plates, NEXRAD, and the engine gauges.

    There are always downsides to an airplane, and the Saratoga is no exception.  The STEC Autopilot leaves some to be desired as I felt it hampered the capability of the G1000 when shooting approaches because the 12 knot crosswind limitation on the autopilot. You can still use the autopilot on an approach with higher than 12 knot crosswinds, but the autopilot tends to search around for the final approach course.

    The air conditioning works very nicely, though it did have a tendency to freeze up at altitude.  We discovered that quickly and just decided to turn it off and leave the blower on, since it was cool enough up high anyway.

    Overall, the Turbo Saratoga is a very nice airplane.  The speed leaves a little to be desired (you can get 10 KTAS more out of a Bonanza with a Continental engine, about 20 knots more if it is a Turbo Bonanza), but it is very high on comfort.  The Piper Saratoga makes for a good family airplane or as a hauler.  I liked the airplane a lot and thoroughly enjoyed my time in it.

  • Reading Weather Prog Charts

    There are a multitude of weather products out there today to assist pilots in preparing for a flight.  Aviationweather.gov is the best source for getting all the information a pilot needs for planning a flight.  Aviationweather.gov is the National Weather Service’s source for all aviation related weather products.  When I teach about weather and weather briefings, I recommend to my students to utilize Aviationweather.gov in the planning stages, but still call the Flight Service Station to get a full fledged weather briefing before takeoff.

    When preflight weather planning, one of the best ways to get a picture of what is happening over a broad area is utilizing the Low Level Significant Weather Prog charts.  The Prog chart gives a forecasted 12 and 24 hour picture of what type of weather to expect over the US.  The Prog chart gives the expected flight rules, areas of turbulence, and where the freezing level is located.  If you’re looking at the 4 panel view, the Surface Prog chart shows fronts, pressure areas, and areas of expected precipitation.  That covers just about everything, doesn’t it?

    I believe the Prog charts are underutilized in planning.  Foreflight and Garmin Pilot have given easy access to radar pictures, satellite pictures, METARs, TAFs, and several other sources of weather information.  But, a lot of the easy access data you can get from those apps is current data (with the exception of the TAF) while a lot of the forecast data takes some hunting around.  So, products like Prog charts aren’t often utilized.

    The other problem arises when pilots know about Prog charts, but don’t know how to read them, then don’t know how to find the legend to decipher the chart, the chart is often set aside and quickly forgotten about just because of a lack of knowledge.  Have no fear, though, as now we will use an example 4 panel Prog chart to decipher the lines and colorations.

    Low Level Sig WX Prog

    Just looking at the Low Level Significant Weather Prog Chart above, it can be a little confusing.  That’s why they make a legend!

    Low Level Legend

    Coupling the legend with the chart above, we can determine some things.  First, California, parts of the Pacific Northwest, a small part of southern Arizona, and a good portion of the Midwest and East coast are going to have marginal VFR conditions in the next 12 hours.  Wisconsin, Illinois, a good portion of the Northeast, and a small portion of the Pacific Northwest will suffer IFR from IFR conditions.  There are going to be a good amount of low level turbulence in the northern and eastern parts of the country.  Finally, the freezing level starts at the surface running in a jagged line across the midwest states and curling up into the Northeast.

    That’s a good bit of information, isn’t it?  If a pilot is planning a VFR flight into the Northeast tonight, it would probably be best to wait for another day, according to this chart.

    Now, to see what is causing the conditions above, we need to look at the Surface Prog Chart.

    Surface Prog

    The green circular areas above show that some form of precipitation is in that area.  The circular dots with the triangle located in Mexico and Baja California are depicting moderate rain showers.  If the triangle was gone, it would just be moderate rain.  In the northeast, all those symbols are showing moderate to heavy snow showers.  Across the plains, we see a lot of high pressure, meaning visibility and nice flying weather.

    These charts are invaluable when it comes to flight planning, especially over long distances when the weather could be changing a lot over the period of your flight.  Put them to use the next time you are planning a trip and you’ll learn you have a much better picture of what the weather is doing.

  • The Aunt Betty Directive: PFD Failures

    Glass panel displays, ballistic parachute aircraft recovery systems, portable tablet computers enabling paperless cockpits, and widely available three axis autopilot systems have changed the way we fly, the way we train, and the way we are expected to perform on check rides. Our training and testing paradigms have tried to stay in synch, yet always seem to be catching up to the latest levels of technology.

    This is very apparent when we instructors are preparing a student for an FAA practical test. When training aircraft had no autopilots, no GPS, and certainly no parachutes, the general philosophy was that during training, the student should have the lowest level of technology available. This was also the expectation on the check ride. This theory has changed over the years and now the Practical Test Standards require that an applicant integrate all available technology while demonstrating mastery of his or her aircraft. This raises numerous questions from instructors and students about what technology will be available for each task.

    One example of this dilemma is found when contemplating an instrument airplane practical test in a Cirrus SR20/SR22. The test requires the task “Instrument Approach without Primary Flight Display”, which has taken the place of what was the partial panel approach, accomplished without use of gyroscopic heading and attitude indicators. In the Cirrus, the standby attitude indicator, standby airspeed, and standby altimeter are available, as is the Multi-Function Display. Guidance from the FAA has us shooting a GPS approach using the moving map display on the MFD after disabling the PFD. Those of us who trained and tested in steam gauge aircraft think that this task should be fairly easy. With a fully functional Attitude Indicator and a nice big moving map display showing our course, a reasonably competent instrument pilot should have little trouble adapting to this setup and flying a good approach.

    But, in the Cirrus specifically, and perhaps in other aircraft as well, another question comes up. Can the applicant use the autopilot (which still works just fine after a display failure) during the approach without the PFD? A rather famous DPE who writes for a national magazine says “yes”, opining that not to allow its use would be introducing simultaneous multiple systems failures, which is strictly forbidden in the minds of some. If we follow this logic, we would not test simulated engine failure emergencies in these aircraft either, because to do so would imply failure of not only the engine, but the CAPS parachute system as well. In my former role as a pilot examiner, I always said no, that the approach should be hand flown. Here is my logic.

    I was amazed that flight instructors and examiners would accept the substitution of autopilot technology for the skill required to fly an approach without the PFD. I would argue that the intent and the well described emphasis of the PTS is that the applicant must demonstrate the ability to control the airplane after a loss of the primary flight display, not observe and monitor the autopilot controlling the airplane! This argument was generally unpersuasive, so I approached from a different point of view, that of a concerned family member.

    “Aunt Betty” represents a future passenger flying with the soon to be rated instrument pilot. Here is the question posed to Aunt Betty: “When we train and test pilots for instrument proficiency, we require them to demonstrate the ability to safely and skillfully fly the airplane without their primary instruments. Now, Betty, in this airplane, we can test this task in one of two ways. We would like your input on which way you would prefer, seeing as you will be a frequent passenger with your nephew. We can either have the pilot (might be your son, brother, husband, or nephew) demonstrate that he can fly the airplane by hand without the PFD, which does require a little more skill and a slightly different technique, or, we can require the pilot to perform this task using the autopilot so that the pilot basically monitors the airplane flying itself on the approach.

    “Now, Aunt Betty, a pilot allowed to use the autopilot system on this approach may not have the skill or technique to fly the approach by hand in the clouds should the autopilot shut down due to turbulence or mechanical failure. Should this happen to a pilot without the skill and practice normally required, the odds of a fatal accident occurring would be quite high.

    “So what do you think, Aunt Betty? Would you feel more comfortable flying with this fellow if he has demonstrated mastery of the aircraft (sans PFD) without the autopilot or only with its assistance?”

    This leads us to a larger discussion about the use of other technology, iPad, GPS moving map, and more. If technology is used as a replacement for pilot proficiency during training and testing, we end up with less skillful, less competent and ultimately less safe pilots. But, if we require that our students demonstrate mastery with the lowest available level of automation and technology (which, by the way, implies excellent fundamental aircraft control skills) then, when technology is added into the equation, we have a safer pilot.

    Technology can be a value added safety multiplier, or it can be a crutch needed to make up for lack of fundamental and advanced skills. Crutch or Safety Multiplier, which one will you choose? I know which one Aunt Betty prefers.

    Charles McDougal is a flight instructor, corporate pilot, and former DPE ‎who offers basic and advanced flight instruction in the San Antonio area.  To find out more information about Charles or to contact him, visit his website, www.flighttrainingcoalition.com.

Leave a Reply

Your email address will not be published. Required fields are marked *