That Pesky Rudder

Whenever I get in an airplane with a pilot for recurrent training, I can assure myself that I will mention rudder usage more than once during the flight.  If it is in a tailwheel (or if the pilot is doing tailwheel training), I’m going to mention the rudder a lot.  How do I know this?  Because basic rudder skills are actually one of the most difficult things to master in flying.

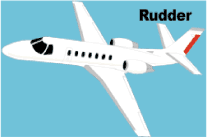
Let’s start simple.  What does the rudder do?  The dictionary definition is it controls the movement about the vertical axis of the airplane.  If you stick a pole down through the CG of the airplane and rotate the airplane around that pole, this is the vertical axis.  Looking at it another way, the rudder moves the airplane’s nose left and right.  Keep this in mind as we move on.
Rudder

Every pilot thinks about the rudder during the takeoff roll.  Because of the torque effect, the pilot must add right rudder during the takeoff roll to stay on the runway centerline.  Depending on the airplane’s horsepower, more rudder pressure is needed in higher powered airplanes.  The problem usually shows up once the airplane gets in the air.

In the worst situation, after takeoff, the pilot will set both feet on the floor and completely disregard the rudder.  Torque effect and now P-factor are continuing to cause the airplane to yaw left, causing the need for right rudder.  With his feet on the floor, though, the pilot is allowing the airplane to yaw.  It’s not terribly noticeable for him in the front seat, but the back seat passengers (especially in a six seat or larger airplane) are certainly feeling it.

One particular problem spot on the climb is the climbing left turn.  In a climbing left turn, training says to add left rudder since it is a left turn (see below for the reasoning).  But, since the airplane is climbing and therefore experiencing left yawing tendencies due to the aforementioned effects, the pilot needs to continue pressing the right rudder, though the pressure won’t be as much as in a straight climb.  Watch the ball the next time you make a climbing left hand turn and it’ll make a believer out of you.

I find only a handful of pilots are this egregious.  Most pilots have rudder problems in turns and in turbulence.  We’ll tackle turns first.  As we all learned when we first started flying, due to adverse yaw, a pilot must add rudder in the turn’s direction.  Again, this isn’t usually where the problem shows up.  During the rollout is the problem area.

Let’s take a turn to the left.  The pilot rolls in, adding left rudder, arrives at his heading, then begins to roll out with the ailerons.  Left adverse yaw is now being experienced and right rudder is needed to smoothly transition back to level flight.  Need some visual assistance?  Watch the nose the next time you make a turn. If you are working the rudder properly, the nose will pivot on one point in the horizon.  If you aren’t using the rudder properly, the nose will draw a U shape on the horizon.  Try making some turns without rudder, see what it looks like, then use the rudder properly.  You’ll notice a big difference.

Finally, let’s talk turbulence.  As we all know, turbulence in the hot summer afternoon is quite pronounced. When the airplane experiences a bump, it usually doesn’t bounce straight up in the air.  There is usually some kind of rolling motion involved.  As the pilot corrects this rolling motion by moving the ailerons, adverse yaw is experienced (just like rolling into and out of a turn that we talked about above), so rudder is needed.  There isn’t a need to stomp on the rudder or you’ll cause the airplane to severely yaw in the other direction, but rudder pressure is needed.

Final approach is where this gets most pilots.  By controlling the nose and not allowing it to move around on final by using the rudder, this will make your approaches a little more stabilized leading to a more successful landing.

Feeling lost when it comes to the rudder?  Ask your instructor the next time you go fly to do some rudder exercises.  Most instructors don’t emphasize these basic stick and rudder skills which leaves pilots lacking as they move on in their aviation lives.  So make it a point to do some basic rudder work the next time you fly with your instructor.

Similar Posts

  • A Proper Cross Country Flight Checklist (Part 1)

    I love cross country flights. Airplanes are designed to travel.  When I was instructing private students, my favorite lessons were always the first cross country flights. I looked forward to getting my students out of the pattern, away from the practice area, and showing them what they could really look forward to as a private pilot.

    When I was in college, my friend and I borrowed his dad’s Cessna 150, did a cross country flight in it from Indianapolis to Kitty Hawk, then down the coast to Florida. We camped in the grass next to the airplane wherever the airport managers would let us and had our own aviation adventure complete with mechanical problems, unexpected weather, and interesting people along the way. These types of trips have produced some of the best memories and experiences that I’ve acquired during my aviation career so far.

    Unfortunately, I know many people whose only cross country flight experience is what was necessary to satisfy their Private and Instrument training requirements. Some of them are nervous about the idea of venturing away from the familiarity of their home airport, while others are relatively new pilots who simply don’t know where to start planning a long cross country flight.

    I’ve taken some notes on my preparations for an upcoming cross country flight that I’ll be flying in my dad’s Bonanza. I’m hoping this checklist might help others feel a little more confident that they have everything they need to get going.

    Oil

    Its always a good idea to bring a few extra quarts of oil. If you stop somewhere and find you need some, its nice to have the right kind on hand. Never assume that the airport you’ll be landing at next will have oil available.

    I like to keep a few extra quarts of 15W50 in the back of the Bonanza, just in case (photo from oil-store.com)
    I like to keep a few extra quarts of 15W50 in the back of the Bonanza, just in case (photo from oil-store.com)

    Fuel Stops

    Here is an example of the 100LL price tool as seen on the Foreflight maps page
    Here is an example of the 100LL price tool as seen on the Foreflight maps page

    I’ve learned the hard way that calling ahead to verify fuel availability can be extremely important. I landed at an airport in Ohio one beautiful Sunday morning to find that the FBO wouldn’t be open until much later in the day. Naturally, there was no other fuel available on the field. I hadn’t called ahead to verify the hours of fuel availability (I assumed they had Self Serve) and had only 2 options: wait a while for the FBO to open, or try and find somewhere else nearby that had gas. As far as price, www.100LL.com is a valuable tool for finding cheap fuel. Foreflight also has posted prices for 100LL and Jet A, but it’s still a good idea to call ahead and verify price and availability.

    Batteries for electronics

    It’s miserable to run out of batteries for a noise canceling headset with hours remaining in your flight. Bring spares, not only for your headset, but for your flashlight and other gadgets as well. Make sure your hand held GPS, iPad, and Stratus are charged (if you have them). I like to carry a charge cable and adapter as a backup so that I can plug things into the cigarette lighter.

    Jumper Cables

    We always carry the ground power cable in the back of the Bonanza just in case we ever need a jump. Last month, when I was flying down to Texas, I was glad I had them; we had a dead battery after our fuel stop and had to borrow some power from an FBO worker’s pick up truck. Don’t assume that wherever you are stopping will have the correct cable to jump your airplane, especially if it requires a specific plug.

    These are the cables we keep in the back of the Bonanza (photo from airchief.com)
    These are the cables we keep in the back of the Bonanza (photo from airchief.com)

    Parking Fees

    Every airport is different. I like to call ahead and find out how much the FBO is going to make me pay in landing/overnight fees. When I flew up to Buffalo last summer, I paid 25 dollars for parking at Niagara International (IAG). Had I parked at Buffalo (BUF), they would have charged me over $200.

    Approach plates and charts

    Make sure you have current approach plates and charts either physically available or downloaded before you blast off. Having a copy of an AFD is a good idea as well, be it digital or paper.

    Rental cars

    If you arrange it beforehand, many FBO’s will have the car ready for you upon arrival. You may also be able to drop the car off at the FBO when are finished, instead of taking it back to the rental agency. It sure is nice to have the car pulled up next to the airplane when it’s time to unload.

    Hotels

    Bigger FBO’s may have discounted rates with local hotels. If you call the desk and explain your needs they may offer to book it for you, or at least point you in the right direction. It may be worth picking an airport with more expensive fuel if it puts you closer to the hotels or restaurants you want to go to.

    Come back next month for Part 2!

    Andrew Robinson is a 135 Charter Pilot and flight instructor who lives with his wife and 2 daughters in Pennsylvania.  He flies Pilatus PC-12s and instructs in Beechcraft Bonanzas.

  • Texas Top Aviation at the AOPA Fly-In

    Where were you on April 26th?

    AOPA Fly In LogoTexas Top Aviation was at the AOPA Regional Fly-In at the San Marcos Regional Airport (KHYI).  If you weren’t there, you certainly missed out spending time with 2,500 other airplane and flying enthusiasts!

    The day began somewhat gloomy and windy with the threat of rain.  Organizers feared that weather would keep a lot of people from coming.  Boy, were they wrong!

    There were many classic airplanes, many modern and pretty nicely equipped airplanes, and everything in between.  There were aviation celebrities, Rod Machado and the Kings of King Schools fame, to name a few.  Not to mention the fabulous BBQ!

    N132BBTexas Top Aviation had several drawings for free training and 3 lucky winners.  We also had a Lancair Super ES for sale, N132BB (which made the San Marcos Record newspaper!). It definitely stood out with it’s unique paint job.  The flames on the tail drew many oohs and aahs.

    Departing the San Marcos Airport after the fly in was like battling traffic in Austin at rush hour (though, Austin doesn’t have any air traffic controllers).  The San Marcos controllers probably hadn’t seen that much traffic since the airport was an Army Air Base back during WWII.  It was quite a sight to see all the exhibitor’s airplanes lined up ready to head skyward.

    Thanks to all of you who stopped by the Texas Top Aviation booth!  It was a pleasure meeting all of you and we look forward to working with you in the future!

    Texas Top Aviation
    Hank Gibson and Russell Moore of Texas Top Aviation


  • Removing a Hold on Foreflight Approach

    I’m a big fan of having my Foreflight map always match up exactly with the way I am flying. Having a Flight Stream in the airplane helps a lot with that as it always prompts me to load the new flight plan from the GPS into my Foreflight map. When I load an approach in the GPS flight plan, Foreflight will put it into my Foreflight flight plan via the Flight Stream.

    The problem I run into on Foreflight is when there is a published hold at the Initial Approach Fix (IAF), but ATC has told me to fly the straight in approach and skip the hold. Up until recently, I didn’t think there was a way to set up a straight in approach on Foreflight, so I just settled for the hold staying on there.

    Not anymore! There is a simple trick that I discovered that allows you to remove the hold from the Foreflight flight plan. Here’s how to do it.

    Load the Approach

    The first step is still to load the approach into your Foreflight flight plan on the Map page. In this scenario, we are flying from KAQO, the Llano Airport, to KHYI, the San Marcos Airport. Austin Approach has told us to expect the straight in RNAV 17 KHYI via PUKIY. So, on Foreflight, we have KAQO and KHYI in our flight plan. Then, I tap the Procedures button on the upper right hand corner of the screen. I then tap Approach, then RNAV 17 KHYI. Then I select my transition.

    The options given are either PUKIY with the hold, seen below;

    Or Vectors to Final, which lines me up inside of PUKIY. Neither of these are what I want.

    But, to get this to work, I select PUKIY, then tap add to route. Now we have our approach loaded into our flight plan.

    Removing the Hold

    The RNAV 17 is now in the Foreflight flight plan, but the hold is displayed at PUKIY. To remove the hold, the first step is to tap the approach in green and a menu pops up.

    The 7th option down is “Remove Hold in lieu of PT.” Eureka! Tap that, then the approach is displayed without the hold. Houston, we have success! It even says “NoPT” in the flight plan.

  • AOPA Air Safety Institute: More Difficult Decisions

    The AOPA Air Safety Institute is making it’s annual loop through Texas this January. The topic for this Safety Seminar is “More Difficult Decisions: Choices & Consequences.”

    The seminar is geared our the decision making process that we as pilots face on each flight. Some decisions are easy (what altitude should I pick?) while some have much greater consequences and should be taken very seriously.

    This event will be interactive for the participants as several scenarios will be presented. The goal is to help pilots learn to think through each decision, weighing the consequences along the weigh to arrive at the safest outcome of the flight.

    The first area seminar will be held on Tuesday, January 21st at the Stinson Field Airport (KSSF, 8535 Mission Road, San Antonio, TX 78214). The second area seminar will be held on Wednesday, January 22nd at the TXDOT office in Austin (200 E. Riverside Dr., Austin, TX 78704). WINGs credit is available for all attendees.

    Learn more here.

  • Building An Airplane

    Randy Vanstory, a long-time customer of Texas Top Aviation, decided in early 2017 to build his own airplane. Randy currently owns a Mooney M20J and has been active in aviation for a number of years.  He took on the Vans RV 10, starting in February 2017.  He’s about halfway through right now, with an estimated completion of mid-2020.

    A completed Vans RV 10

    I asked Randy what gave him the desire to build his own plane.  “I love building things, learning new things, and working on things” he said.  “This satisfies those desires all in one project.”  Randy had a desire to work with his hands, to create something of his own, and building an airplane put several of his passions together in one project.

    Lots of pilots out there dream of building their own airplane in their garage.  There is a certain cool factor to putting together an RV or a Lancair in a garage, then trucking it out to an airport, attaching the wings, then flying a personal creation for the first time.  An airplane unique to you, since there isn’t one quite like it any where else.

    That’s the beauty of a homebuilt.

    Here is a link to Randy’s build video done by Kobalt Tools.

  • Garmin 530/430 Missed Approaches

    Flying a missed approach can be stressful enough.  When you haven’t done one in a while and your GPS isn’t showing you how to get to the missed approach point and you can’t remember which button to press, that adds a lot more stress.  Recipe for disaster?  Quite possibly!

    No need to fear, we are here to help.  The procedure for getting a Garmin 530 or 430 to give you missed approach guidance is actually simple and straightforward, if you know what to do!

    Note: Because of the variety of different autopilot configurations in different airplanes, this article will focus solely on the GPS.

    What the GPS is Thinking

    The way Garmin designed the Garmin 530 and Garmin 430 is to be as helpful to pilots as possible.  Their thinking was, 95% of the time, a pilot will make a landing on an instrument approach.  This is pretty accurate as most of the time, this is what happens.  Most general aviation pilots don’t fly approaches to minimums all that often, thus negating the need for a missed approach.

    Garmin Missed ApproachGarmin designed their software with this in mind.  When an airplane crosses the missed approach point, the GPS will go into what’s called suspend mode (a SUSP annunciation appears above the OBS key).  It will keep the missed approach point as the active waypoint because it assumes the pilot is going to land.

    This can be confusing to pilots.  This is what happens when software engineers and pilots come together. Engineers often believe they are smarter than pilots! (See the Airbus fly by wire roll out)

    The Procedure

    In the case of a missed approach, the button pushing on the GPS is actually relatively simple.  There is no SUSP key to take the GPS out of SUSP mode (thanks Garmin!).  Instead, you press the OBS key.  This will take the GPS out of SUSP mode, making the first waypoint on the missed approach procedure the active waypoint.  Your GPS will now give you guidance on the missed approach procedure.

    If you are going missed off an ILS, LOC, or VOR approach, then there is one more key you’ll have to press. Your CDI needle (whether it is digital or analog, an HSI or just a CDI gauge) will be reading off the NAV radio and your CDI indication on the GPS will be VLOC.  After you press the OBS key, press the CDI key on the GPS so you will start getting course guidance from the GPS again.

    That’s it.  Button pressing on the different autopilots will vary, but if you are familiar with yours, you’ll be able to tell it to follow the GPS and climb to the proper altitude.

Leave a Reply

Your email address will not be published. Required fields are marked *