I Love the Piper PA46

A lot of my customers ask me which airplane that I train in is my favorite.  The Cirrus and the Columbia both are very good airplanes, but if I had my pick, I’d go with a Piper PA46, specifically an ’86-’88 Malibu.
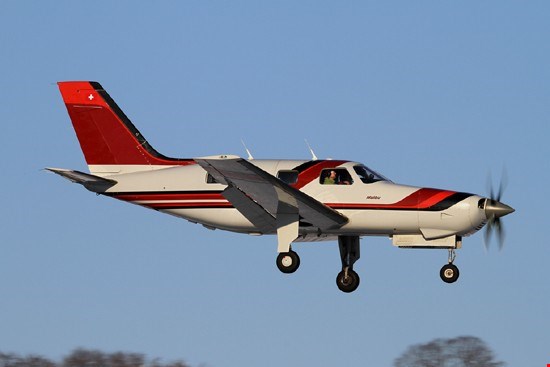
I love the Piper PA46.  6 seat, cabin class, pressurization, air conditioning, great ramp appeal, 17 GPH (in the Continental TSIO 520 or 550; Piper changed to the Lycoming TIO 540 in ’89, which you run rich of peak and burn 22 GPH, decreasing a little bit of the awesomeness).  What more can you ask for?  The interior is roomy, there is plenty of baggage space in the nose and in the rear of the cabin.  They are downright fabulous airplanes.  Plus, you can get into a nice one that has had some panel upgrades and a mid time engine for around $300,000.  That’s not bad.

Cessna tried to make a pressurized single with the P210, but it just doesn’t match up with the Piper PA46. The Piper has more room, more baggage space, a higher max differential pressure and service ceiling, and better air conditioning to boot!

Don’t know much about the Piper PA46?  It’s been called several things.  Originally, it was the Malibu, with a Continental engine.  Now the TSIO 520 was not one of Continental’s better motors.  However, most of the original Malibus have been upgraded to the much better TSIO 550C engine, which is a great product. Cruise around at almost 200 knots at FL200 and burn only 17 GPH.  It’s beautiful.

Piper changed to the Lycoming engine in 1989 and changed the name to the Malibu Mirage, later shortened to just Mirage.

Then, in 2016, Piper upgraded a lot of the avionics, cleaned up the panel, and dubbed it the M350.

Piper made the ill fated decision in the mid 2000s to quit making the Saratoga and instead make an unpressurized version of the PA46 called the Matrix.  It didn’t last long, only about 10 years or so, and hasn’t been very popular (see:  don’t buy one).  Piper took the best part about the PA46, the pressurization, and took it away, leaving an airplane that you still have to wear oxygen in to get the advertised high speeds in the upper teens and flight levels.  Who wants to be cruising around in a cabin class airplane with oxygen on?  Piper needs to bring the Saratoga back to give folks a low level, high performance option.

What would be my dream Piper PA46?  As stated above, an ’86-’88 model Malibu (Piper started off with hydraulic flaps in the ’84-’85 models and it wasn’t a very good system.  They changed to electric flaps in ’86) with a Continental TSIO 550C upgrade.  The Garmin autopilot isn’t out yet, so I’d go with the STEC 3100 Autopilot w/ a Yaw Damper (the airplane originally came with a King KFC 150, which is a really good autopilot, but most of them are getting old and are getting difficult to fix.  King’s replacement KFC 325 is still slogging through certification.  Garmin’s GFC 600 would be ideal, but that isn’t expected to be certified for the PA46 fleet till late this year).  A single Garmin 10.6″ G500 TXi with EIS tied to a Garmin GTN 750 GPS with a Garmin GTR 225 Nav/Comm as the number 2 radio.
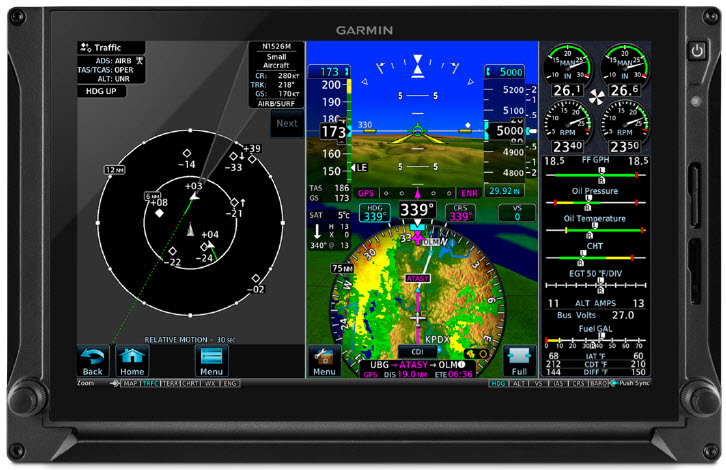
Then I just put gas in it and go.  That would be my kind of airplane.

Similar Posts

  • Avidyne IFD 440 Receives Certification

    Avidyne’s plug and play replacement for the Garmin 430, the Avidyne IFD 440, finally received certification from the FAA last week.  The touch screen GPS unit is being marketed as a simple swap out for the Garmin 430.  This release follows up Avidyne’s release last year of the IFD 540, also a plug and play replacement, but for the Garmin 530.

    The features and touch screen of the GPS units sound quite nifty, but it will be hard for Avidyne to compete with the GTN 750 and 650 from Garmin.  The unit prices for the IFD 540 and 440 will be less (and installation is simpler), but we will see how the company does.

    Avidyne IFD 440

    The STC allows for installation in 1,000 makes and models of aircraft, according to the company, so there are a lot of possibilities for installs.

    In conjunction, Avidyne also released a new version of it’s software for both GPS units.  According to Avidyne, this will unlock multiple features that enhances the capabilities of both units.

    To read more on the IFD 440 and it’s bigger brother, the IFD 540, check out Avidyne’s website.

  • The Go Around Button

    Back in the old days, when flying an approach in an early Cirrus SR22 (circa 2004; yes, in airplane technology, those were the old days), performing a missed approach procedure was a lot of work.  You were low to the ground and weren’t able to see the runway.  Then, you had to start climbing so you don’t hit the ground, then push a lot of buttons in order to get the GPS and autopilot set fly the missed approach procedure.  It was very easy to get distracted with button pushing, then forget to fly the airplane, putting yourself and passengers in very unsafe circumstances.  The go around button has changed all that.

    Going Missed the Old Fashioned Way

    Let’s stick with our example of the 2004 Cirrus.  The SR22 in 2004 was equipped with the Avidyne Entegra system, complete with dual Garmin 430 GPS units, and an STEC 55x Autopilot.  A very capable IFR flying machine (we could use the same example of a 2004 or 2005 Lancair Columbia 350 or 400 that was equipped the same way, except the screens were vertical instead of horizontal).

    Avidyne Cirrus Go Around Button

    We’ll use the ILS 15 at the Temple airport, KTPL, for our example.  You pass TPL, the outer marker at 1,683 with the glide slope already centered.  Everything is going well so far.  The number 1 Garmin 430 is set to VLOC and the autopilot is showing NAV and APR for the lateral guidance and GS on the vertical, tracking the glide slope.  The last weather report stated the clouds were Broken at 500 feet, so it appears like you’ll be able to get in on the approach.

    As you get closer to the Decision Altitude, the clouds aren’t letting up at all.  You hit 1,000 feet on your altimeter, 120 feet above the minimums, and you still can’t see a thing.  Another 100 feet lower doesn’t change anything, so you elect to proceed with the missed approach.  This means things are about to get busy.

    Here’s the process:

    • Fly the airplane first, meaning shut off the autopilot, pitch the nose up to about 7 degrees, TRIM, add full power, retract the flaps, and step on the right rudder
    • The Garmin 430 is now in SUSP mode, meaning the missed approach point is locked in as the active waypoint.  So, you have to press the OBS button to cause the GPS to cycle over to the missed approach procedure
    • You have to press the VLOC button on the Garmin 430 in order to change the CDI back to GPS
    • You have to re-engage the autopilot by pressing NAV twice (which engages GPS Steering mode)
    • You have to reset your altitude bug (if you hadn’t set it for the missed approach altitude previously)
    • You have to press VS and ALT on your autopilot to have the STEC continue the climb

    That’s a lot of work, isn’t it?  Plus, that’s an extensive amount of head down time in the cockpit, with your eyes looking elsewhere other than the instruments while hand flying.  All very low to the ground, I might add.  Can you see how this can be dangerous?  (Note:  The Avidyne IFD 550 has made this a little easier with automatically switching from VLOC to GPS and automatically engaging the missed approach procedure in the flight plan)

    The advent of the Go Around Button has streamlined the process, leading to safer operations where it matters most.  The functions of the Go Around Button vary based on the airplane, but here are three examples, the Garmin G1000 Cessna Corvalis TT, the Garmin G1000 Piper Mirage, and the Garmin Perspective Cirrus SR22.

    Cessna Corvalis TT

    We’ll take the above situation and swap out the airplanes.  Gone is the 2004 Cirrus SR22.  Insert a 2008 Cessna Corvalis TT, equipped with the Garmin G1000 suite and the GFC 700 autopilot.  The go around button is positioned directly above the twist in throttle.

    Cessna Corvalis G1000 Go Around Button

    When you push the Go Around Button, here’s what the system does:

    • Disconnects the Autopilot
    • Sets the Flight Director for 7.5 degrees pitch up (which is about your normal climb angle) and wings level
    • Switches the CDI back to GPS
    • Takes the GPS out of SUSP mode and cycles the flight plan to the first waypoint on the missed approach procedure

    Here’s what you have to do:

    • Follow the flight director by pitching the nose up and TRIM
    • Add full mixture, prop and throttle (prop & throttle should be full already)
    • Retract the flaps
    • Step on the right rudder
    • Re-engage the autopilot, then press NAV and VS (or FLC) and set your altitude bug if it isn’t already set

    Not too bad, eh?  Makes the whole situation streamlined and safer.

    Piper PA46-350P Mirage

    Same situation, different airplane.  You’ll notice the procedure for the Piper Mirage is almost exactly the same as the  Corvalis procedure.  The difference between the two airplanes is where the autopilot controller is.  In the Corvalis, the autopilot controller is positioned on the left side of the MFD, making it easy to scan back and forth while pushing buttons on the autopilot.

    The Piper Mirage autopilot controller is positioned below both screens and in front of the power quadrant. With this positioning, the pilot’s eyes have to go a lot further to see which autopilot button he is pushing. In this case, it becomes very important to get the airplane climbing and trimmed before going down to engage the autopilot.

    As in the Corvalis, here is what the Go Around button does:

    • Disconnects the Autopilot
    • Sets the Flight Director for 7.5 degrees pitch up (which is about your normal climb angle) and wings level
    • Switches the CDI back to GPS
    • Takes the GPS out of SUSP mode and cycles the flight plan to the first waypoint on the missed approach procedure

    And here’s what you have to do:

    • Follow the flight director by pitching the nose up, then TRIM
    • Add full mixture, prop and throttle (prop & throttle should be full already)
    • Retract the flaps
    • Step on the right rudder
    • Re-engage the autopilot, then press NAV and VS (or FLC) and set your altitude bug if it isn’t already set

    Cirrus SR22

    Cirrus Perspective Go Around Button

    This time, we’ll use the 2010 Cirrus SR22T with the Garmin Perspective and GFC 700 Autopilot. One thing I really like about how Cirrus configured their system is where the Go Around button is.  It’s actually on the throttle itself, making it much more intuitive.  This way, you can press the Go Around button while adding full throttle.

    There is one major difference between the Garmin Perspective in the Cirrus and the G1000 in the Corvalis. When you press the Go Around button in the Cirrus, the autopilot actually stays on.

    Here’s what happens when you press the Go Around button in the Cirrus:

    • Flight Director pitches to 7.5 degrees pitch up and wings level
    • AP Mode switches to Go Around mode, following the flight director
    • GPS comes out of SUSP mode
    • CDI switches back to GPS

    All the pilot really has to do is add power, take the flaps up, then press NAV on the GFC 700 to get the autopilot following the missed approach procedure.

    If you aren’t familiar with the Go Around button or haven’t used the one in your plane lately, it’s good to go up with a knowledgeable instructor and fly a couple of approaches where you perform the published missed approach afterward.  That way, he or she can assist you through the first missed approach, then give you pointers until  you get comfortable with the Go Around button.

  • Cirrus Embark

    Free training?

    Yes, you heard correctly.  Last fall, Cirrus released a program called Cirrus Embark.  The Cirrus Embark program offers 3 Free Days of Training to new purchasers of used Cirrus aircraft.  The 3 Days is equivalent to the Cirrus VFR Transition Training Course.

    Previously, Cirrus offered free factory training to anyone who purchased a new Cirrus from the Cirrus factory. Now, anyone buying a used Cirrus gets the same offer through Cirrus Embark at their home airport with a local CSIP training provider.

    IFR pilot?  No problem.  The Cirrus IFR Advanced Transition Training Course is 5 days in length, but the Cirrus Embark program covers the first 3, reducing the out of pocket pay to only 2 days.

    Want more information?  Check out the Cirrus Embark website.

    To get more information on both the VFR and IFR Cirrus Transition Training Courses, visit the Texas Top Aviation Cirrus Training Page.

  • Flying the RDD LX7

    I get to fly a lot of different airplanes in my chosen career. There aren’t many airplanes that I take off in, then say “Wow,” and have a big smile on my face. The RDD LX7 was definitely one of those.

    I wrote about the RDD LX7 in the past, bragging about everything I read about it. The blogs all advertised 250 KTAS and 17 GPH and FL250, all of which are eye popping numbers.

    Lo and behold, those numbers are true.

    I got to go up to RDD’s Redmond, Oregon facility in April 2021 to get my initial training in the RDD LX7 and I couldn’t wipe the smile off my face. The 3 screen G3X Touch layout is very impressive and not crowded like I thought it would be. Being familiar with the G500TXi, there are some G3X specifics that take a little getting used to, but overall, it’s a good system. The main GPS and number 1 radio is a GTN 750Xi.

    We took off from RDM and proceeded to climb at 140 KIAS, which equated to 2,000 FPM. We only had half tanks (which is still 90 gallons of fuel!), but it climbed with no problem. It’s extremely responsive as I learned while doing the basic flight maneuvers. The stall speed of the airplane (the biggest problem with the Lancair 4P, the airframe that the RDD LX7 is derived from, was the terrible wing design and extremely high stall speed), was in the low 60s or high 50s, with the stall being extremely docile.

    The airplane handled very similarly to a Columbia 400, but seemed even more responsive. The glide ratio isn’t as good as some, but it’s still better than a Cirrus (plus it still has a BRS system to boot).

    The big test was the flight to San Antonio from Redmond to bring the plane home. The new owner and I departed RDM with the tanks full of Avgas (180 gallons), then got up to a cruise altitude of FL210. After setting power and leaning, the numbers came out true to spec: 252 KTAS, 17.5 GPH.

    The greatest part? We stopped in Santa Fe to stretch our legs and we didn’t need fuel. We still had 100 gallons left! That left us plenty to get to San Antonio with 40-50 gallons left over. Another RDD LX7 owner flew his piston direct from Redmond, OR to Jacksonville, FL, non-stop. It was over 9 hours. That’s impressive.

    You can’t beat the purchase price, either. A new Cirrus SR22T runs a little north of $1.2m. A piston engine LX7, that is pressurized, 70 KTAS faster with a much longer range, and still has a BRS, is between $850,000-$900,000. An LX7 starts to make a whole lot of sense when you weigh all that. There is also a PT6 option with several different sizes and horsepowers to choose from, which costs more, but you see 300 KTAS.

    To learn more about the RDD LX7, check out the company’s website: RDD LX7.

  • Spring Cirrus Austin, TX Get Together (CATGT)

    The South Central Cirrus Owner’s and Pilot’s Association (COPA) Region is hosting it’s second Fly In dinner at the Austin Executive Airport (KEDC) on Friday, October 8th, dubbed the Spring Cirrus Austin, TX Get Together.  The event is from 5:30-9pm.

    Like the first CATGT in October, there will be dinner ($25 per person), drinks, and several presentations.  Jack Long and Josh Marvil will speak about their trip around the world in a PC-12.  Ed McCombs and Eric Opiela will give a safety presentation about automation and task saturation.

    Plus, best of all, Cirrus is bringing a real live flying SF50 Vision Jet, plus a brand new SR22 G6 with the Garmin Perspective NXi panel.

    Fly in or drive to EDC.  The dinner will be in the Henrickson Jet Center’s main hangar.  You will need to RSVP so event organizers can get a proper head count.  The link to RSVP is here.

    Register for the CATGT before the slots are all filled up!

  • AOPA’s Emergency In Person Seminar

    Courtesy AOPA.org

    We spend time training for them, but real-world emergencies are rare enough that it’s easy to get complacent. They don’t always happen to “other pilots,” though, and preparation can make a big difference when things don’t go as planned:
    • What if you lose 500 rpm during takeoff, but the engine is running smoothly?
    • What if the ammeter drops to zero during a flight in IMC?
    • What if your left aileron develops a strong vibration in flight?
    Our new seminar is full of expert tips on handling those “up here, but wishing you were down there” scenarios. We focus on how to keep abnormal situations from becoming full-blown emergencies, offer advice on keeping critical problems under control, and give our best advice on off-airport landings.

    Find an AOPA Emergency Seminar near you!

    • Monday January 11, 2016-The Woodlands Waterway, 7pm-9pm
      • 1601 Lake Robbins Drive, The Woodlands, TX 77380
    • Tuesday January 12, 2016-Wyndham Houston West, 7pm-9pm
      • 14703 Park Row Blvd., Houston, TX 77079
    • Wednesday January 13, 2016, Holiday Inn San Antonio Airport, 7pm-9pm
      • 77 NE Loop 410, San Antonio, TX 78216
    • Thursday January 14, 2016, Omni Austin Hotel at Southwark, 7pm-9pm
      • 4140 Governor’s Row, Austin, TX 78744

Leave a Reply

Your email address will not be published. Required fields are marked *