Have You Got Your FAA WINGS?

The FAA started their Pilot Proficiency Award Program (commonly known as FAA WINGS) in 1996.  It is run by the FAA Safety Team, or the FAASTeam.  The intent of the program was, and is, to “improve the nation’s accident rate by conveying safety principles and practices through training, outreach, and education” (taken from faasafety.gov).  The FAA WINGS program, free of charge, encourages pilots to pursue recurrent training to enhance their overall knowledge of all the aspects of aviation.
FAASTeam Logo FAA WINGS

The FAA WINGS program has evolved over the years, but with the current structure, pilot’s accomplish tasks, both knowledge and flying, for credit that adds up to the equivalent of a flight review.  Pilot’s must accrue three knowledge credits and three flight credits to complete a phase, and each phase acts as a flight review.

FAA WINGS has three levels, the basic, advanced, and master level.  Under each level, you accomplish different phases.  The basic level is “designed for pilot’s [desiring] a higher level of proficiency than … a normal flight review” (faasafety.gov).  The flying tasks in the basic phase are based on the private or commercial pilot PTS, depending on the airman’s certificate level.  The knowledge courses revolve around many different areas, all of which can be viewed on the FAASafety Team’s website.    Most are free, but there are some courses that have a cost associated with them.  In the advanced and master phases of the FAA WINGS program, the tasks have higher standards, challenging pilots to hold themselves to those higher standards.

One unique aspect of the FAA WINGS program is the opportunity to attend a safety seminar for credit. Throughout the year, there are many different safety seminars that take place in the different FSDO areas. The FAA WINGS seminars range from a study of accidents, to GPS usage and anything in between.  You can even get FAA WINGS credit for attending the Bonanza BPPP or the Cirrus CPPP programs.

As an instructor, I highly recommend to all my customers to enroll in the FAA WINGS program and use it. This keeps pilot proficiency at a high level, which in turn keeps safety at a high level as well.  Plus, you get to learn a lot too!

If you’d like to enroll in the FAA WINGS program, visit faasafety.gov to create an account.  Then, find a good instructor and start working on those phases!

Similar Posts

  • The Dual Garmin G5 Glass Panel Solution

    What’s the most cost effective glass panel retrofit?  There are several options out there (and it seems like more coming each Sun ‘N’ Fun or Osh Kosh event), but the consensus is the Aspen EFD 1000 or 1500, right?  At $12,000 installed, it’s about $8,000-$10,000 cheaper than the Garmin G500 (though you can make the argument that when you add a second screen and SVT to the Aspen, the price is about the same).

    I am here to blow your mind.  What if you could get a glass panel retrofit that is a complete AHRS system with airspeed and altitude, plus a slaved HSI that auto slews to your GPS and a 4 hour backup battery so you can throw your steam attitude indicator away, for only $4,600, plus installation?

    I am not crazy.

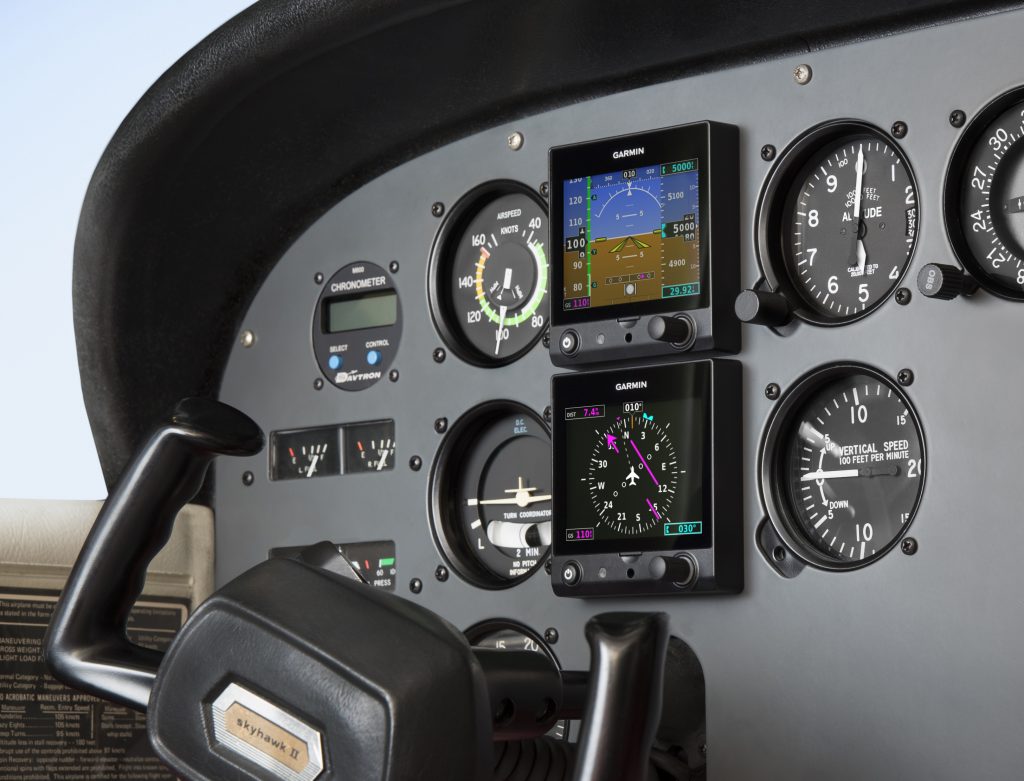
    The Garmin G5 debuted last year when the FAA relaxed it’s regulations to allow more experimental avionics into certified airplanes.  The single G5 was a big hit.  The 3.5 inch screen fit nicely into the hole that the traditional attitude indicator left, giving pilots a glass attitude, airspeed and altimeter options for less than $2,500.

    In March, Garmin brought out the HSI version of the G5.  Equipped with a low cost magnetometer, the DG/HSI version is a complete replacement for the traditional DG/HSI.  The unit also displays ground speed and distance (received from the GPS information), while auto-slewing to the GPS flight plan, so the CDI needle will move on it’s own, eliminating the annoying need for the pilot to set the course on the HSI (and ridding the GPS of the message that pops up reminding the pilot to set the course).

    The dual units provide a complete backup Attitude in the case of a display failure.  The reversionary mode you get with the Garmin G1000 and the Garmin G500 is also present in the dual G5s.  This eliminates the need for a backup steam gauge attitude indicator, freeing up panel space for an engine monitor or some other toy.  The G5 units can also be equipped with 4 hour backup batteries in case of electrical failure.

    The price for the dual G5 setup is very reasonable at just under $4,600 plus installation (which, according to Garmin, should be pretty simple as the units act as plug and play instruments).  The AHRS unit is available stand alone for under $2,200 while the DG/HSI unit standalone runs just under $2,600.

    For more information, check out Garmin’s website.

    What’s the most cost effective glass panel retrofit?  There are several options out there (and it seems like more coming each Sun ‘N’ Fun or Osh Kosh event), but the consensus is the Aspen EFD 1000 or 1500, right?  At $12,000 installed, it’s about $8,000-$10,000 cheaper than the Garmin G500 (though you can make the…

  • The Importance of a Pre-Buy Inspection

    There are multiple ways to save money during the aircraft buying process. To start, since you are buying an airplane, you have some means of positive income in order to afford an airplane. Airplanes come in all different shapes and sizes and usually, an airplane can be found to fit almost any budget, whether is a $20,000 Texas Taildragger all the way up to a multi-million dollar jet.

    One way is to stay within your budget. There will always be a shinier, newer, lower time airplane that is just above where you set your budget at. Don’t reach for it! There is a reason you set your budget where you did.

    Another way is to shop around and get multiple insurance quotes. Your agent is in charge of engaging underwriters who are going to evaluate you and your airplane as risks, then price a policy accordingly. With most airplanes, you should get multiple quotes to see what fits you best. Beware though, because sometimes, you can get a lower rate, but it will require more training, so you end up shelling out more money in the long run. If you find a policy you like, but the training seems skewed or the liability isn’t high enough, you can always have your agent ask the underwriter to modify the quote. You are still in charge.

    Finally, if you evaluate your mission and see that your budget can’t afford an airplane that carries enough or goes fast enough, look into taking on a partner or two to help with costs. Be thorough in vetting your potential partners as a good partnership is worth it’s weight in gold, but a bad one is downright unpleasant and often times hard to get out of. Find pilots who have the same mindset & personality you do and treat their stuff the same way you do. Try to take a ride in their car or go to their house, then you’ll see what kind of shape they will keep the airplane in.

    The best way to cost yourself more money in the aircraft buying process?

    Don’t do a pre-buy inspection.

    A pre-buy inspection takes place after negotiations and once a Purchase Agreement is in place. You are pretty much set on the airplane, you just want a third party mechanic who is knowledgeable on that make and model of airplane (and this is a very important point) to go over it and make sure that it is sound from a mechanical standpoint. The buyer, you, want someone who has never had an association with the seller since the mechanic will be your representative in the process and you want him answering to you.

    If you have used a broker or a buyer’s agent, that person should have already gone through the logbooks for you, so you’ll have a basic idea of the history of the airplane. However, knowledgeable mechanics find things all the time that turn out to be the responsibility of the seller to repair since it happened on their watch. Without a pre-buy, you would end up having to pay for that in the not to distant future.

    Here is an example of where not doing a pre-buy can cost a lot of money.

    An owner bought a late ’70s model Citation ISP, one of the very first Citations ever made. It had been based in Florida (salt & humidity + aircraft don’t mix well) for a while. The buyer didn’t use a broker, but thankfully had someone look through the maintenance history of the airplane. Since it was so old, the logbook reviewer didn’t have time to do anything but a basic overview, but he gave the thumbs up to the buyer.

    The buyer decided he just wanted a boroscope inspection and the seller’s mechanics to look over the airplane. Remember what I said before about a third party mechanic? Well, these mechanics didn’t do a very thorough job. When the buyer took delivery of the plane, after about 10 hours of flying, he already had an $18,000-$25,000 maintenance bill.

    You may say, well that’s a jet. Jet’s have specialized maintenance and need a more extensive pre-buy inspection.

    On the contrary, in my 8 years in the training business, I have seen Cirrus, Piper PA46s, Bonanzas and several other piston engine airplanes that either didn’t have a pre-buy done or the pre-buy was done by someone who didn’t know that airframe. Lo and behold, things started breaking and adding up very quickly that would have been discovered on a good pre-buy inspection.

    Don’t skip on the pre-buy inspection. They usually run a few thousand dollars, but save tons of money in the long run.

    There are multiple ways to save money during the aircraft buying process. To start, since you are buying an airplane, you have some means of positive income in order to afford an airplane. Airplanes come in all different shapes and sizes and usually, an airplane can be found to fit almost any budget, whether is…

  • A Takeoff Briefing

    Takeoff briefings are one of those things that most pilots are taught when they first learn how to fly, but once they get into flying themselves around, quickly fall by the wayside.  There is a reason student pilots are instructed to perform a takeoff briefing before departure.  It gets them thinking about what the plan is after they get off the ground and what to do if something goes wrong.

    Takeoff Briefing

    Takeoff briefings are a good habit to get into.  Airline crews do a takeoff briefing before every departure, even though they have performed a takeoff in that particular airplane thousands of times.  It enhances safety and provides repetition, keeping that knowledge at the forefront of the crew’s minds.

    In general aviation, a takeoff briefing should cover what the takeoff procedure is, what the abort plan is, and what the plan after takeoff is.

    Takeoff Procedure

    Most pilots fly the same airplane all the time, so the familiarity with what goes into a takeoff is there.  But, habits should be formed to brief the takeoff procedure as part of the takeoff briefing.  It doesn’t need to be extensive, just covering the basics of how the airplane is getting off the ground.  Something like this:

    • Throttle setting (if turbo charged, will full throttle cause an overboost?)
    • Rotate speed
    • Expected takeoff roll

    That’s it.  Nothing fancy for the takeoff procedure.

    Abort Plan

    What is the plan if something goes wrong?  It doesn’t have to be an engine failure, maybe the engine coughs when full power is added or maybe the engine doesn’t produce peak RPM.  Maybe the takeoff roll is longer than anticipated and something doesn’t seem right.  Maybe on climb out a door pops open.  Maybe the engine fails at 1,000 feet.  It’s good to keep the plan in the foreground for what to do if an abnormal or emergency situation takes place.

    • Brief the aborted takeoff procedure
      • Pick an abort point on the runway based on the expected ground roll
      • What is the procedure if the airplane isn’t off the ground by then?
      • What is the procedure if the engine quits on the runway?
    • Brief the engine failure procedure at low altitude
      • If the engine fails over the runway, will you try to land on the runway?
      • What altitude would you elect to turn back as opposed to landing straight ahead?
      • If the plane is too low to turn back, would you land straight ahead or aim left or right?
      • What airspeed will you aim to hold if the engine fails?
    • In a Cirrus, what is your minimum parachute deployment altitude?

    After Takeoff Plan

    After the airplane is off the ground, what’s the plan then?  Are you staying in the pattern or departing the area?  Do you need to adjust your power at a certain altitude?  What altitude are you climbing to?  What heading are you going to fly?  Is your flight plan in your GPS?  This is an excellent time to set up altitude and heading bugs if your airplane is so equipped.

    Get in the habit of doing a takeoff briefing before you call the tower or announce your departure.  It get’s your mind focused on the task at hand and then what is going to be happening next.

    Takeoff briefings are one of those things that most pilots are taught when they first learn how to fly, but once they get into flying themselves around, quickly fall by the wayside.  There is a reason student pilots are instructed to perform a takeoff briefing before departure.  It gets them thinking about what the plan…

  • Coflyt Ownership App

    A new app came out last year that fits a need for many owners. Coflyt, available on the Apple App Store for $14/month for up to two airplanes, helps immensely with staying organized. Those questions of, “When is my oil change due?” or “Has the plane had it’s IFR inspections?” are easily answered by checking the app instead of having to dig through maintenance logs.

    Not only does Coflyt help keep track of maintenance, but it also houses squawk lists that owner’s can send to maintenance shops as well as keeping track of Airworthiness Directives. If the pilot remembers at the end of flights to put the amount in, it even shows how much fuel is remaining in the airplane.

    For flying clubs and partnerships, it provides easy scheduling without having to share calendars. Payments can also be taken and flights tracked. No more paper flight sheets after flights to track down.

    As a pilot, it helps immensely to be organized. For $14 a month ($36/month for partnerships or flying clubs), that’s a small price to pay.

    A new app came out last year that fits a need for many owners. Coflyt, available on the Apple App Store for $14/month for up to two airplanes, helps immensely with staying organized. Those questions of, “When is my oil change due?” or “Has the plane had it’s IFR inspections?” are easily answered by checking…

  • Scud Running

    I was speaking with a pilot a few months back who was not instrument rated.  He was telling me of his flying experience while continually speaking fondly of scud running.  He told me several stories, most of the time with a smile on his face, about scud running to his destination while staying clear of clouds.  While he was talking, my mind was cycling through the numerous accident reports I’ve seen where a scud running VFR pilot has crashed into terrain or an obstacle.  Needless to say, scud running is not a very good idea.

    This pilot’s stories got me to thinking, how common is the practice of scud running amongst VFR only pilots?  As an instructor, I always teach my private students about personal minimums and making that no-go decision when clouds are below those personal minimums.  The act of scud running falls under several of those dangerous pilot mindsets, get-there-itis, invincibility, and macho-ism, to name a few.

    To bring everyone on the same page, let’s define scud running.  Wikipedia has a very good definition:

    Scud running is a practice in which pilots lower their altitude to avoid clouds or instrument meteorological conditions (IMC). The goal of scud running is to stay clear of weather to continue flying with visual, rather than instrument, references. This practice is widely accepted to be dangerous, and has led to death in many cases from pilots flying into radio towers and high tension wires; however, even instrument-rated pilots sometimes elect to take the risk to avoid icing or embedded thunderstorms in cloud, or in situations where the minimum instrument altitudes are too high for their aircraft.

    To put some numbers with that definition, a scud running VFR pilot would takeoff with a 1200-1500 foot ceiling and stay 700-1000 feet above the ground, right in the area where towers, hills, and rapidly rising terrain reside.

    Scud Running

    How do we change this mindset?  Well, if someone has been scud running for years without incident, the practice becomes normal, like the pilot I mentioned above.  The mindset of invincibility sets in and the practice continues.  This particular pilot can also lead other pilots to adopt the same practice, encouraging them that nothing will happen to them, since we all know that our pilot peers know better than our flight instructors (insert heavy sarcasm here).

    In order to change this mindset, instructors need to emphasize personal minimums from day one.  This includes ceilings, visibility, and winds.  For a seasoned pilot, a review of accident statistics might help the process.

    Scud running is not a safe practice.  If you’re a scud runner, you need to rethink your attitude.  Is getting there really worth it?

    Still not convinced?  Read this pilot’s experience from AOPA.

    I was speaking with a pilot a few months back who was not instrument rated.  He was telling me of his flying experience while continually speaking fondly of scud running.  He told me several stories, most of the time with a smile on his face, about scud running to his destination while staying clear of…

  • The Piper Saratoga Turbo

    Piper SaratogaRecently, I assisted with the delivery of a 2007 Piper Saratoga Turbo from San Antonio to New York City.  It was a very nicely equipped airplane, complete with a Garmin G1000 panel, an STEC 55x autopilot, and air conditioning.  The owner joined me on the flight back to get trained in the airplane, getting him comfortable in it over our 2 day excursion back to NYC.  Total flight time was 12 hours, though that did include several stops along the way and landing practice at the airports we stopped at.

    The 6 seat Turbo Saratoga is a very comfortable, very capable flying machine.  It is made for hauling, with a gross weight of 3,600 pounds, but that’s not to say it isn’t lacking in comfort, either.  The rear cabin has 4 seats, 2 facing forward and 2 facing rear.  It would be a little tight for 4 full size adults in the back seat.  To avoid knee knocking, the plane is an excellent 4 person and bags aircraft (or 4 adults and 2 kids).

    The really nice part about the Piper Saratoga is the baggage door.  Unlike the Bonanza, the Piper Saratoga has a baggage door that opens to the baggage compartment, creating a much easier way to load and unload baggage.  The nose baggage compartment, which holds an additional 100 pounds, is a very nice feature, allowing the bag load to be spread out.

    Piper Saratoga Inside

    We typically saw cruise speeds of 155-165 KTAS depending on altitude.  The highest we went was only about 9,000 feet, so we didn’t get up real high to see what the single turbo could do.  Even though the Lycoming TIO-540 engine burns about 20 gallons an hour, with 102 gallons of gas on board, the fuel consistently outlasted our desire to continue flying.

    Being equipped with the G1000 was a very nice feature of this particular Piper Saratoga.  The screens are nice and big, larger than the displays on a high wing Cessna or a Corvalis.  That allows for easier viewing of approach plates, NEXRAD, and the engine gauges.

    There are always downsides to an airplane, and the Saratoga is no exception.  The STEC Autopilot leaves some to be desired as I felt it hampered the capability of the G1000 when shooting approaches because the 12 knot crosswind limitation on the autopilot. You can still use the autopilot on an approach with higher than 12 knot crosswinds, but the autopilot tends to search around for the final approach course.

    The air conditioning works very nicely, though it did have a tendency to freeze up at altitude.  We discovered that quickly and just decided to turn it off and leave the blower on, since it was cool enough up high anyway.

    Overall, the Turbo Saratoga is a very nice airplane.  The speed leaves a little to be desired (you can get 10 KTAS more out of a Bonanza with a Continental engine, about 20 knots more if it is a Turbo Bonanza), but it is very high on comfort.  The Piper Saratoga makes for a good family airplane or as a hauler.  I liked the airplane a lot and thoroughly enjoyed my time in it.

    Recently, I assisted with the delivery of a 2007 Piper Saratoga Turbo from San Antonio to New York City.  It was a very nicely equipped airplane, complete with a Garmin G1000 panel, an STEC 55x autopilot, and air conditioning.  The owner joined me on the flight back to get trained in the airplane, getting him…

Leave a Reply

Your email address will not be published. Required fields are marked *