Are you thinking of buying an iPad and going to a paperless cockpit? Have you just recently purchased an iPad and are unsure of how to use Foreflight to it’s fullest extent? Check out this free webinar on Monday, January 19th. Gary Reeves, a Master CFI from California, will be hosting the 90 minute seminar, which begins at 1800 Z. He will be able to point you in the right direction for what type of iPad to purchase, how to set up your Foreflight account, and the basics of using the App.
You can finally get rid of those paper charts, saving clutter in the cockpit. Just make sure you bring along a charger for those extended flight in case your battery dips low!
To sign up for this webinar, click here. There is no cost associated with the webinar.
“AOPA Rusty Pilot presented by AOPA Ambassador Pat Brown at Tempus Training Solutions”
Topic: A Rusty Pilots Seminar
On Saturday, July 16, 2016 at 09:00 Central Daylight Time
Location:
Tempus Training Solutions
2080 Airport Dr.
San Marcos, TX 78666
Select Number:
EA2769634
Description:
Life may have gotten in the way, but the dream of flight can be yours again. Returning to the skies is not as difficult as most rusty pilot think. We’re inviting you back in the cockpit and will help you get there. Come and participate in a FREE Rusty Pilot program with fellow lapsed pilots. We will help you understand what’s changed in aviation since you’ve last took the controls and brush up on your aviation knowledge. The Rusty Pilot program is developed by AOPA in partnership with local flight training providers in order to create the best environment for getting you back in the air and a part of the general aviation community.
It is easier than most people think:
No FAA checkride or test
Medical may not be required
As a Bonus, by attending, you get two to three hours of free ground instruction towards your flight review!
To view further details and registration information for this seminar, click here.
“AOPA Rusty Pilot presented by AOPA Ambassador Pat Brown at Tempus Training Solutions” Topic: A Rusty Pilots Seminar On Saturday, July 16, 2016 at 09:00 Central Daylight Time Location: Tempus Training Solutions 2080 Airport Dr. San Marcos, TX 78666 Select Number: EA2769634 Description: Life may have gotten in the way, but the dream of flight can be yours…
The South Central Cirrus Owner’s and Pilot’s Association (COPA) Region is hosting it’s second Fly In dinner at the Austin Executive Airport (KEDC) on Friday, October 8th, dubbed the Spring Cirrus Austin, TX Get Together. The event is from 5:30-9pm.
Like the first CATGT in October, there will be dinner ($25 per person), drinks, and several presentations. Jack Long and Josh Marvil will speak about their trip around the world in a PC-12. Ed McCombs and Eric Opiela will give a safety presentation about automation and task saturation.
Plus, best of all, Cirrus is bringing a real live flying SF50 Vision Jet, plus a brand new SR22 G6 with the Garmin Perspective NXi panel.
Fly in or drive to EDC. The dinner will be in the Henrickson Jet Center’s main hangar. You will need to RSVP so event organizers can get a proper head count. The link to RSVP is here.
The South Central Cirrus Owner’s and Pilot’s Association (COPA) Region is hosting it’s second Fly In dinner at the Austin Executive Airport (KEDC) on Friday, October 8th, dubbed the Spring Cirrus Austin, TX Get Together. The event is from 5:30-9pm. Like the first CATGT in October, there will be dinner ($25 per person), drinks, and…
There has always been something that felt wrong to me about how the walkway on many models of Beechcraft extends onto the right hand flap. I have never felt right about stepping onto the flap as I make my way into and out of my dad’s E33A Bonanza and therefore I generally try to step over top of it and place my foot on the wing instead. But does this effort actually make any difference, or am I just making my self look silly for no reason?
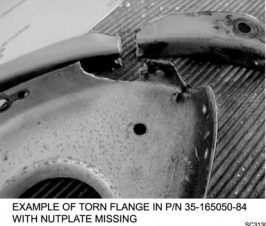
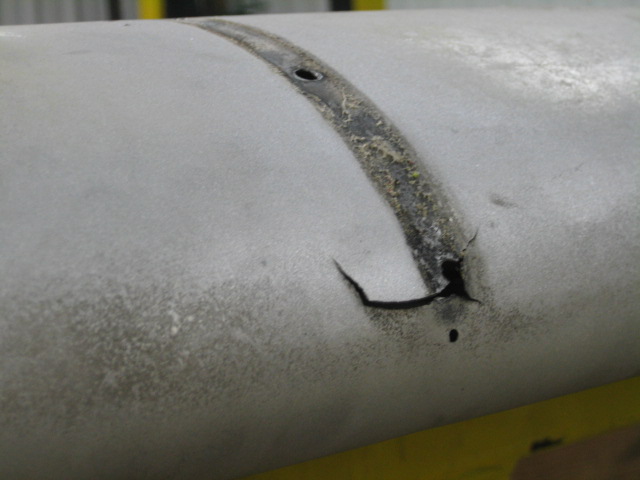
Well, as it turns out, it wasn’t such a bad idea. In 2007, a pilot flying a Beech reported a split flap condition. Upon inspection, it was found that there was damage to the actuation rod attachment as well as the nose rib and nut plates. Six other aircraft were checked and found to have similar damage. These findings were submitted to Hawker Beechcraft and in 2008 and they issued a maintenance alert regarding the issue. In 2011 the FAA issued SAIB CE-11-21 (Special Airworthiness Information Bulletin) to alert owners, operators, and maintenance personnel about the problem; specifically warning of the potential for cracking in the nose flap rib (part number 35-165050-84). And while its true that this type of damage is not limited to the right hand flap, it is known to be much more common on that side. Stepping over the flap instead of on it is recommended by both the FAA and Beechcraft as a solution.
Unfortunately, the flap cracking is known to span a wide variety of aircraft types. A 2011 “Safety Communique” issued by Hawker Beechcraft lists the affected models as:
-Bonanza 33, 35, and 36
-Baron 55, 56, 58, and 95
-Duke 60
Damage at the flap actuator point (Photo Courtesy of AOPA)
According the the FAA, the cracking can been found most commonly on airframes which are between 4,000 and 6,500 hours, but has also been found on aircraft with as few as 2,000.
So, what do we do about it?
First off, although much of the damage is difficult to detect without dis-assembly, the paperwork from both the FAA and Beechcraft recommend taking a look at the flap yourself to see if there are any obvious signs of problems. They also suggest taking special care looking in this area during your preflight inspections.
Next, if you have an airplane which may be susceptible to cracking, talk to who ever is doing your maintenance work and have them look carefully during your annual inspections. I talked to one of the IA’s at our shop who has dealt with this issue before and he told me that most shops will remove the flap and send it away to a repair station to have it fixed. It’s possible that if you purchased your airplane used it may have already had this issue taken care of; a quick look through the maintenance logbooks should clear up any questions.
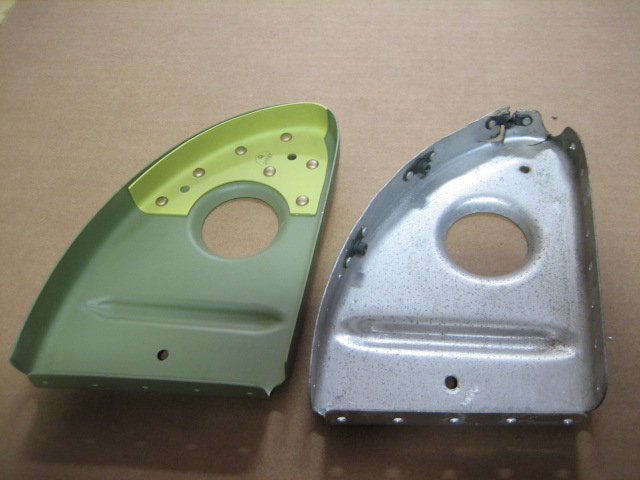
Repaired rib next to a damaged rib (Courtesty: AOPA)
Regardless of whether your airplane is known to suffer from this problem or not, do your best to avoid stepping on the flap when getting in and out of the cockpit. It is also a good idea to ask your passengers to do the same as this simple act could end up saving you big headaches and big money someday down the road.
For more information regarding the flap issues discussed above, talk to your maintenance provider and visit these links:
Andrew Robinson is a 135 Charter Pilot and flight instructor in Pennsylvania. He flies Pilatus PC-12s and instructs in Beechcraft Bonanzas.
There has always been something that felt wrong to me about how the walkway on many models of Beechcraft extends onto the right hand flap. I have never felt right about stepping onto the flap as I make my way into and out of my dad’s E33A Bonanza and therefore I generally try to step…
As all pilots know, the Federal Aviation Regulations require licensed pilots to go through recurrent flight training in the form of a Flight Review every 24 months. The regulations require 1 hour of ground review and a 1 hour flight. This is all that a pilot has to do to legally maintain his or her VFR currency to fly alone in an airplane. Of course, when passengers are aboard, the pilot has to have done 3 takeoffs and landings in the previous 90 days.
What if the pilot in question hasn’t flown in 20 years? All the regulations require is 1 hour of ground review and a 1 hour flight. Kind of scary, isn’t it? (Any instructor worth his salt would not, however, turn a pilot loose with just those flight review minimums if they haven’t flown in 20 years without an extensive amount of recurrent flight training)
Now, a lot can happen in 2 years in between those flight reviews. Regulations change, airspace is modified, and skills change (for the better or worse, most often for the worse over a period of not flying). For a current pilot who flies once or twice a week, those minimums are no problem. Here’s the thing, though. Even those current pilots typically don’t do a lot of stall practice or emergency procedure practice on their own. These are the most critical areas of flight and to only do them every two years leads to a lot of rust building up, sometimes even causing safety concerns in some instances.
How to remedy this? Scheduling recurrent flight training as often as possible with a good instructor who puts you through your paces. Do this often enough and stalls will become second nature. The stall warning horn goes off? Well, lower the nose and add power. Engine failure? Switch tanks and set best glide. Recurrent flight training allows you to become as familiar as possible with your airplane, allowing you to know what to do in every circumstance.
What’s a good recurrent flight training schedule? There are several options out there. The WINGs program is a pretty good option, though you will only have 3 flight training sessions in those two years instead of 1, but it’s a good start. In recent years, the FAA has put out Advisory Circular 61-98B encouraging pilots to begin personal currency programs for themselves. The suggested schedule for VFR recurrent flight training is every 4-6 weeks.
Texas Top Aviation highly recommends this suggested schedule, for both VFR and IFR. The AC doesn’t have a specific recommendation for IFR recurrent flight training, but flying 2-3 approaches a month with an instructor helps keep pilots as proficient as possible in the IFR environment. This way, the instructor can introduce circumstances in a controlled environment that simulate abnormal conditions that might possibly be encountered in flight. If those abnormal conditions are encountered, then it will be second nature on how to handle them, leading to less accidents and safer flying habits.
Try to schedule your recurrent flight training every 4-6 weeks and your piloting skills will stay top notch, keeping you safe and proficient in every circumstance.
As all pilots know, the Federal Aviation Regulations require licensed pilots to go through recurrent flight training in the form of a Flight Review every 24 months. The regulations require 1 hour of ground review and a 1 hour flight. This is all that a pilot has to do to legally maintain his or her…
On the evening of November 3rd, 2015, I was returning to my home airport of Lancaster from Pittsburgh in my company’s Aerostar, after being out on charter all day. It was dark out as I entered the traffic pattern at Lancaster. After an uneventful approach, I was cleared to land behind a Mooney. The spacing looked good as I turned final, but, as I was nearing the threshold, I started to become concerned that the Mooney wouldn’t be clear of the runway in time for me to land. At that moment, over the radio I heard an uncomfortable transmission from the Mooney pilot: “Tower, Mooney ABC has landed gear up.”
It took the tower controller a minute to grasp what was going on, and I was on about a 1-2 mile final when I was instructed to go around. Thankfully, the Mooney came to a stop in such a position that I was able to use the other intersecting runway, and was on the ground only a few minutes later. I can assure you, however, that I’ve never checked my “3 green” so many times in one traffic pattern as after that incident. Thankfully, no one was hurt, but there sure was an impressive amount of emergency equipment on the runway as I taxied back to my hangar.
In aviation, there’s a saying that goes: “There are two types of pilots. Those who have landed with their gear up, and those that will.” I don’t like that saying. The potential of a gear up landing (as a result of pilot error) is something that has always been a risk that I have worked hard to avoid. Not only is a gear up landing embarrassing; but it’s also an extremely expensive black mark on any pilot’s career.
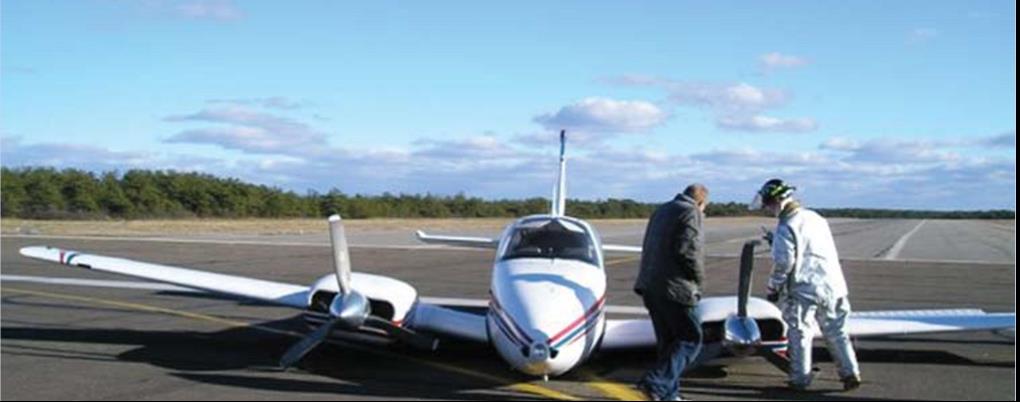
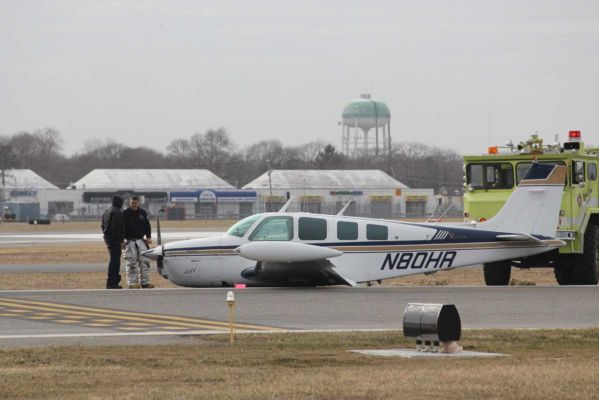
Not a good day. (Photo credit: http://www.newsday.com/long-island/suffolk/plane-lands-at-republic-with-no-wheels-1.2735131)
According to a July 2006, article in Aviation Consumer, the estimated cost of repairs following a gear up landing for an A-36 Bonanza would be about $27,000 and about 3 weeks of down time. 25 years ago, even my beloved E33 Bonanza was the victim of a gear up landing. While it was neither me nor my dad flying our airplane that day, the event stays in its history and reduces its value should the time ever come to sell it.
That incident in 1990 resulted in approximately $25,000-30,000 in repairs. The cause of the incident was classic: the pilot put the gear down at the normal time, but then had his downwind extended by tower. He brought the gear back up to fly the longer downwind, but forgot to put it back down later when he was cleared to land. Like many pilots, he had a set routine time when he normally put the gear down, and when his routine was changed, he didn’t remember to lower the gear once more.
Unfortunately, no matter what experience level one may be at, no pilot is immune to the possibility of such a mistake. The following are 5 tips that I have learned in my time flying that have helped myself and others minimize the chance of a gear-up landing occurring:
Know your aircraft systems: What are the operating perimeters on your airplane’s gear warning system? Most airplanes have a designated speed or power setting at which the gear warning horn will sound in the event that the gear isn’t down and locked. In the Aerostar that I was flying, the gear horn was supposed to come on at 15” of manifold pressure with the gear up, but in practice, it didn’t come on until much lower than that. It has since been adjusted, but at the time it was important for me to know that if I had left the gear up, the horn wouldn’t have sounded in a timely enough manner for me to go around, much less lower it prior to touchdown. Most likely it would have just added to the noise of metal on concrete as I pulled the power all the way back in the landing flare.
Don’t override gear-up warning systems: They were put there for a reason! Even if you’re out doing maneuvers and the horn is blasting in your ear for half an hour, resist the temptation to simply pull the circuit breaker or push the warning silencer to make it shut up. If a pilot disables the gear-up warning horn and then later forgets to put the gear down on landing, he or she will have a much worse headache on their hands than the one that the horn would have given them.
Use your checklists and memory items: It doesn’t matter how much a pilot knows about his or her airplane, or the procedures for it. Distractions happen. Mistakes Happen. Always consult the checklist for confirmation that you’ve accomplished all the essential tasks before landing. Additionally, if you haven’t already, work on developing call outs which you perform out loud regardless of whether you are alone in the airplane or not. Whenever I’m landing an airplane, I start with my flows, go through my GUMPS (Gas-Under carriage- mixture- props- seat belt) checks, then do the printed checklist, and finally when on short final I call out “short final, cleared to land, three green.” I’ve had several passengers tease me about doing the “three green” call out while I was flying aircraft that didn’t have retractable landing gear. But, I’d much rather be in the habit of checking every time regardless of what I’m flying than forgetting to check when it is necessary.
Use your available resources and develop healthy habits: If I have someone riding with me, I generally ask them to confirm that there are 3 green lights glowing on the instrument panel. Even if that person isn’t a pilot, they will probably enjoy the opportunity to be involved, and it’s a good way for me to stay in the habit of checking the gear lights to ensure that everything is properly down and locked. I’ve also found that intentionally leaving your hand on the gear lever until you have gear safe lights is a good idea. Forcing yourself to keep your hand on the handle until you have the all important lights obligates you to actually observe the indications instead of simply throwing the lever and moving onto something else. This way, if you only get an indication of 2 greens you’ll be aware of it right away and have more time to respond appropriately. It also helps you to learn the normal length of time it takes for the gear to extend or retract, which will be helpful to you to be aware of any abnormalities in the gear system.
Upgrade your aircraft’s gear-up warnings: There’s a variety of ways you can improve your aircraft’s ability to warn you of a potential gear-up landing. For student pilots or pilots new to complex aircraft, it could be something as simple as a red post-it note on the panel to remind you to verify the gear position prior to landing. Or, if you own an aircraft that doesn’t have an effective way to warn the pilot of a gear-up landing, consider investing in an aftermarket gear-up warning system – surely the extra price of such an upgrade is a small amount next to the cost of repairing the damage from a gear-up landing!
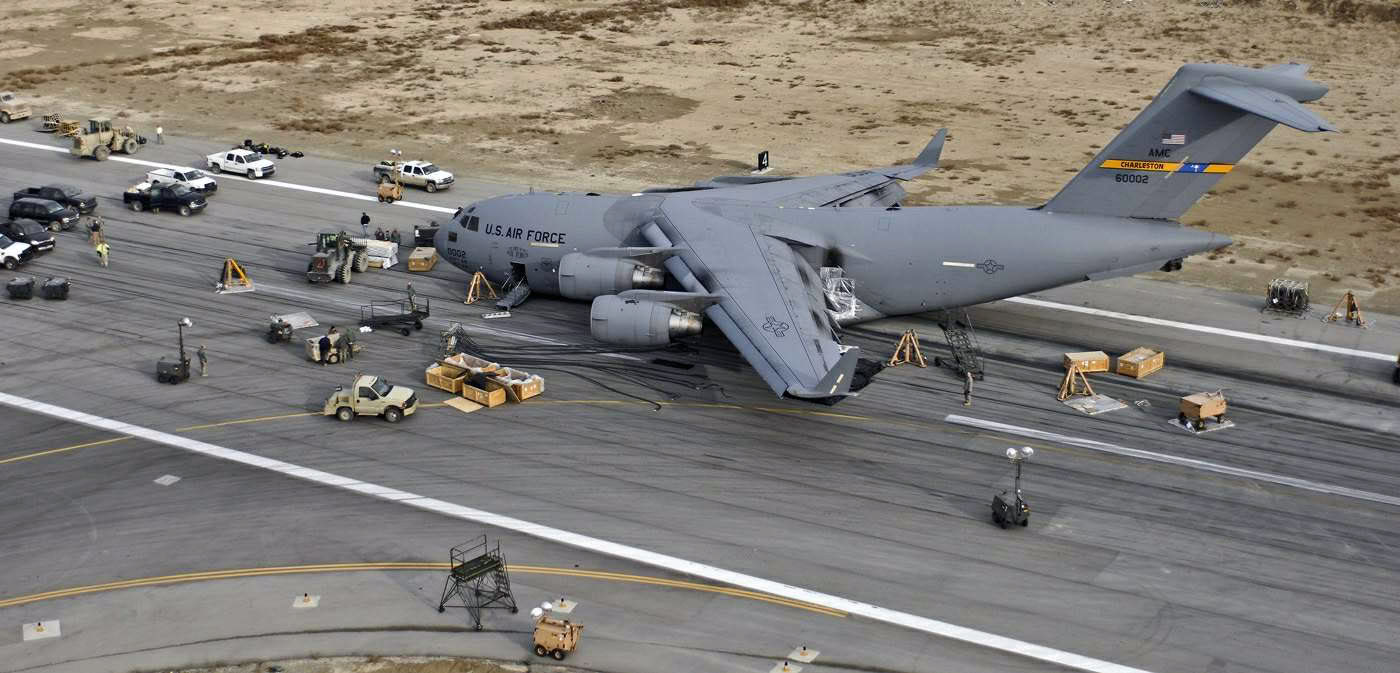
It can happen to anyone! The gear handle in this C-17 was in the “UP” position. (Photo Credit:https://theaviationist.com/2009/02/09/c-17-gear-up-landing-in-bagram-images/)
Always remember, regardless of experience, no pilot is immune to the possibility of a gear up landing. The best way to safeguard yourself is to discipline yourself in the use of flows, checklists, and call outs. Things like gear warning horns, visual reminders, and other systems are a useful back up, but they shouldn’t be relied upon to save your bacon if you don’t get the gear down at the proper time. Fortunately, in most gear up landings, the pilot and passengers are able to walk away uninjured – but that doesn’t lessen the embarrassment or financial burden of the event. So, keep your chin up, your gear down, and remember….THREE GREEN
On the evening of November 3rd, 2015, I was returning to my home airport of Lancaster from Pittsburgh in my company’s Aerostar, after being out on charter all day. It was dark out as I entered the traffic pattern at Lancaster. After an uneventful approach, I was cleared to land behind a Mooney. The spacing…
Flying a missed approach can be stressful enough. When you haven’t done one in a while and your GPS isn’t showing you how to get to the missed approach point and you can’t remember which button to press, that adds a lot more stress. Recipe for disaster? Quite possibly!
No need to fear, we are here to help. The procedure for getting a Garmin 530 or 430 to give you missed approach guidance is actually simple and straightforward, if you know what to do!
Note:Because of the variety of different autopilot configurations in different airplanes, this article will focus solely on the GPS.
What the GPS is Thinking
The way Garmin designed the Garmin 530 and Garmin 430 is to be as helpful to pilots as possible. Their thinking was, 95% of the time, a pilot will make a landing on an instrument approach. This is pretty accurate as most of the time, this is what happens. Most general aviation pilots don’t fly approaches to minimums all that often, thus negating the need for a missed approach.
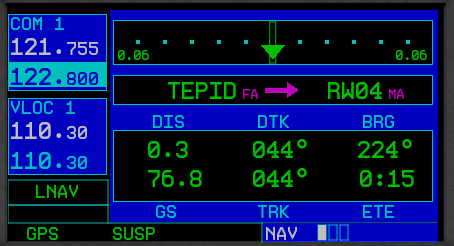
Garmin designed their software with this in mind. When an airplane crosses the missed approach point, the GPS will go into what’s called suspend mode (a SUSP annunciation appears above the OBS key). It will keep the missed approach point as the active waypoint because it assumes the pilot is going to land.
This can be confusing to pilots. This is what happens when software engineers and pilots come together. Engineers often believe they are smarter than pilots! (See the Airbus fly by wire roll out)
The Procedure
In the case of a missed approach, the button pushing on the GPS is actually relatively simple. There is no SUSP key to take the GPS out of SUSP mode (thanks Garmin!). Instead, you press the OBS key. This will take the GPS out of SUSP mode, making the first waypoint on the missed approach procedure the active waypoint. Your GPS will now give you guidance on the missed approach procedure.
If you are going missed off an ILS, LOC, or VOR approach, then there is one more key you’ll have to press. Your CDI needle (whether it is digital or analog, an HSI or just a CDI gauge) will be reading off the NAV radio and your CDI indication on the GPS will be VLOC. After you press the OBS key, press the CDI key on the GPS so you will start getting course guidance from the GPS again.
That’s it. Button pressing on the different autopilots will vary, but if you are familiar with yours, you’ll be able to tell it to follow the GPS and climb to the proper altitude.
Flying a missed approach can be stressful enough. When you haven’t done one in a while and your GPS isn’t showing you how to get to the missed approach point and you can’t remember which button to press, that adds a lot more stress. Recipe for disaster? Quite possibly! No need to fear, we are…