The Cirrus Pilot Proficiency Program (CPPP) will be coming to the Galaxy FBO at the Lone Star Executive Airport in Conroe, TX again this year. The dates of the event will be October 14th-16th.
Wondering what the CPPP program is?
“CPPP offers a weekend event for Cirrus owners and their partners that focuses on Cirrus-specific knowledge and flying proficiency. We bring some of the most experienced flight instructors who regularly teach in all kinds of Cirrus airplanes flown for all kinds of missions. We have prepared an extensive syllabus of ground courses that complement the transition training and delve into areas of greatest need for Cirrus pilots.” (from CirrusPilots.org)
The weekend starts off with a group dinner on Friday night. The Saturday morning ground session focuses on General Aviation Safety with special focus on the Cirrus accident statistics. Normal and emergency procedures are also reviewed.
In the afternoon on Saturday, the attendees are split into two groups. The first group has a myriad of options for ground sessions covering all topics related to Cirrus aircraft and operations. The second group flies, then they switch for the second 3 hour session. Sunday brings the same split, with more courses offered and more flying.
While the Cirrus pilots are flying and learning more about their airplanes, CPPP offers a Partner in Command course for flying partners on Saturday. This allows flying partners to be more comfortable in the airplane and teaches them what to do if something were to happen to the pilot.
All in all, attending a CPPP will improve both Cirrus knowledge and Cirrus flying skills. It’s highly recommended for all Cirrus pilots.
To register for the CPPP event in Conroe, check out the CPPP website.
In the Pre-Takeoff Checklist for any Cirrus aircraft, it calls for pilots to perform a Cirrus Autopilot Check. It is prudent to check the autopilot before your flight to ensure that all aspects of the autopilot are working properly. The only problem is, the checklist doesn’t spell out how to perform the Cirrus Autopilot Check. You would have to go to the POH for the airplane, which is usually in the back seat or a bag somewhere and therefore hard to get to, in order to find the procedure.
The procedure for checking the autopilot is slightly different depending on what autopilot is in your airplane. The procedures for all three are below.
S-TEC 55x
Sync the heading bug to your current heading
Activate heading mode on the autopilot
Twist the heading bug left and right to ensure the ailerons move left and right
Sync the heading bug to your current heading
Activate vertical speed mode on the autopilot
Move the vertical speed bug (or the vertical speed on the altitude pre-selector if you have a steam gauge Cirrus) up and down to ensure the elevator moves accordingly
Ensure you can overpower the autopilot
Press the autopilot disconnect switch to ensure the autopilot shuts off
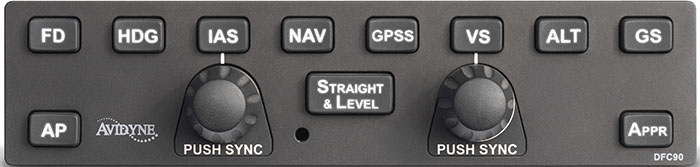
Avidyne DFC 90
Press the AP button to activate the autopilot
Ensure AP, ROLL, and PITCH Annunciations are depicted in green on the top of the PFD
Set the heading bug 90 degrees from the current heading
Press the HDG button on the autopilot
Ensure the ailerons are moving in the proper direction and HDG is annunciated on the top of the PFD
Ensure you can overpower the autopilot
Press the autopilot disconnect switch on the stick and ensure the autopilot has disconnected
Garmin GFC 700
Press the AP button to activate the autopilot
Ensure you can overpower the autopilot
Press the autopilot disconnect switch on the stick to ensure the autopilot has disconnected
You are hand-flying an in-the-weather descent, power back, heading for the FAF. You start a 30 degree banked turn at your lead point to cross the FAF, when your passenger behind you gasps. Looking over your shoulder, you see he has spilled his drink into his lap…too bad for him! However, when you turn your head back to your panel, your inner ear tumbles and you see 45 degrees of bank, 15 degrees nose low, airspeed increasing.
Congratulations! You have managed to get distracted and sucked into an unusual attitude recovery. By the book, you should roll wings level, pull to the horizon, and adjust power as necessary to keep the airspeed within limits. In this scenario, if you had not experienced vertigo, you might have been able to roll to less than 30 degrees of bank, recover your turn, pull the nose up to less than the original descent attitude, pulled a bit of power to slow back to your desired penetration speed and then resumed your desired ground track. However, this would only be appropriate if you had full situational awareness as to the deviations caused by the look over your shoulder, plus full confidence that the moderate corrective actions would put you back on your desired flight path.
As a military aviator, I learned unusual attitude recoveries based upon hard maneuvering at extreme pitch and bank angles. In the hard-maneuvering environment, an unusual attitude could be 90 degrees straight up, airspeed decreasing below 120 kts…or 80 degrees nose low, 135 degrees of bank, airspeed increasing through 500 kts… etc. In these cases, understanding angle of attack, or AOA, is critical to maintaining controlled flight and returning to a normal attitude.
In an extreme nose-high attitude, a military aviator is trained to roll the aircraft to 90 degrees of bank, ease off the back-stick pressure to reduce AOA, add power as required, and allow the nose to slice back towards level, rolling to wings level as the nose approaches the horizon. If nose low, the recovery procedure is to roll rapidly, within asymmetric g limits, until wings level, then to pull at optimum g loading to recover to level flight. For the nose-low recovery, power was normally reduced until airspeed could be assessed and brought under control. However, when doing the nose-low pullout at 7-9 gs, pulling the power for too long would leave you much to slow to resume combat.
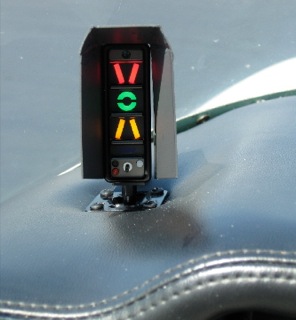
The AOA gauge on a fighter’s glare shield is a primary reference during hard maneuvering and for landing. The AOA for optimum maneuvering is 13 degrees, displayed as the green circle or “green donut” on the gauge. The red chevron on top represents a slow condition of 15 degrees or more and the yellow lower chevron represents 11 degrees or less.
For normal landing in the F-16C, the pilot slows to 220 kts and configures abeam the touchdown point while mentally computing the final approach airspeed of 136 kts plus 4 additional knots for each 1000 lbs of fuel. When rolling off the perch and flying the final turn, the pilot would usually only glance once at the airspeed once to ensure final turn airspeed of 180 kts while using the AOA sight gauge as the primary indicator of a best performance turn. As long as the AOA was green donut (13 degrees) or less, you would not stall. If on speed and 13 degrees wasn’t going to get you around the turn to line up with the runway, you knew you were going to overshoot. You never wanted to see the red chevron of 15 degrees or more as that meant you were too slow, pulling too hard, and in danger of building an un-recoverable sink rate!
Few GA aircraft are currently equipped with AOA indicators, though there are several after market devices available for retrofit. However, knowing the impact of AOA and how to manage it is vital to safe aviating, even without an AOA gauge. The bottom line is, as long as you don’t ask the wing to produce more angle of attack than it can handle, you won’t stall.
Practicing final turn stalls, to know what the wing feels like as you get too slow or pull too much on the controls, increasing AOA past the critical point, will keep you safe when you encounter that unexpected overshooting wind or you find yourself inadvertently on too tight of a downwind leg. Better to overshoot or take it around to try again, than to pull too hard and exceed critical AOA.
Mike Hostage is a retired USAF pilot with 37 years of experience, flying a wide variety of aircraft. An instructor pilot for more than half of his 4800 flight hours, Mike is currently qualified in a Cirrus SR-22T and regularly flies his two homebuilt sailplanes.
Let’s say you’re flying in the mountains of Colorado on a cloudy day. There’s a solid layer from the surface all the way up to 14,000 feet. You’re inbound to Eagle (KEGE) on the RNAV (GPS) D approach. There are mountains next to you and below you, but you aren’t concerned since you can see them all. The base of the last reported overcast layer was 3,000 feet, so you know you’ll break out before the MDA and land no problem.
At 11,100 over AWACC, you clearly see the top of the mountain below you. You are comfortably above it. You already have the runway in sight as well. You pop out of the clouds on the approach at 9,700 feet, spot the airport and follow the tower’s instructions to circle north of the runway for a left base for runway 7.
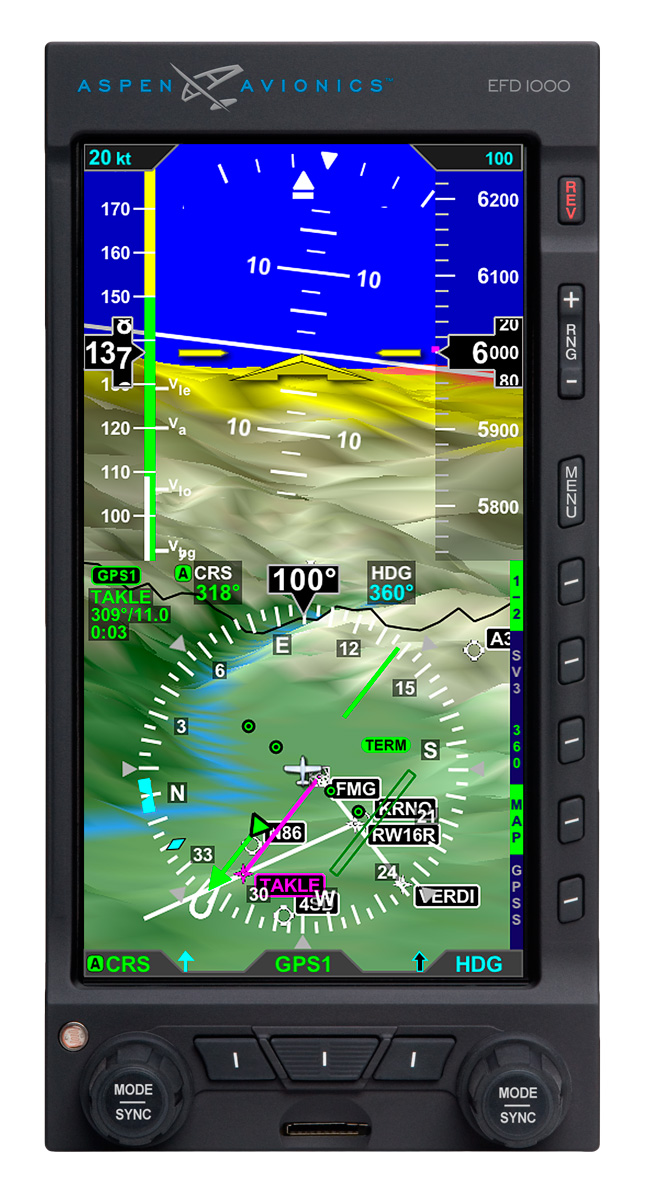
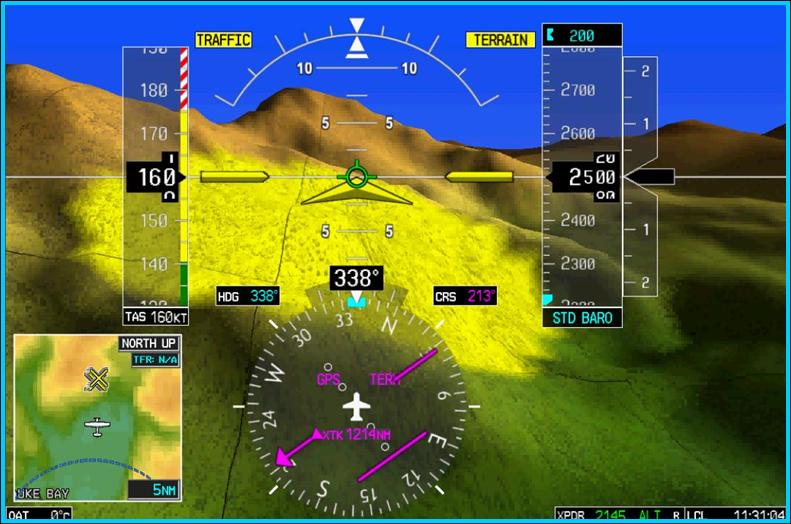
How could you see the mountains inside the clouds? You have Synthetic Vision installed on your glass panel, that’s how.
Aspen Synthetic Vision
Synthetic Vision, which has actually been around since the ’70s when NASA and the US Military first developed it, was first FAA certified for the Gulfstream PlaneView flight deck in 2009. Garmin, Avidyne, and Aspen are the main general aviation manufacturers of synthetic vision these days. All Garmin PFDs are now equipped with Synthetic Vision while Aspen gives you the option to upgrade to Synthetic Vision when you get one of their PFDs installed. Avidyne gives you Synthetic Vision in their R9 upgrade for the Cirrus.
What is Synthetic Vision? Basically, it’s a 3-D picture on the primary flight display showing terrain, obstacles, traffic, and runways. It greatly enhances situation awareness in areas of terrain or high obstacles during IFR conditions or at night.
The goal behind the development of Synthetic Vision was to decrease the amount of controlled flight into terrain (CFIT) accidents. A CFIT accident consists of a perfectly airworthy airplane flown by a pilot (or autopilot) unintentionally into terrain. These accidents can happen in low visibility conditions or at night, but the reason is mainly due to the pilot losing track of his position in relation to obstacles or terrain (or water as was the case with JFK Jr.).
With Synthetic Vision, the goal is to enhance pilot knowledge of what is around the airplane at all times. When you’re at altitude, the terrain below you looks flat. When you start descending down amongst the rocks, the hills or mountains start to rise up on your screen. For those used to the coloration with the 2-D terrain feature on a GPS unit, it translates very easily to the terrain coloration on a Synthetic Vision equipped PFD. Terrain that is between 100 and 500 feet below the aircraft is shown as yellow, while terrain closer than 100 feet is depicted as red.
Garmin Synthetic Vision
One neat feature on Garmin units is the Highway in the Sky. When a pilot puts a course or a flight plan in the GPS, the PFD displays magenta boxes at the altitude selected displaying the route. It’s handy when hand flying to just “fly through the boxes.” They also display descent angles on approaches.
Synthetic Vision is still optional on Garmin and Aspen units, but I highly recommend springing for it. It will give you a higher level of safety and keep you out of the rocks.
I have the blessing (same say it’s a curse) of being a tailwheel pilot. I did my tailwheel training in a Citabria and have gathered about 400 hours over the years in Citabrias, Super Cubs, and Maules (don’t judge all tailwheel airplanes by a Maule, by the way. The Maule is it’s own unique animal). The blessing of being a tailwheel pilot is that it greatly enhances my stick and rudder skills for all airplanes.
No matter what airplane you fly, basic stick and rudder skills are always important. At some point during a flight, the rudder will need to be used, even if you have an airplane that has a yaw damper. Rudder use is vitally important in the takeoff and landing phase, especially if you fly an airplane that generates a lot of torque on the takeoff roll. Rudder in that phase of flight is pretty evident, because if the rudder isn’t used, you’ll go off the left side of the runway.
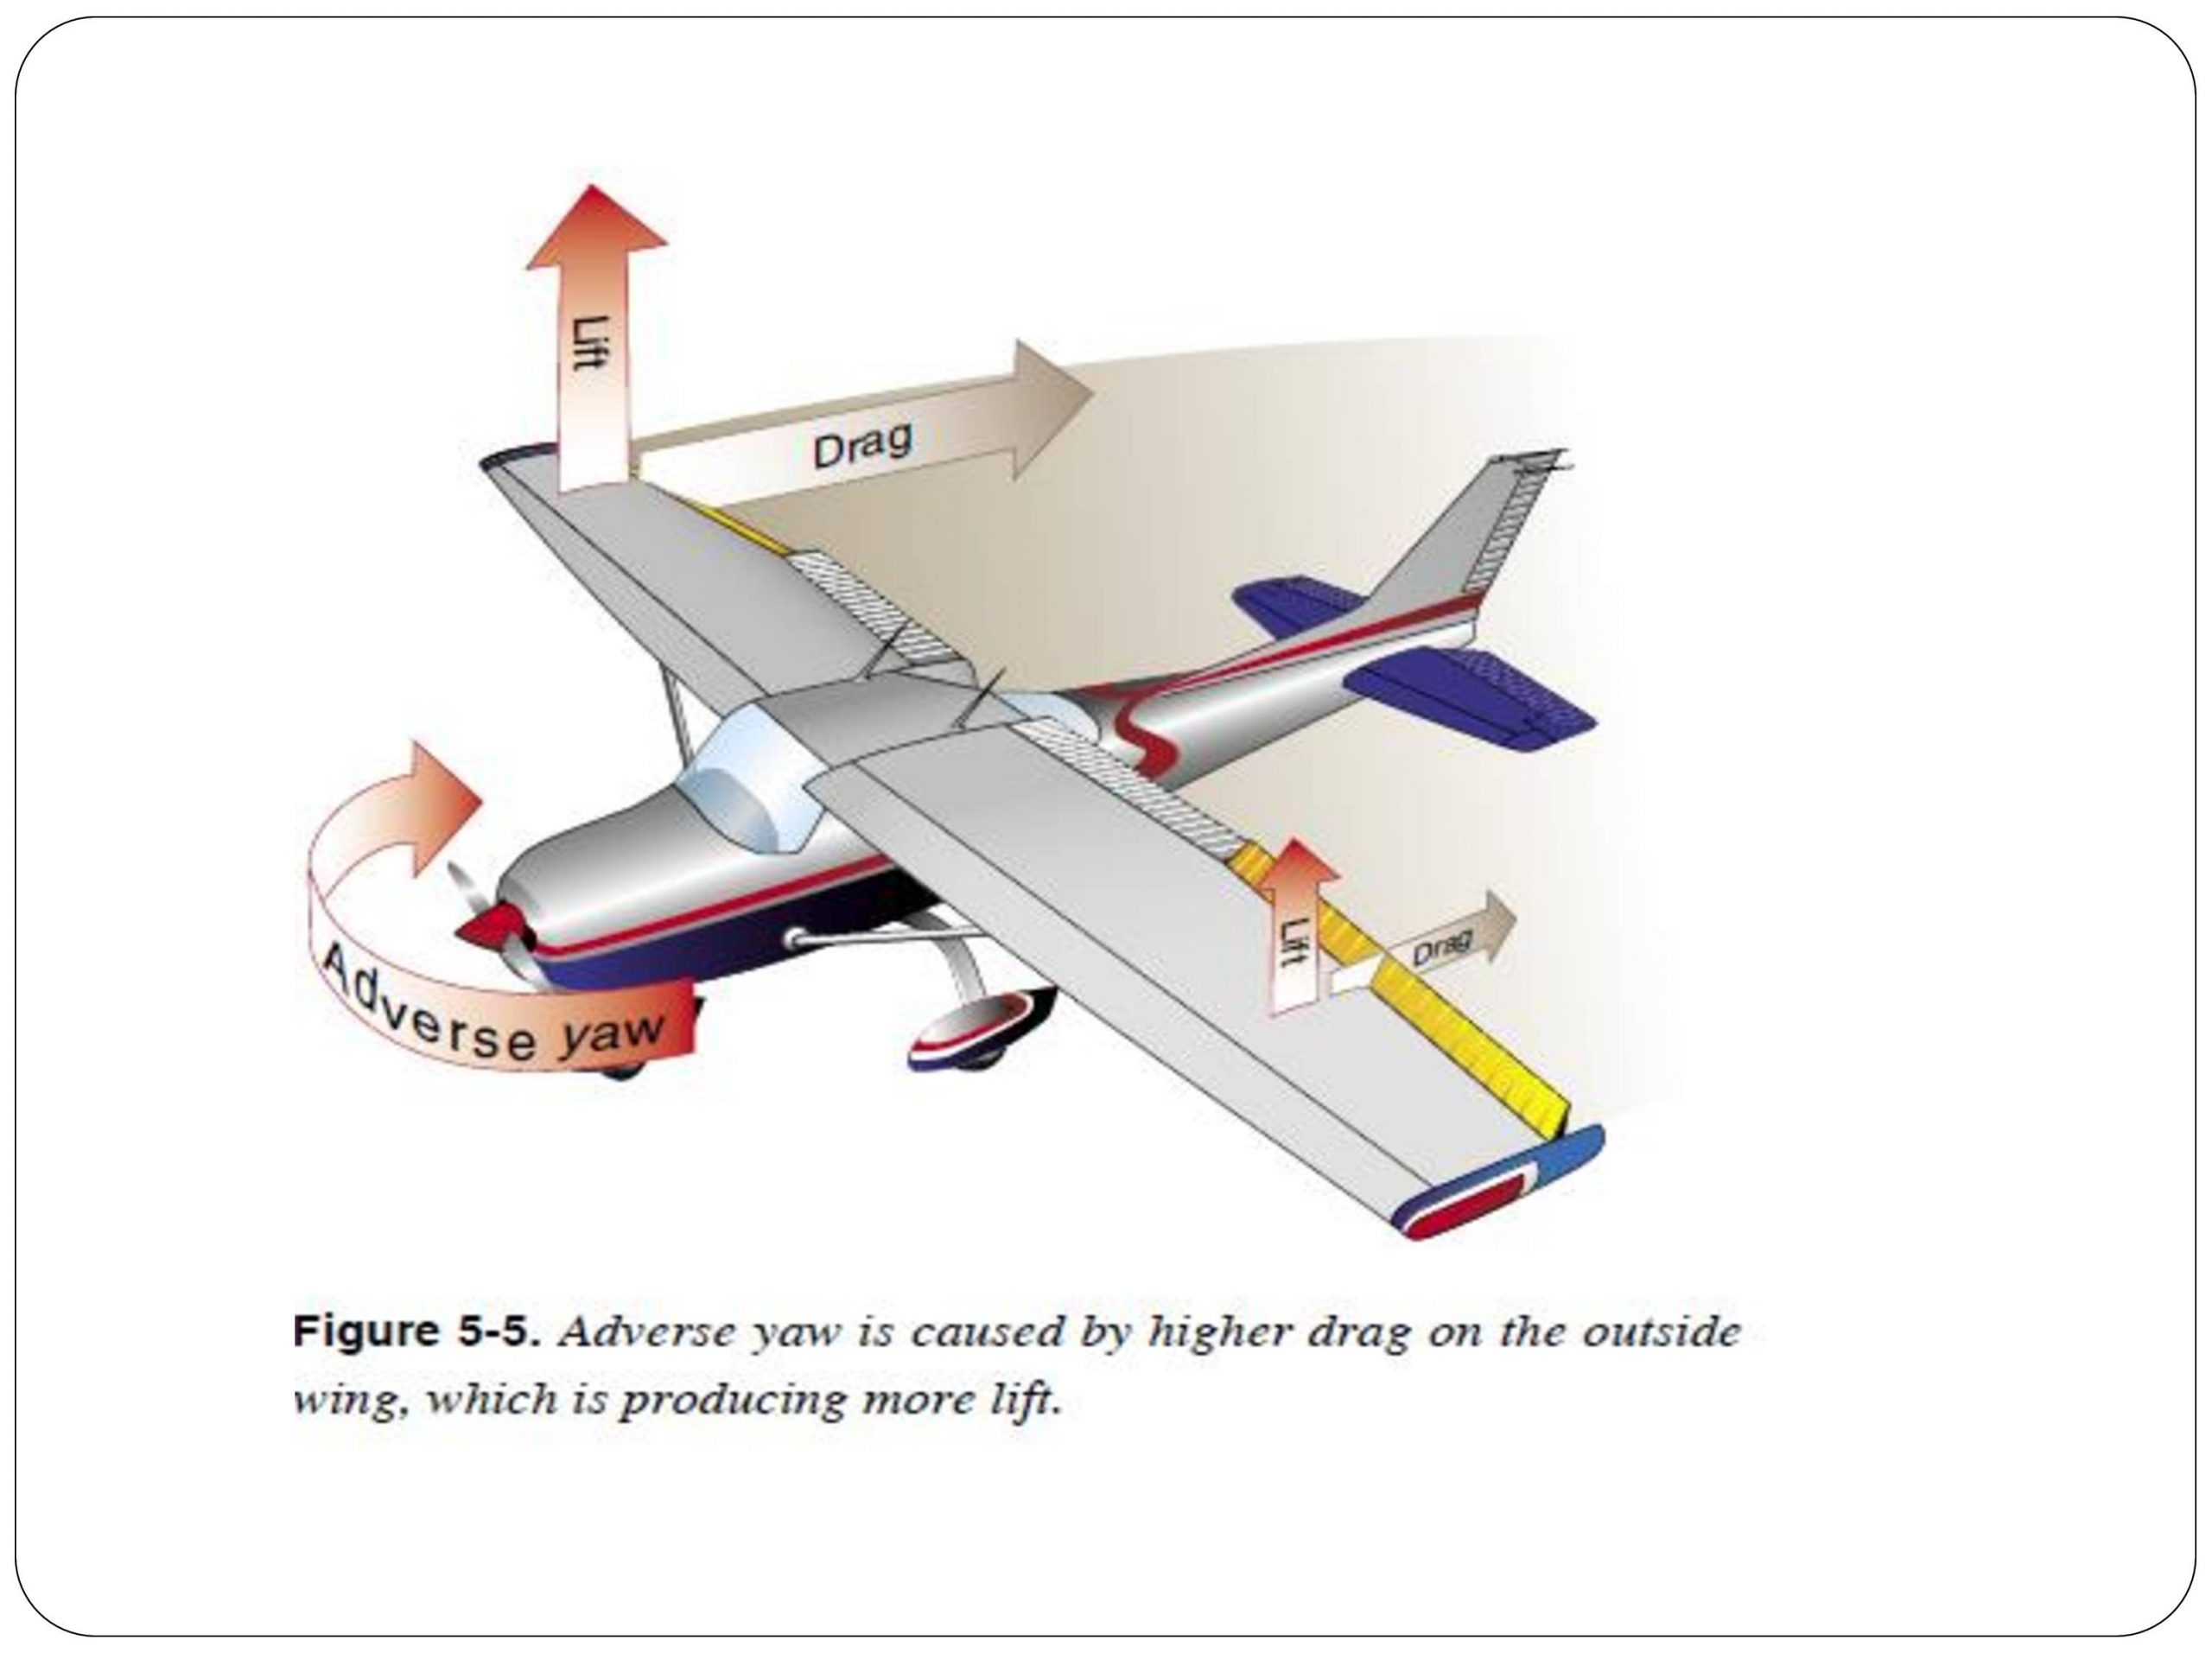
Where I want to focus is rudder use in the landing phase. As an airplane comes down final, there are several forces that are be acting on the airplane. When it’s bumpy, updrafts and downdrafts are moving the plane up and down and all around. To correct for a bump that sends the airplane into a roll, aileron is added in the opposite direction of the roll. That aileron input also induces adverse yaw, pulling the nose of the airplane in the opposite direction that the pilot is moving the ailerons.
If a pilot isn’t using his feet correctly, then the nose of the airplane will wallow around through the air as aileron inputs are used. The tail is also moving around quite a bit, so the pilot might not “feel” the yawing moment, but the passengers in the back seat certainly will.
The other advantage that comes with proper rudder usage on short final is the airplane is more responsive to control inputs. When utilizing both the ailerons and the rudder, a pilot is able to fly the airplane much more precisely and control it much better.
This doesn’t mean you have to be staring at the turn coordinator the whole time down final. In fact, that’s exactly what you don’t want to do. Your eyes need to be outside the airplane. Just get in the habit of stepping on the rudder whenever you move the ailerons on final and eventually, you will feel what your airplane is doing. Don’t step on the rudder as hard as you can, but slight pedal pressure in the direction of aileron input will make a big difference.
Rudder is also vitally important for landing in a crosswind no matter that airplane. Crosswind landings are a learned skill that take a lot of practice to perfect. There is also a lot of confusion as to what control input does what during the landing.
Here is the simplest way to picture a crosswind landing and what the controls do:
Aileron-When performing a crosswind landing, the ailerons keep the airplane over the centerline. If the airplane is drifting to the right of the centerline, add left aileron to bring it back to centerline, then keep enough aileron control pressure in to keep the airplane over centerline. In a perfect crosswind landing, the main tire on the windward side will touch down first. Left crosswind means left tire touching first.
Rudder-When performing a crosswind landing, the job of the rudder is to straighten the nose to point down the runway. You will not be coordinated in a crosswind landing, you will be slipping, which is the goal. So, with a left crosswind, you will be inputting left aileron to remain over the centerline and you will also need right rudder to straighten the nose. This also prevents the airplane from actually rolling in the direction of the aileron input.
If you remember for a crosswind landing: “Aileron into the wind to stay over centerline, opposite rudder to straighten the nose.” Too much aileron and the plane will drift into the wind. Too much rudder and the nose will yaw in the opposite direction.
Rudder is very important, even in our day and age where a lot of general aviation airplanes have yaw dampers. Our feet only have a job for a short period of time, but that is the most critical time. An excellent way to get more proficient in rudder use is to go get a tailwheel endorsement. If you are in the central Texas area, check out TacAreo in Fredericksburg, T82.
You are at cruising altitude and your flight is going just as planned. All of that can change, sometimes without much warning, and you, the non-pilot, are now in charge. Would you know what to do?
This was a scary thought for me until I attended a seminar developed for the non-flyer at a Cirrus Owners Pilot Association (COPA) fly-in. Cirrus is the only small plane with a parachute as standard, so I thought all I had to do in an emergency was pull the chute. It’s a little more complicated than that!
I learned the vast majority of pilot incapacitation happens when the plane is at cruising altitude, so there is time to find a solution.
I was taught ten basic steps to follow to bring the plane safely to the ground.
First attempt to revive the pilot. If he is choking, it is possible to do a Heimlich maneuver from the side. This may dislodge whatever is blocking his airway and solve the problem. If he is experiencing hypoxia, turn off the heat, open all vents, and, if you have on board oxygen, use it. Also, if you can, get instructions on how to descend to a lower altitude. If the pilot is unconscious due to a heart attack or other medical emergency, there are still things you can do from the right seat.
Engage the autopilot if it isn’t already on and move the pilot off the controls. *
Ensure you are connected to the radio. If you hear ATC or other pilots, you are.
Send an electronic trouble message. Set the transponder to 7-7-0-0 to identify your plane to ATC. This will cause your plane to be highlighted on ATC radar screens.
ATC will most likely contact you asking what is your emergency. If this does not happen, you will need to transmit a Mayday call. All non-pilot passengers should know how to use the radio to get help, if they know nothing else.
With help from ATC, decide where you want to go.
Use the autopilot to fly in the direction suggested by ATC. I was taught that ultimately the choice of where to deploy the parachute is up to me because I am now the PIC, pilot in command.
Ensure that seat belts are secure and the emergency hammer is between your legs (so you have it to break a window to escape if needed).
Pull the parachute handle.
On the way down, shut down the engine and brace for impact.
After landing, move away from the plane, into the wind. Stay nearby and wait for help.
The seminar covered specific procedures to accomplish these basic steps, what to do if you don’t get a response from ATC, what to say in a Mayday transmission, how to fly a heading, how to check fuel levels, shut down the engine, etc. After the seminar, I felt much more comfortable about what to do if my pilot suddenly lost consciousness.
I was also told to practice what I had learned to avoid panicking in an emergency situation. There are so many things the person in the right seat can do under normal circumstances to practice. Learn how to set heading bugs, learn where the plane’s Electronic Locator Transmitter (ELT) is located and how to activate it. This will help rescuers locate the airplane. Learn how to assess your fuel levels. Practice making routine radio transmissions. Observe what your pilot does and ask questions if you don’t understand something.
Knowing what to do in an emergency situation will give you a sense of control over what will happen to you, your pilot, and any passengers on board your plane. If you have never considered taking a lesson or two for the non-pilot, find yourself an instructor, and learn what you need to know for your plane. Hopefully you will never have to use it, but if you do, you will be ready to be the PIC who lands the plane.
Anne and her husband Stephen are the proud owners of a Cirrus SR20. They plan to put the airplane to better use once Stephen retires. Anne has a background in desktop publishing and writing.
For years, Cirrus owners who have the Avidyne Entegra PFD and MFD have been clamoring for Avidyne to come up with some sort of upgrade. The Entegra, or EX 5000 system, is late ’90s technology and, though it still works, there will be a certain point in the future when it gives up the ghost. Avidyne still supports the Entegra system, but it’s hard for a Cirrus owner to see all this new technology coming on the market while not being able to upgrade the original Avidyne screens.
Avidyne gave it a go in the late 2000s with a panel upgrade known as the R9. The R9 was a good system, but Avidyne was very slow on the release (rumors were the company wanted it to be absolutely perfect before releasing it, which frustrated Cirrus, who then switched to the Garmin Perspective panel, leaving Avidyne behind) which led to the R9 only being available as a very expensive retrofit to the Entegra system ($80,000-$90,000 for the system and install). Needless to say, there weren’t that many takers.
Late in 2020, Garmin announced it had received certification to retrofit Avidyne Entegra equipped Cirrus Aircraft with the company’s G500 TXi displays, which gave new hope to G1, G2, and G3 Cirrus owners. The price tag wasn’t outrageous, coming in at $16,000 apiece for each display. The G500 TXi works with any possible GPS that can be installed in a Cirrus (GNS 430Ws, GTN 650s, GTN750, or the Avidyne IFD 540/440) and with the DFC 90 Autopilot (if the Cirrus is still equipped with an STEC 55x, the Autopilot would need to be changed to either a DFC 90 or a Garmin GFC 500).
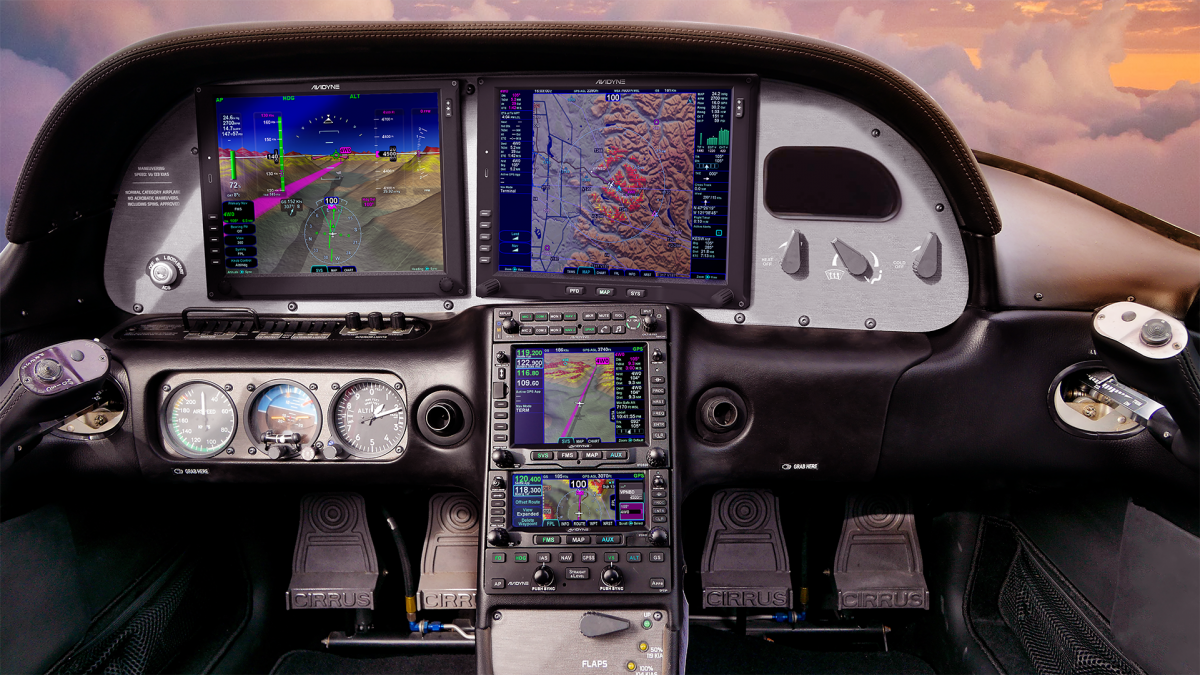
Fast forward to June of 2021 and Avidyne re-enters the game with the Avidyne Vantage. After the R9 debacle, Avidyne has opted this time to go for a more simple approach. The Avidyne Vantage system changes out the Entegra PFD and MFD with bigger screens (12″; Garmin’s TXi units are only 10.6″) with high quality pixelation, synthetic vision, engine gauges, checklists, charts, a hybrid touch interface, and all the other information that was offered on the Entegra system, just all more modern and updated. The best news is that the system provides redundant reversionary mode, which was one of the biggest complaints about the Entegra system.
The price tag comes in lower than Garmin, with each screen being priced at $12,500. The units will work seamlessly with the Avidyne IFD Series GPS units, though, as of this writing, it isn’t clear if the Avidyne Vantage will work with Garmin GTN 430Ws or the GTN 750/650. I would assume that the integration would be there, but I haven’t found any documentation stating that yet. DFC 90 Autopilot integration would be seamless, but not sure the integration with the STEC 55x or Garmin GFC 500.
Avidyne says the Vantage will be fully certified in early 2022, but the company is taking orders now. Visit the Avidyne Website for more information.