The Importance of Slowing Down

Technology has made our job as pilots simpler, streamlined, and safer.  With all the new GPS & autopilot technology that seems to come out every month, flying an airplane is getting easier every day (and when I say flying, I mean programming!).  I can’t tell you the last time I actually used a VOR for navigation, other than a practice approach.  The AIM even has guidance in it now allowing pilots to use the GPS overlay on a VOR or LOC approach instead of switching to the actual NavAid on the course needle (you have to WAAS in order to legally do this).

I hear the argument already.  I am young (31) and used to all the different touchscreens because I have grown up with them.  Tech is nothing new to me.  It’s not that easy for everyone, I do understand.  There is also the argument that all the tech causes pilots to not know how to fly the airplane, which is also valid. This is why I put an emphasis on hand flying in any kind of training I do.

For the sake of argument in this article, yes, I am young and I adapt to technology pretty easily.  I’m not afraid to press buttons to figure out what they do, but I usually do it while sitting on the ground with a GPU hooked up (or I go look in the manual).  And yes, all the autopilot ability has caused a decrease in base pilot skills.  I actually encourage every customer I have to go get a tailwheel rating so that they can actually learn how to fly better.  You don’t use a rudder much in a Cirrus compared to a Super Cub or a Citabria.

What I want to focus on for a few minutes is how to alleviate the frustration that comes with getting so wrapped up in the technology when it doesn’t do something that you want it to, or the wrong button gets pressed, then you end up somewhere you had no intention of being.

The biggest thing a pilot can do when it comes to technology is NEVER to get in a hurry.  Good training is first and foremost, but, after that when flying without an instructor or even in recurrent training, SLOW DOWN and think through what you are doing and what you want the system to do.  This will alleviate a ton of frustration.

It can be very easy in hot, turbulent weather to get tuned in to the GPS programming, trying to do five or six different things in the span of five or six seconds, before looking up and realizing that plane is 500 feet off altitude (without an autopilot) or you blew through the course you were supposed to be intercepting (with an autopilot).

What I teach is to slow down, whether or not you have an autopilot, and do one thing at a time.  Once that item is done, look up at the instruments or the horizon, check on things, make sure the airplane is still flying properly, then do the next thing.  Don’t try and do a bunch of things all at once or in a hurry.  It will usually get you off course and off altitude, plus it distracts the pilot from his main job:  Flying the airplane.

So, next time you want to do something on your GPS, pause, take a breath, think through what you want to do, then do one item at a time.  The outcome will be less frustrating and you’ll keep flying where you want to go.

Similar Posts

  • Night Flying

    Ah, fall is finally here.  In Texas, it arrived about a month late, but showed up with a vengeance.  A strong cold front caused a 40 degree temperature drop in 12 hours earlier this week, bringing rain, lower freezing levels, and lots of wind.

    Fall means cooler temps, but fall also means less light.  The sun begins to set sooner, plus the fall back time change in November cause darkness to spring upon an unaware pilot.

    Before getting in to too many night landings tips, just a friendly reminder, passengers can only be carried at night if the PIC has completed 3 takeoffs and landings to a full stop in the last 90 days during the time period of 1 hour after sunset to 1 hour before sunrise.

    Lots of us have been landing long before sunset for most of the past couple of months, so those night flying skills might be a little rusty.  The best way to remedy night flying rustiness?  Call an instructor and go get some practice.

    In the meantime, here are some tips as to what to expect for your next night flying experience.

    1. Your Eyes Are Very Important.  This may seem like an obvious statement, but night vision can be affected by many things.  Before you takeoff, you want to make sure you can see in the dark.  The FAA recommends no bright lights 30 minutes prior to takeoff.  They also recommend using oxygen at night as this greatly improves night vision, even at low altitudes.  Use off center viewing to help spot traffic or other objects in the air.  Finally, when preflighting, use a red flashlight as much as possible, but if you do have to use a white light, close one eye to keep one eye from being blinded.
    2. Utilize Approach Lights on Landing.  Night landings are very different then day landings.  It is very difficult to get the proper depth perception, not too mention see obstacles below you on your final approach to a runway.  PAPI’s, VASI’s, and instrument approach glide slope’s become very important.  If you are VFR only pilot, if your airport has a PAPI or a VASI, keep 2 white and 2 red (or 1 white and 1 red) lights.  If you see 3 red (or 2 red), climb.  If you see 4 red, definitely climb.  If you are an IFR pilot, I highly recommend always flying an approach at night.  What if your airport doesn’t have a PAPI, VASI, or approach with a glide slope?  You might not want to utilize it at night.  One side note on VFR flight: Clouds are nearly invisible at night.  If you do fly into a cloud (a clue is your strobe lights start reflecting back at you), don’t panic.  If you have an autopilot, turn it on and execute a 180 degree level turn.  If you don’t have an autopilot, start scanning your instruments, keep your attitude indicator blue side up, and make a shallow 180 degree while maintaining altitude.  Then call ATC, advise them what happened, and ask for help.  One more note:  I highly recommend that if a pilot finds that he/she will fly at night at lot, get an instrument rating and fly IFR at night.  It’s much safer.
    3. Practice Landings Before Carrying Passengers.  The tendency when landing at night is to level off too high before flaring, causing the airplane to bleed off speed and energy too high above the runway.  This can lead to a stall, a hard landing, and/or too high of a pitch attitude at touch down causing a tail strike. A good tip is start your level off when you can see the tire marks on the runway.  Make sure you practice night landings, preferably with an experienced instructor who is night current and proficient, before carrying any passengers on board, even if you are night current, but haven’t landed at night in a while.
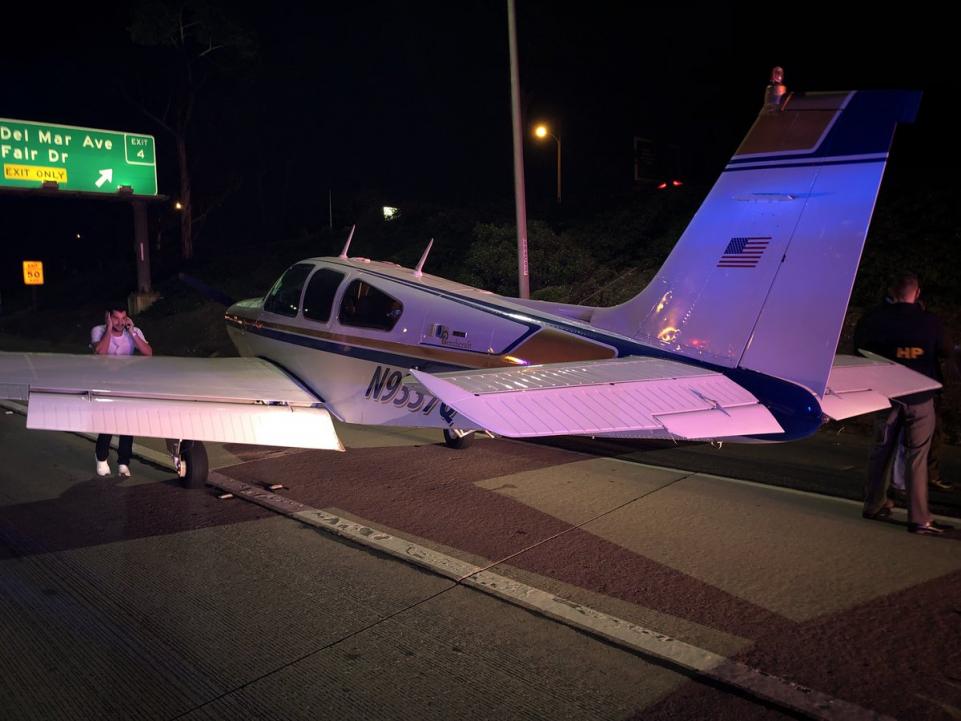
    4. Night Emergencies.  For engine failures at night, you are very limited on options.  Unless you have a Cirrus equipped with a CAPS parachute system, you really have two options if an airport isn’t within gliding distance.  Find a wide, lighted road that appears to be lightly trafficked.  A word of caution, though:  be careful of light poles, fences, concrete medians, cars, and buildings.  The LA freeway would not be a good option (though there are exceptions to this rule as is evidenced by the picture below).  The second option is find a dark spot and pray it’s a field (or the Hudson River).  As you get closer, you can turn your landing light on to see what the ground looks like.  If it looks good, keep the light on and continue.  If you don’t like what you see, turn your landing light off and continue….

    Flying at night can be the best time of day to fly.  It’s usually smoother, cooler, and you get to see all the city lights.  It is a very different environment, however, so make sure to get some training before darkness settles in on your next trip.

  • Casey Aviation Makes Piper PA46 Systems Videos Free

    The safest pilots are the ones who attempt to gain as much knowledge and learning about their airplane and environment as possible. These pilots are the ones who enjoy learning, going to seminars and conventions, and soak up all the MMOPA magazine articles in each issue. These pilots are the ones who get as much training as they can, above and beyond what the minimum requirements are.

    If you are one of these pilots and you own a Piper PA46, then this blog is for you.

    Casey Aviation, one of the best Piper PA46 training companies out there, recently released all of their Malibu, Mirage, Matrix, Meridian, and JetProp systems training videos for free. These are some fantastic videos that Casey Aviation created which go much more in depth than any power point presentation could.

    The great thing about the videos is they give the viewer an all access “inside look” to the specific airplane. Joe Casey, owner of Casey Aviation, takes off cowlings, crawls under the nose gear compartment, and even shows an airplane with the interior out so all the flap cables and environmental systems can be seen.

    I have started referring all of my PA46 customers to the Casey Aviation videos as part of the prep work for our training sessions.

    To access the videos, check out the Casey Aviation website.

  • A Complex Clearance?

    I was flying in the Rio Grande Valley in south Texas a few weeks ago and heard an IFR clearance given to a King Air that pricked my ears up.  It was a clearance from CRP to LRD, but the routing was one you don’t hear too often anymore.  Because of active military airspace, the routing was via a radial and DME off the CRP VOR (so a point defined by the radial and DME) to another radial and DME point off the LRD VOR.

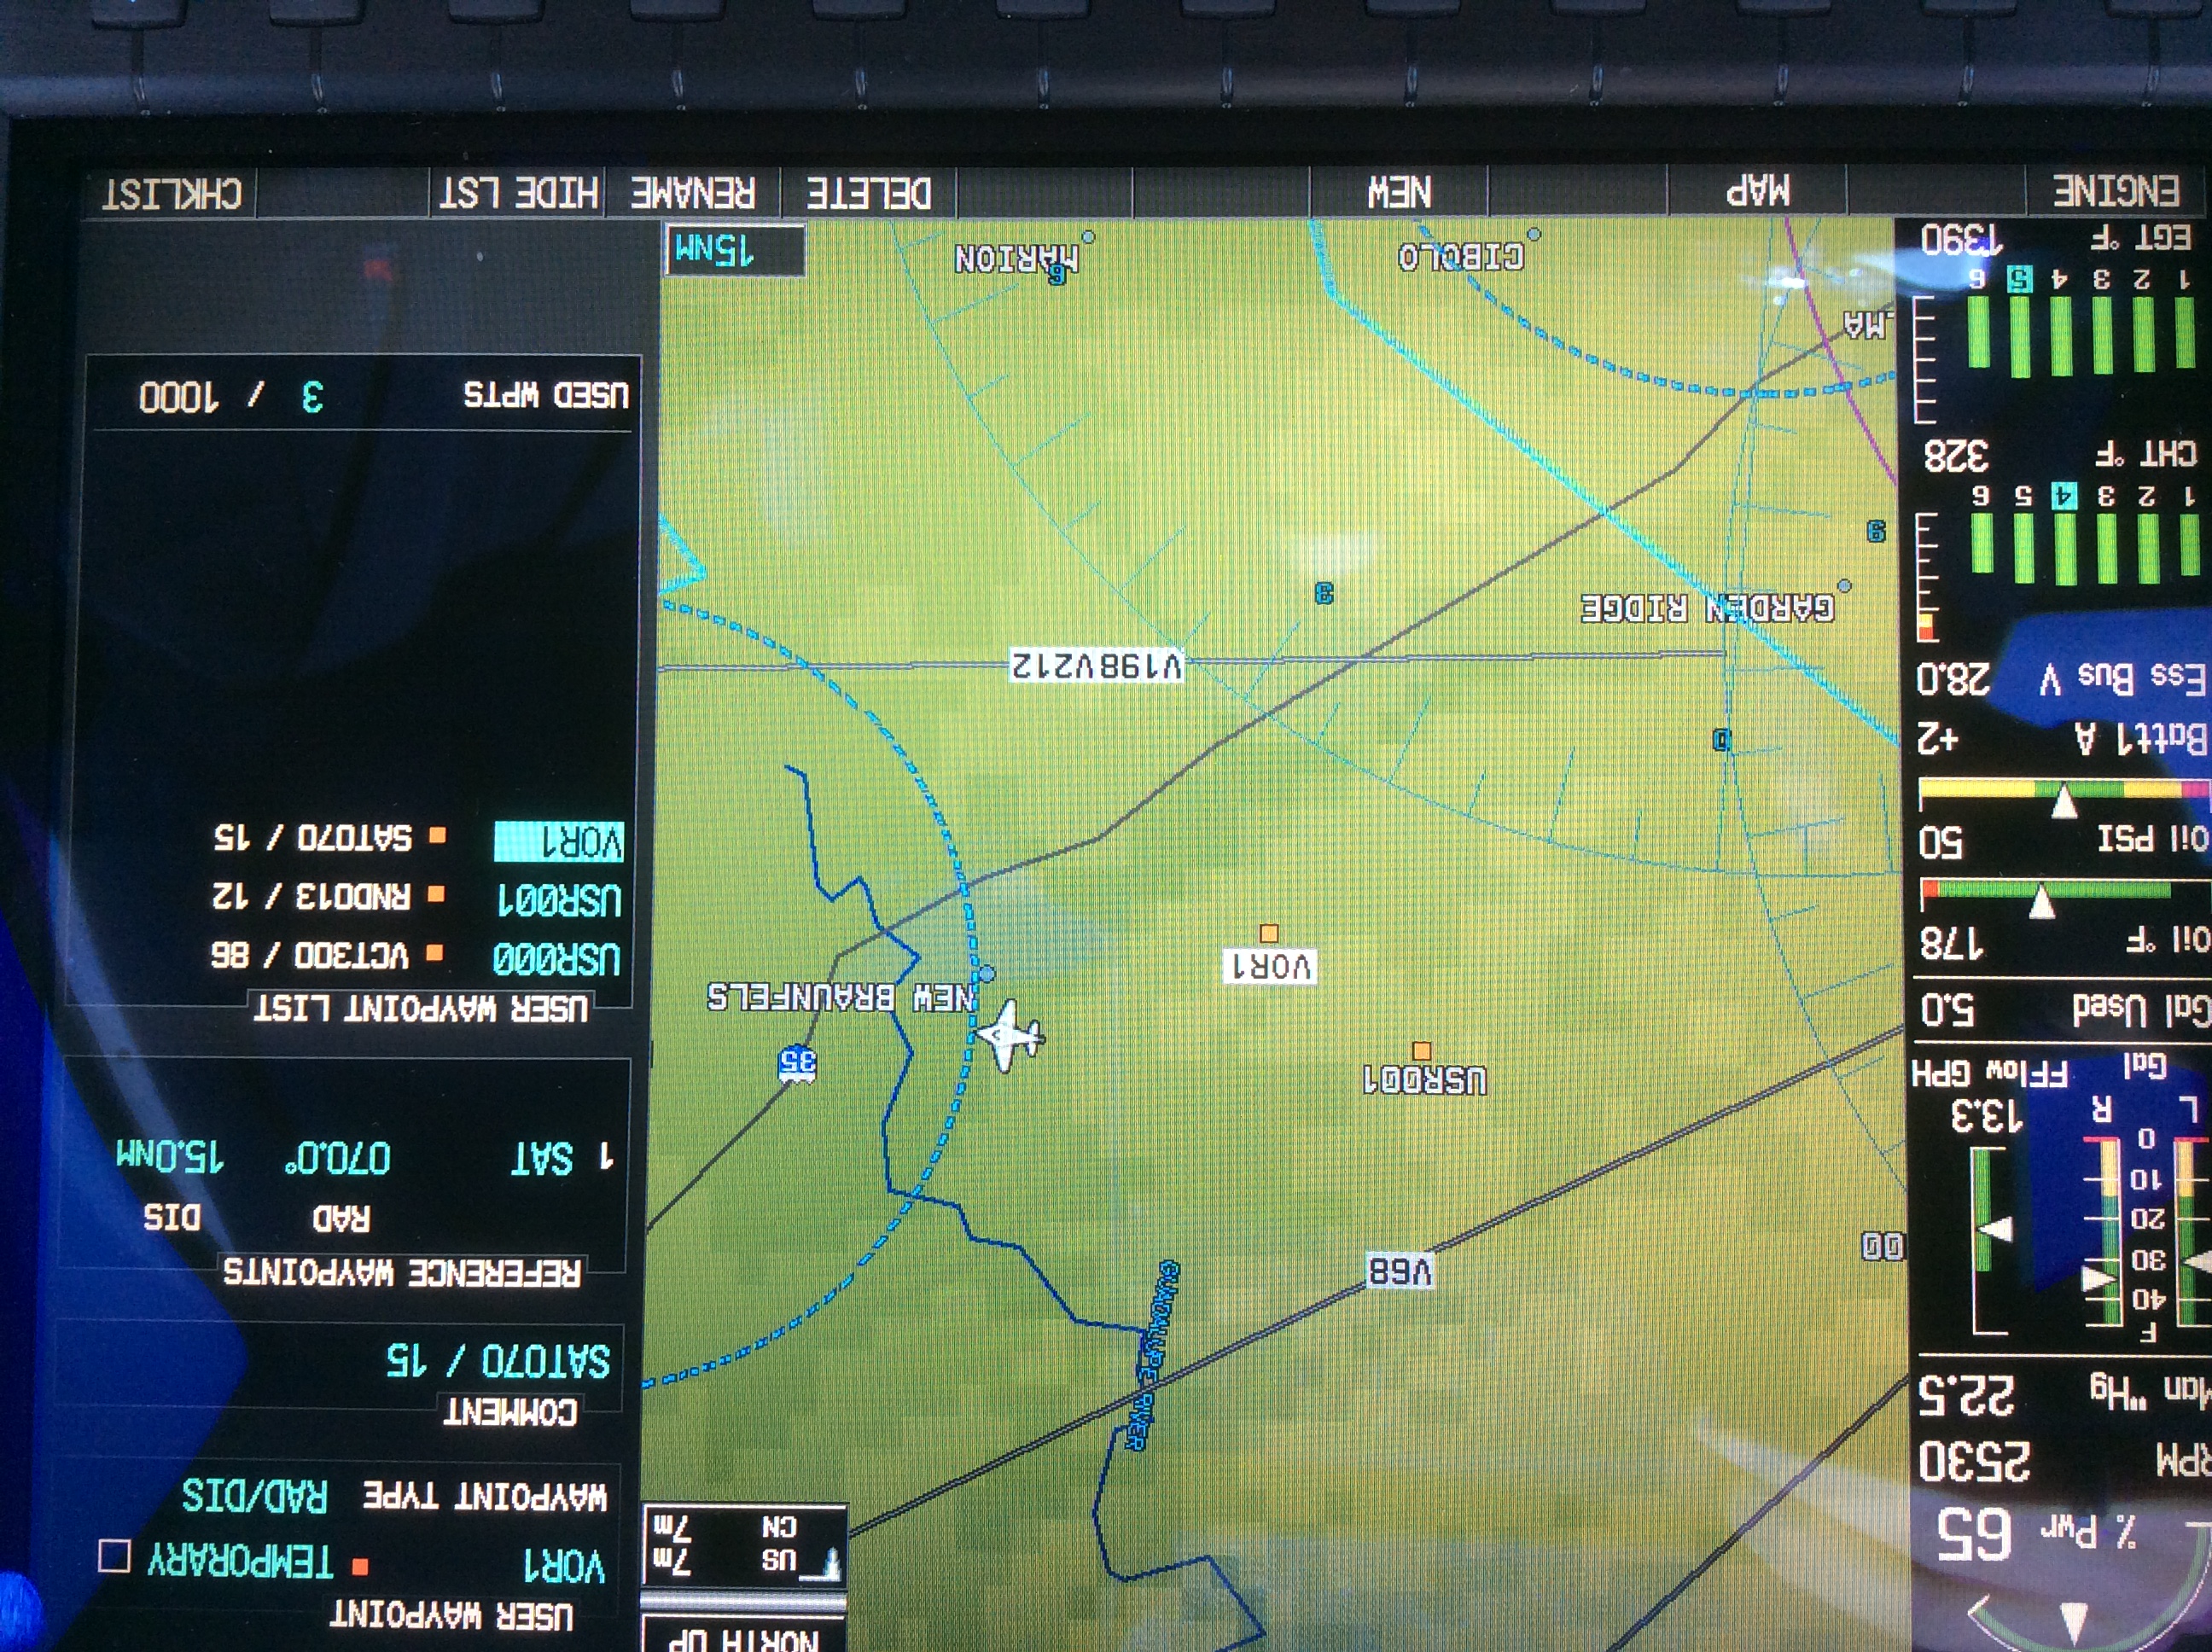
    It took me a second to think about how to do this the easiest (without setting up the VOR and watching the DME).  After a moment’s thought, it’s actually a snap with the G1000.  You create 2 user waypoints, one for each Radial/DME spot, then put those 2 user waypoints in your Flight Plan.

    Here’s how.

    Step 1

    Using the big knob, go to the Waypoint chapter.  Once there, scroll down to the User Waypoint page using the small knob.

    Step 2

    Press the New soft key.  If you want to name the waypoint something specific, you can do that at the top of the page.  If not, it will default to something like VOR 1 or VOR 2.

    Step 3

    Under Waypoint Type, use the small knob to select RAD/DIS (stands for Radial/Distance).

    Step 4

    Under Reference Waypoints, again using the small knob (or your keypad), type or dial in the VOR identifier, the radial from that VOR, and the DME distance.  Press enter and you are done.

    Once you have both User Waypoints created, then just put them in your flight plan (if you forget what you named them, you can just go back to the User Waypoint page), and off you go.

  • GAMI Gains STC for G100UL, Unleaded Avgas

    For years, there has been clamoring for airplanes to get rid of lead in piston engine Avgas. In the early 2000s, Thielert created a Jet A burning piston engine for Diamond Aircraft that gained some traction, but Thielert had internal issues and ended up declaring bankruptcy. Several other Jet A piston engines have come down the line since then to some success (Diamond is currently using 2 Austro manufactured Jet A piston engines on it’s DA62 and a Continental manufactured Jet piston on the new DA50).

    The problem with a Jet A burning piston engine, though, is that those engines would be very expensive to put on existing airplanes, not to mention the cost of the STC alone.

    Insert GAMI (General Aviation Modifications, Inc.), the famed Ada, Oklahoma company that championed turbo normalization, balanced injectors, and lean of peak operations. For those that have been to GAMI’s engine class, you know that these guys are at the very top of their game in engine knowledge.

    In 2010, GAMI started the process of creating an Unleaded form of Avgas, terming it G100UL (the irony of traditional Avgas, 100LL, is the LL starts for low lead, but the lead levels in 100LL are actually quite high. UL stands for UnLeaded). Just before Osh Kosh in 2021, GAMI revealed that it’s work has come to fruition, gaining an STC for G100UL for Lycoming powered Cessna 172s.

    The amazing thing about GAMI’s product is that it is able to mix with 100LL and not cause any issues. This means fuel trucks, fuel lines, fuel pumps, and aircraft fuel tanks don’t have to have any modifications to them to use G100UL. Plus, pilots will see longer engine life using G100UL because of the simple elimination of the lead. In tests, combustion chambers in cylinders burned cleaner, so theoretically, cylinders and engines will last a lot longer.

    According to the company, GAMI has a few more tests to run and, assuming those go well, G100UL will be available for a whole lot more airplanes. An STC will still be required for the use of G100UL in a specific airplane, but the hope is, eventually, 100LL will be completely replaced by G100UL. The only downside is that G100UL is expected to cost about $1/gallon more than 100LL.

    GAMI has partnered with Avfuel, so expect to see 100UL showing up at all Avfuel FBOs in the next year or two.

    To read more, check out the press release on AOPA’s website.

  • AOPA Air Safety Institute: More Difficult Decisions

    The AOPA Air Safety Institute is making it’s annual loop through Texas this January. The topic for this Safety Seminar is “More Difficult Decisions: Choices & Consequences.”

    The seminar is geared our the decision making process that we as pilots face on each flight. Some decisions are easy (what altitude should I pick?) while some have much greater consequences and should be taken very seriously.

    This event will be interactive for the participants as several scenarios will be presented. The goal is to help pilots learn to think through each decision, weighing the consequences along the weigh to arrive at the safest outcome of the flight.

    The first area seminar will be held on Tuesday, January 21st at the Stinson Field Airport (KSSF, 8535 Mission Road, San Antonio, TX 78214). The second area seminar will be held on Wednesday, January 22nd at the TXDOT office in Austin (200 E. Riverside Dr., Austin, TX 78704). WINGs credit is available for all attendees.

    Learn more here.

  • Garmin 530/430 Missed Approaches

    Flying a missed approach can be stressful enough.  When you haven’t done one in a while and your GPS isn’t showing you how to get to the missed approach point and you can’t remember which button to press, that adds a lot more stress.  Recipe for disaster?  Quite possibly!

    No need to fear, we are here to help.  The procedure for getting a Garmin 530 or 430 to give you missed approach guidance is actually simple and straightforward, if you know what to do!

    Note: Because of the variety of different autopilot configurations in different airplanes, this article will focus solely on the GPS.

    What the GPS is Thinking

    The way Garmin designed the Garmin 530 and Garmin 430 is to be as helpful to pilots as possible.  Their thinking was, 95% of the time, a pilot will make a landing on an instrument approach.  This is pretty accurate as most of the time, this is what happens.  Most general aviation pilots don’t fly approaches to minimums all that often, thus negating the need for a missed approach.

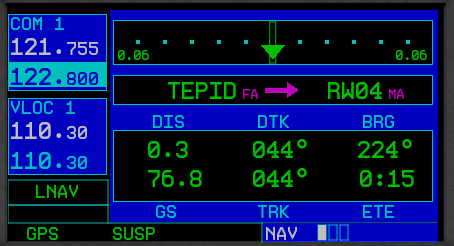
    Garmin Missed ApproachGarmin designed their software with this in mind.  When an airplane crosses the missed approach point, the GPS will go into what’s called suspend mode (a SUSP annunciation appears above the OBS key).  It will keep the missed approach point as the active waypoint because it assumes the pilot is going to land.

    This can be confusing to pilots.  This is what happens when software engineers and pilots come together. Engineers often believe they are smarter than pilots! (See the Airbus fly by wire roll out)

    The Procedure

    In the case of a missed approach, the button pushing on the GPS is actually relatively simple.  There is no SUSP key to take the GPS out of SUSP mode (thanks Garmin!).  Instead, you press the OBS key.  This will take the GPS out of SUSP mode, making the first waypoint on the missed approach procedure the active waypoint.  Your GPS will now give you guidance on the missed approach procedure.

    If you are going missed off an ILS, LOC, or VOR approach, then there is one more key you’ll have to press. Your CDI needle (whether it is digital or analog, an HSI or just a CDI gauge) will be reading off the NAV radio and your CDI indication on the GPS will be VLOC.  After you press the OBS key, press the CDI key on the GPS so you will start getting course guidance from the GPS again.

    That’s it.  Button pressing on the different autopilots will vary, but if you are familiar with yours, you’ll be able to tell it to follow the GPS and climb to the proper altitude.

Leave a Reply

Your email address will not be published. Required fields are marked *